使用docker搭建nextcloud私有云盘
1. docker国内镜像配置
Docker的国内镜像源的资源站也比较丰富:
- Docker中国区官方镜像: https://registry.docker-cn.com
- 网易:http://hub-mirror.c.163.com
- ustc:https://docker.mirrors.ustc.edu.cn
- 中国科技大学:https://docker.mirrors.ustc.edu.cn
- 阿里云: https://cr.console.aliyun.com/
[root@hellogitlab ~]# cat /etc/docker/daemon.json
{
    "registry-mirrors" : [
    "https://registry.docker-cn.com",
    "https://docker.mirrors.ustc.edu.cn",
    "http://hub-mirror.c.163.com",
    "https://cr.console.aliyun.com/"
  ]
}重启docker服务:
[root@hellogitlab ~]# systemctl restart docker && systemctl status docker
● docker.service - Docker Application Container Engine
   Loaded: loaded (/usr/lib/systemd/system/docker.service; disabled; vendor preset: disabled)
   Active: active (running) since 三 2021-03-24 20:50:46 CST; 5ms ago
     Docs: http://docs.docker.com
 Main PID: 11725 (dockerd-current)
   CGroup: /system.slice/docker.service
           ├─11725 /usr/bin/dockerd-current --add-runtime docker-runc=/usr/libexec/docker/docker-runc-current --default-runtime=docker-runc --exec-opt native.cgroupdriver=systemd --u...
           └─11734 /usr/bin/docker-containerd-current -l unix:///var/run/docker/libcontainerd/docker-containerd.sock --metrics-interval=0 --start-timeout 2m --state-dir /var/run/dock...

3月 24 20:50:45 hellogitlab.com dockerd-current[11725]: time="2021-03-24T20:50:45.570763506+08:00" level=warning msg="Docker could not enable SELinux on the host system"
3月 24 20:50:45 hellogitlab.com dockerd-current[11725]: time="2021-03-24T20:50:45.590350462+08:00" level=info msg="Graph migration to content-addressability took 0.00 seconds"
3月 24 20:50:45 hellogitlab.com dockerd-current[11725]: time="2021-03-24T20:50:45.590947445+08:00" level=info msg="Loading containers: start."
3月 24 20:50:45 hellogitlab.com dockerd-current[11725]: time="2021-03-24T20:50:45.605066614+08:00" level=info msg="Firewalld running: true"
3月 24 20:50:45 hellogitlab.com dockerd-current[11725]: time="2021-03-24T20:50:45.908648970+08:00" level=info msg="Default bridge (docker0) is assigned with an IP address ...P address"
3月 24 20:50:46 hellogitlab.com dockerd-current[11725]: time="2021-03-24T20:50:46.014635728+08:00" level=info msg="Loading containers: done."
3月 24 20:50:46 hellogitlab.com dockerd-current[11725]: time="2021-03-24T20:50:46.056797018+08:00" level=info msg="Daemon has completed initialization"
3月 24 20:50:46 hellogitlab.com dockerd-current[11725]: time="2021-03-24T20:50:46.056827634+08:00" level=info msg="Docker daemon" commit="7f2769b/1.13.1" graphdriver=overl...ion=1.13.1
3月 24 20:50:46 hellogitlab.com dockerd-current[11725]: time="2021-03-24T20:50:46.062217420+08:00" level=info msg="API listen on /var/run/docker.sock"
3月 24 20:50:46 hellogitlab.com systemd[1]: Started Docker Application Container Engine.
Hint: Some lines were ellipsized, use -l to show in full.
[root@hellogitlab ~]#检查镜像信息:
[root@hellogitlab ~]# docker info |grep -A4 'Registry'
WARNING: You're not using the default seccomp profile
Registry: https://index.docker.io/v1/
Experimental: false
Insecure Registries:
 127.0.0.0/8
Registry Mirrors:
 https://registry.docker-cn.com
 https://docker.mirrors.ustc.edu.cn
 http://hub-mirror.c.163.com
 https://cr.console.aliyun.com/
[root@hellogitlab ~]#2. 下载nextcloud镜像
参考dockerhub nextcloud官方镜像 https://hub.docker.com/_/nextcloud/ 。
[root@hellogitlab ~]# docker pull nextcloud
Using default tag: latest
Trying to pull repository docker.io/library/nextcloud ...
latest: Pulling from docker.io/library/nextcloud
a076a628af6f: Pull complete
02bab8795938: Pull complete
657d9d2c68b9: Pull complete
f47b5ee58e91: Pull complete
2b62153f094c: Pull complete
60b09083723b: Pull complete
1701d4d0a478: Pull complete
bae0c4dc63ea: Pull complete
a1c05958a901: Pull complete
5964d339be93: Pull complete
17c19430ed9f: Pull complete
1c16920b970c: Pull complete
1fab8f583d66: Pull complete
0c5749796e5b: Pull complete
c7c9dec98822: Pull complete
919350821522: Pull complete
0c1110bab2e5: Pull complete
bb1acf790acf: Pull complete
dfb213813b2e: Pull complete
bf0a9ac4c61a: Pull complete
Digest: sha256:7a0f76e4100619672439e7d1cffd7d0ae1ff1318e7908ca415412d721c3163c5
Status: Downloaded newer image for docker.io/nextcloud:latest
[root@hellogitlab ~]# docker images
REPOSITORY             TAG                 IMAGE ID            CREATED             SIZE
docker.io/nextcloud latest 8bb5955fb2f7 2 months ago 800 MB3. docker运行nextcloud
创建目录用于持久化,在服务器空间比较大的盘下面创建一个目录用于存储nextcloud的数据。
[root@hellogitlab ~]# df -h
文件系统        容量  已用  可用 已用% 挂载点
/dev/vda1        50G   15G   33G   31% /
devtmpfs        1.9G     0  1.9G    0% /dev
tmpfs           1.9G   24K  1.9G    1% /dev/shm
tmpfs           1.9G  588K  1.9G    1% /run
tmpfs           1.9G     0  1.9G    0% /sys/fs/cgroup
tmpfs           379M     0  379M    0% /run/user/0
tmpfs           379M     0  379M    0% /run/user/1000
[root@hellogitlab ~]#
[root@hellogitlab ~]# mkdir /nextcloud
[root@hellogitlab ~]# ls -ld /nextcloud/
drwxr-xr-x 2 root root 4096 3月 24 20:58 /nextcloud/查看当前系统已经占用了哪些端口,确定8080端口没有被占用。
| 此处需要注意的是,后期重新挂载时,会影响你的配置数据,你设置的应用、以及上传的数据可能会丢失,所以在初次挂载时,需要特别注意,路径使用绝对路径,并选择一个合适的路径!!! |
运行命令docker run -d -name nextcloud -p 8080:80 -v nextcloud:/var/www/html nextcloud创建nextcloud服务:
[root@hellogitlab ~]# docker run --name nextcloud -d  -p 8080:80 -v nextcloud:/var/www/html nextcloud
89a04170593a665f114c9a1c207d64590aea68e70cb0802783f27dd22e67c921
[root@hellogitlab ~]# docker ps
CONTAINER ID        IMAGE               COMMAND                  CREATED             STATUS              PORTS                  NAMES
89a04170593a nextcloud "/entrypoint.sh ap..." 3 seconds ago Up 2 seconds 0.0.0.0:8080->80/tcp nextcloud查看端口情况:
[root@hellogitlab ~]# netstat -tunlp|grep 8080
tcp6       0      0 :::8080                 :::*                    LISTEN      22480/docker-proxy-
[root@hellogitlab ~]#放行端口:
# 删除不放行的端口
[root@hellogitlab ~]# firewall-cmd --zone=public --remove-port=81/tcp --permanent
success

# 放行8080端口
[root@hellogitlab ~]# firewall-cmd --zone=public --add-port=8080/tcp --permanent
success
[root@hellogitlab ~]# firewall-cmd --reload
success
[root@hellogitlab ~]# firewall-cmd --list-all
public
  target: default
  icmp-block-inversion: no
  interfaces:
  sources:
  services: ssh dhcpv6-client
  ports: 22/tcp 80/tcp 3690/tcp 443/tcp 8080/tcp
  protocols:
  masquerade: no
  forward-ports:
  source-ports:
  icmp-blocks:
rich rules:4. 在浏览器中访问nextcloud
在浏览器中输入http://hellogitlab.com:8080/,可以正常打开nextcloud页面:
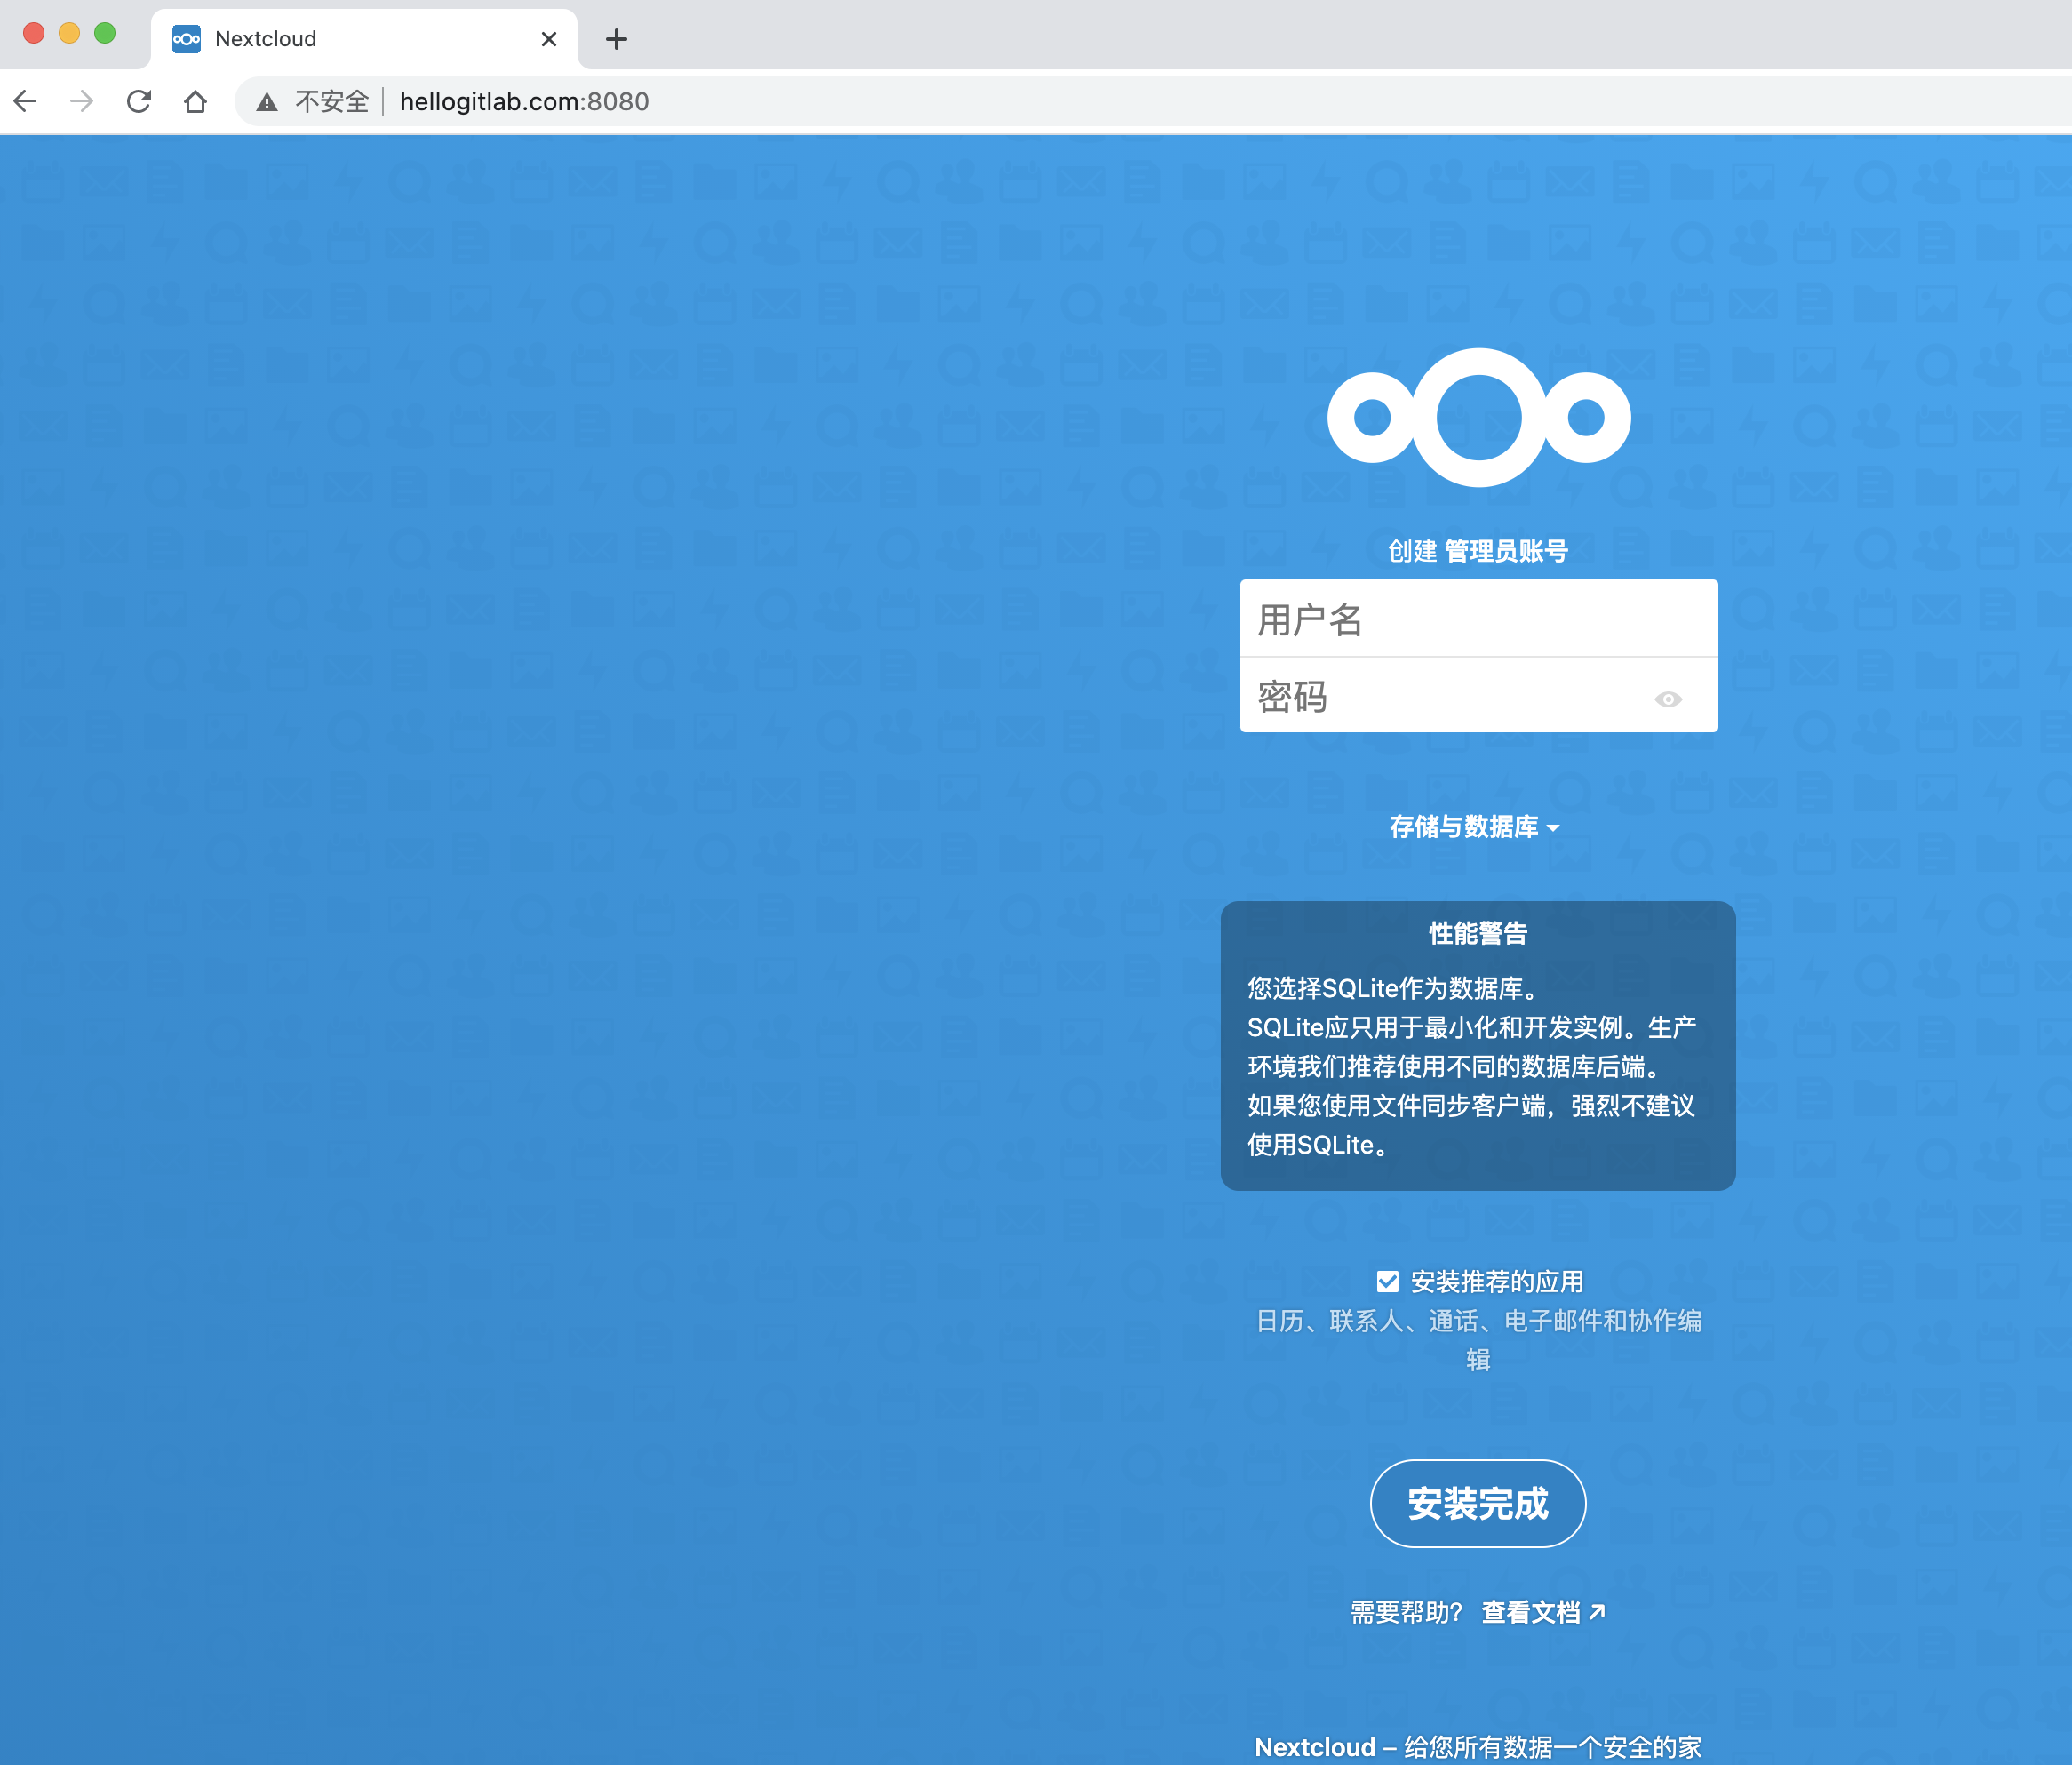
创建一个管理员账号:
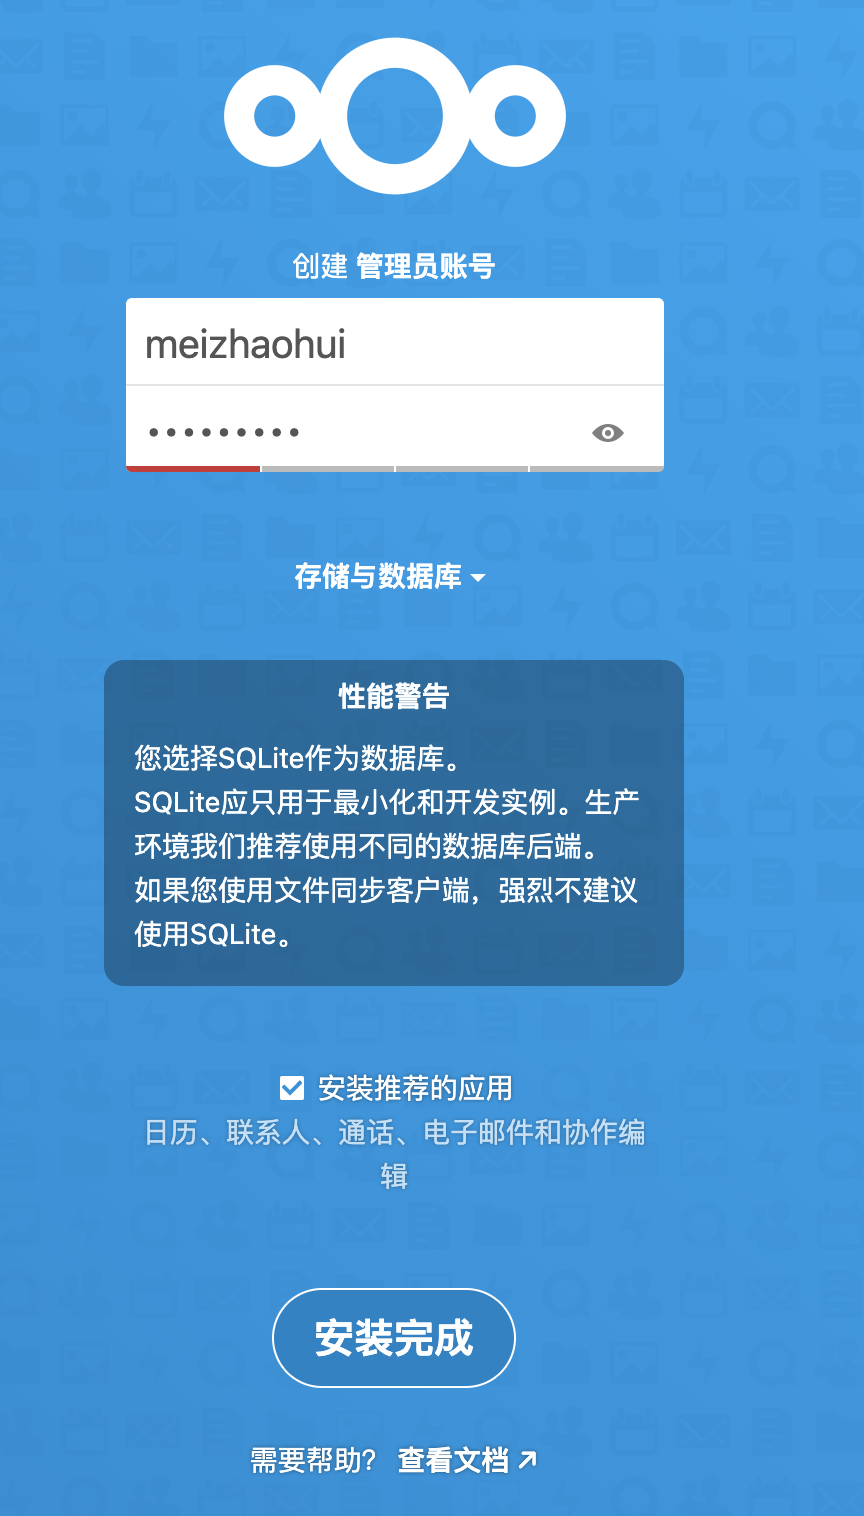
并点击安装完成。
等一会儿后,nextcloud安装完成!安装完成后就可以正常使用nextcloud了,你的私有云盘基本配置成功了。
待优化的点:
- 现在网站使用的
http方式传输,需要更新为https方式传输。 - 配置数据库。
- 增加redis缓存。
- 设置视频缩略图。
- 自制docker镜像。
5. 配置域名解析并申请证书
在腾讯DNS解析界面增加一条新的域名解析:
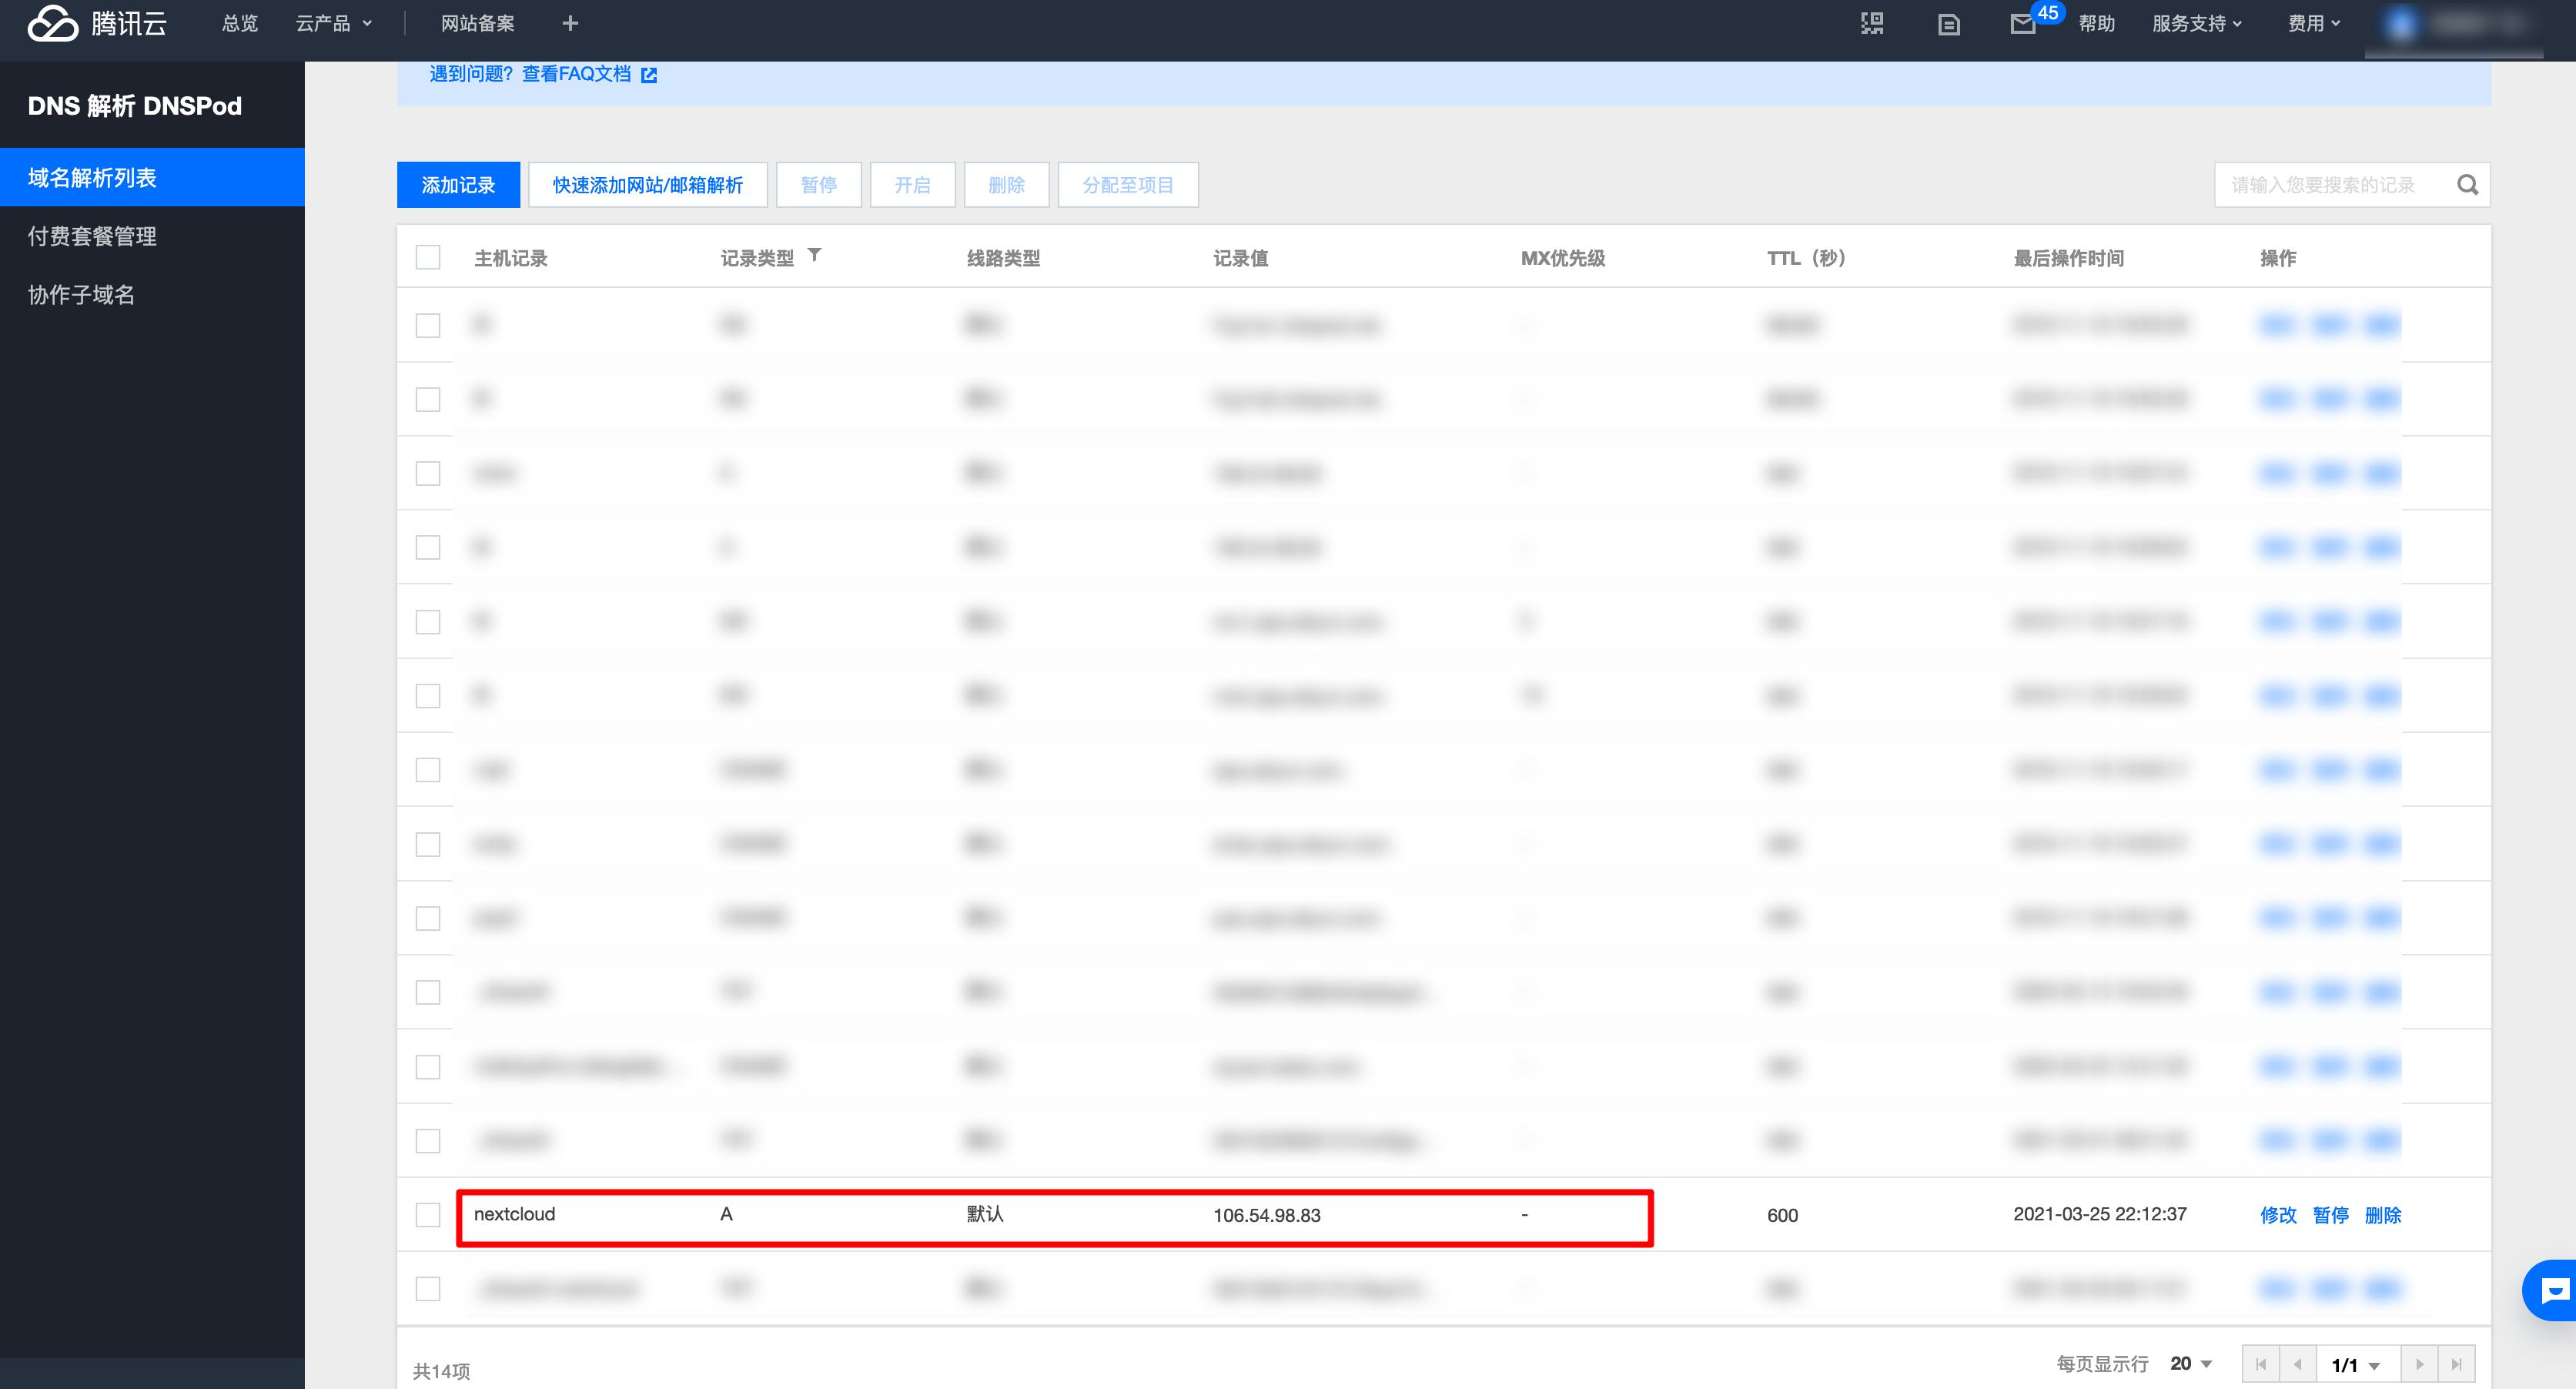
等待一段时间后,使用ping命令来测试子域名是否解析成功:
[mzh@MacBookPro ~ ]$ ping nextcloud.hellogitlab.com -c 3
PING nextcloud.hellogitlab.com (106.54.98.83): 56 data bytes
64 bytes from 106.54.98.83: icmp_seq=0 ttl=51 time=25.004 ms
64 bytes from 106.54.98.83: icmp_seq=1 ttl=51 time=25.221 ms
64 bytes from 106.54.98.83: icmp_seq=2 ttl=51 time=25.848 ms

--- nextcloud.hellogitlab.com ping statistics ---
3 packets transmitted, 3 packets received, 0.0% packet loss
round-trip min/avg/max/stddev = 25.004/25.358/25.848/0.358 ms可以看到,能够正常ping通,说明解析正常。
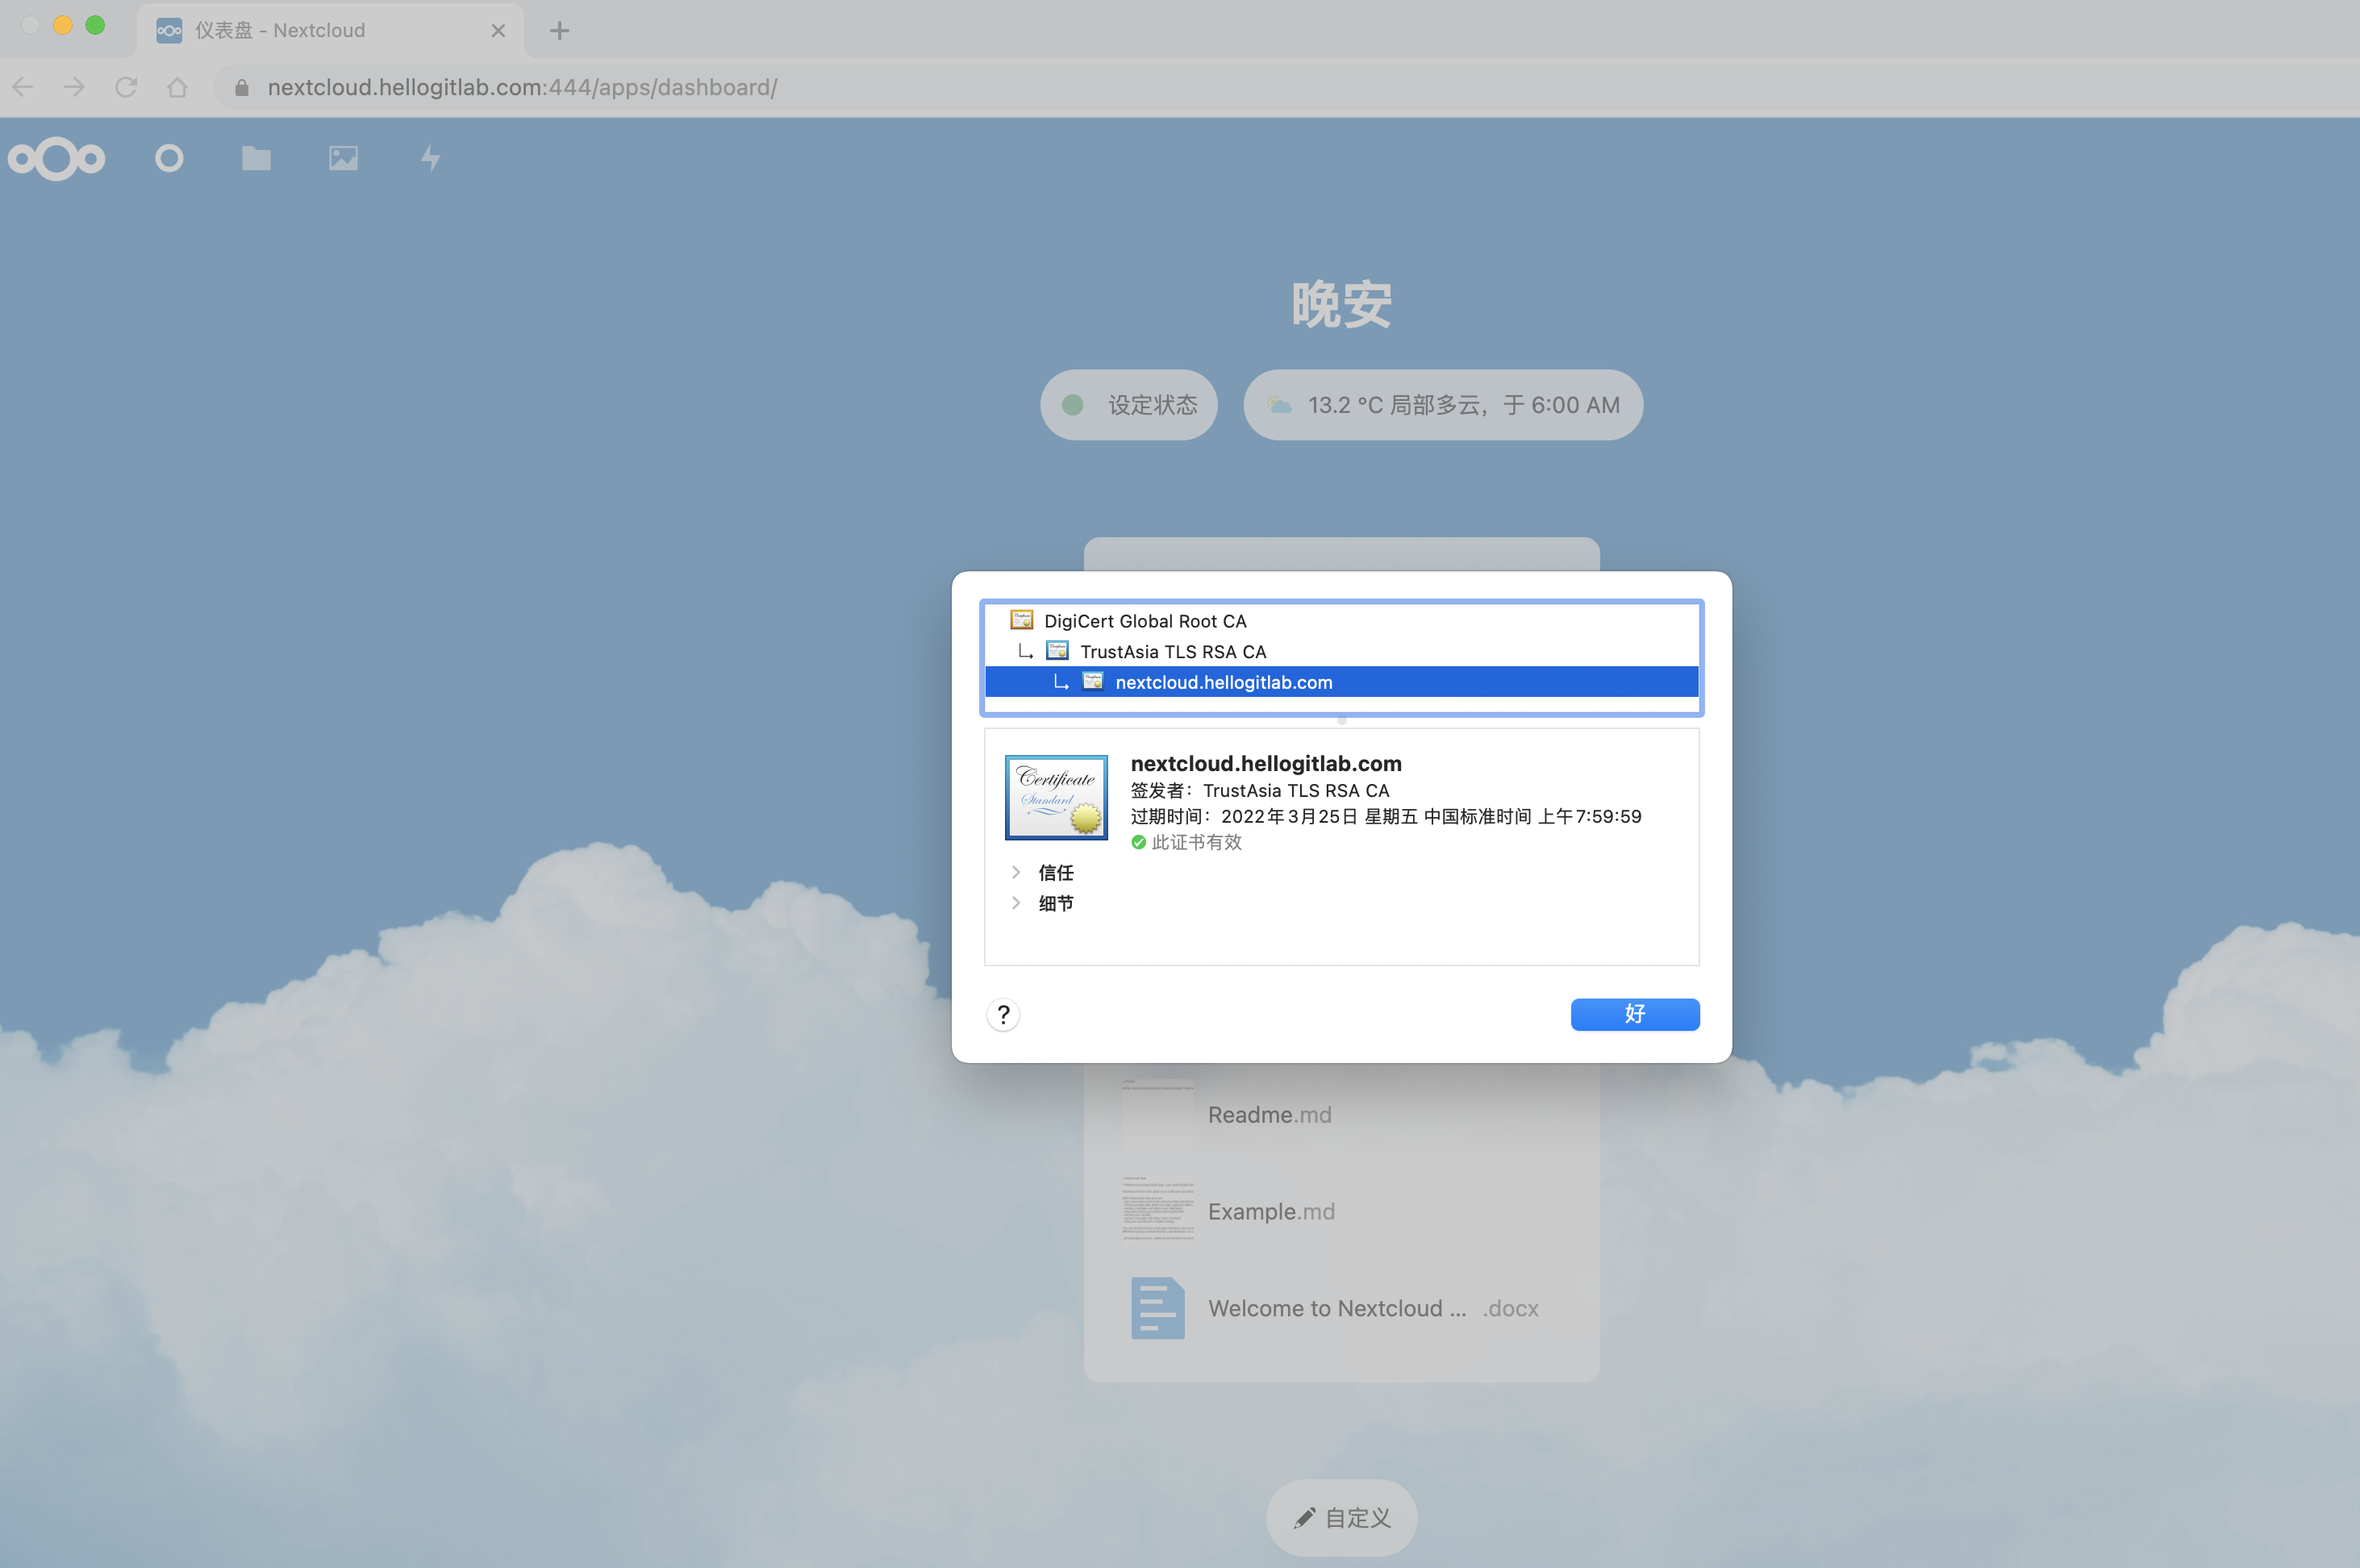
再在腾讯云SSL证书界面 https://console.cloud.tencent.com/ssl 为新的域名nextcloud.hellogitlab.com申请一个免费证书。
证书申请成功后,过一会腾讯云就会颁发证书成功,并在域名解析中添加一条TXT记录。我们下载证书文件,并解压。
将解压后的Nginx文件夹中的两个文件上传到服务器端。
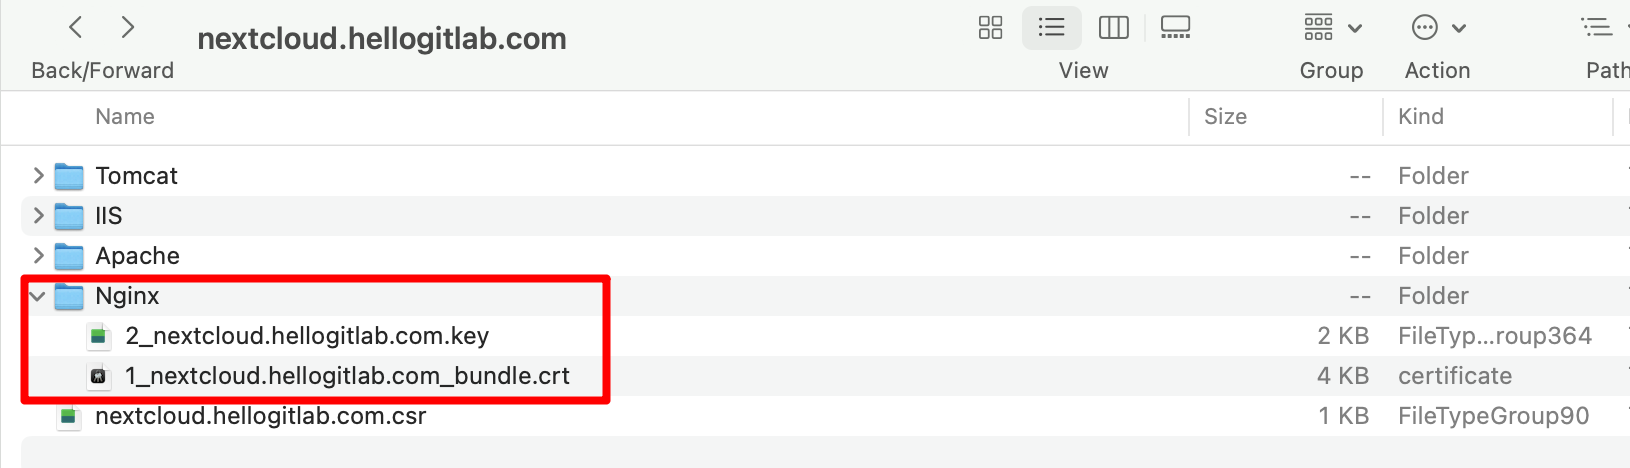
文件上传后,存放在/etc/pki/nginx目录下:
[root@hellogitlab ~]# ls -lh /etc/pki/nginx/
总用量 8.0K
-rw-r--r-- 1 root root 3.7K 3月  26 00:25 1_nextcloud.hellogitlab.com_bundle.crt
-rw-r--r-- 1 root root 1.7K 3月 26 00:25 2_nextcloud.hellogitlab.com.key6. 安装nginx
直接使用命令yum install nginx -y即可。
[root@hellogitlab ~]# yum install nginx -y查看ngInx版本信息:
[root@hellogitlab ~]# nginx -v
nginx version: nginx/1.16.1配置nginx.conf文件,为了不与我们的博客系统冲突,我们使用444端口作为nextcloud.hellogitlab.com域名的https使用的端口。
配置如下:
[root@hellogitlab ~]# cd /etc/nginx
[root@hellogitlab nginx]# pwd
/etc/nginx
[root@hellogitlab nginx]# cp nginx.conf nginx.conf.bak
[root@hellogitlab nginx]# cat nginx.conf
# For more information on configuration, see:
#   * Official English Documentation: http://nginx.org/en/docs/
#   * Official Russian Documentation: http://nginx.org/ru/docs/

user nginx;
worker_processes auto;
error_log /var/log/nginx/error.log;
pid /run/nginx.pid;

# Load dynamic modules. See /usr/share/doc/nginx/README.dynamic.
include /usr/share/nginx/modules/*.conf;

events {
    worker_connections 1024;
}

http {
    log_format  main  '$remote_addr - $remote_user [$time_local] "$request" '
                      '$status $body_bytes_sent "$http_referer" '
                      '"$http_user_agent" "$http_x_forwarded_for"';

    access_log  /var/log/nginx/access.log  main;

    sendfile            on;
    tcp_nopush          on;
    tcp_nodelay         on;
    keepalive_timeout   65;
    types_hash_max_size 2048;

    include             /etc/nginx/mime.types;
    default_type        application/octet-stream;

    # Load modular configuration files from the /etc/nginx/conf.d directory.
    # See http://nginx.org/en/docs/ngx_core_module.html#include
    # for more information.
    include /etc/nginx/conf.d/*.conf;

#     server {
#         listen       80 default_server;
#         listen       [::]:80 default_server;
#         server_name  _;
#         root         /usr/share/nginx/html;
#
#         # Load configuration files for the default server block.
#         include /etc/nginx/default.d/*.conf;
#
#         location / {
#         }
#
#         error_page 404 /404.html;
#         location = /404.html {
#         }
#
#         error_page 500 502 503 504 /50x.html;
#         location = /50x.html {
#         }
#     }

# Settings for a TLS enabled server.
#
#    server {
#        listen       443 ssl http2 default_server;
#        listen       [::]:443 ssl http2 default_server;
#        server_name  _;
#        root         /usr/share/nginx/html;
#
#        ssl_certificate "/etc/pki/nginx/server.crt";
#        ssl_certificate_key "/etc/pki/nginx/private/server.key";
#        ssl_session_cache shared:SSL:1m;
#        ssl_session_timeout  10m;
#        ssl_ciphers HIGH:!aNULL:!MD5;
#        ssl_prefer_server_ciphers on;
#
#        # Load configuration files for the default server block.
#        include /etc/nginx/default.d/*.conf;
#
#        location / {
#        }
#
#        error_page 404 /404.html;
#        location = /404.html {
#        }
#
#        error_page 500 502 503 504 /50x.html;
#        location = /50x.html {
#        }
#    }


	server {
	  listen 444 ssl http2;
	  listen [::]:444 ssl http2;
	  server_name nextcloud.hellogitlab.com;

    ssl_certificate "/etc/pki/nginx/1_nextcloud.hellogitlab.com_bundle.crt";
    ssl_certificate_key "/etc/pki/nginx/2_nextcloud.hellogitlab.com.key";
	  client_max_body_size 10G;

	  add_header Strict-Transport-Security "max-age=63072000; includeSubdomains; preload";

	  location = /.well-known/carddav {
	      return 301 $scheme://$host:$server_port/remote.php/dav;
	  }
	  location = /.well-known/caldav {
	      return 301 $scheme://$host:$server_port/remote.php/dav;
	  }

	  location / {
	      proxy_redirect off;
	      proxy_pass http://127.0.0.1:8080;
	      proxy_set_header Host $http_host;
	  }
	  location = /.htaccess {
	      return 404;
	  }
	}

}
[root@hellogitlab nginx]#最终配置的nginx.conf如上上所。注意其中:
ssl_certificate "/etc/pki/nginx/1_nextcloud.hellogitlab.com_bundle.crt";
ssl_certificate_key "/etc/pki/nginx/2_nextcloud.hellogitlab.com.key";这两行证书的路径要与上一步上传到服务器端的路径保证一致。
另外,proxy_pass http://127.0.0.1:8080; 这一行是对8080端口数据进行转发,转发到上面定义444端口上来。
测试配置有效性:
[root@hellogitlab ~]# nginx -t
nginx: the configuration file /etc/nginx/nginx.conf syntax is ok
nginx: configuration file /etc/nginx/nginx.conf test is successful
[root@hellogitlab ~]# systemctl start nginx && systemctl status nginx
● nginx.service - The nginx HTTP and reverse proxy server
   Loaded: loaded (/usr/lib/systemd/system/nginx.service; disabled; vendor preset: disabled)
   Active: active (running) since 五 2021-03-26 01:16:00 CST; 5ms ago
  Process: 21321 ExecStart=/usr/sbin/nginx (code=exited, status=0/SUCCESS)
  Process: 21318 ExecStartPre=/usr/sbin/nginx -t (code=exited, status=0/SUCCESS)
  Process: 21316 ExecStartPre=/usr/bin/rm -f /run/nginx.pid (code=exited, status=0/SUCCESS)
 Main PID: 21323 (nginx)
    Tasks: 3
   Memory: 3.3M
   CGroup: /system.slice/nginx.service
           ├─21323 nginx: master process /usr/sbin/nginx
           ├─21324 nginx: worker process
           └─21325 nginx: worker process

3月 26 01:16:00 hellogitlab.com systemd[1]: Starting The nginx HTTP and reverse proxy server...
3月 26 01:16:00 hellogitlab.com nginx[21318]: nginx: the configuration file /etc/nginx/nginx.conf syntax is ok
3月 26 01:16:00 hellogitlab.com nginx[21318]: nginx: configuration file /etc/nginx/nginx.conf test is successful
3月 26 01:16:00 hellogitlab.com systemd[1]: Started The nginx HTTP and reverse proxy server.
[root@hellogitlab ~]# systemctl start httpd && systemctl status httpd
● httpd.service - The Apache HTTP Server
   Loaded: loaded (/usr/lib/systemd/system/httpd.service; enabled; vendor preset: disabled)
   Active: active (running) since 五 2021-03-26 01:08:14 CST; 8min ago
     Docs: man:httpd(8)
           man:apachectl(8)
  Process: 17810 ExecStop=/bin/kill -WINCH ${MAINPID} (code=exited, status=0/SUCCESS)
 Main PID: 19857 (httpd)
   Status: "Total requests: 0; Current requests/sec: 0; Current traffic:   0 B/sec"
    Tasks: 6
   Memory: 28.0M
   CGroup: /system.slice/httpd.service
           ├─19857 /usr/sbin/httpd -DFOREGROUND
           ├─19858 /usr/sbin/httpd -DFOREGROUND
           ├─19859 /usr/sbin/httpd -DFOREGROUND
           ├─19860 /usr/sbin/httpd -DFOREGROUND
           ├─19861 /usr/sbin/httpd -DFOREGROUND
           └─19862 /usr/sbin/httpd -DFOREGROUND

3月 26 01:08:14 hellogitlab.com systemd[1]: Starting The Apache HTTP Server...
3月 26 01:08:14 hellogitlab.com systemd[1]: Started The Apache HTTP Server.
[root@hellogitlab ~]#可以看到httpd和nginx服务都正常启动。
[root@hellogitlab ~]# netstat -tunlp|grep httpd
tcp6       0      0 :::80                   :::*                    LISTEN      19857/httpd
tcp6       0      0 :::81                   :::*                    LISTEN      19857/httpd
tcp6       0      0 :::443                  :::*                    LISTEN      19857/httpd
[root@hellogitlab ~]# netstat -tunlp|grep nginx
tcp        0      0 0.0.0.0:444             0.0.0.0:*               LISTEN      21323/nginx: master
tcp6 0 0 :::444 :::* LISTEN 21323/nginx: master防火墙放行444端口,并关闭8080端口。
# 删除不放行的端口
[root@hellogitlab ~]# firewall-cmd --zone=public --remove-port=8080/tcp --permanent
success

# 放行444端口
[root@hellogitlab ~]# firewall-cmd --zone=public --add-port=444/tcp --permanent
success
[root@hellogitlab ~]# firewall-cmd --reload
success
[root@hellogitlab ~]# firewall-cmd --list-all
public
  target: default
  icmp-block-inversion: no
  interfaces:
  sources:
  services: ssh dhcpv6-client
  ports: 22/tcp 80/tcp 3690/tcp 443/tcp 444/tcp
  protocols:
  masquerade: no
  forward-ports:
  source-ports:
  icmp-blocks:
rich rules:7. 配置nextcloud config.php文件
[root@hellogitlab ~]# docker ps
CONTAINER ID        IMAGE               COMMAND                  CREATED             STATUS              PORTS                  NAMES
89a04170593a        nextcloud           "/entrypoint.sh ap..."   27 hours ago        Up About an hour    0.0.0.0:8080->80/tcp   nextcloud
[root@hellogitlab ~]# dkin 89a
root@89a04170593a:/var/www/html# ls
3rdparty  COPYING  config	core	  custom_apps  index.html  lib	ocm-provider  ocs-provider  remote.php	robots.txt  themes
AUTHORS   apps	   console.php	cron.php  data	       index.php   occ	ocs	      public.php    resources	status.php  version.php
root@89a04170593a:/var/www/html# cat config/config.php
<?php
$CONFIG = array (
  'htaccess.RewriteBase' => '/',
  'memcache.local' => '\\OC\\Memcache\\APCu',
  'apps_paths' =>
  array (
    0 =>
    array (
      'path' => '/var/www/html/apps',
      'url' => '/apps',
      'writable' => false,
    ),
    1 =>
    array (
      'path' => '/var/www/html/custom_apps',
      'url' => '/custom_apps',
      'writable' => true,
    ),
  ),
  'instanceid' => 'ocju4a79attj',
  'passwordsalt' => 'GWAjOCz7FLEXJdYtSJHpSb6U9TrMhy',
  'secret' => 'dON/2F9auxtvAT8IMYlcEuYZGyV2RTxC/MbXcSdtNlKyPzWz',
  'trusted_domains' =>
  array (
    0 => 'hellogitlab.com:8080',
    1 => 'nextcloud.hellogitlab.com',
  ),
  'datadirectory' => '/var/www/html/data',
  'dbtype' => 'sqlite3',
  'version' => '20.0.5.2',
  'overwrite.cli.url' => 'http://hellogitlab.com:8080',
  'installed' => true,
  'overwriteprotocol' => 'https',
);
root@89a04170593a:/var/www/html# exit注意,34行加上1 => 'nextcloud.hellogitlab.com',对自己的域名进行授信。41行`'overwriteprotocol' => 'https',设置自动跳转。
重启nextcloud容器:
[root@hellogitlab ~]# docker restart nextcloud
nextcloud
[root@hellogitlab ~]# docker ps
CONTAINER ID        IMAGE               COMMAND                  CREATED             STATUS              PORTS                  NAMES
89a04170593a        nextcloud           "/entrypoint.sh ap..."   27 hours ago        Up 3 seconds        0.0.0.0:8080->80/tcp   nextcloud
[root@hellogitlab ~]#在浏览器中访问新的域名:
8. 邮件通知配置
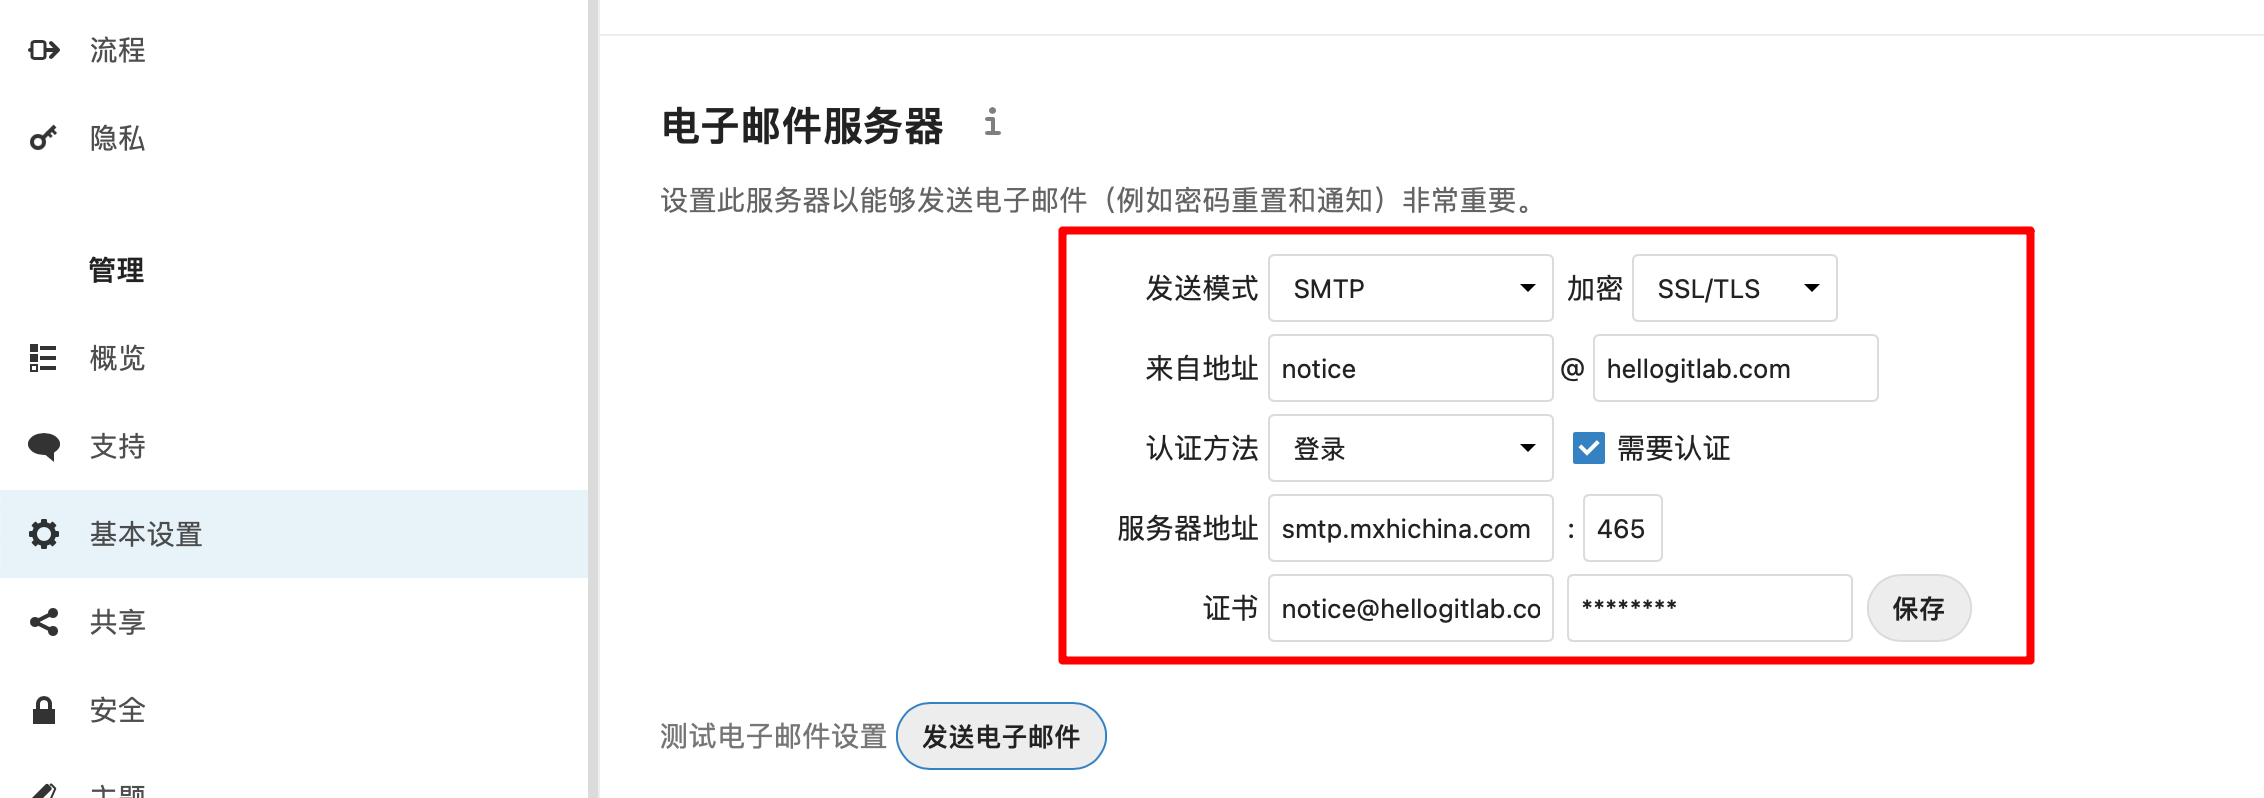
使用postmaster账号登陆企业邮箱,创建一个企业邮箱的通知账号用户notice@hellogitlab.com,然后在nextcloud设置个人信息中配置自己的电子邮箱,然后在管理基本设置界面,设置一下电子邮件服务器,按下图方式设置:
设置完成后,点击发送电子邮件按钮,查看一下自己的邮箱中是否会收到测试邮件通知,过一会儿收到邮件通知:
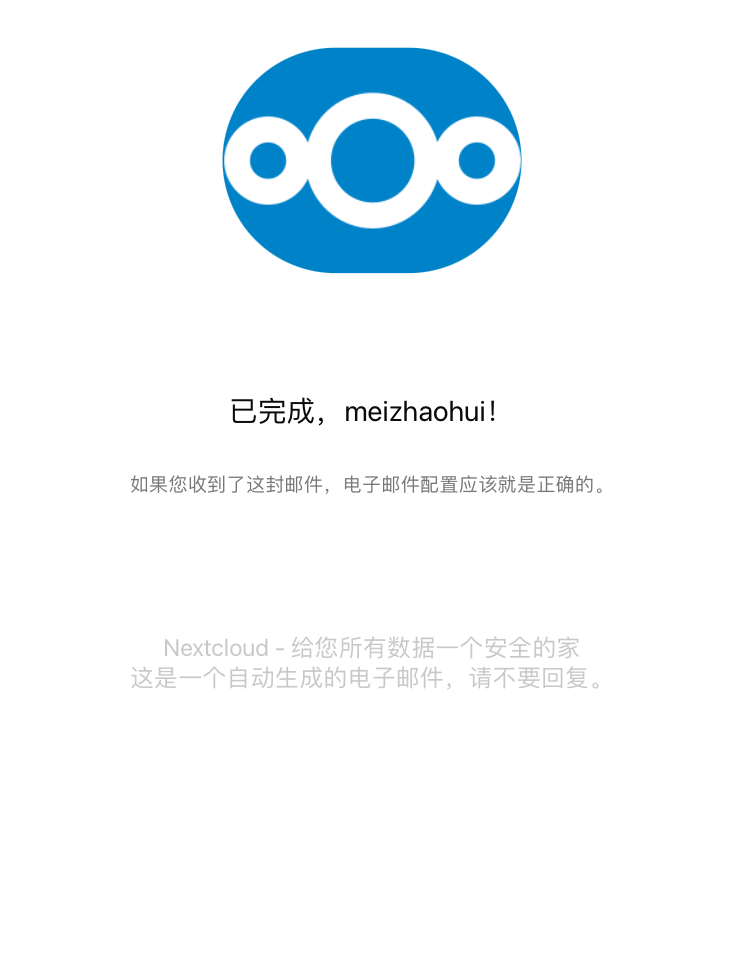
说明邮件通知配置成功!
9. 更新国内源
nextcloud使用的是debian buster系统,我们更新其为国内源,方便安装程序。我们使用腾讯云。
deb http://mirrors.cloud.tencent.com/debian/ buster main non-free contrib
deb http://mirrors.cloud.tencent.com/debian-security buster/updates main
deb http://mirrors.cloud.tencent.com/debian/ buster-updates main non-free contrib
deb http://mirrors.cloud.tencent.com/debian/ buster-backports main non-free contrib

deb-src http://mirrors.cloud.tencent.com/debian-security buster/updates main
deb-src http://mirrors.cloud.tencent.com/debian/ buster main non-free contrib
deb-src http://mirrors.cloud.tencent.com/debian/ buster-updates main non-free contrib
deb-src http://mirrors.cloud.tencent.com/debian/ buster-backports main non-free contrib执行以下命令:
root@89a04170593a:/var/www/html/# cd /etc/apt/
# 备份原始的源
root@89a04170593a:/etc/apt# cp sources.list sources.list.bak
root@89a04170593a:/etc/apt# ls
apt.conf.d  auth.conf.d  preferences.d	sources.list  sources.list.bak	sources.list.d	trusted.gpg.d
# 将腾讯云镜像信息写入到文件
root@89a04170593a:/etc/apt# cat > sources.list << EOF
> deb http://mirrors.cloud.tencent.com/debian/ buster main non-free contrib
> deb http://mirrors.cloud.tencent.com/debian-security buster/updates main
> deb http://mirrors.cloud.tencent.com/debian/ buster-updates main non-free contrib
> deb http://mirrors.cloud.tencent.com/debian/ buster-backports main non-free contrib
>
> deb-src http://mirrors.cloud.tencent.com/debian-security buster/updates main
> deb-src http://mirrors.cloud.tencent.com/debian/ buster main non-free contrib
> deb-src http://mirrors.cloud.tencent.com/debian/ buster-updates main non-free contrib
> deb-src http://mirrors.cloud.tencent.com/debian/ buster-backports main non-free contrib
> EOF

#更新一下源
root@89a04170593a:/etc/apt# apt update
Hit:1 http://mirrors.cloud.tencent.com/debian buster InRelease
Hit:2 http://mirrors.cloud.tencent.com/debian-security buster/updates InRelease
Hit:3 http://mirrors.cloud.tencent.com/debian buster-updates InRelease
Hit:4 http://mirrors.cloud.tencent.com/debian buster-backports InRelease
Reading package lists... Done
Building dependency tree
Reading state information... Done
17 packages can be upgraded. Run 'apt list --upgradable' to see them.
root@89a04170593a:/etc/apt#10. 设置缩略图
使用时会发现,Nextcloud 上传的视频不能生成缩略图。其实 Nextcloud 本身支持生成视频缩略图,需要安装 ffmpeg 并修改配置:
root@89a04170593a:~# apt install ffmpeg -y
Reading package lists... Done
Building dependency tree
Reading state information... Done
Suggested packages:
  ffmpeg-doc
The following NEW packages will be installed:
  ffmpeg
0 upgraded, 1 newly installed, 0 to remove and 17 not upgraded.
Need to get 1434 kB of archives.
After this operation, 2007 kB of additional disk space will be used.
Get:1 http://mirrors.cloud.tencent.com/debian buster/main amd64 ffmpeg amd64 7:4.1.6-1~deb10u1 [1434 kB]
Fetched 1434 kB in 0s (3385 kB/s)
debconf: delaying package configuration, since apt-utils is not installed
Selecting previously unselected package ffmpeg.
(Reading database ... 18550 files and directories currently installed.)
Preparing to unpack .../ffmpeg_7%3a4.1.6-1~deb10u1_amd64.deb ...
Unpacking ffmpeg (7:4.1.6-1~deb10u1) ...
Setting up ffmpeg (7:4.1.6-1~deb10u1) ...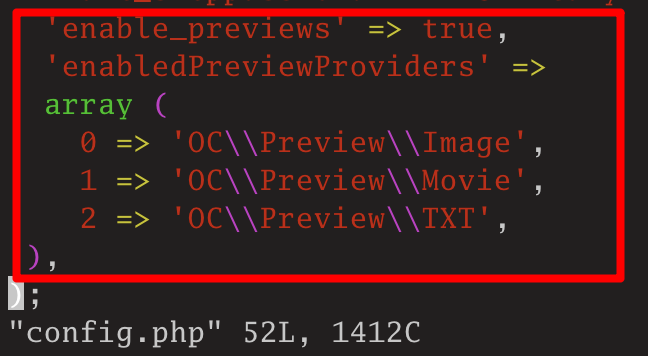
root@89a04170593a:~#修改/var/www/html/config/config.php配置文件,添加:
'enable_previews' => true,
'enabledPreviewProviders' =>
array (
  0 => 'OC\\Preview\\Image',
  1 => 'OC\\Preview\\Movie',
  2 => 'OC\\Preview\\TXT',
),查看最后几行内容:
root@89a04170593a:/var/www/html/config# tail -n 8 config.php
  'enable_previews' => true,
  'enabledPreviewProviders' =>
  array (
    0 => 'OC\\Preview\\Image',
    1 => 'OC\\Preview\\Movie',
    2 => 'OC\\Preview\\TXT',
 ),
);
修改后,重启nextcloud容器:
[root@hellogitlab ~]# docker restart nextcloud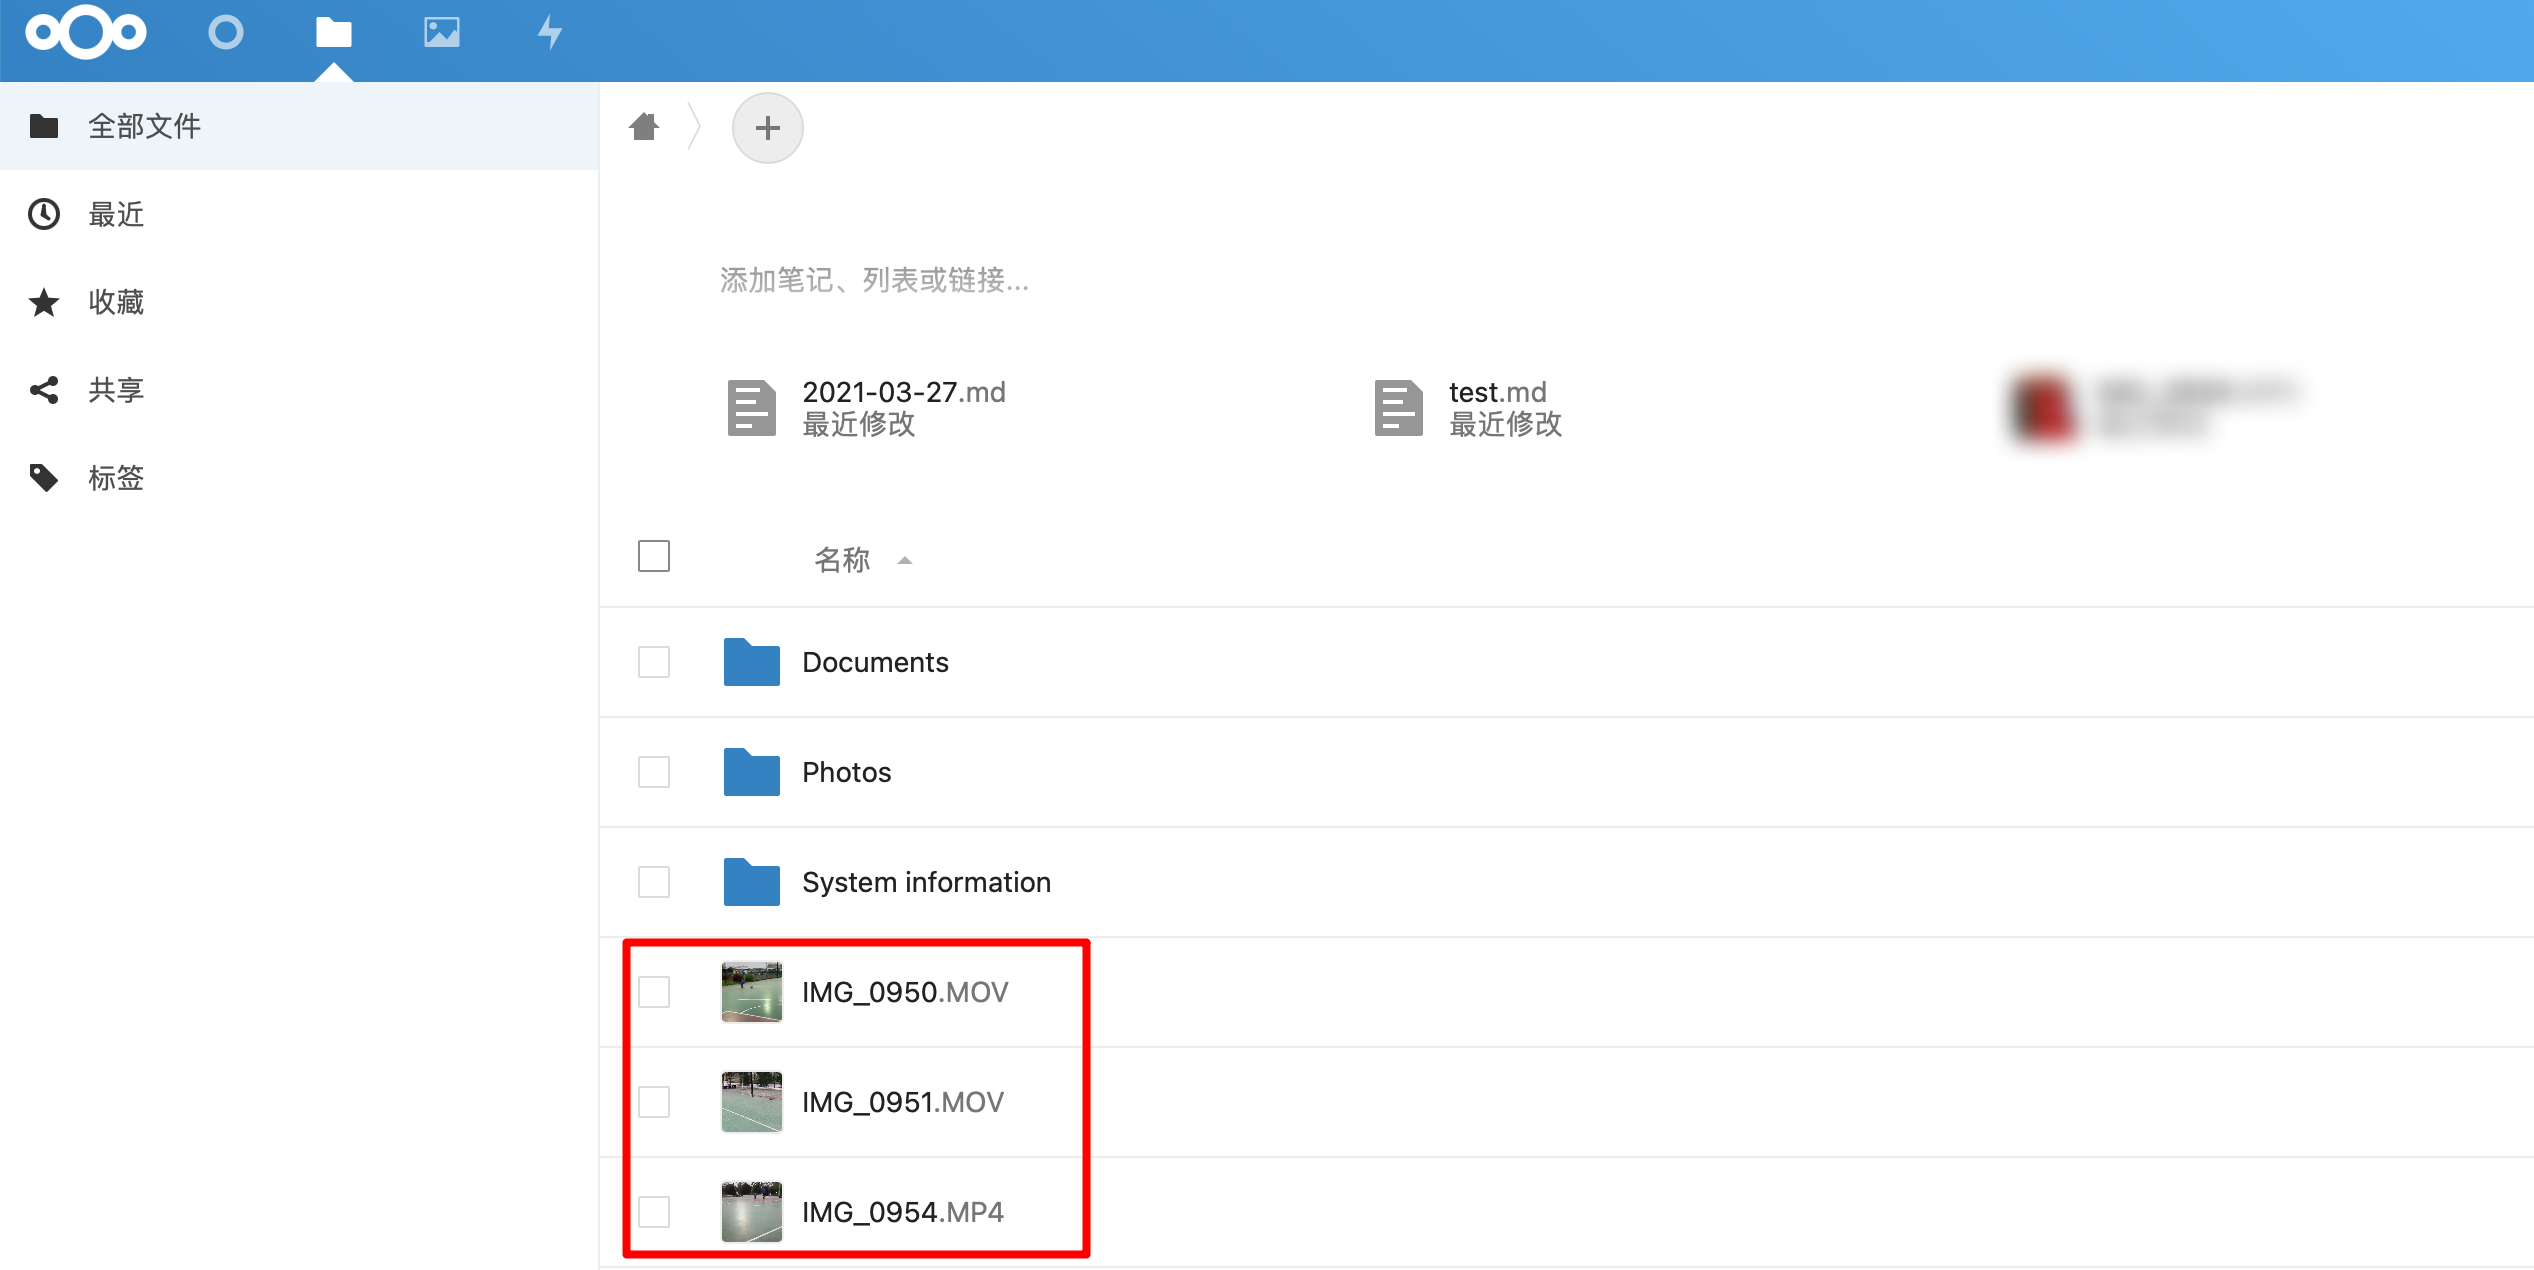
nextcloud然后再在nextcloud中可以看到视频已经的缩略图了。
11. 手动下载app-以music音乐为例
nextcloud有非常多好用的app,你可以在nextcloud App Store上面去看一下!下面列一些好用的应用:
- External sites 外部站点,可以在nextcloud中链接到外部网站。
- passwords密码管理,自动生成密码,并管理你的密码,再也不用记一大堆密码了。可配合手机端的
Passwords应用使用。 - Bookmarks书签管理,可以同步不同浏览器之间的书签同步,需要安装浏览器插件应用
floccus。可配置手机端的nextBookmark应用使用。 - Brute-force settings白名单设置。
下载链接:
# 外部站点
https://github.com/nextcloud/external/releases/download/v3.8.1/external-3.8.1.tar.gz
# music
https://github.com/owncloud/music/releases/download/v1.1.0/music_1.1.0_nc-signed.tar.gz
# 密码管理
https://git.mdns.eu/nextcloud/passwords/-/jobs/12073/artifacts/raw/passwords.tar.gz
# 书签
https://github.com/nextcloud/bookmarks/releases/download/v4.1.0/bookmarks-4.1.0.tar.gz
# 白名单
https://github.com/nextcloud/bruteforcesettings/releases/download/v2.1.0/bruteforcesettings.tar.gz在nextcloud应用界面点击下载并启用时,会经常下载不成功。我们通过手动下载安装app。
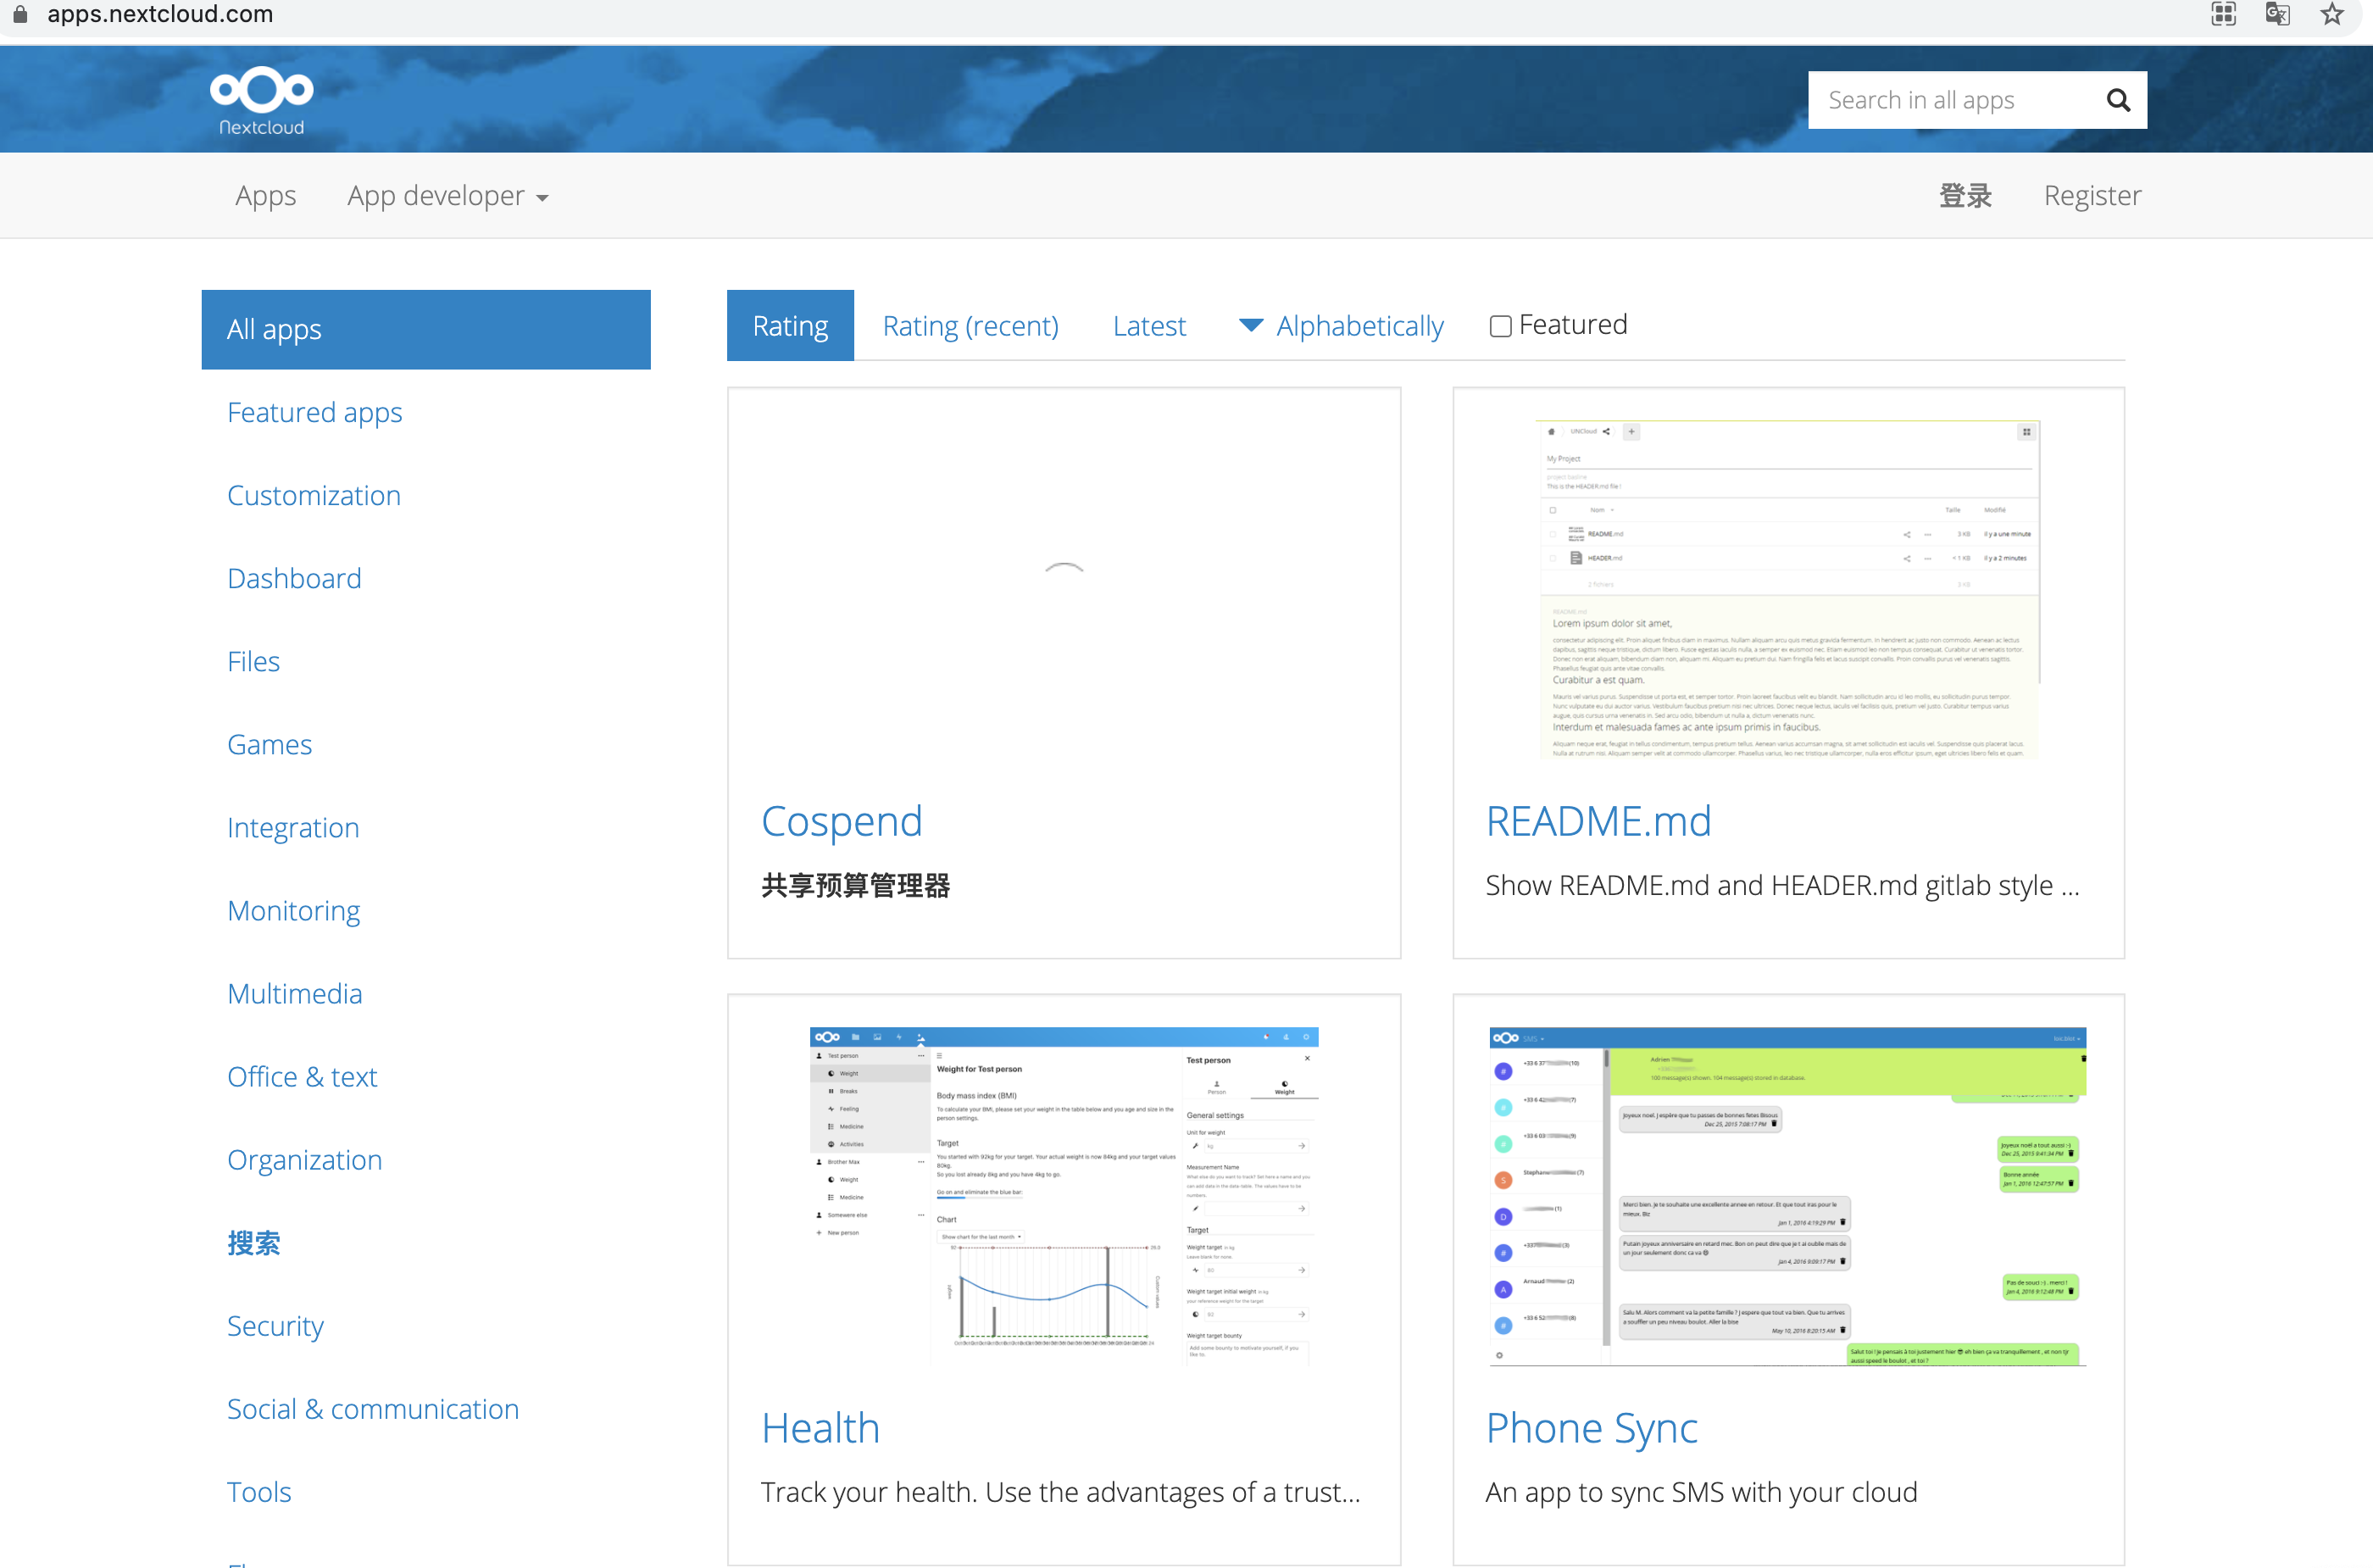
nextcloud App Store: https://apps.nextcloud.com/
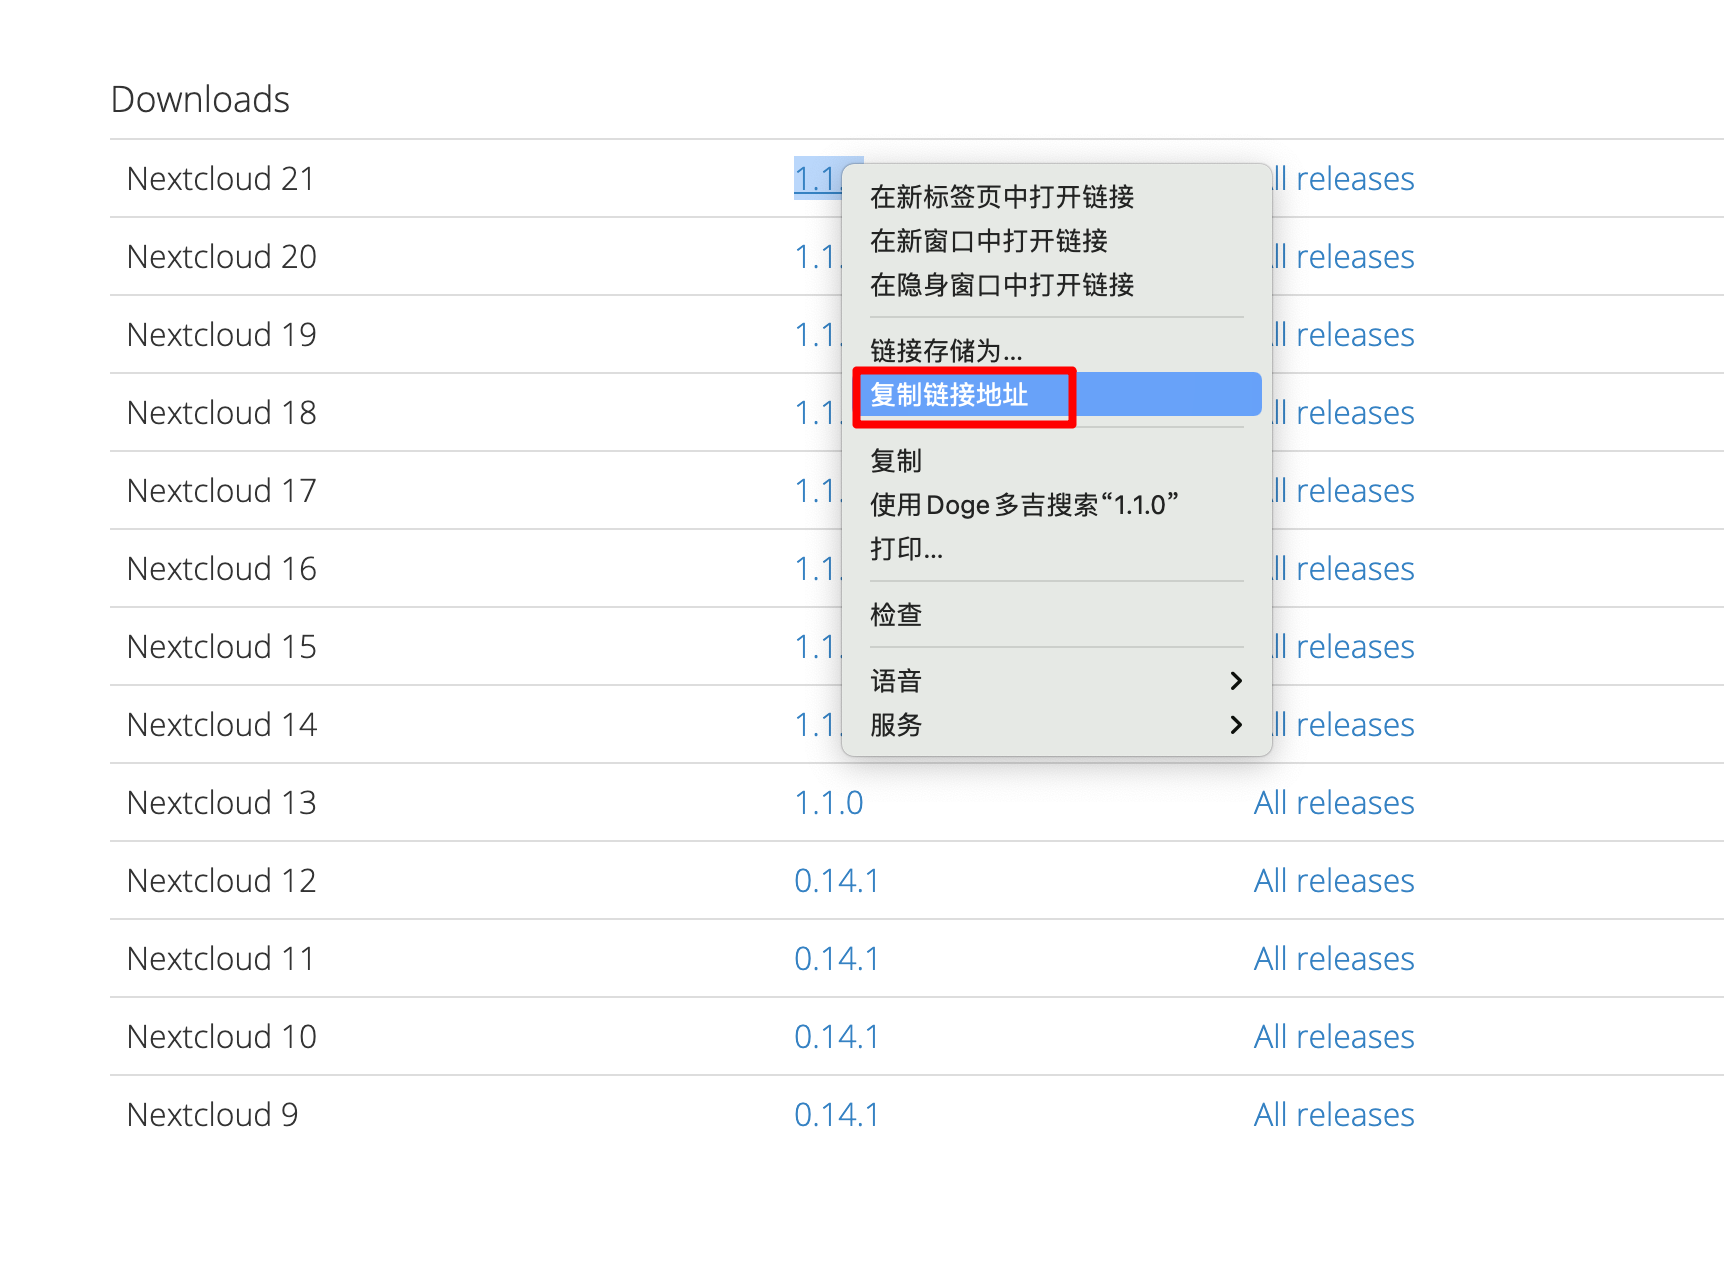
在右上角的搜索框输入music,并按回车搜索,点击进入到第一个搜索结果中:
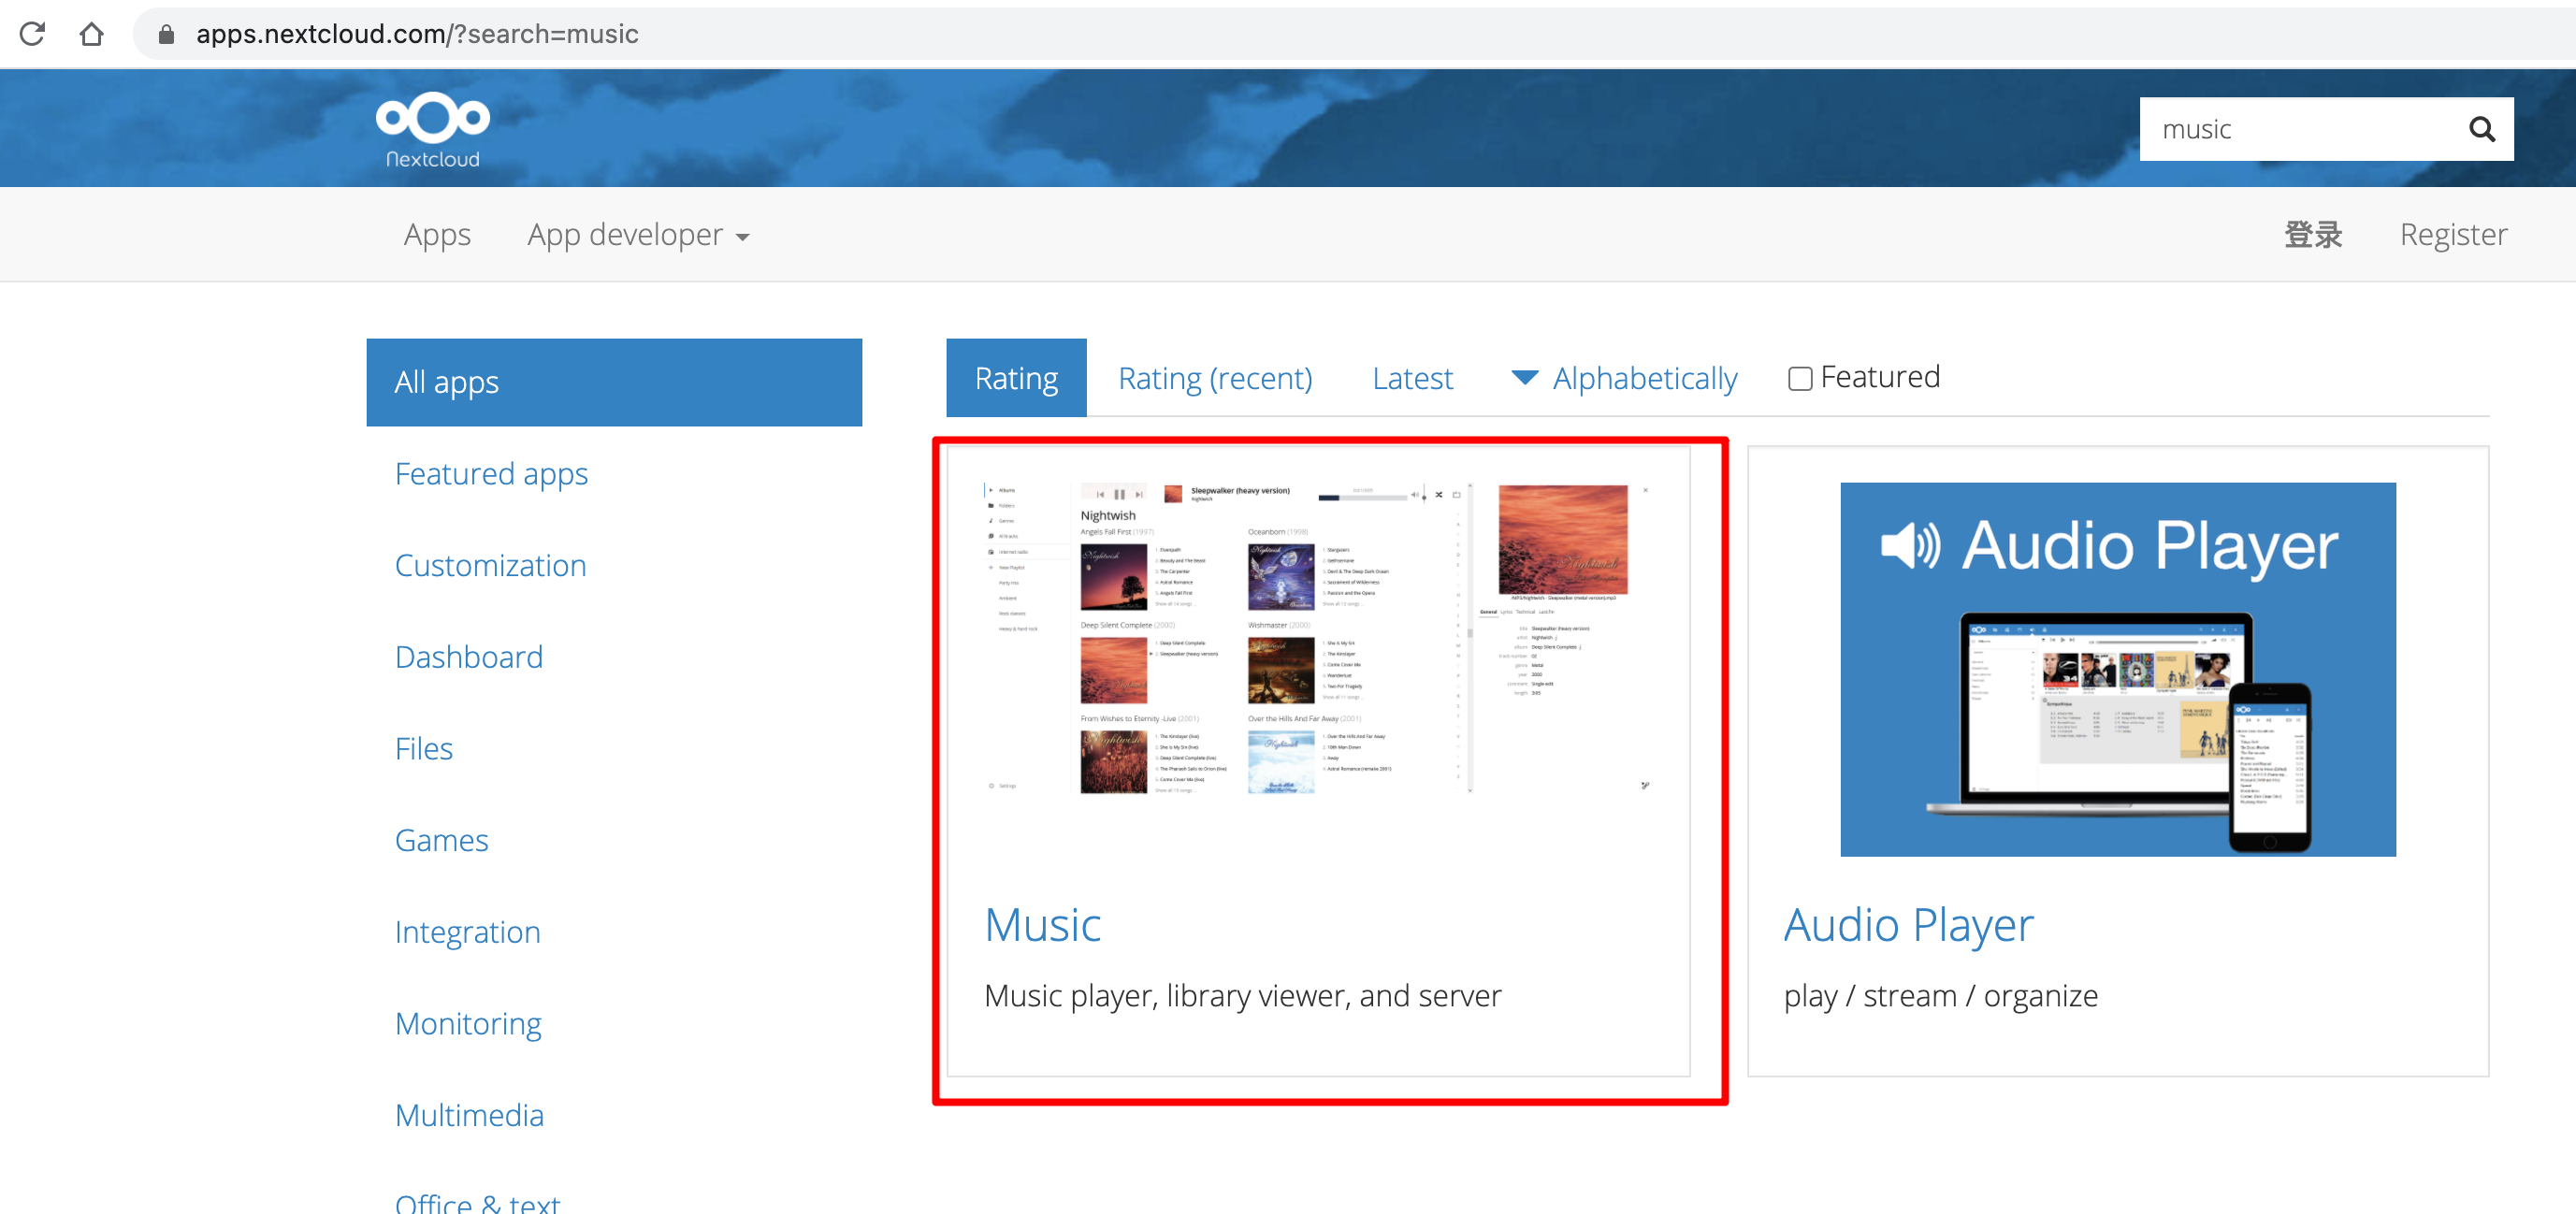
在Music详情页面,下方有一个Downloads列表,我们选择一个下载版本,右键复制链接地址:
进入到nextcloud容器中,并切换到apps目录:
# 查看nextcloud容器id
[root@hellogitlab ~]# docker ps
CONTAINER ID        IMAGE               COMMAND                  CREATED             STATUS              PORTS                  NAMES
89a04170593a        nextcloud           "/entrypoint.sh ap..."   3 days ago          Up 17 hours         0.0.0.0:8080->80/tcp   nextcloud

# 进入到nextcloud容器命令行
[root@hellogitlab ~]# dkin 89a0

# 切换到apps目录,这个目录存放各种应用
root@89a04170593a:/var/www/html# cd apps

# 下载music应用,地址就是刚才右键复制的应用链接
root@89a04170593a:/var/www/html/apps# wget https://github.com/owncloud/music/releases/download/v1.1.0/music_1.1.0_nc-signed.tar.gz
Connecting to github.com (github.com)|13.250.177.223|:443... connected.
HTTP request sent, awaiting response... 302 Found
Location: https://github-releases.githubusercontent.com/10240326/5836f080-8cef-11eb-8abc-0719a38f7fe1?X-Amz-Algorithm=AWS4-HMAC-SHA256&X-Amz-Credential=AKIAIWNJYAX4CSVEH53A%2F20210328%2Fus-east-1%2Fs3%2Faws4_request&X-Amz-Date=20210328T062758Z&X-Amz-Expires=300&X-Amz-Signature=8e74e0a52c6a5cc8f7f15aa4a0d9ba4a9b4694245547a3871286b77873b43900&X-Amz-SignedHeaders=host&actor_id=0&key_id=0&repo_id=10240326&response-content-disposition=attachment%3B%20filename%3Dmusic_1.1.0_nc-signed.tar.gz&response-content-type=application%2Foctet-stream [following]
--2021-03-28 06:27:58--  https://github-releases.githubusercontent.com/10240326/5836f080-8cef-11eb-8abc-0719a38f7fe1?X-Amz-Algorithm=AWS4-HMAC-SHA256&X-Amz-Credential=AKIAIWNJYAX4CSVEH53A%2F20210328%2Fus-east-1%2Fs3%2Faws4_request&X-Amz-Date=20210328T062758Z&X-Amz-Expires=300&X-Amz-Signature=8e74e0a52c6a5cc8f7f15aa4a0d9ba4a9b4694245547a3871286b77873b43900&X-Amz-SignedHeaders=host&actor_id=0&key_id=0&repo_id=10240326&response-content-disposition=attachment%3B%20filename%3Dmusic_1.1.0_nc-signed.tar.gz&response-content-type=application%2Foctet-stream
Resolving github-releases.githubusercontent.com (github-releases.githubusercontent.com)... 185.199.110.154, 185.199.111.154, 185.199.108.154, ...
Connecting to github-releases.githubusercontent.com (github-releases.githubusercontent.com)|185.199.110.154|:443... connected.
HTTP request sent, awaiting response... 200 OK
Length: 1254419 (1.2M) [application/octet-stream]
Saving to: 'music_1.1.0_nc-signed.tar.gz'

music_1.1.0_nc-signed.tar.gz                   100%[=================================================================================================>]   1.20M  34.3KB/s    in 33s

2021-03-28 06:28:32 (36.8 KB/s) - 'music_1.1.0_nc-signed.tar.gz' saved [1254419/1254419]

root@89a04170593a:/var/www/html/apps#解压:
root@89a04170593a:/var/www/html/apps# tar zxvf music_1.1.0_nc-signed.tar.gz
music/
music/COPYING
music/CONTRIBUTING.md
music/css/
music/css/.keep
music/js/
music/js/.keep
music/appinfo/
... 以下省略修改权限:
root@89a04170593a:/var/www/html/apps# chown -R www-data:root music
root@89a04170593a:/var/www/html/apps# ls -lah music
total 156K
drwxr-xr-x 11 www-data root 4.0K Mar 24 19:55 .
drwxr-xr-x 50 www-data root 4.0K Mar 28 06:29 ..
drwxr-xr-x  3 www-data root 4.0K Mar 24 19:55 3rdparty
-rw-r--r--  1 www-data root 2.6K Mar 24 19:55 AUTHORS.md
-rw-r--r--  1 www-data root  49K Mar 24 19:55 CHANGELOG.md
-rw-r--r--  1 www-data root 1.8K Mar 24 19:55 CONTRIBUTING.md
-rw-r--r--  1 www-data root  34K Mar 24 19:55 COPYING
-rw-r--r--  1 www-data root  15K Mar 24 19:55 README.md
drwxr-xr-x  2 www-data root 4.0K Mar 24 20:02 appinfo
drwxr-xr-x  2 www-data root 4.0K Mar 24 19:55 css
drwxr-xr-x  3 www-data root 4.0K Mar 24 20:02 dist
drwxr-xr-x  2 www-data root 4.0K Mar 24 19:55 img
drwxr-xr-x  2 www-data root 4.0K Mar 24 19:55 js
drwxr-xr-x  2 www-data root 4.0K Mar 24 19:55 l10n
drwxr-xr-x 15 www-data root 4.0K Mar 24 19:55 lib
drwxr-xr-x  3 www-data root 4.0K Mar 24 19:55 templates
root@89a04170593a:/var/www/html/apps# ls -ld music
drwxr-xr-x 11 www-data root 4096 Mar 24 19:55 music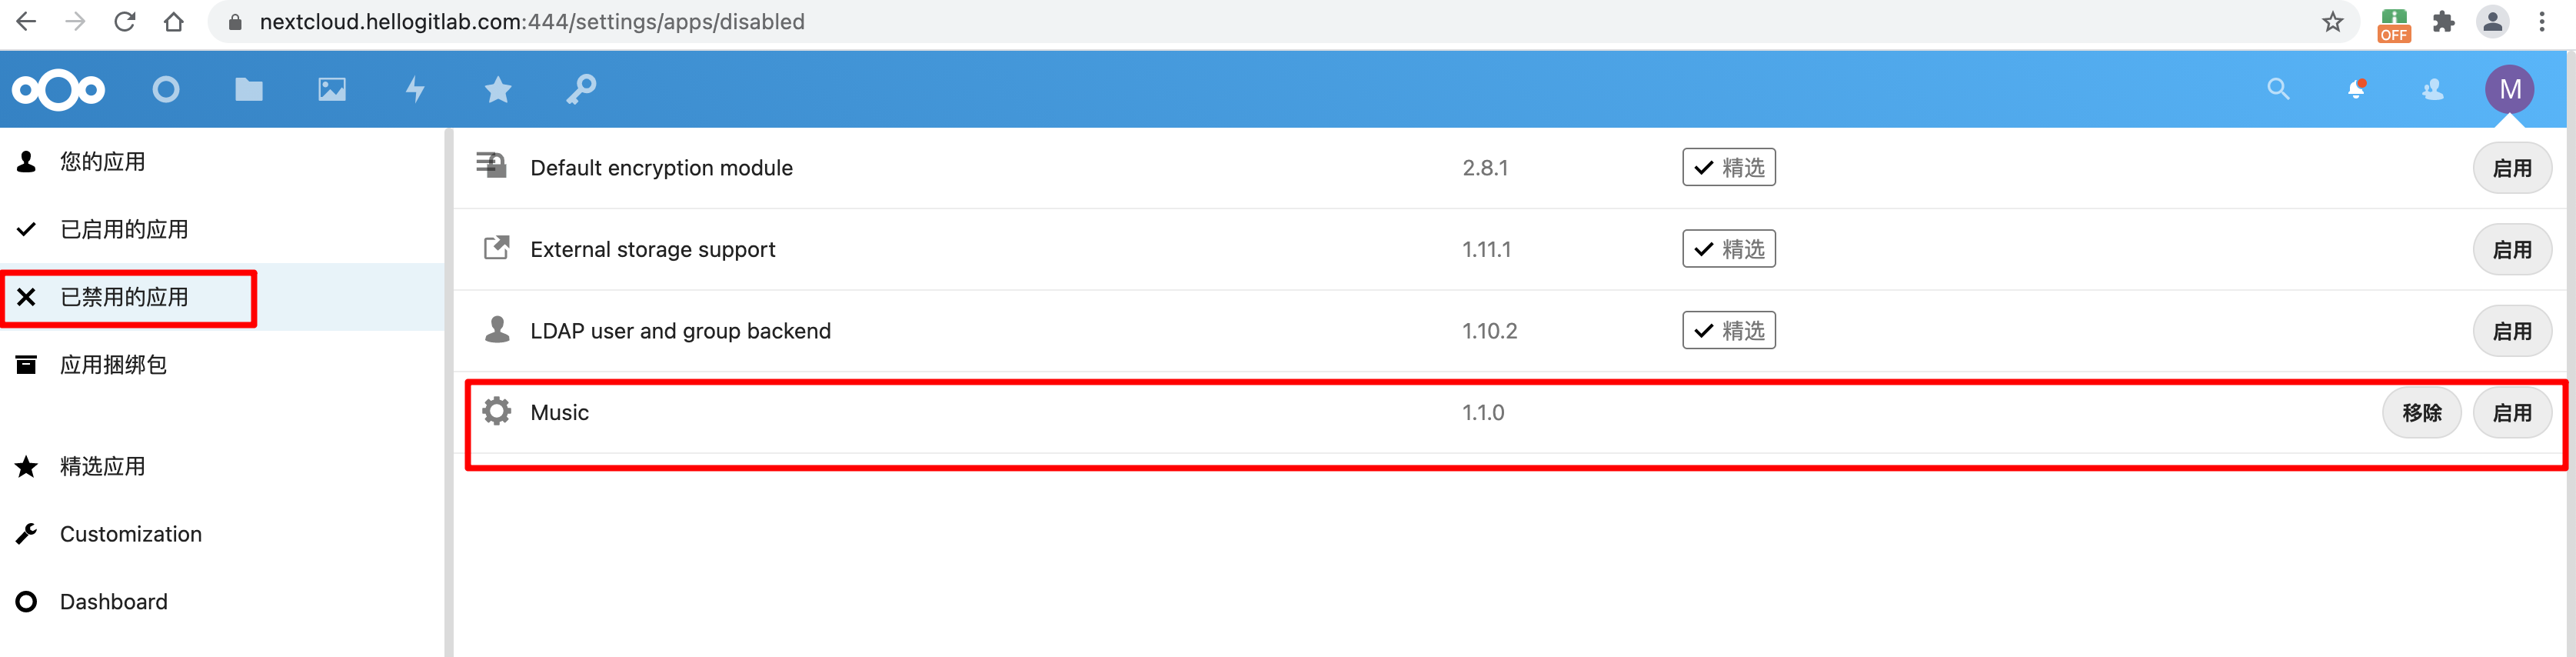
root@89a04170593a:/var/www/html/apps#修改权限后,在应用界面可以看到Music应用:
我们点击启用按钮,此时让输入授权密码,输入你的密码,并确认即可。
上传一首歌曲到nextcloud,然后点击页面顶部的音乐图标,就可以打开音乐界面,可以看到刚才上传的音乐了:
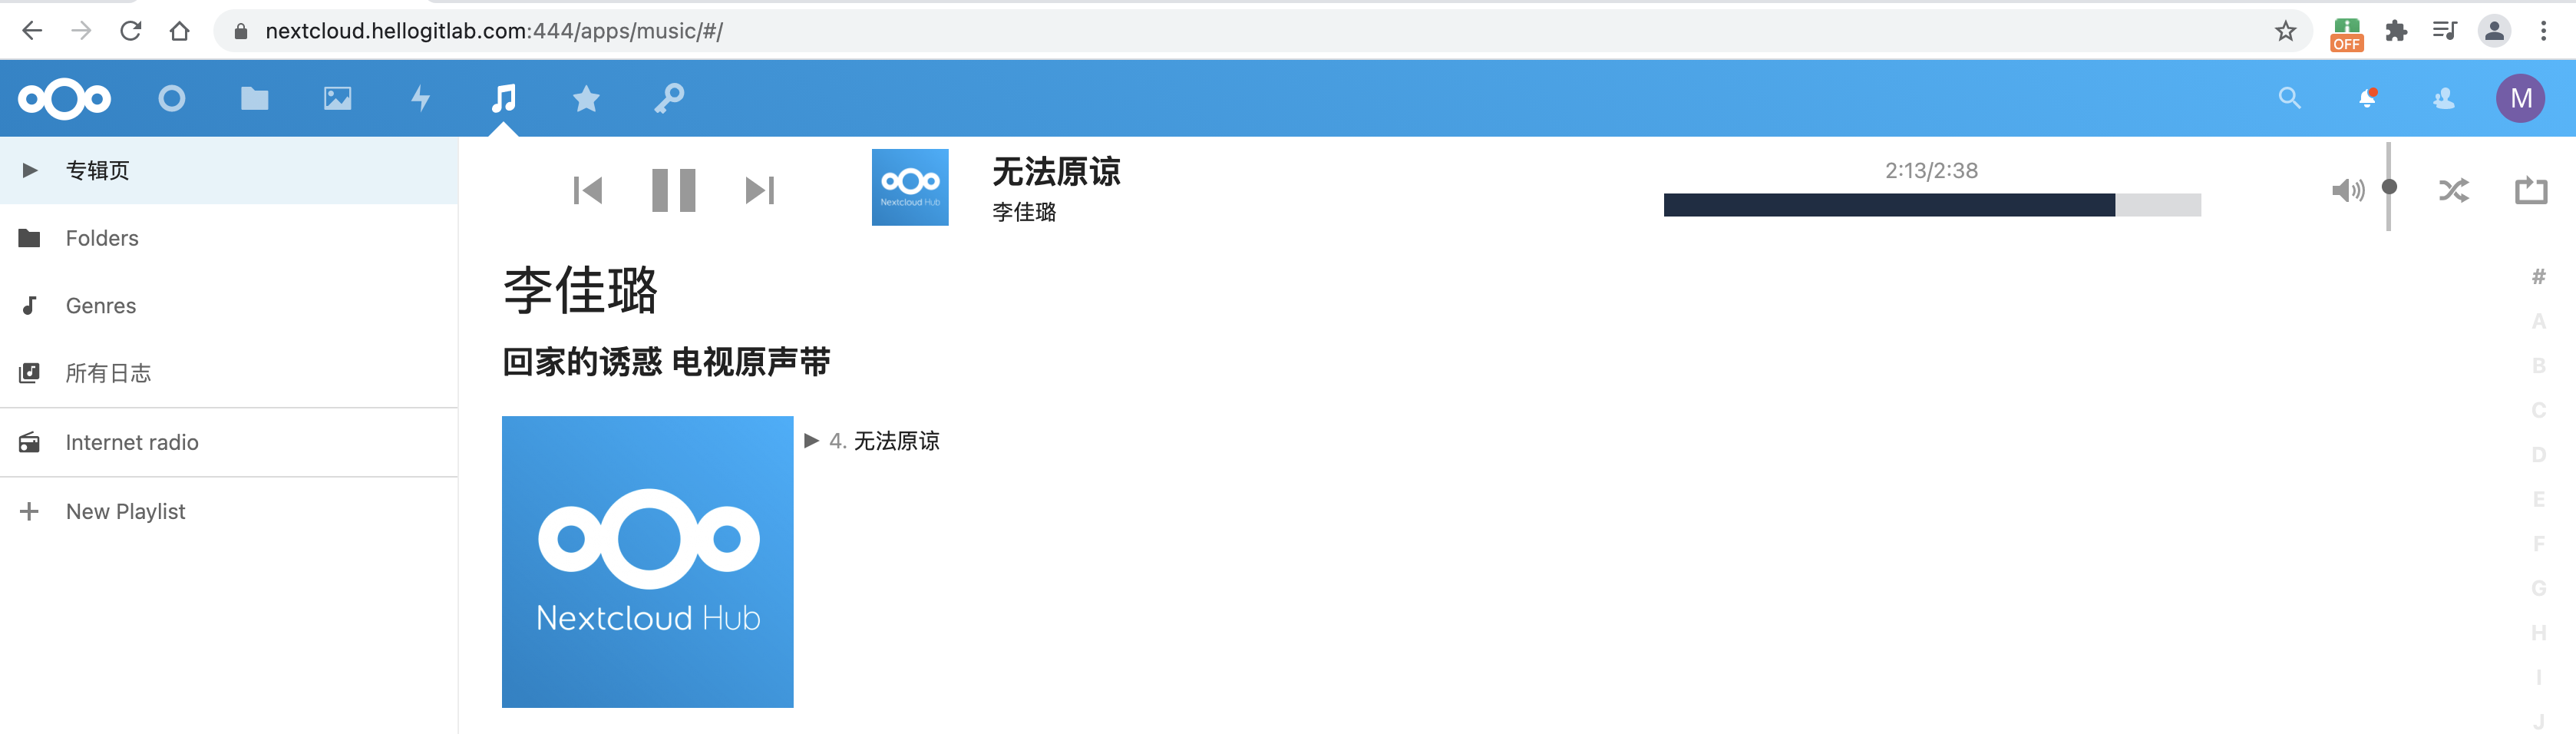
点击播放按钮就可以听音乐🎵了!
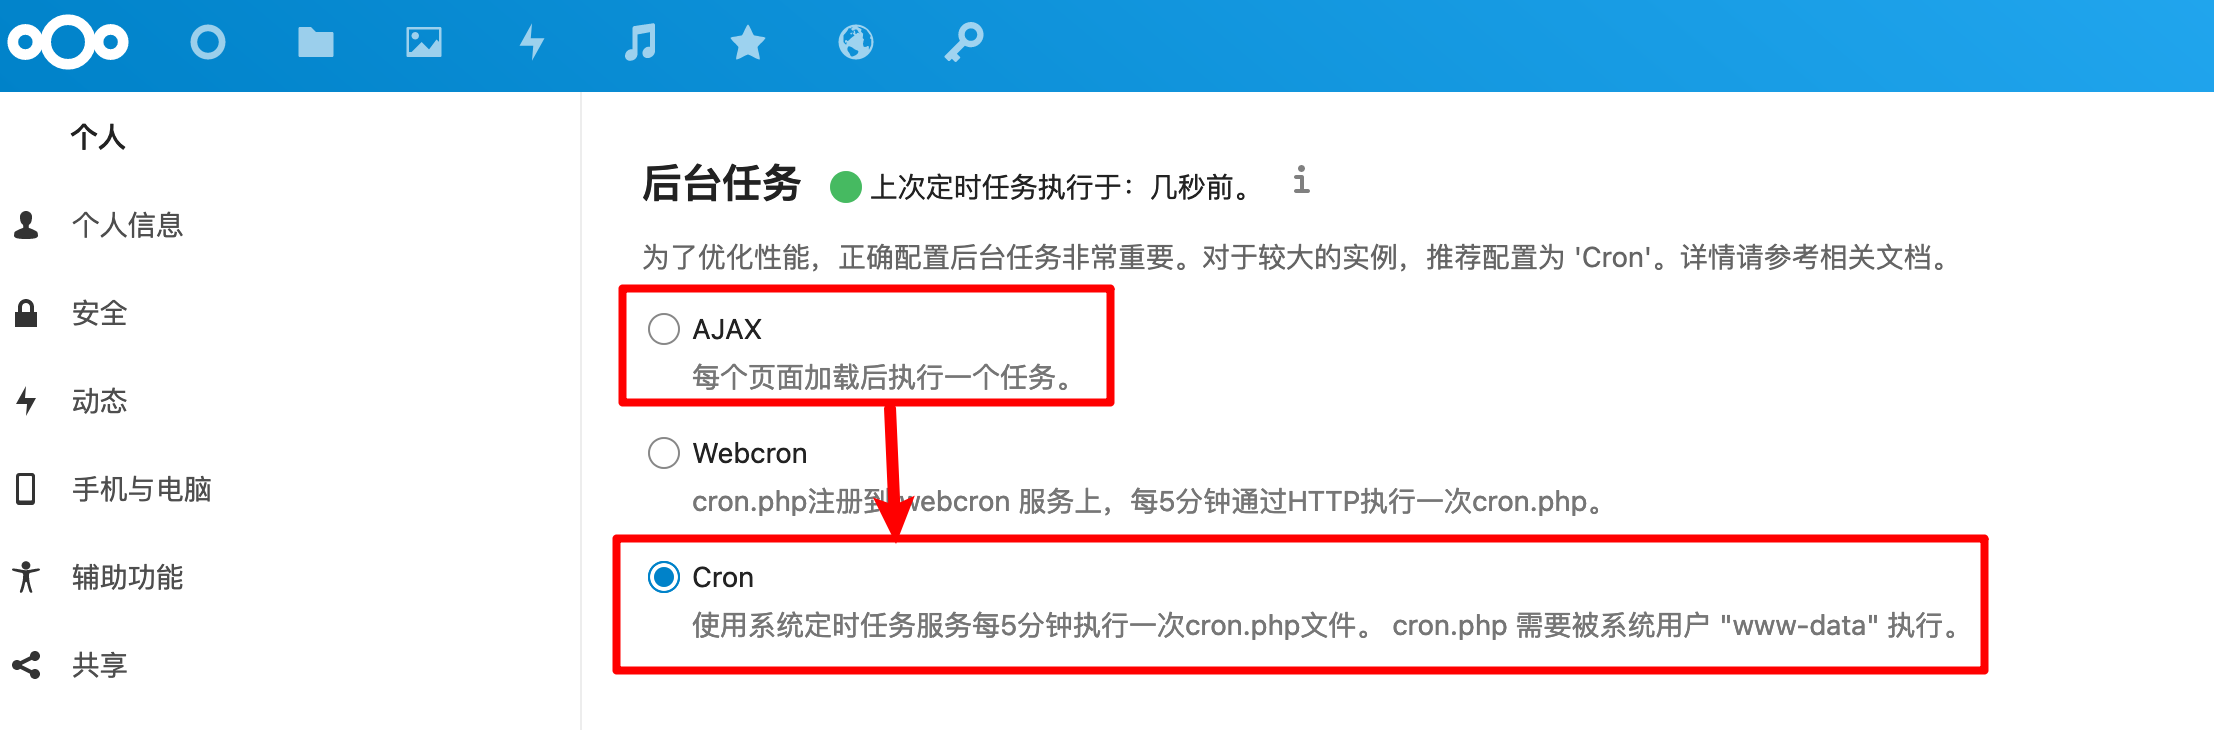
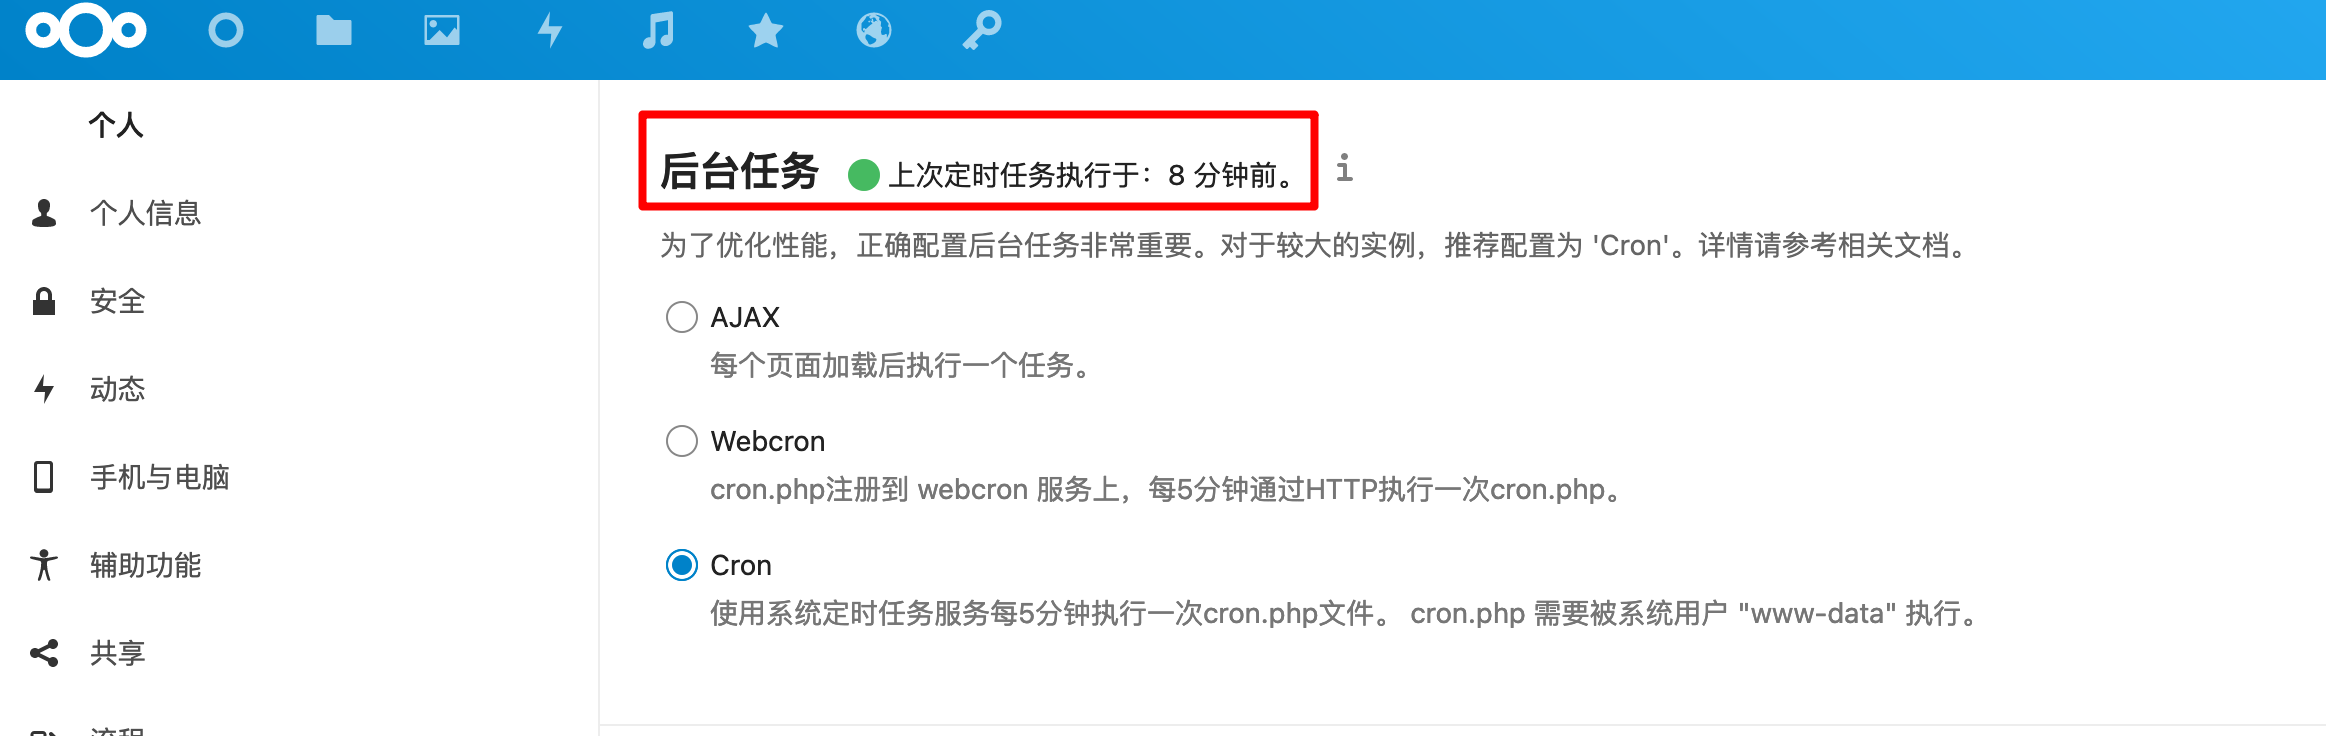
12. 优化定时任务cron
使用cron去执行后台任务:在设置中将设置从ajax调整到cron,然后在宿主机建立crontab任务。
首先在容器中查看一下cron.php文件路径:
root@89a04170593a:/var/www/html# ls -lah cron.php
-rw-r--r-- 1 www-data root 5.0K Mar 24 13:40 cron.php
root@89a04170593a:/var/www/html# pwd
/var/www/html
root@89a04170593a:/var/www/html# ls -lah /var/www/html/cron.php
-rw-r--r-- 1 www-data root 5.0K Mar 24 13:40 /var/www/html/cron.php尝试执行同步命令:
root@89a04170593a:/var/www/html# su www-data
This account is currently not available.
root@89a04170593a:/var/www/html# php -f /var/www/html/cron.php
Console has to be executed with the user that owns the file config/config.php
Current user id: 0
Owner id of config.php: 33
root@89a04170593a:/var/www/html# ls -lah config/config.php
-rw-r----- 1 www-data www-data 1.4K Mar 27 12:32 config/config.php
root@89a04170593a:/var/www/html# id 33
uid=33(www-data) gid=33(www-data) groups=33(www-data)发现不能以root账号执行,我们需要使用www-data用户执行。我们退出容器,在容器外执行命令:
[root@hellogitlab ~]# docker exec --user www-data -it nextcloud php -f /var/www/html/cron.php
[root@hellogitlab ~]# echo $?
0在界面上可以看到同步成功了:
在宿主机上面添加一个定时任务:
[root@hellogitlab ~]# crontab -e
crontab: installing new crontab
[root@hellogitlab ~]# crontab -l|tail -n 2
# sync the nextcloud
*/5 * * * * docker exec --user www-data -i nextcloud php -f /var/www/html/cron.php
[root@hellogitlab ~]#这样宿主机每5分钟就会同步执行一次。
13. 手动添加文件到nextcloud用户目录,不显示处理
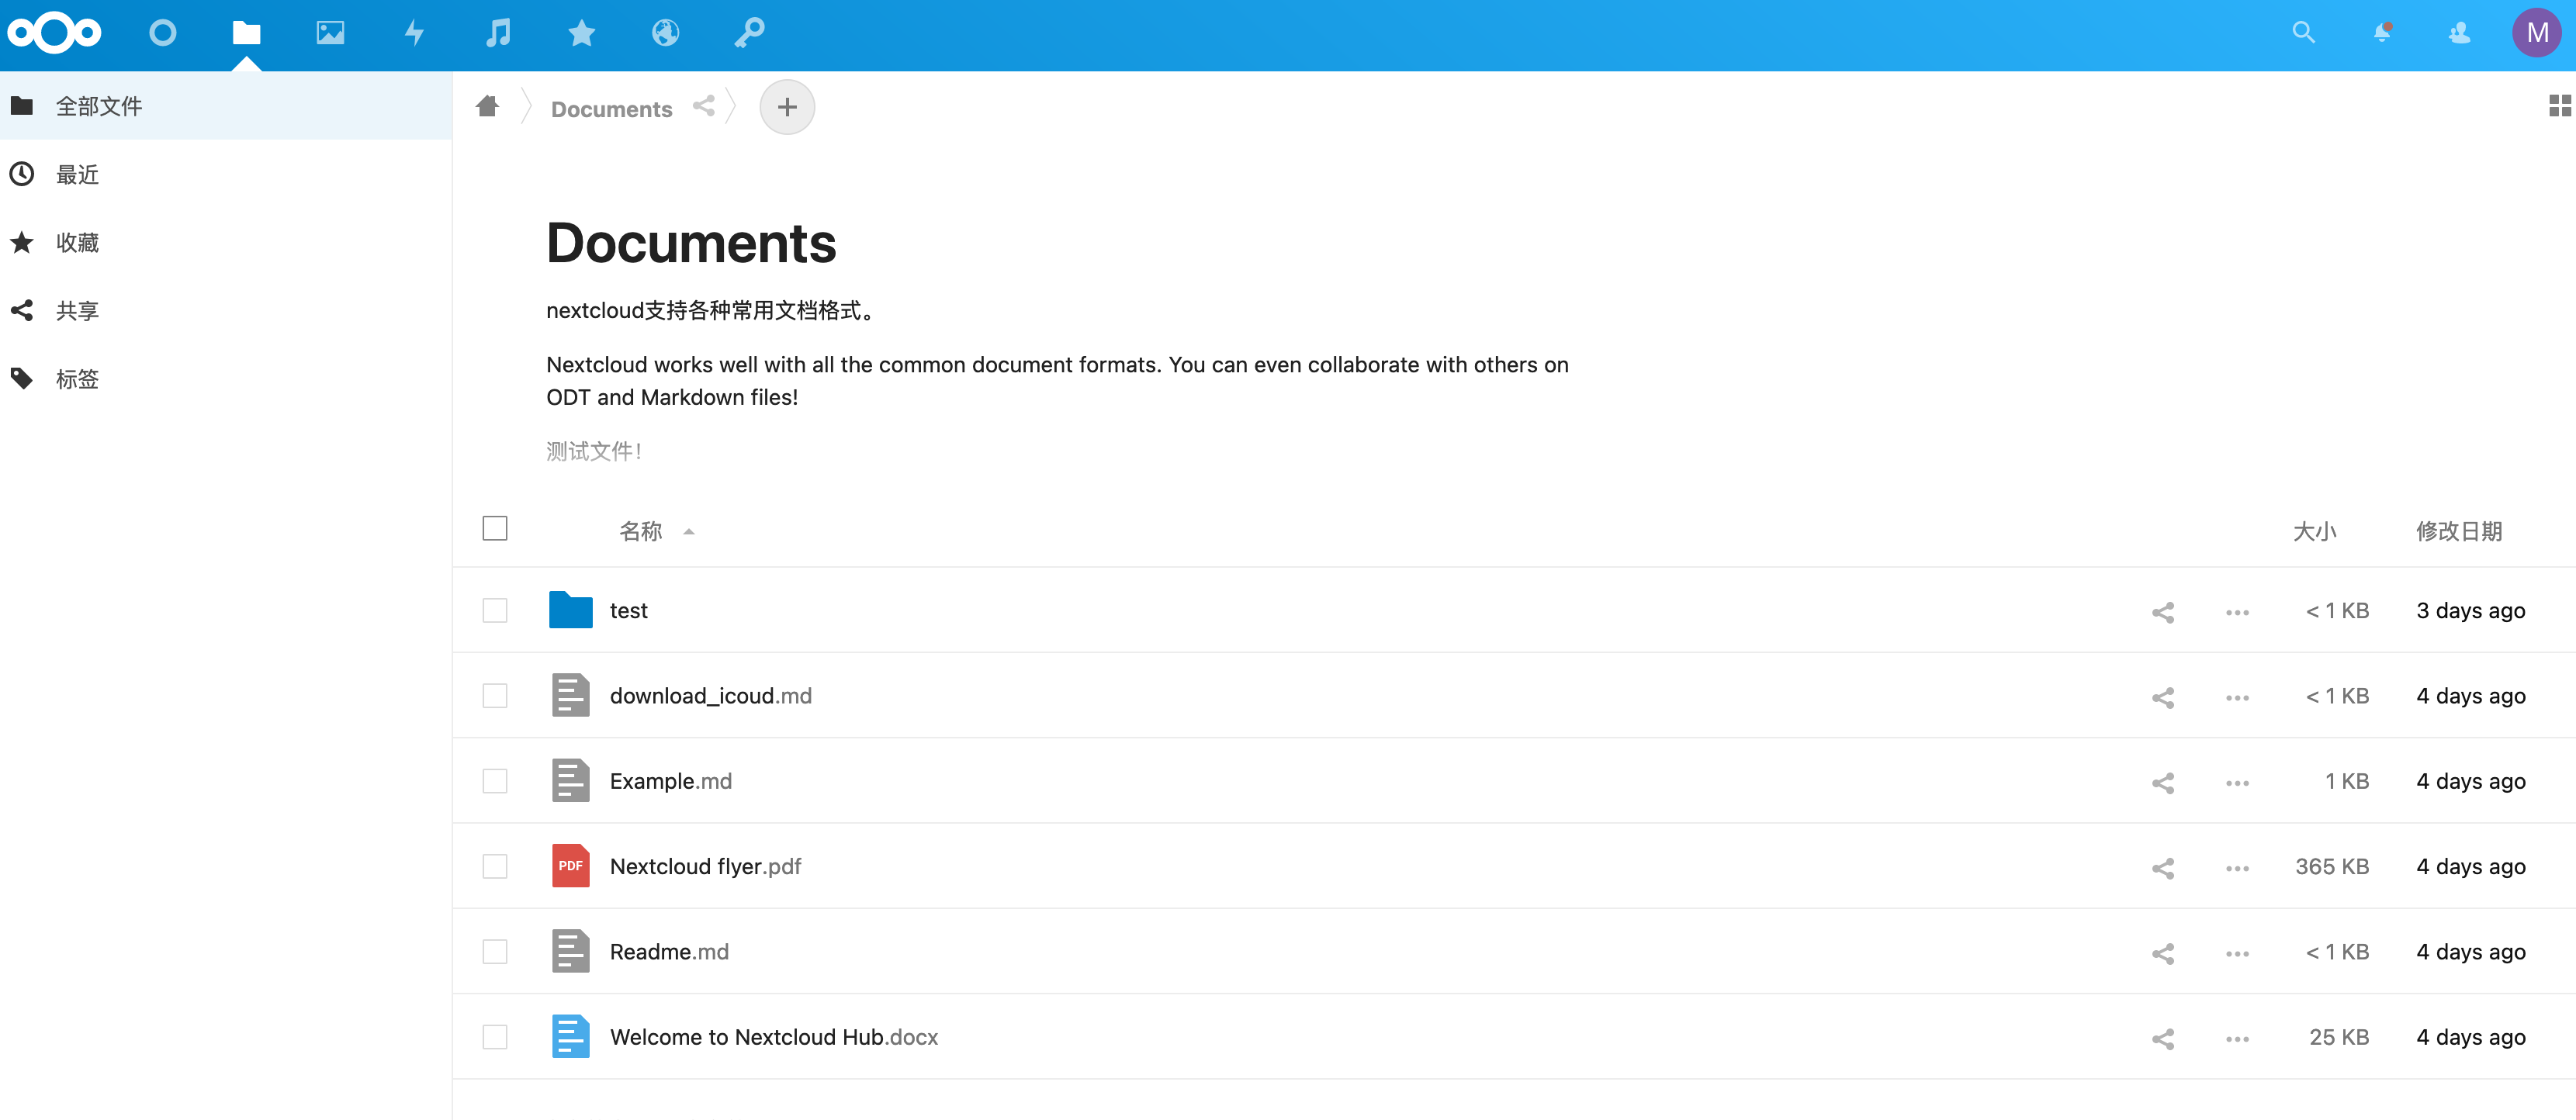
把自己本地的文件复制到nextcloud相应的用户目录中,nextcloud中并不会显示。我们测试一下:
root@89a04170593a:/var/www/html/data/meizhaohui/files/Documents# ls
total 412
-rw-r--r-- 1 www-data www-data   1095 Mar 24 13:54  Example.md
-rw-r--r-- 1 www-data www-data 374008 Mar 24 13:54 'Nextcloud flyer.pdf'
-rw-r--r-- 1 www-data www-data    196 Mar 24 14:39  Readme.md
-rw-r--r-- 1 www-data www-data  25150 Mar 24 13:54 'Welcome to Nextcloud Hub.docx'
-rw-r--r-- 1 www-data www-data     73 Mar 24 16:03  download_icoud.md
drwxr-xr-x 2 www-data www-data   4096 Mar 25 22:48  test
root@89a04170593a:/var/www/html/data/meizhaohui/files/Documents# cp Example.md addbymyself.md
root@89a04170593a:/var/www/html/data/meizhaohui/files/Documents# chown www-data:www-data addbymyself.md
root@89a04170593a:/var/www/html/data/meizhaohui/files/Documents# ls
total 416
-rw-r--r-- 1 www-data www-data   1095 Mar 24 13:54  Example.md
-rw-r--r-- 1 www-data www-data 374008 Mar 24 13:54 'Nextcloud flyer.pdf'
-rw-r--r-- 1 www-data www-data    196 Mar 24 14:39  Readme.md
-rw-r--r-- 1 www-data www-data  25150 Mar 24 13:54 'Welcome to Nextcloud Hub.docx'
-rw-r--r-- 1 www-data www-data   1095 Mar 28 13:05  addbymyself.md
-rw-r--r-- 1 www-data www-data     73 Mar 24 16:03  download_icoud.md
drwxr-xr-x 2 www-data www-data   4096 Mar 25 22:48  test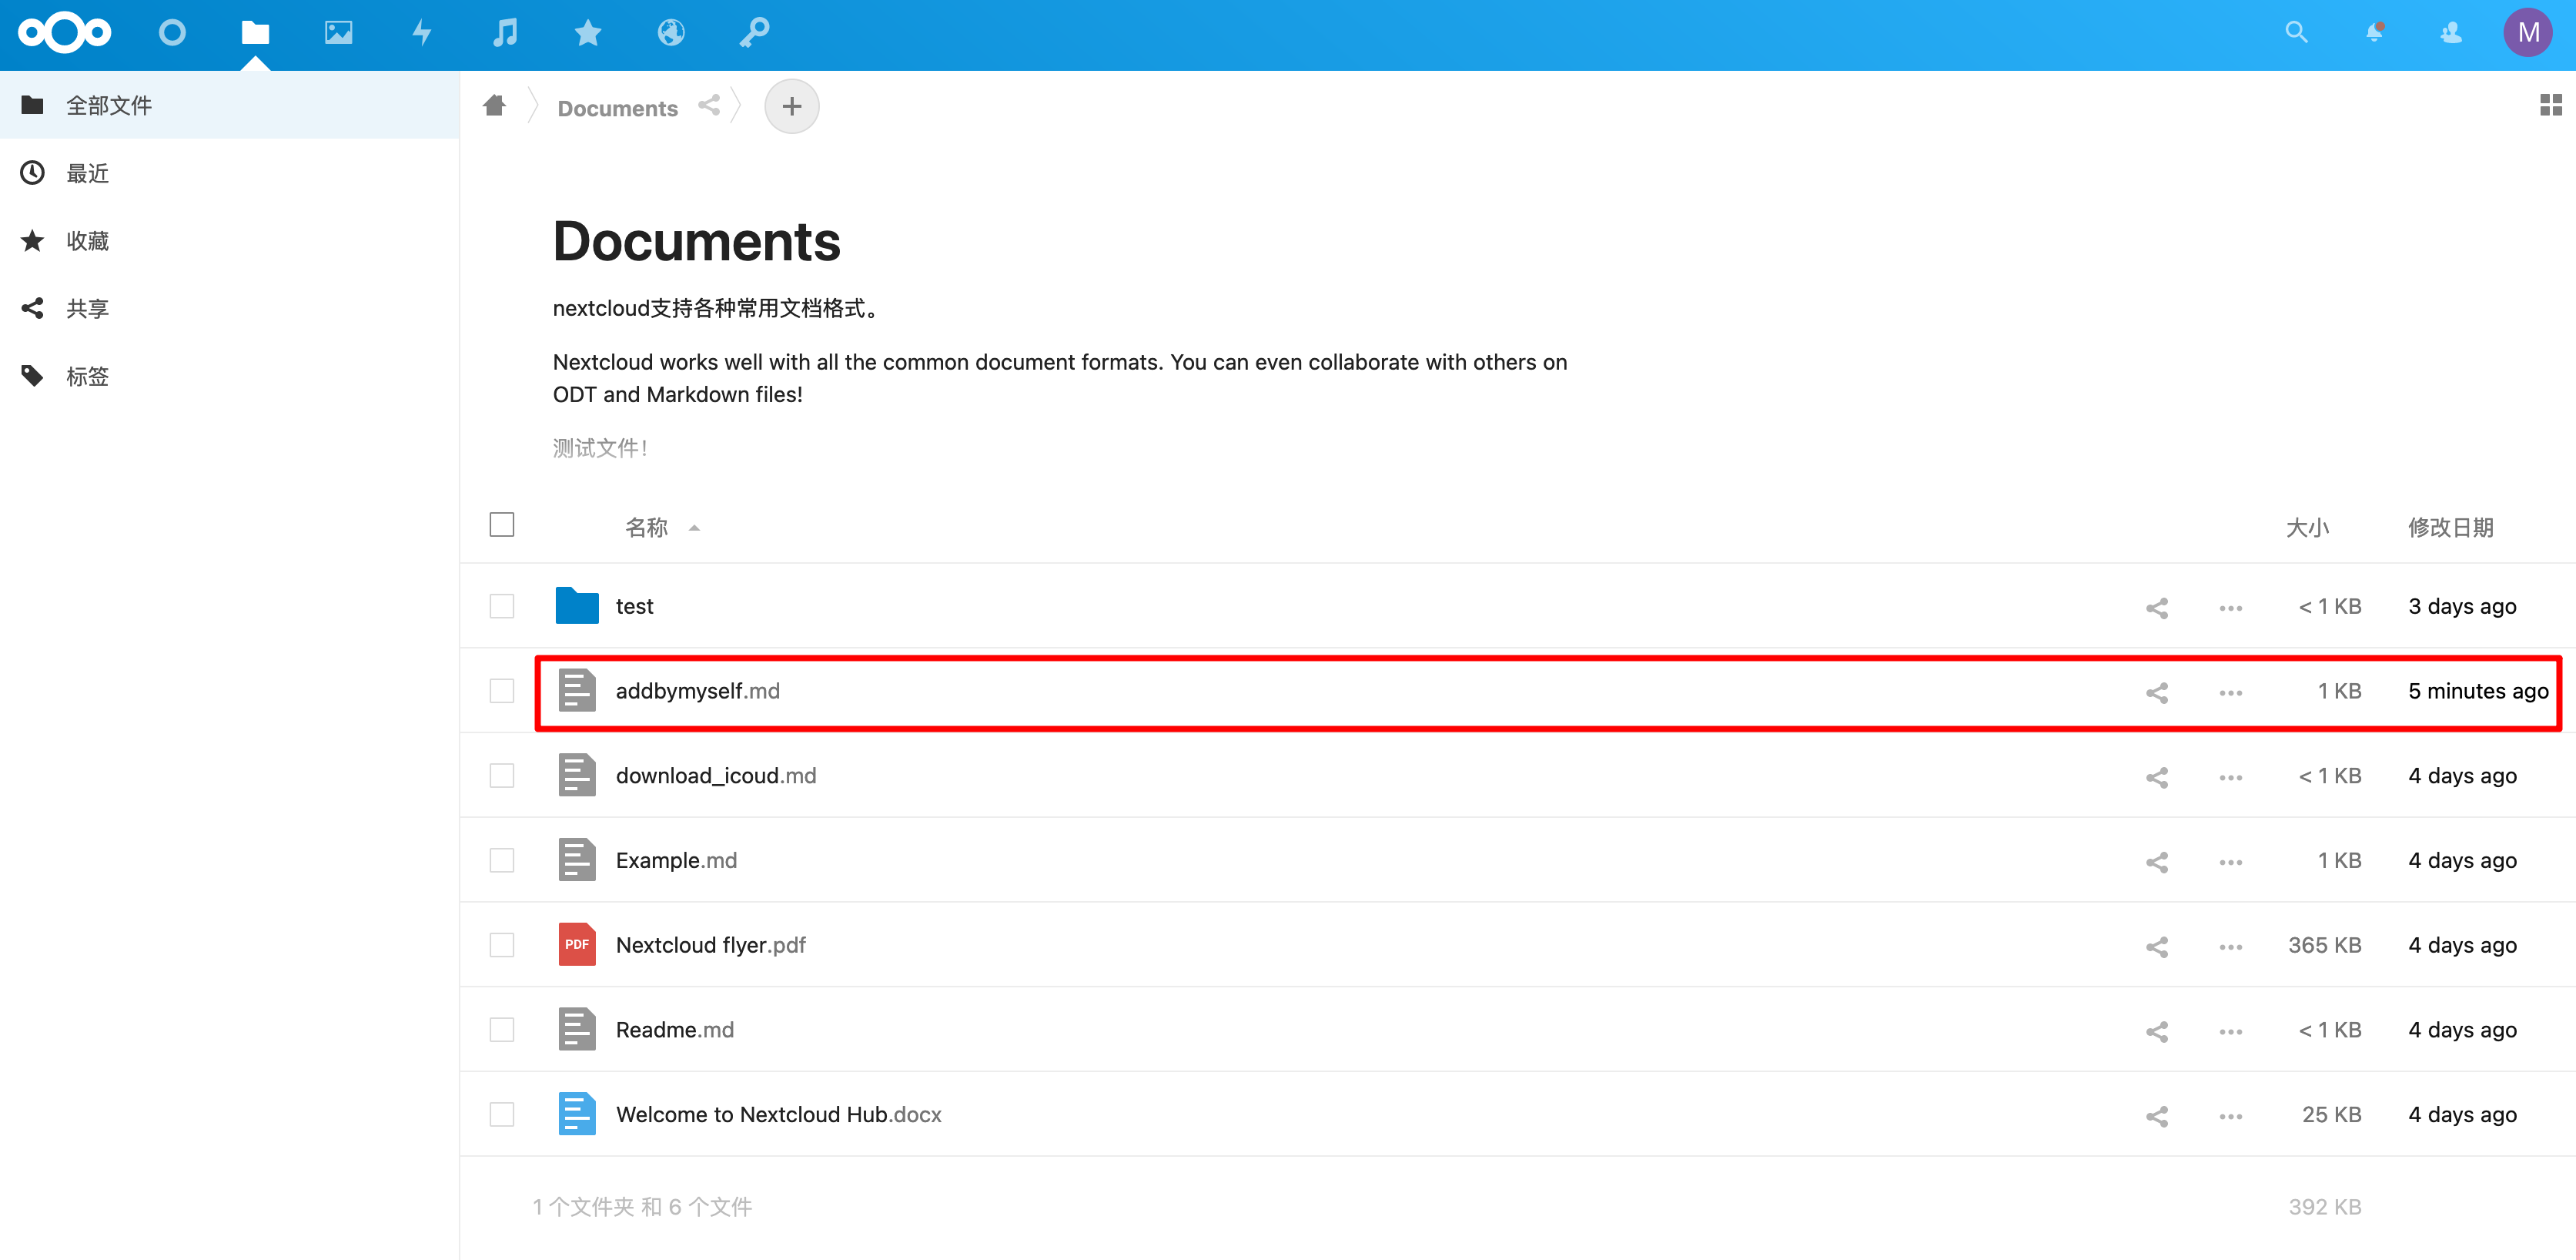
root@89a04170593a:/var/www/html/data/meizhaohui/files/Documents#此时在nextcloud上面并没有显示:
这时,我们应该更新一下数据库数据,需要手动执行以下命令(注意,是在宿主机上面执行!!),nextcloud才会将数据添加进数据库里:
[root@hellogitlab ~]# docker exec --user www-data nextcloud php occ files:scan --all
Starting scan for user 1 out of 2 (meizhaohui)
Starting scan for user 2 out of 2 (test)
+---------+-------+--------------+
| Folders | Files | Elapsed time |
+---------+-------+--------------+
| 17      | 51    | 00:00:01     |
+---------+-------+--------------+
[root@hellogitlab ~]#此时,刷新一下nextcloud页面,可以看到,刚才手动添加的文件已经正常显示了:
为了不每次手动添加文件时,都需要执行该命令,我们在宿主机上面也可以添加一个定时任务:
[root@hellogitlab ~]# crontab -l|tail -n 2
# add file data to the nextcloud database
*/5 * * * * docker exec --user www-data -i nextcloud php occ files:scan --all
[root@hellogitlab ~]#当然,定时任务可以不用配置。因为这种通过手动添加的场景相对比较少。
14. 增加redis缓存
通过使用内存作为数据缓存的话,可以提高nextcloud的性能,以加web端的访问速度,并且nextcloud支持多个内存缓存后端,如APCu、Redis、Memcached。
我们以Redis作为数据缓存。
下载redis镜像:
[root@hellogitlab ~]# docker pull redis
Using default tag: latest
Trying to pull repository docker.io/library/redis ...
latest: Pulling from docker.io/library/redis
a076a628af6f: Already exists
f40dd07fe7be: Pull complete
ce21c8a3dbee: Pull complete
ee99c35818f8: Pull complete
56b9a72e68ff: Pull complete
3f703e7f380f: Pull complete
Digest: sha256:0f97c1c9daf5b69b93390ccbe8d3e2971617ec4801fd0882c72bf7cad3a13494
Status: Downloaded newer image for docker.io/redis:latest
[root@hellogitlab dockerdata]# docker images redis
REPOSITORY          TAG                 IMAGE ID            CREATED             SIZE
docker.io/redis latest 621ceef7494a 2 months ago 104 MB在Redis官网下载一份redis安装程序,并解压,修改其中的redis.conf配置文件。
创建本地持久化目录:
[root@hellogitlab ~]# mkdir /dockerdata && cd /dockerdata
[root@hellogitlab dockerdata]# mkdir redis
[root@hellogitlab dockerdata]# cd redis
[root@hellogitlab redis]# wget http://download.redis.io/redis-stable/redis.conf
--2021-03-28 23:34:56--  http://download.redis.io/redis-stable/redis.conf
正在解析主机 download.redis.io (download.redis.io)...
2021-03-28 23:34:57 (97.1 KB/s) - 已保存 “redis.conf” [92222/92222])
# 修改redis.conf内容
[root@hellogitlab redis]#
# 查看所有配置
[root@hellogitlab redis]# grep -v '#' redis.conf|grep -v '^$'|sort
acllog-max-len 128
activerehashing yes
always-show-logo yes
aof-load-truncated yes
aof-rewrite-incremental-fsync yes
aof-use-rdb-preamble yes
appendfilename "appendonly.aof"
appendfsync everysec
appendonly yes
auto-aof-rewrite-min-size 64mb
auto-aof-rewrite-percentage 100
client-output-buffer-limit normal 0 0 0
client-output-buffer-limit pubsub 32mb 8mb 60
client-output-buffer-limit replica 256mb 64mb 60
daemonize no
databases 16
dbfilename dump.rdb
dir ./
dynamic-hz yes
hash-max-ziplist-entries 512
hash-max-ziplist-value 64
hll-sparse-max-bytes 3000
hz 10
jemalloc-bg-thread yes
latency-monitor-threshold 0
lazyfree-lazy-eviction no
lazyfree-lazy-expire no
lazyfree-lazy-server-del no
lazyfree-lazy-user-del no
list-compress-depth 0
list-max-ziplist-size -2
logfile "/data/redis.log"
loglevel notice
lua-time-limit 5000
no-appendfsync-on-rewrite no
notify-keyspace-events ""
pidfile /var/run/redis_6378.pid
port 6378
protected-mode yes
rdbchecksum yes
rdbcompression yes
rdb-del-sync-files no
rdb-save-incremental-fsync yes
repl-disable-tcp-nodelay no
repl-diskless-load disabled
repl-diskless-sync-delay 5
repl-diskless-sync no
replica-lazy-flush no
replica-priority 100
replica-read-only yes
replica-serve-stale-data yes
requirepass **************securepassword******************
save 300 10
save 60 10000
save 900 1
set-max-intset-entries 512
slowlog-log-slower-than 10000
slowlog-max-len 128
stop-writes-on-bgsave-error yes
stream-node-max-bytes 4096
stream-node-max-entries 100
supervised no
tcp-backlog 511
tcp-keepalive 300
timeout 0
zset-max-ziplist-entries 128
zset-max-ziplist-value 64
[root@hellogitlab redis]#注意以下需要关注的配置:
# 注释掉这部分,使redis可以外部访问
# bind 127.0.0.1
# 不用守护线程的方式启动,默认是no,如设置为yes后台守护进程,则redis启动后就马上退出!!注意此处!!!!!!!
daemonize no
# 给redis设置密码,注意密码不要让别人知道
requirepass 你的密码
# redis持久化,默认是no
appendonly yes
# 防止出现远程主机强迫关闭了一个现有的连接的错误,保持默认300即可
tcp-keepalive 300
# 设置保护模式,禁止远程访问,仅本机访问
protected-mode yes
# 修改端口号,默认6379,修改为6378
port 6378
# pidfile文档
pidfile /var/run/redis_6378.pid
# 日志文件,不要设置为`/var/log/redis/redis.log`,否则会存在日志文件不存在的异常
logfile "/data/redis.log"启动redis:
[root@hellogitlab ~]# docker run --name redis-server --restart=always -p 6378:6378 -v /dockerdata/redis/redis.conf:/etc/redis/redis.conf -v /dockerdata/redis/data:/data -d redis:latest redis-server /etc/redis/redis.conf
ecef03de2237f243d031cafae5fc4870f4dee7d33aa269038fe7f180c2dfd66d参数解释:
`docker run` 运行docker容器
`--name redis-server`  指定容器名称
`--restart=always` docker重启后,启动容器
`-p 6378:6378`  把容器内的6378端口映射到宿主机6378端口
`-v /dockerdata/redis/redis.conf:/etc/redis/redis.conf` 把主机上的redis.conf放在容器的/etc/redis/redis.conf位置
`-v /dockerdata/redis/data:/data` 把redis持久化的数据在宿主机内显示,做数据备份,也就是把redis数据存在宿主机的/dockerdata/redis/data目录下
`-d redis:latest` 在后台运行redis容器
`redis-server /etc/redis/redis.conf` 关键配置,让redis不是无配置启动,而是按照/etc/redis/redis.conf的配置启动的如果你启动过程中redis一直重启,有可能就是你的daemoniz配置成了daemonize yes,导致redis在后台运行。而docker容器必须要有一个前台进程才能留存否则容器会自动退出。
查看运行情况:
[root@hellogitlab redis]# docker ps |head -n 1; docker ps|grep redis-server
CONTAINER ID        IMAGE               COMMAND                  CREATED             STATUS              PORTS                              NAMES
ecef03de2237 redis:latest "docker-entrypoint..." 41 seconds ago Up 40 seconds 0.0.0.0:6378->6378/tcp, 6379/tcp redis-server我们在宿主机上安装一下redis工具,使用命令行连接redis容器:
[root@hellogitlab ~]# yum install redis -y
[meizhaohui@hellogitlab ~]$ redis-cli -p 6378 -a "securepassword"
127.0.0.1:6378> get a
"b"
127.0.0.1:6378> set b c
OK
127.0.0.1:6378> get b
"c"
127.0.0.1:6378>说明能够正常写入数据到redis中。
配置nextcloud的缓存,参考官方指导:
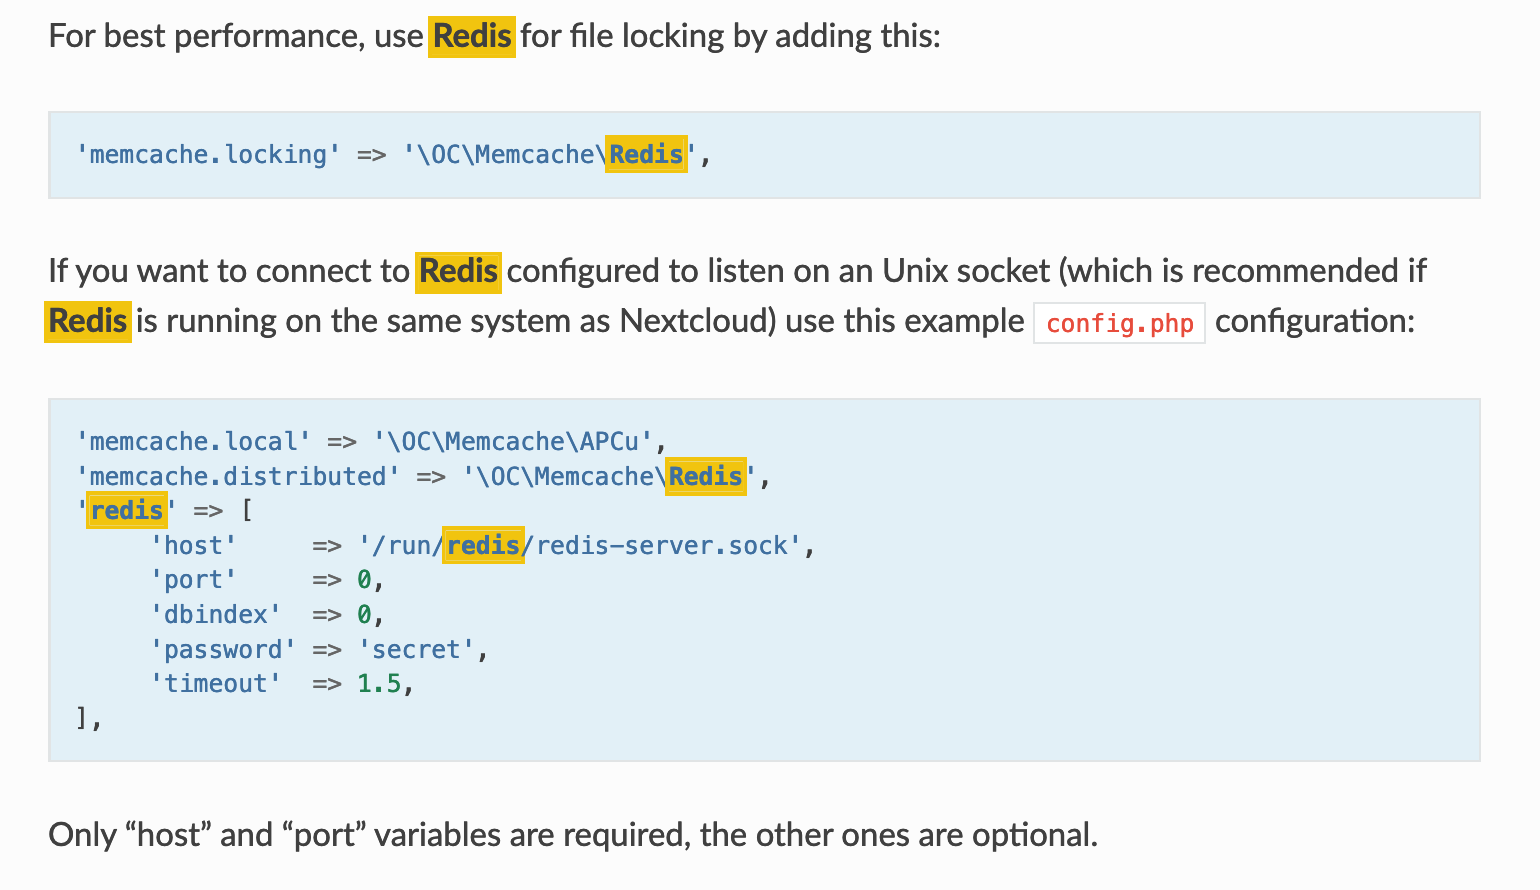
配置config.php文件:
root@89a04170593a:/var/www/html/config# head -n 12 config.php
<?php
$CONFIG = array (
  'htaccess.RewriteBase' => '/',
  'memcache.local' => '\\OC\\Memcache\\APCu',
  'memcache.distributed' => '\OC\Memcache\Redis',
  'redis' => [
     'host'     => 'hellogitlab.com',
     'port'     => 6378,
     'password' => 'securepassword',
     'timeout'  => 1.5,
  ],
  'apps_paths' =>
root@89a04170593a:/var/www/html/config#配置后重启nextcloud容器,然后打开nextcloud浏览器。
在后台检查一下redis是否增加了新的key值:
[meizhaohui@hellogitlab ~]$ redis-cli -p 6378 -a "securepassword" -h hellogitlab.com
hellogitlab.com:6378> ls
(error) ERR unknown command `ls`, with args beginning with:
hellogitlab.com:6378> get a
"b"
hellogitlab.com:6378> gets
(error) ERR unknown command `gets`, with args beginning with:
hellogitlab.com:6378> keys
(error) ERR wrong number of arguments for 'keys' command
hellogitlab.com:6378> keys *
 1) "f944948d6e25ff6be26d865176a21c4a/imagePath-ad10a4b5e8c0338e5a79b03b164af307-settings-favicon.ico"
 2) "f944948d6e25ff6be26d865176a21c4a/imagePath-ad10a4b5e8c0338e5a79b03b164af307-core-background.png"
 3) "f944948d6e25ff6be26d865176a21c4a/imagePath-ad10a4b5e8c0338e5a79b03b164af307-settings-password.svg"
 4) "f944948d6e25ff6be26d865176a21c4a/imagePath-ad10a4b5e8c0338e5a79b03b164af307-dashboard-favicon-mask.svg"
 5) "f944948d6e25ff6be26d865176a21c4a/SCSS-deps-ad10a4b5e8c0338e5a79b03b164af307notifications-0577-ad10-styles.css.deps"
 6) "f944948d6e25ff6be26d865176a21c4a/imagePath-ad10a4b5e8c0338e5a79b03b164af307-serverinfo-app-dark.svg"
 7) "b"
....省略可以看到,已经生成了非常多的缓存数据了。说明配置成功了!
可以明显感觉到网站速度变快了!
15. 配置正确的目录挂载
由于前面的操作疏忽,挂载nextcloud目录时,使用了相对路径。我们需要将nextcloud数据存放在正确位置,修改nextcloud的目录挂载属性。我们将设置本地挂载目录为/dockerdata/nextcloud/data。
首先创建本地挂载目录:
[root@hellogitlab ~]# mkdir -p /dockerdata/nextcloud/data
[root@hellogitlab ~]# ls -ld /dockerdata/nextcloud/data
drwxr-xr-x 2 root root 4096 3月 24 20:58 /dockerdata/nextcloud/data为了便于后面对json字符串进行处理,我们安装一下jq软件:
# 安装
[root@hellogitlab ~]# yum install jq -y

# 查看jq的版本信息
[root@hellogitlab ~]# jq --version
jq-1.6

# 查看jq命令行帮助信息
[root@hellogitlab ~]# jq --help
jq - commandline JSON processor [version 1.6]

Usage:	jq [options] <jq filter> [file...]
	jq [options] --args <jq filter> [strings...]
	jq [options] --jsonargs <jq filter> [JSON_TEXTS...]

jq is a tool for processing JSON inputs, applying the given filter to
its JSON text inputs and producing the filter's results as JSON on
standard output.

The simplest filter is ., which copies jq's input to its output
unmodified (except for formatting, but note that IEEE754 is used
for number representation internally, with all that that implies).

For more advanced filters see the jq(1) manpage ("man jq")
and/or https://stedolan.github.io/jq

Example:

	$ echo '{"foo": 0}' | jq .
	{
		"foo": 0
	}

Some of the options include:
  -c               compact instead of pretty-printed output;
  -n               use `null` as the single input value;
  -e               set the exit status code based on the output;
  -s               read (slurp) all inputs into an array; apply filter to it;
  -r               output raw strings, not JSON texts;
  -R               read raw strings, not JSON texts;
  -C               colorize JSON;
  -M               monochrome (don't colorize JSON);
  -S               sort keys of objects on output;
  --tab            use tabs for indentation;
  --arg a v        set variable $a to value <v>;
  --argjson a v    set variable $a to JSON value <v>;
  --slurpfile a f  set variable $a to an array of JSON texts read from <f>;
  --rawfile a f    set variable $a to a string consisting of the contents of <f>;
  --args           remaining arguments are string arguments, not files;
  --jsonargs       remaining arguments are JSON arguments, not files;
  --               terminates argument processing;

Named arguments are also available as $ARGS.named[], while
positional arguments are available as $ARGS.positional[].

See the manpage for more options.
[root@hellogitlab ~]#为了便于我们快速的docker容器运行信息,我们可以创建一个快捷命令,在~/.bashrc文件中添加以下内容:
alias dkc='docker_check'
function docker_check()
{
    container_name=$1
    docker ps|head -n 1; docker ps|grep "${container_name}"
}添加完成后,查看~/.bashrc内容:
[root@hellogitlab ~]# tail -n 6 ~/.bashrc
alias dkc='docker_check'
function docker_check()
{
    container_name=$1
    docker ps|head -n 1; docker ps|grep "${container_name}"
}使用命令source ~/.bashrc使快捷命令生效:
[root@hellogitlab ~]# source ~/.bashrc然后就可以使用快捷命令查看docker单个容器的运行信息了,如我们要查看nextcloud容器的运行情况:
[root@hellogitlab ~]# dkc nextcloud
CONTAINER ID        IMAGE               COMMAND                  CREATED             STATUS              PORTS                              NAMES
89a04170593a        nextcloud           "/entrypoint.sh ap..."   6 days ago          Up 2 days           0.0.0.0:8080->80/tcp               nextcloud
[root@hellogitlab ~]#记住上面nextcloud容器的id号89a04170593a。
为了修改nextcloud的目录挂载,现在我们先停止nextcloud容器。
[root@hellogitlab ~]# docker stop nextcloud
nextcloud我们先使用docker inspect获取容器的元数据,元数据比较多,我们使用jq命令过滤一下:
[root@hellogitlab ~]# docker inspect nextcloud|jq '.[0].Mounts'
[
  {
    "Type": "volume",
    "Name": "nextcloud",
    "Source": "/var/lib/docker/volumes/nextcloud/_data",
    "Destination": "/var/www/html",
    "Driver": "local",
    "Mode": "z",
    "RW": true,
    "Propagation": ""
  }
]
[root@hellogitlab ~]# docker inspect redis-server|jq '.[0].Mounts'
[
  {
    "Type": "bind",
    "Source": "/dockerdata/redis/redis.conf",
    "Destination": "/etc/redis/redis.conf",
    "Mode": "",
    "RW": true,
    "Propagation": "rprivate"
  },
  {
    "Type": "bind",
    "Source": "/dockerdata/redis/data",
    "Destination": "/data",
    "Mode": "",
    "RW": true,
    "Propagation": "rprivate"
  }
]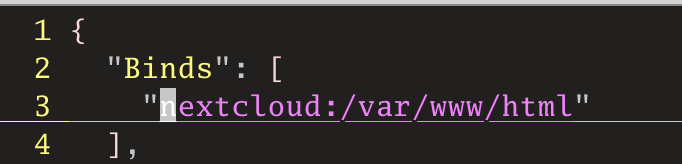
[root@hellogitlab ~]#我们同时获取了nextcloud和redis-server两个容器的挂载信息元数据,redis-server的挂载使用的绝对路径,是正确的路径,我们需要参数redis-server的数据来配置一下nextcloud的挂载信息,修改后nextcloud的挂载信息应该是这样的:
[
  {
    "Type": "bind",
    "Source": "/dockerdata/nextcloud/data",
    "Destination": "/var/www/html",
    "Mode": "",
    "RW": true,
    "Propagation": "rprivate"
  }
]我们切换的docker容器的配置目录:
[root@hellogitlab ~]# cd /var/lib/docker/containers/
[root@hellogitlab containers]# ls
27a0f23540d8e23a1b86b56465d35e60c768ac822fb95b54b527996d30658a0a  89a04170593a665f114c9a1c207d64590aea68e70cb0802783f27dd22e67c921
78b326089573d44a5f30647a16dc9e46248afc4a350cf355aa865386de6ef12b  ecef03de2237f243d031cafae5fc4870f4dee7d33aa269038fe7f180c2dfd66d
[root@hellogitlab containers]#可以看到该目录下面有多个文件夹,我们需要根据nextcloud的容器id切换到对应的目录下,前面已经确定nextcloud容器的id是89a04170593a,我们进入到文件夹名以该id信息开头的目录下:
root@hellogitlab containers]# cd 89a04170593a665f114c9a1c207d64590aea68e70cb0802783f27dd22e67c921/
[root@hellogitlab 89a04170593a665f114c9a1c207d64590aea68e70cb0802783f27dd22e67c921]# ls
checkpoints  config.v2.json  hostconfig.json  hostname  hosts  resolv.conf  resolv.conf.hash  secrets  shm
[root@hellogitlab 89a04170593a665f114c9a1c207d64590aea68e70cb0802783f27dd22e67c921]#目录下面的config.v2.json和hostconfig.json是我们需要修改的配置文件。
我们查看一下配置文件信息:
# 文件原始json数据被压缩在一起,不便于查看
[root@hellogitlab 89a04170593a665f114c9a1c207d64590aea68e70cb0802783f27dd22e67c921]# cat config.v2.json
{"StreamConfig":{},"State":{"Running":false,"Paused":false,"Restarting":false,"OOMKilled":false,"RemovalInProgress":false,"Dead":false,"Pid":0,"ExitCode":0,"Error":"","StartedAt":"2021-03-28T17:38:01.798312241Z","FinishedAt":"2021-03-30T22:50:48.452629461Z","Health":null},"ID":"89a04170593a665f114c9a1c207d64590aea68e70cb0802783f27dd22e67c921","Created":"2021-03-24T13:42:29.385396424Z","Managed":false,"Path":"/entrypoint.sh","Args":["apache2-foreground"],"Config":{"Hostname":"89a04170593a","Domainname":"","User":"","AttachStdin":false,"AttachStdout":false,"AttachStderr":false,"ExposedPorts":{"80/tcp":{}},"Tty":false,"OpenStdin":false,"StdinOnce":false,"Env":["PATH=/usr/local/sbin:/usr/local/bin:/usr/sbin:/usr/bin:/sbin:/bin","PHPIZE_DEPS=autoconf \t\tdpkg-dev \t\tfile \t\tg++ \t\tgcc \t\tlibc-dev \t\tmake \t\tpkg-config \t\tre2c","PHP_INI_DIR=/usr/local/etc/php","APACHE_CONFDIR=/etc/apache2","APACHE_ENVVARS=/etc/apache2/envvars","PHP_EXTRA_BUILD_DEPS=apache2-dev","PHP_EXTRA_CONFIGURE_ARGS=--with-apxs2 --disable-cgi","PHP_CFLAGS=-fstack-protector-strong -fpic -fpie -O2 -D_LARGEFILE_SOURCE -D_FILE_OFFSET_BITS=64","PHP_CPPFLAGS=-fstack-protector-strong -fpic -fpie -O2 -D_LARGEFILE_SOURCE -D_FILE_OFFSET_BITS=64","PHP_LDFLAGS=-Wl,-O1 -pie","GPG_KEYS=42670A7FE4D0441C8E4632349E4FDC074A4EF02D 5A52880781F755608BF815FC910DEB46F53EA312","PHP_VERSION=7.4.14","PHP_URL=https://www.php.net/distributions/php-7.4.14.tar.xz","PHP_ASC_URL=https://www.php.net/distributions/php-7.4.14.tar.xz.asc","PHP_SHA256=f9f3c37969fcd9006c1dbb1dd76ab53f28c698a1646fa2dde8547c3f45e02886","NEXTCLOUD_VERSION=20.0.5"],"Cmd":["apache2-foreground"],"Image":"nextcloud","Volumes":{"/var/www/html":{}},"WorkingDir":"/var/www/html","Entrypoint":["/entrypoint.sh"],"OnBuild":null,"Labels":{},"StopSignal":"SIGWINCH"},"Image":"sha256:8bb5955fb2f762817cbbcfa1dc7fb3bf5c4c3e6c215d136bdbd32c80c53afe8f","NetworkSettings":{"Bridge":"","SandboxID":"394abfb03ed8f79ffbe2205531e5ec16beafbf2cf6425bce56f4fa6f5036832a","HairpinMode":false,"LinkLocalIPv6Address":"","LinkLocalIPv6PrefixLen":0,"Networks":{"bridge":{"IPAMConfig":null,"Links":null,"Aliases":null,"NetworkID":"f563f8bf0b491badc16657015c62f8475397737843ce5478823ec50aafe2acfc","EndpointID":"","Gateway":"","IPAddress":"","IPPrefixLen":0,"IPv6Gateway":"","GlobalIPv6Address":"","GlobalIPv6PrefixLen":0,"MacAddress":"","IPAMOperational":false}},"Service":null,"Ports":null,"SandboxKey":"/var/run/docker/netns/394abfb03ed8","SecondaryIPAddresses":null,"SecondaryIPv6Addresses":null,"IsAnonymousEndpoint":false,"HasSwarmEndpoint":false},"LogPath":"","Name":"/nextcloud","Driver":"overlay2","MountLabel":"","ProcessLabel":"","RestartCount":0,"HasBeenStartedBefore":true,"HasBeenManuallyStopped":true,"MountPoints":{"/var/www/html":{"Source":"/var/lib/docker/volumes/nextcloud/_data","Destination":"/var/www/html","RW":true,"Name":"nextcloud","Driver":"local","Type":"volume","Relabel":"z","Spec":{"Type":"volume","Source":"nextcloud","Target":"/var/www/html"}}},"SecretReferences":null,"AppArmorProfile":"","HostnamePath":"/var/lib/docker/containers/89a04170593a665f114c9a1c207d64590aea68e70cb0802783f27dd22e67c921/hostname","HostsPath":"/var/lib/docker/containers/89a04170593a665f114c9a1c207d64590aea68e70cb0802783f27dd22e67c921/hosts","ShmPath":"/var/lib/docker/containers/89a04170593a665f114c9a1c207d64590aea68e70cb0802783f27dd22e67c921/shm","ResolvConfPath":"/var/lib/docker/containers/89a04170593a665f114c9a1c207d64590aea68e70cb0802783f27dd22e67c921/resolv.conf","SeccompProfile":"","NoNewPrivileges":false}
# 我们使用jq美化打印输出一下
[root@hellogitlab 89a04170593a665f114c9a1c207d64590aea68e70cb0802783f27dd22e67c921]# cat config.v2.json |jq
{
"StreamConfig": {},
"State": {
"Running": false,
"Paused": false,
"Restarting": false,
"OOMKilled": false,
"RemovalInProgress": false,
"Dead": false,
"Pid": 0,
"ExitCode": 0,
"Error": "",
"StartedAt": "2021-03-28T17:38:01.798312241Z",
"FinishedAt": "2021-03-30T22:50:48.452629461Z",
"Health": null
},
"ID": "89a04170593a665f114c9a1c207d64590aea68e70cb0802783f27dd22e67c921",
"Created": "2021-03-24T13:42:29.385396424Z",
"Managed": false,
"Path": "/entrypoint.sh",
"Args": [
"apache2-foreground"
],
"Config": {
"Hostname": "89a04170593a",
"Domainname": "",
"User": "",
"AttachStdin": false,
"AttachStdout": false,
"AttachStderr": false,
"ExposedPorts": {
"80/tcp": {}
},
"Tty": false,
"OpenStdin": false,
"StdinOnce": false,
"Env": [
"PATH=/usr/local/sbin:/usr/local/bin:/usr/sbin:/usr/bin:/sbin:/bin",
"PHPIZE_DEPS=autoconf \t\tdpkg-dev \t\tfile \t\tg++ \t\tgcc \t\tlibc-dev \t\tmake \t\tpkg-config \t\tre2c",
"PHP_INI_DIR=/usr/local/etc/php",
"APACHE_CONFDIR=/etc/apache2",
"APACHE_ENVVARS=/etc/apache2/envvars",
"PHP_EXTRA_BUILD_DEPS=apache2-dev",
"PHP_EXTRA_CONFIGURE_ARGS=--with-apxs2 --disable-cgi",
"PHP_CFLAGS=-fstack-protector-strong -fpic -fpie -O2 -D_LARGEFILE_SOURCE -D_FILE_OFFSET_BITS=64",
"PHP_CPPFLAGS=-fstack-protector-strong -fpic -fpie -O2 -D_LARGEFILE_SOURCE -D_FILE_OFFSET_BITS=64",
"PHP_LDFLAGS=-Wl,-O1 -pie",
"GPG_KEYS=42670A7FE4D0441C8E4632349E4FDC074A4EF02D 5A52880781F755608BF815FC910DEB46F53EA312",
"PHP_VERSION=7.4.14",
"PHP_URL=https://www.php.net/distributions/php-7.4.14.tar.xz",
"PHP_ASC_URL=https://www.php.net/distributions/php-7.4.14.tar.xz.asc",
"PHP_SHA256=f9f3c37969fcd9006c1dbb1dd76ab53f28c698a1646fa2dde8547c3f45e02886",
"NEXTCLOUD_VERSION=20.0.5"
],
"Cmd": [
"apache2-foreground"
],
"Image": "nextcloud",
"Volumes": {
"/var/www/html": {}
},
"WorkingDir": "/var/www/html",
"Entrypoint": [
"/entrypoint.sh"
],
"OnBuild": null,
"Labels": {},
"StopSignal": "SIGWINCH"
},
"Image": "sha256:8bb5955fb2f762817cbbcfa1dc7fb3bf5c4c3e6c215d136bdbd32c80c53afe8f",
"NetworkSettings": {
"Bridge": "",
"SandboxID": "394abfb03ed8f79ffbe2205531e5ec16beafbf2cf6425bce56f4fa6f5036832a",
"HairpinMode": false,
"LinkLocalIPv6Address": "",
"LinkLocalIPv6PrefixLen": 0,
"Networks": {
"bridge": {
"IPAMConfig": null,
"Links": null,
"Aliases": null,
"NetworkID": "f563f8bf0b491badc16657015c62f8475397737843ce5478823ec50aafe2acfc",
"EndpointID": "",
"Gateway": "",
"IPAddress": "",
"IPPrefixLen": 0,
"IPv6Gateway": "",
"GlobalIPv6Address": "",
"GlobalIPv6PrefixLen": 0,
"MacAddress": "",
"IPAMOperational": false
}
},
"Service": null,
"Ports": null,
"SandboxKey": "/var/run/docker/netns/394abfb03ed8",
"SecondaryIPAddresses": null,
"SecondaryIPv6Addresses": null,
"IsAnonymousEndpoint": false,
"HasSwarmEndpoint": false
},
"LogPath": "",
"Name": "/nextcloud",
"Driver": "overlay2",
"MountLabel": "",
"ProcessLabel": "",
"RestartCount": 0,
"HasBeenStartedBefore": true,
"HasBeenManuallyStopped": true,
"MountPoints": {
"/var/www/html": {
"Source": "/var/lib/docker/volumes/nextcloud/_data",
"Destination": "/var/www/html",
"RW": true,
"Name": "nextcloud",
"Driver": "local",
"Type": "volume",
"Relabel": "z",
"Spec": {
"Type": "volume",
"Source": "nextcloud",
"Target": "/var/www/html"
}
}
},
"SecretReferences": null,
"AppArmorProfile": "",
"HostnamePath": "/var/lib/docker/containers/89a04170593a665f114c9a1c207d64590aea68e70cb0802783f27dd22e67c921/hostname",
"HostsPath": "/var/lib/docker/containers/89a04170593a665f114c9a1c207d64590aea68e70cb0802783f27dd22e67c921/hosts",
"ShmPath": "/var/lib/docker/containers/89a04170593a665f114c9a1c207d64590aea68e70cb0802783f27dd22e67c921/shm",
"ResolvConfPath": "/var/lib/docker/containers/89a04170593a665f114c9a1c207d64590aea68e70cb0802783f27dd22e67c921/resolv.conf",
"SeccompProfile": "",
"NoNewPrivileges": false
}
# 同样查看一下hostconfig.json信息
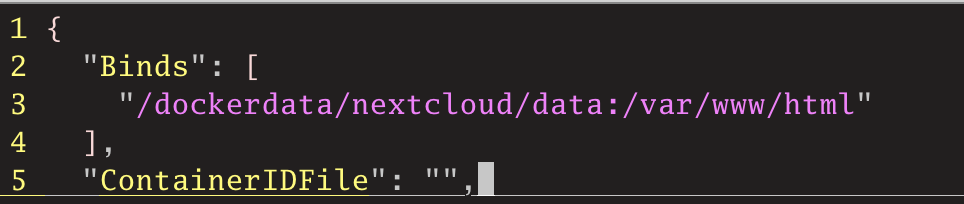
[root@hellogitlab 89a04170593a665f114c9a1c207d64590aea68e70cb0802783f27dd22e67c921]# cat hostconfig.json
{"Binds":["nextcloud:/var/www/html"],"ContainerIDFile":"","LogConfig":{"Type":"journald","Config":{}},"NetworkMode":"default","PortBindings":{"80/tcp":[{"HostIp":"","HostPort":"8080"}]},"RestartPolicy":{"Name":"no","MaximumRetryCount":0},"AutoRemove":false,"VolumeDriver":"","VolumesFrom":null,"CapAdd":null,"CapDrop":null,"Dns":[],"DnsOptions":[],"DnsSearch":[],"ExtraHosts":null,"GroupAdd":null,"IpcMode":"","Cgroup":"","Links":[],"OomScoreAdj":0,"PidMode":"","Privileged":false,"PublishAllPorts":false,"ReadonlyRootfs":false,"SecurityOpt":null,"UTSMode":"","UsernsMode":"","ShmSize":67108864,"Runtime":"docker-runc","ConsoleSize":[0,0],"Isolation":"","CpuShares":0,"Memory":0,"NanoCpus":0,"CgroupParent":"","BlkioWeight":0,"BlkioWeightDevice":null,"BlkioDeviceReadBps":null,"BlkioDeviceWriteBps":null,"BlkioDeviceReadIOps":null,"BlkioDeviceWriteIOps":null,"CpuPeriod":0,"CpuQuota":0,"CpuRealtimePeriod":0,"CpuRealtimeRuntime":0,"CpusetCpus":"","CpusetMems":"","Devices":[],"DiskQuota":0,"KernelMemory":0,"MemoryReservation":0,"MemorySwap":0,"MemorySwappiness":-1,"OomKillDisable":false,"PidsLimit":0,"Ulimits":null,"CpuCount":0,"CpuPercent":0,"IOMaximumIOps":0,"IOMaximumBandwidth":0}
[root@hellogitlab 89a04170593a665f114c9a1c207d64590aea68e70cb0802783f27dd22e67c921]# cat hostconfig.json |jq
{
"Binds": [
"nextcloud:/var/www/html"
],
"ContainerIDFile": "",
"LogConfig": {
"Type": "journald",
"Config": {}
},
"NetworkMode": "default",
"PortBindings": {
"80/tcp": [
{
"HostIp": "",
"HostPort": "8080"
}
]
},
"RestartPolicy": {
"Name": "no",
"MaximumRetryCount": 0
},
"AutoRemove": false,
"VolumeDriver": "",
"VolumesFrom": null,
"CapAdd": null,
"CapDrop": null,
"Dns": [],
"DnsOptions": [],
"DnsSearch": [],
"ExtraHosts": null,
"GroupAdd": null,
"IpcMode": "",
"Cgroup": "",
"Links": [],
"OomScoreAdj": 0,
"PidMode": "",
"Privileged": false,
"PublishAllPorts": false,
"ReadonlyRootfs": false,
"SecurityOpt": null,
"UTSMode": "",
"UsernsMode": "",
"ShmSize": 67108864,
"Runtime": "docker-runc",
"ConsoleSize": [
0,
0
],
"Isolation": "",
"CpuShares": 0,
"Memory": 0,
"NanoCpus": 0,
"CgroupParent": "",
"BlkioWeight": 0,
"BlkioWeightDevice": null,
"BlkioDeviceReadBps": null,
"BlkioDeviceWriteBps": null,
"BlkioDeviceReadIOps": null,
"BlkioDeviceWriteIOps": null,
"CpuPeriod": 0,
"CpuQuota": 0,
"CpuRealtimePeriod": 0,
"CpuRealtimeRuntime": 0,
"CpusetCpus": "",
"CpusetMems": "",
"Devices": [],
"DiskQuota": 0,
"KernelMemory": 0,
"MemoryReservation": 0,
"MemorySwap": 0,
"MemorySwappiness": -1,
"OomKillDisable": false,
"PidsLimit": 0,
"Ulimits": null,
"CpuCount": 0,
"CpuPercent": 0,
"IOMaximumIOps": 0,
"IOMaximumBandwidth": 0
}作为对照,我们看一下redis-server配置文件信息,此处只列出我们关心的内容:
[root@hellogitlab 89a04170593a665f114c9a1c207d64590aea68e70cb0802783f27dd22e67c921]# cat ../ecef03de2237f243d031cafae5fc4870f4dee7d33aa269038fe7f180c2dfd66d/config.v2.json |jq '.MountPoints'
{
  "/data": {
    "Source": "/dockerdata/redis/data",
    "Destination": "/data",
    "RW": true,
    "Name": "",
    "Driver": "",
    "Type": "bind",
    "Propagation": "rprivate",
    "Spec": {
      "Type": "bind",
      "Source": "/dockerdata/redis/data",
      "Target": "/data"
    }
  },
  "/etc/redis/redis.conf": {
    "Source": "/dockerdata/redis/redis.conf",
    "Destination": "/etc/redis/redis.conf",
    "RW": true,
    "Name": "",
    "Driver": "",
    "Type": "bind",
    "Propagation": "rprivate",
    "Spec": {
      "Type": "bind",
      "Source": "/dockerdata/redis/redis.conf",
      "Target": "/etc/redis/redis.conf"
    }
  }
}

[root@hellogitlab 89a04170593a665f114c9a1c207d64590aea68e70cb0802783f27dd22e67c921]# cat ../ecef03de2237f243d031cafae5fc4870f4dee7d33aa269038fe7f180c2dfd66d/hostconfig.json|jq '.Binds'
[
  "/dockerdata/redis/redis.conf:/etc/redis/redis.conf",
  "/dockerdata/redis/data:/data"
]为了便于修改,我们使用jq命令将美化的数据写入到临时文件中,然后再在临时文件中进行修改,修改完成后再写入到正式配置文件中。
# 备份原始配置文件
[root@hellogitlab 89a04170593a665f114c9a1c207d64590aea68e70cb0802783f27dd22e67c921]# cp config.v2.json config.v2.json.bak
[root@hellogitlab 89a04170593a665f114c9a1c207d64590aea68e70cb0802783f27dd22e67c921]# cp hostconfig.json hostconfig.json.bak

# 将美化后的数据写入到临时文件中
[root@hellogitlab 89a04170593a665f114c9a1c207d64590aea68e70cb0802783f27dd22e67c921]# cat config.v2.json|jq > new_config.v2.json
[root@hellogitlab 89a04170593a665f114c9a1c207d64590aea68e70cb0802783f27dd22e67c921]# cat hostconfig.json|jq > new_hostconfig.json
[root@hellogitlab 89a04170593a665f114c9a1c207d64590aea68e70cb0802783f27dd22e67c921]#我们参考redis-server的数据对nextcloud容器的配置文件进行修改,我们在临时文件中进行修改。
修改前,new_config.v2.json关于挂载点的信息:

我们使用vim进行修改,修改后挂载点的信息如下:

然后我们生成压缩后的配置写入到正式文件:
[root@hellogitlab 89a04170593a665f114c9a1c207d64590aea68e70cb0802783f27dd22e67c921]# cat new_config.v2.json |jq -c > config.v2.json
[root@hellogitlab 89a04170593a665f114c9a1c207d64590aea68e70cb0802783f27dd22e67c921]#同样修改一下hostconfig.json文件,这个只需要Bind处:
修改前:
修改后:
然后我们生成压缩后的配置写入到正式文件:
[root@hellogitlab 89a04170593a665f114c9a1c207d64590aea68e70cb0802783f27dd22e67c921]# cat new_hostconfig.json |jq -c > hostconfig.json
[root@hellogitlab 89a04170593a665f114c9a1c207d64590aea68e70cb0802783f27dd22e67c921]#重启docker服务,并启动nextcloud容器:
# 重启docker服务
[root@hellogitlab ~]# systemctl restart docker
[root@hellogitlab ~]# systemctl status docker|head -n 3
● docker.service - Docker Application Container Engine
   Loaded: loaded (/usr/lib/systemd/system/docker.service; disabled; vendor preset: disabled)
   Active: active (running) since 三 2021-03-31 07:42:01 CST; 37s ago
[root@hellogitlab ~]#


# 启动nextcloud容器
[root@hellogitlab ~]# docker start nextcloud
nextcloud
[root@hellogitlab ~]# dkc nextcloud
CONTAINER ID        IMAGE               COMMAND                  CREATED             STATUS              PORTS                              NAMES
89a04170593a        nextcloud           "/entrypoint.sh ap..."   6 days ago          Up 9 seconds        0.0.0.0:8080->80/tcp               nextcloud
[root@hellogitlab ~]#查看一下nextcloud的挂载点元数据信息:
[root@hellogitlab ~]# docker inspect nextcloud |jq '.[].Mounts'
[
  {
    "Type": "bind",
    "Source": "/dockerdata/nextcloud/data",
    "Destination": "/var/www/html",
    "Mode": "",
    "RW": true,
    "Propagation": "rprivate"
  }
]
[root@hellogitlab ~]#可以看到,与预期的结果一样,说明配置正确!
然后看一下,本地挂载点目录数据是否有了:
[root@hellogitlab ~]# ls -lah /dockerdata/nextcloud/data/
总用量 168K
drwxr-xr-x 14   33 root 4.0K 3月  31 07:43 .
drwxr-xr-x  3 root root 4.0K 3月  31 07:01 ..
drwxr-xr-x 41   33 root 4.0K 3月  31 07:43 3rdparty
drwxr-xr-x 47   33 root 4.0K 3月  31 07:43 apps
-rw-r--r--  1   33 root  17K 3月  31 07:43 AUTHORS
drwxr-xr-x  2   33 root 4.0K 3月  31 07:44 config
-rw-r--r--  1   33 root 3.9K 3月  31 07:43 console.php
-rw-r--r--  1   33 root  34K 3月  31 07:43 COPYING
drwxr-xr-x 22   33 root 4.0K 3月  31 07:43 core
-rw-r--r--  1   33 root 5.0K 3月  31 07:43 cron.php
drwxr-xr-x  2   33 root 4.0K 3月  31 07:43 custom_apps
drwxr-xr-x  2   33 root 4.0K 3月  31 07:48 data
-rw-r--r--  1   33 root 3.0K 3月  31 07:43 .htaccess
-rw-r--r--  1   33 root  156 3月  31 07:43 index.html
-rw-r--r--  1   33 root 2.9K 3月  31 07:43 index.php
drwxr-xr-x  6   33 root 4.0K 3月  31 07:43 lib
-rwxr-xr-x  1   33 root  283 3月  31 07:43 occ
drwxr-xr-x  2   33 root 4.0K 3月  31 07:43 ocm-provider
drwxr-xr-x  2   33 root 4.0K 3月  31 07:43 ocs
drwxr-xr-x  2   33 root 4.0K 3月  31 07:43 ocs-provider
-rw-r--r--  1   33 root 3.1K 3月  31 07:43 public.php
-rw-r--r--  1   33 root 5.3K 3月  31 07:43 remote.php
drwxr-xr-x  4   33 root 4.0K 3月  31 07:43 resources
-rw-r--r--  1   33 root   26 3月  31 07:43 robots.txt
-rw-r--r--  1   33 root 2.4K 3月  31 07:43 status.php
drwxr-xr-x  3   33 root 4.0K 3月  31 07:43 themes
-rw-r--r--  1   33 root  101 3月  31 07:43 .user.ini
-rw-r--r--  1   33 root  382 3月  31 07:43 version.php
[root@hellogitlab ~]#这样可以看到,数据已经挂载过来了。说明配置正确。
| 此处需要注意的是,虽然重新挂载了,但原来设置的应用、以及上传的数据都不存在了,所以在初次挂载时,需要特别注意,路径使用绝对路径!!! |
16. 创建postgresql数据库
此处不详细介绍,请参考我的另一章文章 docker配置postgresql数据库
在其中创建了nextcloud数据库,用户ncadmin,将授予ncadmin对数据库nextcloud的管理权限。
17. 数据迁移(!迁移失败!)
官方文档 Converting database typehttps://docs.nextcloud.com/server/20/admin_manual/configuration_database/db_conversion.html 提到可以将SQLite数据库转换成性能更好的MySQL, MariaDB or PostgreSQL数据库,考虑到后期我需要搭建本地的GitLab私有仓库,而GitLab后台也是用的PostgreSQL,因此我将nextcloud的数据迁移到PostgreSQL数据库中。
最好的方式是在开始运行容器时,增加--link postgres-server:pg方式连接到postges-server容器。
我们尝试转换一下,看看行不行。
docker exec --user www-data nextcloud php occ db:convert-type --port="5432" --password="password" --clear-schema --all-apps pgsql username hostname database


docker exec --user www-data nextcloud php occ db:convert-type --port="5432" --password="securepasswd" --clear-schema --all-apps pgsql ncadmin hellogitlab.com nextcloud执行发现转换失败:

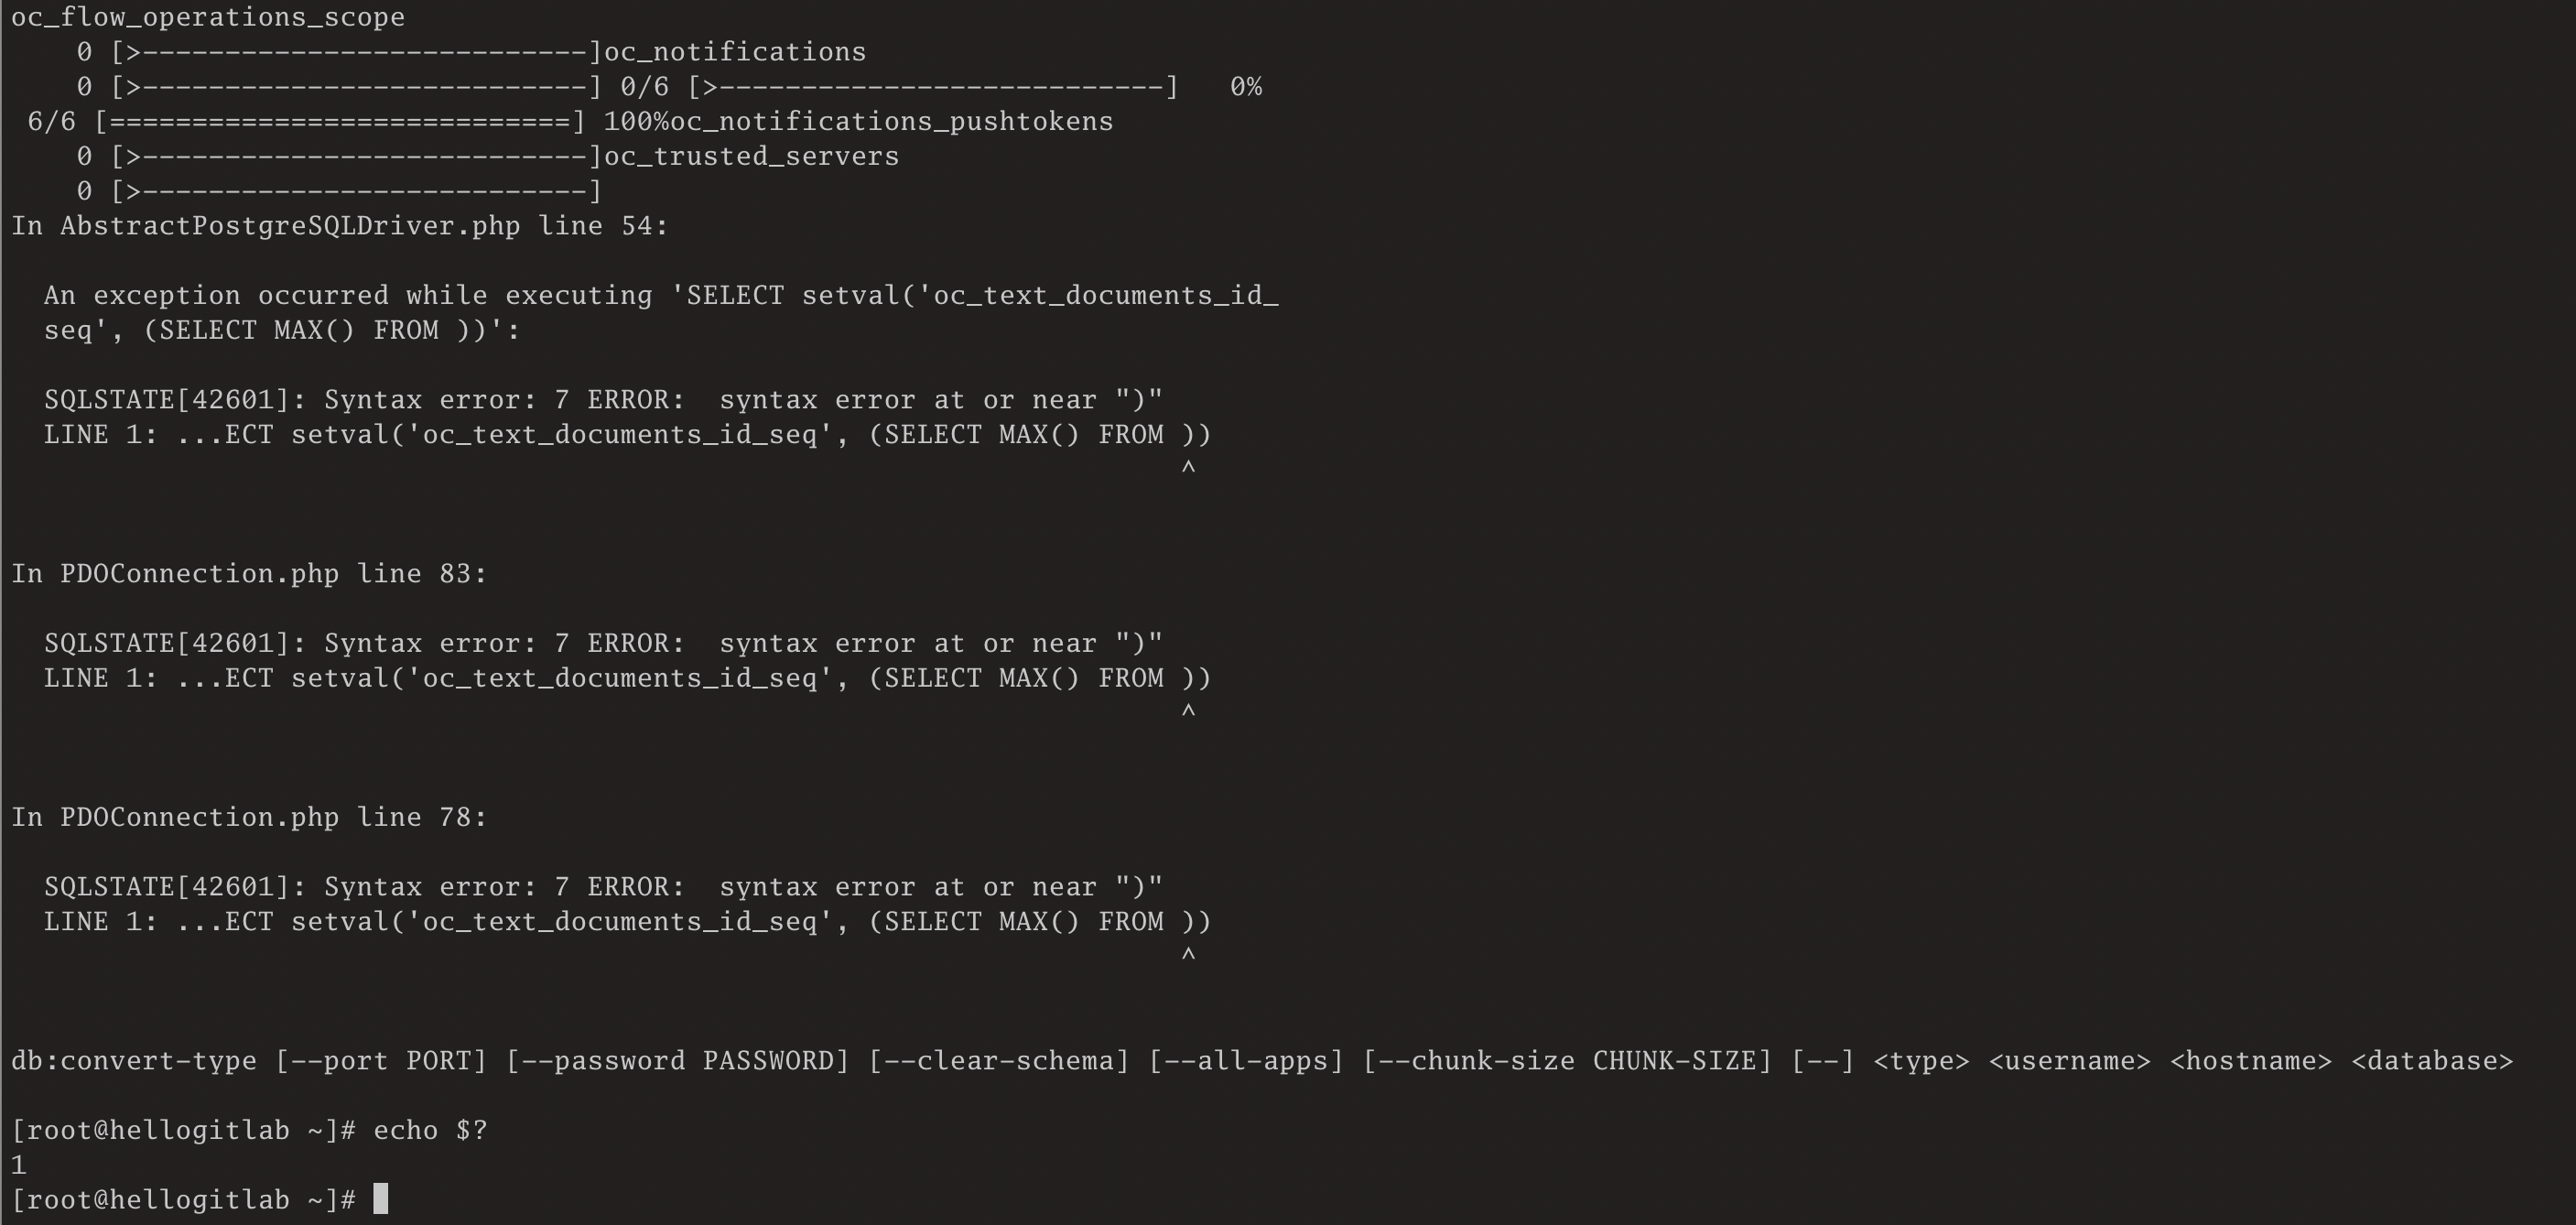
报以下异常:
In AbstractPostgreSQLDriver.php line 54:

  An exception occurred while executing 'SELECT setval('oc_text_documents_id_
  seq', (SELECT MAX() FROM ))':

  SQLSTATE[42601]: Syntax error: 7 ERROR:  syntax error at or near ")"
  LINE 1: ...ECT setval('oc_text_documents_id_seq', (SELECT MAX() FROM ))
                                                                       ^


In PDOConnection.php line 83:

  SQLSTATE[42601]: Syntax error: 7 ERROR:  syntax error at or near ")"
  LINE 1: ...ECT setval('oc_text_documents_id_seq', (SELECT MAX() FROM ))
                                                                       ^


In PDOConnection.php line 78:

  SQLSTATE[42601]: Syntax error: 7 ERROR:  syntax error at or near ")"
  LINE 1: ...ECT setval('oc_text_documents_id_seq', (SELECT MAX() FROM ))
                                                                       ^


db:convert-type [--port PORT] [--password PASSWORD] [--clear-schema] [--all-apps] [--chunk-size CHUNK-SIZE] [--] <type> <username> <hostname> <database>参考:Syntax Error on db:convert-type when converting any DB to ->PostgreSQL | NC 20
说是要禁用 text应用,并删除-app-apps`参数。
我们在已启用的应用管理界面禁用text应用,并将--all-apps参数去掉后,再尝试一次。执行命令docker exec --user www-data nextcloud php occ db:convert-type --port="5432" --password="securepasswd" --clear-schema pgsql ncadmin hellogitlab.com nextcloud。
[root@hellogitlab ~]# docker exec --user www-data nextcloud php occ db:convert-type --port="5432" --password="securepasswd" --clear-schema pgsql ncadmin hellogitlab.com nextcloud
Clearing schema in new database
Creating schema in new database
The following tables will not be converted:
oc_text_documents
oc_text_sessions
oc_text_steps
Please note that tables belonging to available but currently not installed apps
can be included by specifying the --all-apps option.
Continue with the conversion (y/n)? [n] y # <---------备注,此处提示时,输入y确认,确认后需要等待系统处理,需要几分钟等了好久没有反应,按Ctrl + C终止程序,放弃此方法!
数据迁移失败!!!
因此,我计划重新运行容器,~~并在容器运行命令中加上数据库--link参数,~~然后再重新配置nextcloud环境。
| 此处需要注意的是,“docker link 过时不再用了?那容器互联、服务发现怎么办"一文中不建议使用`--link`参数,而使用`--network`参数,暂时不会,忽略此方法! |
我们直接通过配置环境变量来连接数据库。
18. 通过配置环境变量文件来运行nextcloud
在dockerhub nextcloud官方镜像中,提到我们可以通过配置环境变量来自动配置nextcloud。
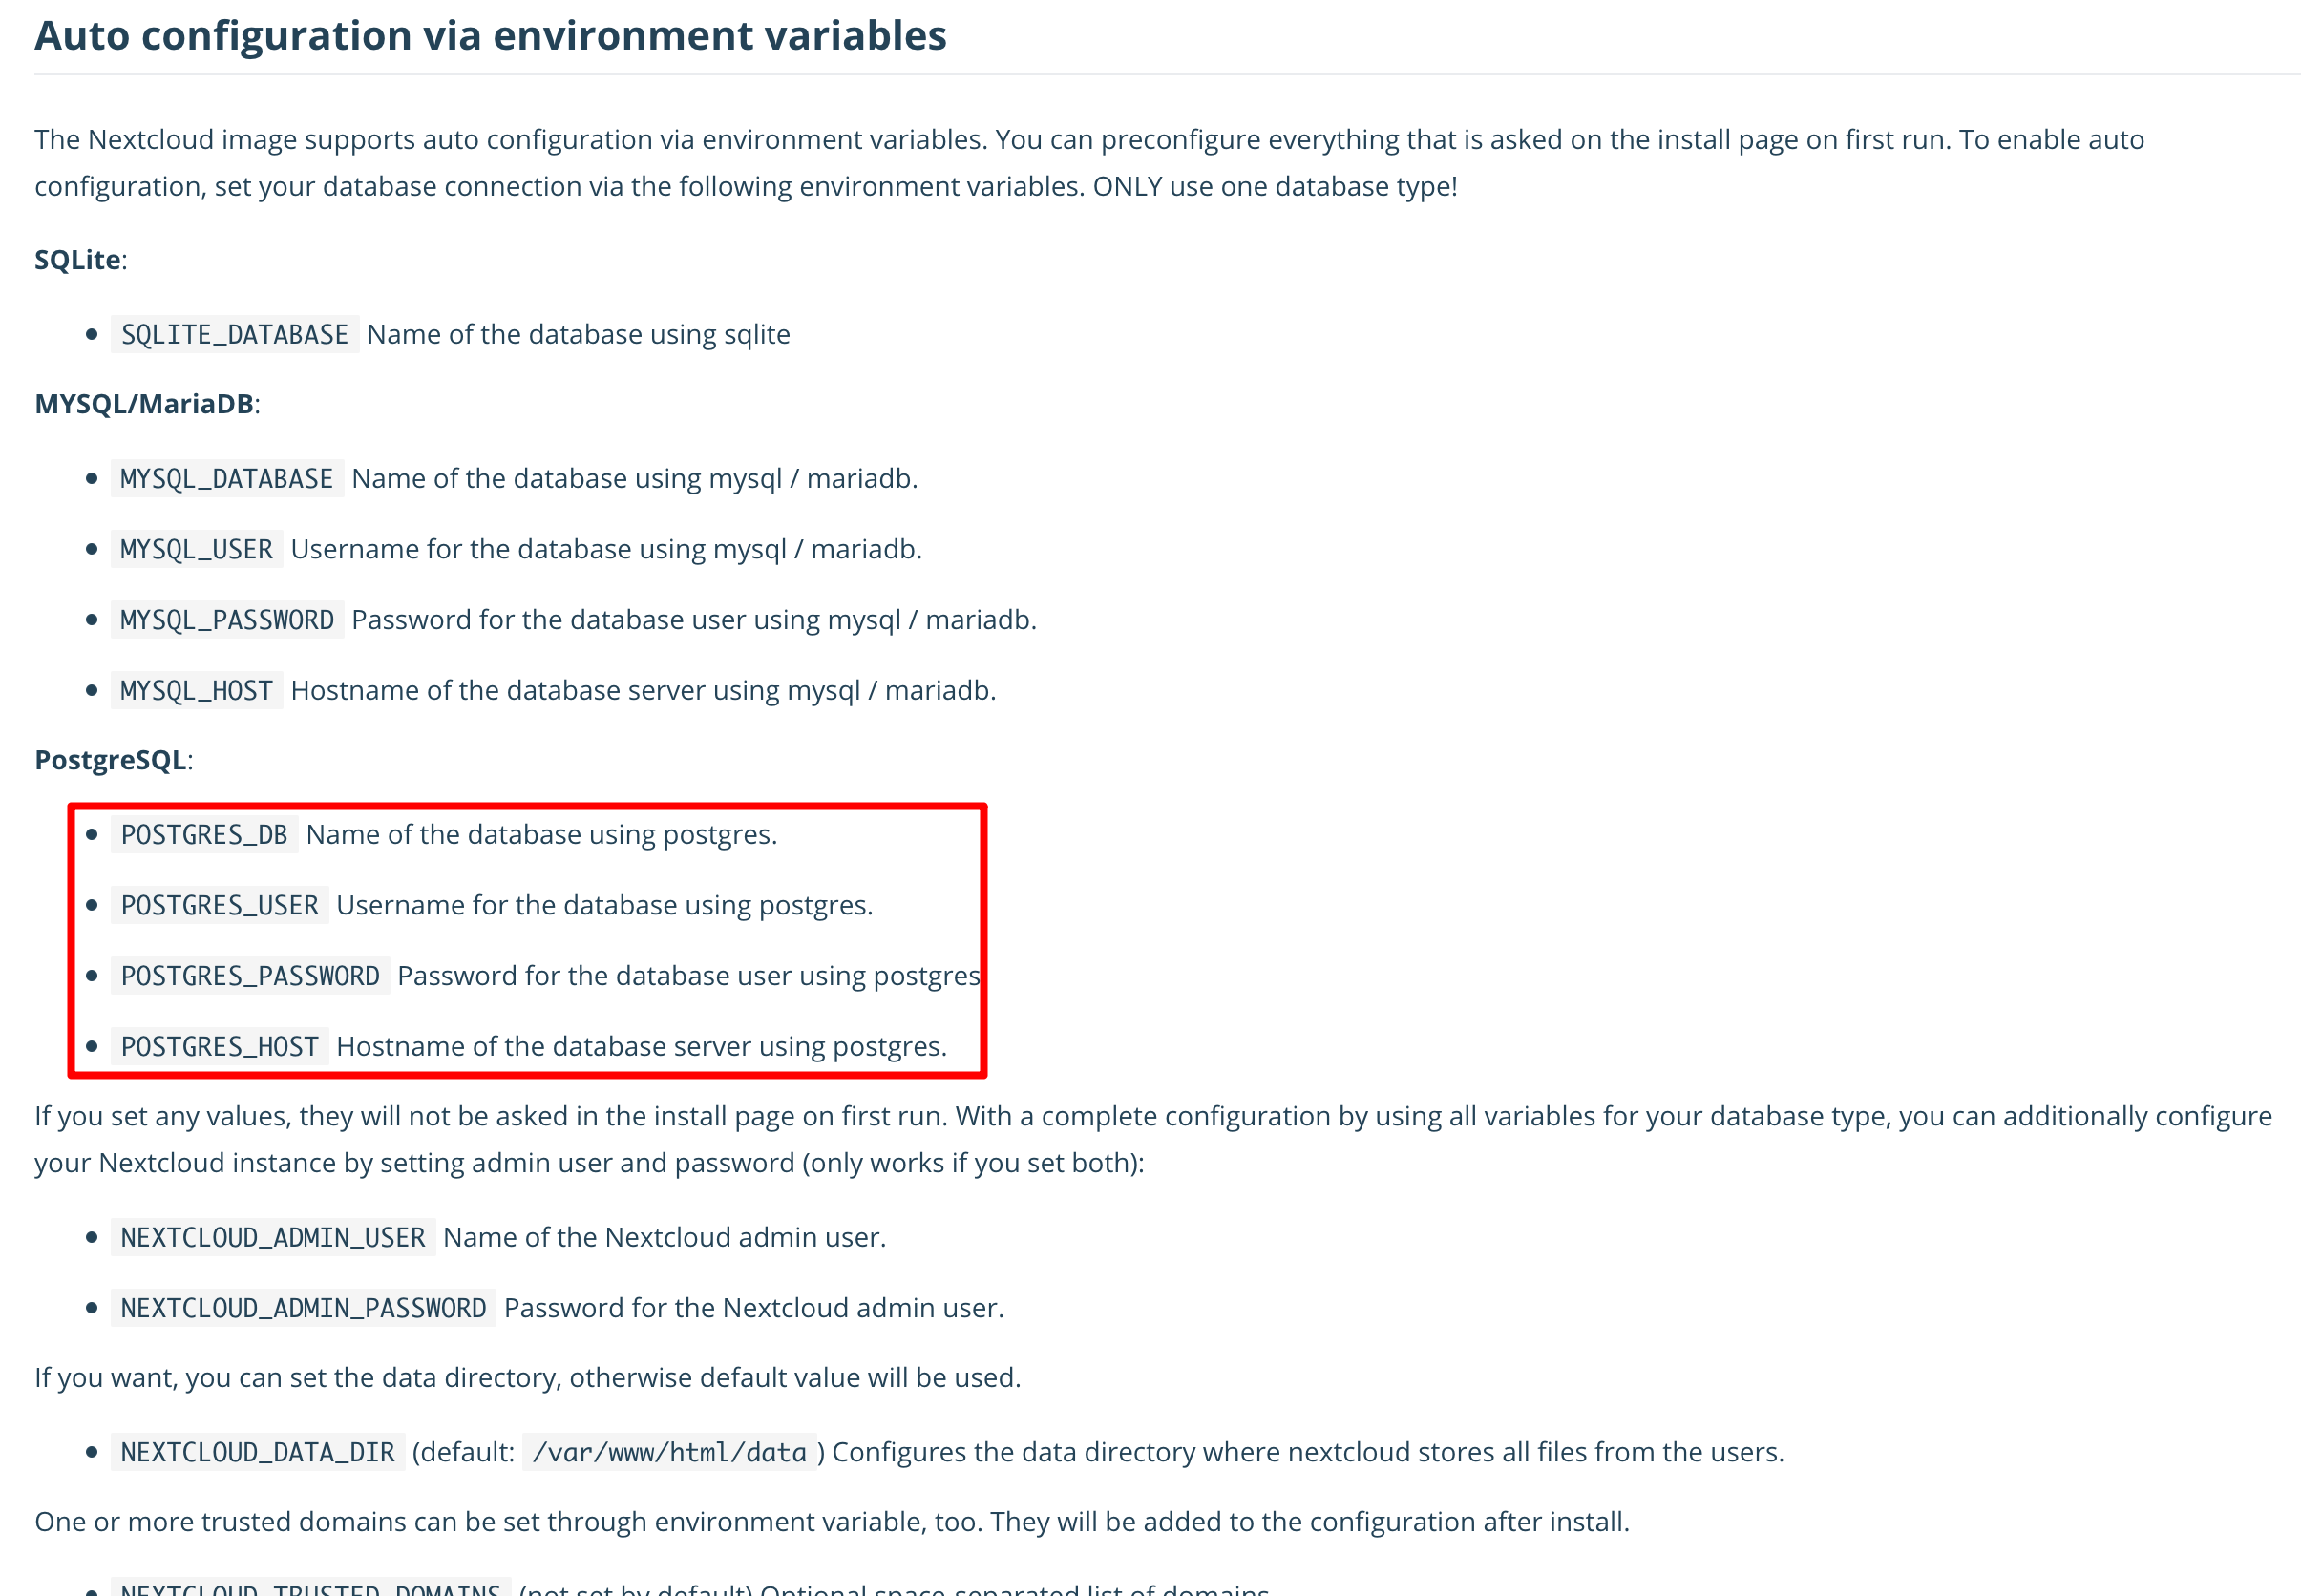
如前面我们测试的,我们需要使用Redis作缓存、postgresql作数据库、SMTP外部邮箱配置,另外,可以在在环境变量中配置nextcloud的管理员账号和密码。
我们列一下:
# 1. postgresql数据库相关
# 数据库名
POSTGRES_DB
# 数据库主机名
POSTGRES_HOST
# 用户名
POSTGRES_USER
# 登陆数据库使用的密码
POSTGRES_PASSWORD

# 2. Redis缓存相关
# 缓存主机
REDIS_HOST
# Redis端口号
REDIS_HOST_PORT
# Redis密码
REDIS_HOST_PASSWORD

# 3.外部邮箱
# SMTP服务器地址
SMTP_HOST
# SMTP安全类型
SMTP_SECURE
# SMTP端口号
SMTP_PORT
# SMTP认证类型
SMTP_AUTHTYPE
# SMTP认证用户名
SMTP_NAME
# SMTP认证用户密码
SMTP_PASSWORD
# 邮件from地址设置
MAIL_FROM_ADDRESS

# 4. nextcloud设置
# nextcloud管理员用户名
NEXTCLOUD_ADMIN_USER
# nextcloud管理员密码
NEXTCLOUD_ADMIN_PASSWORD
# 可信域名
NEXTCLOUD_TRUSTED_DOMAINS这些变量差不多覆盖了我们需要设置的内容。
我们尝试写一个配置文件.nextcloud.env,并运行centos容器,打印出环境变量;
# 查看配置文件
[root@hellogitlab ~]# cat .nextcloud.env
#1.postgresql数据库相关
#数据库名
POSTGRES_DB=nextcloud
#数据库主机名
POSTGRES_HOST=hellogitlab.com
#用户名
POSTGRES_USER=ncadmin
#登陆数据库使用的密码
POSTGRES_PASSWORD=password

#2.Redis缓存相关
#缓存主机
REDIS_HOST=hellogitlab.com
#Redis端口号
REDIS_HOST_PORT=6378
#Redis密码
REDIS_HOST_PASSWORD=password

[root@hellogitlab ~]#
# 通过运行centos容器命令查看环境变量
[root@hellogitlab ~]# docker run --env-file=.nextcloud.env centos env
PATH=/usr/local/sbin:/usr/local/bin:/usr/sbin:/usr/bin:/sbin:/bin
HOSTNAME=96772aeee751
POSTGRES_DB=nextcloud
POSTGRES_HOST=hellogitlab.com
POSTGRES_USER=ncadmin
POSTGRES_PASSWORD=password
REDIS_HOST=hellogitlab.com
REDIS_HOST_PORT=6378
REDIS_HOST_PASSWORD=password
HOME=/root
[root@hellogitlab nextcloud]#可以看到能够正常获取环境变量。
相应的,我们也可以通过这种方式为nextcloud提供环境变量。
我们先进入到Postgresql中删除之前迁移失败时生成的nextcloud数据表,并重新授权。
删除数据库:
[root@hellogitlab ~]# psql -Uadmin -dtestdb -h localhost
用户 admin 的口令:
psql (9.2.24, 服务器 13.1 (Debian 13.1-1.pgdg100+1))
警告:psql 版本9.2, 服务器版本13.0.
一些psql功能可能无法工作.
输入 "help" 来获取帮助信息.

testdb=#
testdb=# DROP DATABASE nextcloud;
DROP DATABASE再重新创建数据库,并授权:
# 创建数据库
testdb=# CREATE DATABASE nextcloud;
CREATE DATABASE

# 授权
testdb=# GRANT ALL PRIVILEGES ON DATABASE nextcloud TO ncadmin;
GRANT这样数据库准备好了。将旧的nextcloud容器删除掉,然后重新运行一个新的nextcloud容器。
删除旧的nextcloud容器,并删除目录挂载数据:
[root@hellogitlab nextcloud]# pwd
/dockerdata/nextcloud
# 删除容器
[root@hellogitlab nextcloud]# dkr nextcloud
nextcloud
nextcloud
# 删除挂载数据
[root@hellogitlab nextcloud]# trash-put data/
[root@hellogitlab nextcloud]# trash-empty
[root@hellogitlab nextcloud]# mkdir data重新运行容器:
docker run --name nextcloud --env-file=/dockerdata/nextcloud/.nextcloud.env -p 8080:80 -v /dockerdata/nextcloud/data:/var/www/html -d nextcloud运行:
[root@hellogitlab ~]# docker run --name nextcloud --env-file=/dockerdata/nextcloud/.nextcloud.env -p 8080:80 -v /dockerdata/nextcloud/data:/var/www/html -d nextcloud
7d0951455066120c3eb8a94b37527d5c53fdb839fc3583166ec9625e15741b30查看日志:
[root@hellogitlab ~]# docker logs -f nextcloud
Configuring Redis as session handler
Initializing nextcloud 20.0.5.2 ...
Initializing finished
New nextcloud instance
Installing with PostgreSQL database
starting nextcloud installation

Nextcloud was successfully installed
setting trusted domains…
System config value trusted_domains => 1 set to string hellogitlab.com:8080,nextcloud.hellogitlab.com
AH00558: apache2: Could not reliably determine the server's fully qualified domain name, using 172.18.0.4. Set the 'ServerName' directive globally to suppress this message
AH00558: apache2: Could not reliably determine the server's fully qualified domain name, using 172.18.0.4. Set the 'ServerName' directive globally to suppress this message
[Tue Apr 06 23:53:23.469067 2021] [mpm_prefork:notice] [pid 1] AH00163: Apache/2.4.38 (Debian) PHP/7.4.14 configured -- resuming normal operations
[Tue Apr 06 23:53:23.469149 2021] [core:notice] [pid 1] AH00094: Command line: 'apache2 -D FOREGROUND'打开nextcloud链接地址 https://nextcloud.hellogitlab.com:444/,页面提示通过不被信任的域名访问异常:
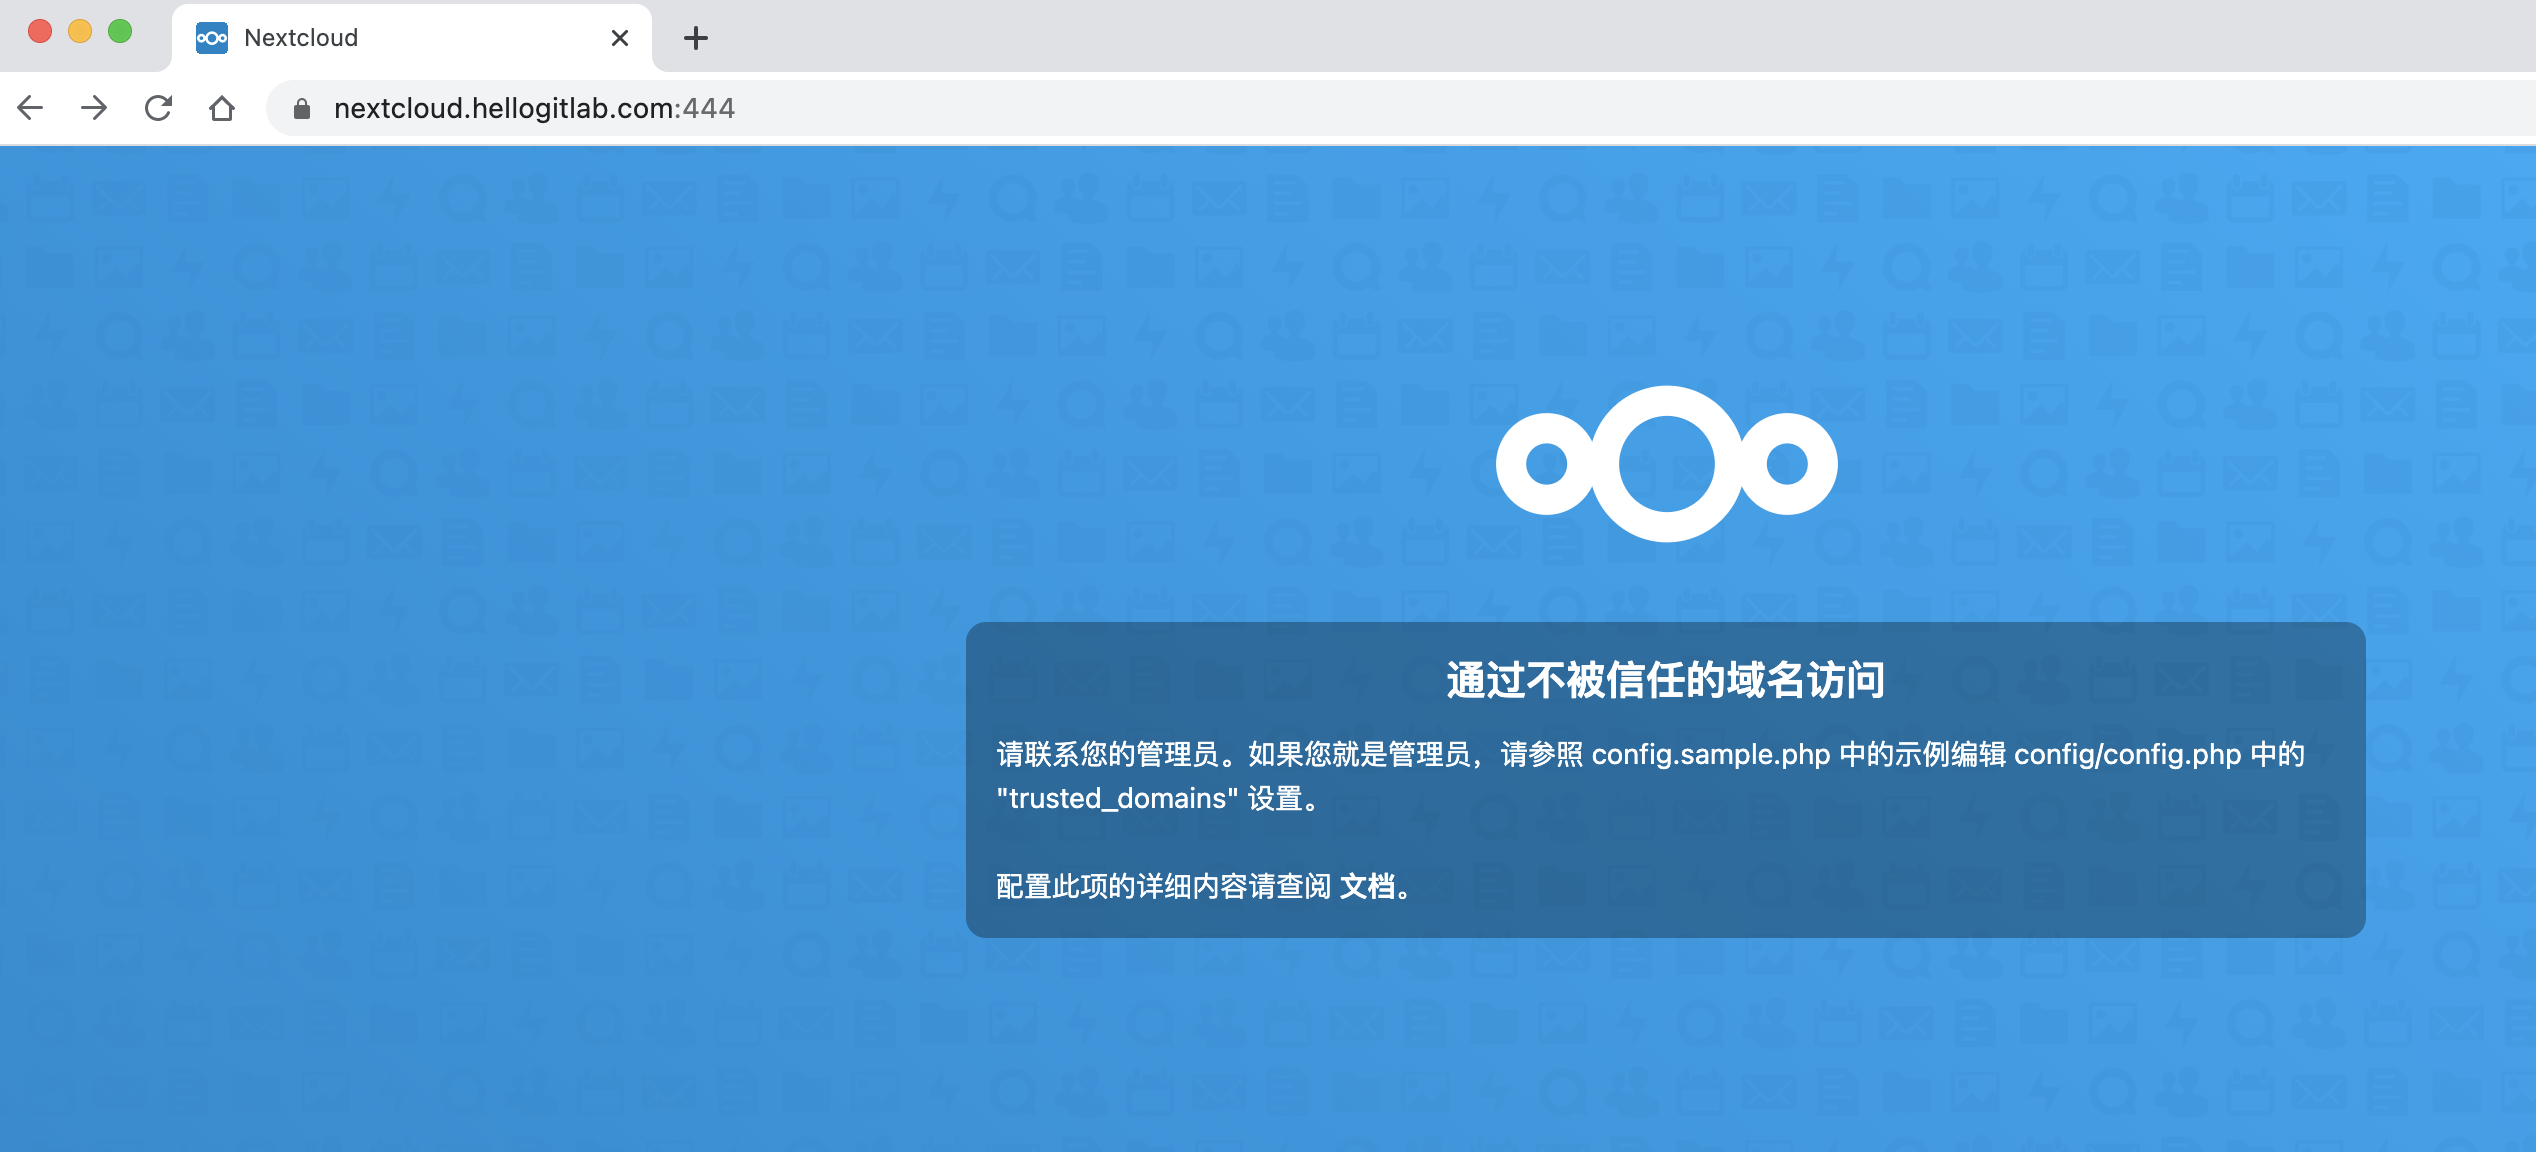
查看配置文件,可知config.php中域名配置异常:
[root@hellogitlab ~]# dkin nextcloud
root@7d0951455066:/var/www/html# cat config/config.php |grep -A 4 'trusted_domains'
  'trusted_domains' =>
  array (
    0 => 'localhost',
    1 => 'hellogitlab.com:8080,nextcloud.hellogitlab.com',
),说明我们配置文件中可信域名配置错误。
我们安装一下vim后,然后使用vim编辑一下config.php配置文件,更新后查看可信域名信息:
root@7d0951455066:/var/www/html# cat config/config.php |grep -A 5 'trusted_domains'
  'trusted_domains' =>
  array (
    0 => 'hellogitlab.com:8080',
    1 => 'nextcloud.hellogitlab.com',
),退出容器命令行,然后重启容器:
[root@hellogitlab ~]# docker stop nextcloud
nextcloud
[root@hellogitlab ~]# docker start nextcloud
nextcloud再次打开web页面:

页面正常显示。
我们输入一下登陆用户名和密码,看看能不能登陆进去。此时可以正常登陆进入到nextcloud页面,说明配置正确!
我们在概览页面可以看到有数据库丢失了一些索引的警告:
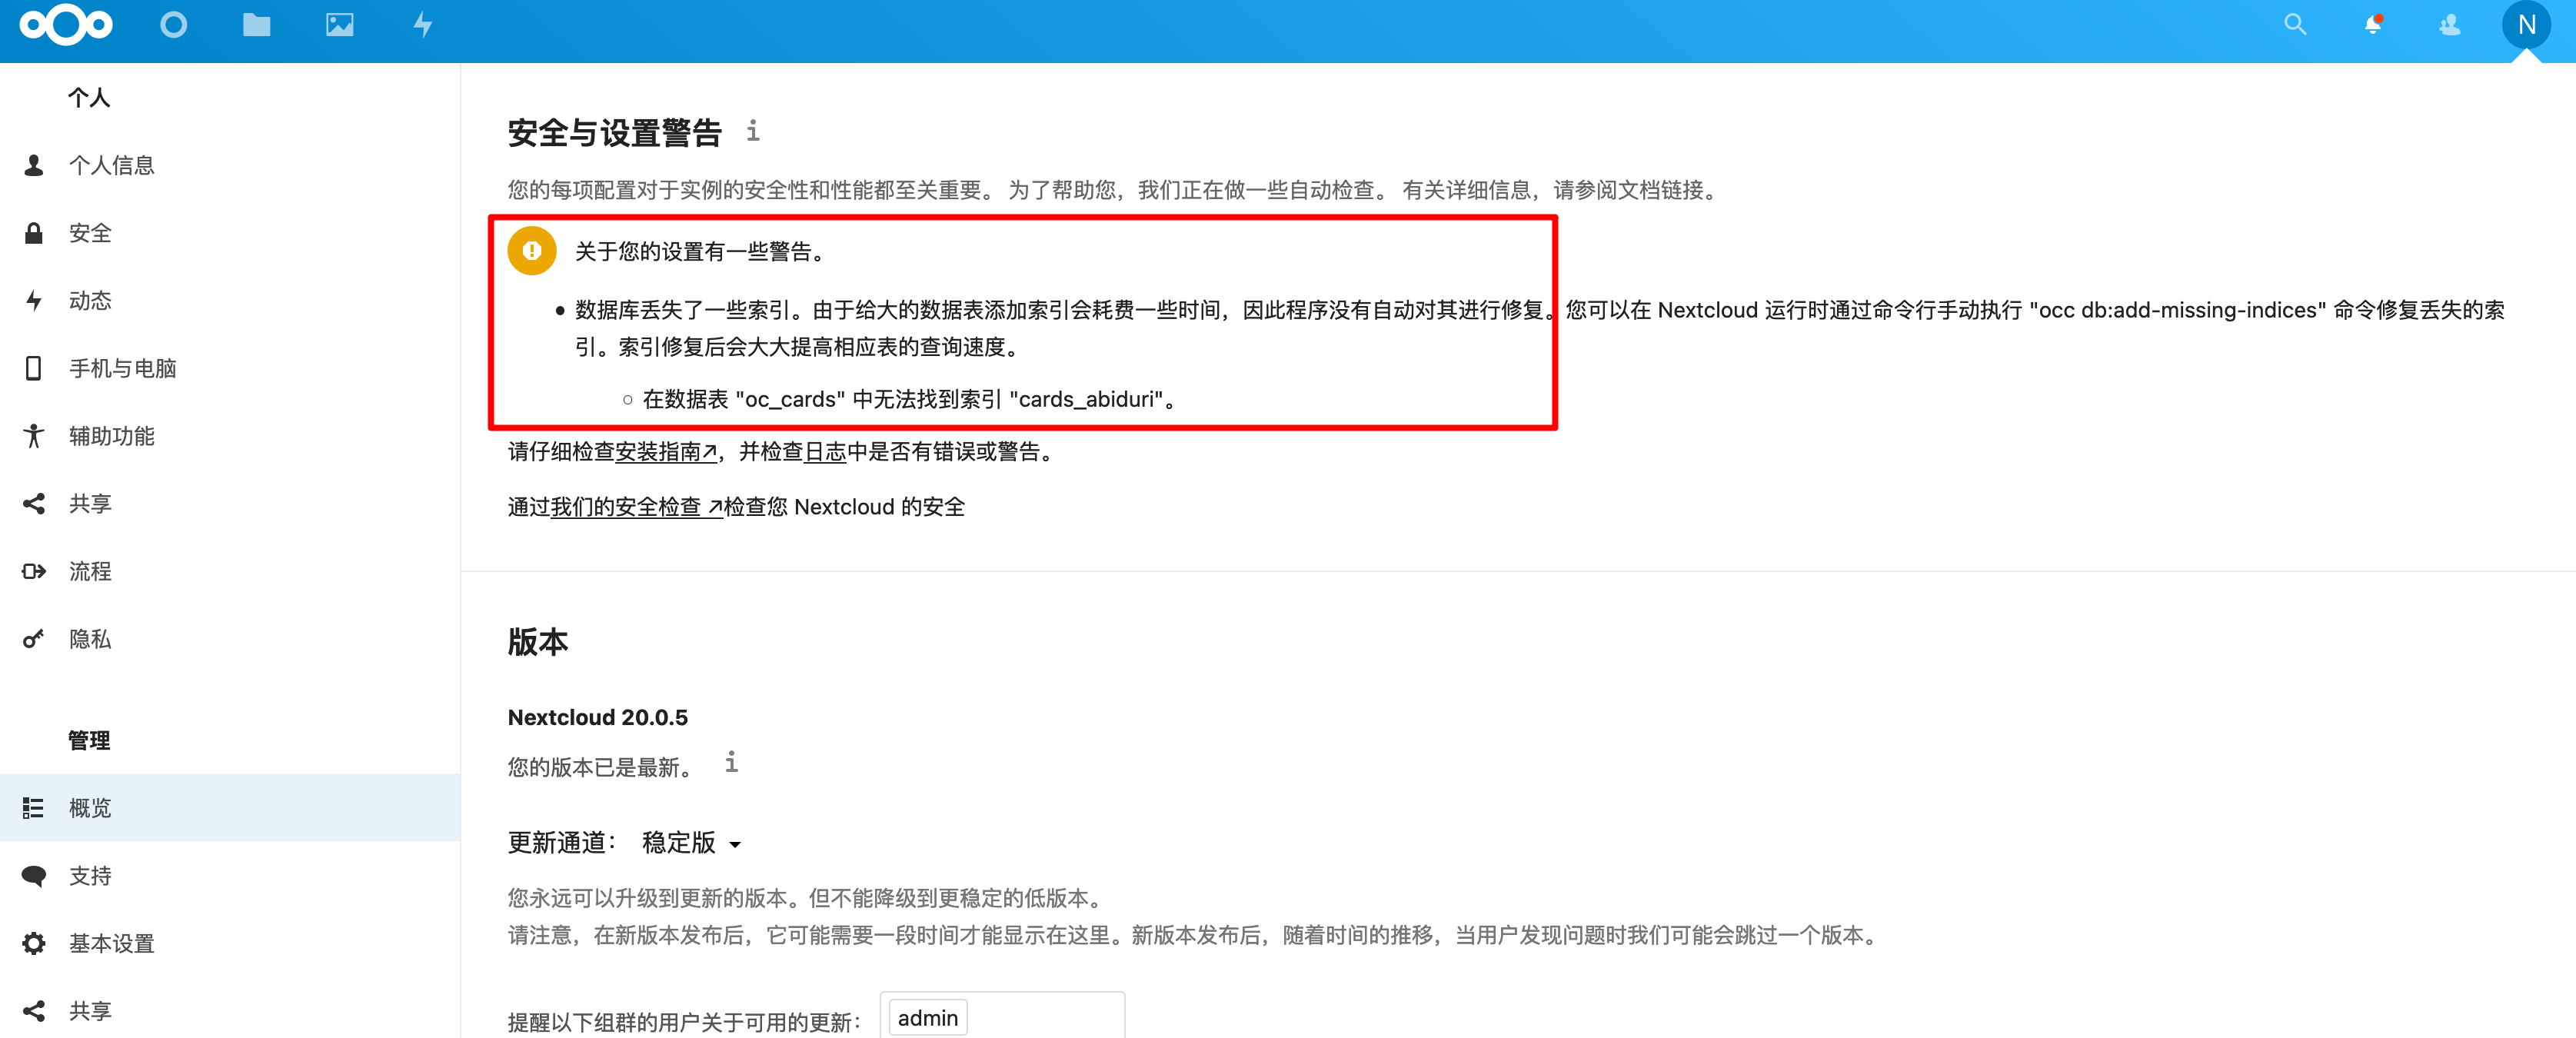
我们不用关闭容器,直接运行以下命令:
[root@hellogitlab nextcloud]# docker exec --user www-data nextcloud php occ db:add-missing-indices
Check indices of the share table.
Check indices of the filecache table.
Check indices of the twofactor_providers table.
Check indices of the login_flow_v2 table.
Check indices of the whats_new table.
Check indices of the cards table.
Adding cards_abiduri index to the cards table, this can take some time...
cards table updated successfully.
Check indices of the cards_properties table.
Check indices of the calendarobjects_props table.
Check indices of the schedulingobjects table.
Check indices of the oc_properties table.刷新页面,这样概览页面就不会显示警告了!
自定义的环境配置文件如下:
[root@hellogitlab nextcloud]# cat .nextcloud.env
#1.postgresql数据库相关
#数据库名
POSTGRES_DB=nextcloud
#数据库端口号5432
POSTGRES_PORT=5432
#数据库主机名
POSTGRES_HOST=hellogitlab.com
#用户名
POSTGRES_USER=ncadmin
#登陆数据库使用的密码
POSTGRES_PASSWORD=securepassword

#2.Redis缓存相关
#缓存主机
REDIS_HOST=hellogitlab.com
#Redis端口号
REDIS_HOST_PORT=6378
#Redis密码
REDIS_HOST_PASSWORD=securepassword

# 3.外部邮箱
# SMTP服务器地址
SMTP_HOST=smtp.mxhichina.com
# SMTP域名
MAIL_DOMAIN=hellogitlab.com
# SMTP安全类型
SMTP_SECURE=ssl
# SMTP端口号
SMTP_PORT=465
# SMTP认证类型
SMTP_AUTHTYPE=LOGIN
# SMTP认证用户名
SMTP_NAME=notice@hellogitlab.com
# SMTP认证用户密码
SMTP_PASSWORD=securepassword
# 邮件from地址设置
# MAIL_FROM_ADDRESS 此处只应写用户名
MAIL_FROM_ADDRESS=notice

# 4. nextcloud设置
# nextcloud管理员用户名
NEXTCLOUD_ADMIN_USER=ncadmin
# nextcloud管理员密码
NEXTCLOUD_ADMIN_PASSWORD=securepassword
# 可信域名
NEXTCLOUD_TRUSTED_DOMAINS=hellogitlab.com:8080 nextcloud.hellogitlab.com
[root@hellogitlab nextcloud]#最终生成的配置文件如下:
root@b172ace555a9:/var/www/html# cat config/config.php
<?php
$CONFIG = array (
  'htaccess.RewriteBase' => '/',
  'memcache.local' => '\\OC\\Memcache\\APCu',
  'apps_paths' =>
  array (
    0 =>
    array (
      'path' => '/var/www/html/apps',
      'url' => '/apps',
      'writable' => false,
    ),
    1 =>
    array (
      'path' => '/var/www/html/custom_apps',
      'url' => '/custom_apps',
      'writable' => true,
    ),
  ),
  'memcache.distributed' => '\\OC\\Memcache\\Redis',
  'memcache.locking' => '\\OC\\Memcache\\Redis',
  'redis' =>
  array (
    'host' => 'hellogitlab.com',
    'password' => 'securepassword',
    'port' => 6378,
  ),
  'mail_smtpmode' => 'smtp',
  'mail_smtphost' => 'smtp.mxhichina.com',
  'mail_smtpport' => '465',
  'mail_smtpsecure' => 'ssl',
  'mail_smtpauth' => true,
  'mail_smtpauthtype' => 'LOGIN',
  'mail_smtpname' => 'notice@hellogitlab.com',
  'mail_smtppassword' => 'securepassword',
  'mail_from_address' => 'notice',
  'mail_domain' => 'hellogitlab.com',
  'passwordsalt' => 'dszdHKxV/dfsdfdsfsd',
  'secret' => 'XqVVvw8YRfdsfsdLhGI+securepassword',
  'trusted_domains' =>
  array (
    0 => 'localhost',
    1 => 'hellogitlab.com:8080',
    2 => 'nextcloud.hellogitlab.com',
  ),
  'datadirectory' => '/var/www/html/data',
  'dbtype' => 'pgsql',
  'version' => '20.0.5.2',
  'overwrite.cli.url' => 'http://hellogitlab.com:8080',
  'overwriteprotocol' => 'https',
  'dbname' => 'nextcloud',
  'dbhost' => 'hellogitlab.com',
  'dbport' => '',
  'dbtableprefix' => 'oc_',
  'dbuser' => 'ncadmin',
  'dbpassword' => 'password',
  'installed' => true,
  'instanceid' => 'ocmdfsdfds',
  'enable_previews' => true,
  'enabledPreviewProviders' =>
  array (
    0 => 'OC\\Preview\\Image',
    1 => 'OC\\Preview\\Movie',
    2 => 'OC\\Preview\\TXT',
 ),
);19. 手机客户端多次登陆出现请求过多的问题
多次手机登陆后,有可能手机客户端被拦截住:
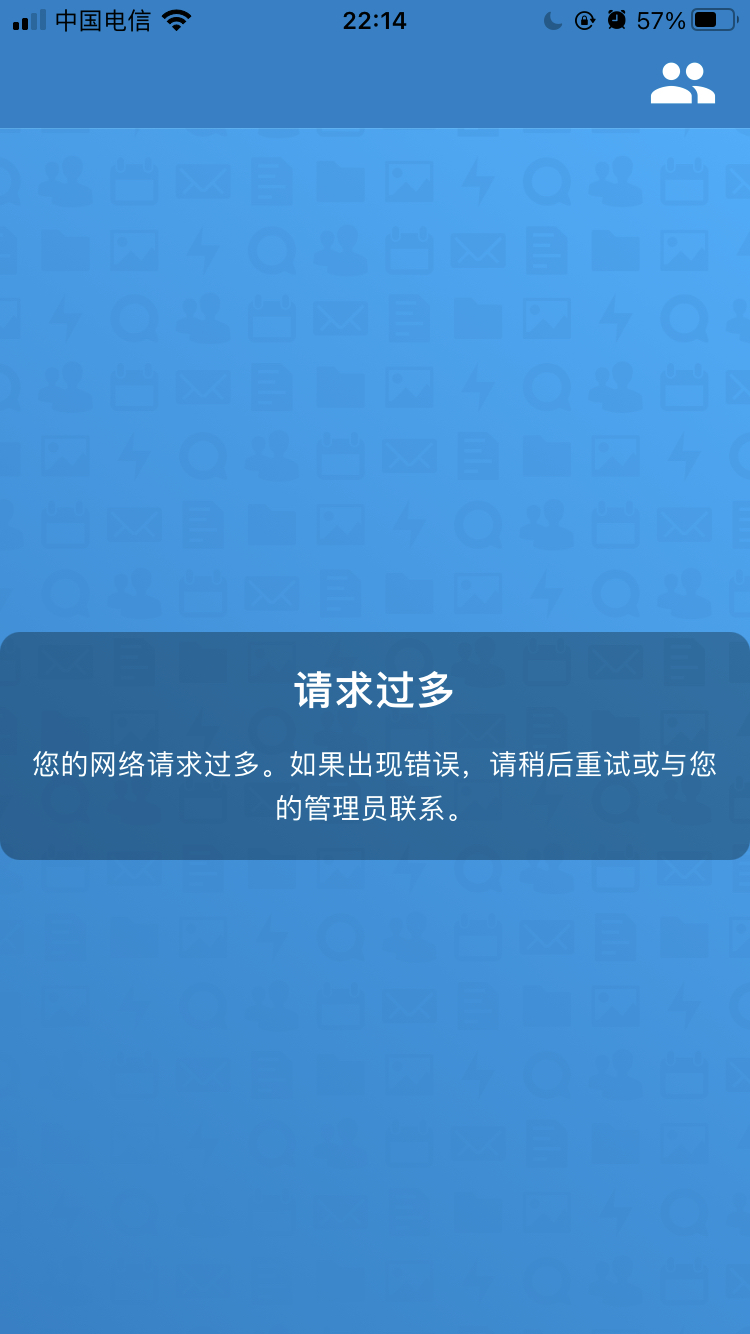
参考 https://help.nextcloud.com/t/cannot-login-too-many-requests/100905/16 运行以下命令:
docker exec --user www-data nextcloud php occ security:bruteforce:reset <IP> 其中IP是被拦截的IP,可以在设置-日志界面查看到被拦截的IP地址信息。
执行命令:
[root@hellogitlab ~]# docker exec --user www-data nextcloud php occ security:bruteforce:reset 172.18.0.1
[root@hellogitlab ~]#重新使用手机客户端则可以正常登陆!
也可以将表中的数据删除掉:
nextcloud=# DELETE FROM oc_bruteforce_attempts WHERE id > 1;
DELETE 212
nextcloud=# SELECT * FROM oc_bruteforce_attempts;
 id | action |  occurred  |     ip     |    subnet     |       metadata
----+--------+------------+------------+---------------+-----------------------
  1 | login  | 1618053092 | 172.18.0.1 | 172.18.0.1/32 | {"user":"meizhaohui"}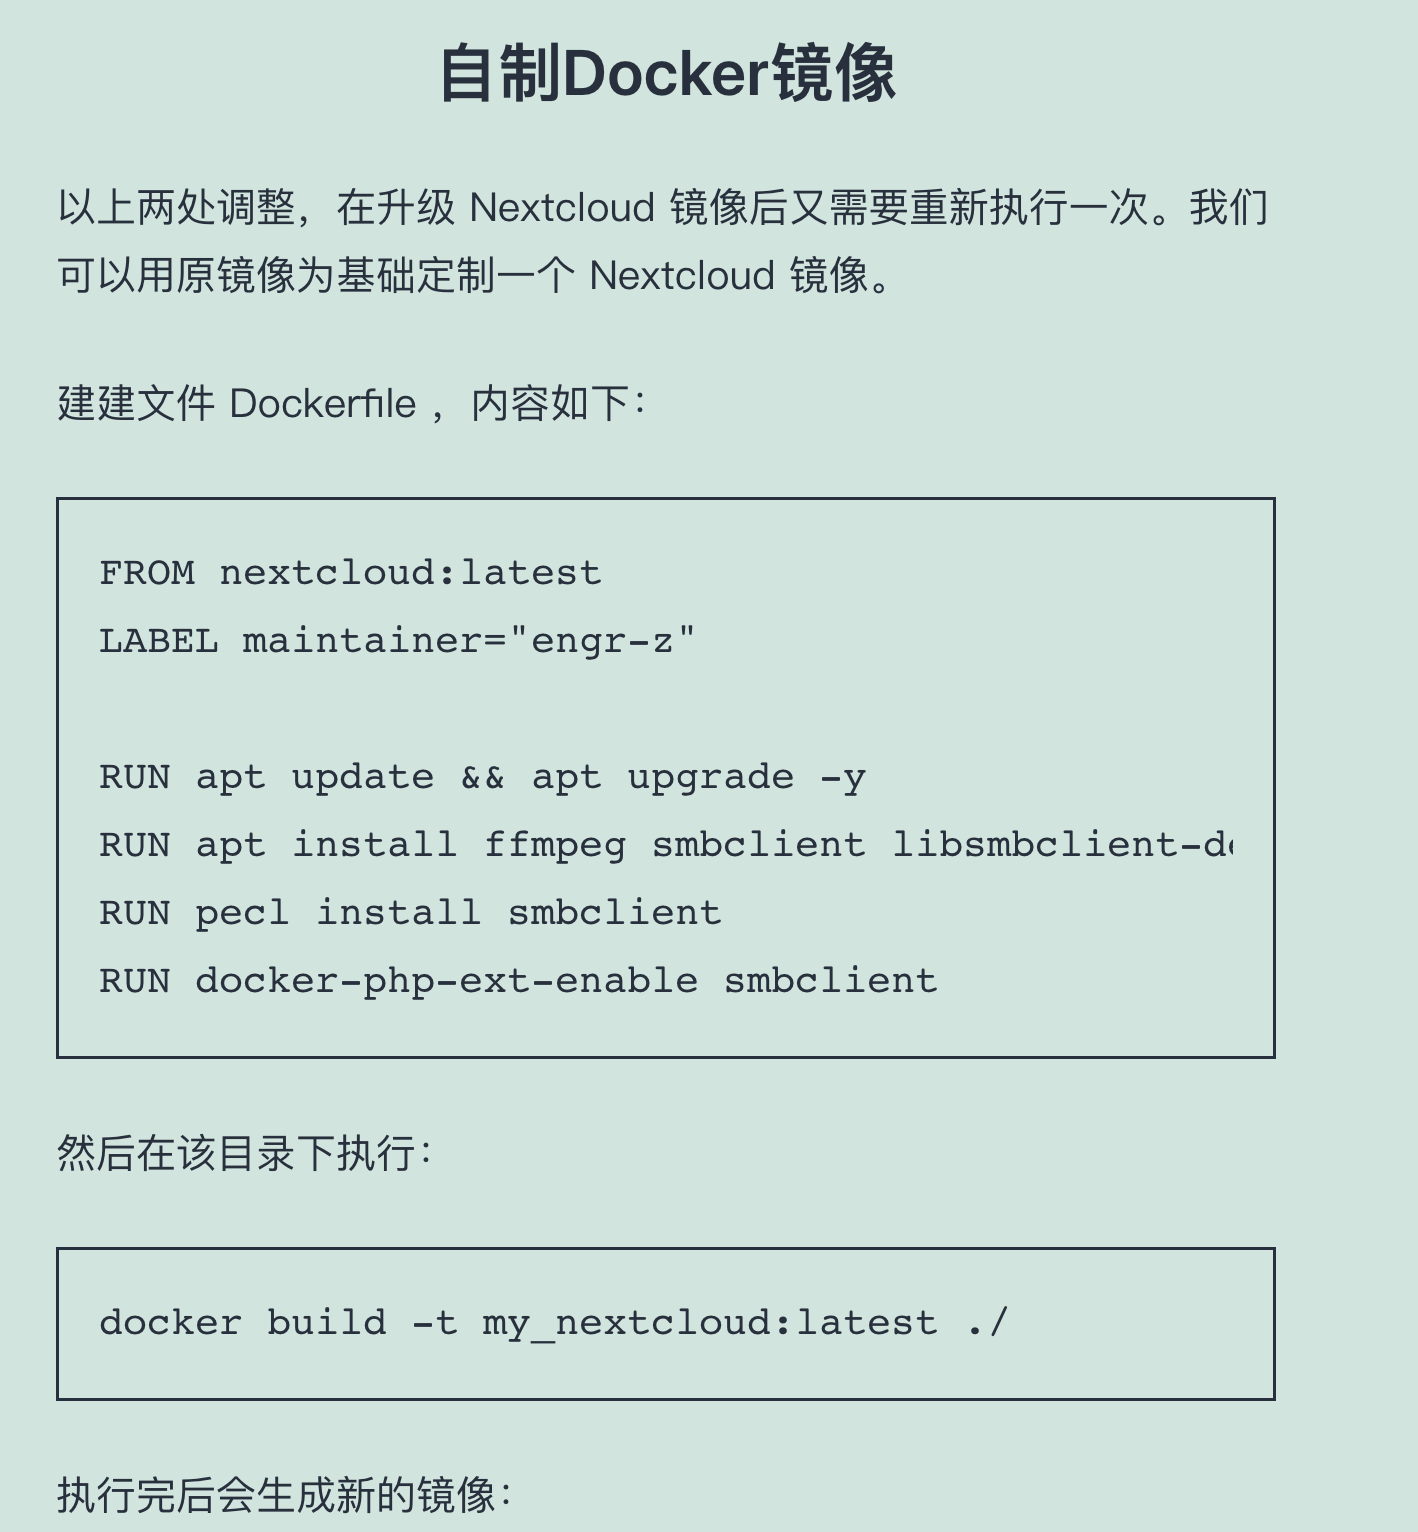
(1 行记录)20. 定制Docker镜像,编写自己的dockerfile
待补充。
需要做的事情:
# 1. 更新apt源
cat > /etc/apt/source.list << EOF
deb http://mirrors.cloud.tencent.com/debian/ buster main non-free contrib
deb http://mirrors.cloud.tencent.com/debian-security buster/updates main
deb http://mirrors.cloud.tencent.com/debian/ buster-updates main non-free contrib
deb http://mirrors.cloud.tencent.com/debian/ buster-backports main non-free contrib

deb-src http://mirrors.cloud.tencent.com/debian-security buster/updates main
deb-src http://mirrors.cloud.tencent.com/debian/ buster main non-free contrib
deb-src http://mirrors.cloud.tencent.com/debian/ buster-updates main non-free contrib
deb-src http://mirrors.cloud.tencent.com/debian/ buster-backports main non-free contrib
EOF

# 2. 更新源
apt update

# 3. 安装软件
apt inatall vim ffmpge -y

# 4. 更新配置文件,如增加缩略图设置、overwrite.cli.url设置等自制镜像示例,参考https://engr-z.com/278.html:
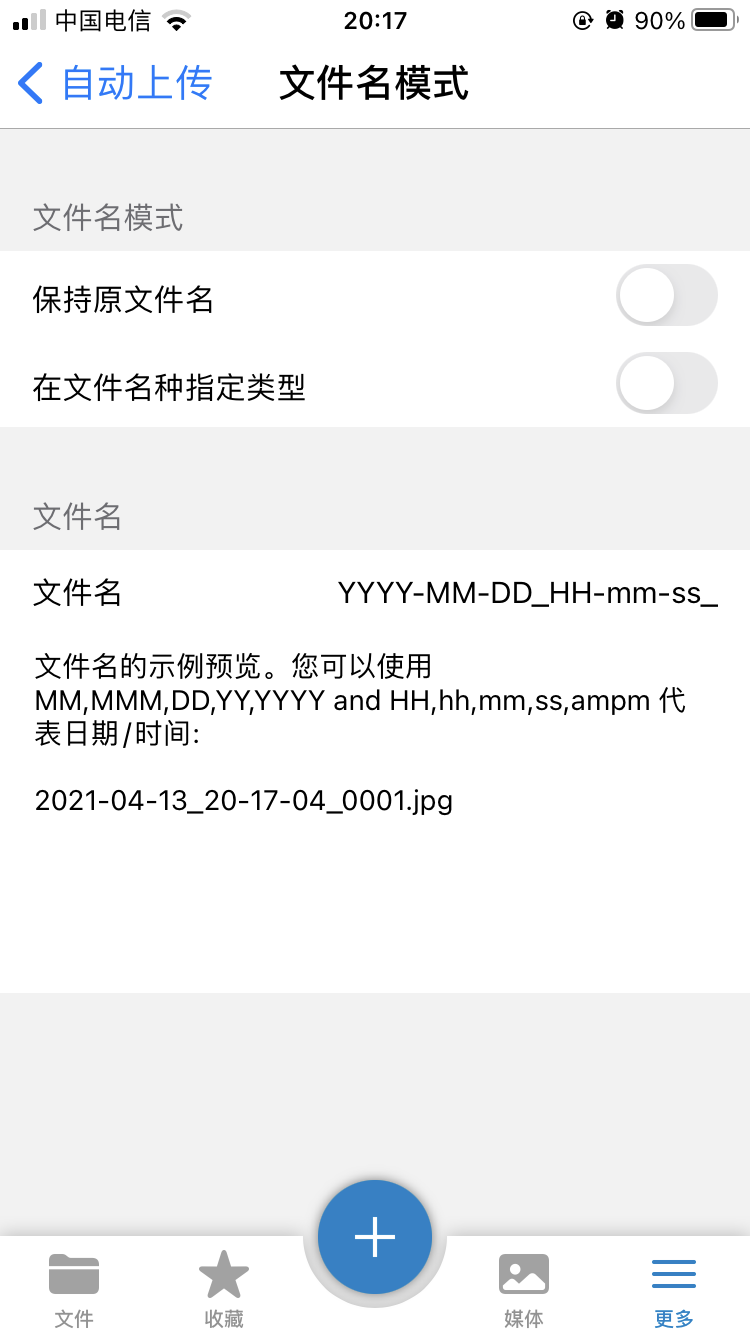
21. 照片自动上传
在手机客户端可以设置照片自动上传,并设置文件名格式,默认的文件名中包含空格,我不喜欢文件名上包含空格,改成不带空格的格式,设置如下图:
说明:
markdown字体标红处理方法:<font color='red'> text </font>
效果:
设置背景色:<table><tr><td bgcolor=#54FF9F>背景色的设置是按照十六进制颜色值:#54FF9F</td></tr></table>
效果:
| 背景色的设置是按照十六进制颜色值:#54FF9F |
参考:
- 使用docker-compose搭建Nextcloud个人云盘并开启https教程
- Centos 7.6搭建Nextcloud 17.0.0个人云盘详细教程
- 企业邮箱通过SMTP程序进行发信
- 企业邮箱postmaster管理员账号更改密码方法
- Debian 10 Buster 国内常用镜像源
- 基于Nextcloud打造个人工作台
- 定制优化Nextcloud镜像
- NextCloud Background jobs
- Docker安装nextcloud以及遇到的一下问题和优化方法
- MySQL与PostgreSQL哪个更好
- Docker redis
- 最详细的docker中安装并配置redis
- Docker 自定义配置运行redis自动退出
- nextcloud Memory caching
- nextcloud config PostgreSQL database
- 使用docker搭建基于Postgresql的Nextcloud
- nextcloud Converting database type
- nextcloud 切换数据库 mysql->PostgreSQL(sqlite->mysql同理) 遇到的一些问题 Docker版
- [docker link 过时不再用了?那容器互联、服务发现怎么办?
- Cannot login: Too Many Requests