搭建自己的nexus私有仓库10--Nexus API接口的使用2
本文档是nexus系列课程第9篇。
- nexus系列课程第1篇,请参考 搭建自己的nexus私有仓库1--nexus初体验
- nexus系列课程第2篇,请参考 搭建自己的nexus私有仓库2--创建python pypi代理
- nexus系列课程第3篇,请参考 搭建自己的nexus私有仓库3--创建yum ius代理
- nexus系列课程第4篇,请参考 搭建自己的nexus私有仓库4--创建docker私有仓库
- nexus系列课程第5篇,请参考 搭建自己的nexus私有仓库5--测试docker仓库pull和push
- nexus系列课程第6篇,请参考 搭建自己的nexus私有仓库6--使用nginx反向代理
- nexus系列课程第7篇,请参考 搭建自己的nexus私有仓库7--修改nexus容器时区
- nexus系列课程第8篇,请参考 搭建自己的nexus私有仓库8--Nexus3的数据库结构
- nexus系列课程第9篇,请参考 搭建自己的nexus私有仓库9--Nexus API接口的使用1
0. 情况说明
本篇是在上一篇的基础上,通过Nexus API接口创建Nexus相关仓库。
需要完成以下需求:
- 创建yum、pypi、maven、docker之类的仓库,docker仓库由于涉及到三种类型的仓库创建,并且有端口配置,使用API时优先创建yum和pypi代理代理仓库来测试API接口。
1. 创建yum-proxy代理仓库
本节创建一个CentOS7系统使用的centos-proxy代理仓库。
Create Yum proxy repository。
POST请求/service/rest/v1/repositories/yum/proxy接口。
Nexus API页面给出了参数示例:
{
  "name": "internal",
  "online": true,
  "storage": {
    "blobStoreName": "default",
    "strictContentTypeValidation": true
  },
  "cleanup": {
    "policyNames": [
      "string"
    ]
  },
  "proxy": {
    "remoteUrl": "https://remote.repository.com",
    "contentMaxAge": 1440,
    "metadataMaxAge": 1440
  },
  "negativeCache": {
    "enabled": true,
    "timeToLive": 1440
  },
  "httpClient": {
    "blocked": false,
    "autoBlock": true,
    "connection": {
      "retries": 0,
      "userAgentSuffix": "string",
      "timeout": 60,
      "enableCircularRedirects": false,
      "enableCookies": false,
      "useTrustStore": false
    },
    "authentication": {
      "type": "username",
      "username": "string",
      "password": "string",
      "ntlmHost": "string",
      "ntlmDomain": "string"
    }
  },
  "routingRule": "string",
  "replication": {
    "preemptivePullEnabled": false,
    "assetPathRegex": "string"
  },
  "yumSigning": {
    "keypair": "string",
    "passphrase": "string"
  }
}
下面将相关字段加了些说明:
{
  # 仓库的名称,建议用英文名称
  "name": "internal",
  # 仓库是否在线可用,我创建仓库当然希望其在线
  "online": true,
  # 对象存储相关,除了docker仓库,其他仓库我都使用默认default
  "storage": {
    "blobStoreName": "default",
    "strictContentTypeValidation": true
  },
  # 清理规则,我没有定义规则,应该可以删除这个属性
  "cleanup": {
    "policyNames": [
      "string"
    ]
  },
  # 代理相关
  # remoteUrl是我需要代理的远程仓库地址,我代理清华大学开源镜像站上的yum源
  "proxy": {
    "remoteUrl": "https://remote.repository.com",
    "contentMaxAge": 1440,
    "metadataMaxAge": 1440
  },
  # 缓存代理仓库中不存在的内容的响应
  "negativeCache": {
    "enabled": true,
    "timeToLive": 1440
  },
  # http客户端相关
  "httpClient": {
    "blocked": false,
    "autoBlock": true,
    # 连接相关,如重试、超时之类,默认可以不开启
    "connection": {
      "retries": 0,
      "userAgentSuffix": "string",
      "timeout": 60,
      "enableCircularRedirects": false,
      "enableCookies": false,
      "useTrustStore": false
    },
    # 远程代理仓库如果需要认证的话,可以设置以下认证信息
    "authentication": {
      "type": "username",
      "username": "string",
      "password": "string",
      "ntlmHost": "string",
      "ntlmDomain": "string"
    }
  },
  # 路由规则,可以设置路由黑名单、白名单之类的规则
  "routingRule": "string",
  # 复制相关设置,在页面上没找到相关配置
  "replication": {
    "preemptivePullEnabled": false,
    "assetPathRegex": "string"
  },
  # yum签名,可以忽略
  "yumSigning": {
    "keypair": "string",
    "passphrase": "string"
  }
}注意,json不支持注释信息,你在使用过程中,请参考官方示例,不要使用以上带#井号的文本内容。
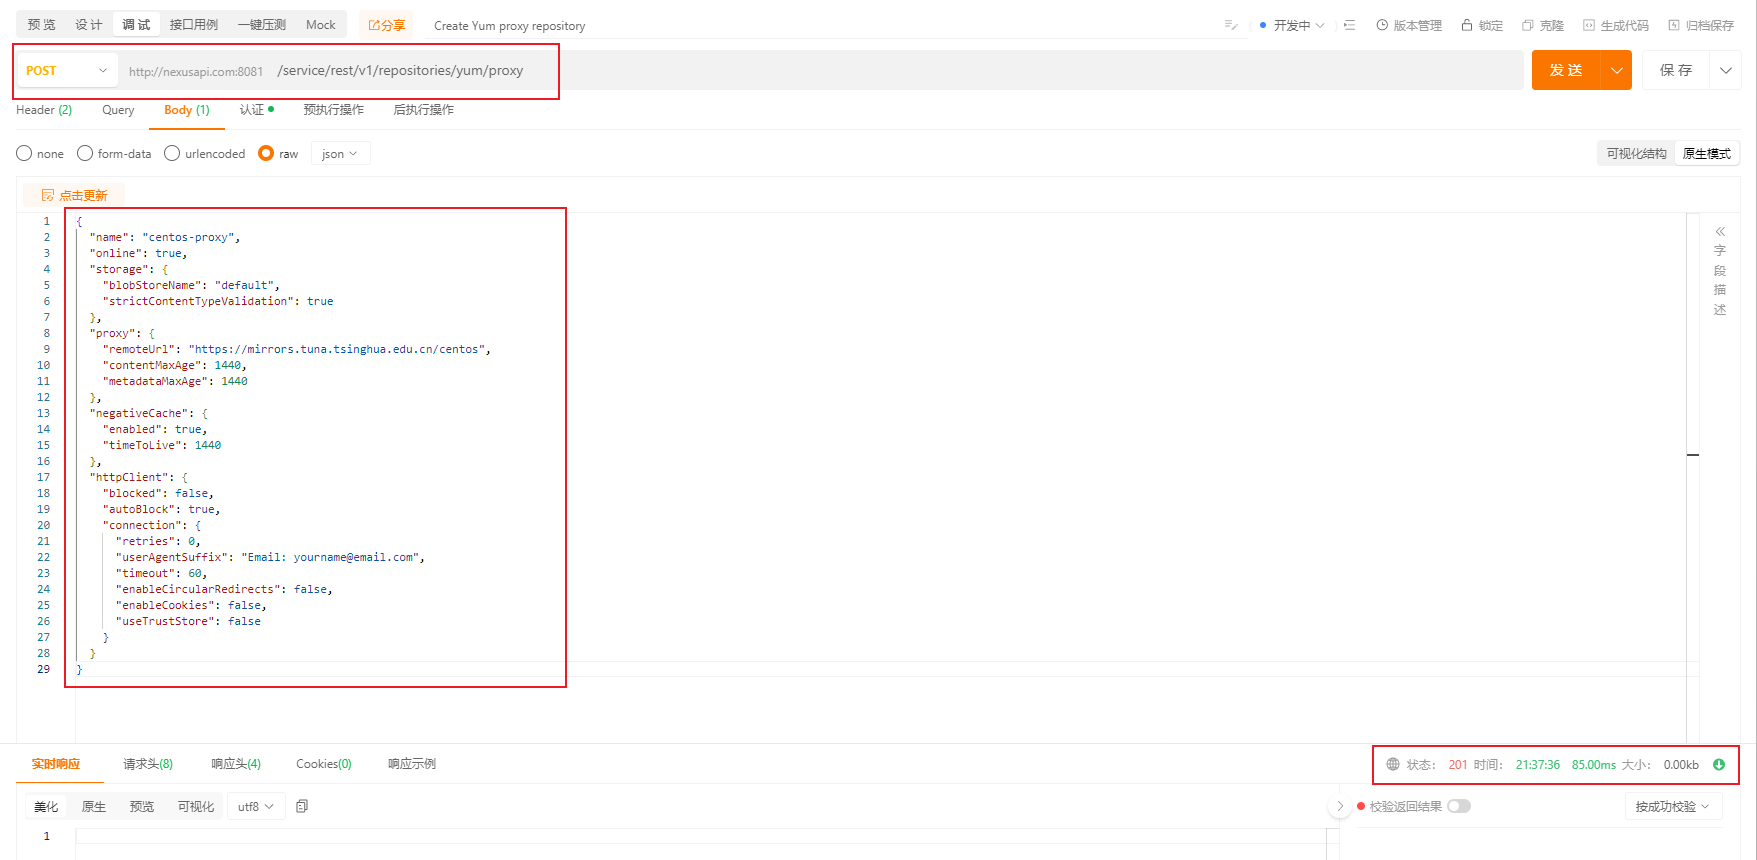
如我们创建一个centos-proxy代理的仓库,其对应的json数据如下:
{
  "name": "centos-proxy",
  "online": true,
  "storage": {
    "blobStoreName": "default",
    "strictContentTypeValidation": true
  },
  "proxy": {
    "remoteUrl": "https://mirrors.tuna.tsinghua.edu.cn/centos",
    "contentMaxAge": 1440,
    "metadataMaxAge": 1440
  },
  "negativeCache": {
    "enabled": true,
    "timeToLive": 1440
  },
  "httpClient": {
    "blocked": false,
    "autoBlock": true,
    "connection": {
      "retries": 0,
      "userAgentSuffix": "Email: yourname@email.com",
      "timeout": 60,
      "enableCircularRedirects": false,
      "enableCookies": false,
      "useTrustStore": false
    }
  }
}然后在ApiPost中发送请求,可以看到返回了201状态码:
生成Python3代码:
import requests

url = "http://nexusapi.com:8081/service/rest/v1/repositories/yum/proxy"

payload = {
    "name": "centos-proxy",
    "online": True,
    "storage": {
        "blobStoreName": "default",
        "strictContentTypeValidation": True
    },
    "proxy": {
        "remoteUrl": "https://mirrors.tuna.tsinghua.edu.cn/centos",
        "contentMaxAge": 1440,
        "metadataMaxAge": 1440
    },
    "negativeCache": {
        "enabled": True,
        "timeToLive": 1440
    },
    "httpClient": {
        "blocked": False,
        "autoBlock": True,
        "connection": {
            "retries": 0,
            "userAgentSuffix": "Email: yourname@email.com",
            "timeout": 60,
            "enableCircularRedirects": False,
            "enableCookies": False,
            "useTrustStore": False
        }
    }
}
headers = {
    "Accept": "application/json",
    "Content-Type": "application/json",
    "content-type": "application/json",
    "Authorization": "Basic YWRtaW46YWRtaW4xMjM="
}

response = requests.request("POST", url, json=payload, headers=headers)
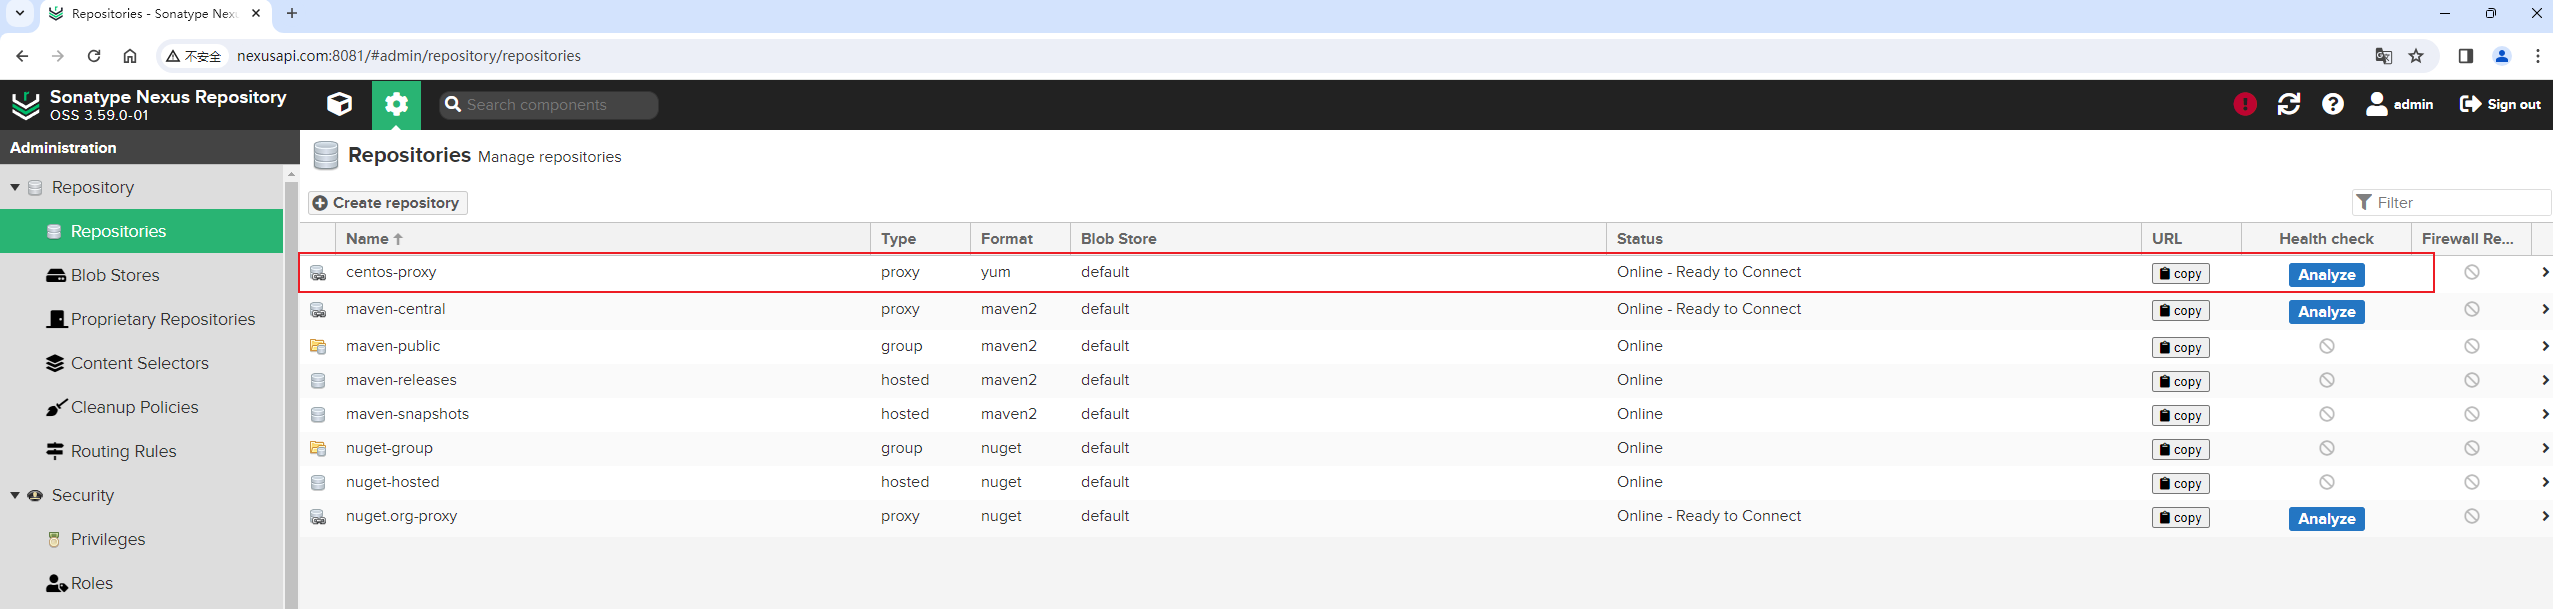
print(response.text)此时,在Nexus上面可以看到刚才通过API创建的仓库:
我们此时,把测试虚拟机启动起来,测试一下代理能不能正常用。
# 查看测试主机IP
[root@nexus-test ~]# hostname -I
192.168.56.131 10.0.3.15

# 配置自定义域名
[root@nexus-test ~]# tail -n 2 /etc/hosts
# Nexus API
192.168.56.130 nexusapi.com
[root@nexus-test ~]#

# 替换一下yum源
[root@nexus-test ~]# cd /etc/yum.repos.d/
[root@nexus-test yum.repos.d]# cp -p CentOS-Base.repo CentOS-Base.repo.tsinghua.bak
[root@nexus-test yum.repos.d]# sed -i 's@https://mirrors.tuna.tsinghua.edu.cn/centos/@http://nexusapi.com:8081/repository/centos-proxy/@g' CentOS-Base.repo

# 为了让仓库名与默认的不同,我们在仓库名中加上nexusapi-标记
[root@nexus-test yum.repos.d]# sed -i 's/\[/[nexusapi-/g' CentOS-Base.repo
[root@nexus-test yum.repos.d]# cat CentOS-Base.repo
# CentOS-Base.repo
#
# The mirror system uses the connecting IP address of the client and the
# update status of each mirror to pick mirrors that are updated to and
# geographically close to the client.  You should use this for CentOS updates
# unless you are manually picking other mirrors.
#
# If the mirrorlist= does not work for you, as a fall back you can try the
# remarked out baseurl= line instead.
#
#

[nexusapi-base]
name=CentOS-$releasever - Base
#mirrorlist=http://mirrorlist.centos.org/?release=$releasever&arch=$basearch&repo=os&infra=$infra
baseurl=http://nexusapi.com:8081/repository/centos-proxy/$releasever/os/$basearch/
gpgcheck=1
gpgkey=file:///etc/pki/rpm-gpg/RPM-GPG-KEY-CentOS-7

#released updates
[nexusapi-updates]
name=CentOS-$releasever - Updates
#mirrorlist=http://mirrorlist.centos.org/?release=$releasever&arch=$basearch&repo=updates&infra=$infra
baseurl=http://nexusapi.com:8081/repository/centos-proxy/$releasever/updates/$basearch/
gpgcheck=1
gpgkey=file:///etc/pki/rpm-gpg/RPM-GPG-KEY-CentOS-7

#additional packages that may be useful
[nexusapi-extras]
name=CentOS-$releasever - Extras
#mirrorlist=http://mirrorlist.centos.org/?release=$releasever&arch=$basearch&repo=extras&infra=$infra
baseurl=http://nexusapi.com:8081/repository/centos-proxy/$releasever/extras/$basearch/
gpgcheck=1
gpgkey=file:///etc/pki/rpm-gpg/RPM-GPG-KEY-CentOS-7

#additional packages that extend functionality of existing packages
[nexusapi-centosplus]
name=CentOS-$releasever - Plus
#mirrorlist=http://mirrorlist.centos.org/?release=$releasever&arch=$basearch&repo=centosplus&infra=$infra
baseurl=http://nexusapi.com:8081/repository/centos-proxy/$releasever/centosplus/$basearch/
gpgcheck=1
enabled=0
gpgkey=file:///etc/pki/rpm-gpg/RPM-GPG-KEY-CentOS-7

[root@nexus-test yum.repos.d]# cd
[root@nexus-test ~]#测试更新软件包缓存 :
[root@nexus-test ~]# yum makecache
Loaded plugins: fastestmirror
Determining fastest mirrors
docker-ce-stable | 3.5 kB 00:00:00
epel | 4.7 kB 00:00:00
nexusapi-base | 2.2 kB 00:00:00
nexusapi-extras | 1.5 kB 00:00:00
nexusapi-updates | 1.5 kB 00:00:00
(1/20): docker-ce-stable/7/x86_64/updateinfo | 55 B 00:00:01
(2/20): docker-ce-stable/7/x86_64/filelists_db | 57 kB 00:00:01
(3/20): epel/x86_64/group_gz | 100 kB 00:00:00
(4/20): epel/x86_64/updateinfo | 1.0 MB 00:00:00
(5/20): docker-ce-stable/7/x86_64/other_db | 142 kB 00:00:00
(6/20): epel/x86_64/prestodelta | 1.8 kB 00:00:00
(7/20): docker-ce-stable/7/x86_64/primary_db | 131 kB 00:00:00
(8/20): epel/x86_64/filelists_db | 12 MB 00:00:01
(9/20): nexusapi-base/7/x86_64/filelists | 7.1 MB 00:00:00
(10/20): nexusapi-base/7/x86_64/primary | 2.9 MB 00:00:00
(11/20): nexusapi-base/7/x86_64/other | 1.5 MB 00:00:00
(12/20): nexusapi-extras/7/x86_64/primary | 107 kB 00:00:00
(13/20): epel/x86_64/primary_db | 7.0 MB 00:00:01
(14/20): epel/x86_64/other_db | 3.4 MB 00:00:00
(15/20): nexusapi-extras/7/x86_64/other | 109 kB 00:00:00
(16/20): nexusapi-base/7/x86_64/group_gz | 153 kB 00:00:00
(17/20): nexusapi-updates/7/x86_64/primary | 15 MB 00:00:00
(18/20): nexusapi-extras/7/x86_64/filelists | 252 kB 00:00:00
(19/20): nexusapi-updates/7/x86_64/other | 1.2 MB 00:00:00
(20/20): nexusapi-updates/7/x86_64/filelists | 16 MB 00:00:02
nexusapi-base 10072/10072
nexusapi-base 10072/10072
nexusapi-base 10072/10072
nexusapi-extras 518/518
nexusapi-extras 518/518
nexusapi-extras 518/518
nexusapi-updates 5704/5704
nexusapi-updates 5704/5704
nexusapi-updates 5704/5704
Metadata Cache Created
[root@nexus-test ~]#可以看到,软件包缓存已经更新了。
测试安装包:
# 搜索包
[root@nexus-test ~]# yum search telnet
Loaded plugins: fastestmirror
Loading mirror speeds from cached hostfile
==================================================================================================================================== N/S matched: telnet =====================================================================================================================================
dcap-tunnel-telnet.x86_64 : Telnet tunnel for dCache
libguac-client-telnet.x86_64 : Telnet support for guacd
libtelnet.x86_64 : TELNET protocol parsing framework
libtelnet-devel.x86_64 : Header files for libtelnet
libtelnet-utils.x86_64 : TELNET utility programs from libtelnet
perl-Net-Telnet.noarch : Net-Telnet Perl module
telnet.x86_64 : The client program for the Telnet remote login protocol
telnet-server.x86_64 : The server program for the Telnet remote login protocol
procServ.x86_64 : Process server with telnet console and log access
putty.x86_64 : SSH, Telnet and Rlogin client
tn5250.i686 : 5250 Telnet protocol and Terminal
tn5250.x86_64 : 5250 Telnet protocol and Terminal

  Name and summary matches only, use "search all" for everything.

# 查看telnet包信息
# 可以看到在nexusapi-updates仓库下
[root@nexus-test ~]# yum info telnet
Loaded plugins: fastestmirror
Loading mirror speeds from cached hostfile
Available Packages
Name        : telnet
Arch        : x86_64
Epoch       : 1
Version     : 0.17
Release     : 66.el7
Size        : 64 k
Repo        : nexusapi-updates/7/x86_64
Summary     : The client program for the Telnet remote login protocol
URL         : http://web.archive.org/web/20070819111735/www.hcs.harvard.edu/~dholland/computers/old-netkit.html
License     : BSD
Description : Telnet is a popular protocol for logging into remote systems over the
            : Internet. The package provides a command line Telnet client

# 安装包,可以看到安装成功了
[root@nexus-test ~]# yum install telnet -y
Loaded plugins: fastestmirror
Loading mirror speeds from cached hostfile
Resolving Dependencies
--> Running transaction check
---> Package telnet.x86_64 1:0.17-66.el7 will be installed
--> Finished Dependency Resolution

Dependencies Resolved

==============================================================================================================================================================================================================================================================================================
 Package                                                          Arch                                                             Version                                                                   Repository                                                                  Size
==============================================================================================================================================================================================================================================================================================
Installing:
 telnet                                                           x86_64                                                           1:0.17-66.el7                                                             nexusapi-updates                                                            64 k

Transaction Summary
==============================================================================================================================================================================================================================================================================================
Install  1 Package

Total download size: 64 k
Installed size: 113 k
Downloading packages:
telnet-0.17-66.el7.x86_64.rpm                                                                                                                                                                                                                                          |  64 kB  00:00:00
Running transaction check
Running transaction test
Transaction test succeeded
Running transaction
  Installing : 1:telnet-0.17-66.el7.x86_64                                                                                                                                                                                                                                                1/1
  Verifying  : 1:telnet-0.17-66.el7.x86_64                                                                                                                                                                                                                                                1/1

Installed:
  telnet.x86_64 1:0.17-66.el7

Complete!
[root@nexus-test ~]#在Nexus Browse浏览器页面可以看到telnet的包已经被缓存了下来:
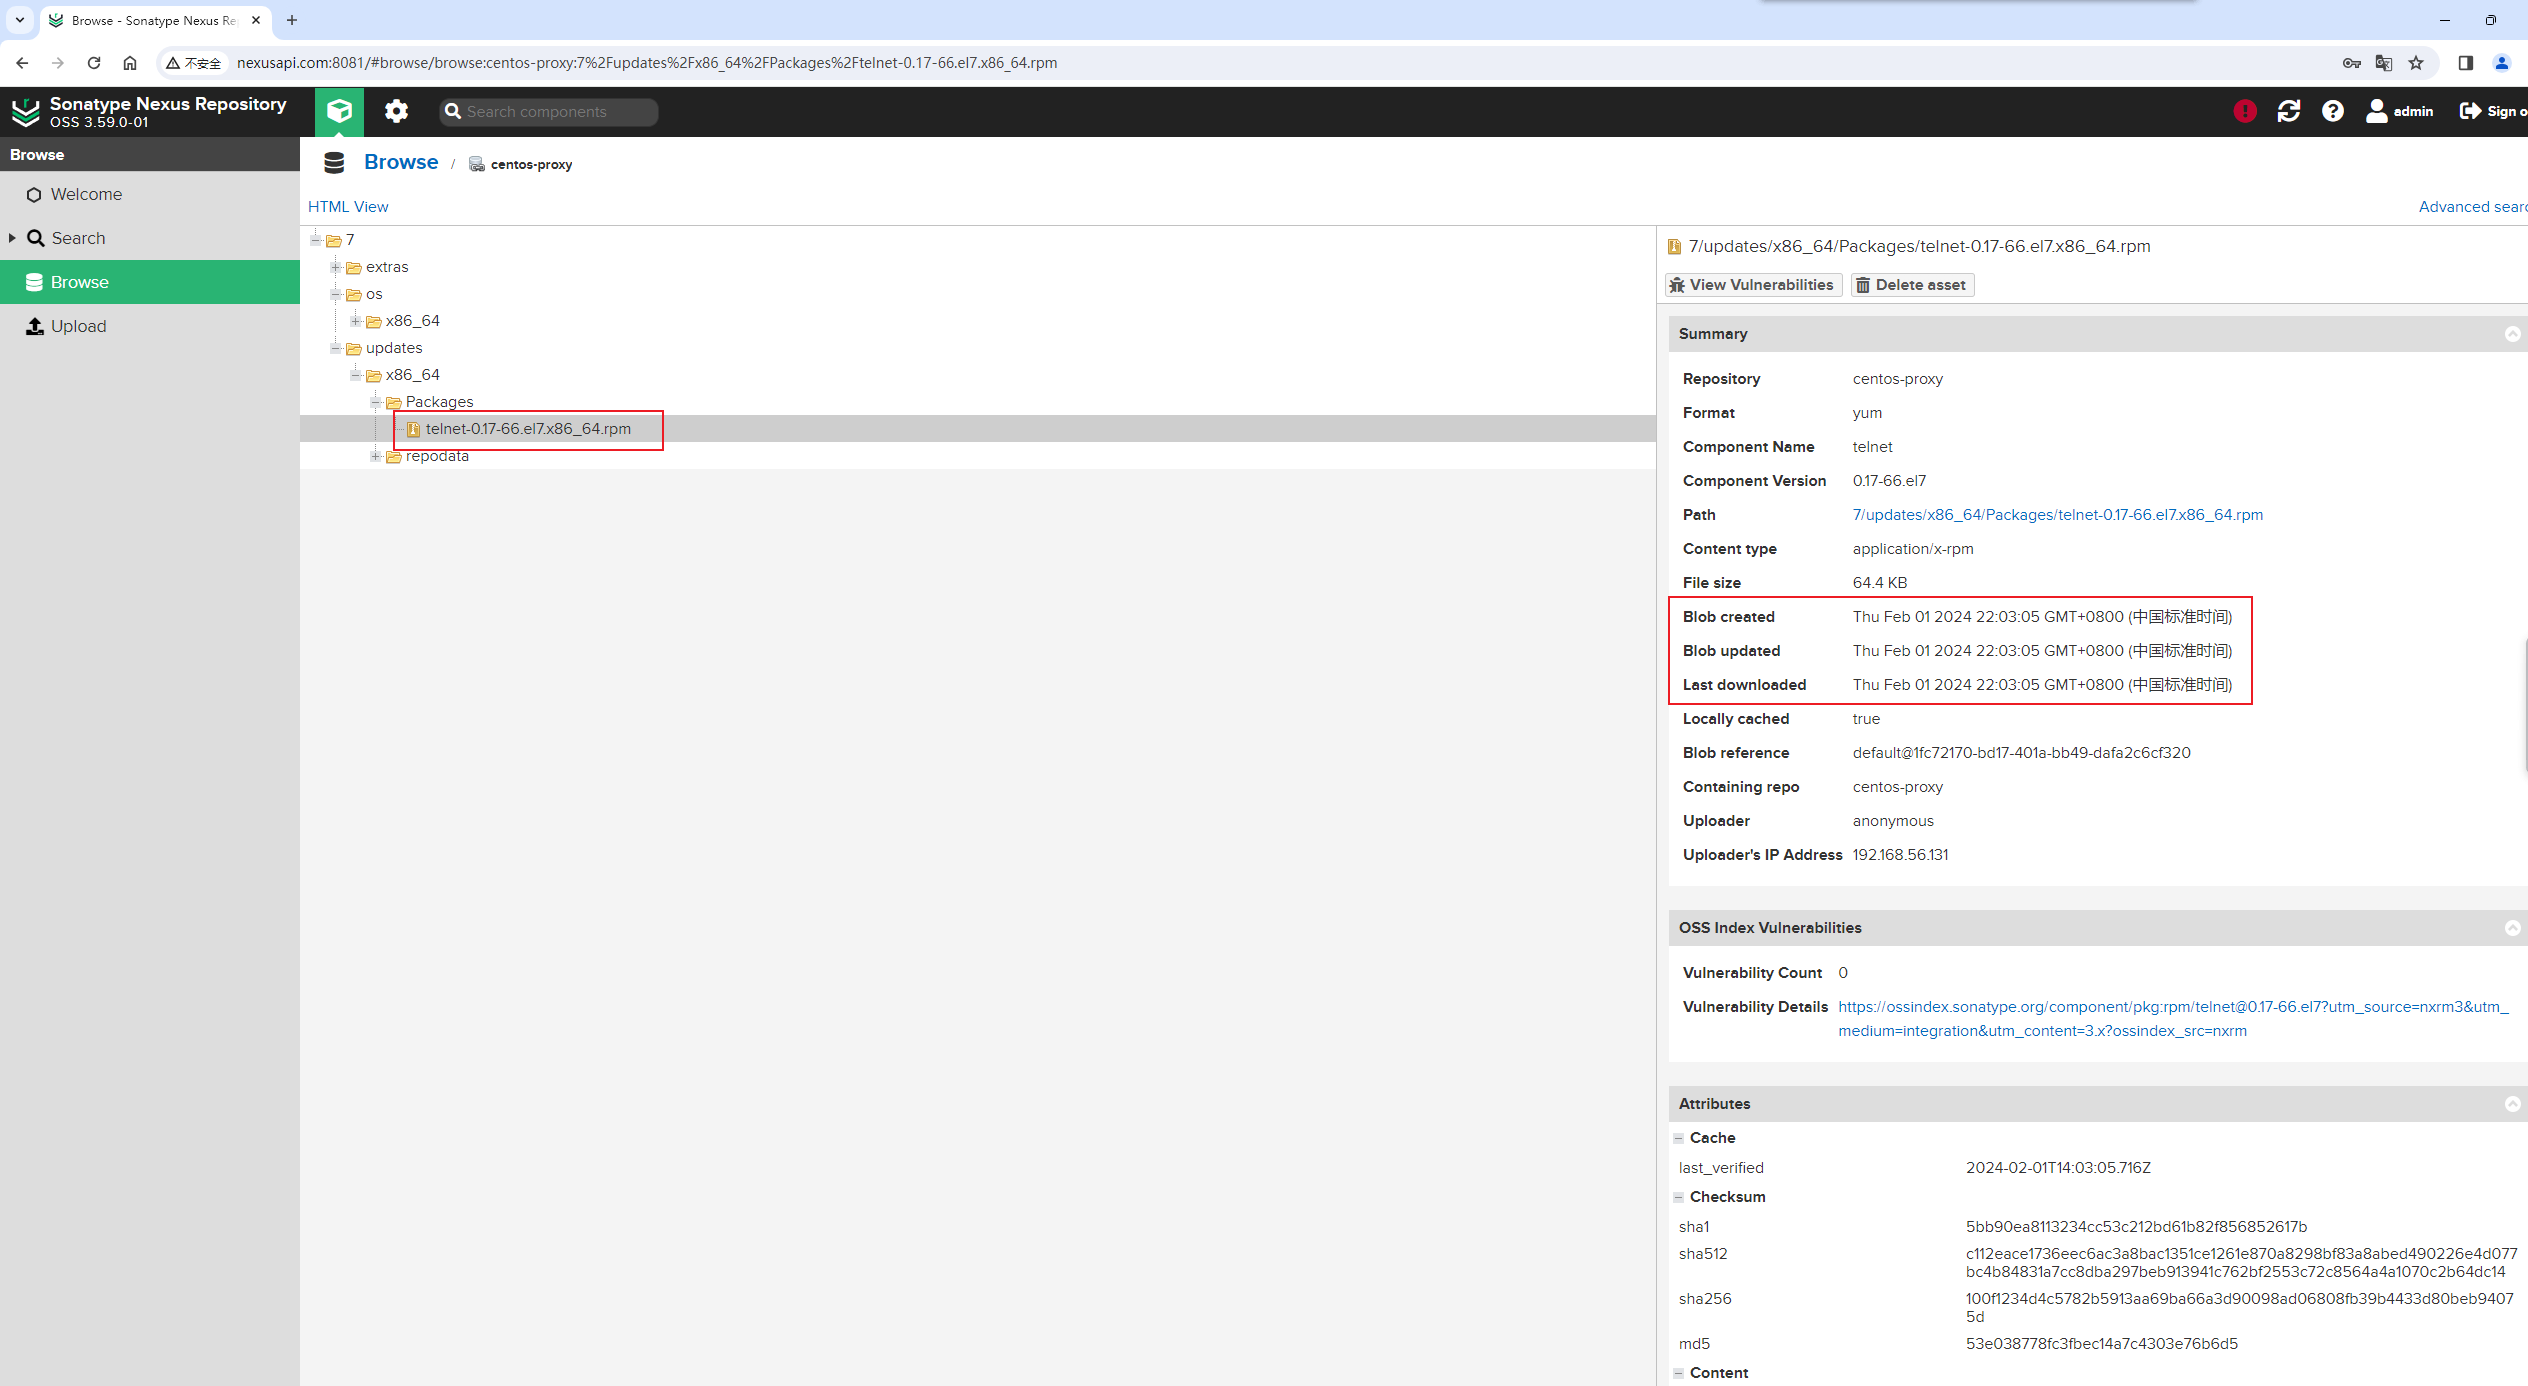
说明我们通过nexus API接口创建的centos-proxy代理仓库是正常可用的。
2. 创建pypi-proxy代理仓库
本节创建一个Python使用的pypi-proxy代理仓库。
Create PyPI proxy repository。
POST请求 /service/rest/v1/repositories/pypi/proxy接口。
Nexus API页面给出了参数示例:
{
  "name": "internal",
  "online": true,
  "storage": {
    "blobStoreName": "default",
    "strictContentTypeValidation": true
  },
  "cleanup": {
    "policyNames": [
      "string"
    ]
  },
  "proxy": {
    "remoteUrl": "https://remote.repository.com",
    "contentMaxAge": 1440,
    "metadataMaxAge": 1440
  },
  "negativeCache": {
    "enabled": true,
    "timeToLive": 1440
  },
  "httpClient": {
    "blocked": false,
    "autoBlock": true,
    "connection": {
      "retries": 0,
      "userAgentSuffix": "string",
      "timeout": 60,
      "enableCircularRedirects": false,
      "enableCookies": false,
      "useTrustStore": false
    },
    "authentication": {
      "type": "username",
      "username": "string",
      "password": "string",
      "ntlmHost": "string",
      "ntlmDomain": "string"
    }
  },
  "routingRule": "string",
  "replication": {
    "preemptivePullEnabled": false,
    "assetPathRegex": "string"
  }
}有了上一节的centos-proxy代理仓库的创建经验,此节修改以上参数就简单得多。
此时,我们直接来改Python代码,直接用代码来请求API接口。
修改后的代码:
######################################################################
# 创建pypi-proxy代理仓库
import requests

url = "http://nexusapi.com:8081/service/rest/v1/repositories/pypi/proxy"

payload = {
    "name": "pypi-proxy",
    "online": True,
    "storage": {
        "blobStoreName": "default",
        "strictContentTypeValidation": True
    },
    "proxy": {
        "remoteUrl": "https://pypi.tuna.tsinghua.edu.cn",
        "contentMaxAge": 1440,
        "metadataMaxAge": 1440
    },
    "negativeCache": {
        "enabled": True,
        "timeToLive": 1440
    },
    "httpClient": {
        "blocked": False,
        "autoBlock": True,
        "connection": {
            "retries": 0,
            "userAgentSuffix": "Email: yourname@email.com",
            "timeout": 60,
            "enableCircularRedirects": False,
            "enableCookies": False,
            "useTrustStore": False
        }
    }
}
headers = {
    "Accept": "application/json",
    "Content-Type": "application/json",
    "content-type": "application/json",
    "Authorization": "Basic YWRtaW46YWRtaW4xMjM="
}

response = requests.request("POST", url, json=payload, headers=headers)

print(response.text)
print(response.status_code)执行代码:
$ python nexus_api.py

201刷新Nexus页面,可以看到,pypi-proxy代理仓库创建成功!
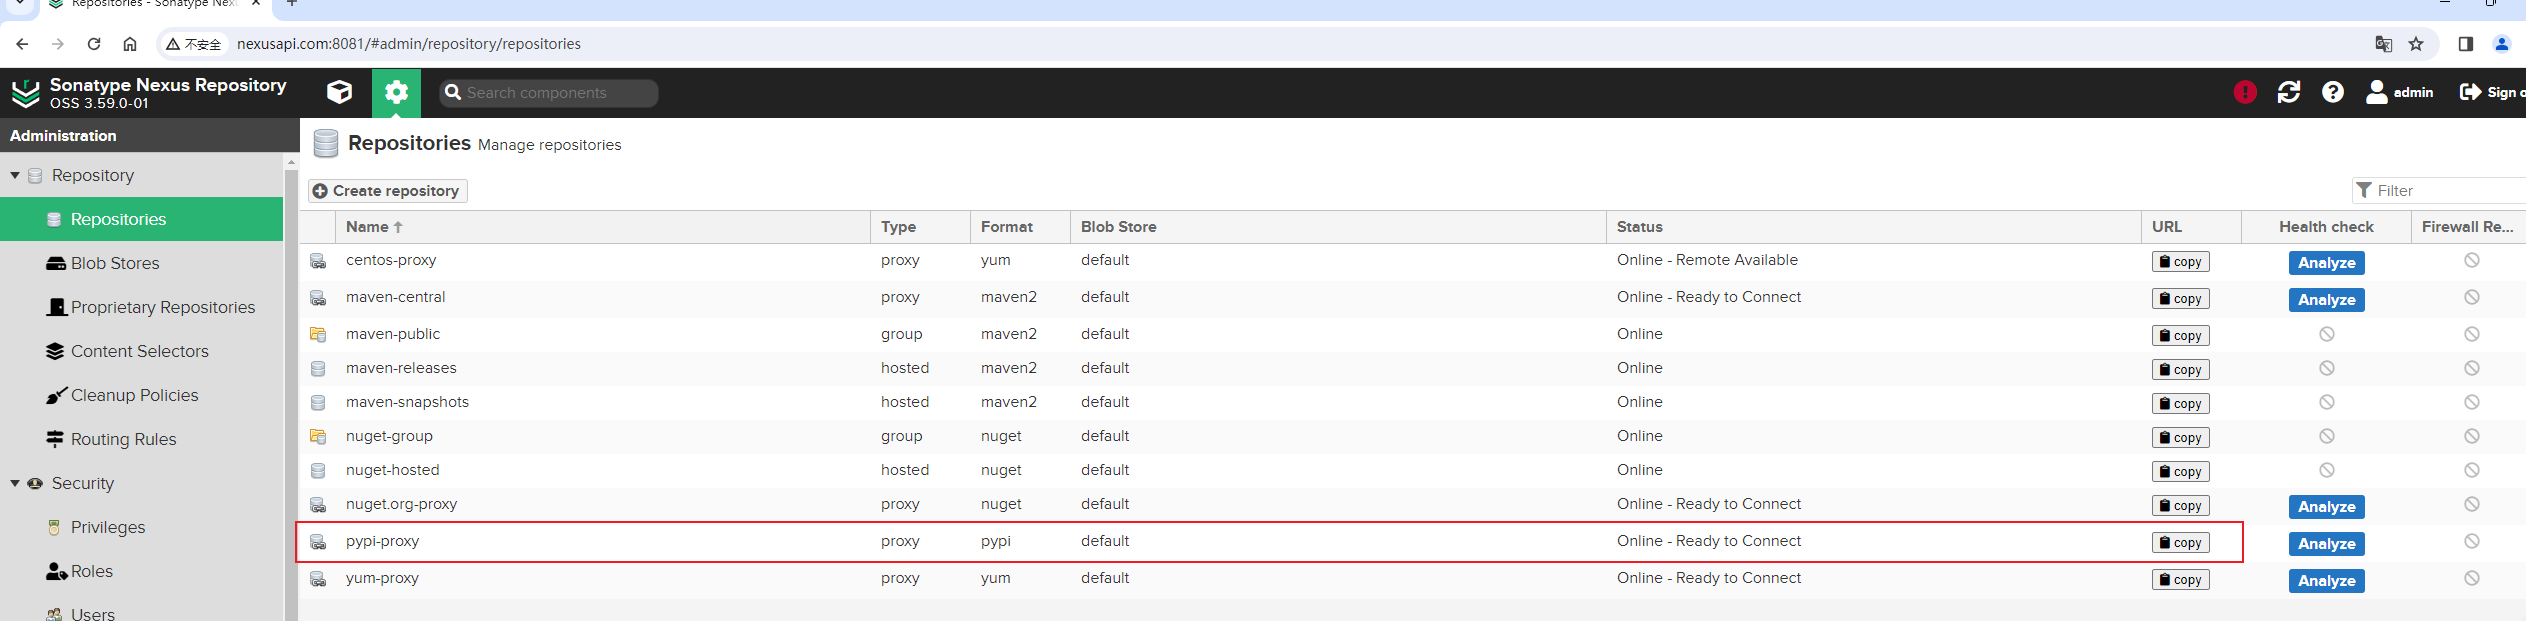
测试我刚创建的pypi-proxy代理仓库是否可用:
# 查看pip配置信息,由于pip版本太低,不支持config子命令
[root@nexus-test ~]# pip3 config list
ERROR: unknown command "config"

# 查看原来的加速源配置,可以看到是阿里云的
[root@nexus-test ~]# cat .pip/pip.conf
[global]
index-url = http://mirrors.aliyun.com/pypi/simple/

[install]
trusted-host=mirrors.aliyun.com

# 备份一下原来的源
[root@nexus-test ~]# cp -p ~/.pip/pip.conf{,.bak}

# 使用vim修改一下加速源配置
[root@nexus-test ~]# vi .pip/pip.conf

# 再次查看加速源配置
[root@nexus-test ~]# cat ~/.pip/pip.conf
[global]
index-url = http://nexusapi.com:8081/repository/pypi-proxy/simple/

[install]
trusted-host=nexusapi.com

[root@nexus-test ~]#
# 刚好使用我们的代理,更新一下pip版本
[root@nexus-test ~]# pip3 install -U pip
WARNING: Running pip install with root privileges is generally not a good idea. Try `pip3 install --user` instead.
Collecting pip
  Downloading http://nexusapi.com:8081/repository/pypi-proxy/packages/pip/21.3.1/pip-21.3.1-py3-none-any.whl (1.7MB)
    100% |████████████████████████████████| 1.7MB 110.9MB/s
Installing collected packages: pip
Successfully installed pip-21.3.1
[root@nexus-test ~]# pip config list
global.index-url='http://nexusapi.com:8081/repository/pypi-proxy/simple/'
install.trusted-host='nexusapi.com'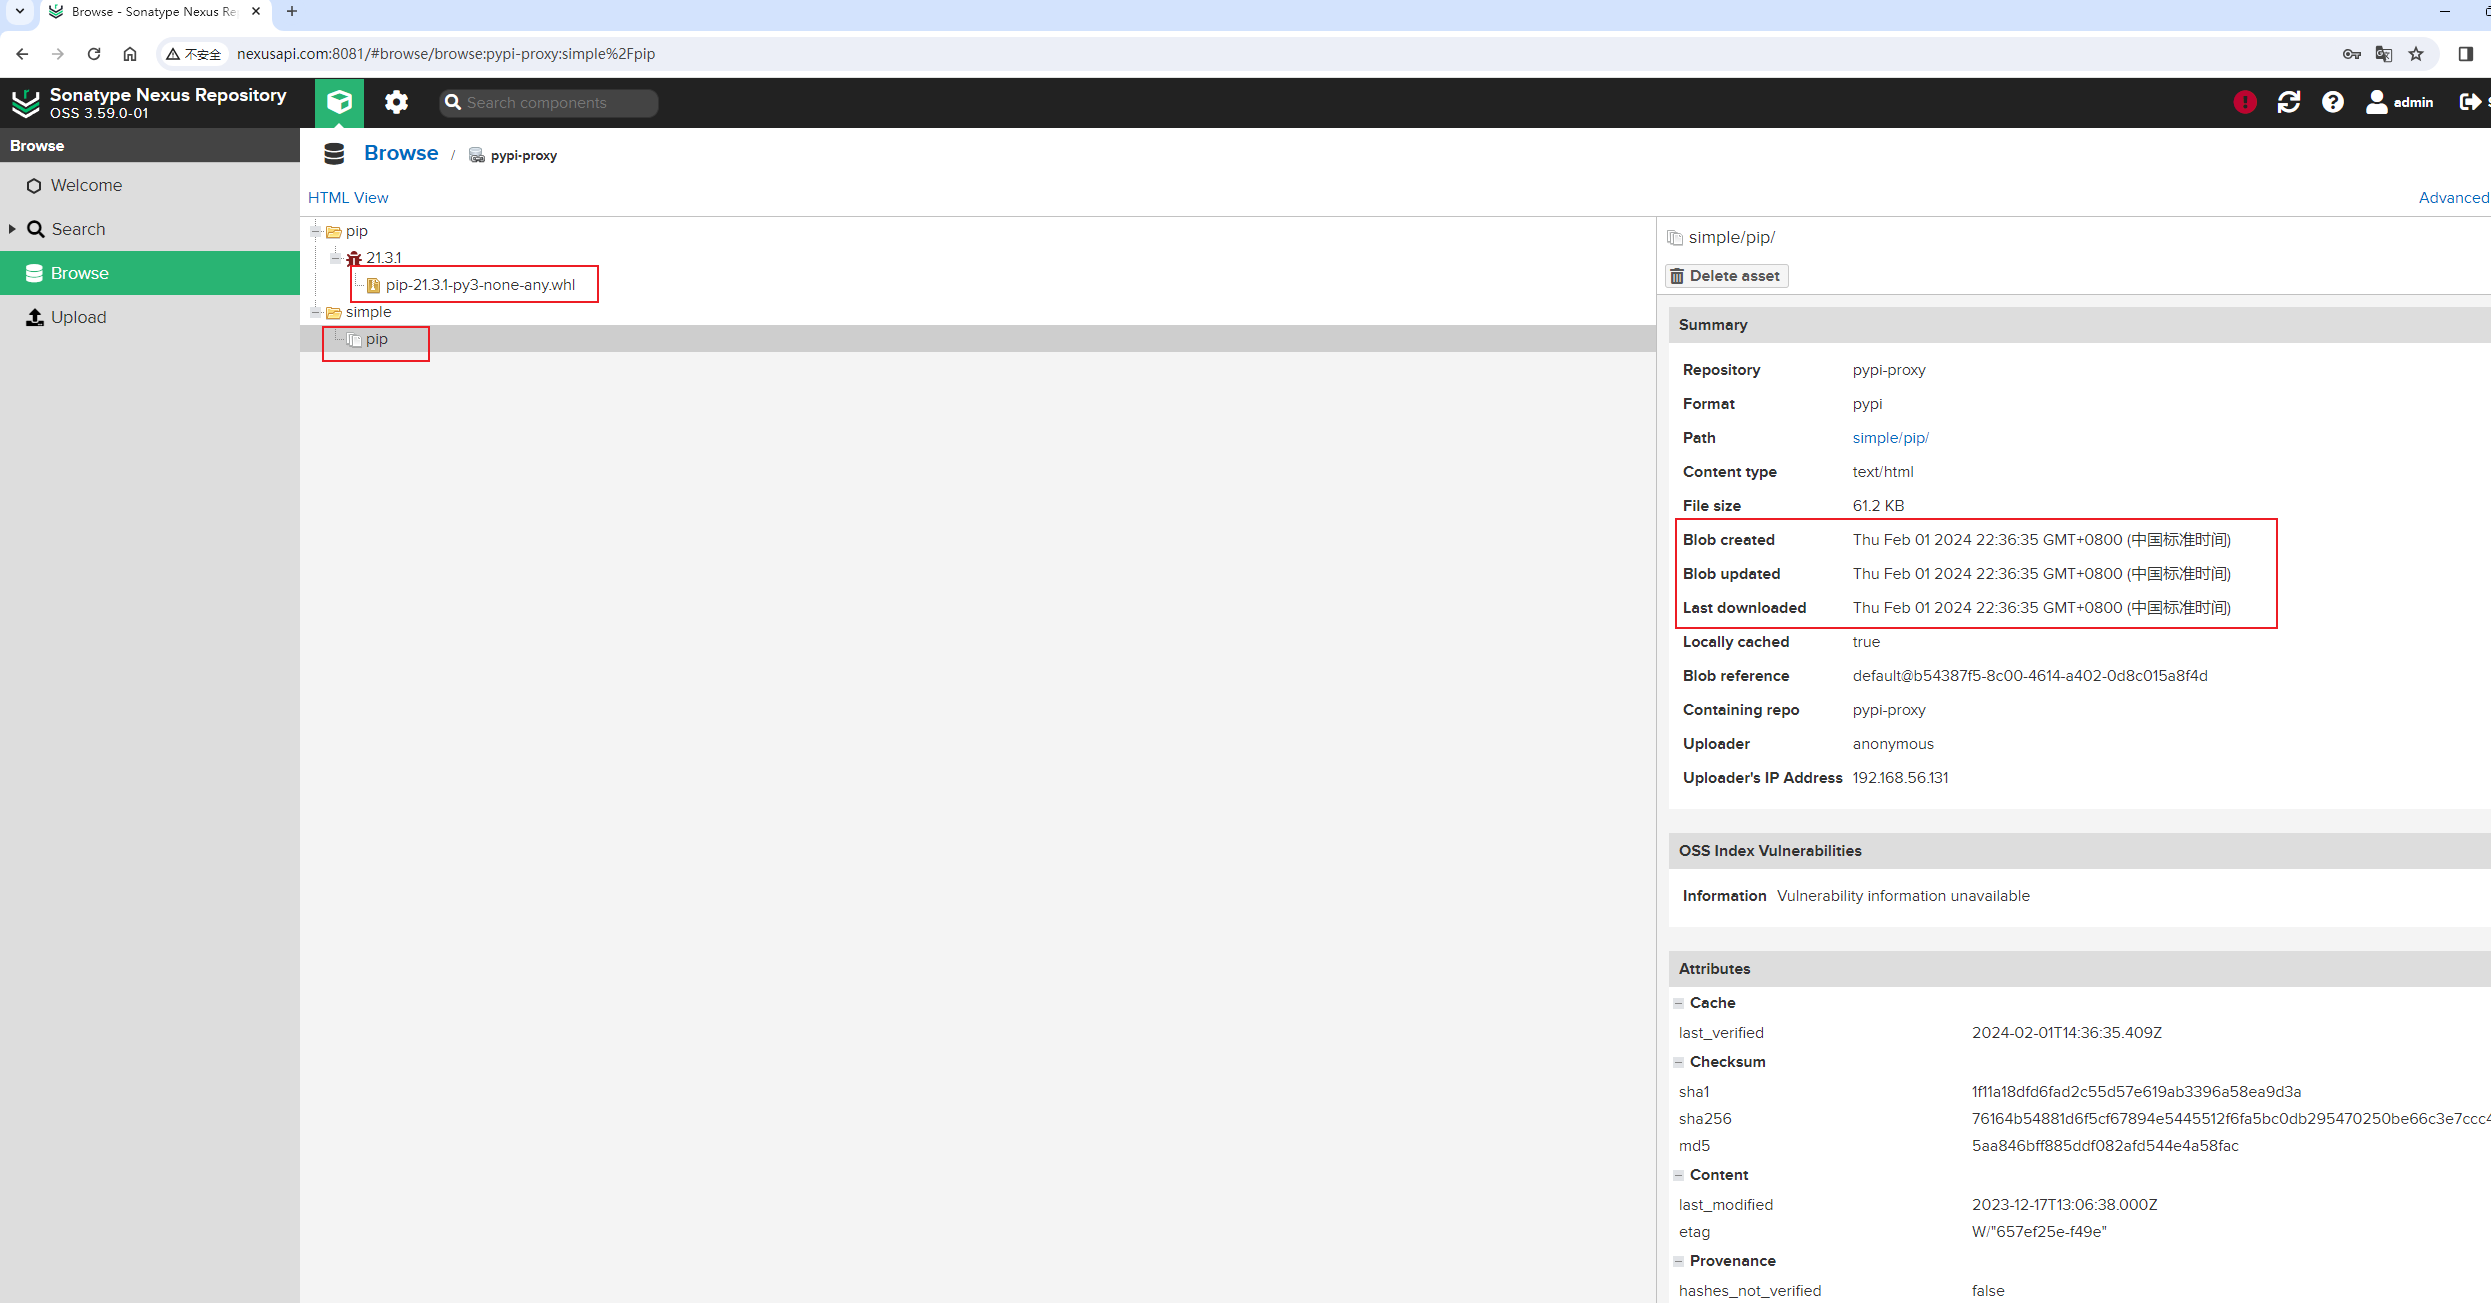
[root@nexus-test ~]#此时,可以在Nexus Browse浏览器页面看到已经有pypi-proxy代理仓库的缓存数据了:
说明通过API接口创建pypi-proxy代理仓库也能正常工作了。
再安装一个包试下:
[root@nexus-test ~]# pip3 install requests
WARNING: pip is being invoked by an old script wrapper. This will fail in a future version of pip.
Please see https://github.com/pypa/pip/issues/5599 for advice on fixing the underlying issue.
To avoid this problem you can invoke Python with '-m pip' instead of running pip directly.
Looking in indexes: http://nexusapi.com:8081/repository/pypi-proxy/simple/
Collecting requests
  Downloading http://nexusapi.com:8081/repository/pypi-proxy/packages/requests/2.27.1/requests-2.27.1-py2.py3-none-any.whl (63 kB)
     |████████████████████████████████| 63 kB 2.6 MB/s
Collecting idna<4,>=2.5
  Downloading http://nexusapi.com:8081/repository/pypi-proxy/packages/idna/3.6/idna-3.6-py3-none-any.whl (61 kB)
     |████████████████████████████████| 61 kB 402 kB/s
Collecting charset-normalizer~=2.0.0
  Downloading http://nexusapi.com:8081/repository/pypi-proxy/packages/charset-normalizer/2.0.12/charset_normalizer-2.0.12-py3-none-any.whl (39 kB)
Collecting urllib3<1.27,>=1.21.1
  Downloading http://nexusapi.com:8081/repository/pypi-proxy/packages/urllib3/1.26.18/urllib3-1.26.18-py2.py3-none-any.whl (143 kB)
     |████████████████████████████████| 143 kB 103.0 MB/s
Collecting certifi>=2017.4.17
  Downloading http://nexusapi.com:8081/repository/pypi-proxy/packages/certifi/2023.11.17/certifi-2023.11.17-py3-none-any.whl (162 kB)
     |████████████████████████████████| 162 kB 101.8 MB/s
Installing collected packages: urllib3, idna, charset-normalizer, certifi, requests
Successfully installed certifi-2023.11.17 charset-normalizer-2.0.12 idna-3.6 requests-2.27.1 urllib3-1.26.18
WARNING: Running pip as the 'root' user can result in broken permissions and conflicting behaviour with the system package manager. It is recommended to use a virtual environment instead: https://pip.pypa.io/warnings/venv
[root@nexus-test ~]#没问题,通过代理仓库下载了相关的包,Nexus Browse浏览器页面也有新的更新了:
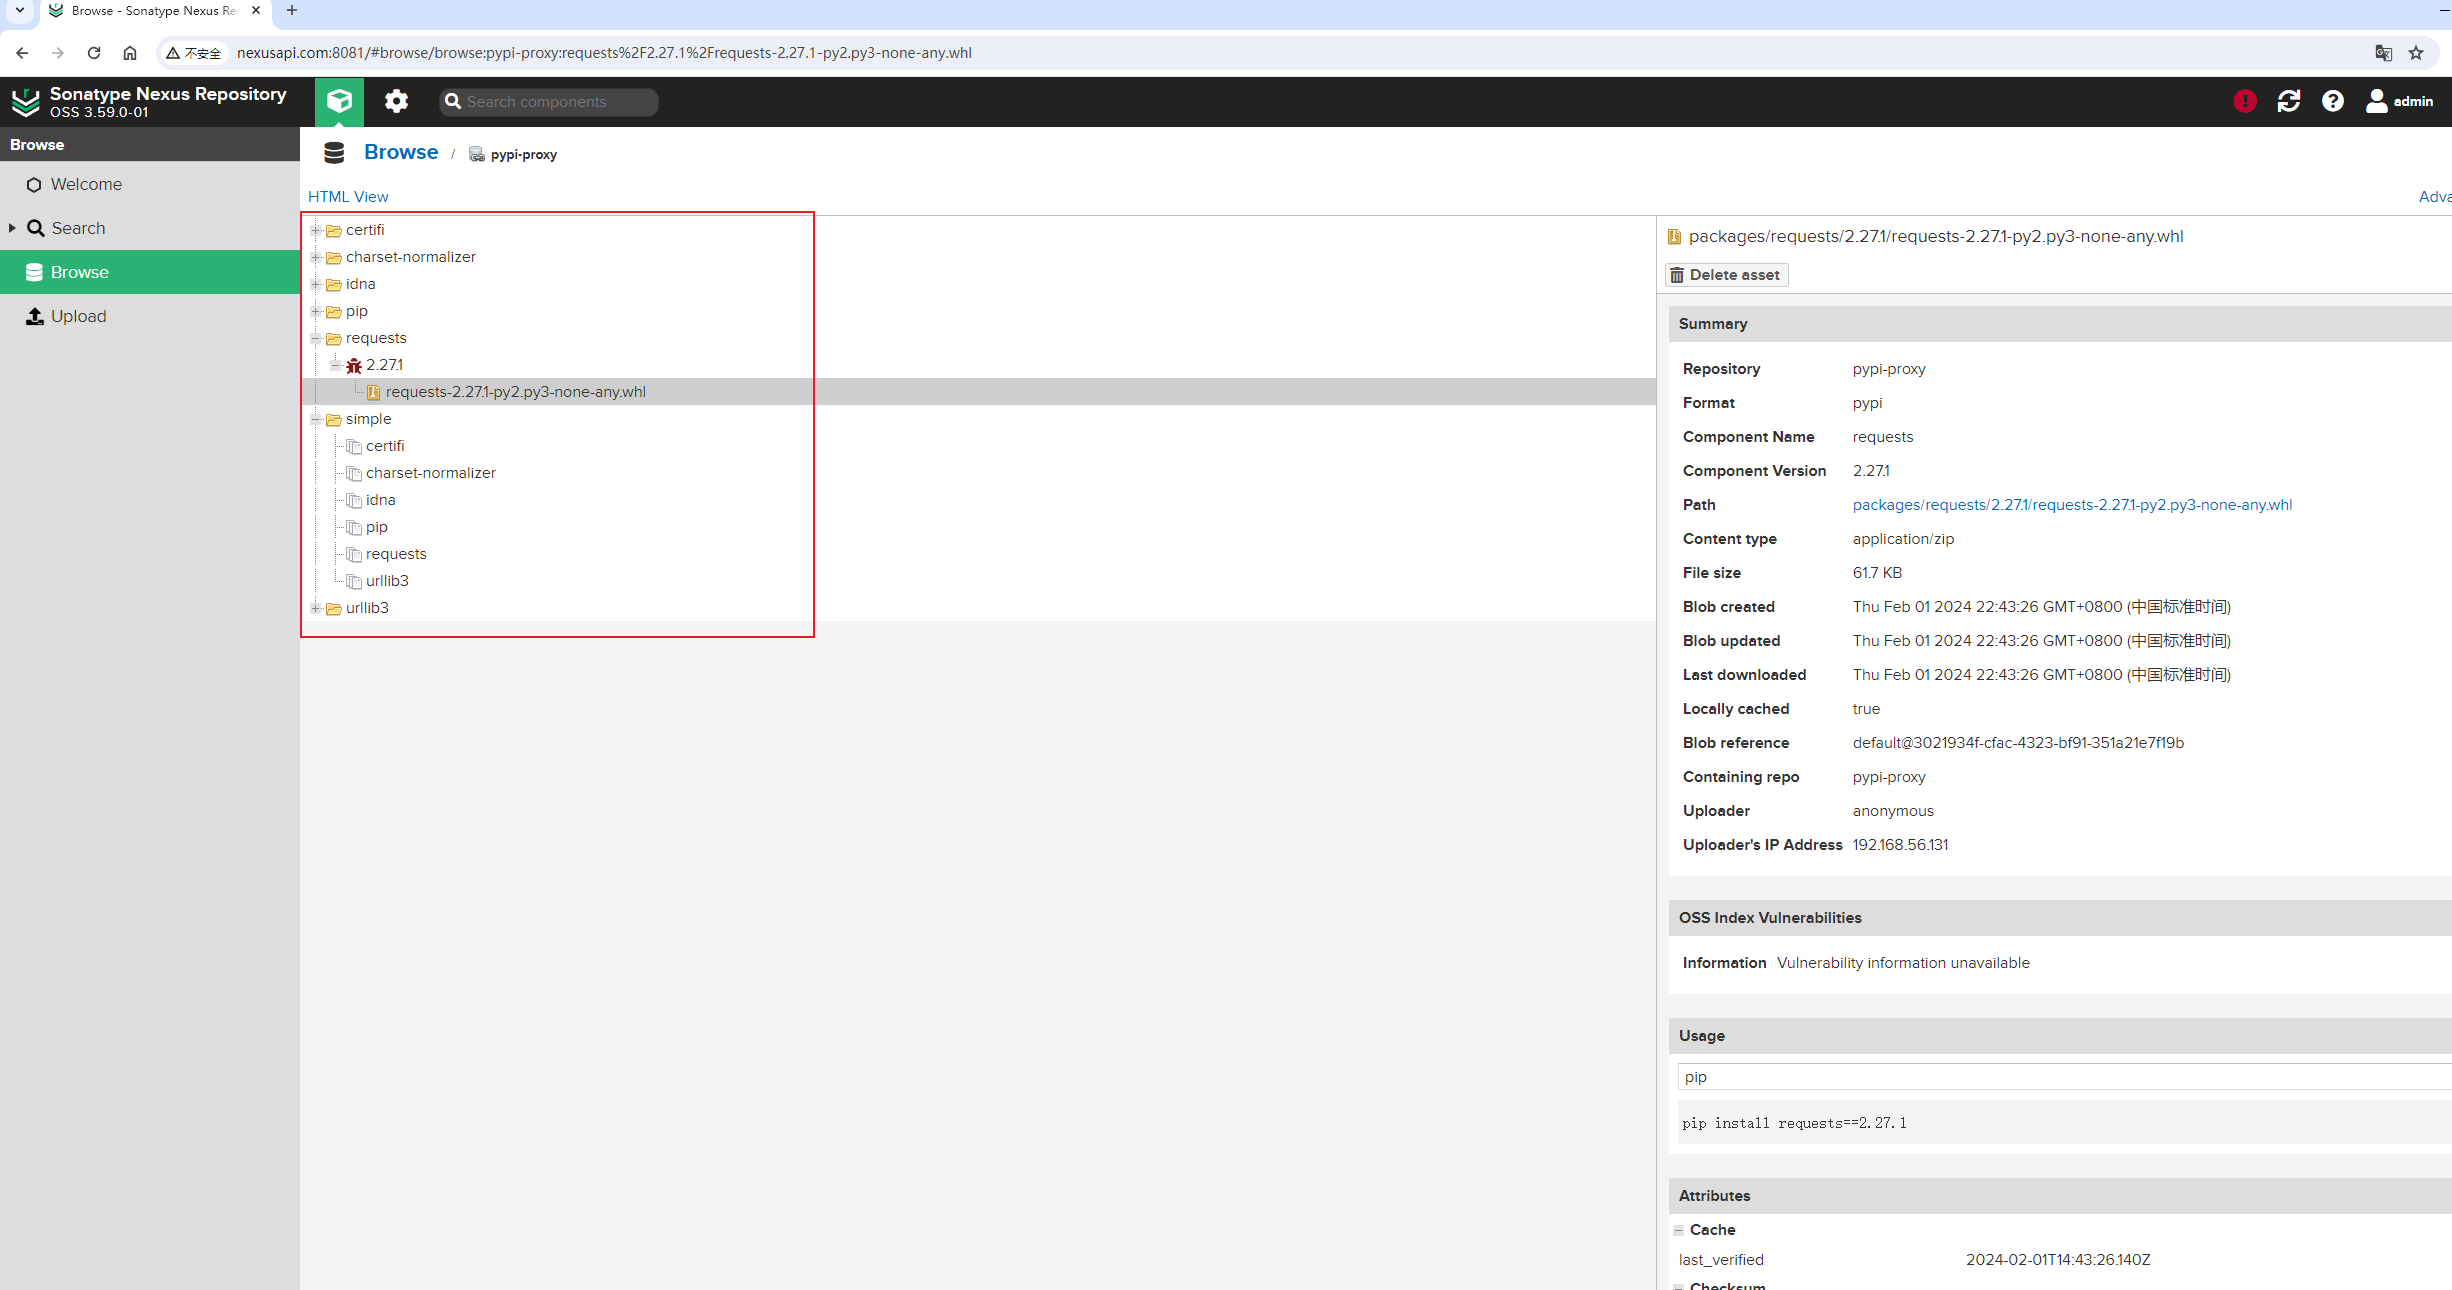
再次确认代码仓库能正常工作了。
3. 创建maven-proxy代理仓库
本节创建一个Java打包工具maven的maven-proxy代理仓库。
Create Maven proxy repository。
POST请求 /service/rest/v1/repositories/maven/proxy接口。
Nexus API页面给出了参数示例:
{
  "name": "internal",
  "online": true,
  "storage": {
    "blobStoreName": "default",
    "strictContentTypeValidation": true
  },
  "cleanup": {
    "policyNames": [
      "string"
    ]
  },
  "proxy": {
    "remoteUrl": "https://remote.repository.com",
    "contentMaxAge": 1440,
    "metadataMaxAge": 1440
  },
  "negativeCache": {
    "enabled": true,
    "timeToLive": 1440
  },
  "httpClient": {
    "blocked": false,
    "autoBlock": true,
    "connection": {
      "retries": 0,
      "userAgentSuffix": "string",
      "timeout": 60,
      "enableCircularRedirects": false,
      "enableCookies": false,
      "useTrustStore": false
    },
    "authentication": {
      "type": "username",
      "username": "string",
      "password": "string",
      "ntlmHost": "string",
      "ntlmDomain": "string",
      "preemptive": false
    }
  },
  "routingRule": "string",
  "replication": {
    "preemptivePullEnabled": false,
    "assetPathRegex": "string"
  },
  "maven": {
    "versionPolicy": "MIXED",
    "layoutPolicy": "STRICT",
    "contentDisposition": "ATTACHMENT"
  }
}有了上一节的centos-proxy和pypi-proxy代理仓库的创建经验,此节修改以上参数就简单得多。
此时,我们直接来改Python代码,直接用代码来请求API接口。
修改后的代码:
######################################################################
# 创建maven-proxy代理仓库
import requests

url = "http://nexusapi.com:8081/service/rest/v1/repositories/maven/proxy"

payload = {
    "name": "maven-proxy",
    "online": True,
    "storage": {
        "blobStoreName": "default",
        "strictContentTypeValidation": True
    },
    "proxy": {
        "remoteUrl": "https://maven.aliyun.com/repository/public",
        "contentMaxAge": 1440,
        "metadataMaxAge": 1440
    },
    "negativeCache": {
        "enabled": True,
        "timeToLive": 1440
    },
    "httpClient": {
        "blocked": False,
        "autoBlock": True,
        "connection": {
            "retries": 0,
            "userAgentSuffix": "Email: yourname@email.com",
            "timeout": 60,
            "enableCircularRedirects": False,
            "enableCookies": False,
            "useTrustStore": False
        }
    },
    "maven": {
        "versionPolicy": "RELEASE",
        "layoutPolicy": "STRICT",
        "contentDisposition": "ATTACHMENT"
    }
}
headers = {
    "Accept": "application/json",
    "Content-Type": "application/json",
    "content-type": "application/json",
    "Authorization": "Basic YWRtaW46YWRtaW4xMjM="
}

response = requests.request("POST", url, json=payload, headers=headers)

print(response.text)
print(response.status_code)执行代码:
$ python nexus_api.py

201刷新Nexus页面,可以看到,maven-proxy代理仓库创建成功!
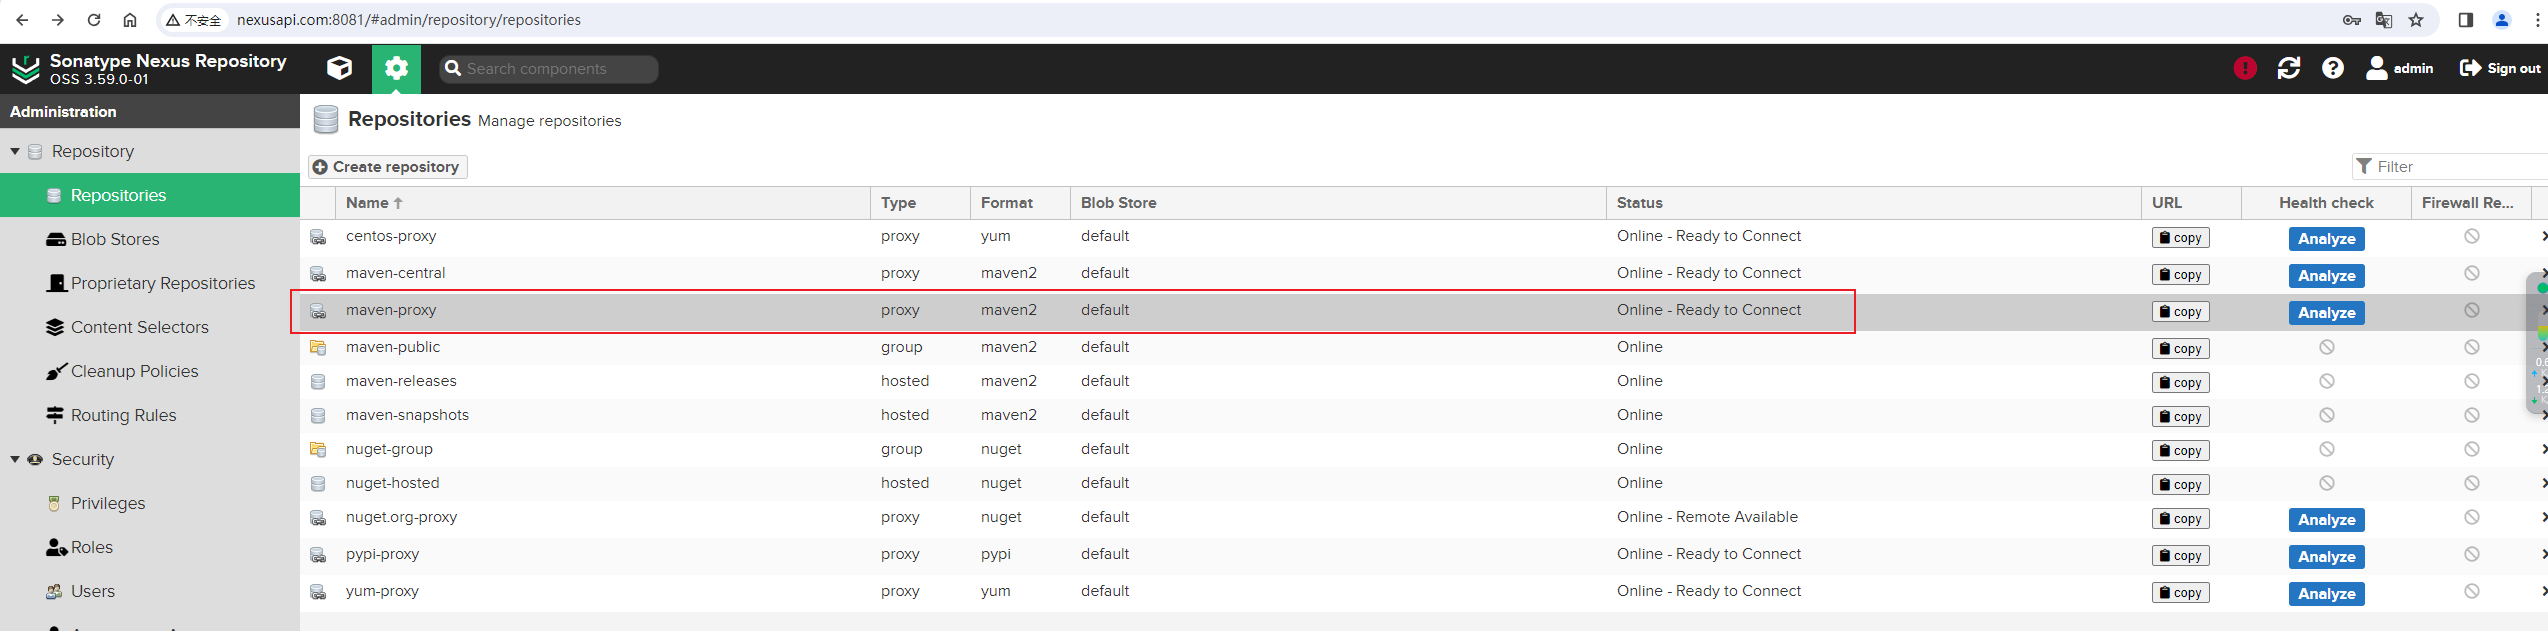
代理仓库详情:
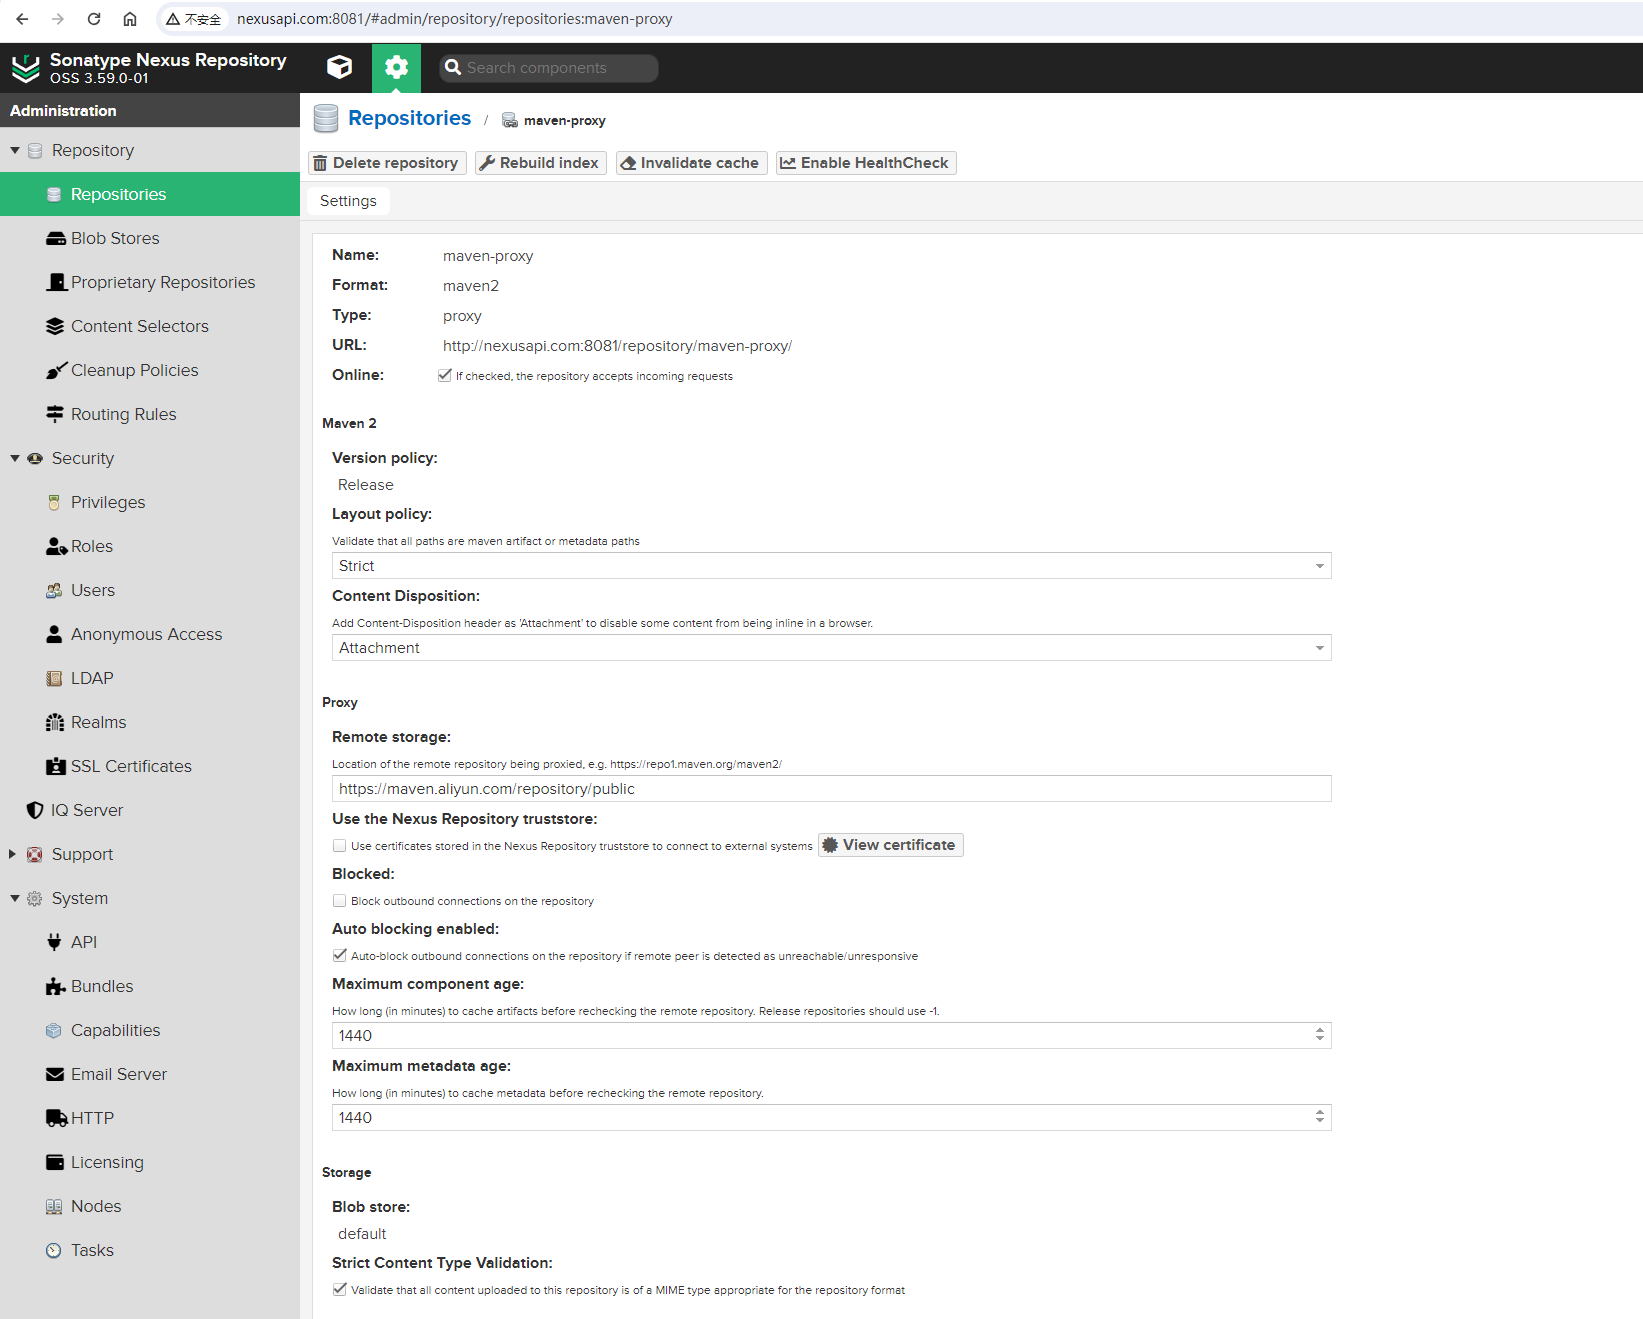
对应的Maven代理仓库地址 http://nexusapi.com:8081/repository/maven-proxy/。
参考 vscode配置maven环境 修改maven配置,并测试是否能通过代理仓库maven项目。
修改maven配置文件,将原来阿里云仓库注释掉,然后设置代理仓库的URL等信息:
  <mirrors>
    <!-- mirror
     | Specifies a repository mirror site to use instead of a given repository. The repository that
     | this mirror serves has an ID that matches the mirrorOf element of this mirror. IDs are used
     | for inheritance and direct lookup purposes, and must be unique across the set of mirrors.
     |
    <mirror>
      <id>mirrorId</id>
      <mirrorOf>repositoryId</mirrorOf>
      <name>Human Readable Name for this Mirror.</name>
      <url>http://my.repository.com/repo/path</url>
    </mirror>

    <mirror>
        <id>aliyunmaven</id>
        <mirrorOf>*</mirrorOf>
        <name>阿里云公共仓库</name>
        <url>https://maven.aliyun.com/repository/public</url>
    </mirror>
    -->
    <mirror>
        <id>nexuu-maven</id>
        <mirrorOf>*</mirrorOf>
        <name>Nexus Maven代理仓库</name>
        <url>http://nexusapi.com:8081/repository/maven-proxy</url>
    </mirror>
</mirrors>然后创建maven项目:
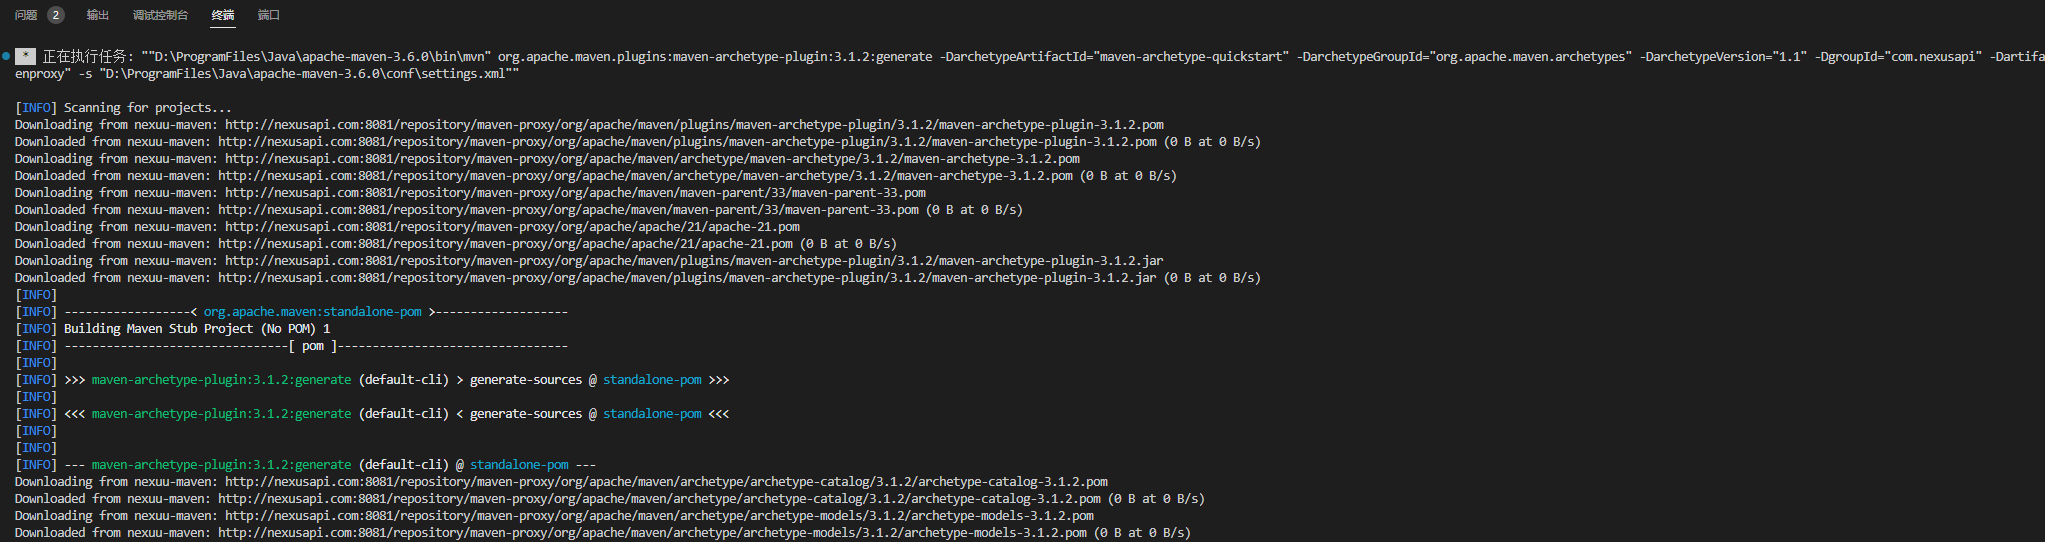
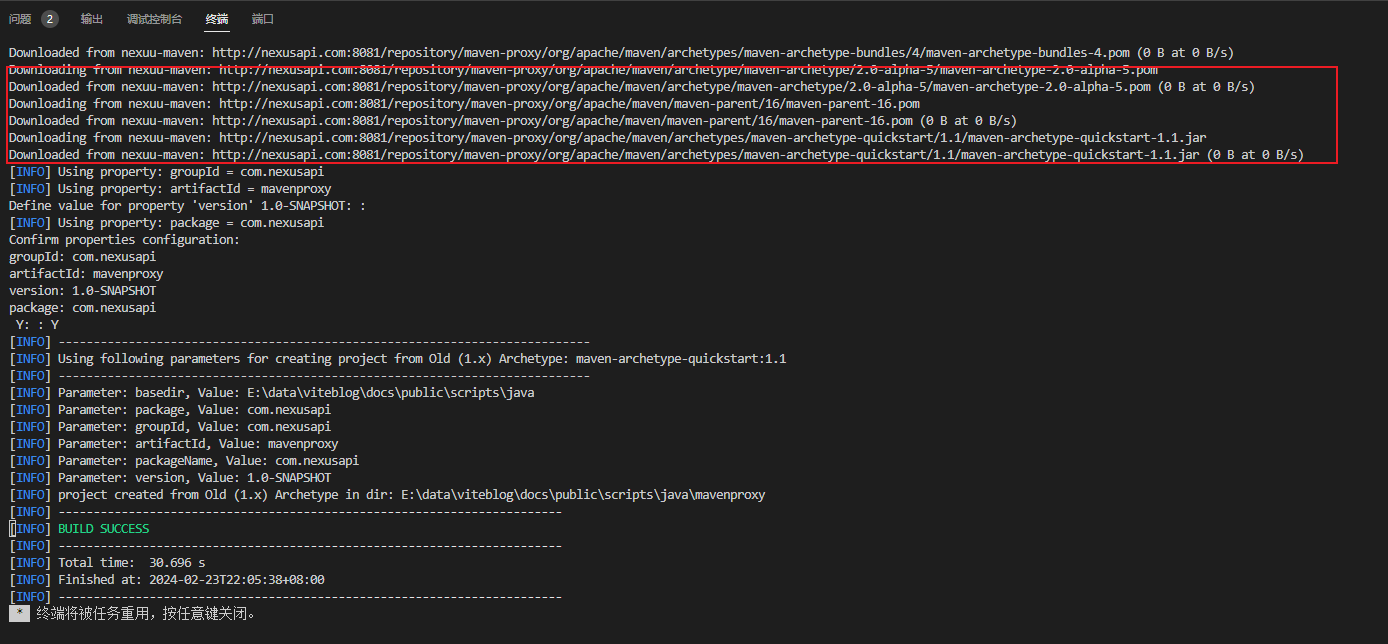
可以看到maven项目创建成功,能够正常从代理仓库下载依赖包。
然后打开对应的maven项目,可以看到能够正常运行:
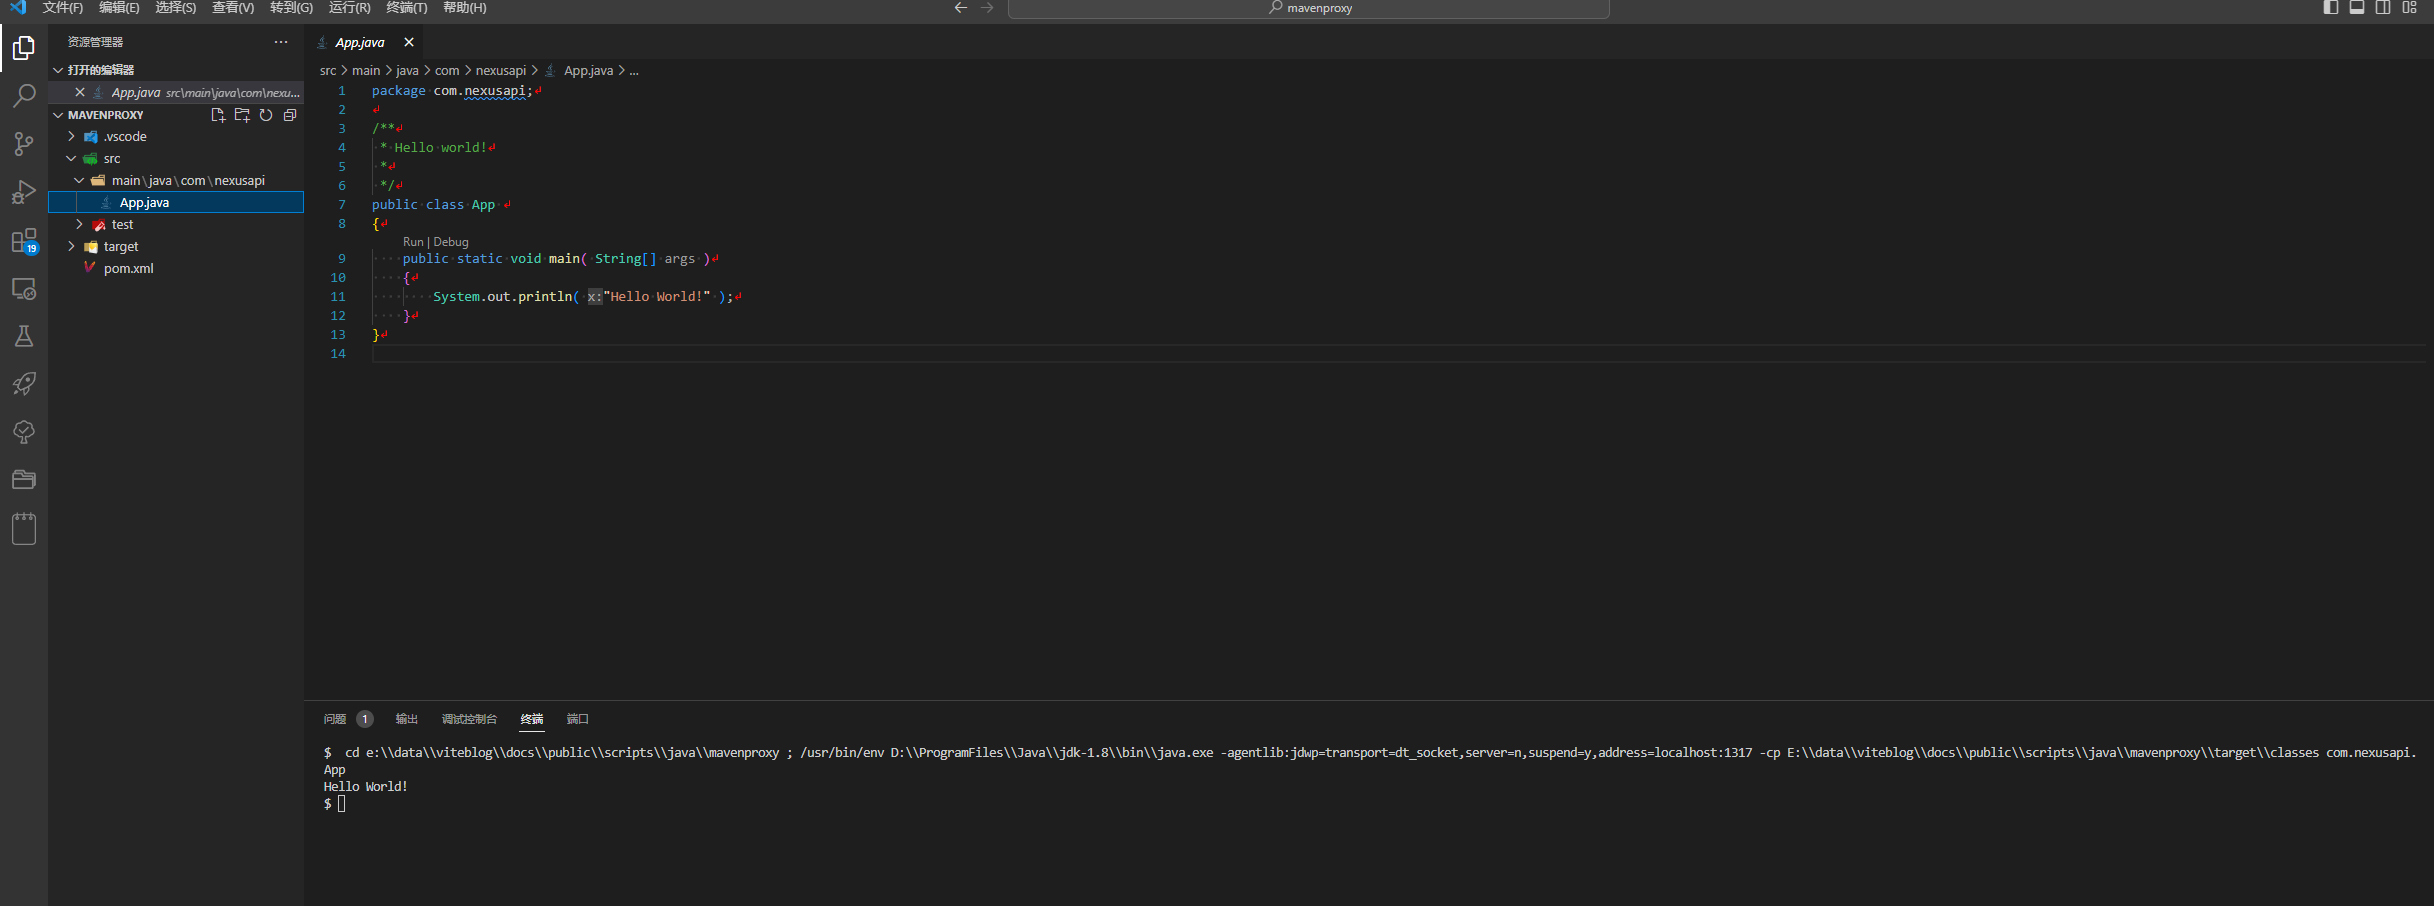
在nexus browse浏览器页面也可以看到maven-proxy仓库缓存了数据:
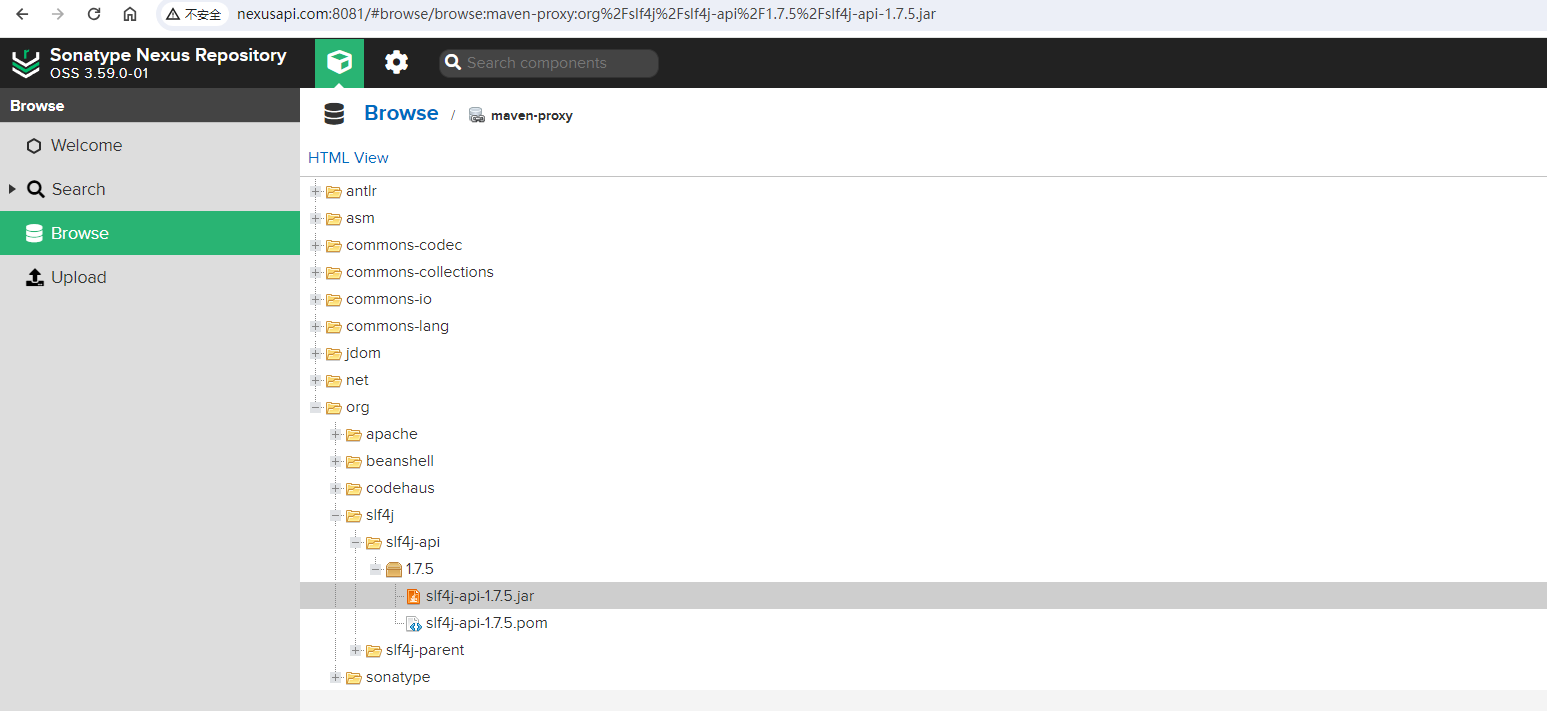
也就说明通过api接口创建的maven代理仓库能够正常工作。
4. 创建docker-proxy代理仓库
本节创建docker加速源的docker-proxy代理仓库。
Create Docker proxy repository。
POST请求 /service/rest/v1/repositories/docker/proxy接口。
Nexus API页面给出了参数示例:
{
  "name": "internal",
  "online": true,
  "storage": {
    "blobStoreName": "default",
    "strictContentTypeValidation": true
  },
  "cleanup": {
    "policyNames": [
      "string"
    ]
  },
  "proxy": {
    "remoteUrl": "https://remote.repository.com",
    "contentMaxAge": 1440,
    "metadataMaxAge": 1440
  },
  "negativeCache": {
    "enabled": true,
    "timeToLive": 1440
  },
  "httpClient": {
    "blocked": false,
    "autoBlock": true,
    "connection": {
      "retries": 0,
      "userAgentSuffix": "string",
      "timeout": 60,
      "enableCircularRedirects": false,
      "enableCookies": false,
      "useTrustStore": false
    },
    "authentication": {
      "type": "username",
      "username": "string",
      "password": "string",
      "ntlmHost": "string",
      "ntlmDomain": "string"
    }
  },
  "routingRule": "string",
  "replication": {
    "preemptivePullEnabled": false,
    "assetPathRegex": "string"
  },
  "docker": {
    "v1Enabled": false,
    "forceBasicAuth": true,
    "httpPort": 8082,
    "httpsPort": 8083,
    "subdomain": "docker-a"
  },
  "dockerProxy": {
    "indexType": "HUB",
    "indexUrl": "string",
    "cacheForeignLayers": true,
    "foreignLayerUrlWhitelist": [
      "string"
    ]
  }
}此时,我们直接将json字符串写入到docker-proxy.json文件中,然后用代码读取该文件:
{
  "name": "docker-proxy",
  "online": true,
  "storage": {
    "blobStoreName": "docker",
    "strictContentTypeValidation": true
  },
  "proxy": {
    "remoteUrl": "https://hub-mirror.c.163.com",
    "contentMaxAge": 1440,
    "metadataMaxAge": 1440
  },
  "negativeCache": {
    "enabled": true,
    "timeToLive": 1440
  },
  "httpClient": {
    "blocked": false,
    "autoBlock": true,
    "connection": {
      "retries": 0,
      "userAgentSuffix": "Email: yourname@email.com",
      "timeout": 60,
      "enableCircularRedirects": false,
      "enableCookies": false,
      "useTrustStore": false
   }
  },
  "docker": {
    "v1Enabled": true,
    "forceBasicAuth": false,
    "httpPort": 8001,
    "httpsPort": null,
    "subdomain": null
  },
  "dockerProxy": {
    "indexType": "HUB",
    "indexUrl": null,
    "cacheForeignLayers": false,
    "foreignLayerUrlWhitelist": []
  }
}代理网易的docker镜像https://hub-mirror.c.163.com,然后更新nexus_api.py文件:
######################################################################
# 创建docker-proxy代理仓库
import os

import requests
import json

url = "http://nexusapi.com:8081/service/rest/v1/repositories/docker/proxy"
script_path = os.path.abspath(__file__)
parent_dir = os.path.join(script_path, '..')
filename = f"{parent_dir}/nexus_api/docker-proxy.json"

with open(filename) as file:
    payload = json.load(file)
headers = {
    "Accept": "application/json",
    "Content-Type": "application/json",
    "content-type": "application/json",
    "Authorization": "Basic YWRtaW46YWRtaW4xMjM="
}

response = requests.request("POST", url, json=payload, headers=headers)

print(response.text)
print(response.status_code)执行代码:
$ python nexus_api.py

201刷新Nexus页面,可以看到,docker-proxy代理仓库创建成功!


说明docker-proxy代理仓库创建成功!
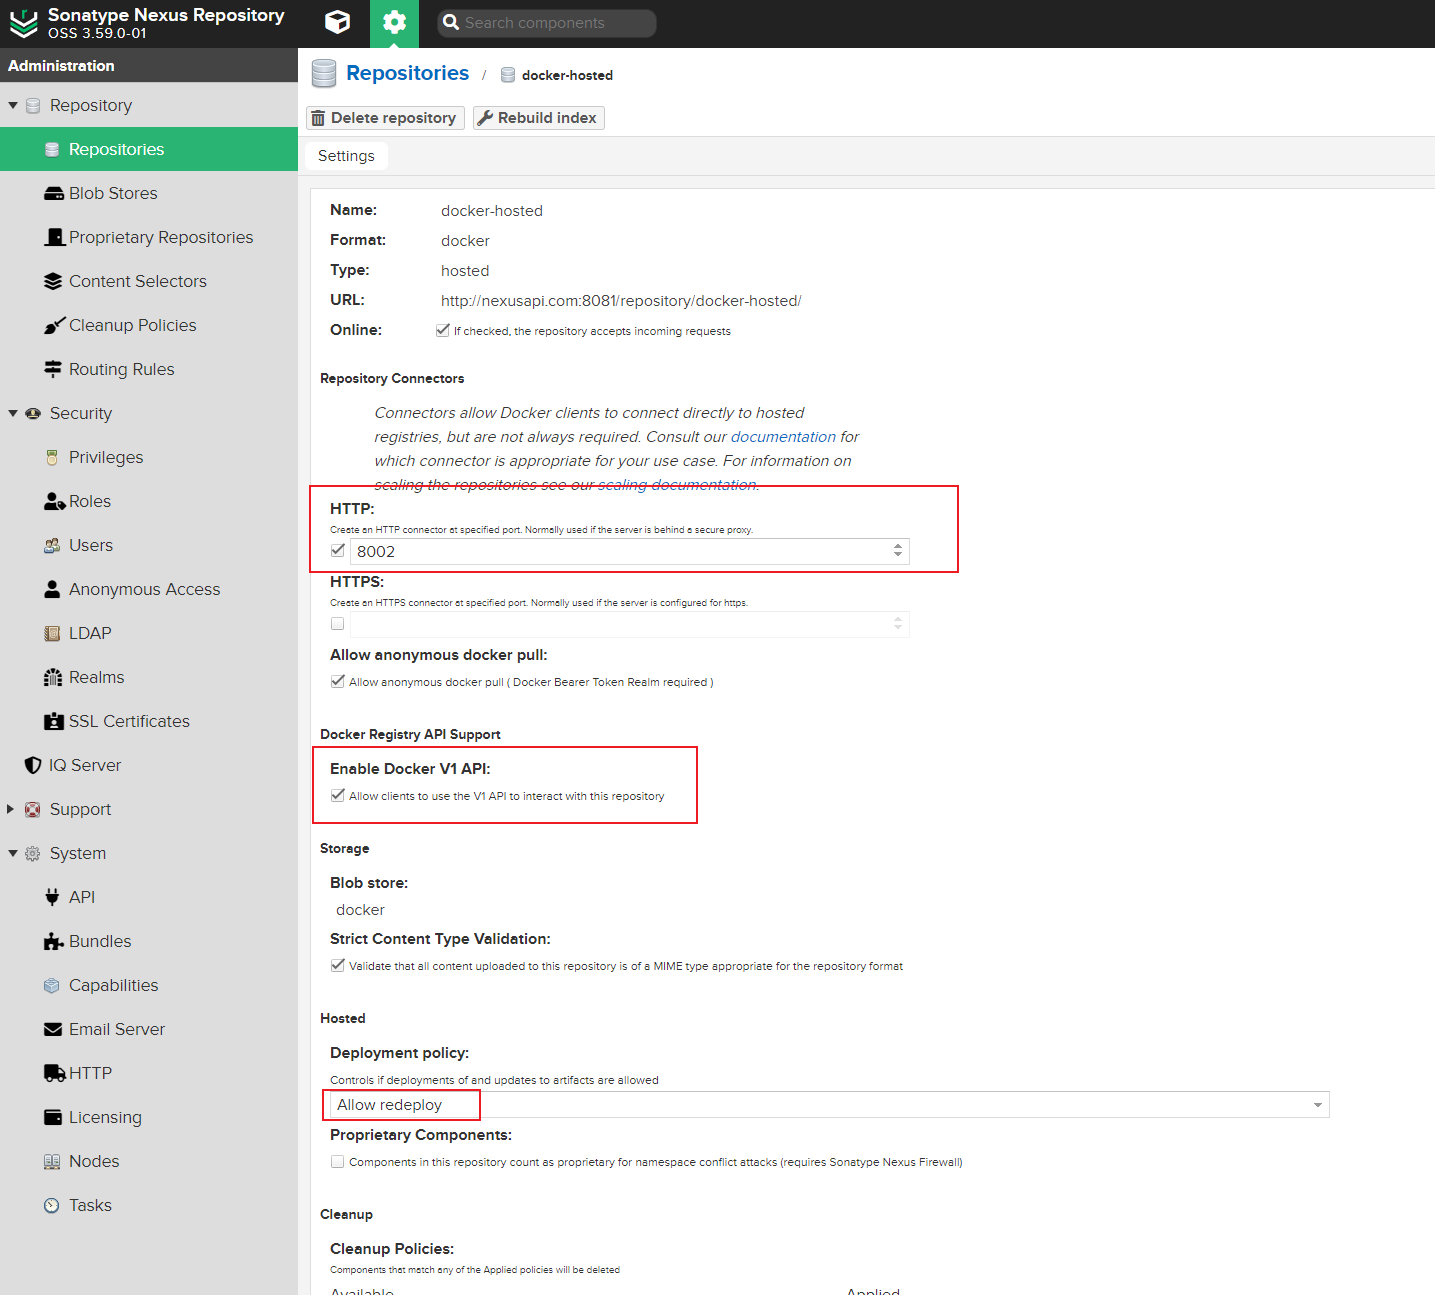
5. 创建docker-hosted本地仓库
本节创建docker-hosted本地仓库,指定HTTP端口8002,用于上传自己打包的镜像。
Create Docker hosted repository。
POST请求 /service/rest/v1/repositories/docker/hosted接口。
Nexus API页面给出了参数示例:
{
  "name": "internal",
  "online": true,
  "storage": {
    "blobStoreName": "default",
    "strictContentTypeValidation": true,
    "writePolicy": "allow_once",
    "latestPolicy": true
  },
  "cleanup": {
    "policyNames": [
      "string"
    ]
  },
  "component": {
    "proprietaryComponents": true
  },
  "docker": {
    "v1Enabled": false,
    "forceBasicAuth": true,
    "httpPort": 8082,
    "httpsPort": 8083,
    "subdomain": "docker-a"
  }
}此时,我们直接将json字符串写入到docker-hosted.json文件中,然后用代码读取该文件:
{
  "name": "docker-hosted",
  "online": true,
  "storage": {
    "blobStoreName": "docker",
    "strictContentTypeValidation": true,
    "writePolicy": "ALLOW",
    "latestPolicy": true
  },

  "component": {
    "proprietaryComponents": false
  },
  "docker": {
    "v1Enabled": true,
    "forceBasicAuth": false,
    "httpPort": 8002,
    "httpsPort": null,
    "subdomain": null
  }
}然后更新nexus_api.py文件:
######################################################################
# 创建docker-hosted本地仓库
import os

import requests
import json

url = "http://nexusapi.com:8081/service/rest/v1/repositories/docker/hosted"
script_path = os.path.abspath(__file__)
parent_dir = os.path.join(script_path, '..')
filename = f"{parent_dir}/nexus_api/docker-hosted.json"

with open(filename) as file:
    payload = json.load(file)
headers = {
    "Accept": "application/json",
    "Content-Type": "application/json",
    "content-type": "application/json",
    "Authorization": "Basic YWRtaW46YWRtaW4xMjM="
}

response = requests.request("POST", url, json=payload, headers=headers)

print(response.text)
print(response.status_code)执行代码:
$ python nexus_api.py

201刷新Nexus页面,可以看到,docker-hosted本地仓库创建成功!
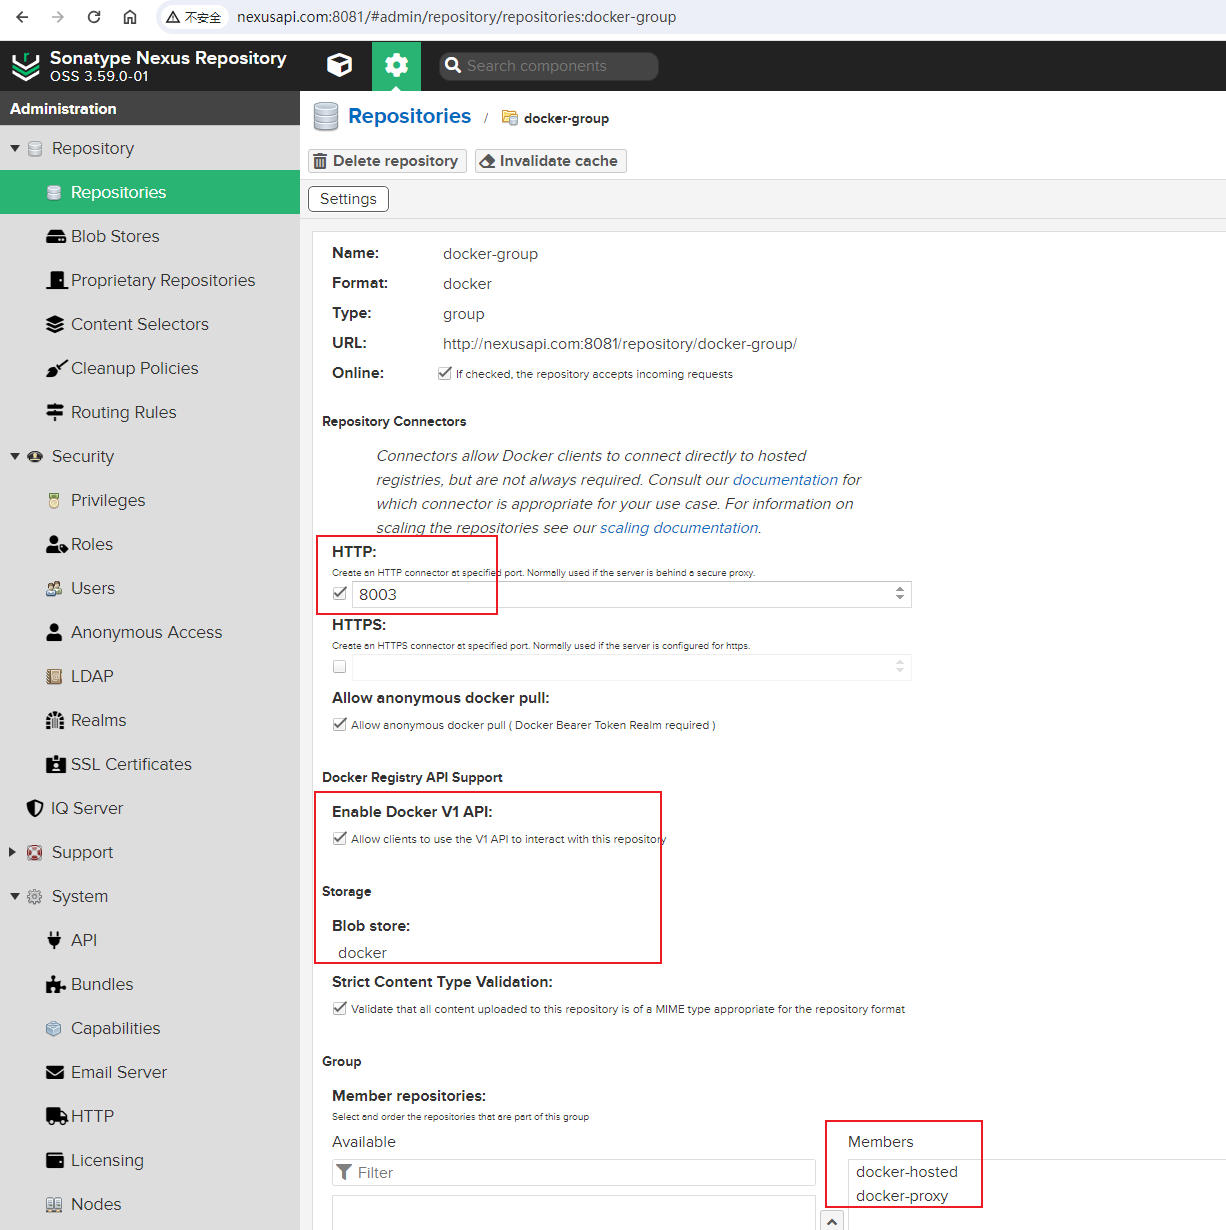
6. 创建docker-group聚合仓库
本节创建docker-group聚合仓库,指定HTTP端口8003,用于将docker-proxy代理仓库和docker-hosted本地仓库组成一个组。
Create Docker group repository。
POST请求 /service/rest/v1/repositories/docker/group接口。
Nexus API页面给出了参数示例:
{
  "name": "internal",
  "online": true,
  "storage": {
    "blobStoreName": "default",
    "strictContentTypeValidation": true
  },
  "group": {
    "memberNames": [
      "string"
    ],
    "writableMember": "string"
  },
  "docker": {
    "v1Enabled": false,
    "forceBasicAuth": true,
    "httpPort": 8082,
    "httpsPort": 8083,
    "subdomain": "docker-a"
  }
}此时,我们直接将json字符串写入到docker-group.json文件中,然后用代码读取该文件:
{
  "name": "docker-group",
  "online": true,
  "storage": {
    "blobStoreName": "docker",
    "strictContentTypeValidation": true
  },
  "group": {
    "memberNames": [
      "docker-hosted",
      "docker-proxy"
    ],
    "writableMember": null
  },
  "docker": {
    "v1Enabled": true,
    "forceBasicAuth": false,
    "httpPort": 8003,
    "httpsPort": null,
    "subdomain": null
  }
}然后更新nexus_api.py文件:
######################################################################
# 创建docker-group聚合仓库
import os

import requests
import json

url = "http://nexusapi.com:8081/service/rest/v1/repositories/docker/group"
script_path = os.path.abspath(__file__)
parent_dir = os.path.join(script_path, '..')
filename = f"{parent_dir}/nexus_api/docker-group.json"

with open(filename) as file:
    payload = json.load(file)
headers = {
    "Accept": "application/json",
    "Content-Type": "application/json",
    "content-type": "application/json",
    "Authorization": "Basic YWRtaW46YWRtaW4xMjM="
}

response = requests.request("POST", url, json=payload, headers=headers)

print(response.text)
print(response.status_code)执行代码:
$ python nexus_api.py

201刷新Nexus页面,可以看到,docker-group聚合仓库创建成功!