搭建自己的nexus私有仓库1--nexus初体验
本文系列计划做以下事情:
- 使用docker sonatype/nexus3镜像创建nexus容器。
- 创建docker代理仓库、私有仓库、docker组仓库。
使用docker-compose配置nexus容器。- 使用nexus3 api创建blob存储,创建repositories等。
- 使用ansible一键部署nexus容器,并配置好repositories仓库。
docker nexus3配置使用可参考B站大佬视频 使用 Nexus 制作 Docker 私库 学习 2022-11-24。
文档可参考在 Docker 中安装 Nexus
以下是实验环境:
| 主机 | IP | 主机名 | 操作系统 | docker版本 | 自定义域名 |
|---|---|---|---|---|---|
| 1 | 192.168.56.11 | nexus | CentOS 7.6.1810 | 20.10.5 | nexushub.com |
| 2 | 192.168.56.12 | master | CentOS 7.6.1810 | 20.10.5 |
0. 准备工作
请在主机2以及你的电脑上面配置域名解析:
[root@master ~]# tail -n 1 /etc/hosts
192.168.56.11 nexushub.com注意,实际操作时,请将192.168.56.11替换成你服务器的内网IP或者公网IP,nexushub.com替换成你想使用的域名。
1. nexus初体验
1.1 下载指定版本容器
首先下载sonatype/nexus3镜像:
# 当前时间
[root@nexus ~]# date
Mon Aug 21 22:55:34 CST 2023
[root@nexus ~]#

# 下载镜像
[root@nexus ~]# docker pull sonatype/nexus3:3.59.0
3.59.0: Pulling from sonatype/nexus3
57168402cb72: Pull complete
ccdb07e91e21: Pull complete
713b05c4ae12: Pull complete
da83a81c238e: Pull complete
16447e7f6d34: Pull complete
3f3e8a0af04e: Pull complete
564f69aa8faf: Pull complete
Digest: sha256:919ec9845bd0432ff345044f50b3b1696d92321b458ecd942dbdc7908192ea16
Status: Downloaded newer image for sonatype/nexus3:3.59.0
docker.io/sonatype/nexus3:3.59.0
[root@nexus ~]#查看镜像版本信息:
[root@nexus ~]# docker images sonatype/nexus3:3.59.0
REPOSITORY        TAG       IMAGE ID       CREATED      SIZE
sonatype/nexus3   3.59.0    42da3c83697f   5 days ago   552MB
[root@nexus ~]#1.2 运行nexus容器
执行以下命令启动nexus容器:
[root@nexus ~]# docker run -d --restart always -p 8081:8081 --name nexus sonatype/nexus3:3.59.0
80bbd285db0bc84a50b785a2aeb688d8bf6879e5fa1381357fa1426a9f38148a
[root@nexus ~]#查看容器信息:
[root@nexus ~]# docker ps
CONTAINER ID   IMAGE                    COMMAND                  CREATED              STATUS              PORTS                    NAMES
80bbd285db0b   sonatype/nexus3:3.59.0   "/opt/sonatype/nexus…"   About a minute ago   Up About a minute   0.0.0.0:8081->8081/tcp   nexus
[root@nexus ~]#1.3 nexus管理端的使用
访问nexus管理网站 http://nexushub.com:8081/

点击右上角的登陆"Sign in",会提示输入用户名密码:
 可以看到,
可以看到,admin账号的密码信息在/nexus-data/admin.password文件中,我们使用docker exec命令查看一下:
[root@nexus ~]# docker exec -it nexus cat /nexus-data/admin.password
cb417bf4-eb29-43e5-89c8-304860c41ede[root@nexus ~]#
[root@nexus ~]#可以看到cb417bf4-eb29-43e5-89c8-304860c41ede就是nexus的初始密码。
输入账号admin,密码cb417bf4-eb29-43e5-89c8-304860c41ede,然后点击【Sign in】登陆: 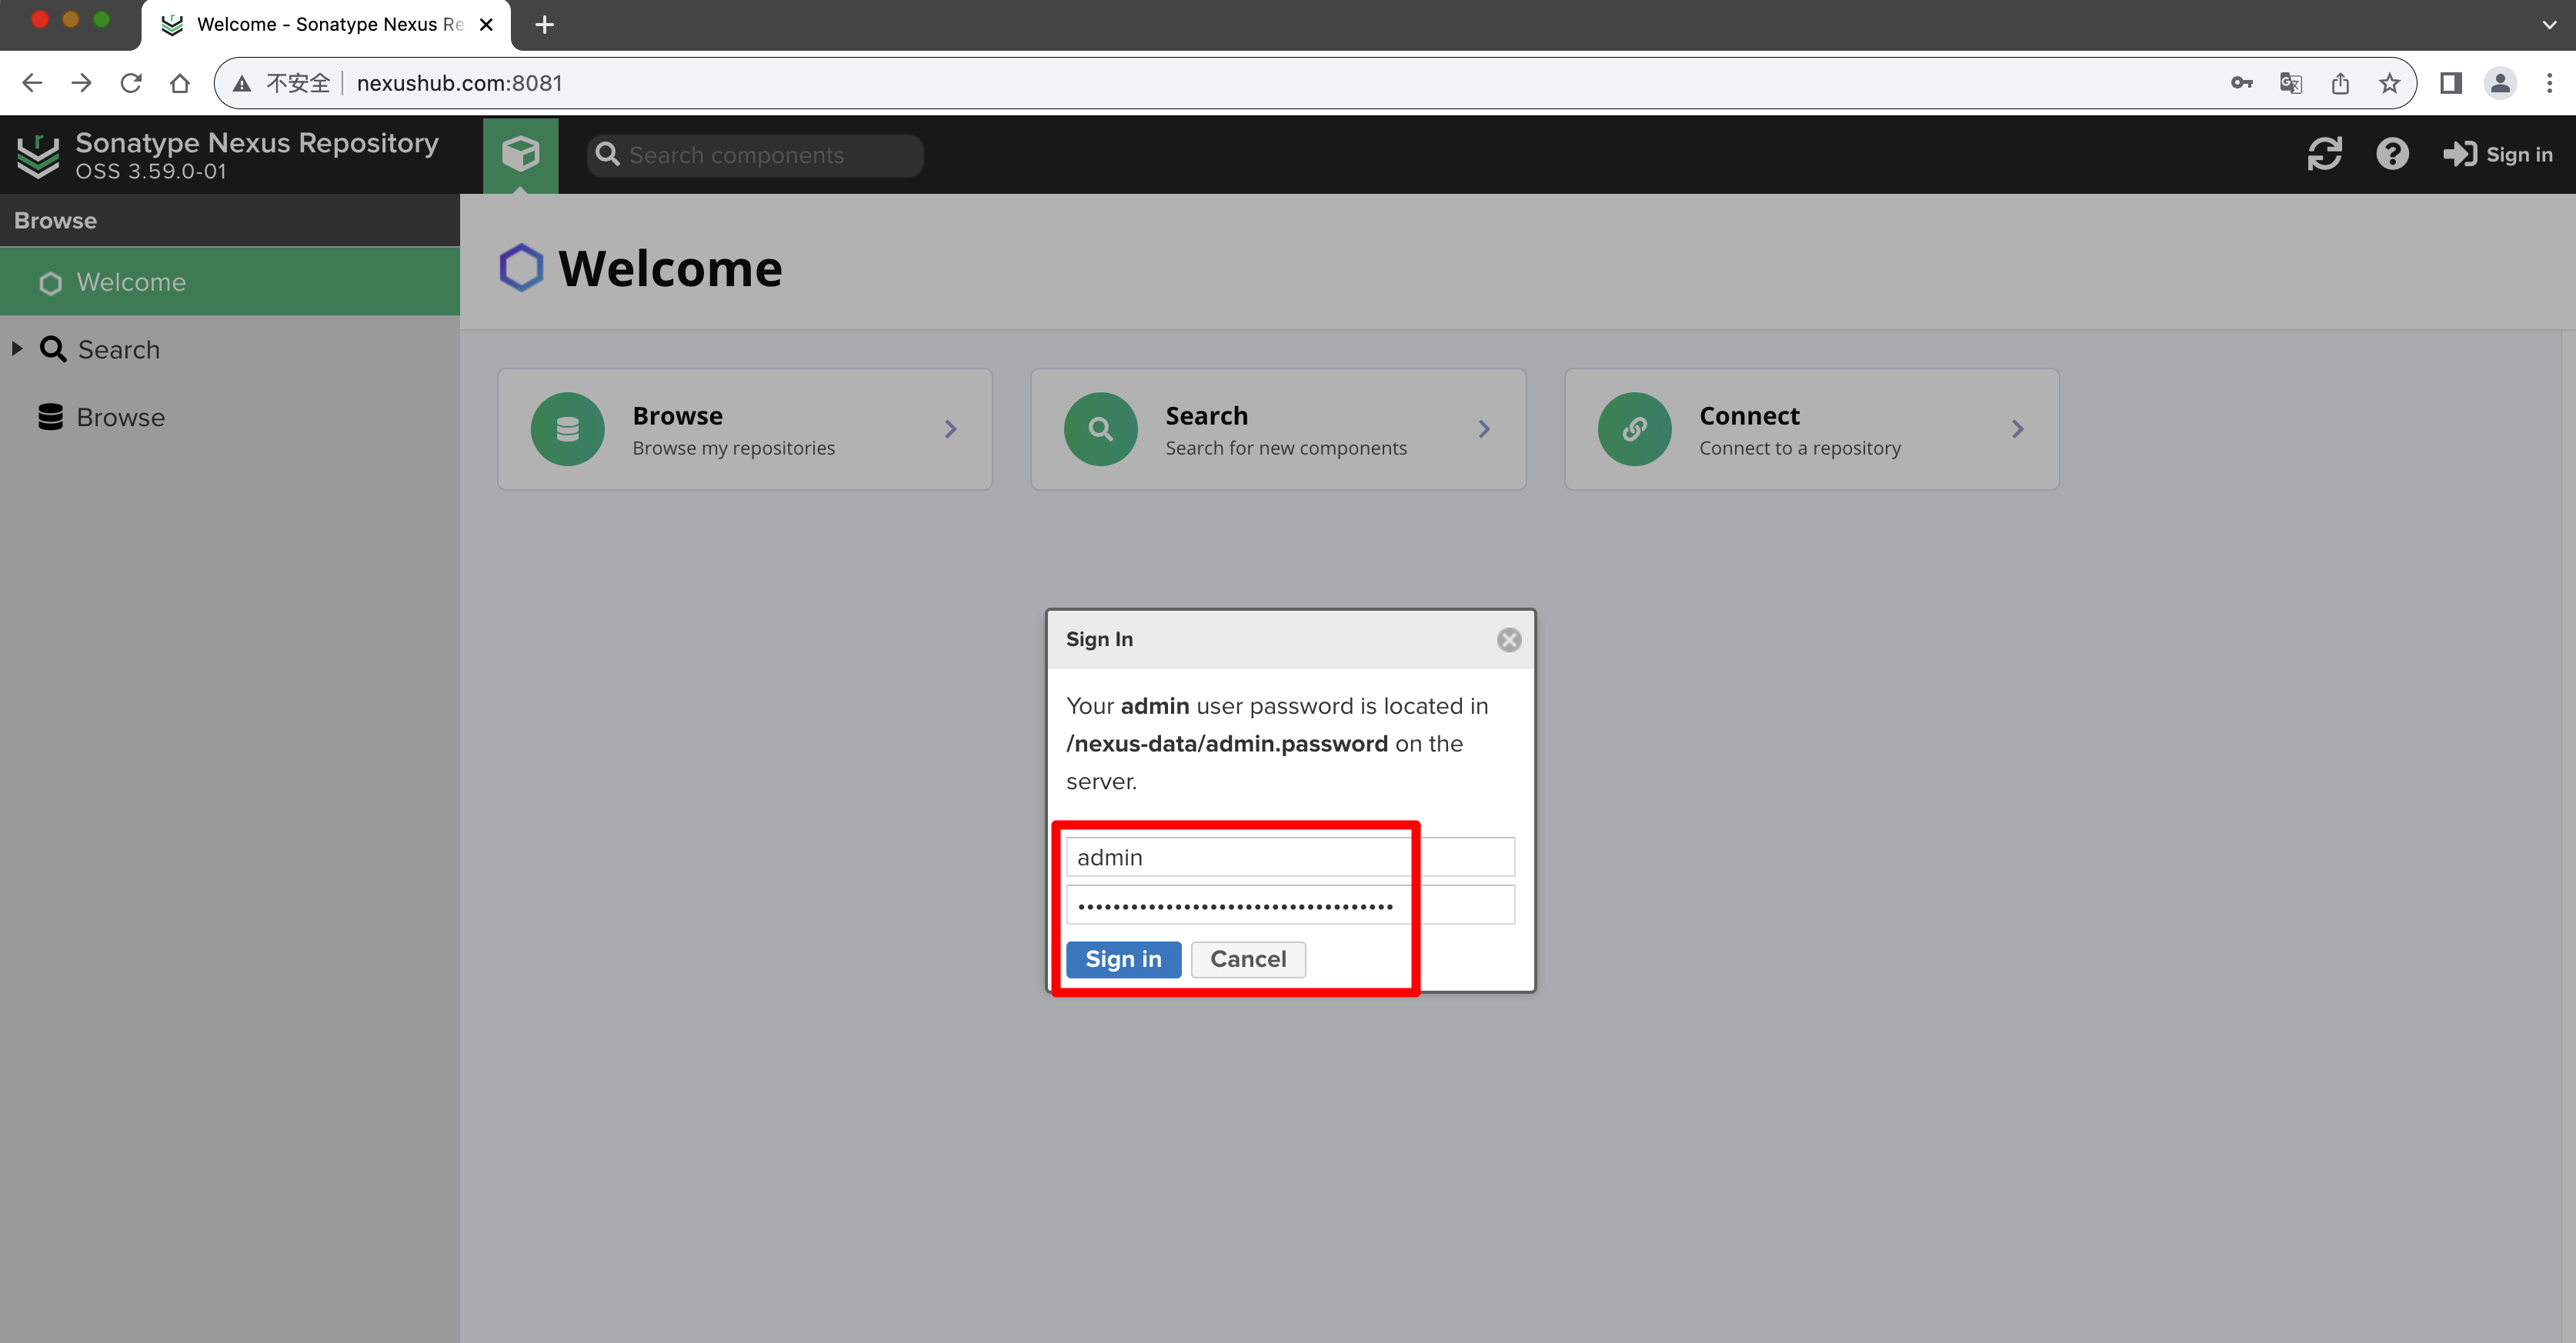
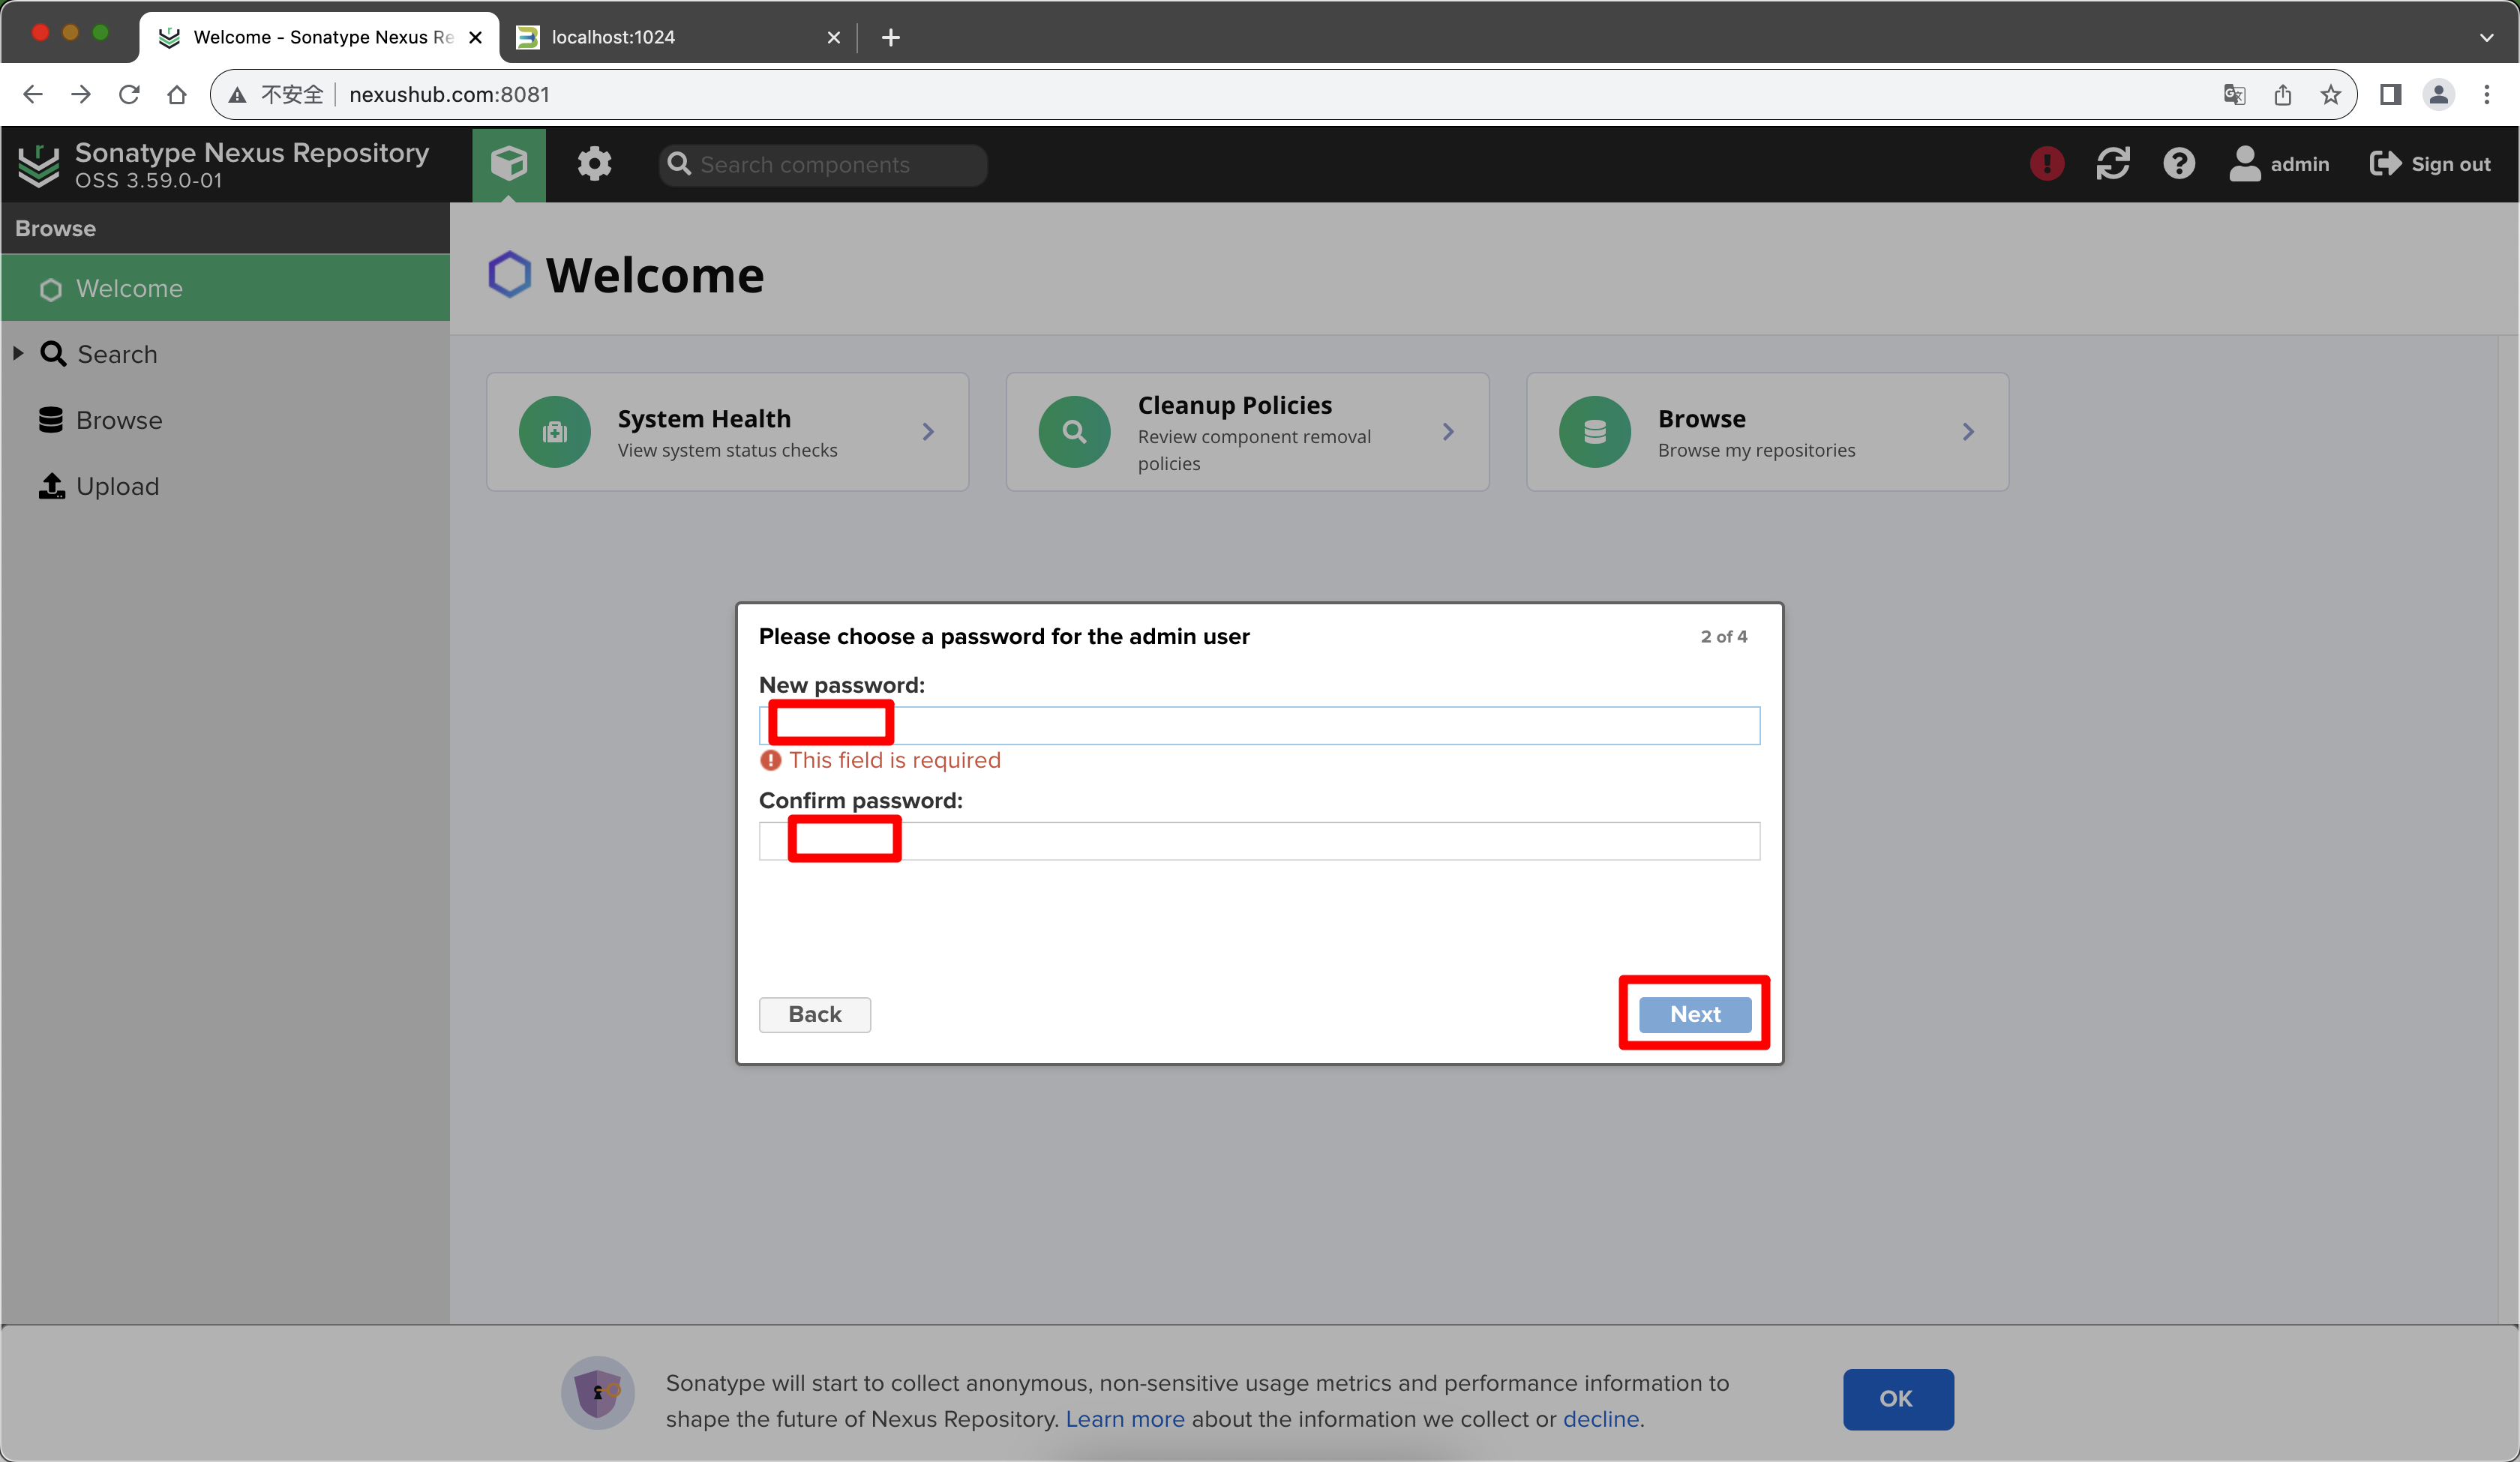
向导提示处,直接点【Next】下一步:
 此时让重新设置admin密码,注意设置一个强密码,不要让别人知道:
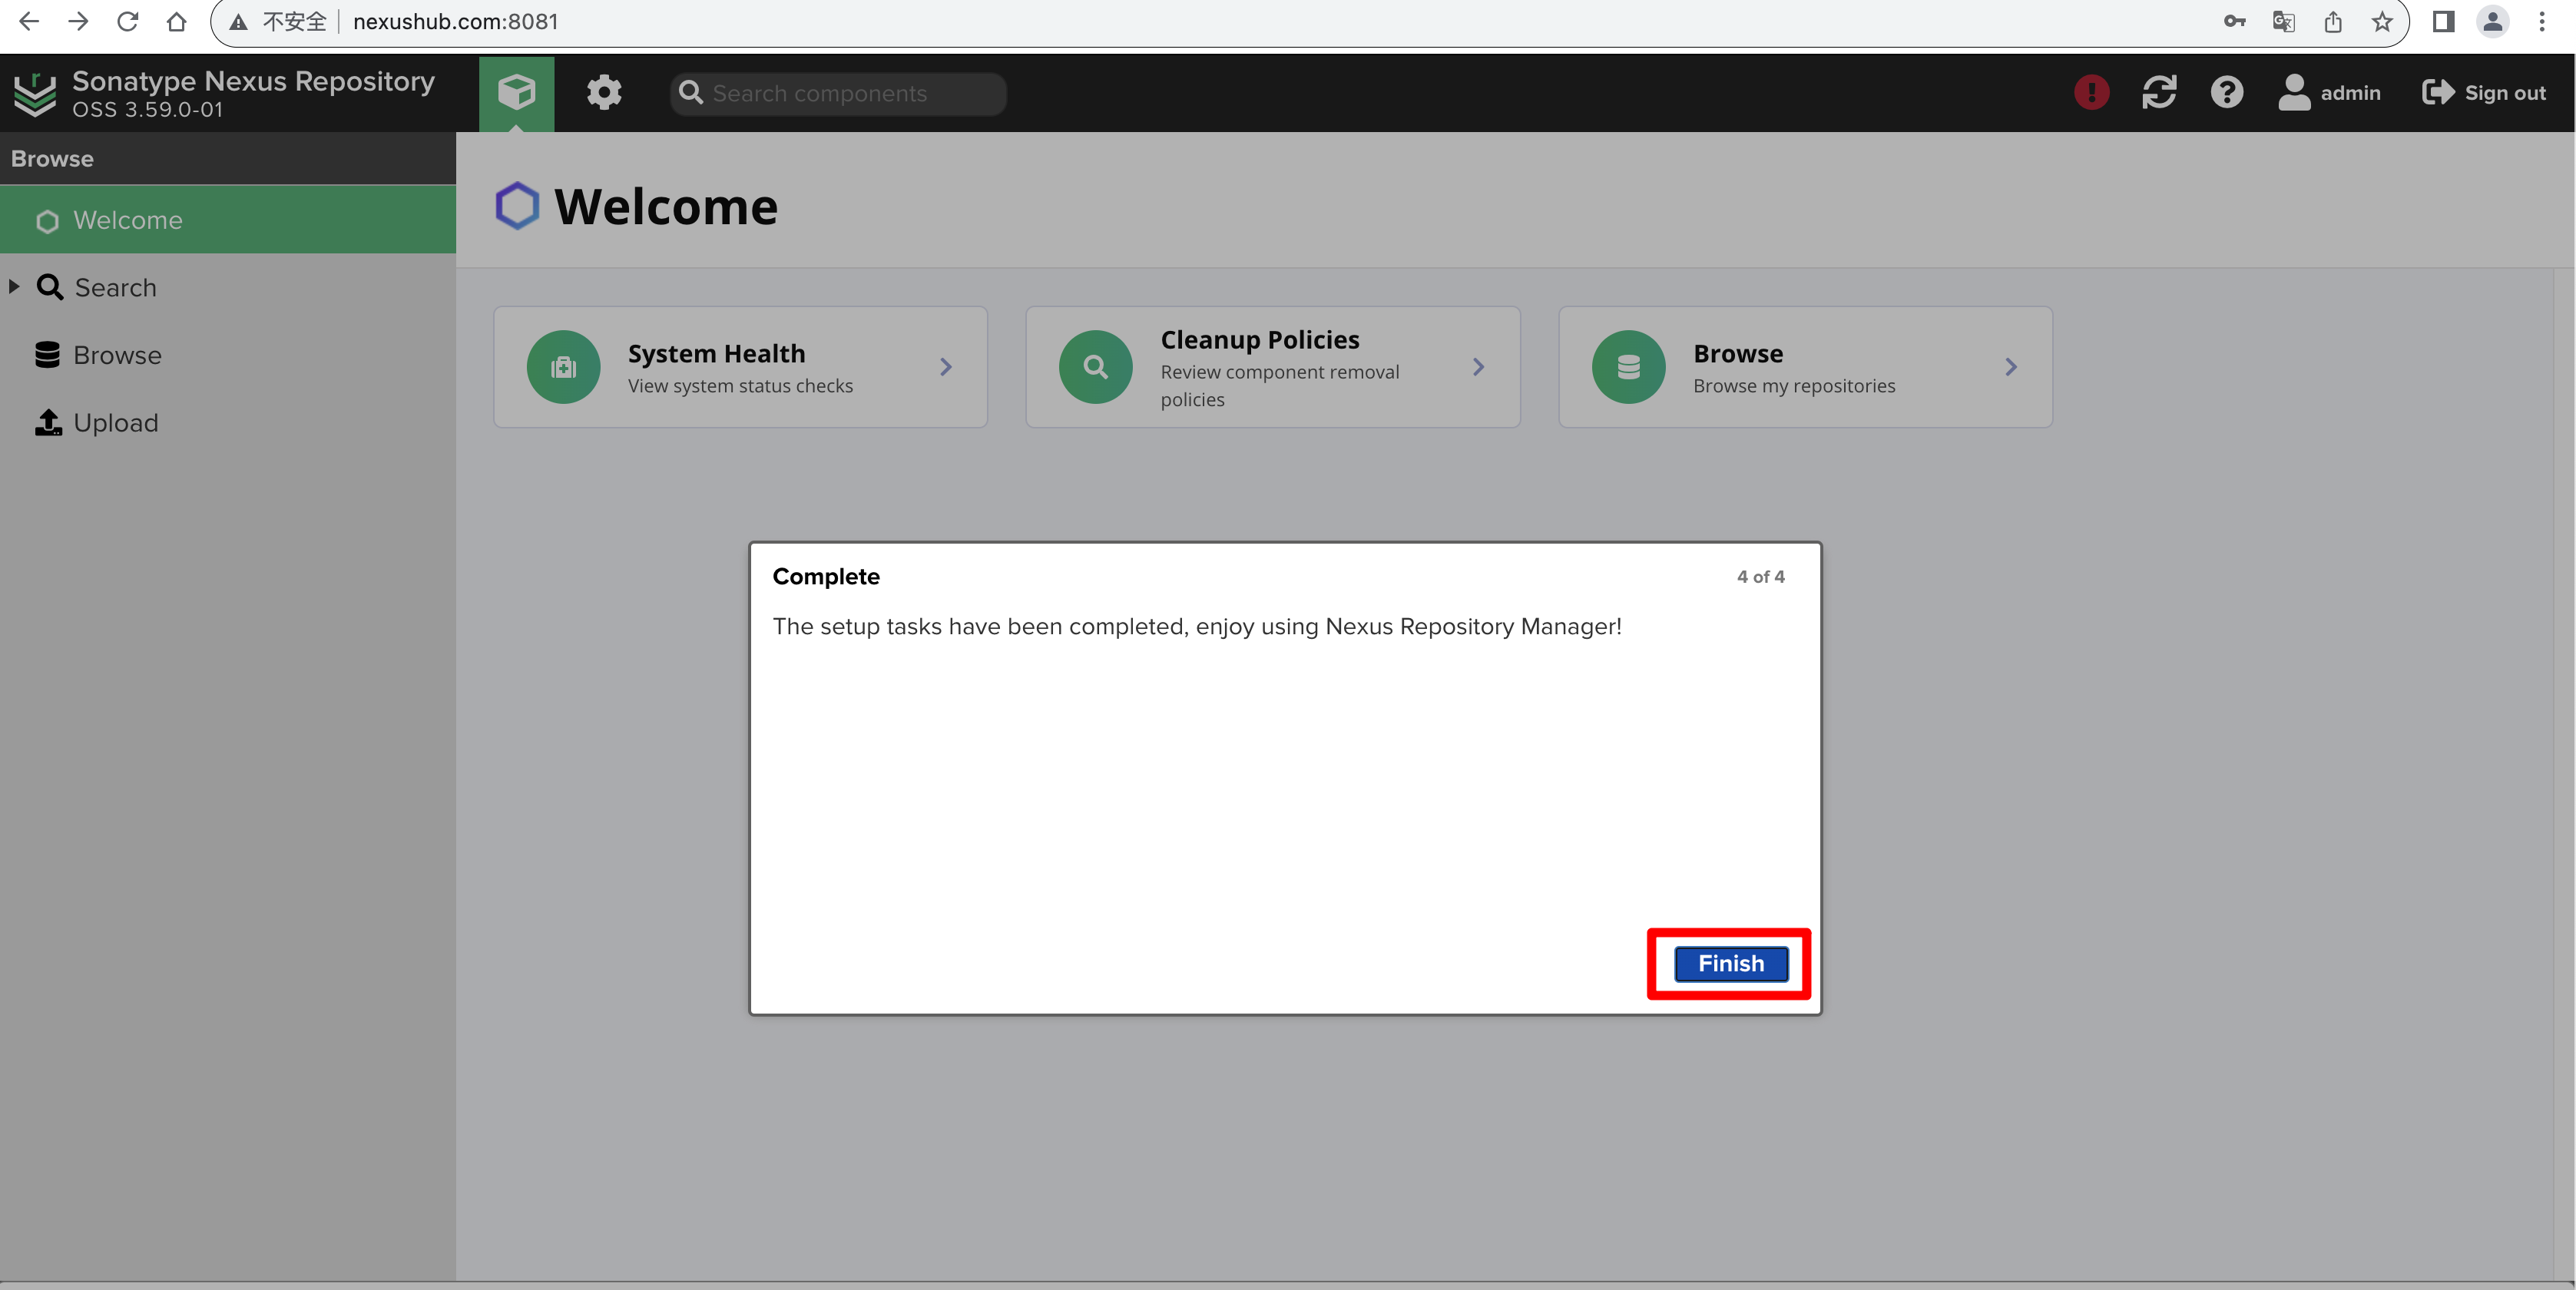
我们勾选允许匿名访问:

最后点击【Finish】完成即可:
 点击左侧的【Browse】浏览器,可以随意看一下系统自带的几个示例仓库:

通过点击页面顶部的齿轮设置图标:

可以看到很多相关的设置,上图是API页面视图。
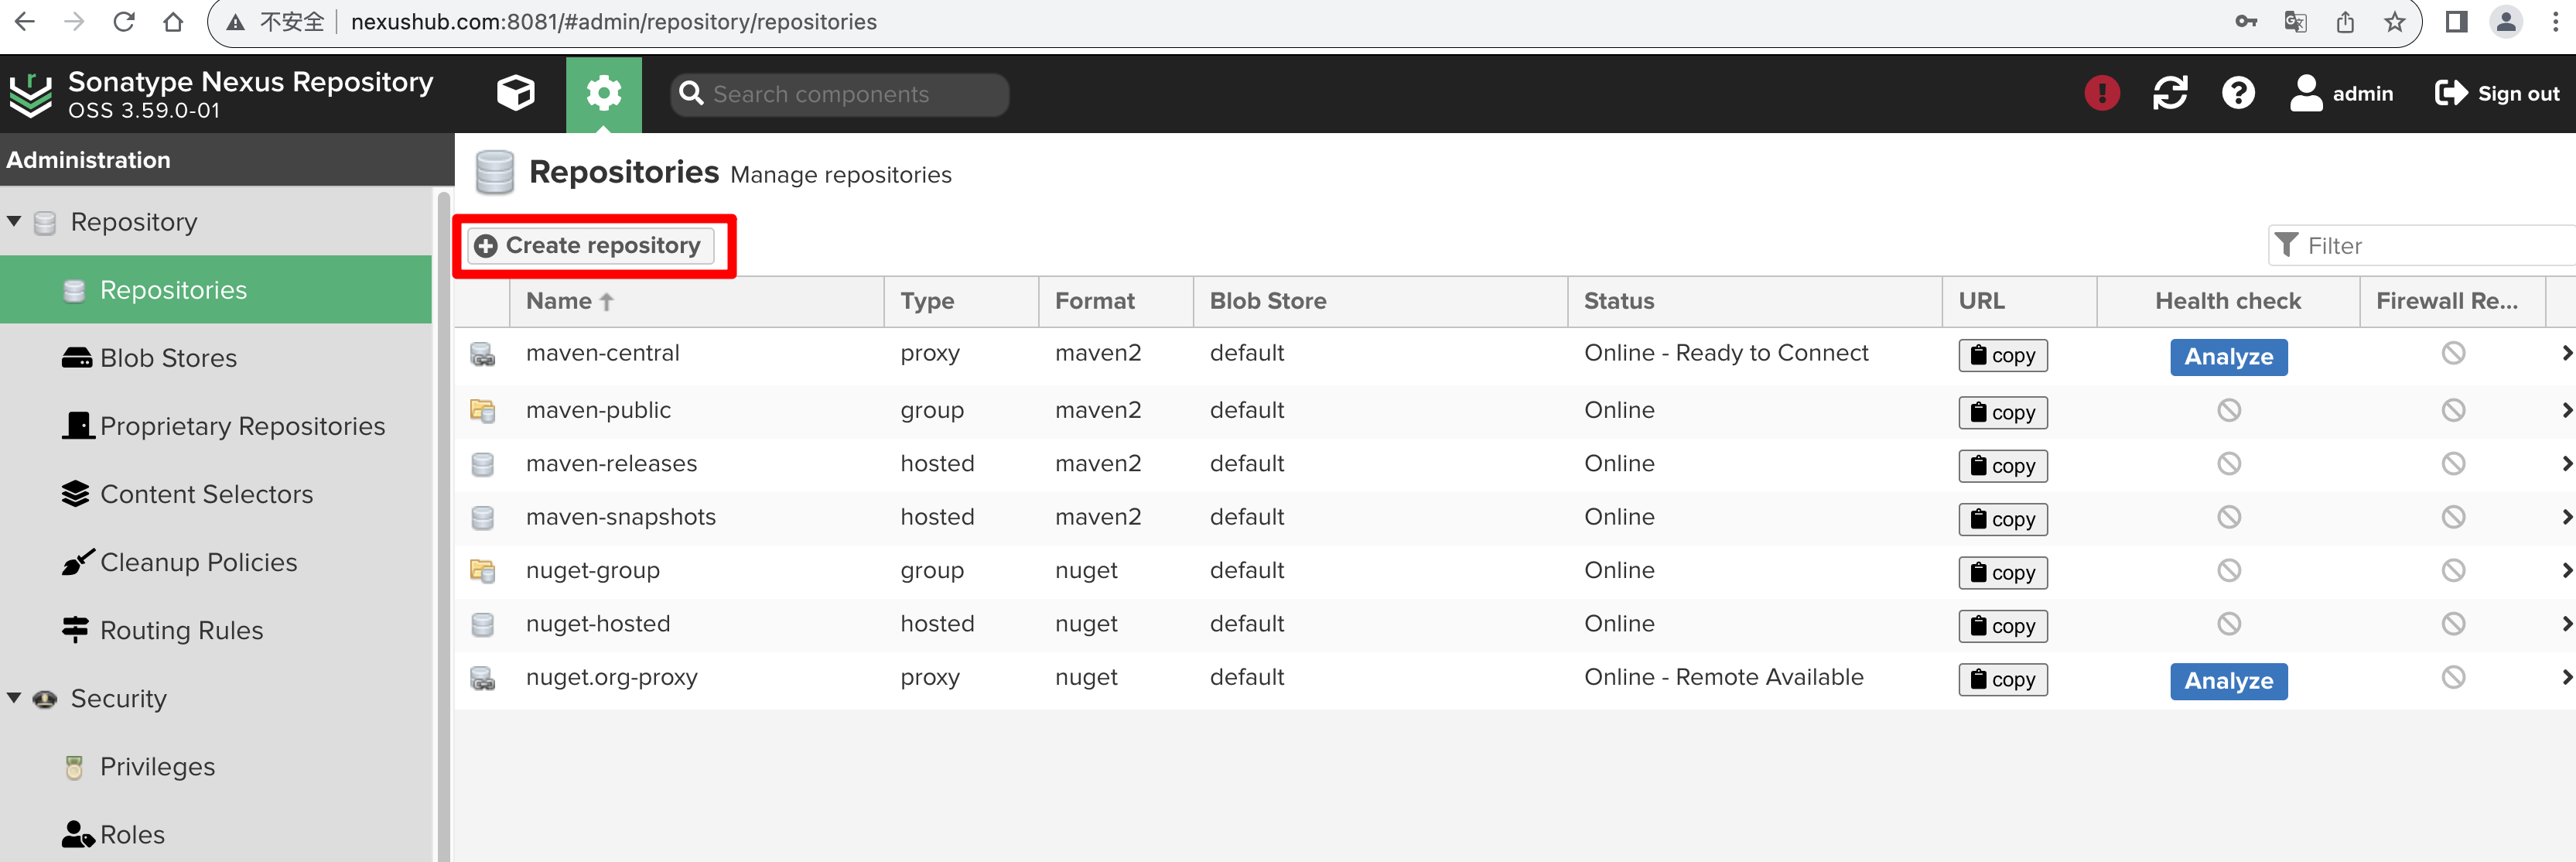
1.4 创建第一个代理仓库
上一节中,我们知道通过点击页面顶部的齿轮设置图标:
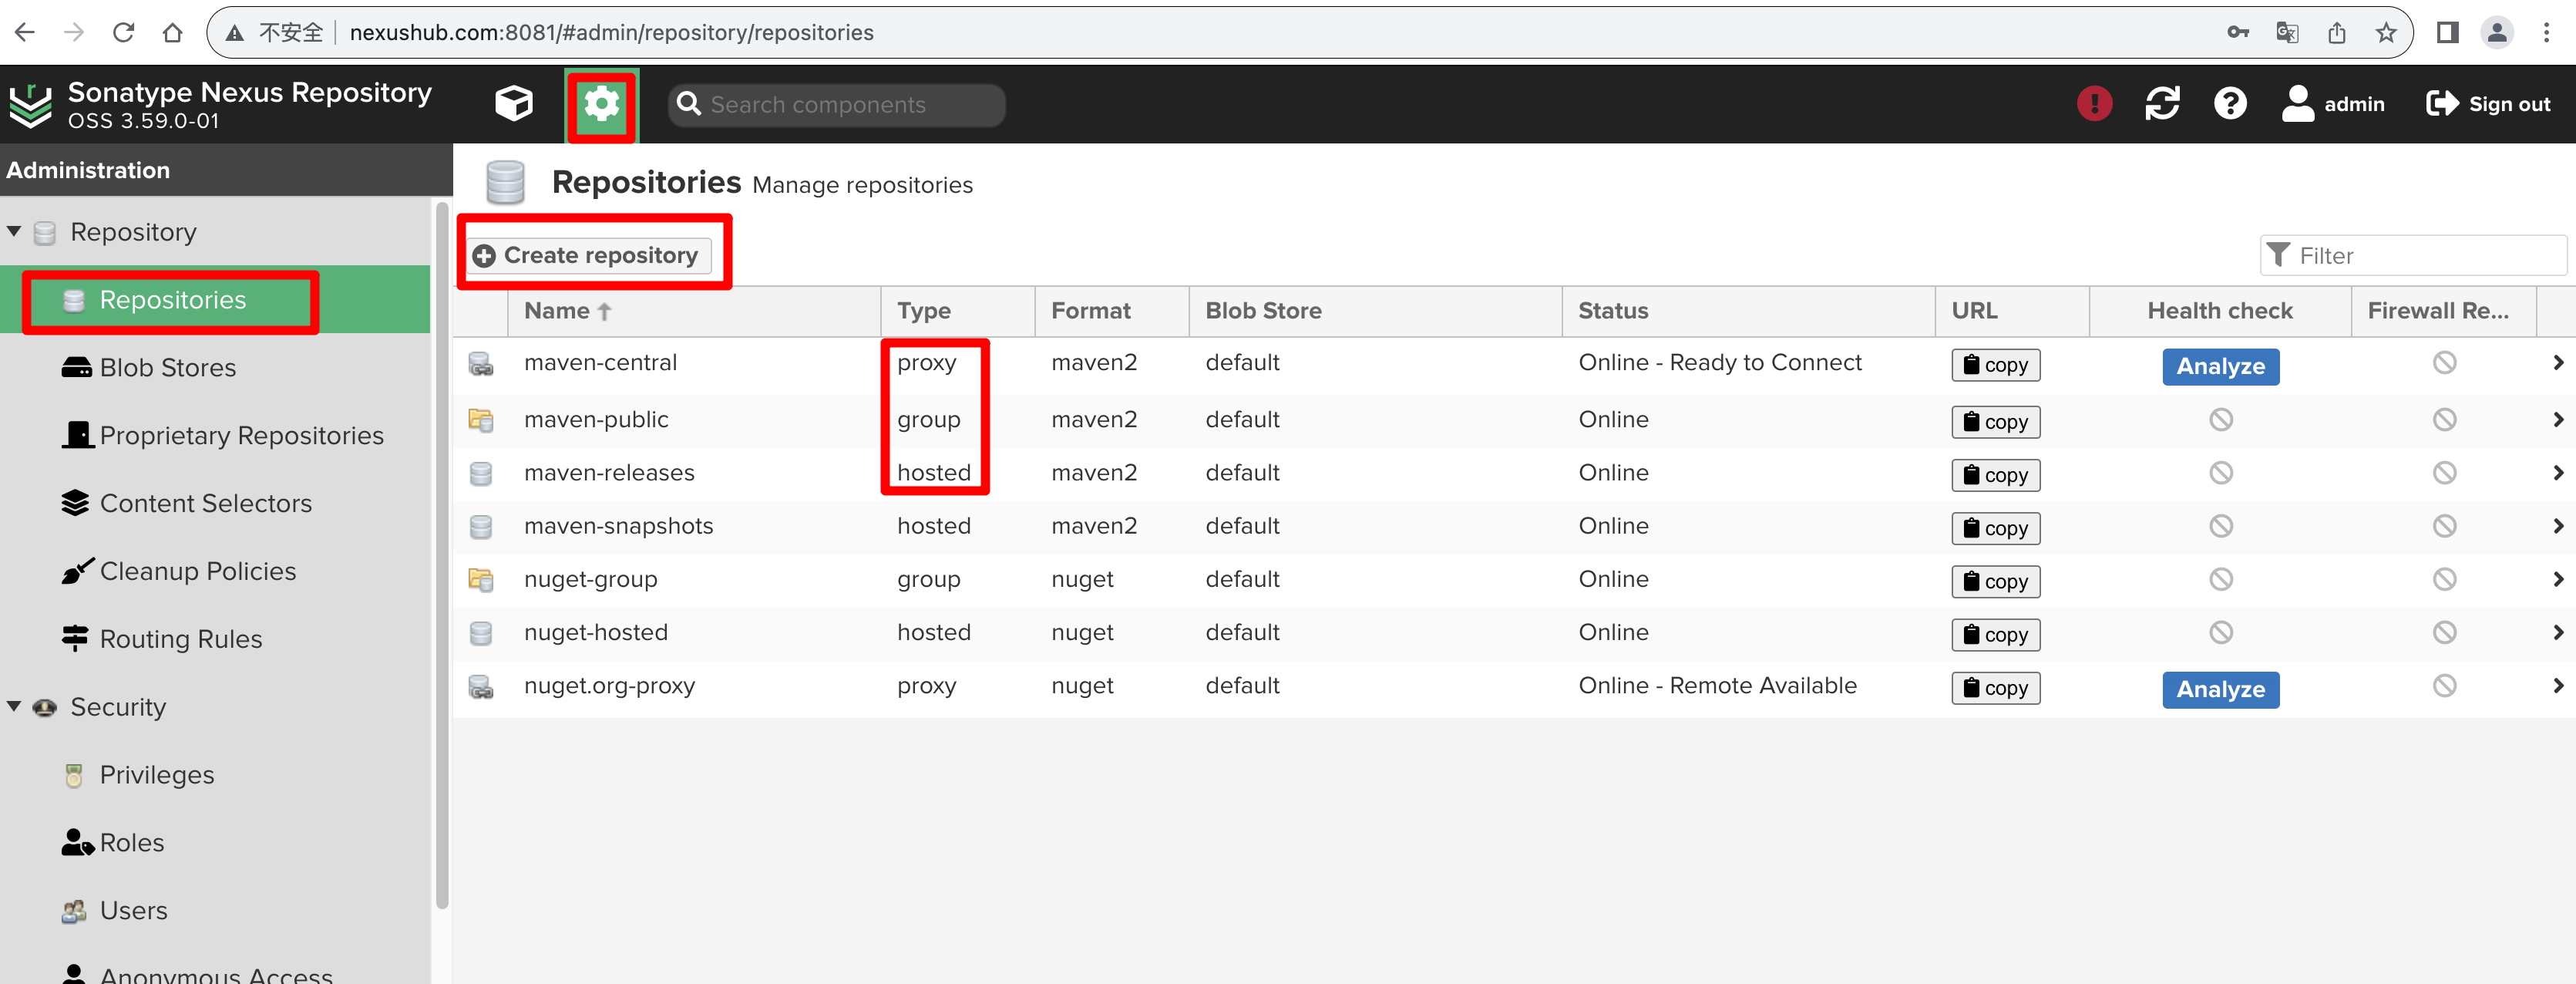 进入到设置页面后,点击左侧的【Repositories】进入到仓库管理页面,nexus默认创建了7个示例仓库。
1.4.1 仓库类型
在nexus中,大部分的仓库都可以分为以下三种类型:
- 【proxy】,代理仓库,用来代理像 清华大学开源软件镜像站 https://mirrors.tuna.tsinghua.edu.cn/、阿里巴巴开源镜像站 https://developer.aliyun.com/mirror/ 等站点。
- 【hosted】,宿主仓库,即本地仓库,可以用来存放自己的jar包、docker镜像等,属于自己的仓库。
- 【group】,仓库组,可以将多个代理仓库或宿主仓库合并在一起,然后向外提供服务。
1.4.2 创建仓库
我们以配置yum代理仓库为例,讲解如何使用nexus配置一个代理仓库。
- Step 1: 点击【Create Repository】按钮
- Step 2: 【Select Recipe】选项仓库类型
Select Recipe 表示选择配方,也就是选择仓库类型的意思。
 可以看到,在仓库类型选择界面有非常多的仓库类型,如常用的docker、maven2、npm等都有proxy、hosted、group三种类型的仓库。我们需要使用的yum仓库,将页面拉到最底部,可以看到
yum(proxy):
 我们直接点击
yum(proxy)进入到yum代理仓库配置界面:
 可以看到,有很多地方空白着,需要我们填写。
- Step 3: 仓库详情填写
以下详细介绍各个属性的意义,并给出填写示例。
- Name: 仓库名,需要唯一,不能与其他已经仓库的仓库重名,最好能通过名称知道仓库的意义。如我们yum代理仓库,通常是给CentOS7系统使用的,我们直接命名为yum-proxy。
- Signing Key 和 Passphrase: gpg签名相关,忽略。
- Remote storage: 远程存储仓库的URL地址,如我们直接代理清华大学的centos源,其地址是 https://mirrors.tuna.tsinghua.edu.cn/centos/, 因此我们填写 https://mirrors.tuna.tsinghua.edu.cn/centos/ 。
- Block outbound connections on the repository, 阻止出站连接,我们不勾选。
- Auto-block outbound connections on the repository if remote peer is detected as unreachable/unresponsive, 如果检测到远程对等方无法访问/没有响应,则自动阻止存储库上的出站连接,这个保持默认即可。即远程代理仓库不可用时,我们这个代理仓库会自动阻止出站连接,也就是不去访问这个远程仓库了。
- How long (in minutes) to cache artifacts before rechecking the remote repository, 在多少分钟内会再次检查远程仓库,也就是在多少分钟内使用缓存的归档文件,默认1440分钟,也就是1天。可以改大点,测试时,保持默认即可。
- How long (in minutes) to cache metadata before rechecking the remote repository. 原数据缓存多少分钟,默认1440分钟,也就是1天。可以改大点,测试时,保持默认即可。
- Blob store used to store repository contents,存储库使用的blob,可以使用默认的default,也可以自己新建Blob。第一次使用,使用默认即可。后续熟练后,可以新建blob。
- Cache responses for content not present in the proxied repository ,缓存代理存储库中不存在的内容的响应,这样可以加速代理响应。保持默认即可。
- How long to cache the fact that a file was not found in the repository (in minutes) 在存储库中找不到文件时,缓存多少分钟,默认1440分钟,也就是1天。
- Cleanup,清理策略,默认没有,不管。
- Authentication,用于HTTP认证的,通常开源镜像站不需要认证。有需要认证时,才勾选此处。我们不勾选即可。
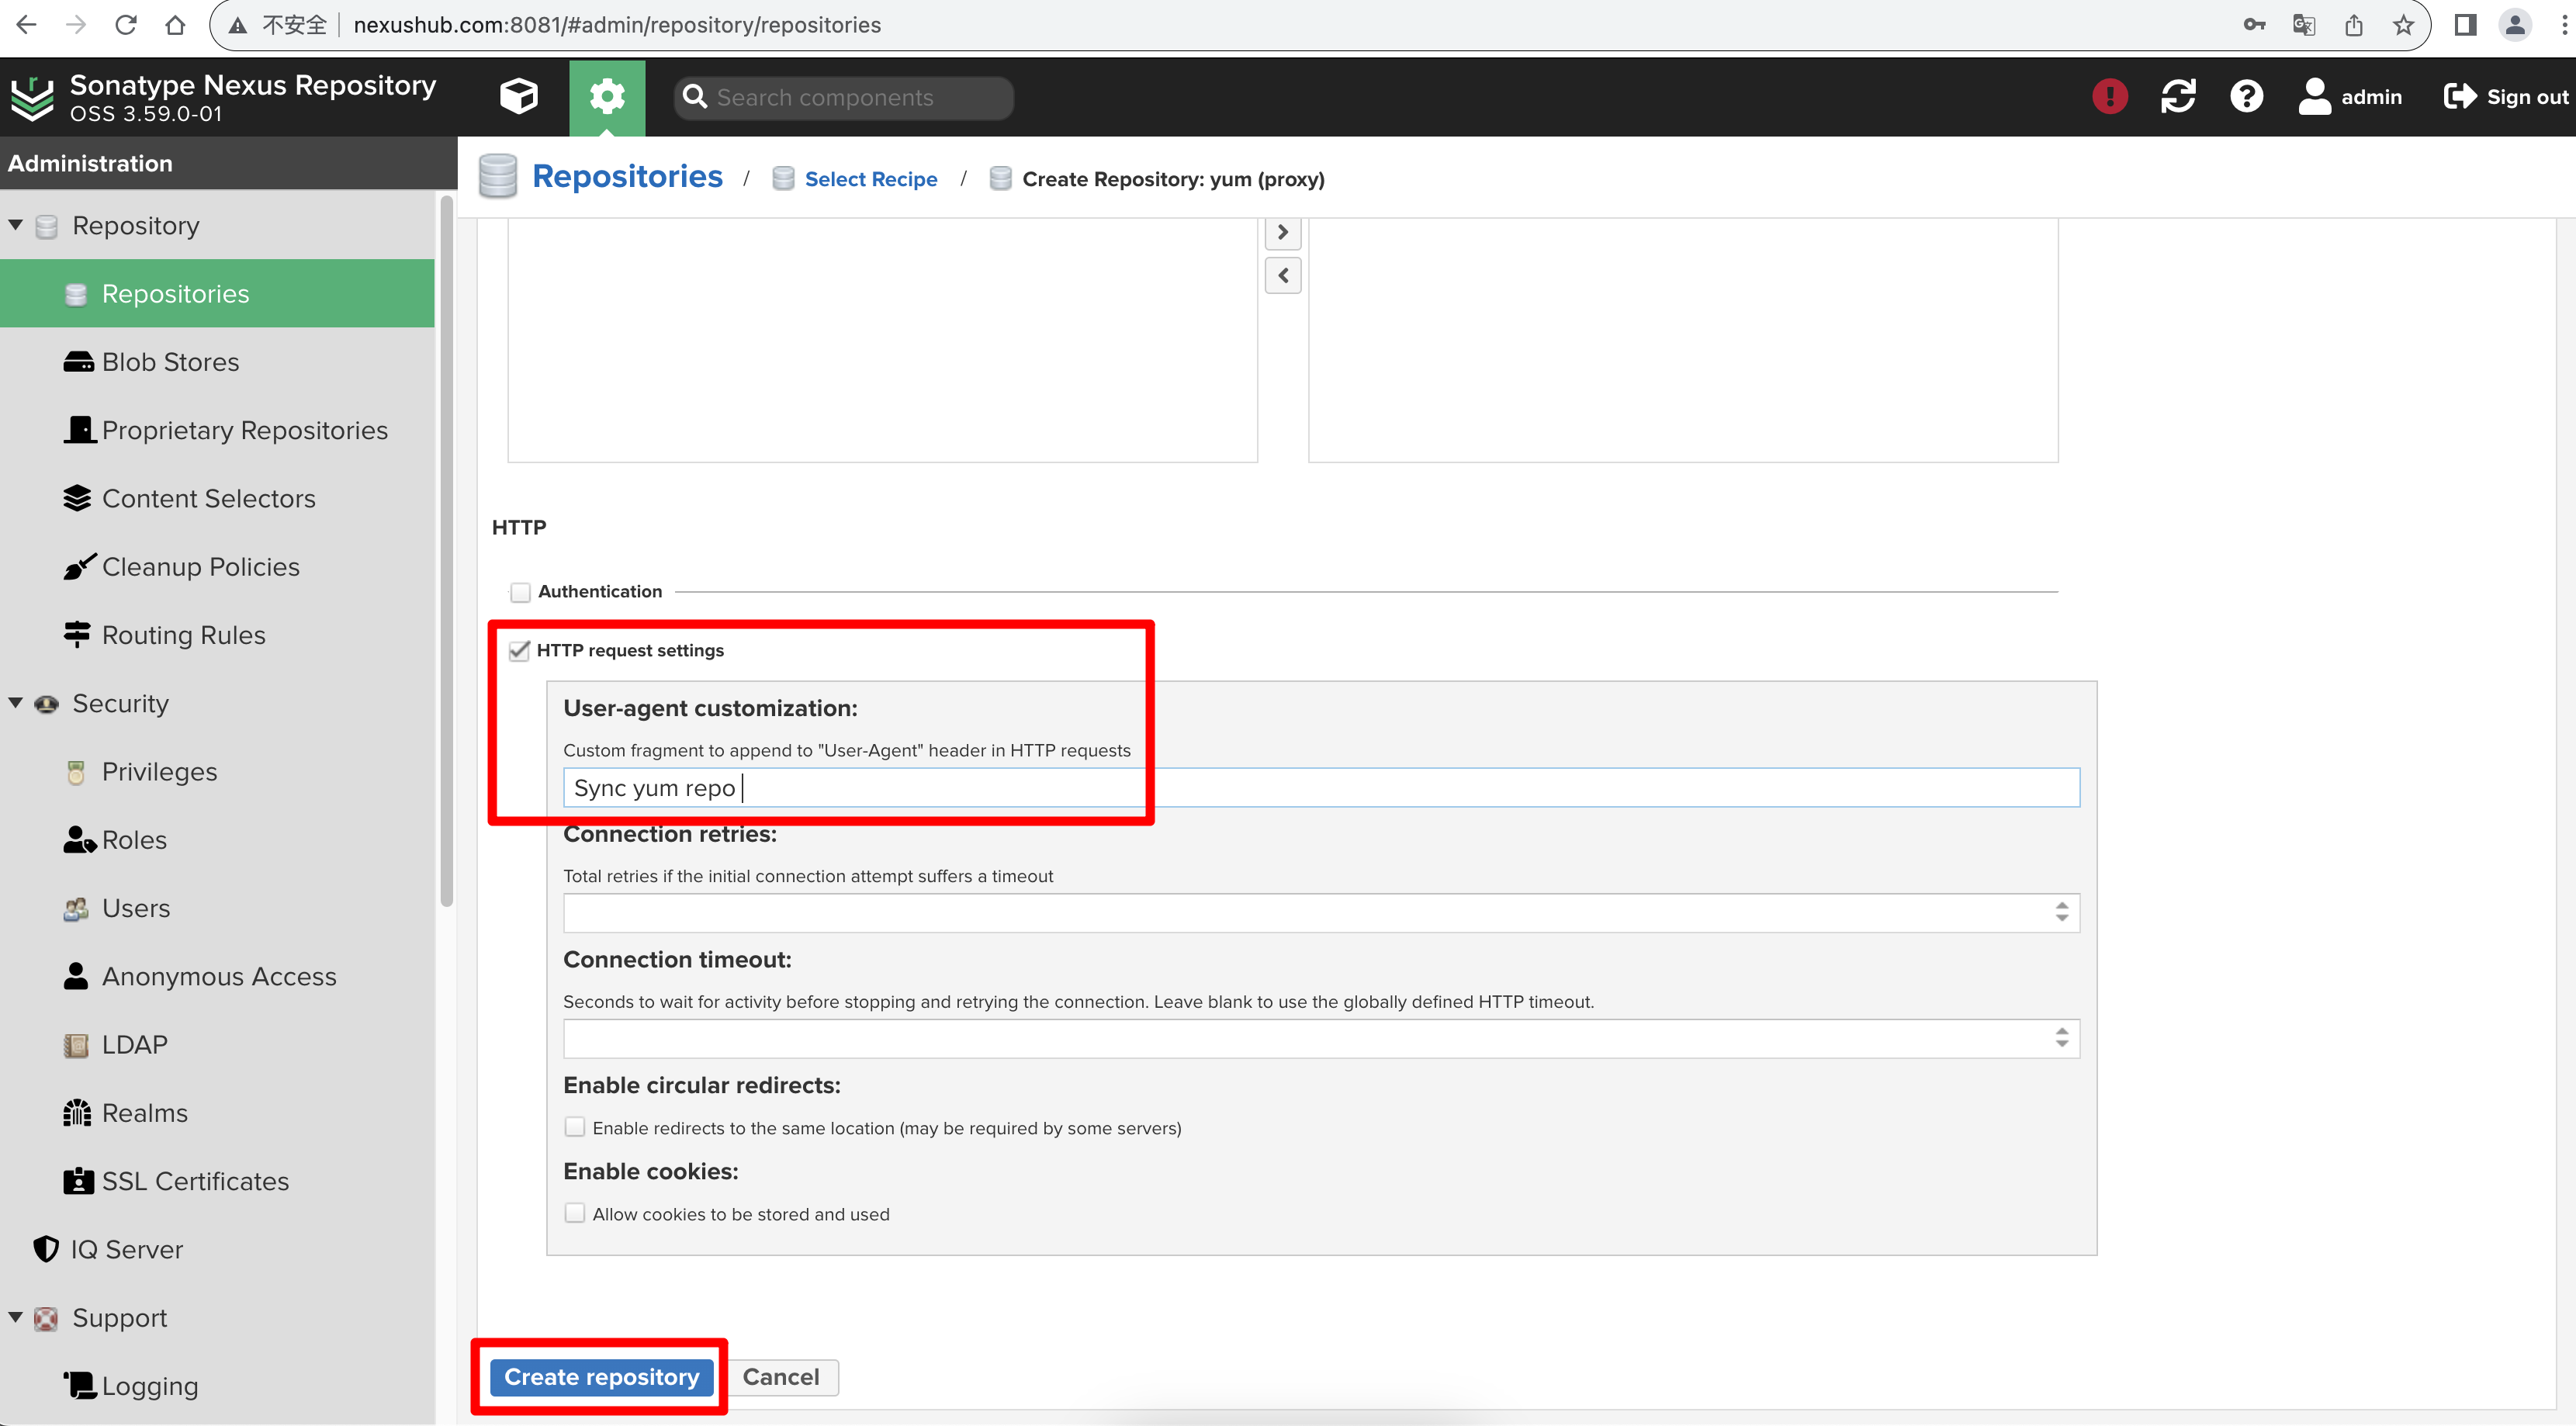
- HTTP request setting,HTTP请求设置,我们一般只需要设置一下User-Agent请求头即可,如填写"Sync yum repo. email: mzh.whut@gmail.com"。
按以上说明填写即可:

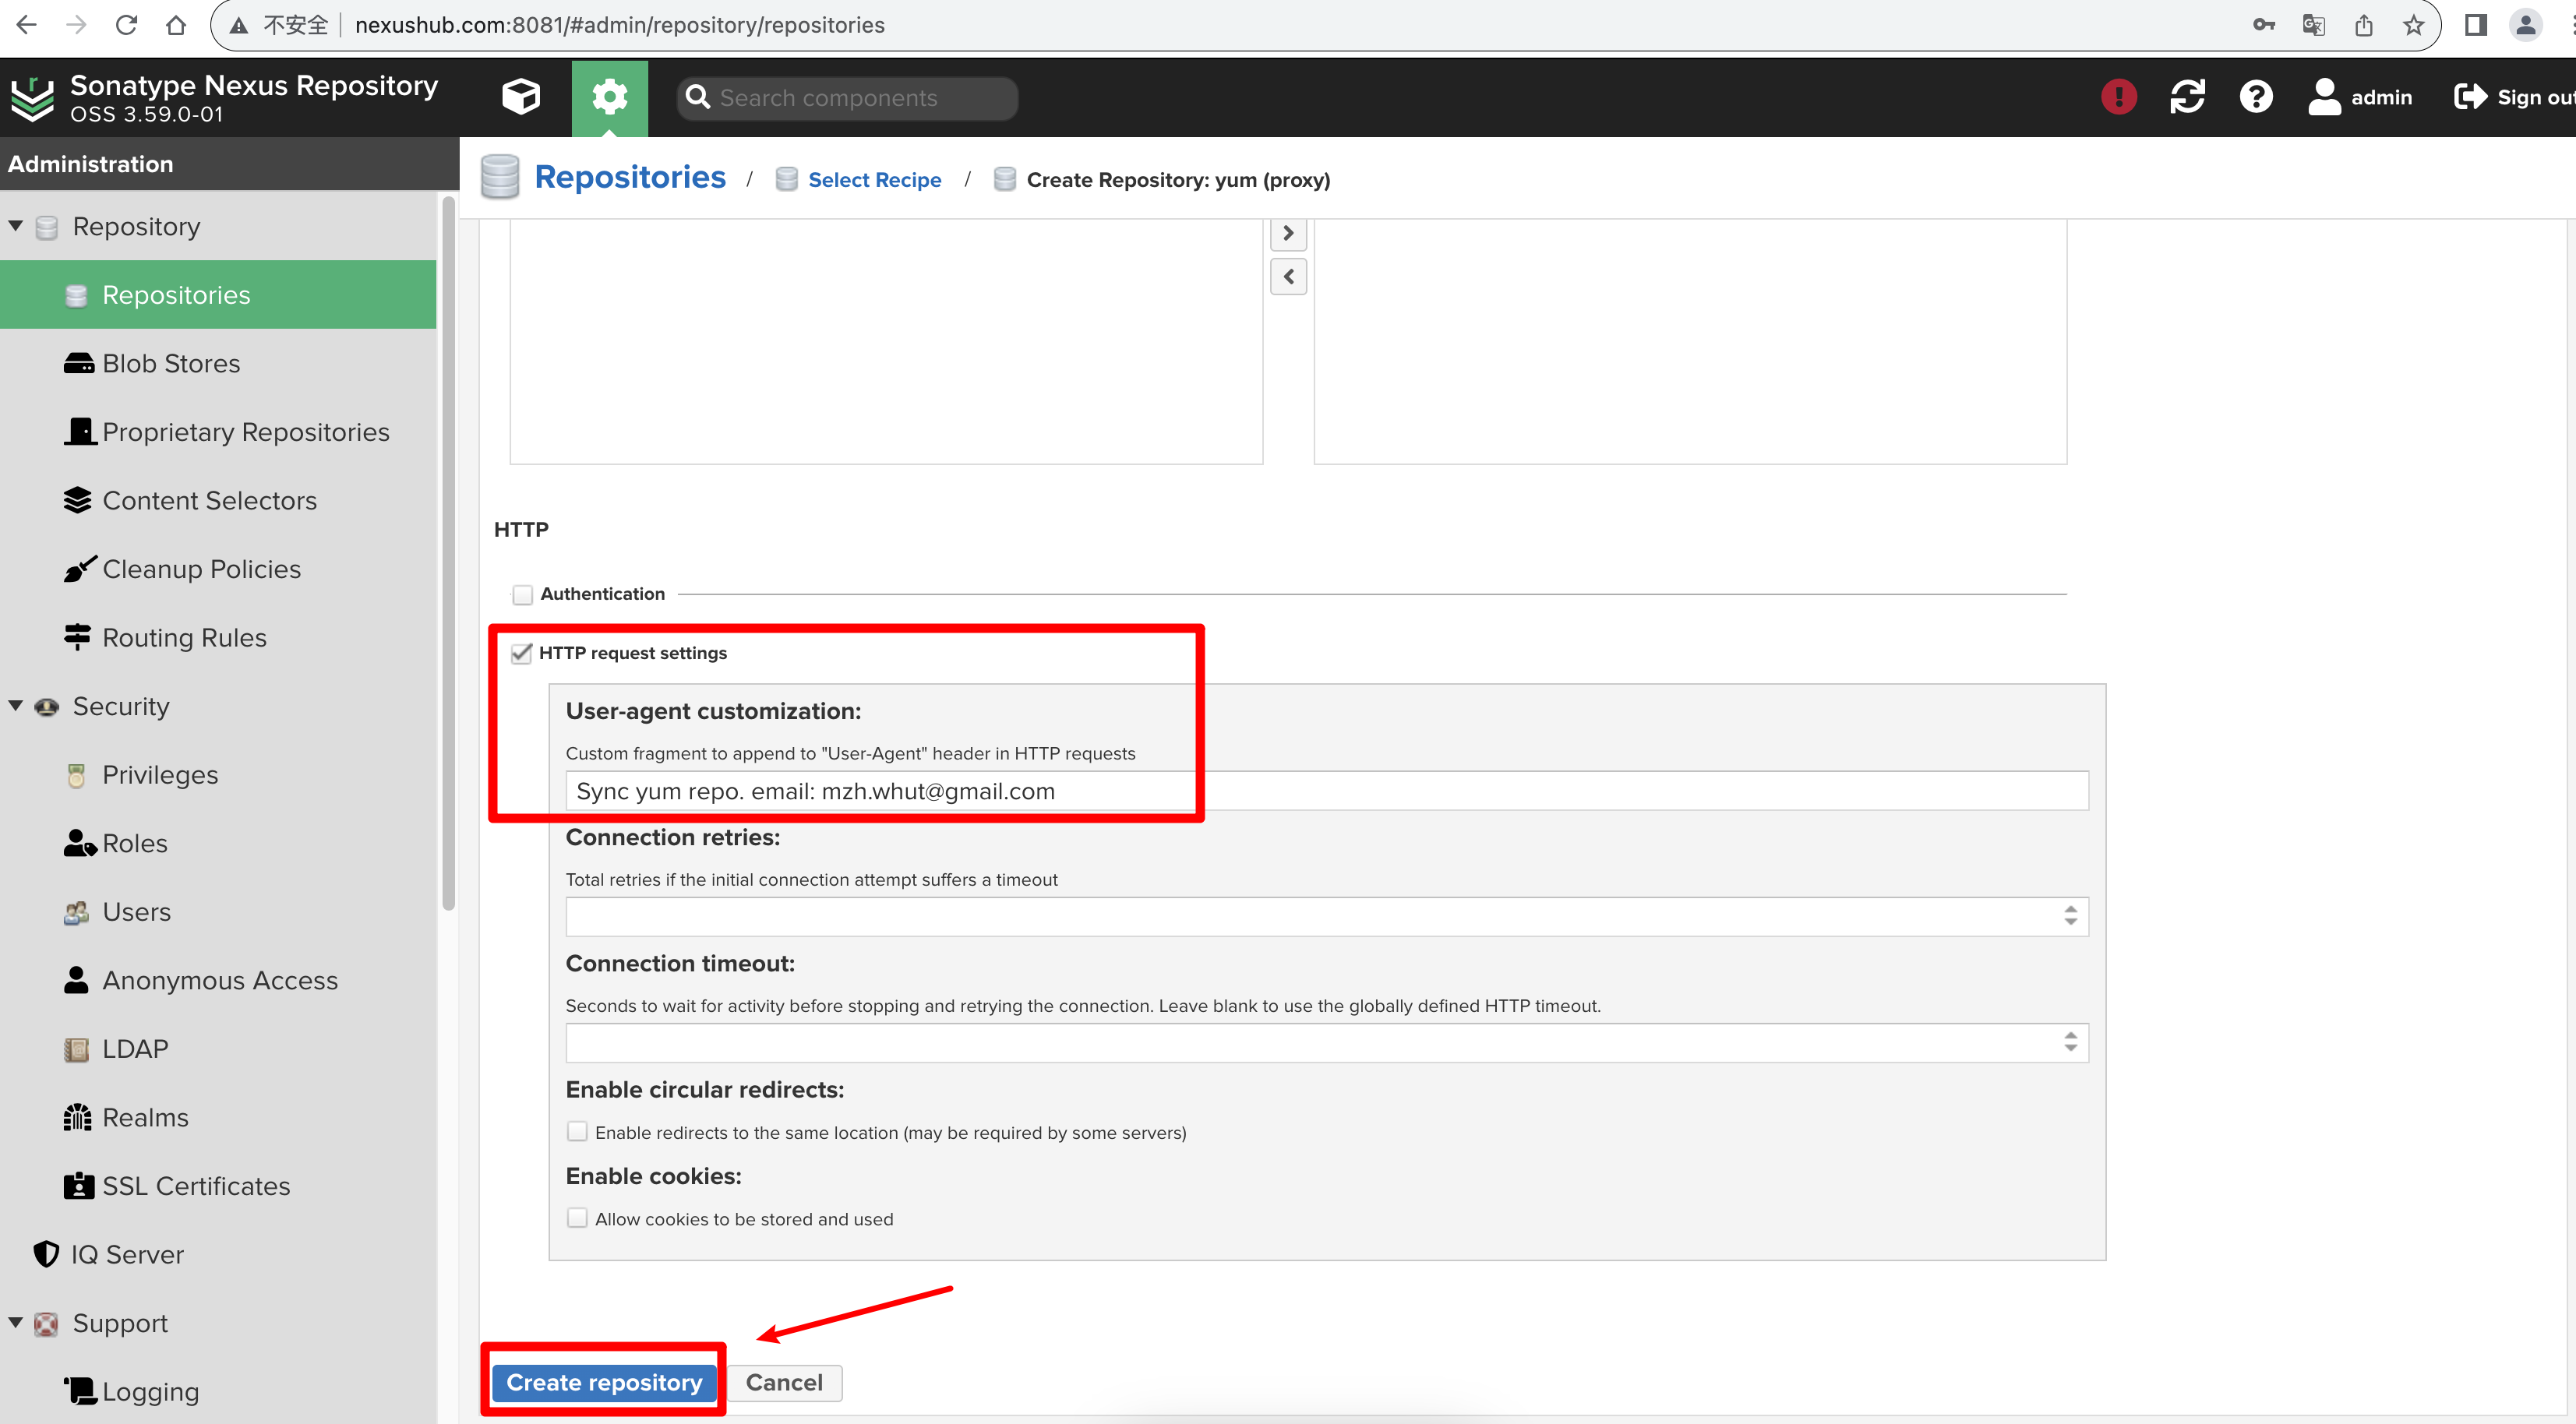 最后,点击【Create Repository】按钮,就完成仓库的创建了。
这时候在仓库列表处,可以看到刚才创建的yum-proxy代理仓库:
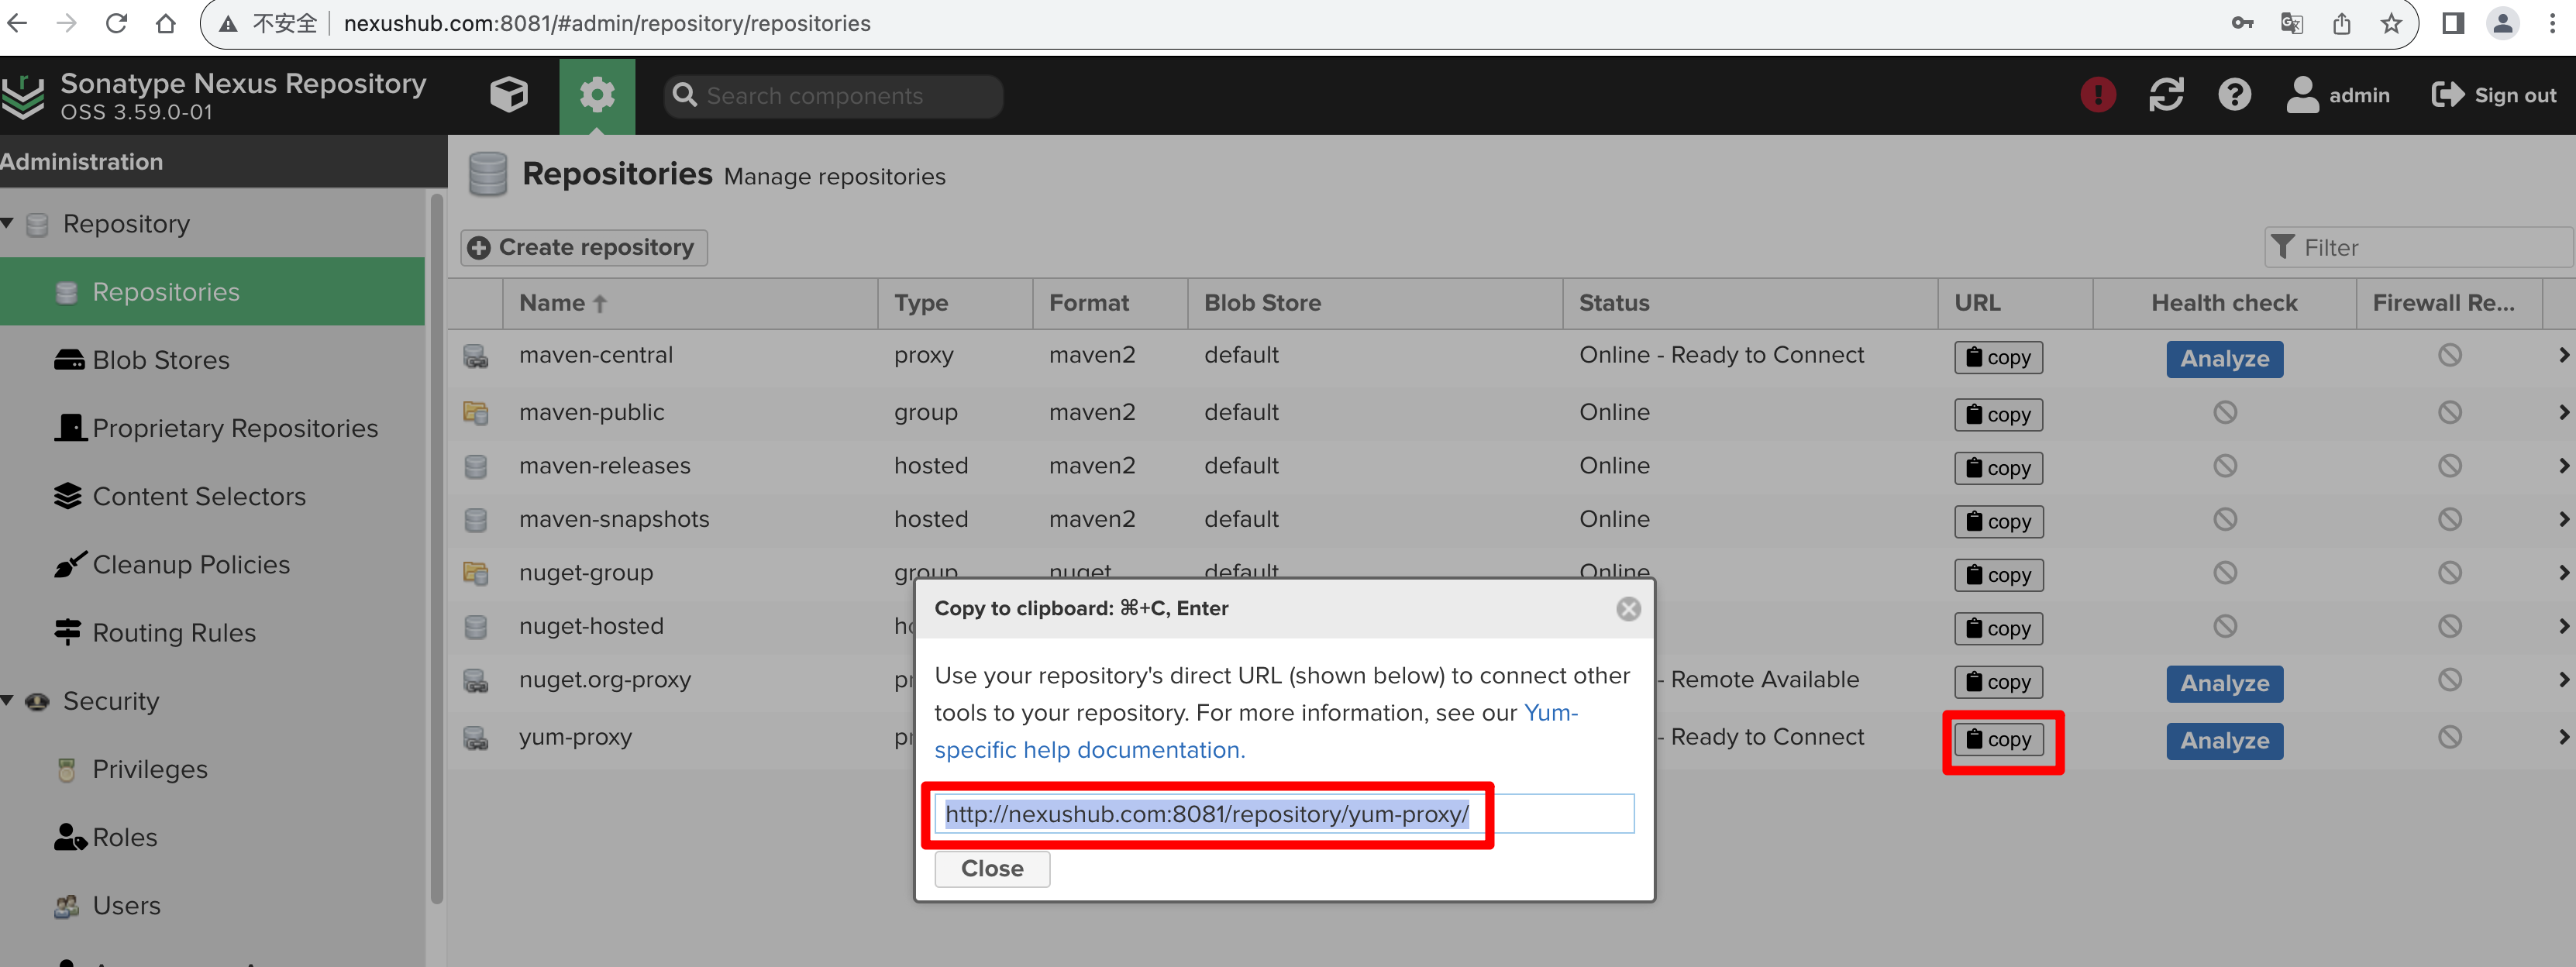
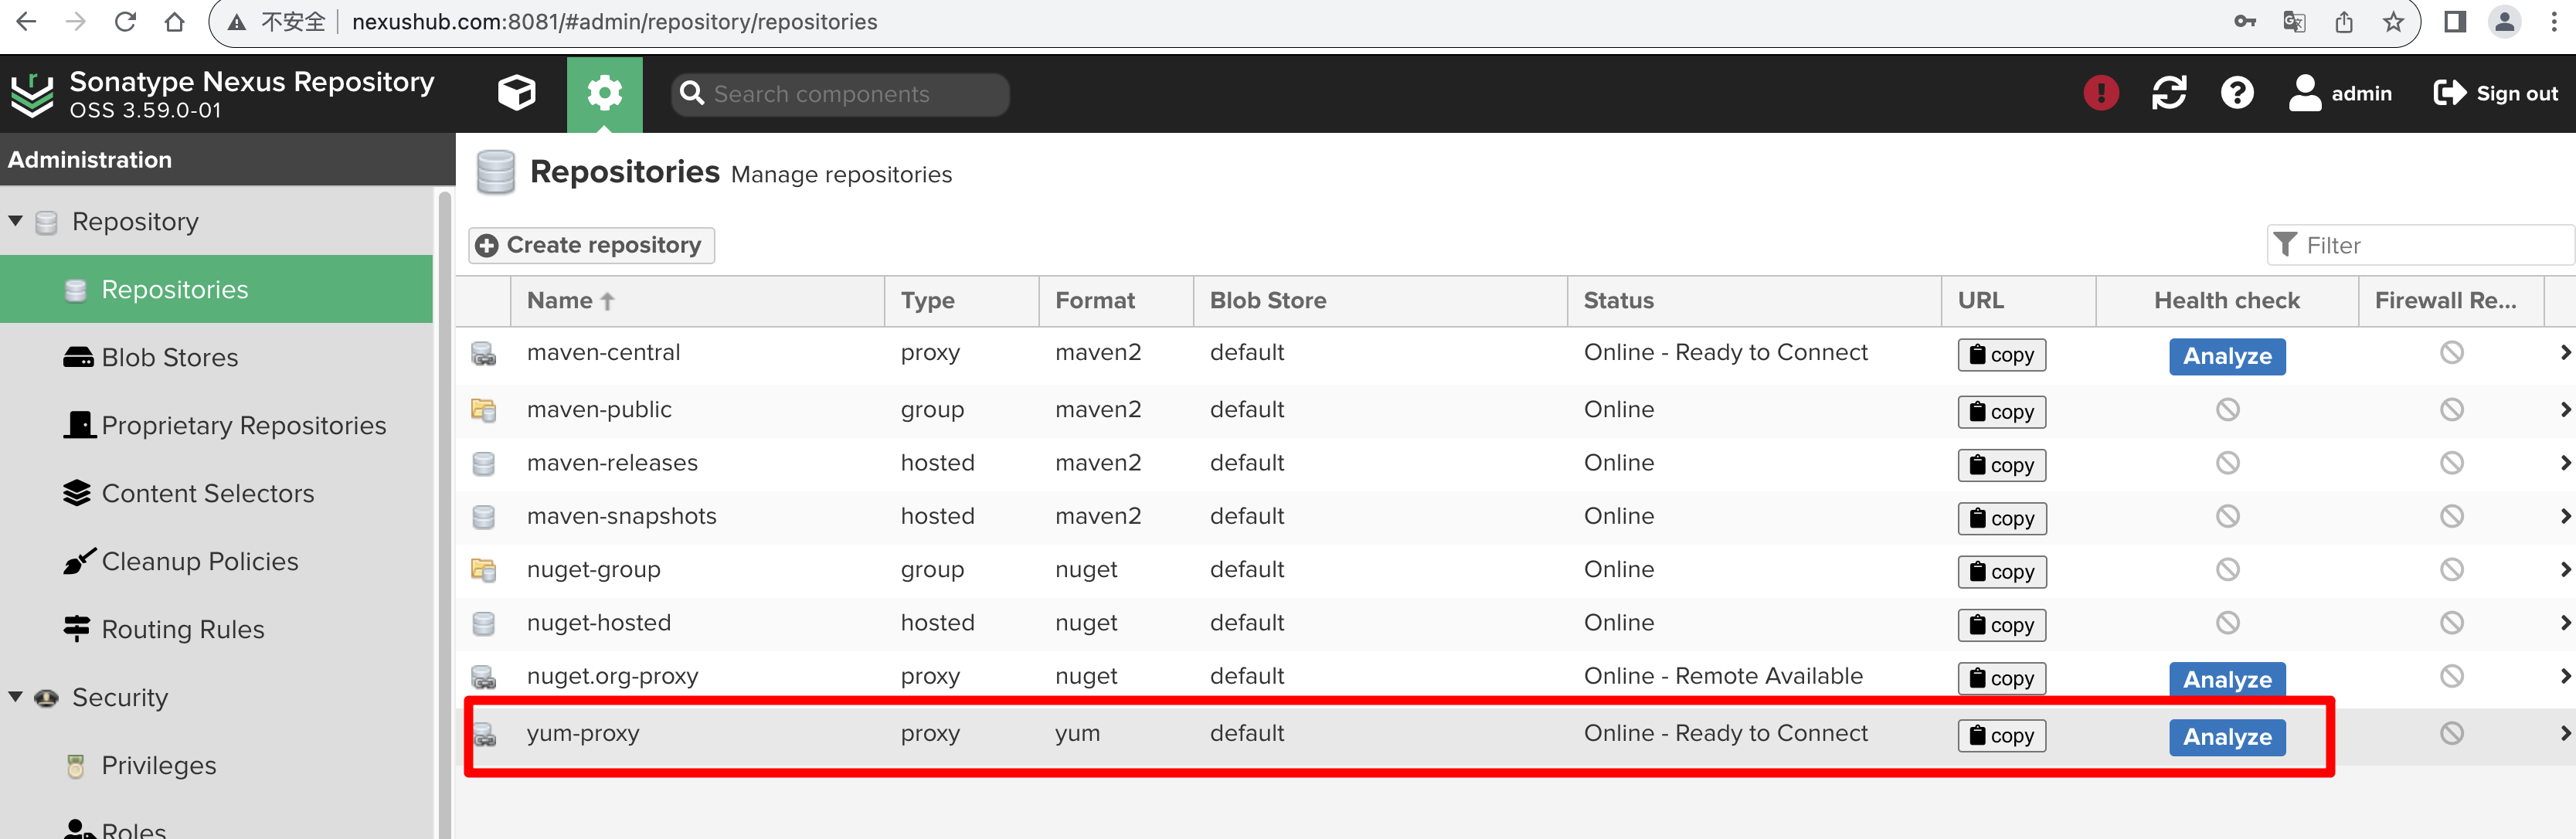 点击仓库行中的【copy】图标,可以查看仓库对应的URL信息:
1.5 使用代理仓库
上一节中,我们创建了代理仓库yum-proxy,这一节我们说可以使用。
我们可以参考 https://mirrors.tuna.tsinghua.edu.cn/help/centos/ 的帮助信息进行修改。
备份原始仓库配置文件:
[root@master ~]# cd /etc/yum.repos.d
[root@master yum.repos.d]# cp -p CentOS-Base.repo CentOS-Base.repo.bak
[root@master yum.repos.d]#文件替换:
[root@master yum.repos.d]# cat CentOS-Base.repo
[extras]
gpgcheck=1
gpgkey=http://mirrors.tencentyun.com/centos/RPM-GPG-KEY-CentOS-7
enabled=1
baseurl=http://mirrors.tencentyun.com/centos/$releasever/extras/$basearch/
name=Qcloud centos extras - $basearch
[os]
gpgcheck=1
gpgkey=http://mirrors.tencentyun.com/centos/RPM-GPG-KEY-CentOS-7
enabled=1
baseurl=http://mirrors.tencentyun.com/centos/$releasever/os/$basearch/
name=Qcloud centos os - $basearch
[updates]
gpgcheck=1
gpgkey=http://mirrors.tencentyun.com/centos/RPM-GPG-KEY-CentOS-7
enabled=1
baseurl=http://mirrors.tencentyun.com/centos/$releasever/updates/$basearch/
name=Qcloud centos updates - $basearch[root@master yum.repos.d]#
[root@master yum.repos.d]#
[root@master yum.repos.d]# sed -i 's@http://mirrors.tencentyun.com/centos/@http://nexushub.com:8081/repository/yum-proxy/@g' CentOS-Base.repo
[root@master yum.repos.d]# cat CentOS-Base.repo
[extras]
gpgcheck=1
gpgkey=http://nexushub.com:8081/repository/yum-proxy/RPM-GPG-KEY-CentOS-7
enabled=1
baseurl=http://nexushub.com:8081/repository/yum-proxy/$releasever/extras/$basearch/
name=Qcloud centos extras - $basearch
[os]
gpgcheck=1
gpgkey=http://nexushub.com:8081/repository/yum-proxy/RPM-GPG-KEY-CentOS-7
enabled=1
baseurl=http://nexushub.com:8081/repository/yum-proxy/$releasever/os/$basearch/
name=Qcloud centos os - $basearch
[updates]
gpgcheck=1
gpgkey=http://nexushub.com:8081/repository/yum-proxy/RPM-GPG-KEY-CentOS-7
enabled=1
baseurl=http://nexushub.com:8081/repository/yum-proxy/$releasever/updates/$basearch/
name=Qcloud centos updates - $basearch[root@master yum.repos.d]#最后将配置文件里面name也修改一下,修改后查看文件内容:
[root@master yum.repos.d]# cat CentOS-Base.repo
[nexushub-extras]
gpgcheck=1
gpgkey=http://nexushub.com:8081/repository/yum-proxy/RPM-GPG-KEY-CentOS-7
enabled=1
baseurl=http://nexushub.com:8081/repository/yum-proxy/$releasever/extras/$basearch/
name=Nexushub centos extras - $basearch
[nexushub-os]
gpgcheck=1
gpgkey=http://nexushub.com:8081/repository/yum-proxy/RPM-GPG-KEY-CentOS-7
enabled=1
baseurl=http://nexushub.com:8081/repository/yum-proxy/$releasever/os/$basearch/
name=Nexushub centos os - $basearch
[nexushub-updates]
gpgcheck=1
gpgkey=http://nexushub.com:8081/repository/yum-proxy/RPM-GPG-KEY-CentOS-7
enabled=1
baseurl=http://nexushub.com:8081/repository/yum-proxy/$releasever/updates/$basearch/
name=Nexushub centos updates - $basearch

[root@master yum.repos.d]#更新软件包缓存:
[root@master ~]# yum makecache
Loaded plugins: fastestmirror, langpacks
Loading mirror speeds from cached hostfile
nexushub-extras                                                                                  | 1.5 kB  00:00:00
nexushub-os                                                                                      | 2.2 kB  00:00:00
nexushub-updates                                                                                 | 1.5 kB  00:00:00
(1/10): nexushub-extras/7/x86_64/primary                                                         | 107 kB  00:00:00
(2/10): nexushub-os/7/x86_64/filelists                                                           | 7.1 MB  00:00:00
(3/10): nexushub-os/7/x86_64/primary                                                             | 2.9 MB  00:00:00
(4/10): nexushub-os/7/x86_64/other                                                               | 1.5 MB  00:00:00
(5/10): nexushub-extras/7/x86_64/other                                                           | 109 kB  00:00:00
(6/10): nexushub-updates/7/x86_64/primary                                                        |  13 MB  00:00:00
(7/10): nexushub-extras/7/x86_64/filelists                                                       | 252 kB  00:00:00
(8/10): nexushub-os/7/x86_64/group_gz                                                            | 153 kB  00:00:00
(9/10): nexushub-updates/7/x86_64/other                                                          | 1.0 MB  00:00:00
(10/10): nexushub-updates/7/x86_64/filelists                                                     |  14 MB  00:00:00
nexushub-extras                                                                                                 518/518
nexushub-extras                                                                                                 518/518
nexushub-extras                                                                                                 518/518
nexushub-os                                                                                                 10072/10072
nexushub-os                                                                                                 10072/10072
nexushub-os                                                                                                 10072/10072
nexushub-updates                                                                                              5165/5165
nexushub-updates                                                                                              5165/5165
nexushub-updates                                                                                              5165/5165
Metadata Cache Created
[root@master ~]#可以看到,缓存创建成功!
安装包:
[root@master ~]# yum install nmap
Loaded plugins: fastestmirror, langpacks
Loading mirror speeds from cached hostfile
Resolving Dependencies
--> Running transaction check
---> Package nmap.x86_64 2:6.40-19.el7 will be installed
--> Processing Dependency: nmap-ncat = 2:6.40-19.el7 for package: 2:nmap-6.40-19.el7.x86_64
--> Running transaction check
---> Package nmap-ncat.x86_64 2:6.40-19.el7 will be installed
--> Finished Dependency Resolution

Dependencies Resolved

========================================================================================================================
 Package                    Arch                    Version                          Repository                    Size
========================================================================================================================
Installing:
 nmap                       x86_64                  2:6.40-19.el7                    nexushub-os                  3.9 M
Installing for dependencies:
 nmap-ncat                  x86_64                  2:6.40-19.el7                    nexushub-os                  206 k

Transaction Summary
========================================================================================================================
Install  1 Package (+1 Dependent package)

Total download size: 4.2 M
Installed size: 17 M
Is this ok [y/d/N]: y
Downloading packages:
(1/2): nmap-ncat-6.40-19.el7.x86_64.rpm                                                          | 206 kB  00:00:00
(2/2): nmap-6.40-19.el7.x86_64.rpm                                                               | 3.9 MB  00:00:00
------------------------------------------------------------------------------------------------------------------------
Total                                                                                   5.7 MB/s | 4.2 MB  00:00:00
Running transaction check
Running transaction test
Transaction test succeeded
Running transaction
  Installing : 2:nmap-ncat-6.40-19.el7.x86_64                                                                       1/2
  Installing : 2:nmap-6.40-19.el7.x86_64                                                                            2/2
  Verifying  : 2:nmap-ncat-6.40-19.el7.x86_64                                                                       1/2
  Verifying  : 2:nmap-6.40-19.el7.x86_64                                                                            2/2

Installed:
  nmap.x86_64 2:6.40-19.el7

Dependency Installed:
  nmap-ncat.x86_64 2:6.40-19.el7

Complete!
[root@master ~]#可以看到,是从我们配置的代理仓库下载的!
在nexus浏览器处,也可以看到刚才下载的包被缓存下来了:

说明我们配置的第一个代理仓库正常工作了!!
1.6 配置epel代理仓库
EPEL(Extra Packages for Enterprise Linux) 是由 Fedora Special Interest Group 维护的 Enterprise Linux(RHEL、CentOS)中经 常用到的包。
详细可参考: https://mirrors.tuna.tsinghua.edu.cn/help/epel/
参考1.4节,创建epel代理仓库,以下列表一些关键信息:
- name: epel-proxy
- type: proxy
- format: yum
- remote storage: https://mirrors.tuna.tsinghua.edu.cn/epel/
- User Agent: Sync yum repo

 信息填写完成后,点击【Create Repository】按钮,就完成仓库的创建了。
可以看到刚才创建的仓库,已经出现在仓库列表中:
 我们现在来配置epel yum源。
将清华大学epel仓库的帮助信息中的epel yum源配置复制下来:
[epel]
name=Extra Packages for Enterprise Linux 7 - $basearch
baseurl=https://mirrors.tuna.tsinghua.edu.cn/epel/7/$basearch
#mirrorlist=https://mirrors.fedoraproject.org/metalink?repo=epel-7&arch=$basearch
failovermethod=priority
enabled=1
gpgcheck=1
gpgkey=file:///etc/pki/rpm-gpg/RPM-GPG-KEY-EPEL-7

[epel-debuginfo]
name=Extra Packages for Enterprise Linux 7 - $basearch - Debug
baseurl=https://mirrors.tuna.tsinghua.edu.cn/epel/7/$basearch/debug
#mirrorlist=https://mirrors.fedoraproject.org/metalink?repo=epel-debug-7&arch=$basearch
failovermethod=priority
enabled=0
gpgkey=file:///etc/pki/rpm-gpg/RPM-GPG-KEY-EPEL-7
gpgcheck=1

[epel-source]
name=Extra Packages for Enterprise Linux 7 - $basearch - Source
baseurl=https://mirrors.tuna.tsinghua.edu.cn/epel/7/SRPMS
#mirrorlist=https://mirrors.fedoraproject.org/metalink?repo=epel-source-7&arch=$basearch
failovermethod=priority
enabled=0
gpgkey=file:///etc/pki/rpm-gpg/RPM-GPG-KEY-EPEL-7
gpgcheck=1修改其中配置,将https://mirrors.tuna.tsinghua.edu.cn/epel/替换成我们的代理仓库的url http://nexushub.com:8081/repository/epel-proxy/, 然后再将仓库名称标志增加nexushub-前缀,便于标记我们使用的是自己的代理仓库。
最终生成的epel.repo内容如下:
[nexushub-epel]
name=Extra Packages for Enterprise Linux 7 - $basearch
baseurl=http://nexushub.com:8081/repository/epel-proxy/7/$basearch
#mirrorlist=https://mirrors.fedoraproject.org/metalink?repo=epel-7&arch=$basearch
failovermethod=priority
enabled=1
gpgcheck=1
gpgkey=file:///etc/pki/rpm-gpg/RPM-GPG-KEY-EPEL-7

[nexushub-epel-debuginfo]
name=Extra Packages for Enterprise Linux 7 - $basearch - Debug
baseurl=http://nexushub.com:8081/repository/epel-proxy/7/$basearch/debug
#mirrorlist=https://mirrors.fedoraproject.org/metalink?repo=epel-debug-7&arch=$basearch
failovermethod=priority
enabled=0
gpgkey=file:///etc/pki/rpm-gpg/RPM-GPG-KEY-EPEL-7
gpgcheck=1

[nexushub-epel-source]
name=Extra Packages for Enterprise Linux 7 - $basearch - Source
baseurl=http://nexushub.com:8081/repository/epel-proxy/7/SRPMS
#mirrorlist=https://mirrors.fedoraproject.org/metalink?repo=epel-source-7&arch=$basearch
failovermethod=priority
enabled=0
gpgkey=file:///etc/pki/rpm-gpg/RPM-GPG-KEY-EPEL-7
gpgcheck=1配置完成后,查看新的epel yum源信息:
[root@master ~]# ls -lha /etc/yum.repos.d/epel.repo
-rw-r--r-- 1 root root 997 Aug 25 07:25 /etc/yum.repos.d/epel.repo
[root@master ~]# cat /etc/yum.repos.d/epel.repo
[nexushub-epel]
name=Extra Packages for Enterprise Linux 7 - $basearch
baseurl=http://nexushub.com:8081/repository/epel-proxy/7/$basearch
#mirrorlist=https://mirrors.fedoraproject.org/metalink?repo=epel-7&arch=$basearch
failovermethod=priority
enabled=1
gpgcheck=1
gpgkey=file:///etc/pki/rpm-gpg/RPM-GPG-KEY-EPEL-7

[nexushub-epel-debuginfo]
name=Extra Packages for Enterprise Linux 7 - $basearch - Debug
baseurl=http://nexushub.com:8081/repository/epel-proxy/7/$basearch/debug
#mirrorlist=https://mirrors.fedoraproject.org/metalink?repo=epel-debug-7&arch=$basearch
failovermethod=priority
enabled=0
gpgkey=file:///etc/pki/rpm-gpg/RPM-GPG-KEY-EPEL-7
gpgcheck=1

[nexushub-epel-source]
name=Extra Packages for Enterprise Linux 7 - $basearch - Source
baseurl=http://nexushub.com:8081/repository/epel-proxy/7/SRPMS
#mirrorlist=https://mirrors.fedoraproject.org/metalink?repo=epel-source-7&arch=$basearch
failovermethod=priority
enabled=0
gpgkey=file:///etc/pki/rpm-gpg/RPM-GPG-KEY-EPEL-7
gpgcheck=1

[root@master ~]#创建缓存:
[root@master ~]# yum makecache
Loaded plugins: fastestmirror, langpacks
Loading mirror speeds from cached hostfile
nexushub-epel                                                                                    | 3.3 kB  00:00:00
nexushub-extras                                                                                  | 1.5 kB  00:00:00
nexushub-os                                                                                      | 2.2 kB  00:00:00
nexushub-updates                                                                                 | 1.5 kB  00:00:00
(1/6): nexushub-epel/x86_64/group_gz                                                             |  99 kB  00:00:00
(2/6): nexushub-epel/x86_64/updateinfo                                                           | 1.0 MB  00:00:00
(3/6): nexushub-epel/x86_64/prestodelta                                                          |  753 B  00:00:00
(4/6): nexushub-epel/x86_64/primary                                                              | 3.9 MB  00:00:00
(5/6): nexushub-epel/x86_64/other                                                                | 2.4 MB  00:00:00
(6/6): nexushub-epel/x86_64/filelists                                                            |  12 MB  00:00:01
nexushub-epel                                                                                               13769/13769
nexushub-epel                                                                                               13769/13769
nexushub-epel                                                                                               13769/13769
nexushub-updates                                                                                              5176/5176
Metadata Cache Created
[root@master ~]#安装包:
[root@master ~]# yum install -y jq
Loaded plugins: fastestmirror, langpacks
Loading mirror speeds from cached hostfile
Resolving Dependencies
--> Running transaction check
---> Package jq.x86_64 0:1.6-2.el7 will be installed
--> Finished Dependency Resolution

Dependencies Resolved

========================================================================================================================
 Package               Arch                      Version                         Repository                        Size
========================================================================================================================
Installing:
 jq                    x86_64                    1.6-2.el7                       nexushub-epel                    167 k

Transaction Summary
========================================================================================================================
Install  1 Package

Total download size: 167 k
Installed size: 381 k
Downloading packages:
jq-1.6-2.el7.x86_64.rpm                                                                          | 167 kB  00:00:00
Running transaction check
Running transaction test
Transaction test succeeded
Running transaction
  Installing : jq-1.6-2.el7.x86_64                                                                                  1/1
  Verifying  : jq-1.6-2.el7.x86_64                                                                                  1/1

Installed:
  jq.x86_64 0:1.6-2.el7

Complete!
[root@master ~]# jq --version
jq-1.6
[root@master ~]#可以看到,安装jq工具时,使用的yum源是nexushub-epel源,正是我们刚才配置的yum源,说明epel代理仓库也配置正常!