GitLab的替代者-轻量级Gogs安装与配置
我们使用docker安装gogs服务。
1. 安装
1.1 下载镜像
使用dockerhub中给定的命令docker pull gogs/gogs下载镜像:
[root@hellogitlab ~]# docker pull gogs/gogs
Using default tag: latest
Trying to pull repository docker.io/gogs/gogs ...
latest: Pulling from docker.io/gogs/gogs
e95f33c60a64: Pull complete
6629f7b66676: Pull complete
95248f7b0231: Pull complete
1a4b11e4c1b9: Pull complete
1613ead921c8: Pull complete
37949e6160d8: Pull complete
38df9b14eb06: Pull complete
93d905b51231: Pull complete
Digest: sha256:7607fee4a463fdda91e7126fcc8504e7d972c4b80e79b2102c0de7175c1d3b81
Status: Downloaded newer image for docker.io/gogs/gogs:latest
[root@hellogitlab ~]#1.2 数据库准备
我们在postgresql中创建一个gogs的数据库,并授权。
数据库创建和授权可参考 postgresql_in_docker
# 创建数据库
CREATE DATABASE gogs;
# 创建用户
CREATE USER gogsadmin WITH password 'securepasswd';
# 授权
GRANT ALL PRIVILEGES ON DATABASE gogs TO gogsadmin;1.3 准备证书文件
在腾讯云上面申请二级域名gogs.hellogitlab.com的免费证书。

为后面设置HTTPS协议做准备。
在创建证书的同时,我们也需要增加一个gogs.hellogitlab.com的域名解析。

这样便于后面为Gogs服务设置域名。
1.4 创建持久化目录
创建持久化目录/dockerdata/gogs/data用于存储gogs的数据。
[root@hellogitlab ~]# mkdir -p /dockerdata/gogs/data
[root@hellogitlab ~]# ls -lah /dockerdata/gogs
总用量 12K
drwxr-xr-x 3 root root 4.0K 4月  23 23:50 .
drwxr-xr-x 6 root root 4.0K 4月  23 23:50 ..
drwxr-xr-x 2 root root 4.0K 4月 23 23:50 data1.5 运行容器
运行以下命令:
$ docker run --name=gogs --restart=always -p 10022:22 -p 10080:3000 -v /dockerdata/gogs/data:/data -d gogs/gogs

# --name=gogs 设置容器名称为gogs
# --restart=always 设置docker服务重启后自动启动容器
# -p 10022:22 将容器内部22端口映射到宿主机10022端口
# -p 10080:3000 将容器内容3000端口映射到宿主机10080端口
# -v /dockerdata/gogs/data:/data 把gogs的数据/data 持久化到宿主机的/dockerdata/gogs/data下,做数据备份
# -d 在后台运行容器运行:
运行容器
[root@hellogitlab ~]# docker run --name=gogs --restart=always -p 10022:22 -p 10080:3000 -v /dockerdata/gogs/data:/data -d gogs/gogs
ccb8bd71125e166808609920f9a82d5c3c8ea635e8951f5cab546c439ed88004

# 查看刚才运行成功的容器
[root@hellogitlab ~]# docker ps -n 1
CONTAINER ID        IMAGE               COMMAND                  CREATED             STATUS              PORTS                                            NAMES
ccb8bd71125e gogs/gogs "/app/gogs/docker/..." 2 minutes ago Up About a minute 0.0.0.0:10022->22/tcp, 0.0.0.0:10080->3000/tcp gogs1.6 防火墙放行端口
防火墙放行10022和10080端口
我们先放行一下端口:
firewall-cmd --zone=public --add-port=10022/tcp --permanent
firewall-cmd --zone=public --add-port=10080/tcp --permanent
firewall-cmd --reload
firewall-cmd --list-all执行命令:
[root@hellogitlab ~]# firewall-cmd --zone=public --add-port=10022/tcp --permanent
success
[root@hellogitlab ~]# firewall-cmd --zone=public --add-port=10080/tcp --permanent
success
[root@hellogitlab ~]# firewall-cmd --reload
success
[root@hellogitlab ~]# firewall-cmd --list-all
public
  target: default
  icmp-block-inversion: no
  interfaces:
  sources:
  services: ssh dhcpv6-client
  ports: 10022/tcp 10080/tcp
  protocols:
  masquerade: no
  forward-ports:
  source-ports:
  icmp-blocks:
rich rules:防火墙放行后。我们就可以在浏览器上查看gogs页面。
优化提示
后面对系统优化可以知道,需要再放行一个HTTPS方式使用的端口号,我们使用10081作为Gogs HTTPS加密传输使用的端口号:
[root@hellogitlab ~]# firewall-cmd --zone=public --add-port=10081/tcp --permanent
success由于我们计划使用Nginx对docker容器进行反向代码,将10080端口映射到10081端口,然后配置SSL证书,因此我们在这里也将10081端口放行。
1.7 初始安装配置
打开浏览器,访问页面http://hellogitlab.com:10080,此时会自动跳转到首次运行安装程序页面。
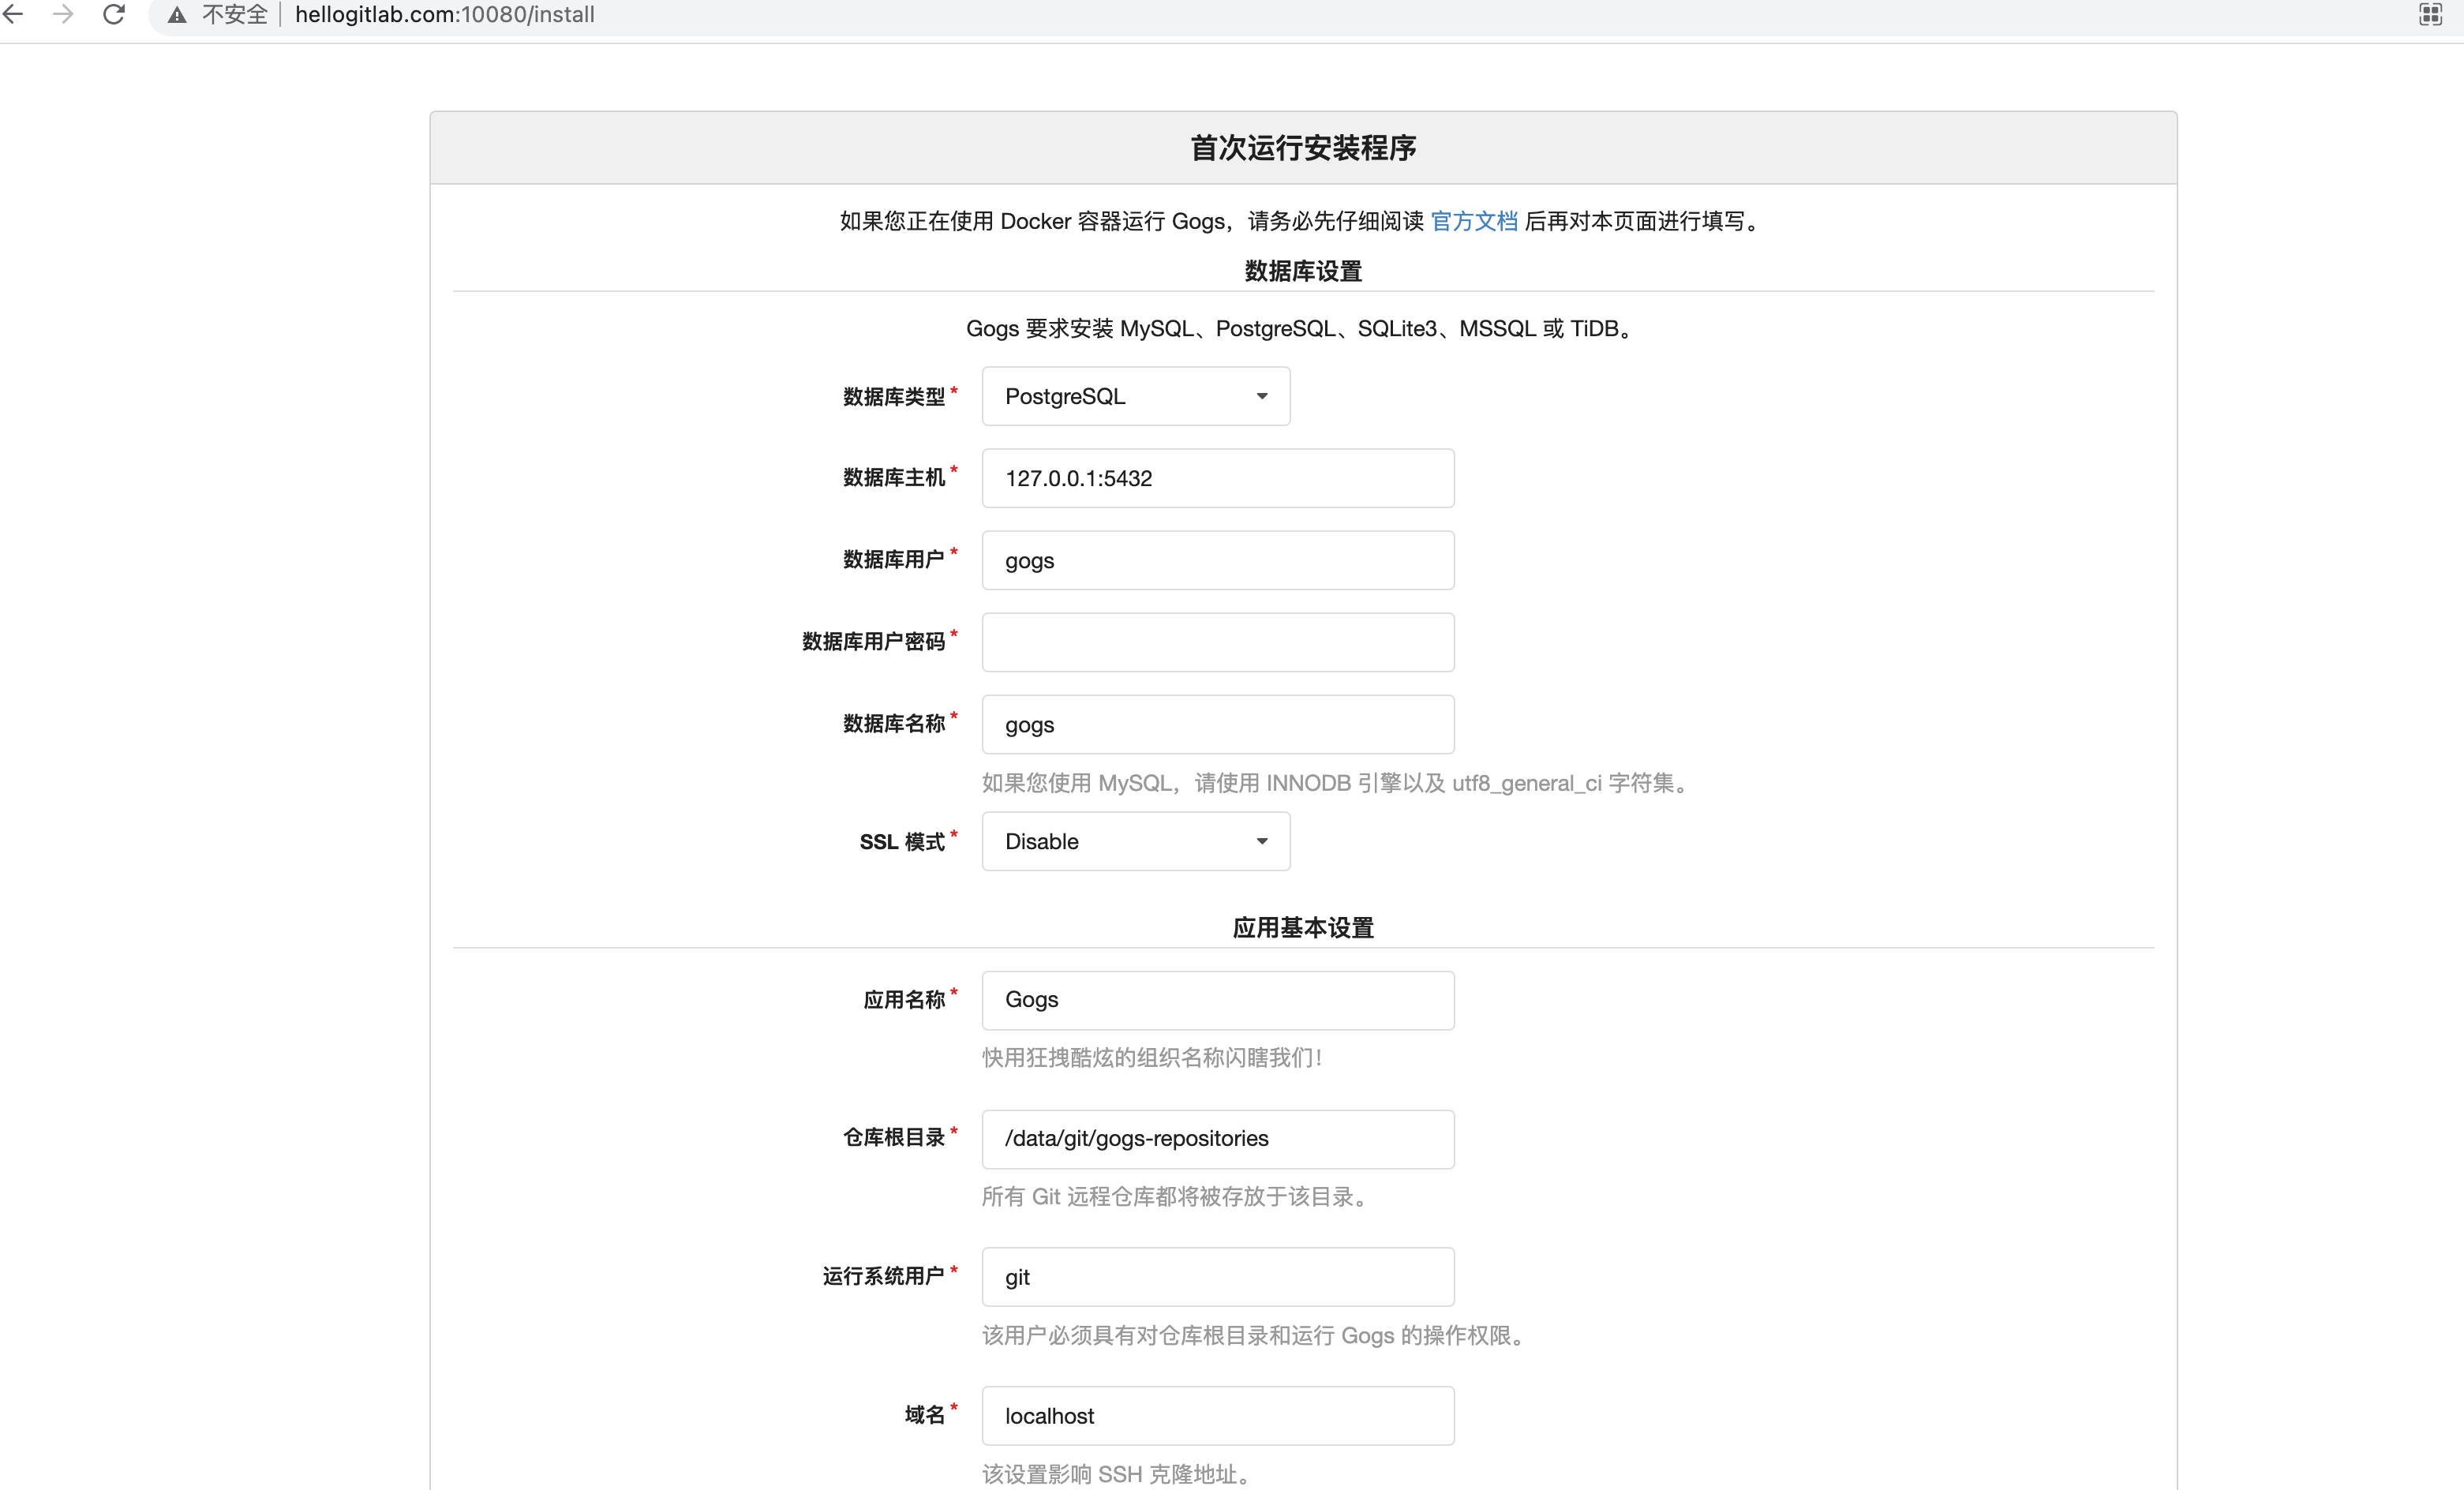
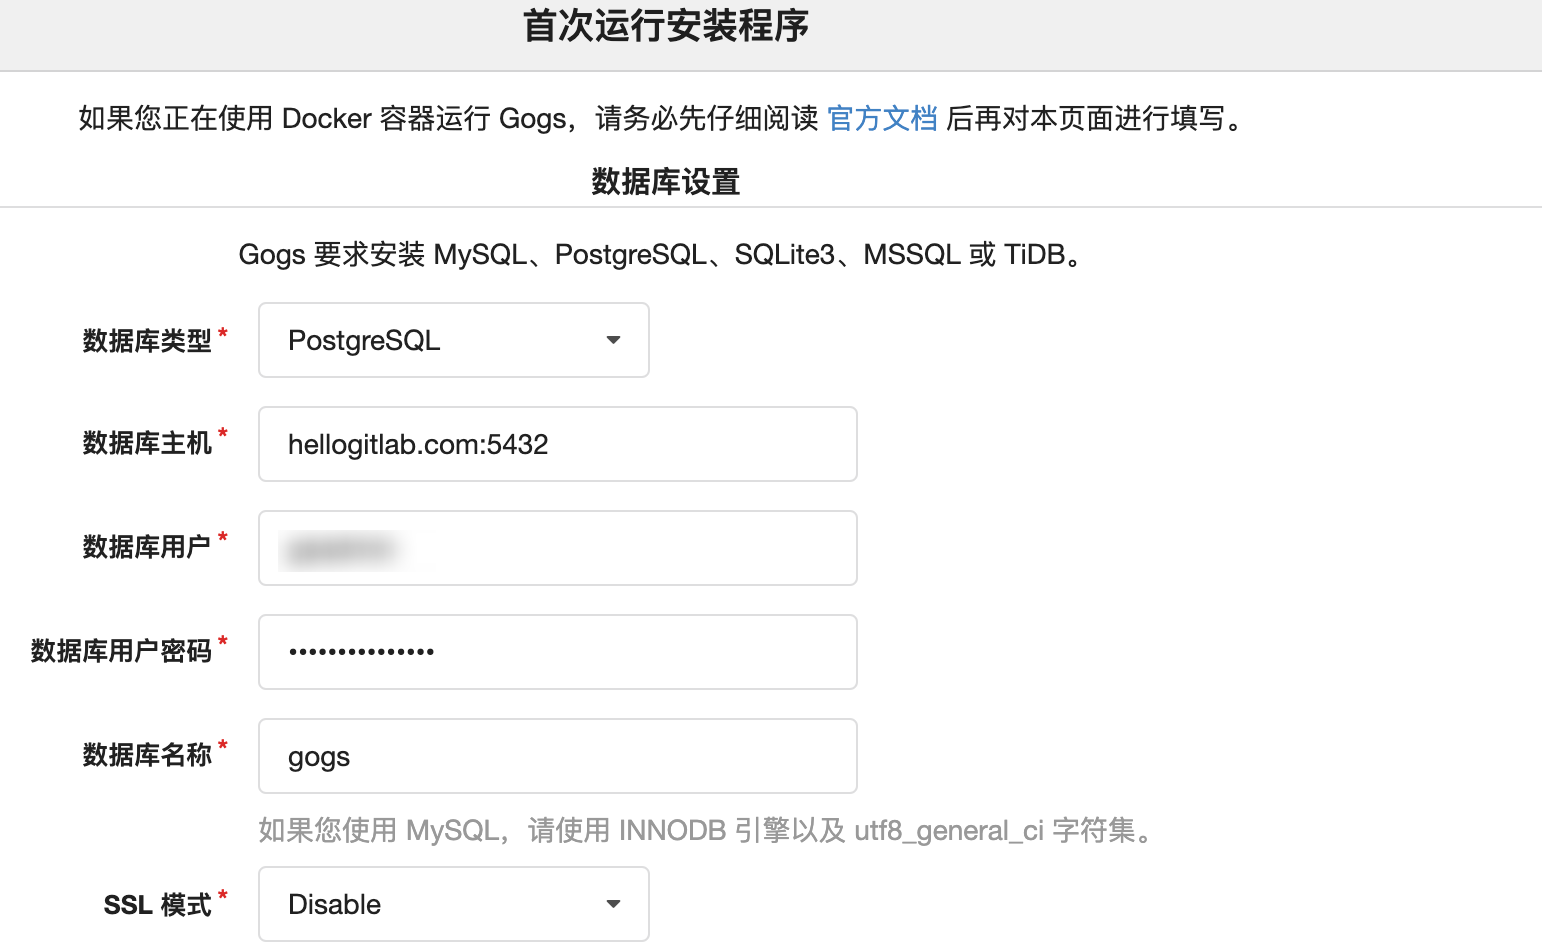
我们使用postgresql,填写刚才创建的数据库信息:
最后需要对外暴露的域名和端口设置:
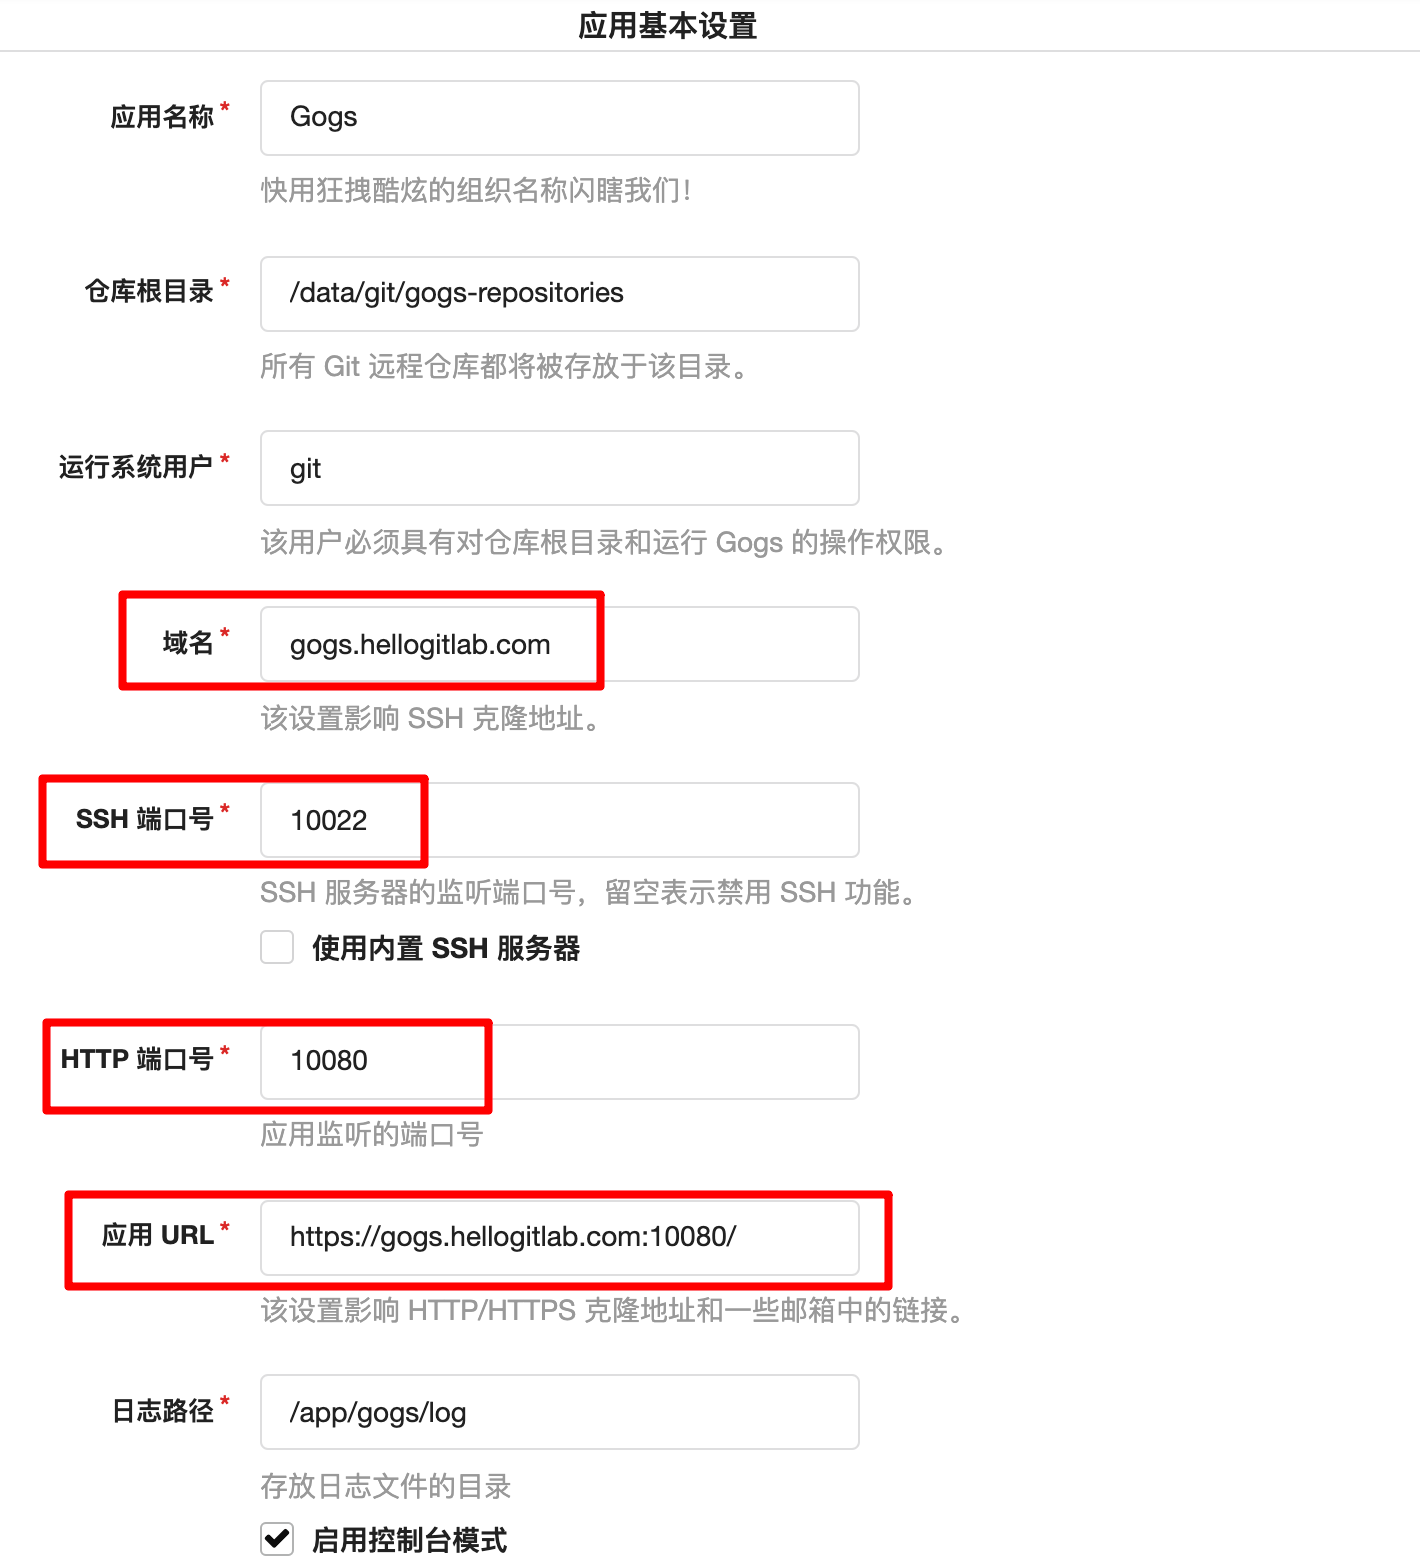
这里需要注意的是,我们虽然在应用URL中指定了https://gogs.hellogitlab.com:10080/,开启了https协议,但由于我们并没有配置证书,此时https不可用,需要使用http形式访问Gogs。
登陆后,创建test仓库,可以看到HTTPS和SSH形式的下载链接都可以显示:
- HTTPS形式:
https://gogs.hellogitlab.com:10080/meizhaohui/test.git - SSH形式:
ssh://git@gogs.hellogitlab.com:10022/meizhaohui/test.git
我尝试使用这两种方式下载仓库代码。
HTTP方式下载:
$ git clone https://gogs.hellogitlab.com:10080/meizhaohui/test.git
Cloning into 'test'...
fatal: unable to access 'https://gogs.hellogitlab.com:10080/meizhaohui/test.git/': error:1400410B:SSL routines:CONNECT_CR_SRVR_HELLO:wrong version number出现异常。
SSH方式下载:
$ git clone ssh://git@gogs.hellogitlab.com:10022/meizhaohui/test.git
Cloning into 'test'...
remote: Enumerating objects: 10, done.
remote: Counting objects: 100% (10/10), done.
remote: Compressing objects: 100% (7/7), done.
remote: Total 10 (delta 0), reused 0 (delta 0)
Receiving objects: 100% (10/10), done.可以看到,能正常下载。
此时,SSH形式可以正常下载。而HTTPS方式下载需要优化。
1.8 Nginx反向代理配置
为了让我们通过HTTPS加密形式访问Gogs服务,我们配置一下Nginx代码,将10080端口转发到10081端口,并且为10081端口设置SSL证书。
我们将1.3节点准备的证书文件下载下来,并上传到服务器上。存放到/etc/pki/nginx/目录下。
[root@hellogitlab ~]# ls -lah /etc/pki/nginx/*gogs*
-rw-r--r-- 1 root root 3.9K 4月  24 19:03 /etc/pki/nginx/1_gogs.hellogitlab.com_bundle.crt
-rw-r--r-- 1 root root 1.7K 4月 24 19:03 /etc/pki/nginx/2_gogs.hellogitlab.com.key然后在/etc/nginx/conf.d/目录下创建一个gogs.conf的配置文件。
配置文件内容如下:
[root@hellogitlab ~]# cat /etc/nginx/conf.d/gogs.conf
server {
        listen       10081 ssl;
        server_name  gogs.hellogitlab.com;
        ssl_certificate "/etc/pki/nginx/1_gogs.hellogitlab.com_bundle.crt";
        ssl_certificate_key "/etc/pki/nginx/2_gogs.hellogitlab.com.key";
        ssl_session_timeout 5m;
        ssl_protocols TLSv1 TLSv1.1 TLSv1.2;
        ssl_ciphers ECDHE-RSA-AES128-GCM-SHA256:HIGH:!aNULL:!MD5:!RC4:!DHE;
        ssl_prefer_server_ciphers on;

        location / {
       # proxy_set_header Host $host;
       # proxy_set_header X-Forwarded-For $proxy_add_x_forwarded_for;
        proxy_pass http://localhost:10080/;
       }
}注意
listen 10081 ssl; 最后HTTPS加密传输需要暴露的端口号。
server_name gogs.hellogitlab.com;处改成你的域名。
ssl_certificate "/etc/pki/nginx/1_gogs.hellogitlab.com_bundle.crt"; 证书文件。
ssl_certificate_key "/etc/pki/nginx/2_gogs.hellogitlab.com.key"; 证书文件。
proxy_pass http://localhost:10080/; 将10081端口转发到10080端口。
配置完成后,测试一下nginx配置文件是否正确。使用nginx -t检查一下:
[root@hellogitlab ~]# nginx -t
nginx: the configuration file /etc/nginx/nginx.conf syntax is ok
nginx: configuration file /etc/nginx/nginx.conf test is successful说明Nginx配置正确。
1.9 邮件配置
之前初始体验的时候,我们并没有配置Gogs的邮件,我们再次测试的时候,可以在初始安装界面加上邮件相关的配置。
你可以准备一个外部邮箱,专门用来做邮件通知。如我使用的是notice@hellogitlab.com专用邮箱。
可以在后面重新运行docker容器后,再进行配置。
1.10 头像优化
默认情况下,会加载gravatar.com网站上的头像,而在国内这个网站却被屏蔽了,导致Gogs系统显示头像会出现异常:

我们参考 https://github.com/gogs/gogs/issues/1470 尝试给docker容器加上OFFLINE_MODE参数,并设置值为true,看能不能解决该问题。
我们将该参数写到配置文件.gogs.env中,后面运行容器时,从配置文件中读取环境变量。
[root@hellogitlab ~]# cat /dockerdata/gogs/.gogs.env
# 关闭原程头像引用 https://gravatar.com连接异常
OFFLINE_MODE=true注意,等号=两侧不要有空格。
1.11 优化后重新运行容器
我们在运行容器时加载环境变量,并在容器运行后重启Nginx服务。
注意,我们最终需要使用的gogs服务的地址是https://gogs.hellogitlab.com:10081。
在重新运行容器前,我们将之前生成的数据库数据删除,以及持久化的数据删除。
先停止gogs容器。
[root@hellogitlab ~]# docker stop gogs
gogs
[root@hellogitlab ~]# docker rm gogs
gogs删除持久化数据:
# 查看持久化目录下的文件
[root@hellogitlab ~]# ls /dockerdata/gogs/data/
git  gogs  ssh
# 删除持久化目录下的所有文件
[root@hellogitlab ~]# trash-put /dockerdata/gogs/data/* && trash-empty
[root@hellogitlab ~]# ls /dockerdata/gogs/data/删除数据库,并新建数据库,并授权:
[root@hellogitlab ~]# psql -Uadmin -dtestdb -h localhost
用户 admin 的口令:
psql (9.2.24, 服务器 13.1 (Debian 13.1-1.pgdg100+1))
警告:psql 版本9.2, 服务器版本13.0.
一些psql功能可能无法工作.
输入 "help" 来获取帮助信息.

testdb=#
# 删除数据库
testdb=# DROP DATABASE gogs;
DROP DATABASE

# 重新创建数据库
testdb=# CREATE DATABASE gogs;
CREATE DATABASE

# 给数据库管理用户授权
testdb=# GRANT ALL PRIVILEGES ON DATABASE gogs TO gogsadmin;
GRANT
testdb=# \q以上准备工作完成后,我们重新运行容器。
[root@hellogitlab ~]# docker run --name=gogs --env-file=/dockerdata/gogs/.gogs.env --restart=always -p 10022:22 -p 10080:3000 -v /dockerdata/gogs/data:/data -d gogs/gogs
e1a3883c0a818f74a480d731d7a26e10bb7406e462b37d760fc7d7b021e75b34
[root@hellogitlab ~]# docker ps --latest
CONTAINER ID        IMAGE               COMMAND                  CREATED              STATUS              PORTS                                            NAMES
e1a3883c0a81 gogs/gogs "/app/gogs/docker/..." About a minute ago Up About a minute 0.0.0.0:10022->22/tcp, 0.0.0.0:10080->3000/tcp gogs可以看到容器正常运行。
我们重启一下Nginx服务:
[root@hellogitlab ~]# systemctl restart nginx
[root@hellogitlab ~]# systemctl status nginx
● nginx.service - The nginx HTTP and reverse proxy server
   Loaded: loaded (/usr/lib/systemd/system/nginx.service; disabled; vendor preset: disabled)
   Active: active (running) since 六 2021-04-24 23:45:38 CST; 6s ago
  Process: 30101 ExecStart=/usr/sbin/nginx (code=exited, status=0/SUCCESS)
  Process: 30097 ExecStartPre=/usr/sbin/nginx -t (code=exited, status=0/SUCCESS)
  Process: 30095 ExecStartPre=/usr/bin/rm -f /run/nginx.pid (code=exited, status=0/SUCCESS)
 Main PID: 30103 (nginx)
    Tasks: 3
   Memory: 4.1M
   CGroup: /system.slice/nginx.service
           ├─30103 nginx: master process /usr/sbin/nginx
           ├─30104 nginx: worker process
           └─30105 nginx: worker process

4月 24 23:45:38 hellogitlab.com systemd[1]: Starting The nginx HTTP and reverse proxy server...
4月 24 23:45:38 hellogitlab.com nginx[30097]: nginx: the configuration file /etc/nginx/nginx.conf syntax is ok
4月 24 23:45:38 hellogitlab.com nginx[30097]: nginx: configuration file /etc/nginx/nginx.conf test is successful
4月 24 23:45:38 hellogitlab.com systemd[1]: Started The nginx HTTP and reverse proxy server.
[root@hellogitlab ~]#此时,我们可以访问https://gogs.hellogitlab.com:10081/install,进行初始化安装配置。
数据库配置:
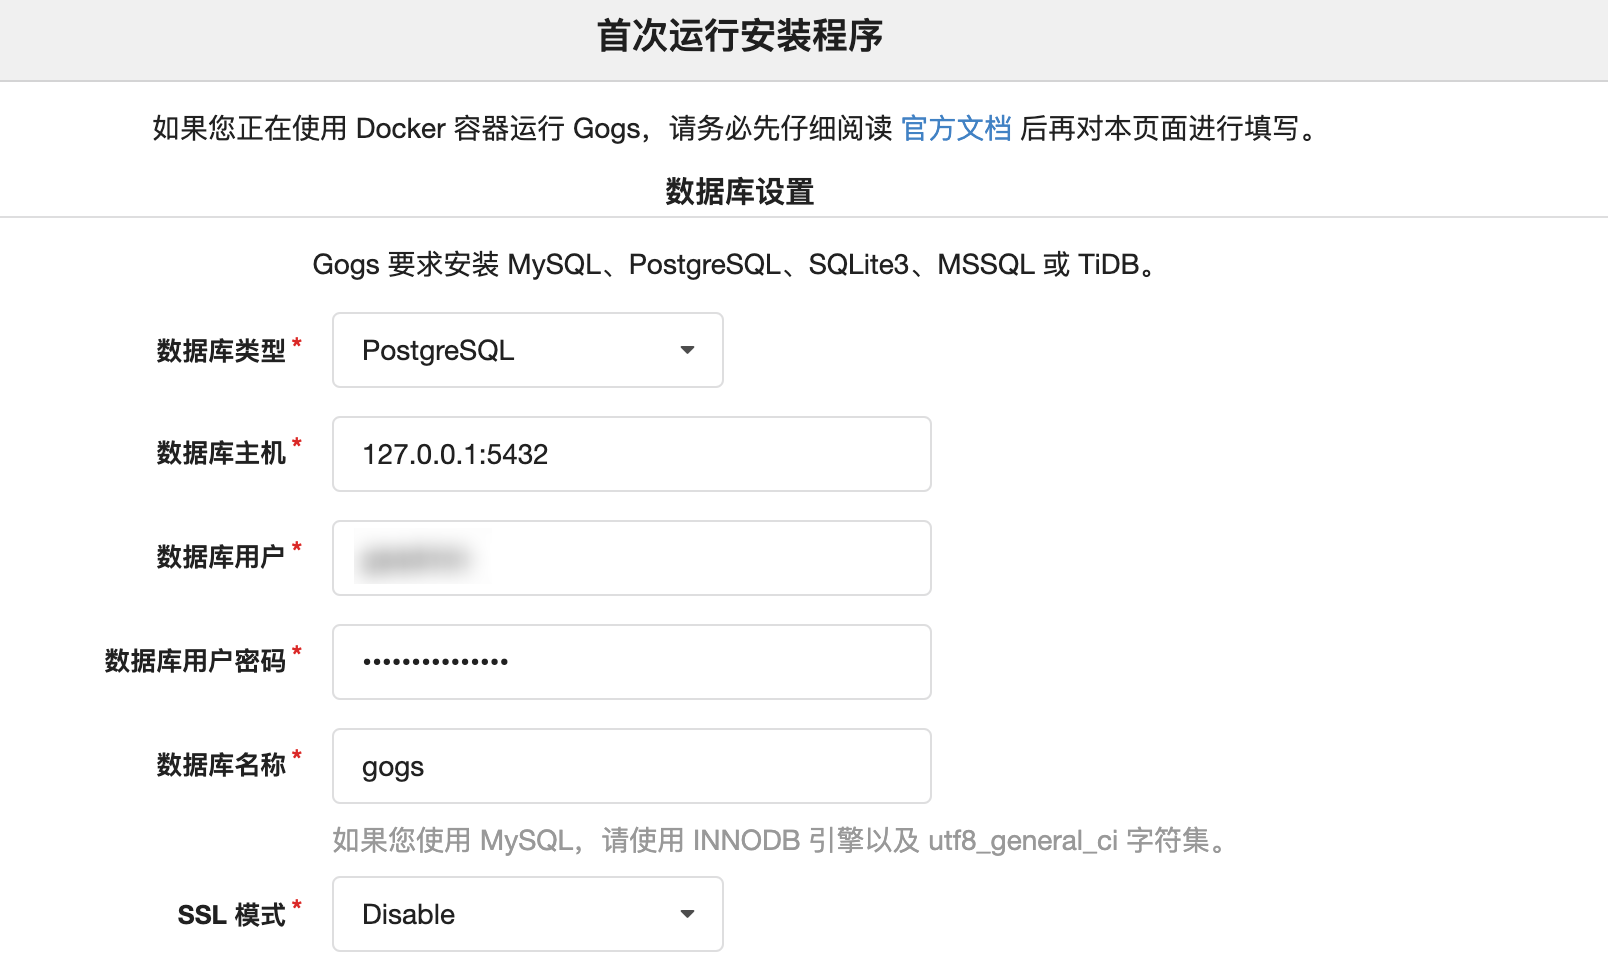
应用基本配置:
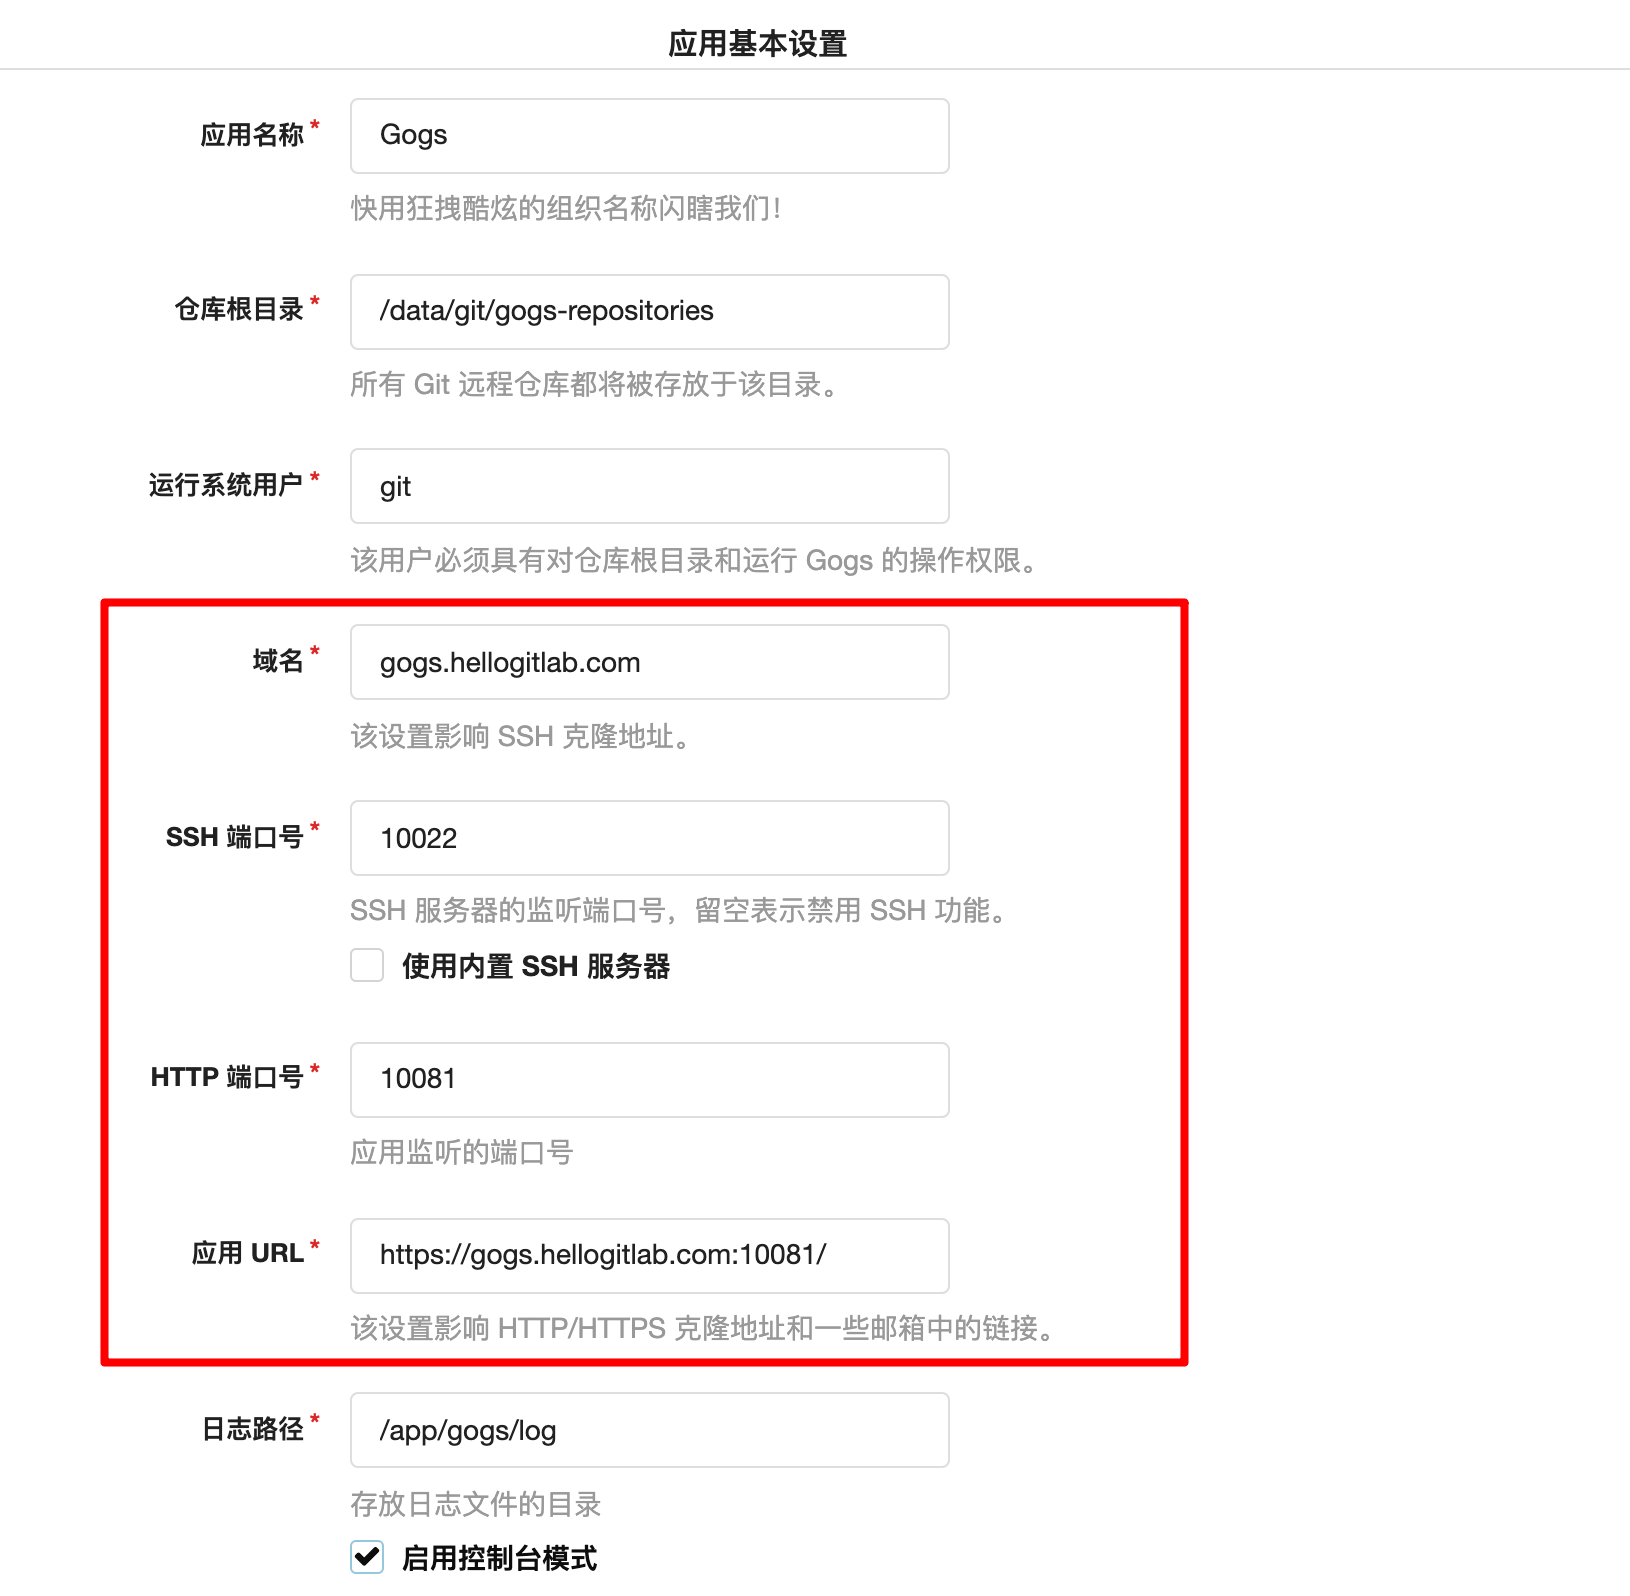
邮件服务配置:

注意,此处邮件服务时,应在SMTP主机处加上端口号,我们需要使用SMTP加密,使用465端口号。
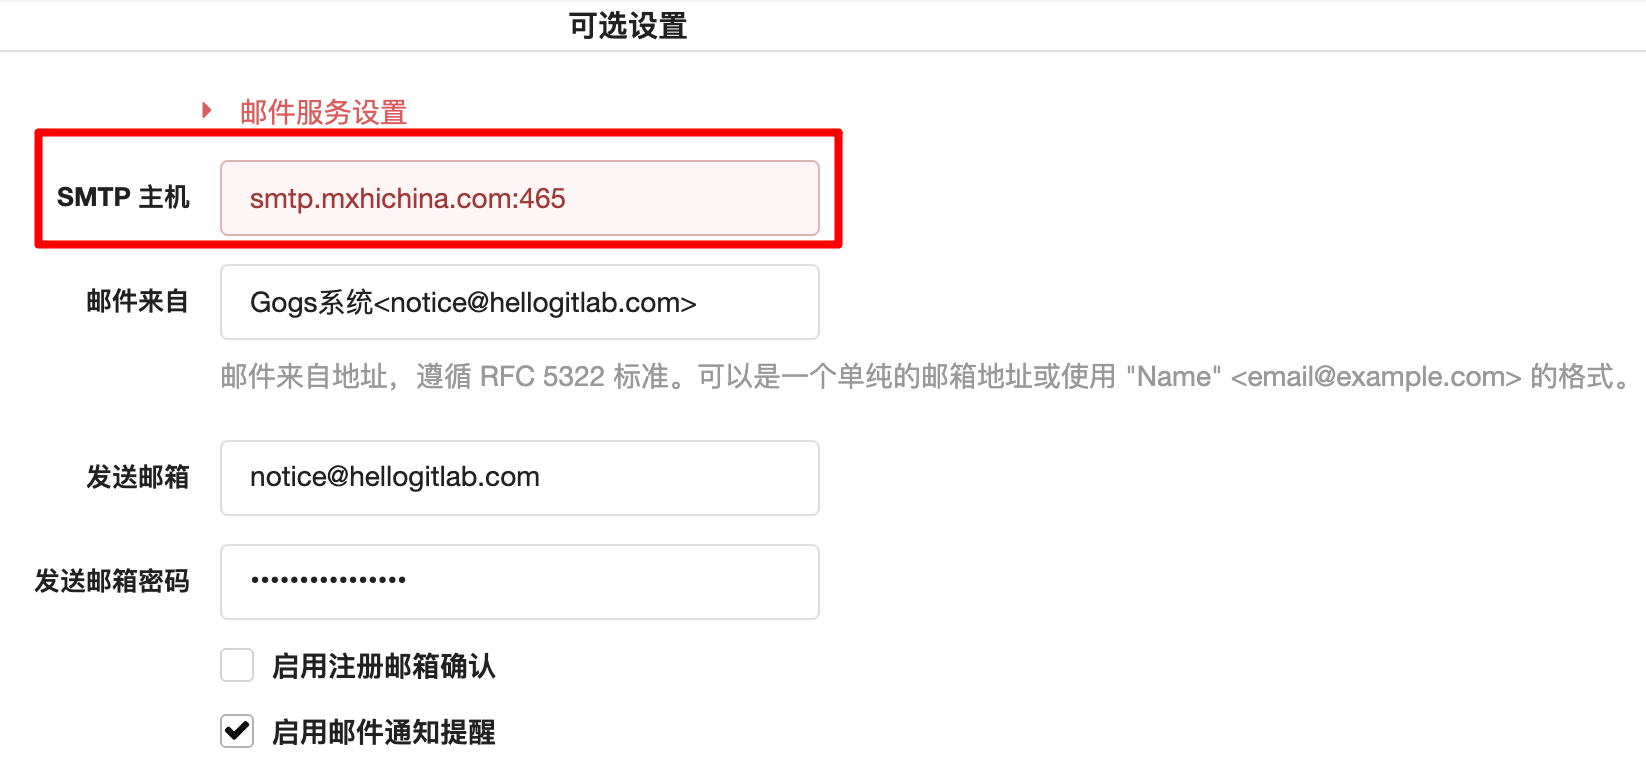
此处我们启用邮件通知提醒。
另外,在服务器和其他服务设置中。我们禁用Gravatar服务,以及禁用用户自主注册。
最后要设置一个管理员账号。
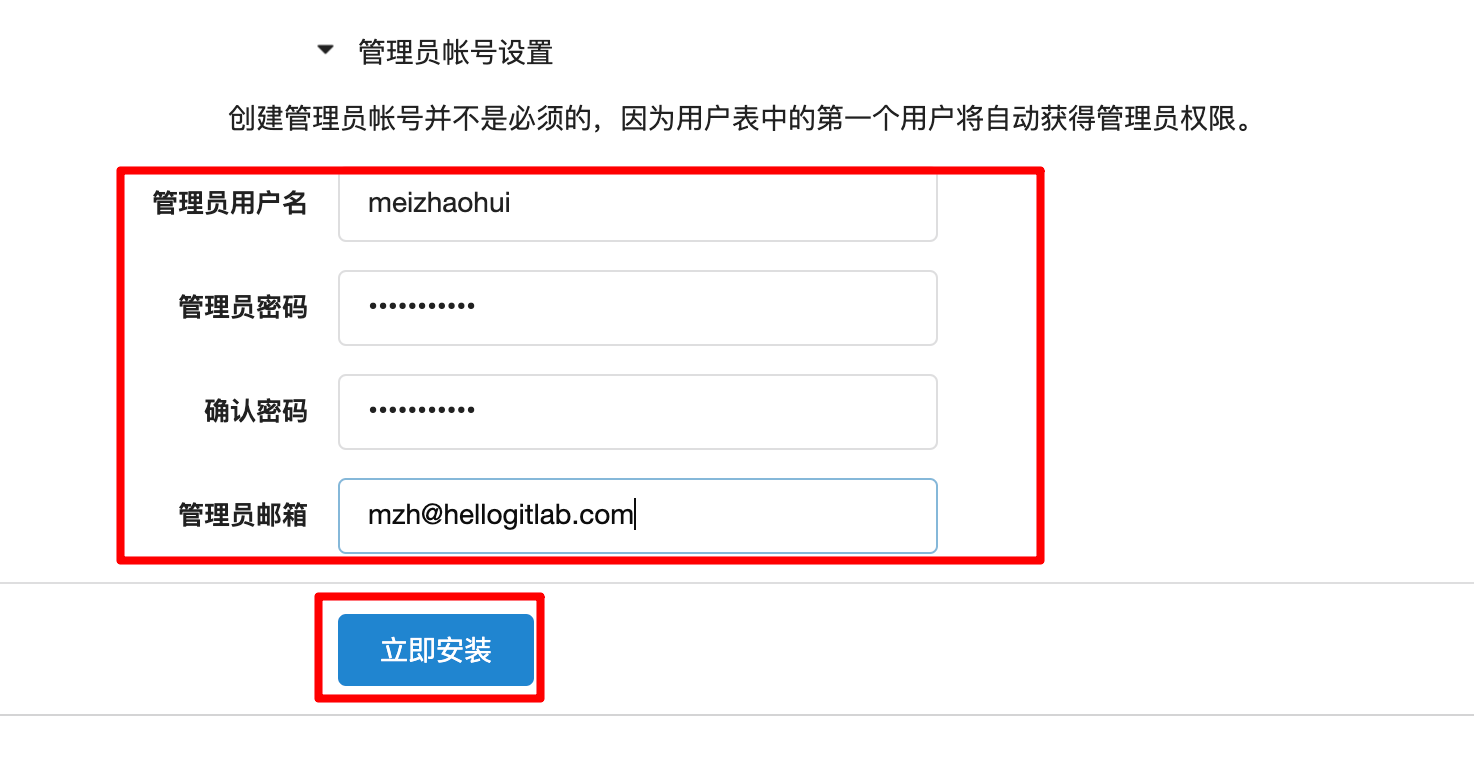
配置好后,点击立即安装按钮。
安装成功后,系统自动进入到控制面板页面:

可以创建一个testrepo仓库。
创建后,测试一下是否能够正常克隆下载并提交修改。
此时,可以看到,测试仓库页面可以正常显示HTTPS和SSH方式的下载链接:
- HTTPS方式: https://gogs.hellogitlab.com:10081/meizhaohui/testrepo.git
- SSH方式:ssh://git@gogs.hellogitlab.com:10022/meizhaohui/testrepo.git
我们尝试下载一下。
通过HTTPS方式下载并提交修改:
$ git clone https://gogs.hellogitlab.com:10081/meizhaohui/testrepo.git
Cloning into 'testrepo'...
Username for 'https://gogs.hellogitlab.com:10081': meizhaohui
Password for 'https://meizhaohui@gogs.hellogitlab.com:10081':
remote: Enumerating objects: 4, done.
remote: Counting objects: 100% (4/4), done.
remote: Compressing objects: 100% (3/3), done.
remote: Total 4 (delta 0), reused 0 (delta 0)
Unpacking objects: 100% (4/4), done.可以看到,在输入正确的用户名和密码之后,可以正常下载。
如果首次下载提示fatal: Authentication failed for,可以先执行命令git config --global --unset credential.helper再进行下载。
[mzh@MacBookPro test ]$ cd testrepo
[mzh@MacBookPro testrepo (master)]$ ls
README.md
[mzh@MacBookPro testrepo (master)]$ cat README.md
# testrepo

测试仓库%                                                                       [mzh@MacBookPro testrepo (master)]$ echo -e '\nadd by https\n' >> README.md
[mzh@MacBookPro testrepo (master ✗)]$ cat README.md
# testrepo

测试仓库
add by https
[mzh@MacBookPro testrepo (master ✗)]$ git add .
[mzh@MacBookPro testrepo (master ✗)]$ git commit -m"commit by https"
[master 25837c6] commit by https
 1 file changed, 3 insertions(+), 1 deletion(-)
[mzh@MacBookPro testrepo (master)]$ git push origin master
Enumerating objects: 5, done.
Counting objects: 100% (5/5), done.
Delta compression using up to 8 threads
Compressing objects: 100% (2/2), done.
Writing objects: 100% (3/3), 323 bytes | 323.00 KiB/s, done.
Total 3 (delta 0), reused 0 (delta 0)
To https://gogs.hellogitlab.com:10081/meizhaohui/testrepo.git
   855f8c1..25837c6  master -> master
[mzh@MacBookPro testrepo (master)]$我们刷新页面,可以看到刚才的提交已经显示在页面上了:
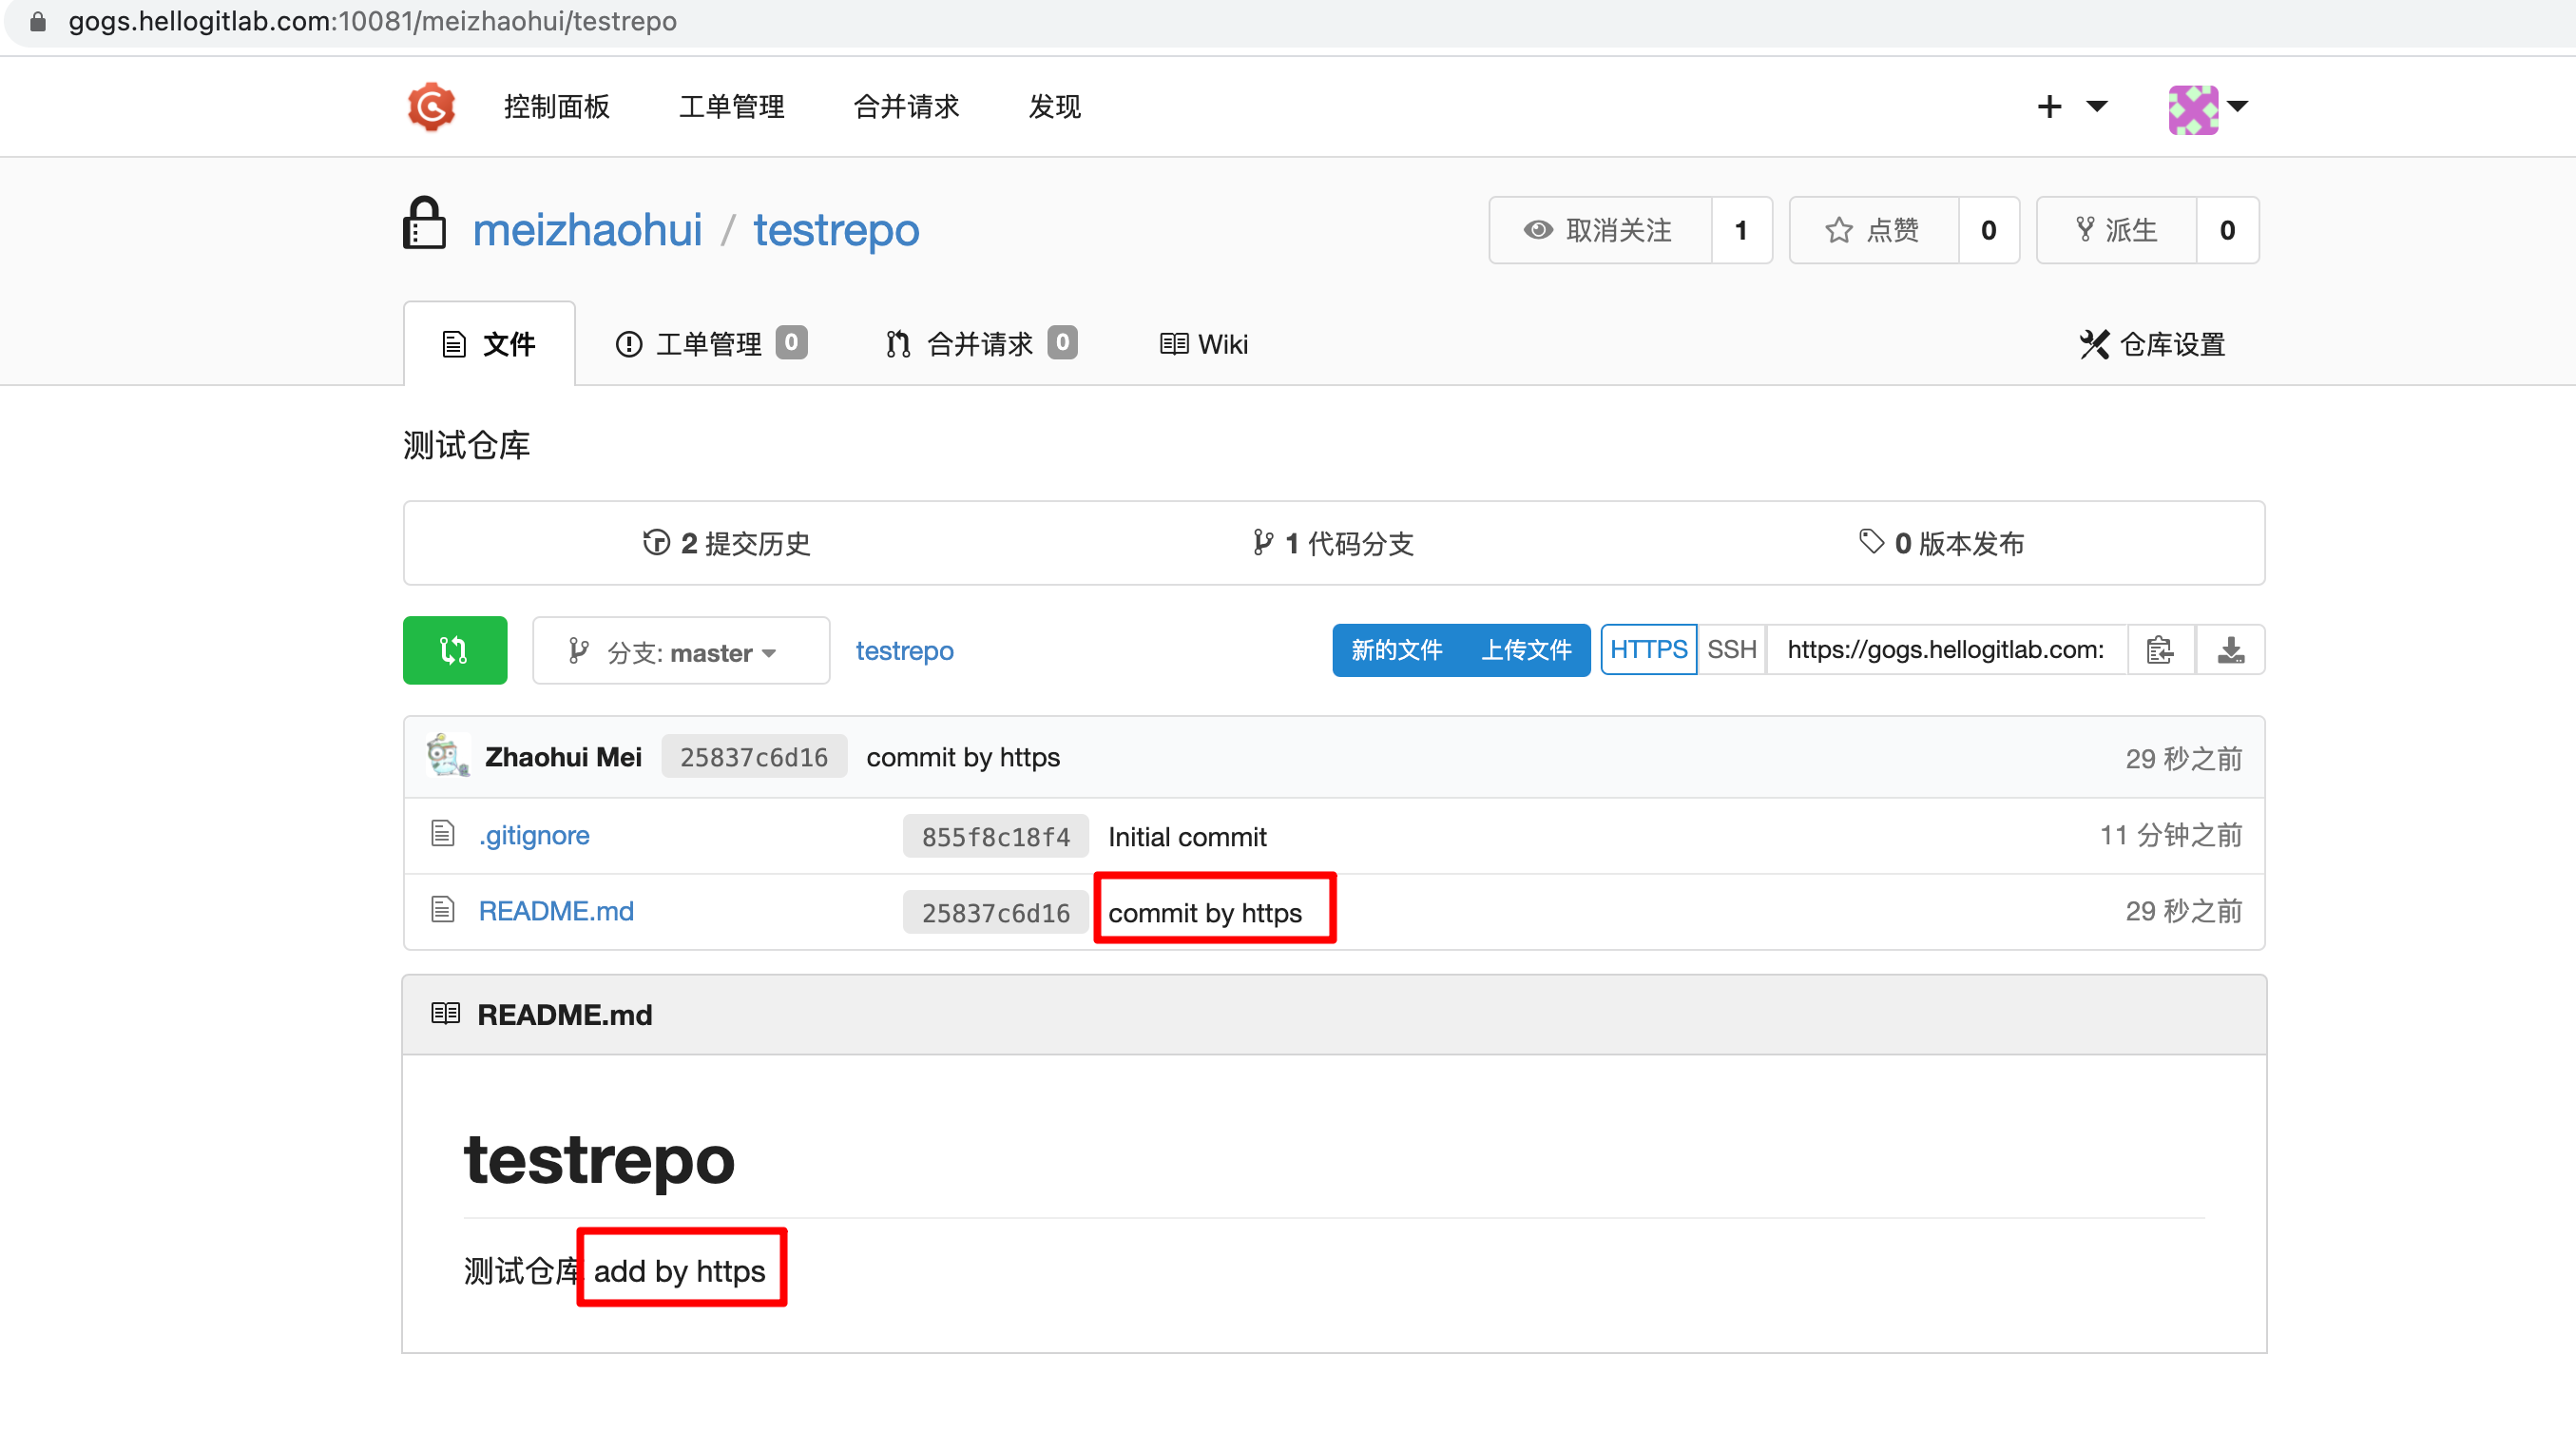
说明HTTPS方式配置正常!
同样,使用SSH方式下载试一下。
使用SSH方式下载前,需要将自动的电脑公钥加到Gogs系统的个人账号的SSH密钥当中。

添加后,再使用SSH方式下载。
$ git clone ssh://git@gogs.hellogitlab.com:10022/meizhaohui/testrepo.git
Cloning into 'testrepo'...
The authenticity of host '[gogs.hellogitlab.com]:10022 ([106.54.98.83]:10022)' can't be established.
ECDSA key fingerprint is SHA256:7FdGgE80pPNZ87i6TfgVwBaZ+fLc4SvE9lgVx/zYwHM.
Are you sure you want to continue connecting (yes/no/[fingerprint])? yes
Warning: Permanently added '[gogs.hellogitlab.com]:10022,[106.54.98.83]:10022' (ECDSA) to the list of known hosts.
remote: Enumerating objects: 7, done.
remote: Counting objects: 100% (7/7), done.
remote: Compressing objects: 100% (5/5), done.
remote: Total 7 (delta 0), reused 0 (delta 0)
Receiving objects: 100% (7/7), done.可以看到,能够正常下载。
如果你遇到异常提示:
$ git clone ssh://git@gogs.hellogitlab.com:10022/meizhaohui/testrepo.git
Cloning into 'testrepo'...
@@@@@@@@@@@@@@@@@@@@@@@@@@@@@@@@@@@@@@@@@@@@@@@@@@@@@@@@@@@
@    WARNING: REMOTE HOST IDENTIFICATION HAS CHANGED!     @
@@@@@@@@@@@@@@@@@@@@@@@@@@@@@@@@@@@@@@@@@@@@@@@@@@@@@@@@@@@
IT IS POSSIBLE THAT SOMEONE IS DOING SOMETHING NASTY!
Someone could be eavesdropping on you right now (man-in-the-middle attack)!
It is also possible that a host key has just been changed.
The fingerprint for the ECDSA key sent by the remote host is
SHA256:7FdGgE80pPNZ87i6TfgVwBaZ+fLc4SvE9lgVx/zYwHM.
Please contact your system administrator.
Add correct host key in /Users/mzh/.ssh/known_hosts to get rid of this message.
Offending ECDSA key in /Users/mzh/.ssh/known_hosts:16
ECDSA host key for [gogs.hellogitlab.com]:10022 has changed and you have requested strict checking.
Host key verification failed.
fatal: Could not read from remote repository.

Please make sure you have the correct access rights
and the repository exists.说明服务器端的指纹发生变化,只需要将~/.ssh/known_hosts文件中关于gogs的行信息删除掉即可。删除后再执行上述下载操作。
我们再进行提交操作。
$ cd testrepo
[mzh@MacBookPro testrepo (master)]$ ls
README.md
[mzh@MacBookPro testrepo (master)]$ vi README.md
[mzh@MacBookPro testrepo (master ✗)]$ cat README.md
# testrepo

测试仓库
add by https

add by ssh

[mzh@MacBookPro testrepo (master ✗)]$ git add .
[mzh@MacBookPro testrepo (master ✗)]$ git commit -m"commit by ssh"
[master 9f4b930] commit by ssh
 1 file changed, 2 insertions(+)
[mzh@MacBookPro testrepo (master)]$ git push origin master
Enumerating objects: 5, done.
Counting objects: 100% (5/5), done.
Delta compression using up to 8 threads
Compressing objects: 100% (3/3), done.
Writing objects: 100% (3/3), 327 bytes | 327.00 KiB/s, done.
Total 3 (delta 0), reused 0 (delta 0)
To ssh://gogs.hellogitlab.com:10022/meizhaohui/testrepo.git
   25837c6..9f4b930  master -> master
[mzh@MacBookPro testrepo (master)]$在Gogs系统上面,刷新页面,可以看到刚才的提交已经正常显示了:
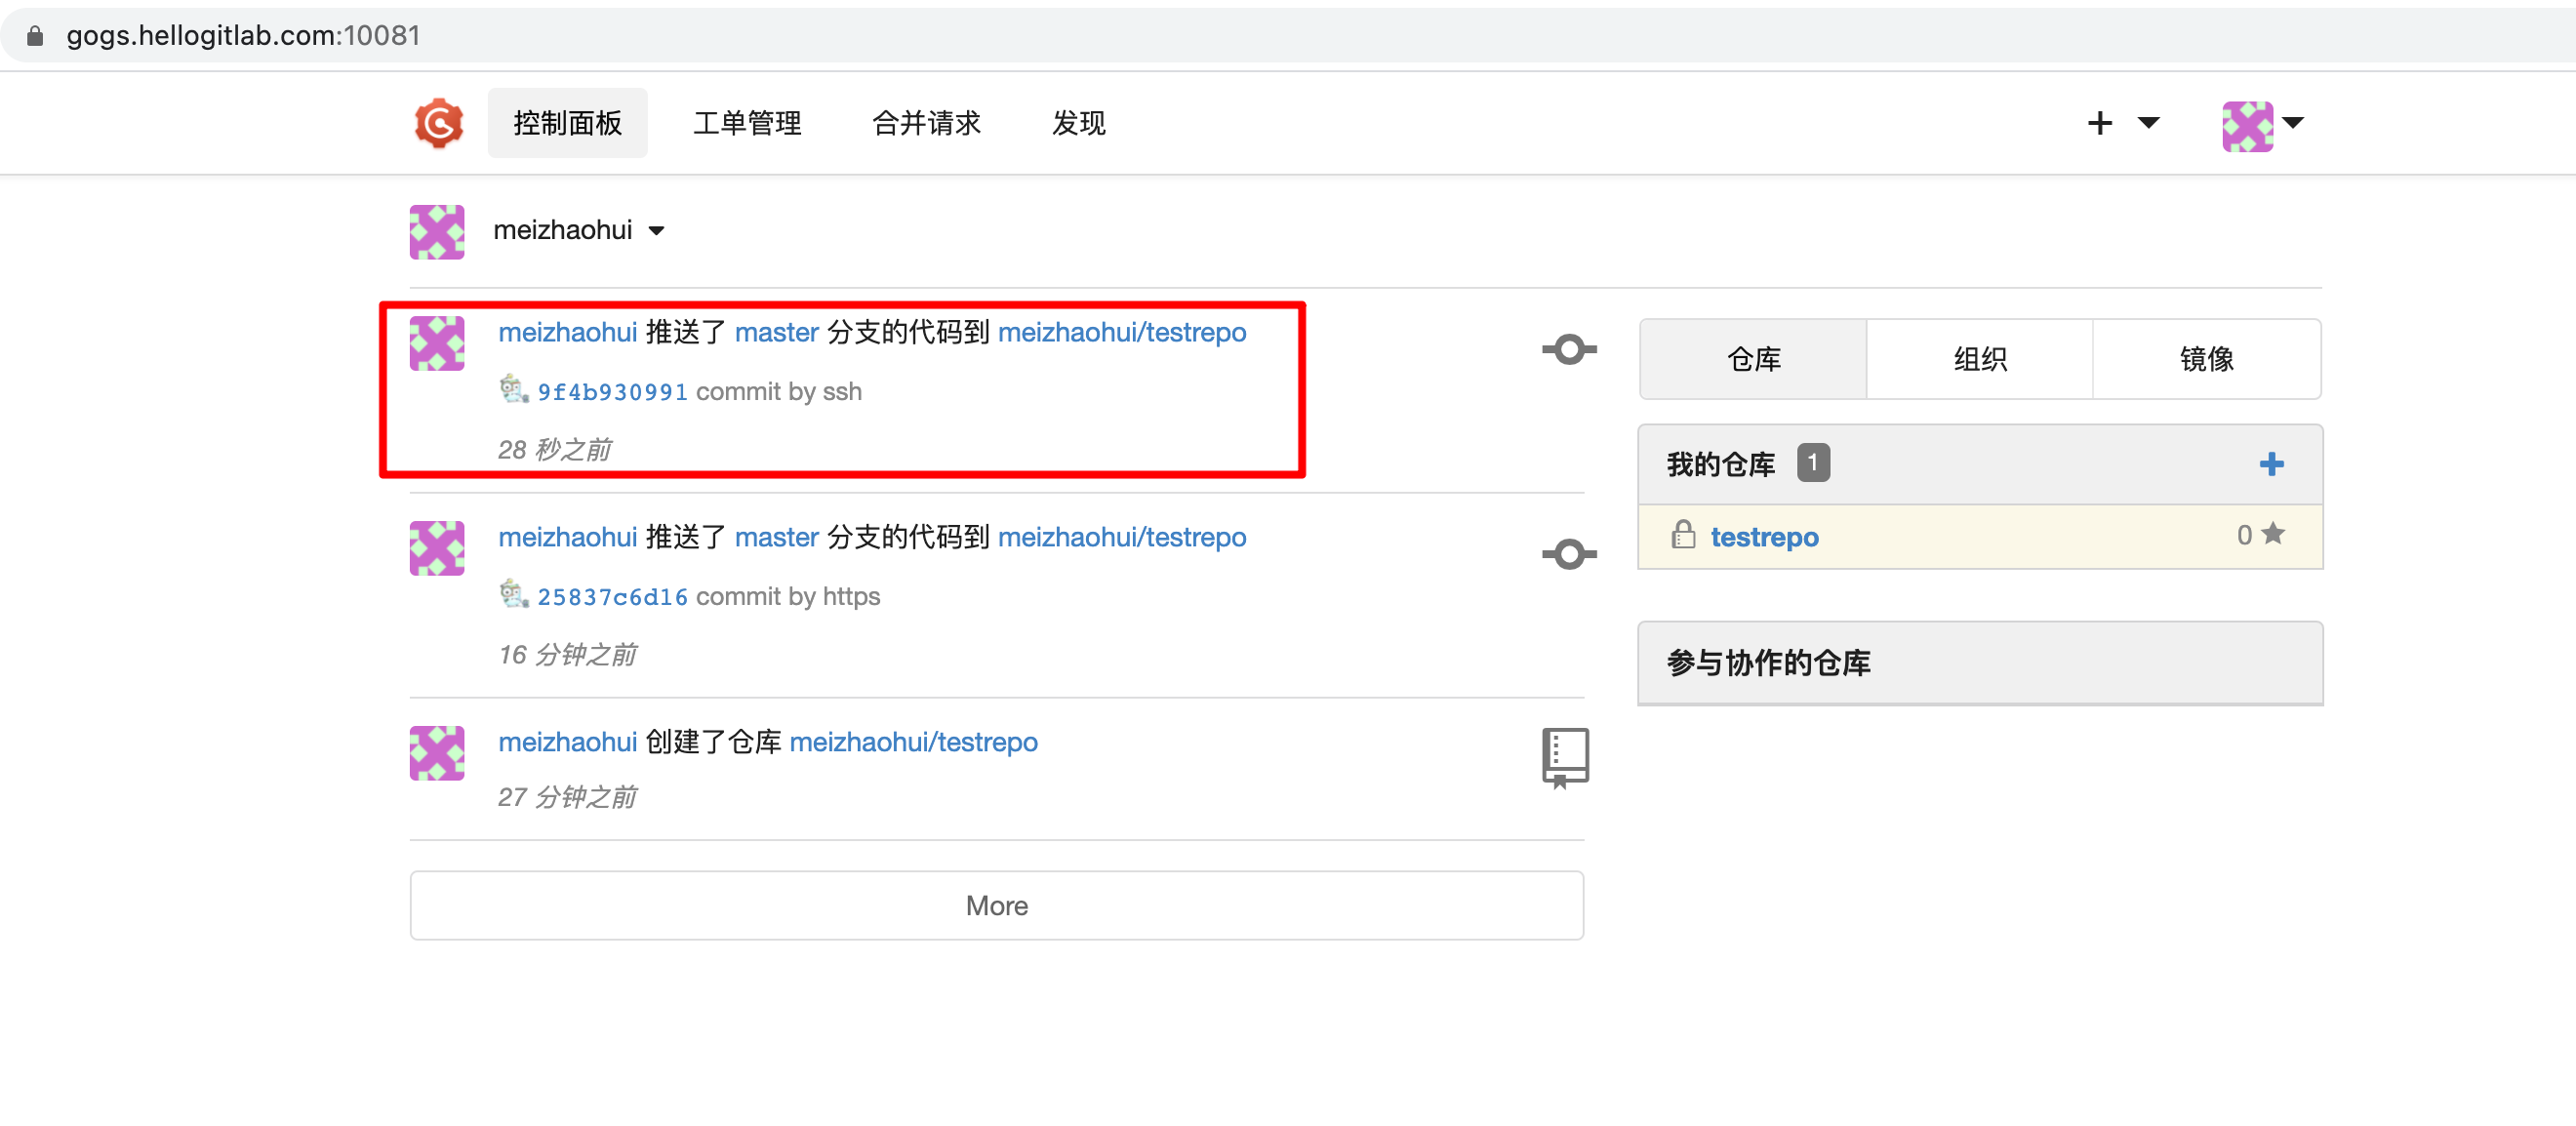
说明我们的配置正常的!
后续你就可以自己创建比较正式的仓库,存放自己的代码了!
2. 服务地址优化
你如果按上述部署完成了部署的话,也可以不进行此节的操作。
由于某些原因,我需要更新一下服务地址,直接使用https://gogs.hellogitlab.com来访问我们的Gogs服务。
你可以参考 统一网站端口号 其中有详细的说明。
此处我们仅修改一下/etc/nginx/conf.d/gogs.conf配置即可。
查看优化后的配置文件:
[root@hellogitlab ~]# cat /etc/nginx/conf.d/gogs.conf
server {
        listen       80;
        server_name gogs.hellogitlab.com;
        rewrite ^ https://$http_host$request_uri? permanent;
}
server {
        listen       443 ssl;
        server_name  gogs.hellogitlab.com;
        ssl_certificate "/etc/pki/nginx/1_gogs.hellogitlab.com_bundle.crt";
        ssl_certificate_key "/etc/pki/nginx/2_gogs.hellogitlab.com.key";
        ssl_session_timeout 5m;
        ssl_protocols TLSv1 TLSv1.1 TLSv1.2;
        ssl_ciphers ECDHE-RSA-AES128-GCM-SHA256:HIGH:!aNULL:!MD5:!RC4:!DHE;
        ssl_prefer_server_ciphers on;

        location / {

                proxy_set_header Host $host;
                proxy_set_header X-Forwarded-For $proxy_add_x_forwarded_for;
                proxy_pass http://localhost:10080/;
       }
}
[root@hellogitlab ~]# nginx -t
nginx: the configuration file /etc/nginx/nginx.conf syntax is ok
nginx: configuration file /etc/nginx/nginx.conf test is successful
[root@hellogitlab ~]#检查Nginx配置,可以发现没有异常,我们重启一下Nginx服务:
[root@hellogitlab ~]# systemctl restart nginx && systemctl status nginx|grep Active
   Active: active (running) since 一 2021-04-26 23:55:56 CST; 7ms ago
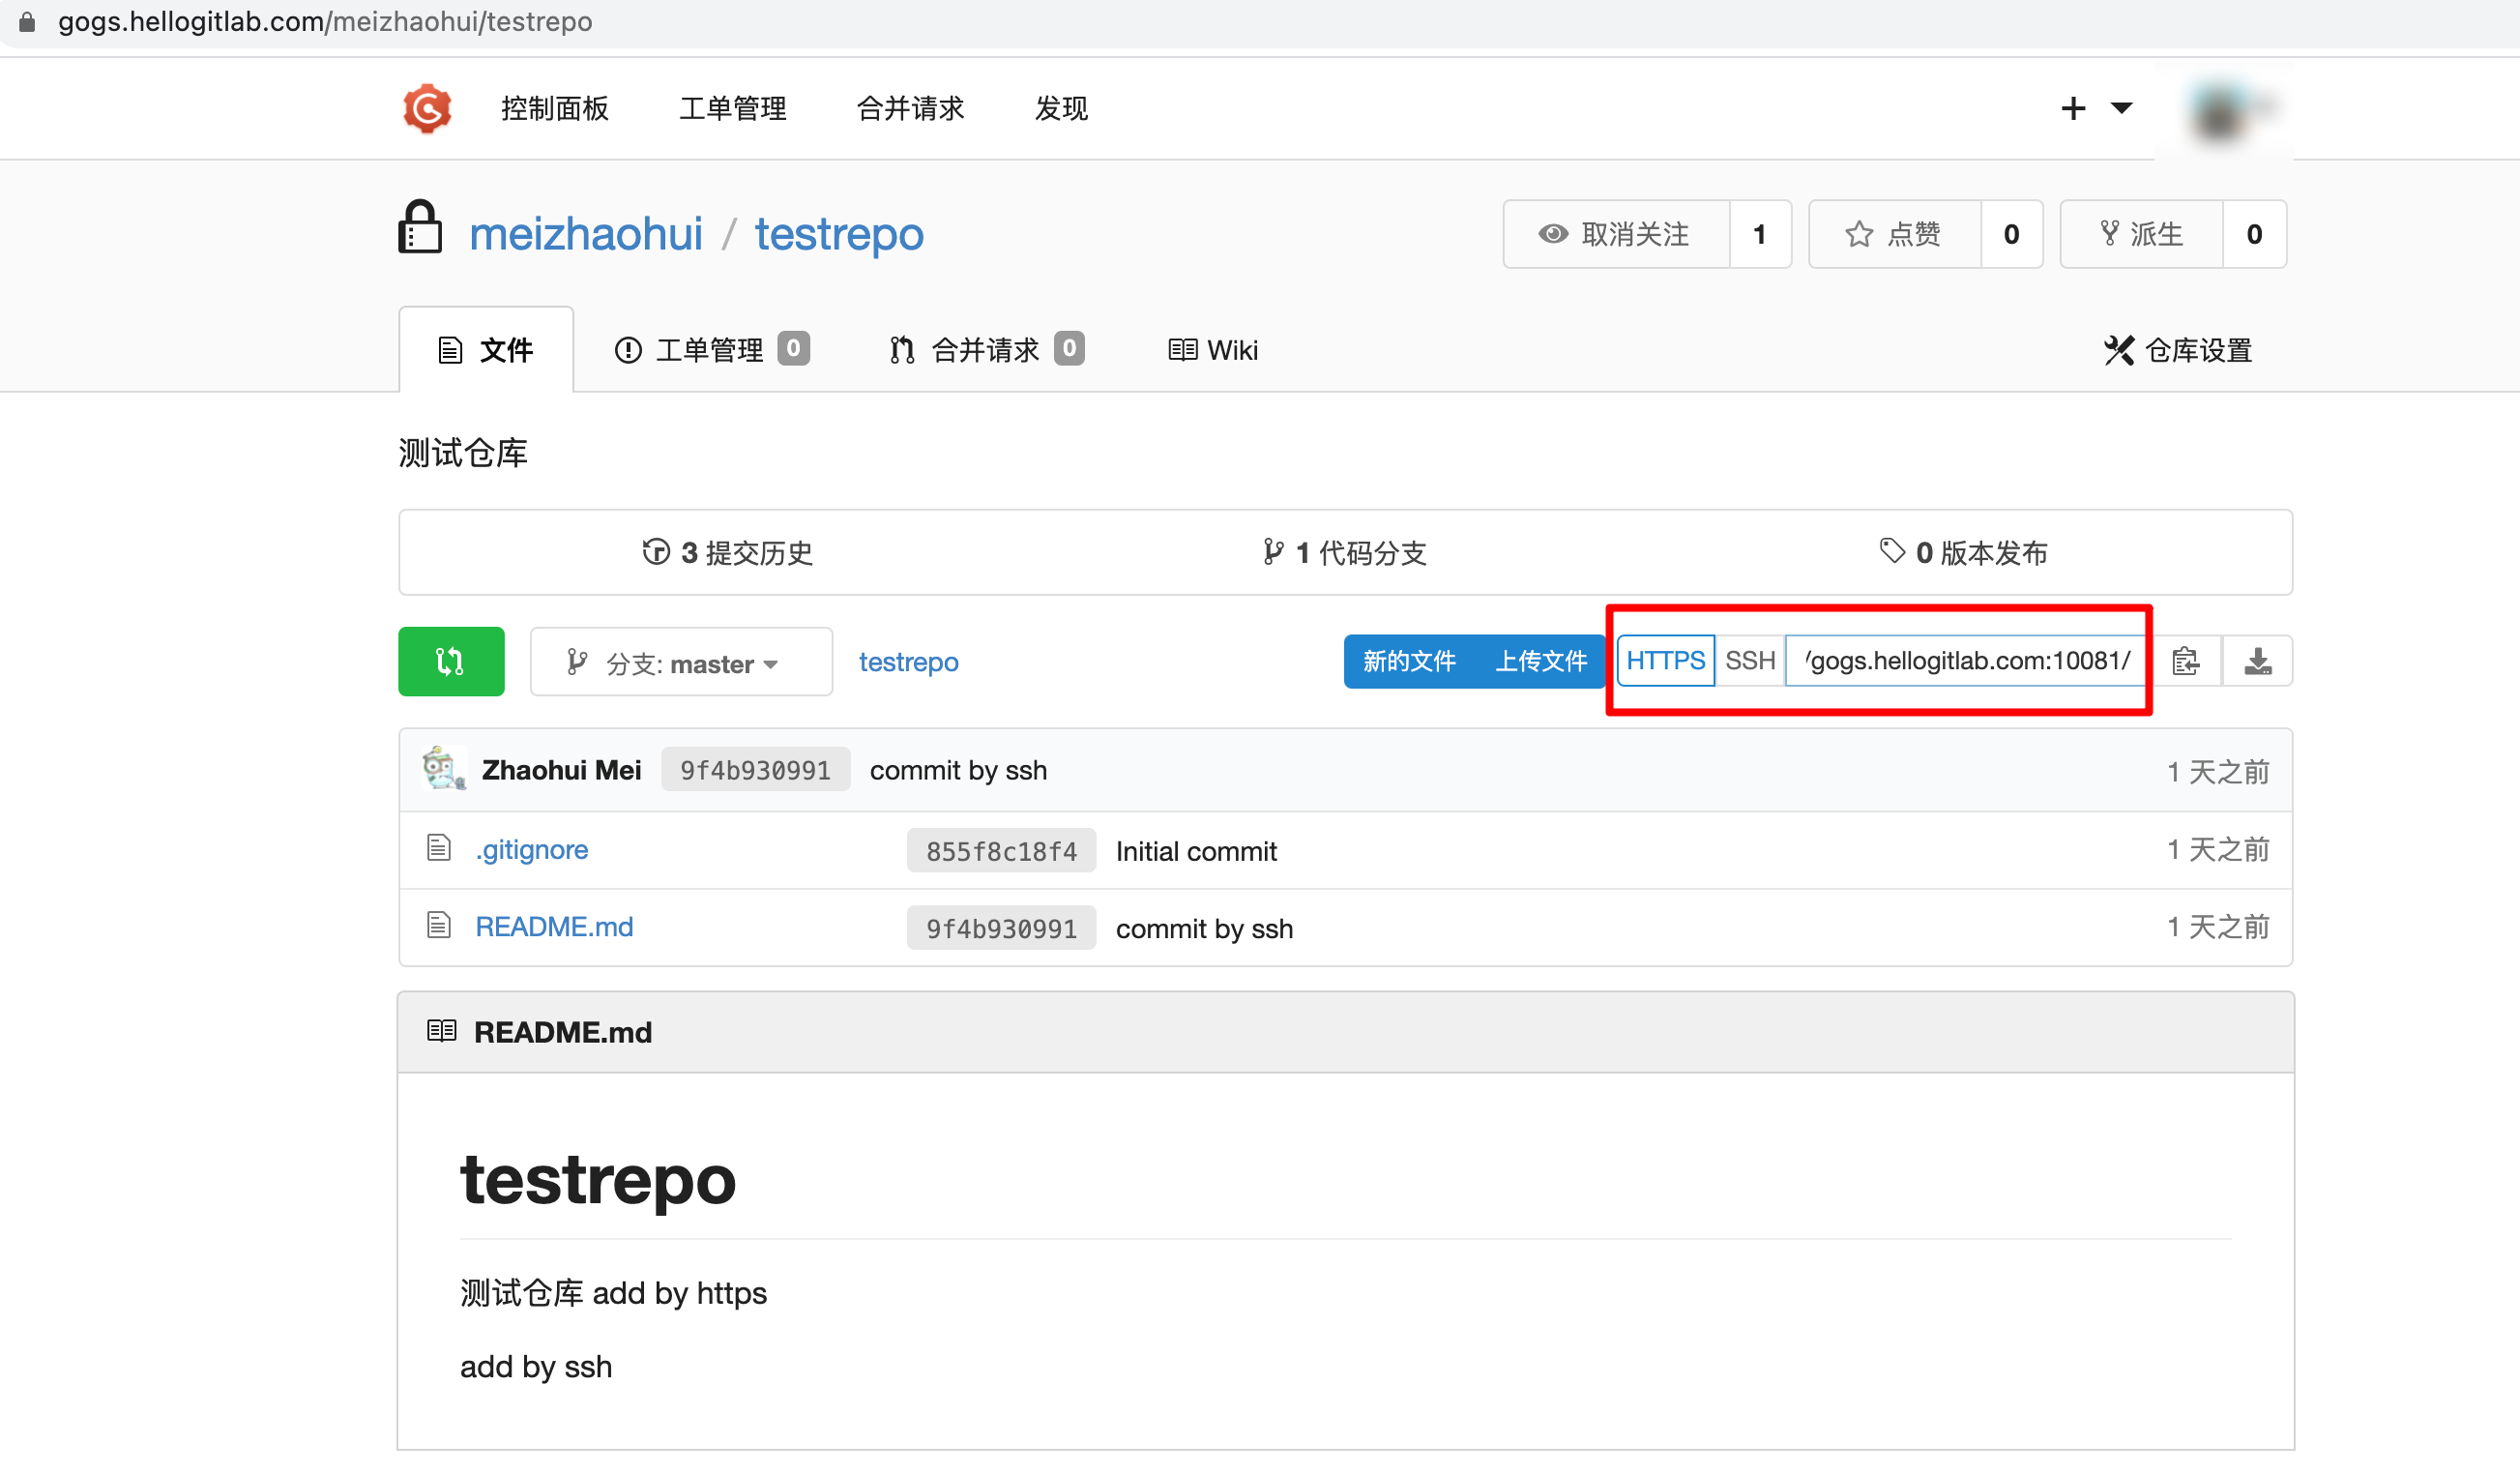
[root@hellogitlab ~]#此时在浏览器中打开https://gogs.hellogitlab.com/,可以正常访问,但查看我们仓库中的HTTPS形式下载的URL并没有更新过来,还是https://gogs.hellogitlab.com:10081/meizhaohui/testrepo.git:
2.1 修改gogs的HTTPS端口号
现在我们要做的是将Gogs服务中HTTPS形式使用的端口号10081改成443端口,这样才与我们的修改后的页面地址保持一致。
我们先停止gogs容器,然后去持久化文件夹里面直接修改配置文件。
# 停止容器
[root@hellogitlab ~]# docker stop gogs
gogs

# 切换到gogs配置文件目录
[root@hellogitlab ~]# cd /dockerdata/gogs/data/gogs/conf/
[root@hellogitlab conf]# ls
app.ini

# 查看配置文件中10081字符
[root@hellogitlab conf]# grep '10081' app.ini
HTTP_PORT        = 10081
EXTERNAL_URL = https://gogs.hellogitlab.com:10081/我们使用VIM进行修改:
[root@hellogitlab conf]# grep -E 'HTTP_PORT|EXTERNAL_URL' app.ini
HTTP_PORT        = 3000
EXTERNAL_URL = https://gogs.hellogitlab.com/只需要gogs应用在内部监控默认的3000端口,然后应用URL通过EXTERNAL_URL = https://gogs.hellogitlab.com/指定,此时不需要在域名后带带:443端口信息。
我们再启动一下gogs容器:
[root@hellogitlab conf]# cd
[root@hellogitlab ~]# docker start gogs
gogs
[root@hellogitlab ~]# docker ps -l
CONTAINER ID        IMAGE               COMMAND                  CREATED             STATUS              PORTS                                            NAMES
eaa3883c0a81        gogs/gogs           "/app/gogs/docker/..."   2 days ago          Up 5 seconds        0.0.0.0:10022->22/tcp, 0.0.0.0:10080->3000/tcp   gogs
[root@hellogitlab ~]#可以看到gogs容器启动成功。我们在浏览器再检查一下。
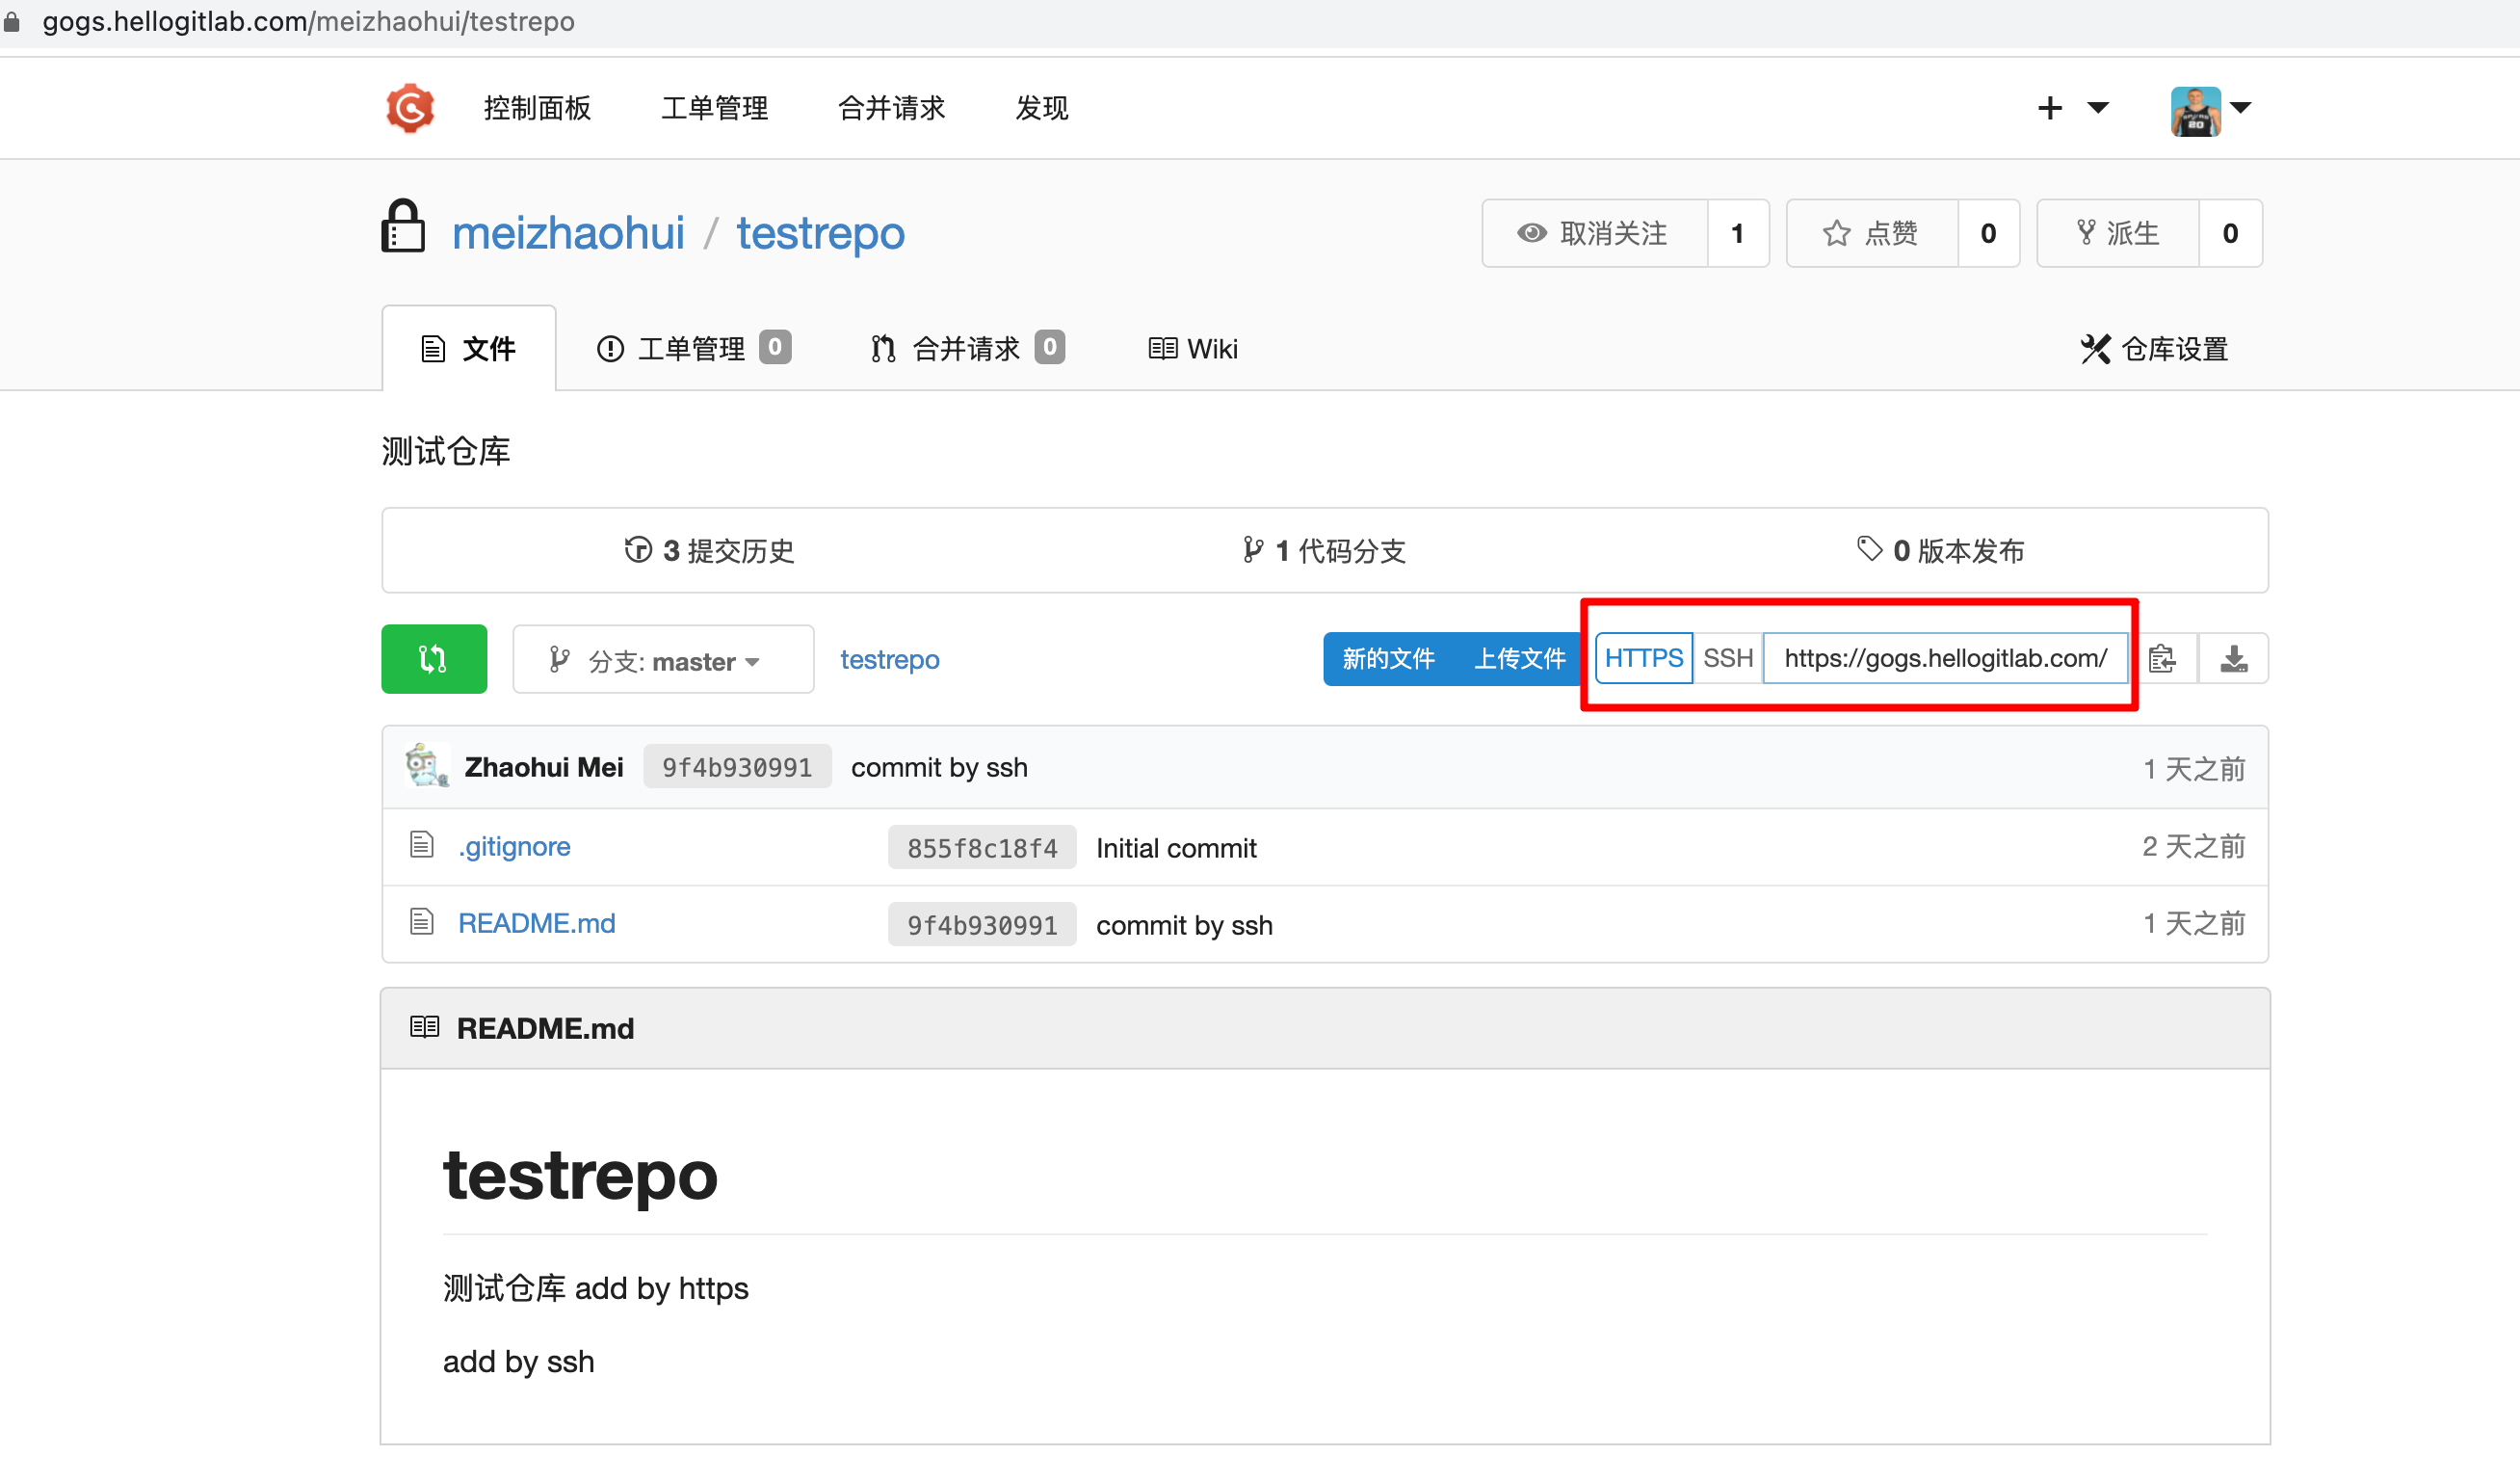
可以看到HTTPS形式下载的链接已经发生变更,变成了https://gogs.hellogitlab.com/meizhaohui/testrepo.git。说明我们的配置基本正确。
我们再尝试使用HTTPS方式下载:
$ git clone https://gogs.hellogitlab.com/meizhaohui/testrepo.git
Cloning into 'testrepo'...
remote: Enumerating objects: 10, done.
remote: Counting objects: 100% (10/10), done.
remote: Compressing objects: 100% (8/8), done.
remote: Total 10 (delta 0), reused 0 (delta 0)
Unpacking objects: 100% (10/10), done.尝试提交修改:
$ cat README.md
# testrepo

测试仓库
add by https

add by ssh

[mzh@MacBookPro testrepo (master)]$ echo '\n add by https again!' >> README.md
[mzh@MacBookPro testrepo (master ✗)]$ git add .
[mzh@MacBookPro testrepo (master ✗)]$ git commit -m"commit by https again"
[master f01ec2d] commit by https again
 1 file changed, 2 insertions(+)
[mzh@MacBookPro testrepo (master)]$ git push origin master
Enumerating objects: 5, done.
Counting objects: 100% (5/5), done.
Delta compression using up to 8 threads
Compressing objects: 100% (3/3), done.
Writing objects: 100% (3/3), 347 bytes | 347.00 KiB/s, done.
Total 3 (delta 0), reused 0 (delta 0)
To https://gogs.hellogitlab.com/meizhaohui/testrepo.git
   9f4b930..f01ec2d  master -> master
[mzh@MacBookPro testrepo (master)]$可以看到能够正常提交成功,说明我们的网站服务地址更新成功了!
另外,你也可以参考 Share port 22 between Gogs inside Docker & the local system 将10022端口改成22端口,与宿主机共用22端口。我因为是自己使用,不做修改。
参考: