搭建自己的nexus私有仓库12--Nexus权限配置
本文档是nexus系列课程第12篇,使用Nexus API接口配置用户权限。
- nexus系列课程第1篇,请参考 搭建自己的nexus私有仓库1--nexus初体验
- nexus系列课程第2篇,请参考 搭建自己的nexus私有仓库2--创建python pypi代理
- nexus系列课程第3篇,请参考 搭建自己的nexus私有仓库3--创建yum ius代理
- nexus系列课程第4篇,请参考 搭建自己的nexus私有仓库4--创建docker私有仓库
- nexus系列课程第5篇,请参考 搭建自己的nexus私有仓库5--测试docker仓库pull和push
- nexus系列课程第6篇,请参考 搭建自己的nexus私有仓库6--使用nginx反向代理
- nexus系列课程第7篇,请参考 搭建自己的nexus私有仓库7--修改nexus容器时区
- nexus系列课程第8篇,请参考 搭建自己的nexus私有仓库8--Nexus3的数据库结构
- nexus系列课程第9篇,请参考 搭建自己的nexus私有仓库9--Nexus API接口的使用1
- nexus系列课程第10篇,请参考 搭建自己的nexus私有仓库10--Nexus API接口的使用2
- nexus系列课程第11篇,请参考 搭建自己的nexus私有仓库11--Nexus API接口的使用优化
0. 情况说明
nexus系列课程第9-11篇详细讲解了通过Python调用Nexus API接口创建Nexus相关仓库。
已经完成以下需求:
- [√] Neuxs API接口调用时,是否有动态Token,如何正确获取API接口Token值。
- [√] 创建docker blob对象存储,将docker单独存放在该blob对象存储中。
- [√] 激活【Docker Bearer Token Realm】,让能够匿名下载Docker镜像。
- [√] 创建yum、pypi、maven、docker之类的仓库,docker仓库由于涉及到三种类型的仓库创建,并且有端口配置,使用API时优先创建yum和pypi代理代理仓库来测试API接口。
本篇需要完成以下需求:
- 快速创建一个用户账号,如账号名为
devops,并将给其授权能够朝docker-hosted仓库推送镜像。
1. 业务分析
在创建用户前,我们先分析一下现有用户是如何配置了。
1.1 本地账号分析
在Nexus管理页面,依次点击【Security】-【Users】:
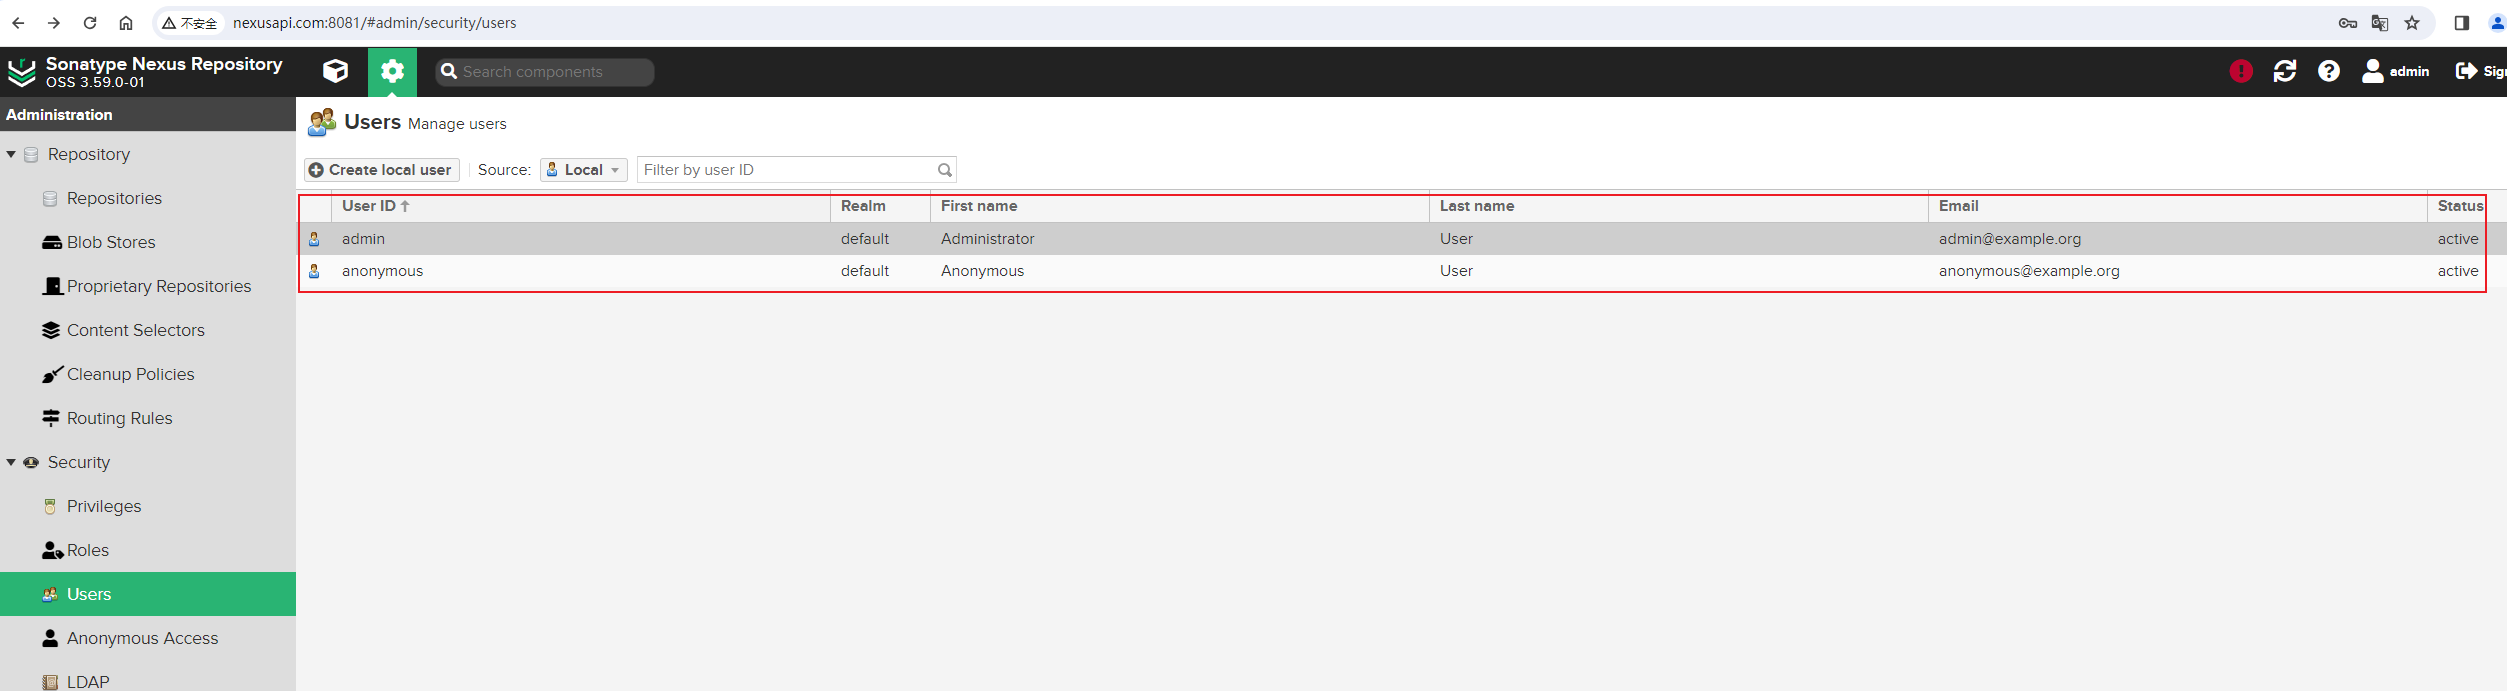
可以看到,当前有两个本地用户,一个是admin管理员用户,另外一个是anonymous匿名用户。点击一下anonymous匿名用户,查看其有什么权限:
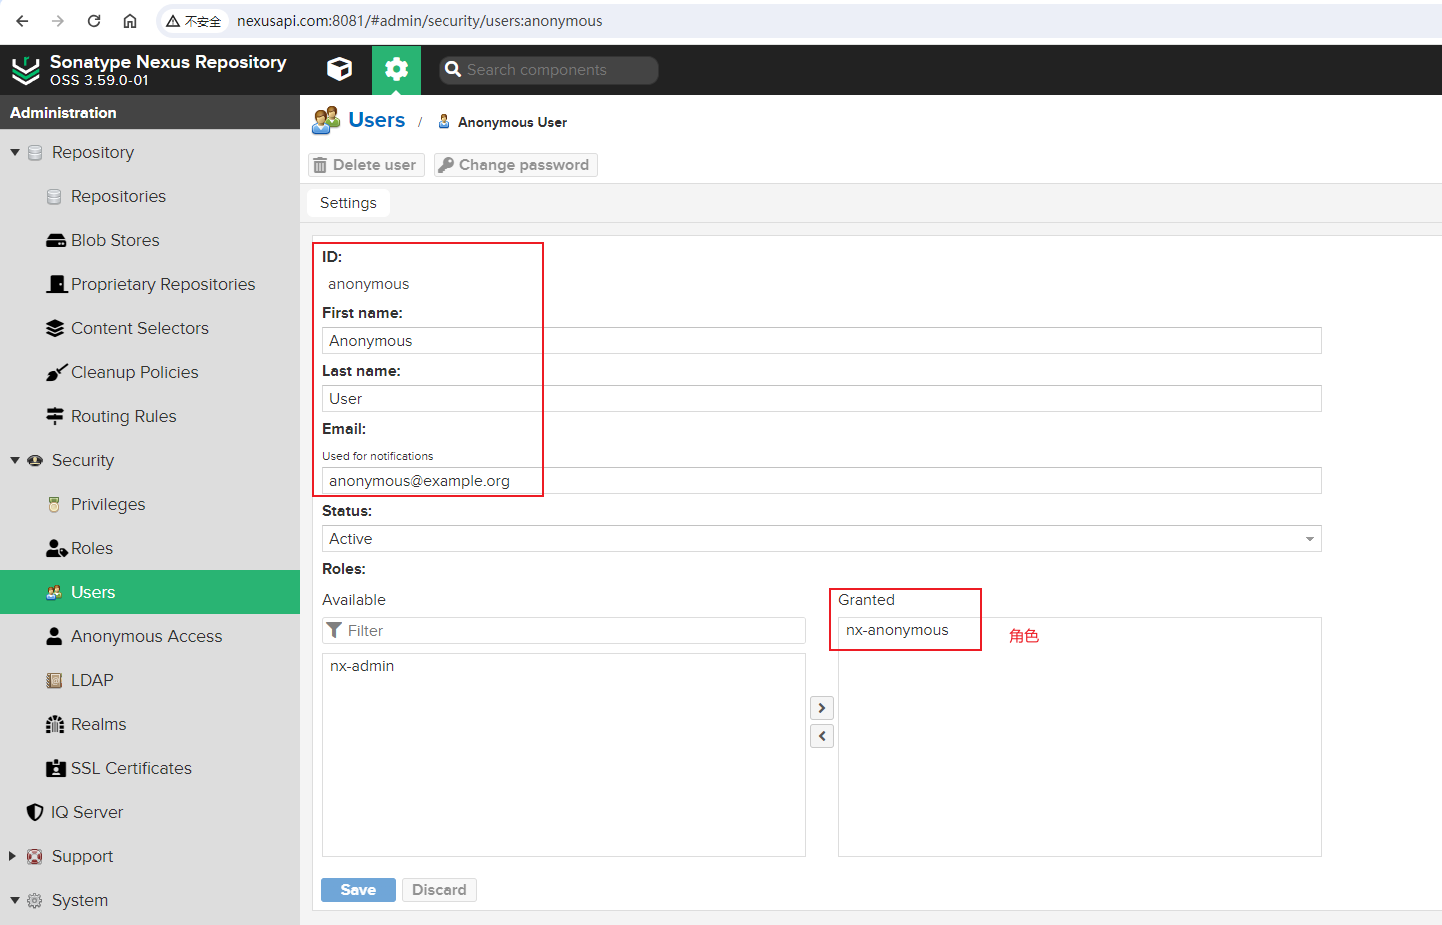
可以看到有以下信息:
- ID: anonymous
- First Name: Anonymous
- Last Name: User
- Email: anonymous@example.org
- Status: Active
- Roles: nx-anonymous
再看一下admin管理员用户的信息:
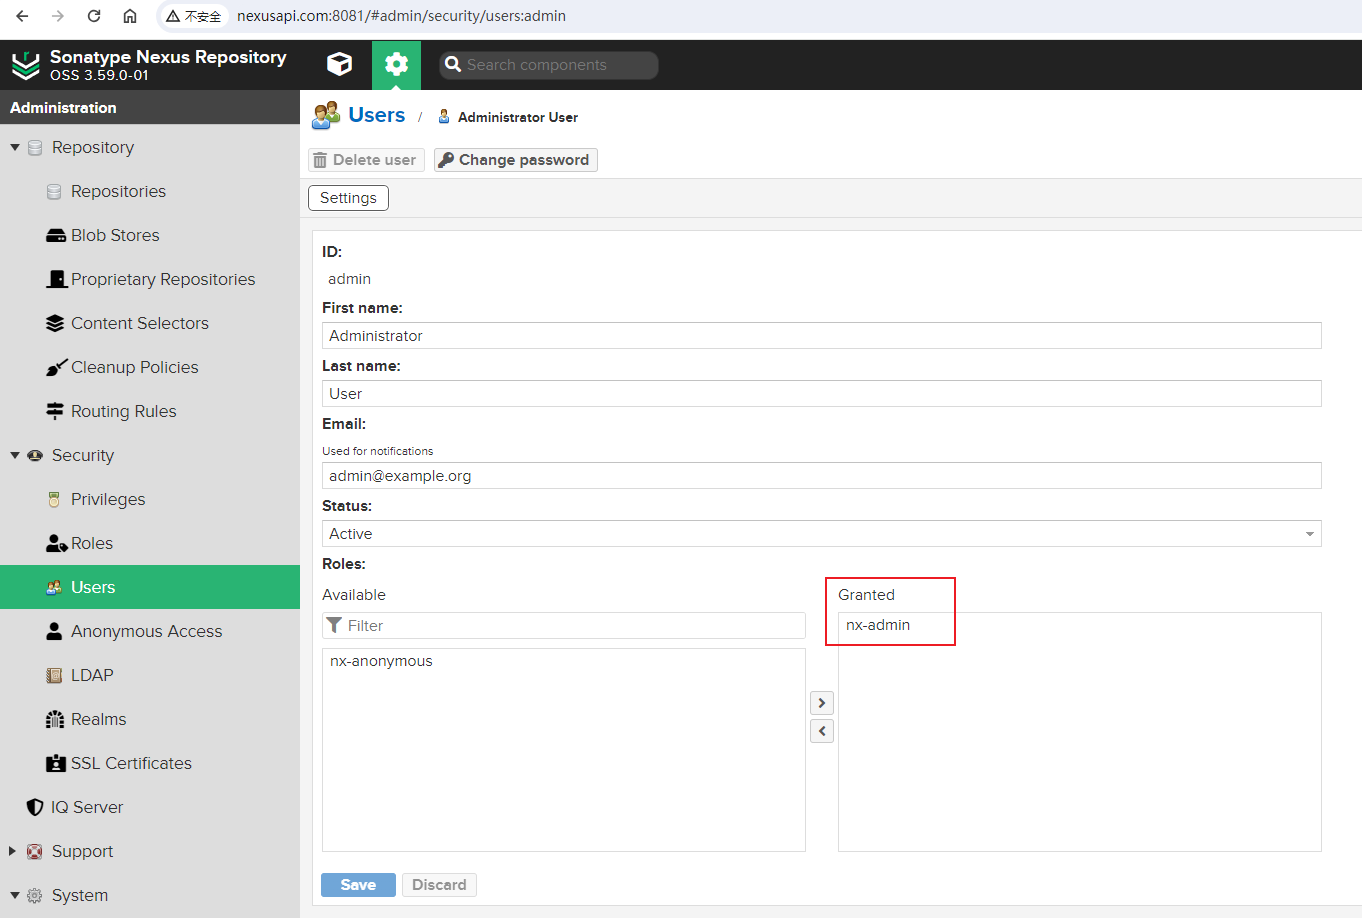
可以看到管理人配置的信息如下:
- ID: admin
- First Name: Administrator
- Last Name: User
- Email: admin@example.org
- Status: Active
- Roles: nx-admin
可以看到,用户权限是通过Roles角色来控制的,管理员用户配置了nx-admin角色,匿名用户配置了nx-anonymous角色。
1.2 角色分析
在Nexus管理页面,依次点击【Security】-【Roles】:

可以看到,有nx-admin和nx-anonymous两个角色。
nx-admin角色详情如下:
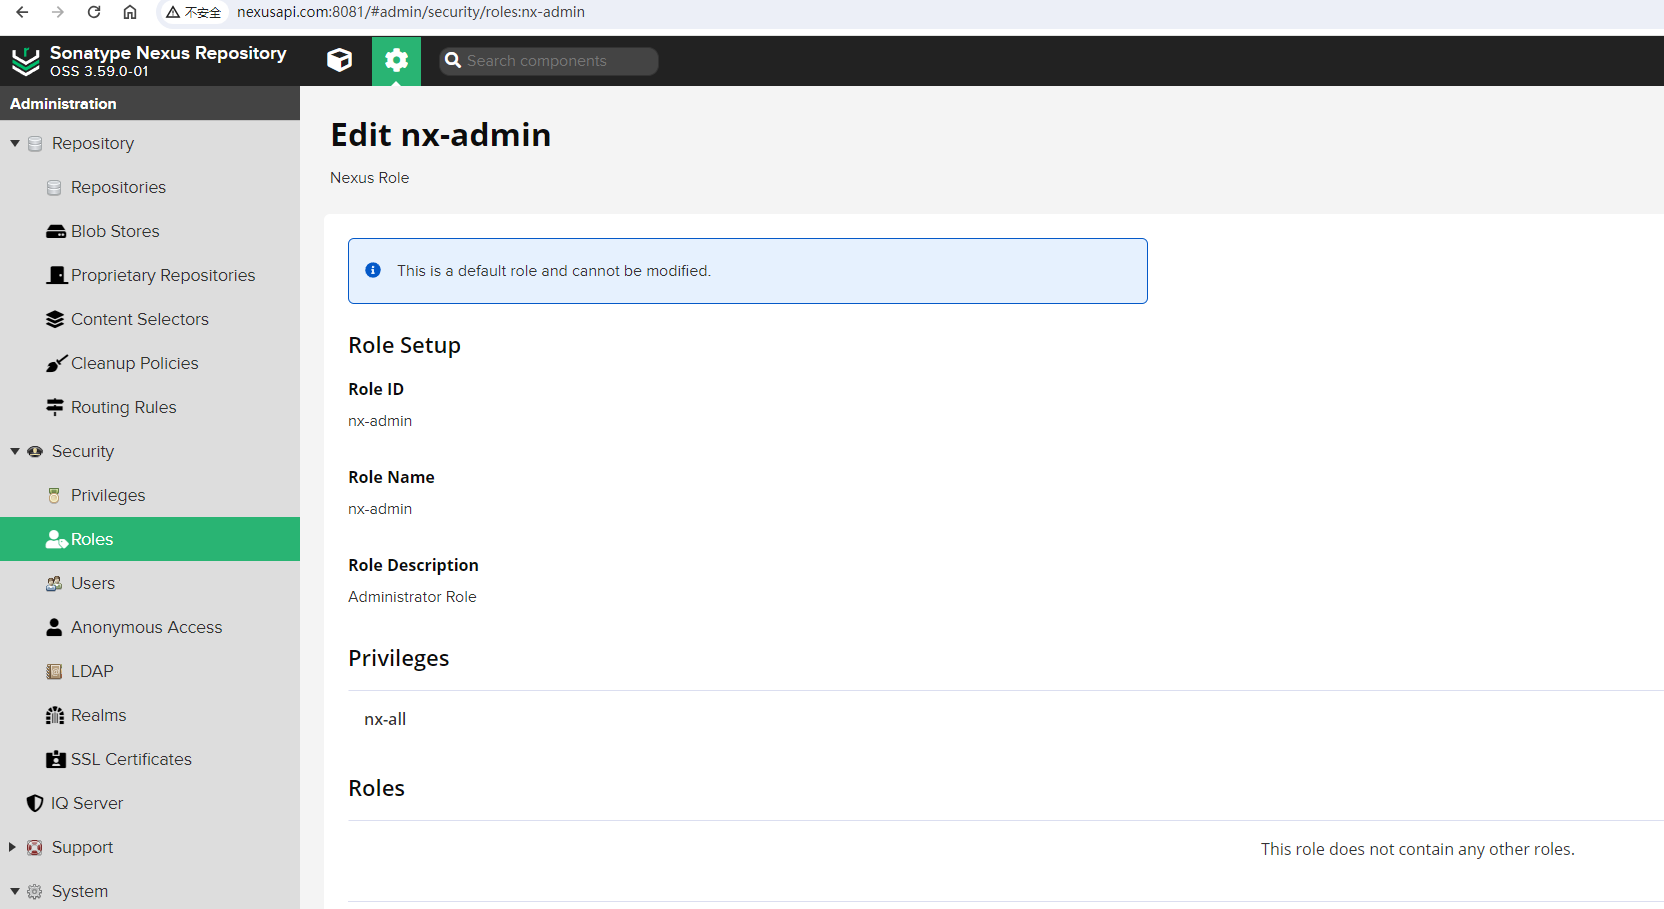
即:
Role ID: nx-admin
Role Name: nx-admin
Role Description: Administrator Role
Privileges: nx-all
而nx-anonymous角色详情如下:
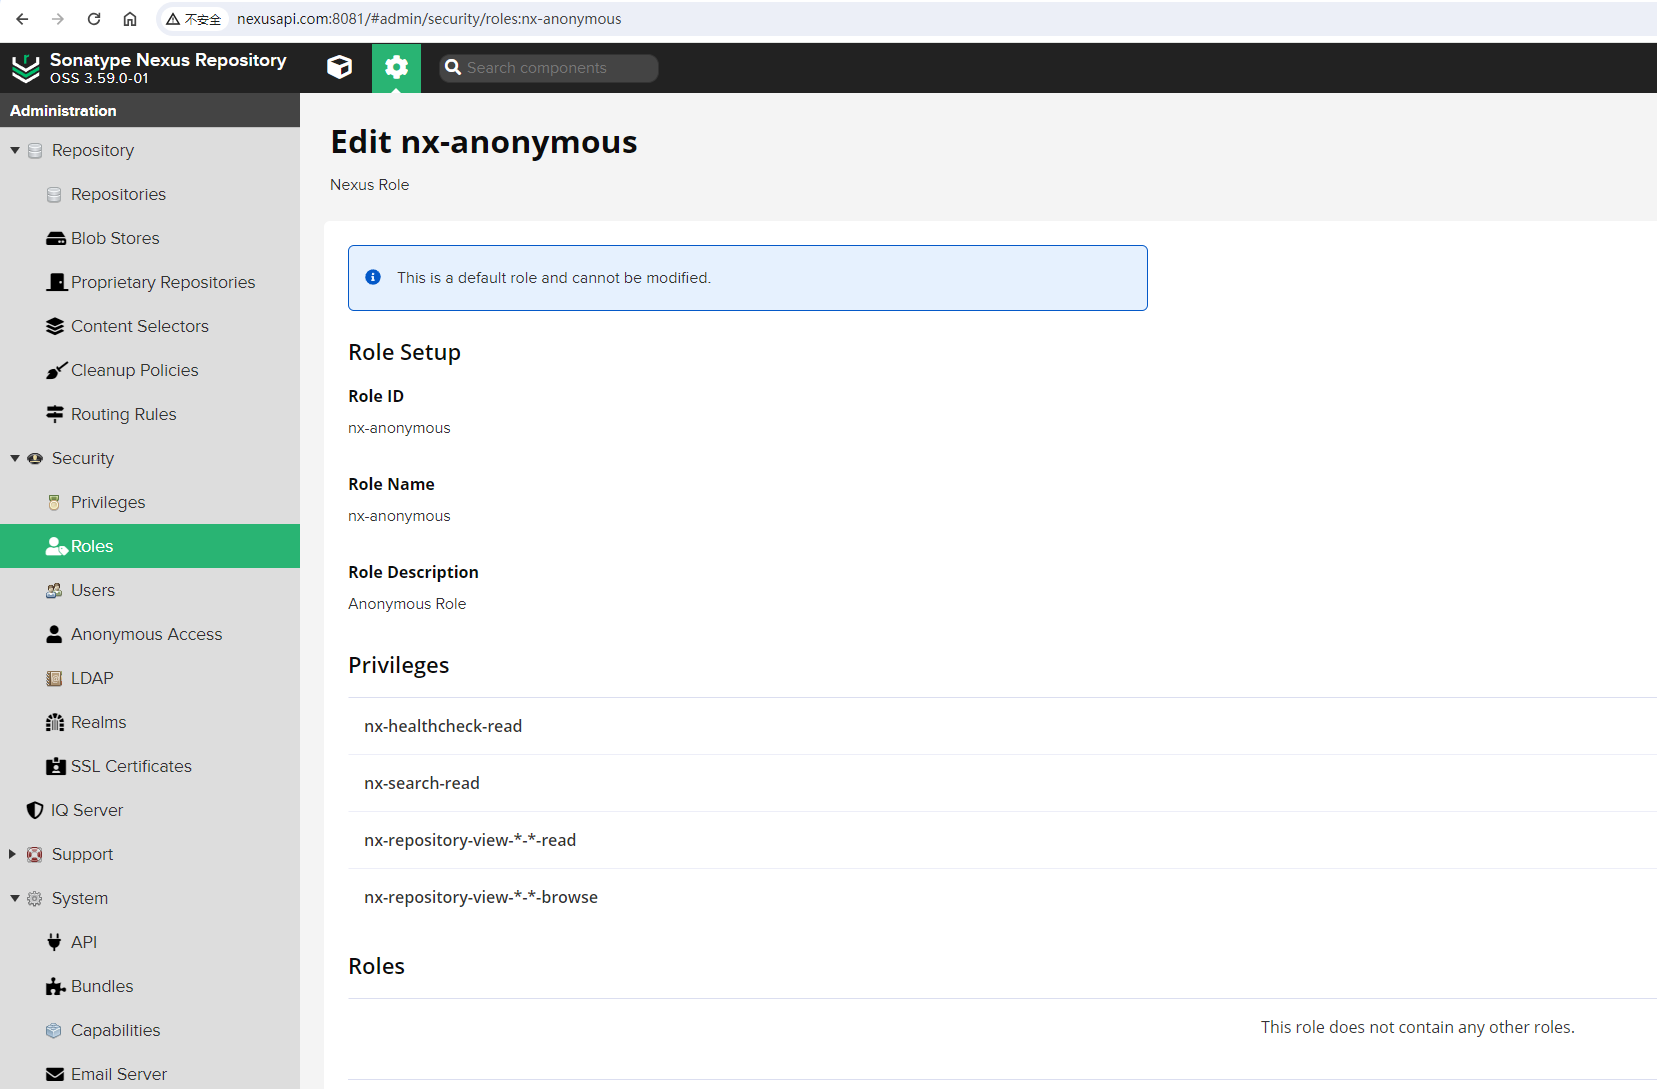
即:
- Role ID: nx-anonymous
- Role Name: nx-anonymous
- Role Description: Anonymous Role
- Privileges:
- nx-healthcheck-read
- nx-search-read
- nx-repository-view---read
- nx-repository-view---browse
通过分析匿名用户的权限可以知道,在未登陆Nexus系统时,匿名用户是可以搜索仓库和在Browse浏览器中浏览仓库信息的。我们要创建的devops用户,只需要比匿名用户新增朝docker-hosted本地仓库推送镜像的权限即可。
1.3 权限分析
在Nexus管理页面,依次点击【Security】-【Privileges】,并搜索docker关键字,查看docker查看的权限:
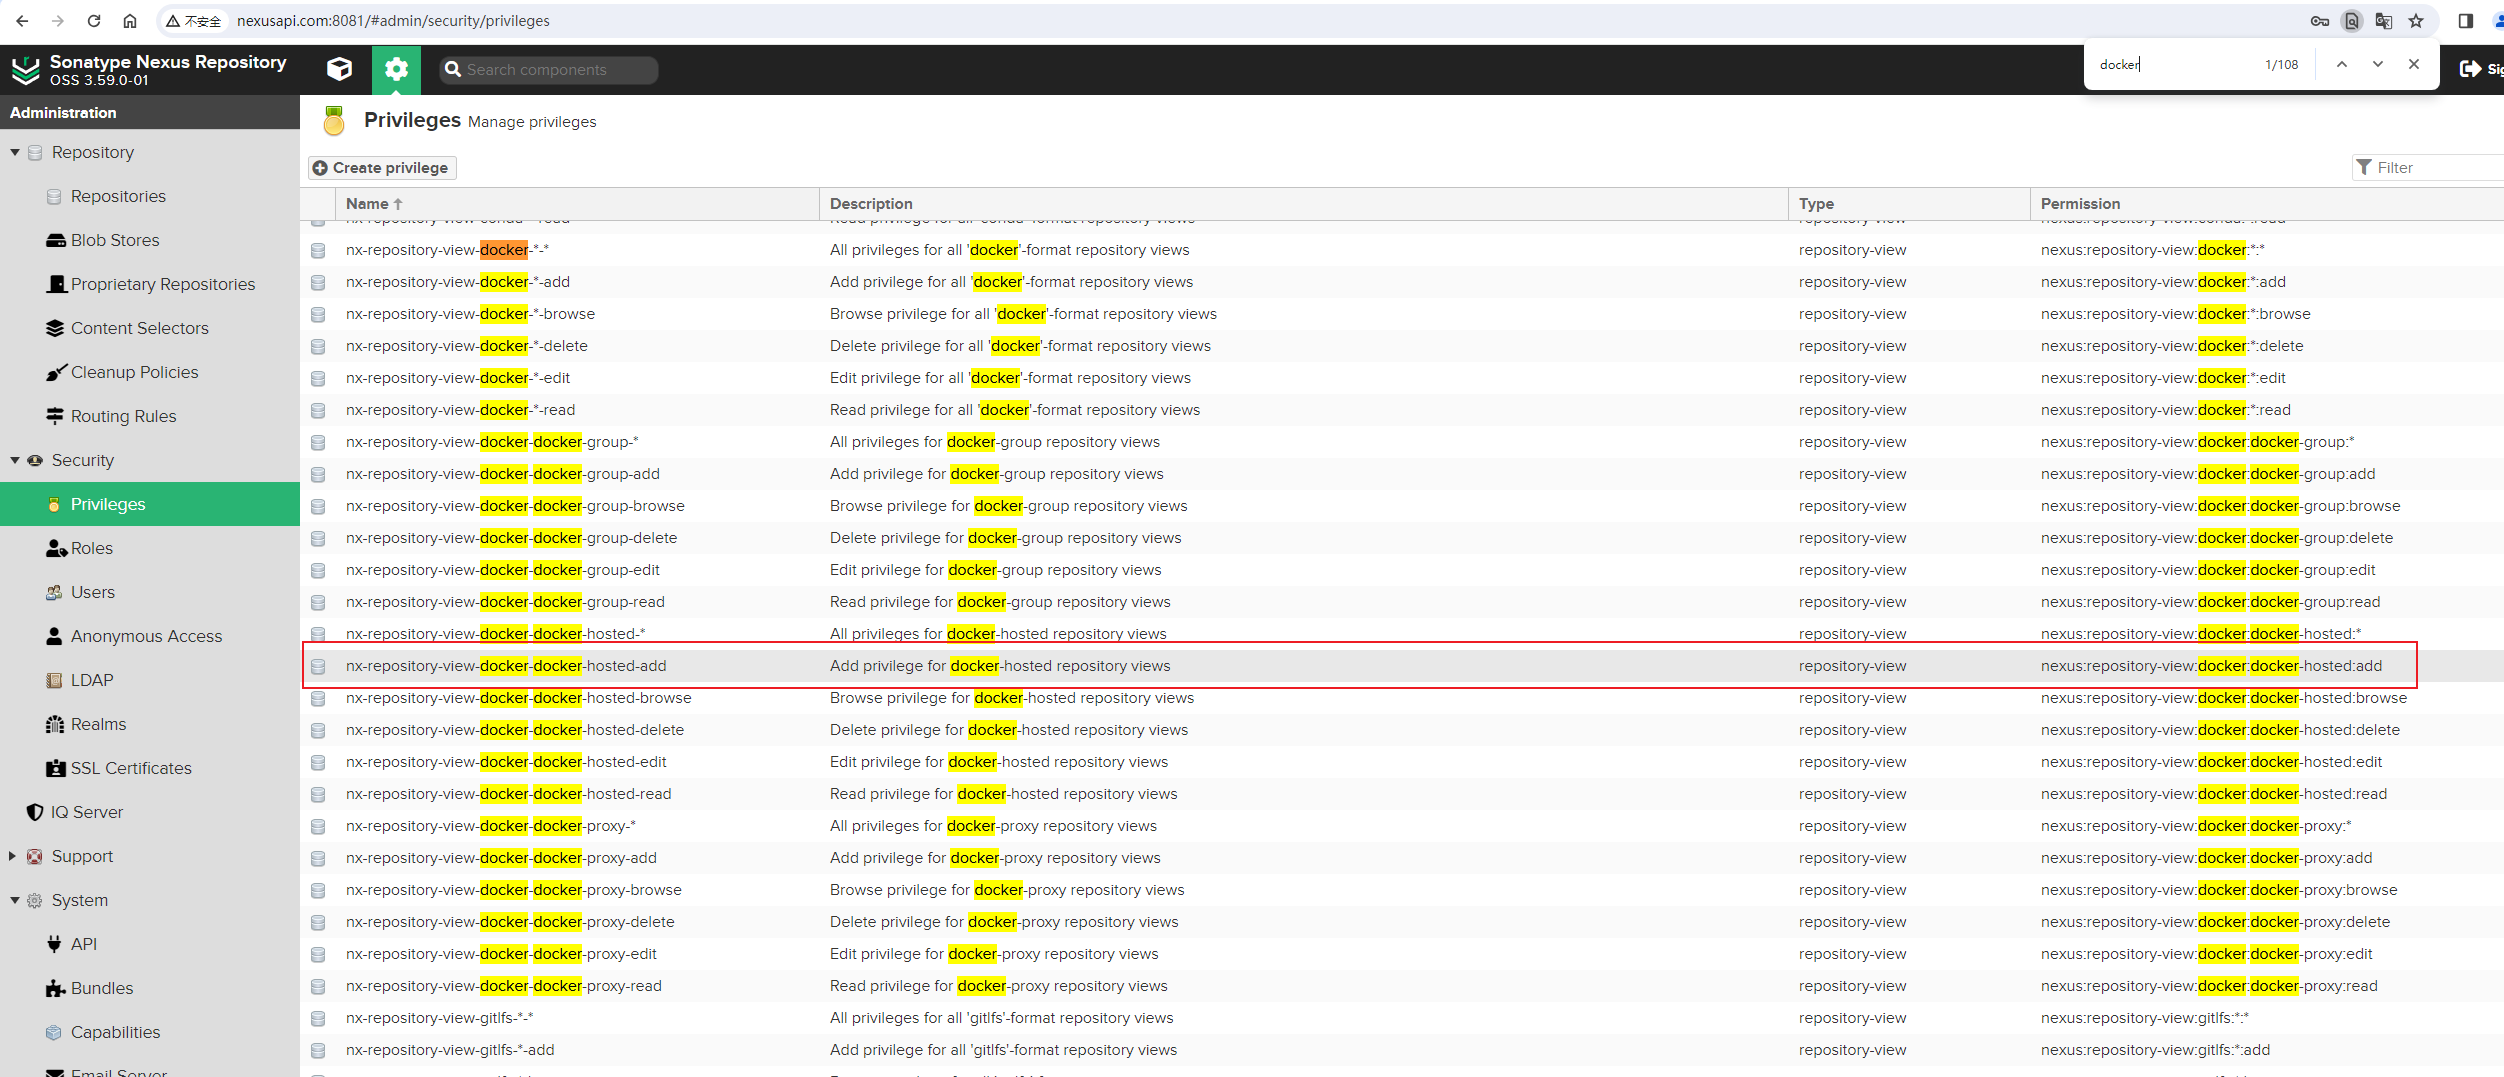
为了让devops这个普通用户能够上传docker镜像,我们需要增加nx-repository-view-docker-docker-hosted-add权限,还需要增加nx-repository-view-docker-docker-hosted-edit权限。
2. 用户权限测试
我们先来创建一个测试一下,创建一个test账号。
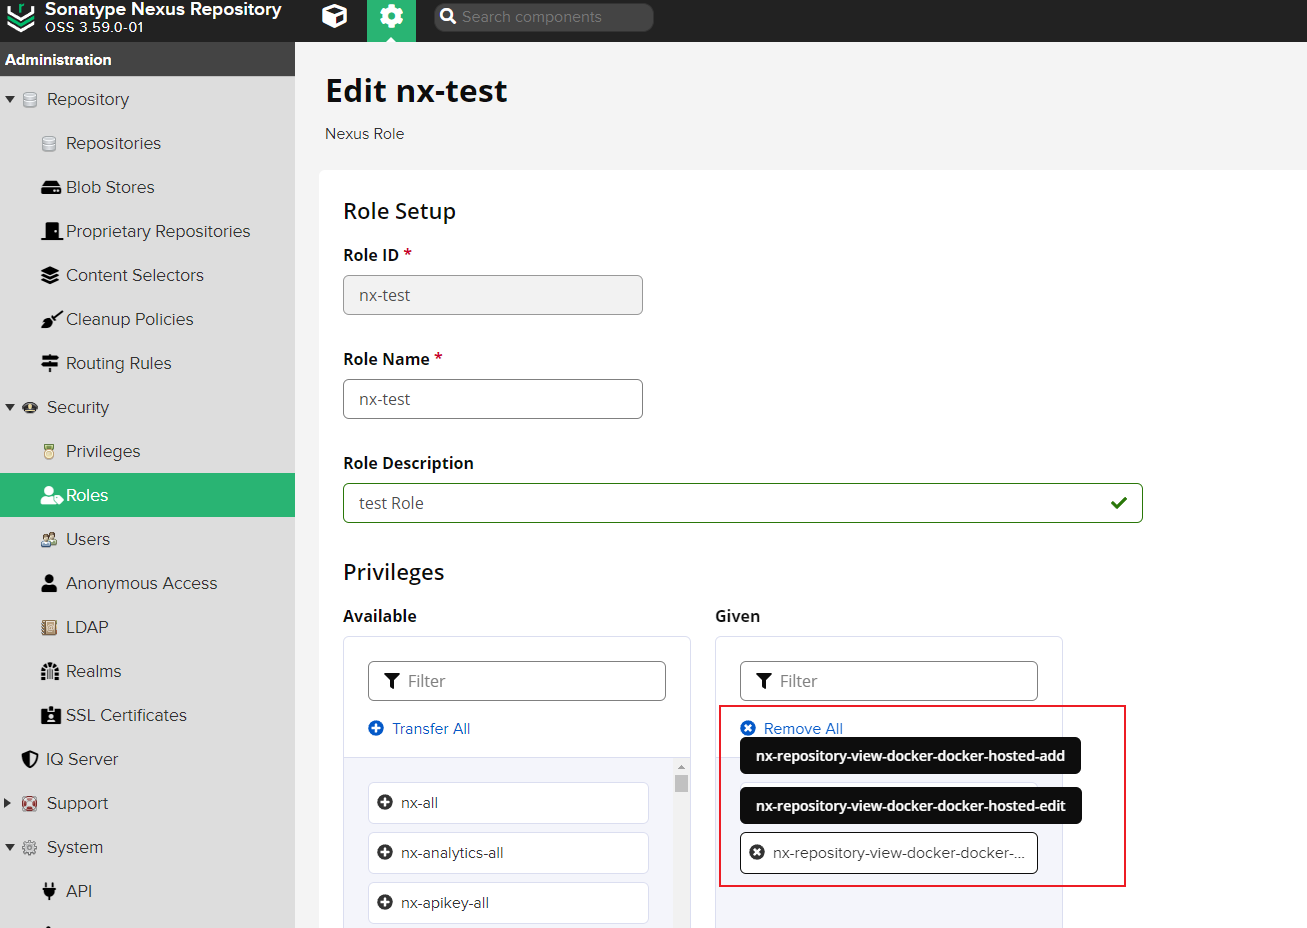
2.1 创建测试角色
创建nx-test角色:
Role ID: nx-test
Role Name: nx-test
Role Description: test Role
Privileges:
nx-repository-view-docker-docker-hosted-add权限,如果只增加这个权限,推送时会提示unauthorized: access to the requested resource is not authorized异常nx-repository-view-docker-docker-hosted-edit权限,注意,这个权限也要配置。
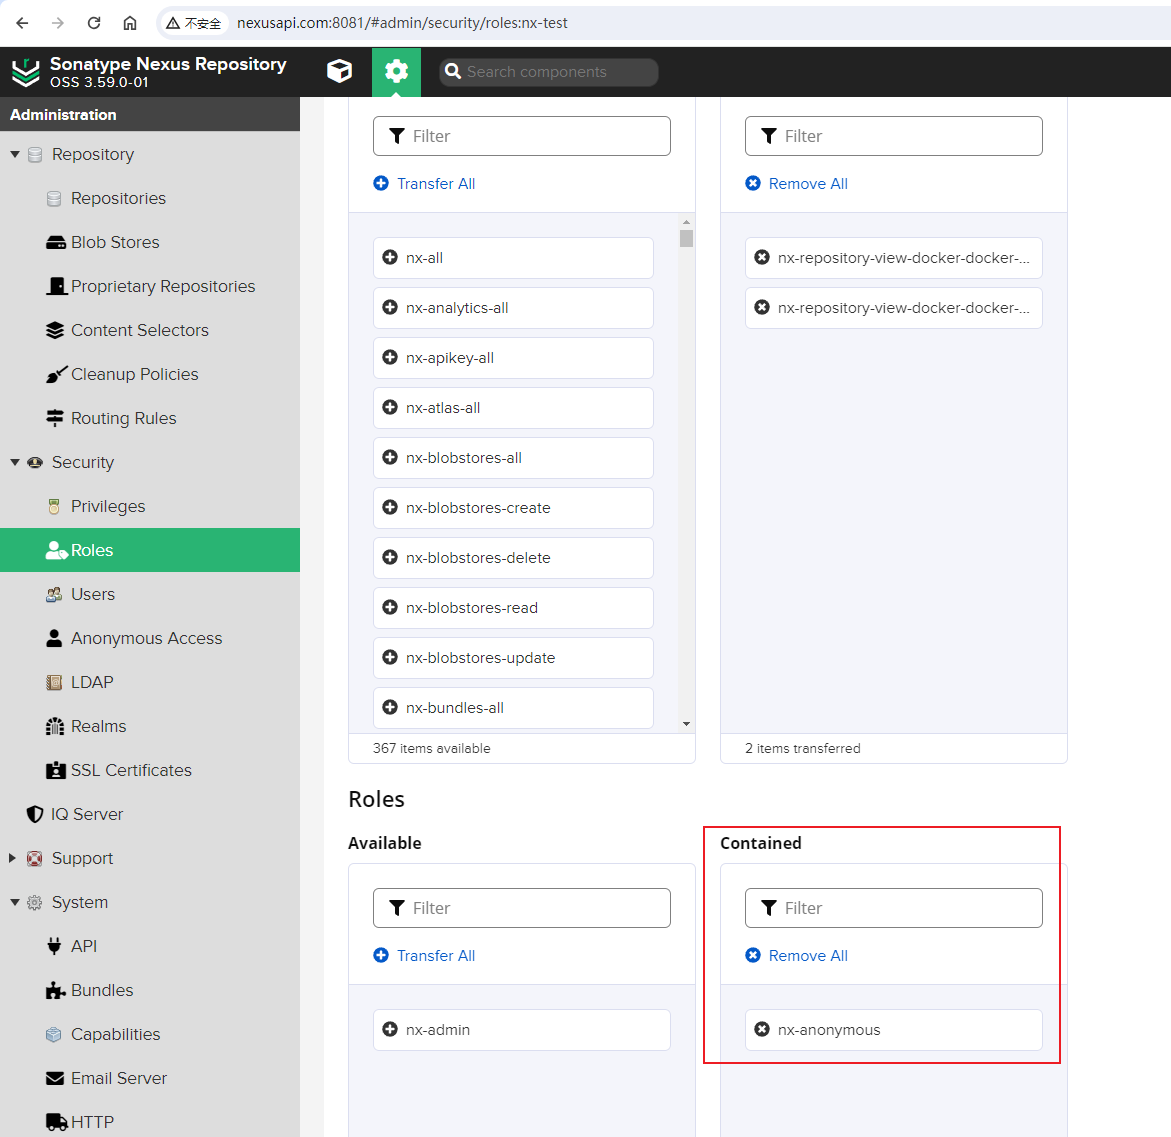
Roles:
- nx-anonymous, 将匿名用户的角色包含到
nx-test角色当中,这样nx-test角色就拥有了匿名用户相关的权限。
- nx-anonymous, 将匿名用户的角色包含到
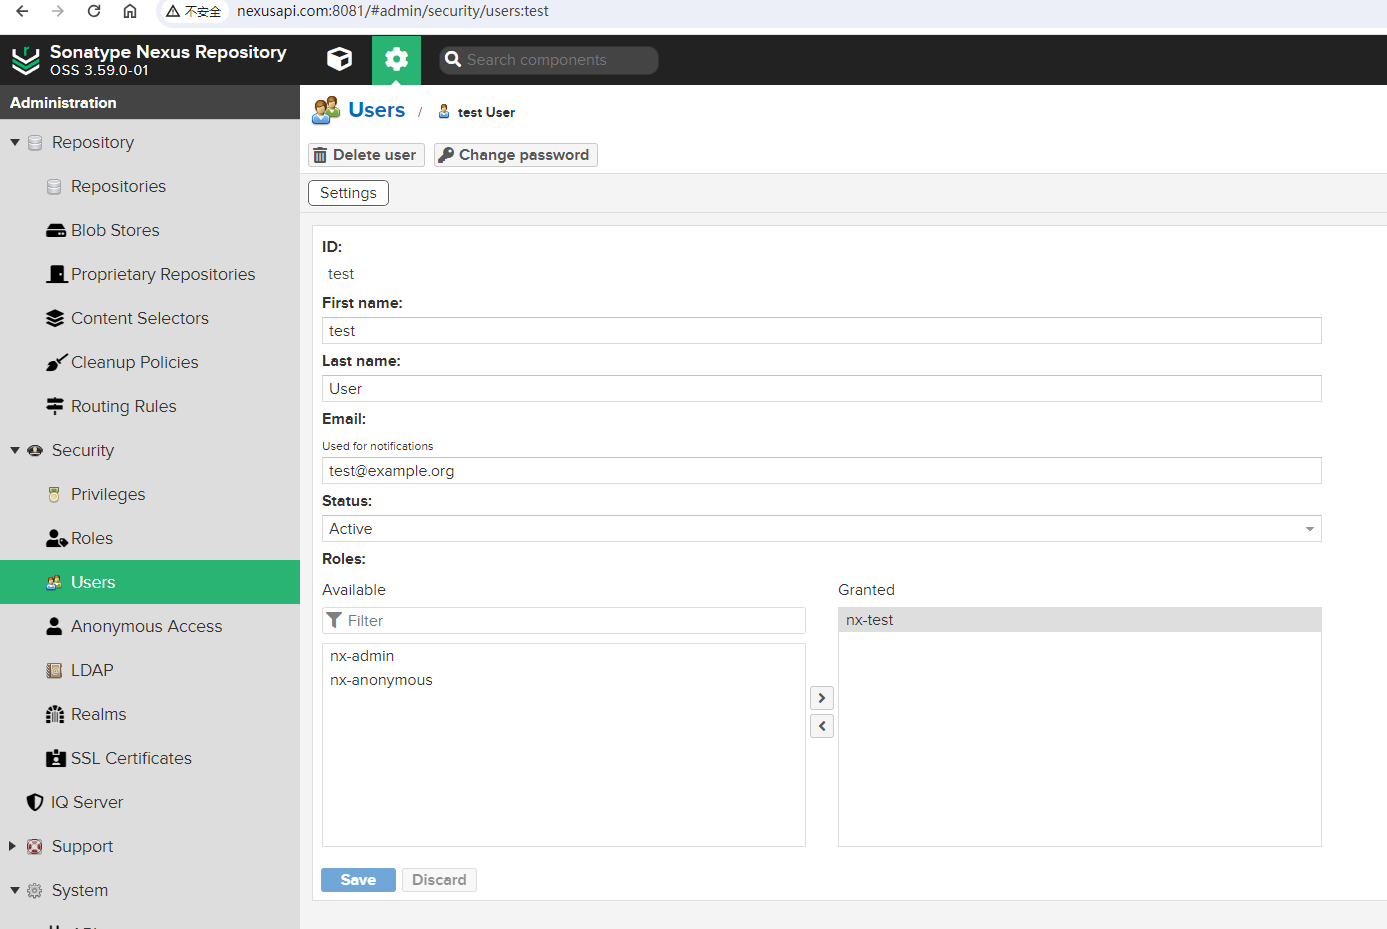
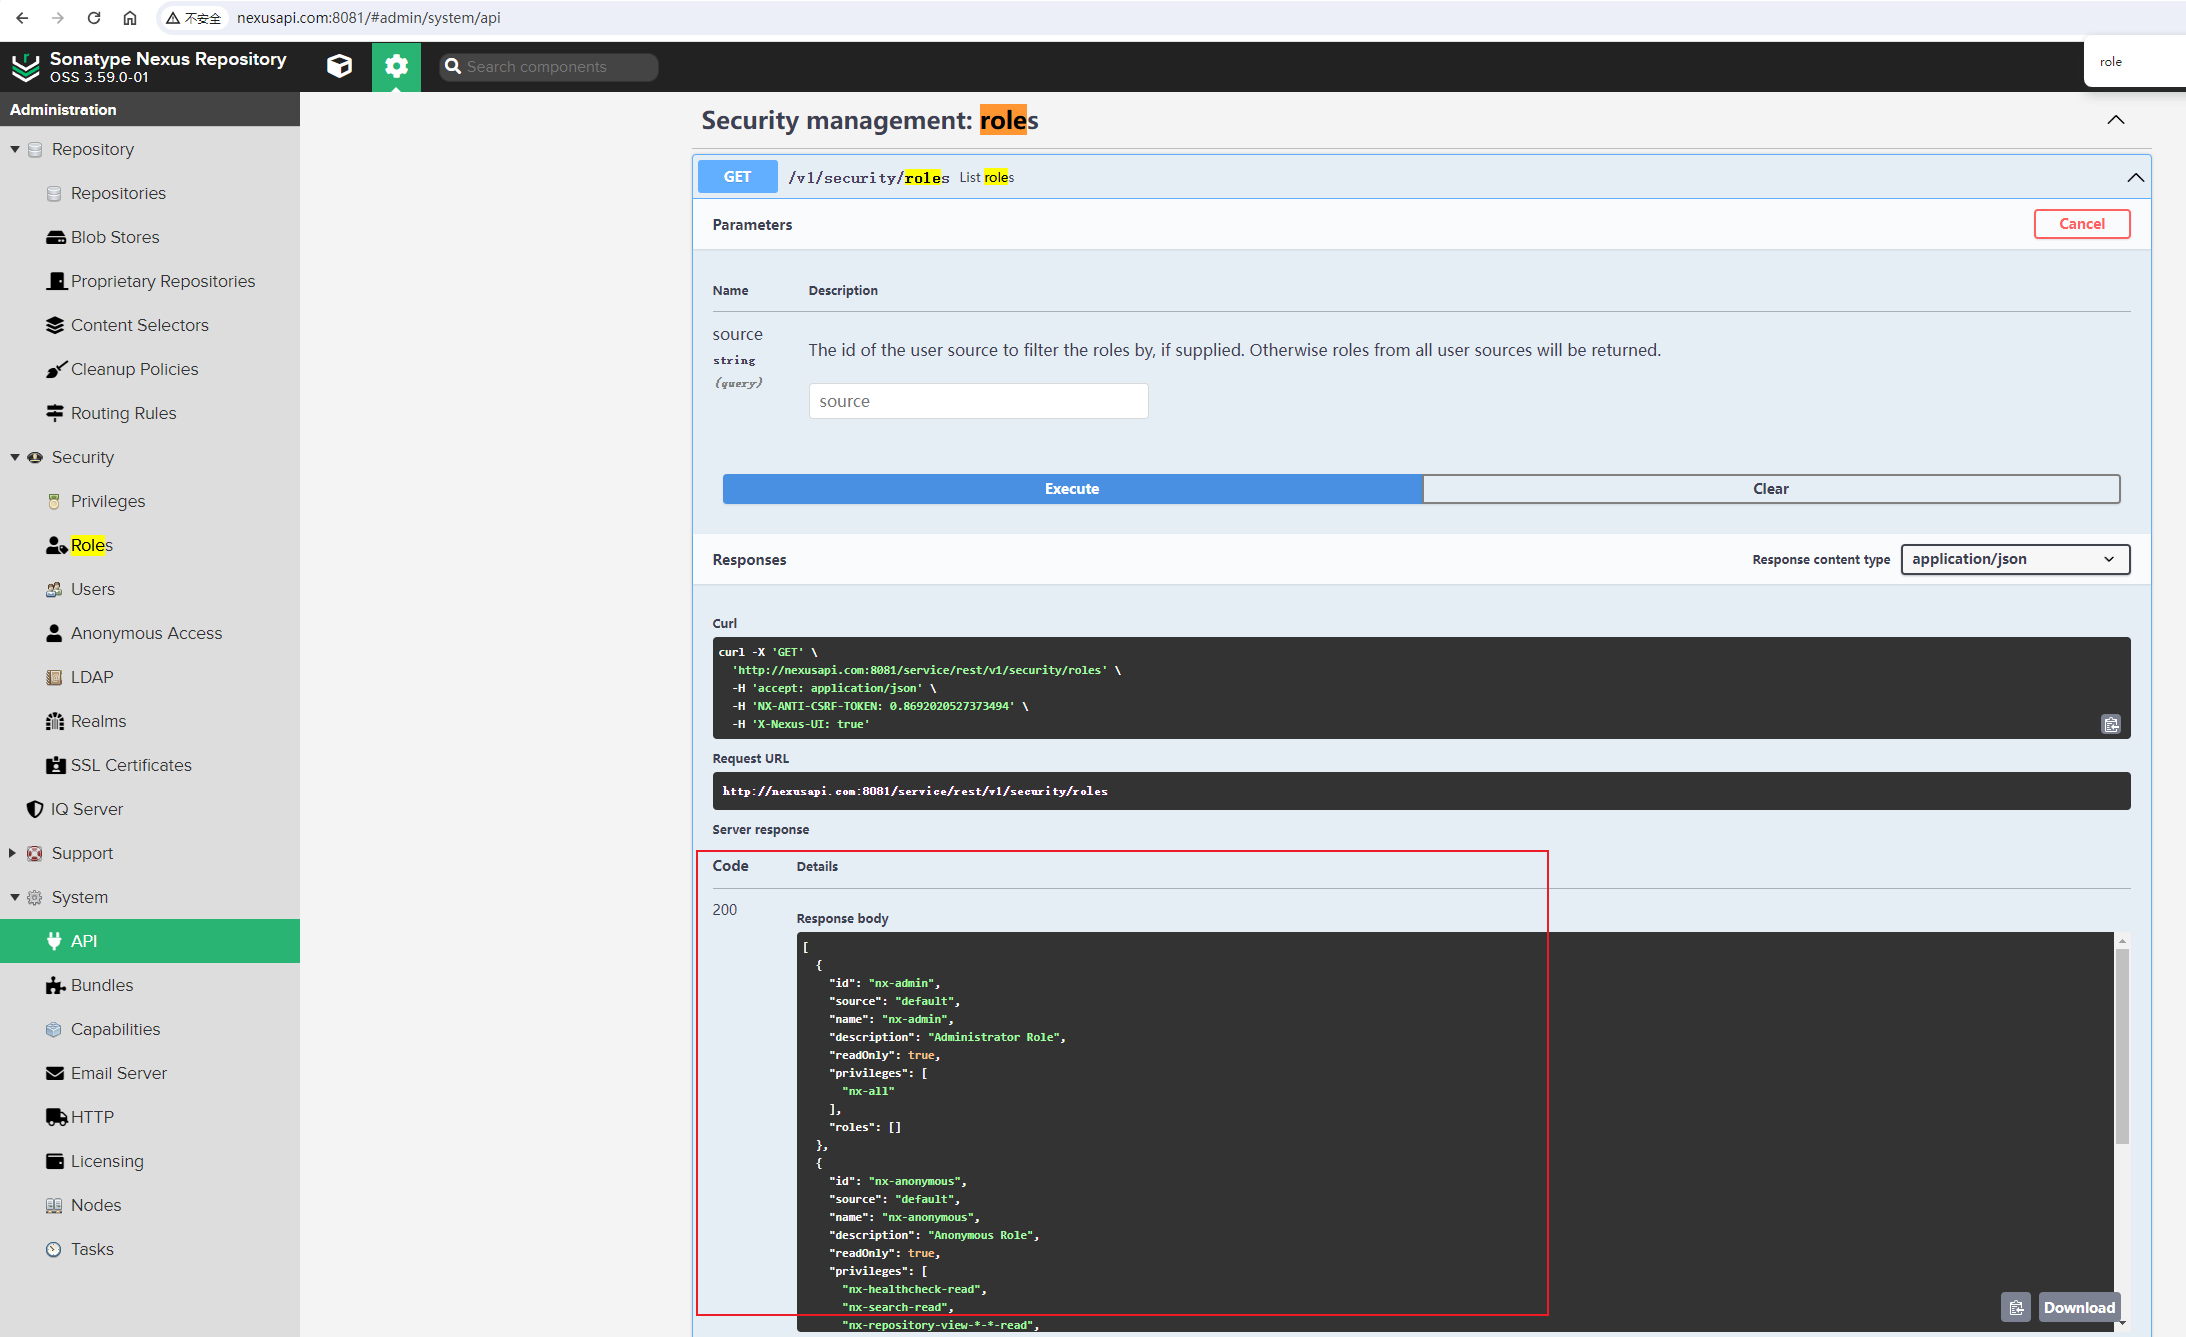
2.2 创建测试用户
配置测试用户test相关信息:
- ID: test
- First Name: test
- Last Name: User
- Email: test@example.org
- Status: Active
- Roles: nx-test
2.3 测试推送
本地打镜像测试推送到docker-hosted仓库:
# 修改docker配置
[root@nexus-test ~]# cat /etc/docker/daemon.json|jq
{
  "insecure-registries": [
    "nexusapi.com:8001",
    "nexusapi.com:8002"
  ],
  "registry-mirrors": [
    "http://nexusapi.com:8001",
    "http://nexusapi.com:8002"
  ],
  "data-root": "/data/docker"
}

# 启动docker服务
[root@nexus-test ~]# systemctl start docker

# 查看域名解析
[root@nexus-test ~]# cat /etc/hosts
127.0.0.1   localhost localhost.localdomain localhost4 localhost4.localdomain4
::1         localhost localhost.localdomain localhost6 localhost6.localdomain6

# Nexus API
192.168.56.130 nexusapi.com
106.2.45.242 hub-mirror.c.163.com

# 尝试能不能正常ping通自定义域名
[root@nexus-test ~]# ping nexusapi.com
PING nexusapi.com (192.168.56.130) 56(84) bytes of data.
64 bytes from nexusapi.com (192.168.56.130): icmp_seq=1 ttl=64 time=0.269 ms
64 bytes from nexusapi.com (192.168.56.130): icmp_seq=2 ttl=64 time=0.234 ms
64 bytes from nexusapi.com (192.168.56.130): icmp_seq=3 ttl=64 time=0.248 ms
^C
--- nexusapi.com ping statistics ---
3 packets transmitted, 3 received, 0% packet loss, time 1999ms
rtt min/avg/max/mdev = 0.234/0.250/0.269/0.019 ms

# 查看当前存在的镜像
[root@nexus-test ~]# docker images
REPOSITORY    TAG       IMAGE ID       CREATED         SIZE
nginx         latest    e4720093a3c1   3 weeks ago     187MB
alpine        3.17      eaba187917cc   6 weeks ago     7.06MB
alpine        3.18      d3782b16ccc9   6 weeks ago     7.34MB
alpine        latest    05455a08881e   6 weeks ago     7.38MB
hello-world   latest    d2c94e258dcb   10 months ago   13.3kB

# 创建本地镜像配置文件
[root@nexus-test ~]# mkdir mysql
[root@nexus-test ~]# cd mysql
[root@nexus-test mysql]# ls
[root@nexus-test mysql]# vi Dockerfile
[root@nexus-test mysql]# cat Dockerfile
FROM alpine:3.18
RUN sed -i 's/dl-cdn.alpinelinux.org/mirrors.tuna.tsinghua.edu.cn/g' /etc/apk/repositories \
    && apk add --update mysql-client \
    && rm -rf /var/cache/apk/*
ENTRYPOINT ["mysql"]
[root@nexus-test mysql]#

# 构建镜像
[root@nexus-test mysql]# docker build --tag mysql-client:hosted .
Sending build context to Docker daemon  2.048kB
Step 1/3 : FROM alpine:3.18
 ---> d3782b16ccc9
Step 2/3 : RUN sed -i 's/dl-cdn.alpinelinux.org/mirrors.tuna.tsinghua.edu.cn/g' /etc/apk/repositories     && apk add --update mysql-client     && rm -rf /var/cache/apk/*
 ---> Running in 4c84802949a8
fetch https://mirrors.tuna.tsinghua.edu.cn/alpine/v3.18/main/x86_64/APKINDEX.tar.gz
fetch https://mirrors.tuna.tsinghua.edu.cn/alpine/v3.18/community/x86_64/APKINDEX.tar.gz
(1/9) Installing mariadb-common (10.11.6-r0)
(2/9) Installing libbz2 (1.0.8-r5)
(3/9) Installing perl (5.36.2-r0)
(4/9) Installing libgcc (12.2.1_git20220924-r10)
(5/9) Installing ncurses-terminfo-base (6.4_p20230506-r0)
(6/9) Installing libncursesw (6.4_p20230506-r0)
(7/9) Installing libstdc++ (12.2.1_git20220924-r10)
(8/9) Installing mariadb-client (10.11.6-r0)
(9/9) Installing mysql-client (10.11.6-r0)
Executing busybox-1.36.1-r5.trigger
OK: 86 MiB in 24 packages
Removing intermediate container 4c84802949a8
 ---> 3ace44d722b6
Step 3/3 : ENTRYPOINT ["mysql"]
 ---> Running in 29018676974a
Removing intermediate container 29018676974a
 ---> c688e7a0c3cb
Successfully built c688e7a0c3cb
Successfully tagged mysql-client:hosted

# 登陆docker-hosted本地仓库,登陆成功了
[root@nexus-test mysql]# docker login http://nexusapi.com:8002
Username: test
Password:  #<------ 此处输入密码
WARNING! Your password will be stored unencrypted in /root/.docker/config.json.
Configure a credential helper to remove this warning. See
https://docs.docker.com/engine/reference/commandline/login/#credentials-store

Login Succeeded

# 查看镜像
[root@nexus-test mysql]# docker images
REPOSITORY     TAG       IMAGE ID       CREATED          SIZE
mysql-client   hosted    c688e7a0c3cb   40 seconds ago   84.6MB
nginx          latest    e4720093a3c1   3 weeks ago      187MB
alpine         3.17      eaba187917cc   6 weeks ago      7.06MB
alpine         3.18      d3782b16ccc9   6 weeks ago      7.34MB
alpine         latest    05455a08881e   6 weeks ago      7.38MB
hello-world    latest    d2c94e258dcb   10 months ago    13.3kB

# 重新打标签
[root@nexus-test mysql]# docker tag mysql-client:hosted nexusapi.com:8002/mysql-client:hosted
[root@nexus-test mysql]# docker images
REPOSITORY                       TAG       IMAGE ID       CREATED              SIZE
nexusapi.com:8002/mysql-client   hosted    c688e7a0c3cb   About a minute ago   84.6MB
mysql-client                     hosted    c688e7a0c3cb   About a minute ago   84.6MB
nginx                            latest    e4720093a3c1   3 weeks ago          187MB
alpine                           3.17      eaba187917cc   6 weeks ago          7.06MB
alpine                           3.18      d3782b16ccc9   6 weeks ago          7.34MB
alpine                           latest    05455a08881e   6 weeks ago          7.38MB
hello-world                      latest    d2c94e258dcb   10 months ago        13.3kB

# nx-test角色未配置nx-repository-view-docker-docker-hosted-edit权限时,尝试推送镜像到远程仓库
# 可以看到两次都失败了
[root@nexus-test mysql]# docker push nexusapi.com:8002/mysql-client:hosted
The push refers to repository [nexusapi.com:8002/mysql-client]
5105853d04b3: Pushing [==================================================>]  78.61MB
aedc3bda2944: Pushing [==================================================>]   7.63MB
unauthorized: access to the requested resource is not authorized

# nx-test角色配置nx-repository-view-docker-docker-hosted-edit权限后,尝试推送镜像到远程仓库
# 可以正常推送到远程仓库
[root@nexus-test mysql]# docker push nexusapi.com:8002/mysql-client:hosted
The push refers to repository [nexusapi.com:8002/mysql-client]
5105853d04b3: Pushed
aedc3bda2944: Pushed
hosted: digest: sha256:8b3a001c64f35982d758bb41788e77b603490e073c8cc09142f6f580b91b35f3 size: 740
[root@nexus-test mysql]#
3. 通过API接口创建用户
通过前两节分析可知:
快速创建一个用户账号,如账号名为devops,并将给其授权能够朝docker-hosted仓库推送镜像这一个需求,可以分解成以下事项:
- 创建
nx-devops角色,并分配nx-repository-view-docker-docker-hosted-add和nx-repository-view-docker-docker-hosted-edit权限,并且包含nx-anonymous角色。需要使用/v1/security/roles接口,发送POST请求。 - 创建
devops用户,并授予nx-devops角色。需要使用/v1/security/users接口,发送POST请求。
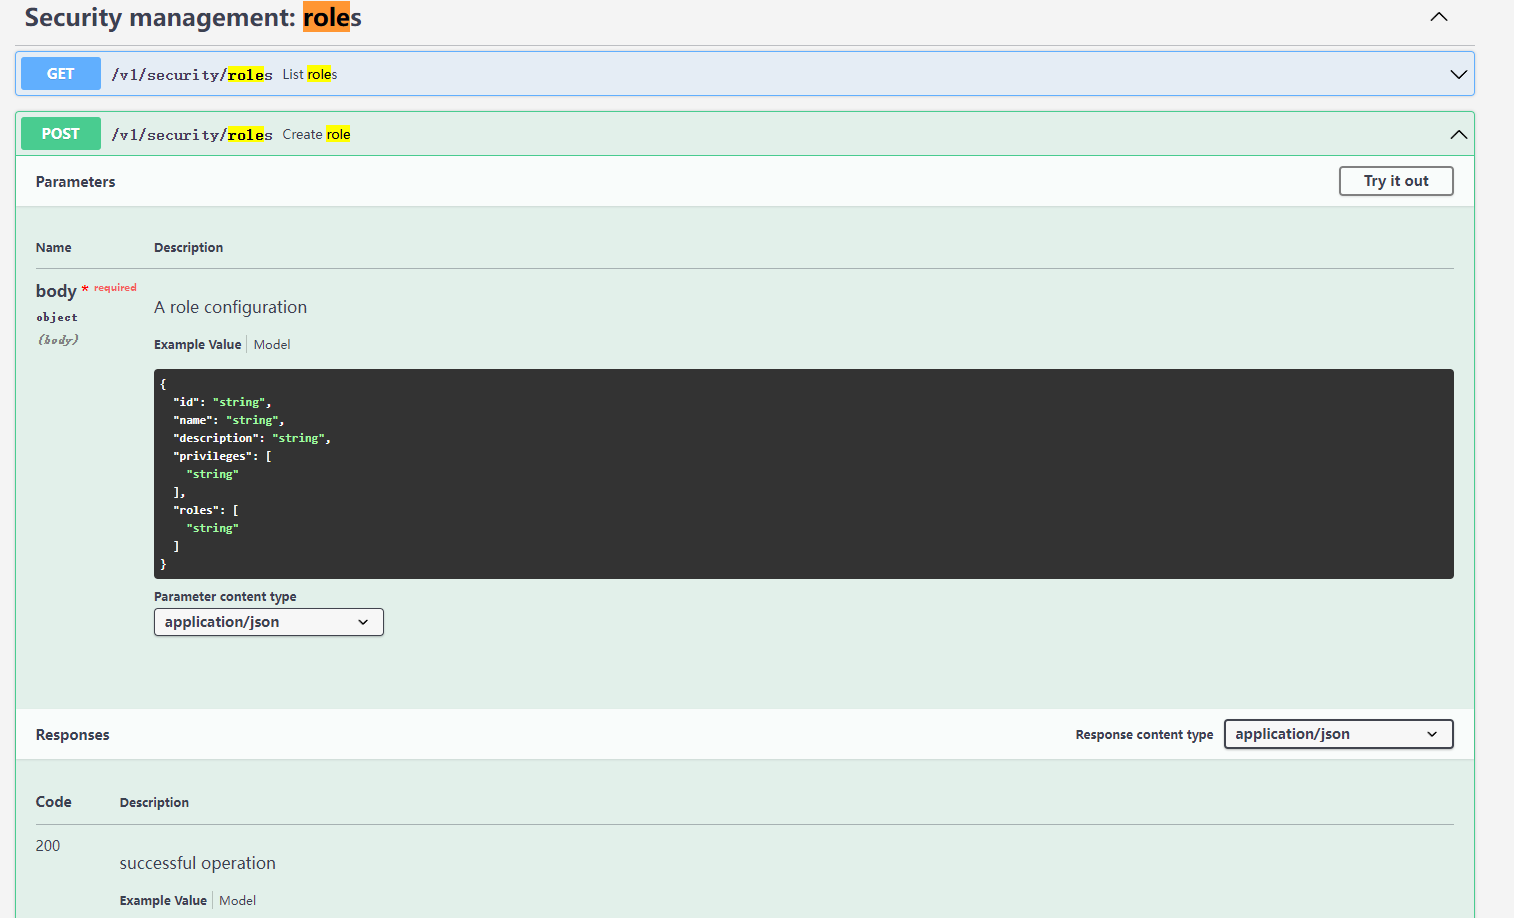
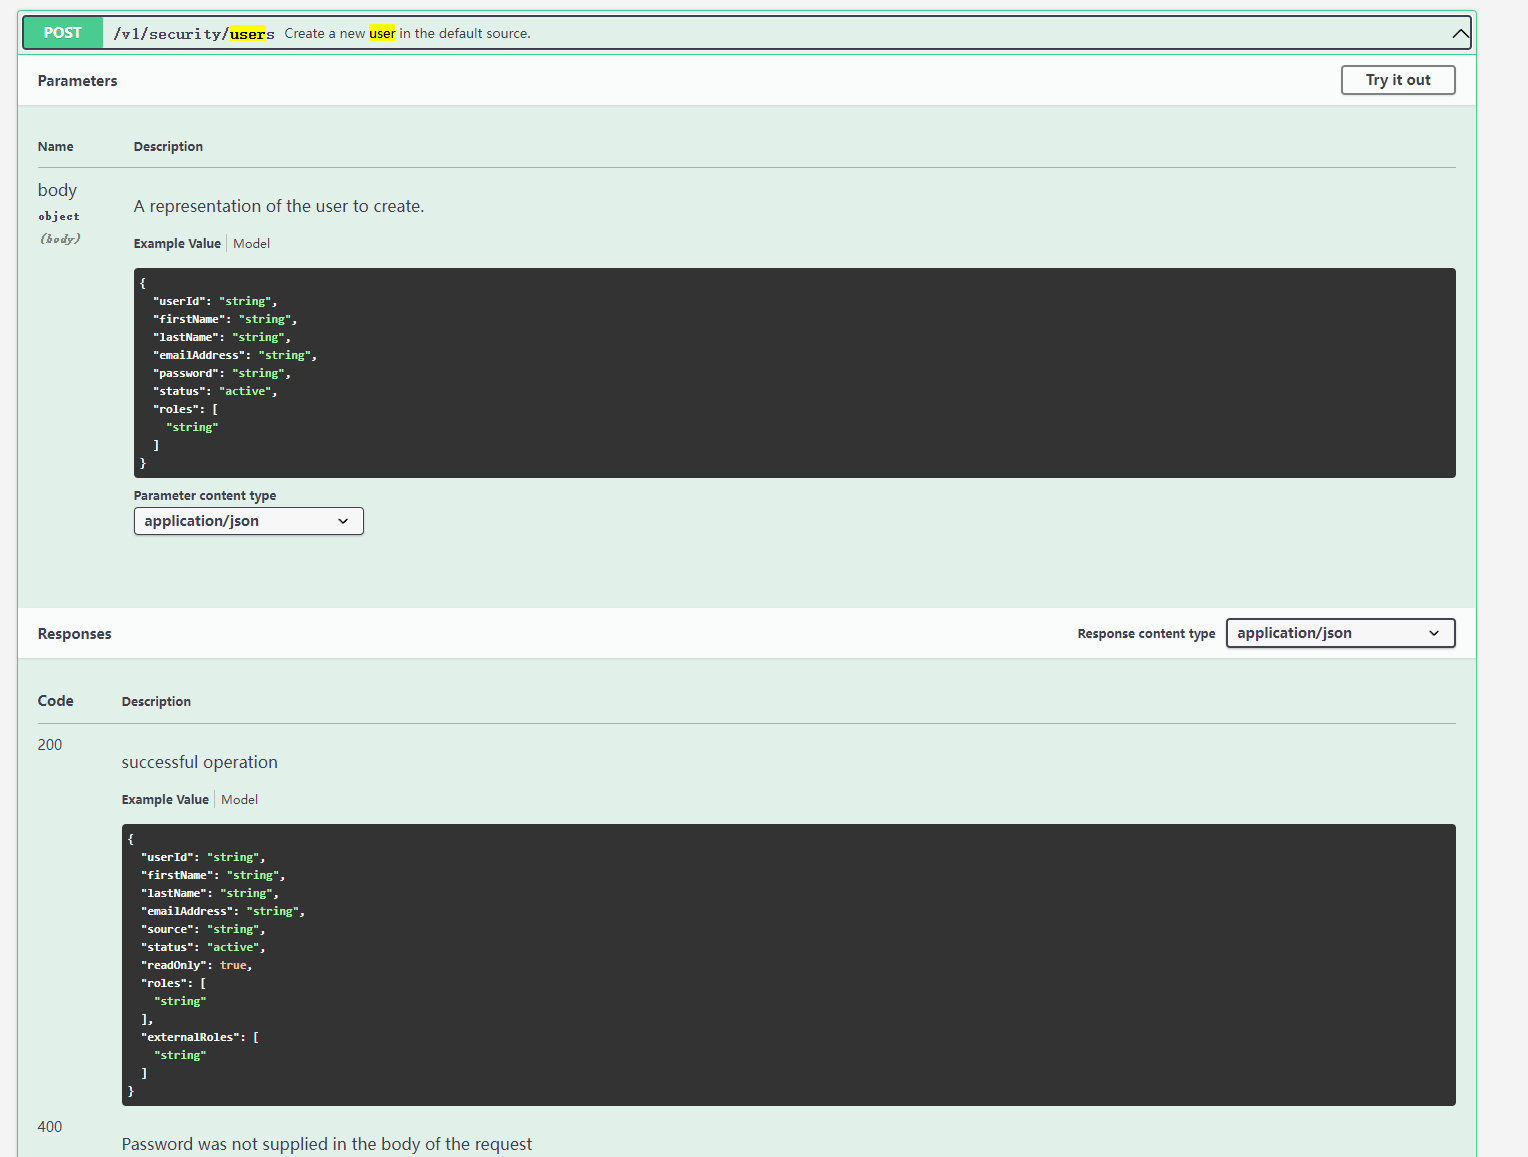
3.1 使用角色api接口
先在Nexus API页面获取所有角色的相关信息:
GET请求/v1/security/roles接口。
请求的返回信息如下:
[
  {
    "id": "nx-admin",
    "source": "default",
    "name": "nx-admin",
    "description": "Administrator Role",
    "readOnly": true,
    "privileges": [
      "nx-all"
    ],
    "roles": []
  },
  {
    "id": "nx-anonymous",
    "source": "default",
    "name": "nx-anonymous",
    "description": "Anonymous Role",
    "readOnly": true,
    "privileges": [
      "nx-healthcheck-read",
      "nx-search-read",
      "nx-repository-view-*-*-read",
      "nx-repository-view-*-*-browse"
    ],
    "roles": []
  },
  {
    "id": "nx-test",
    "source": "default",
    "name": "nx-test",
    "description": "test Role",
    "readOnly": false,
    "privileges": [
      "nx-repository-view-docker-docker-hosted-add",
      "nx-repository-view-docker-docker-hosted-edit"
    ],
    "roles": [
      "nx-anonymous"
    ]
  }
]我们只需要将nx-test角色相关的内容中test修改成我们需要通过api创建的用户devops即可。
在 nexus_api/config文件夹下创建role.json配置文件,其内容如下:
{
  "id": "nx-devops",
  "name": "nx-devops",
  "description": "Devops Role",
  "privileges": [
      "nx-repository-view-docker-docker-hosted-add",
      "nx-repository-view-docker-docker-hosted-edit"
  ],
  "roles": [
    "nx-anonymous"
  ]
}Python代码优化过程,详见 nexus系列课程第11篇,请参考 搭建自己的nexus私有仓库11--Nexus API接口的使用优化, 此处不再详细解释。
创建角色主要是增加了以下代码:
    def create_role(self):
        """创建普通用户角色"""
        logger.info('创建普通用户角色')
        role_file = f'{CONFIG_DIR}/role.json'
        payload = self.load_json_config_file(json_file=role_file)
        api = f'/v1/security/roles'
        self.curl(api=api, method='POST', payload=payload)
logger.success(f'成功创建用户角色')3.2 使用用户api接口
先在Nexus API页面获取test用户的相关信息:
GET请求/v1/security/users接口,并将userid参数设置test。
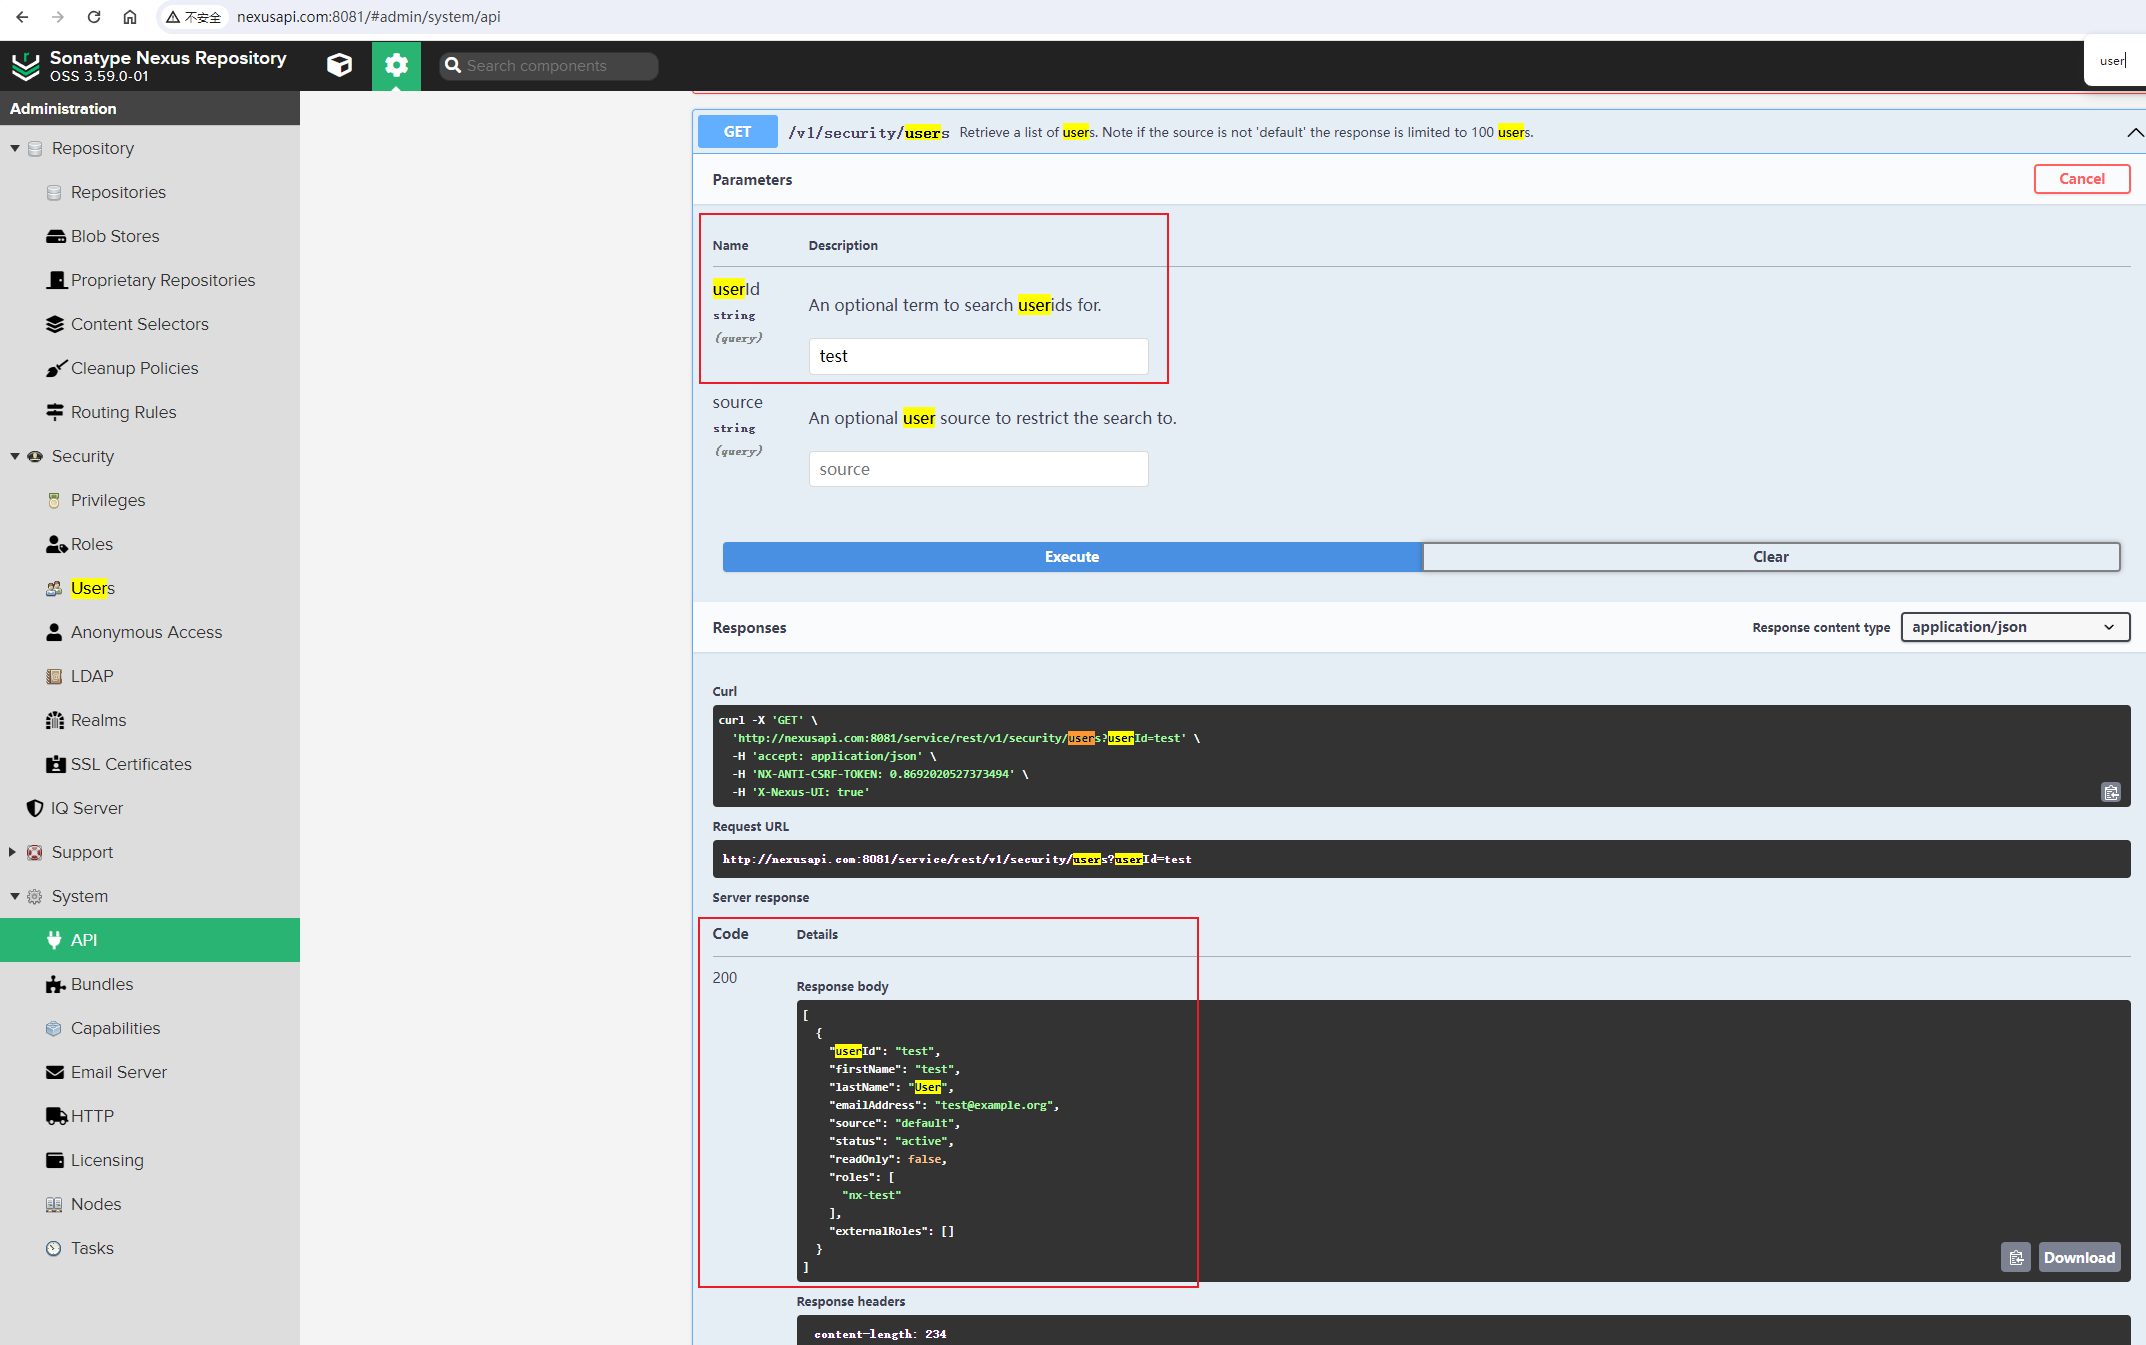
请求的返回信息如下:
[
  {
    "userId": "test",
    "firstName": "test",
    "lastName": "User",
    "emailAddress": "test@example.org",
    "source": "default",
    "status": "active",
    "readOnly": false,
    "roles": [
      "nx-test"
    ],
    "externalRoles": []
  }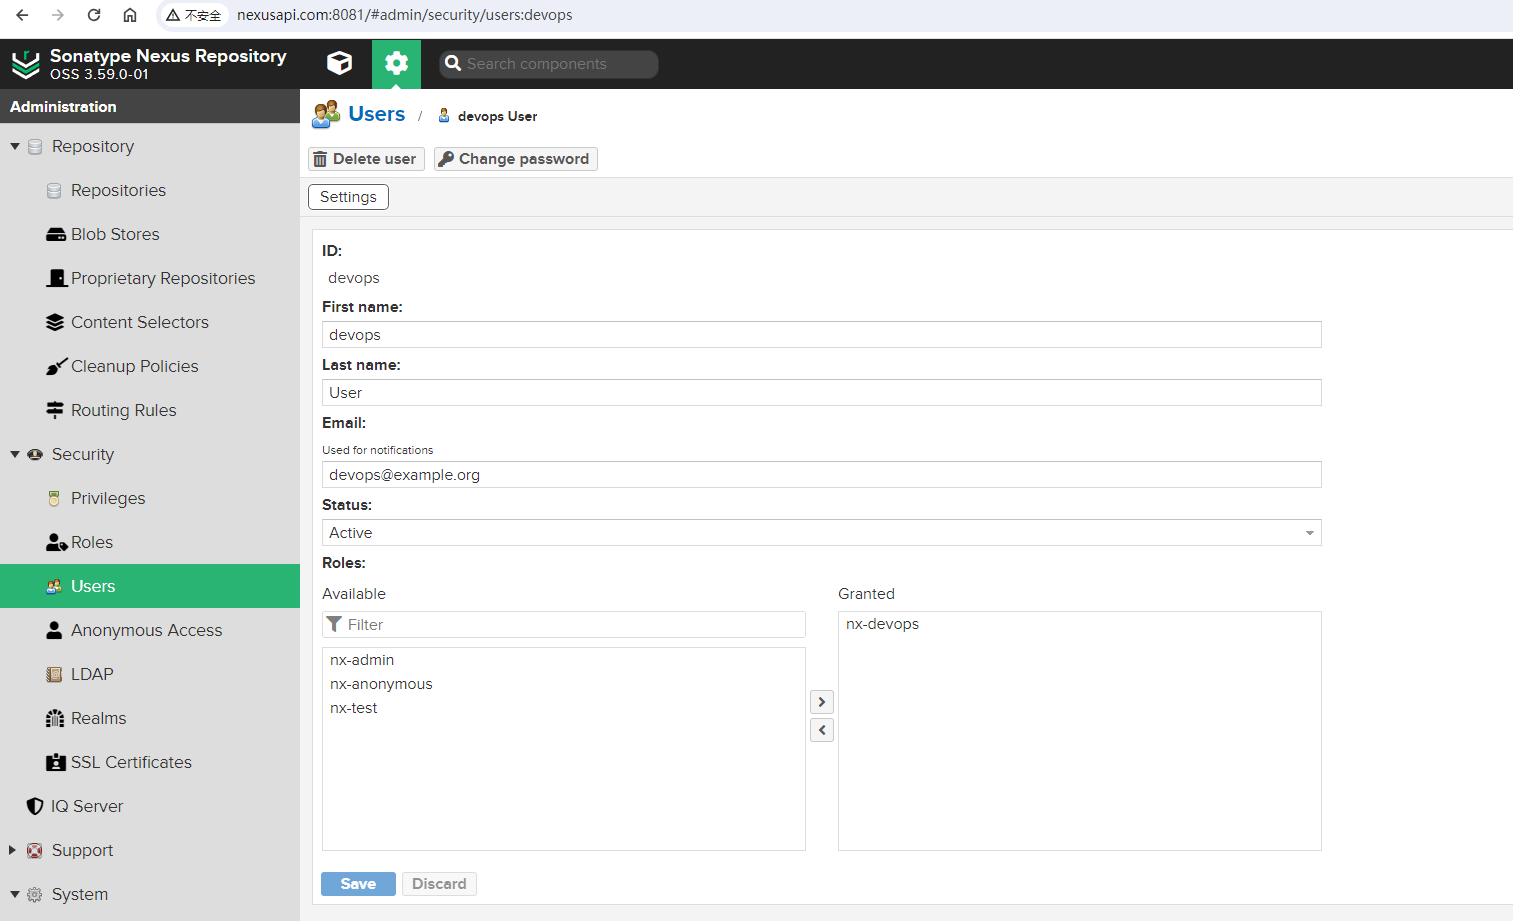
]在 nexus_api/config文件夹下创建user.json配置文件,其内容如下:
{
  "userId": "devops",
  "firstName": "devops",
  "lastName": "User",
  "emailAddress": "devops@example.org",
  "password": "123456",
  "status": "active",
  "roles": [
    "nx-devops"
  ]
}注意
user.json配置文件中定义的"password": "123456",密码信息并不需要做加密,是原始密码信息,不要将你的密码推送到github上去了!!
创建用户主要是增加了以下代码:
    def create_user(self):
        """创建用户"""
        logger.info('创建用户')
        user_file = f'{CONFIG_DIR}/user.json'
        payload = self.load_json_config_file(json_file=user_file)
        api = f'/v1/security/users'
        self.curl(api=api, method='POST', payload=payload)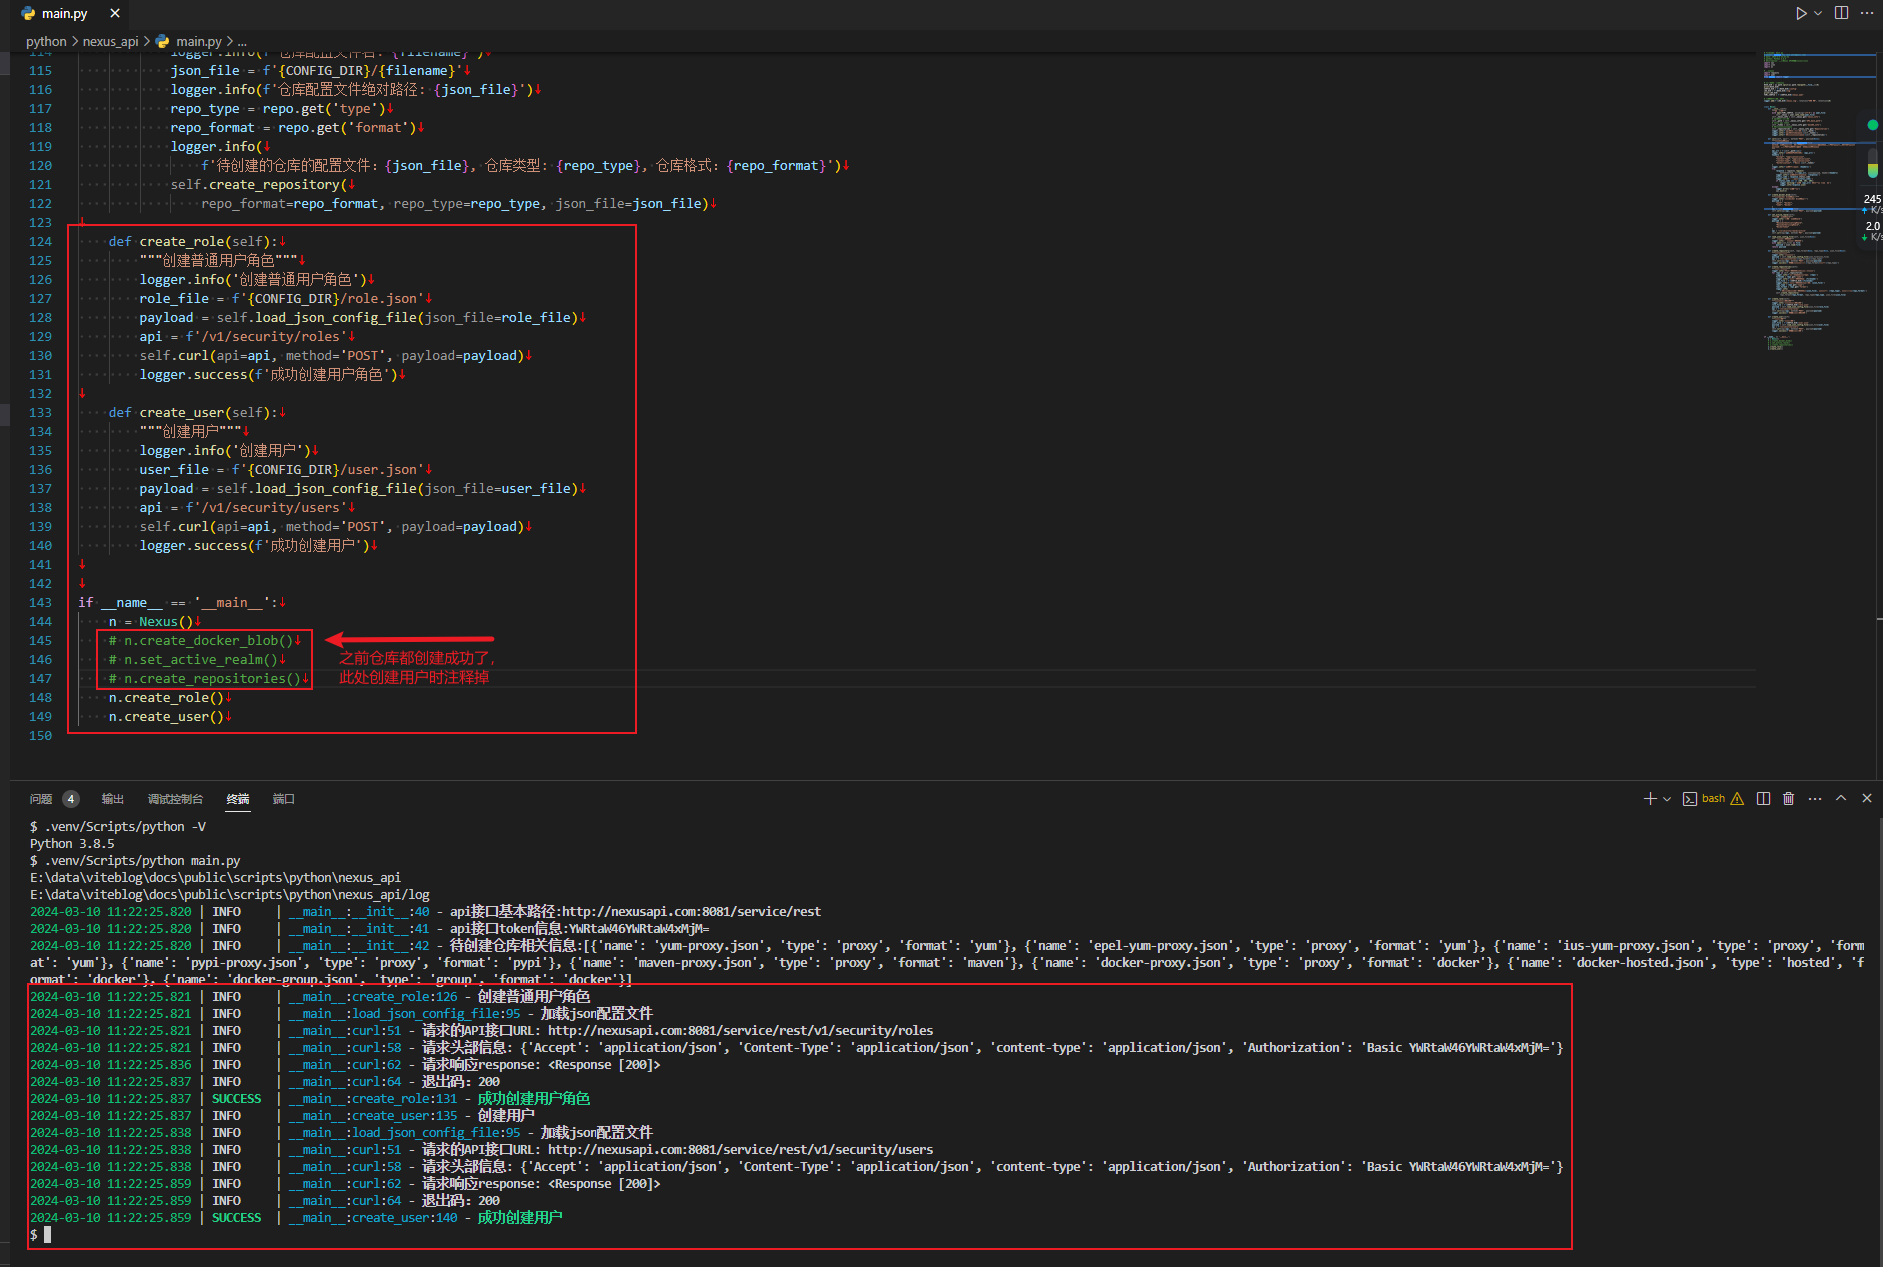
logger.success(f'成功创建用户')3.3 创建角色和用户
创建角色和用户时,执行Python脚本效果图:
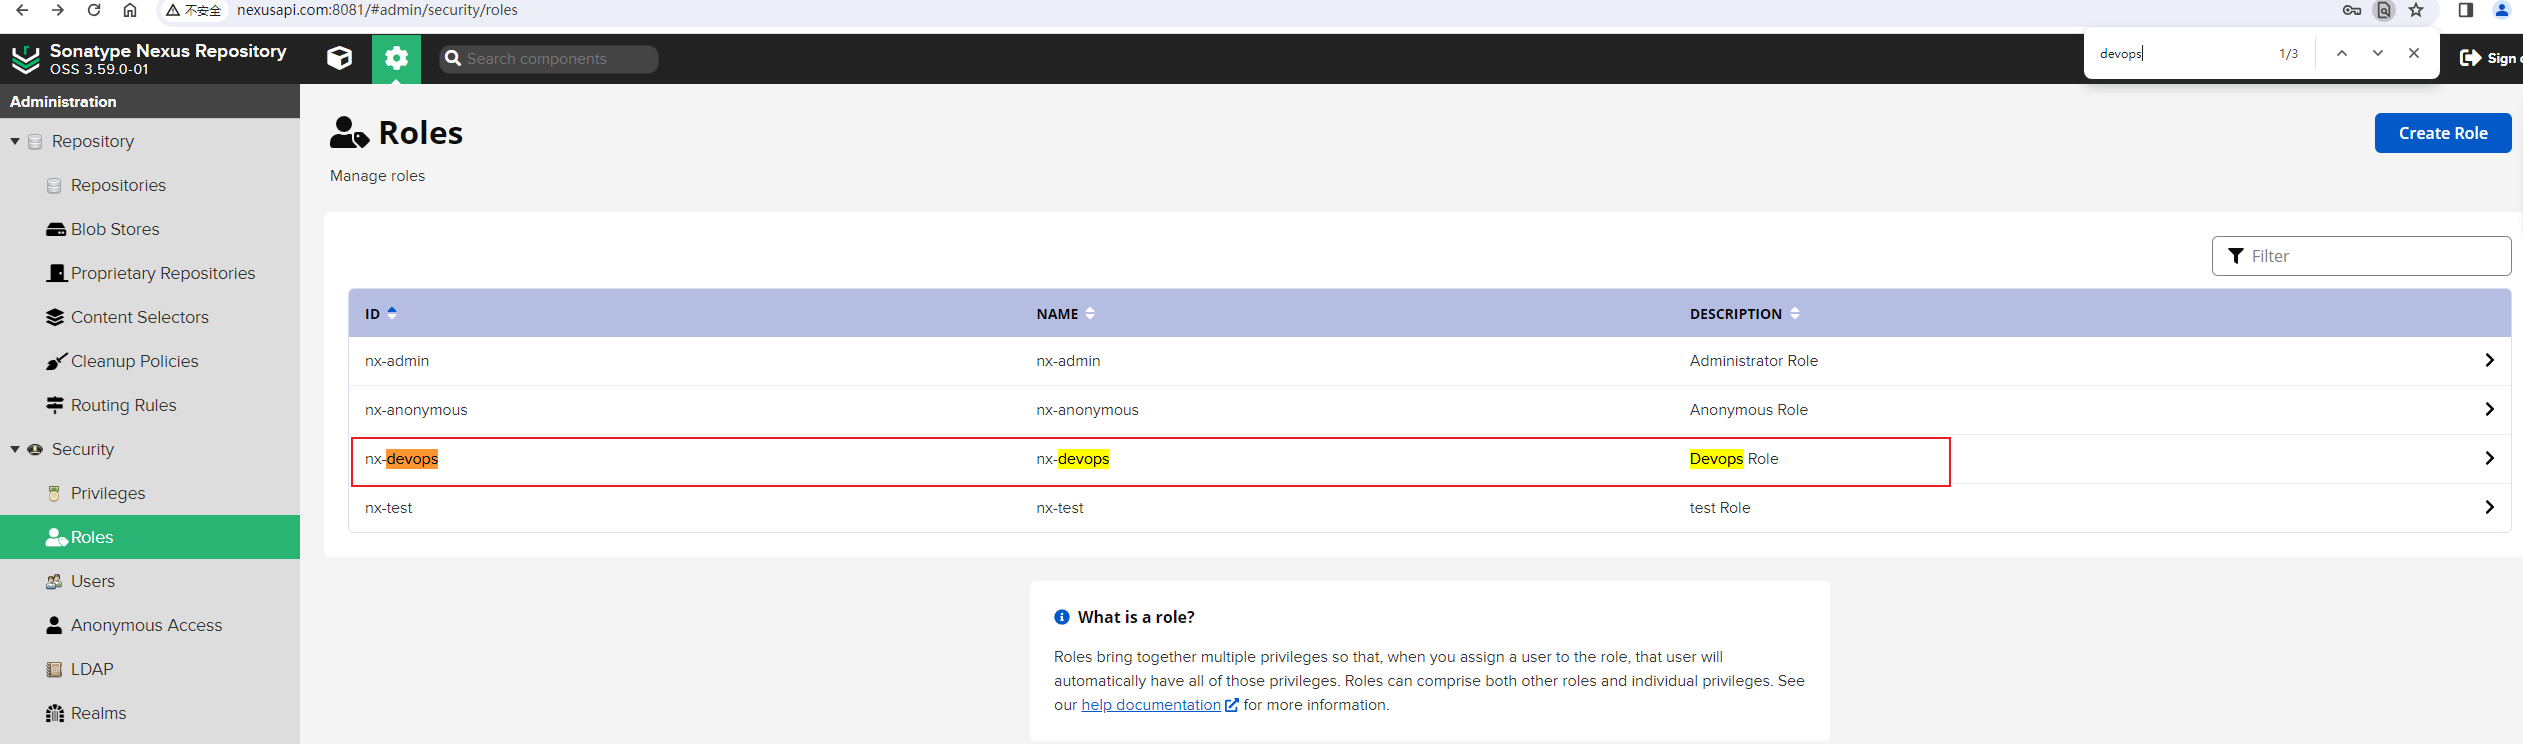
刚创建的nx-devops角色:
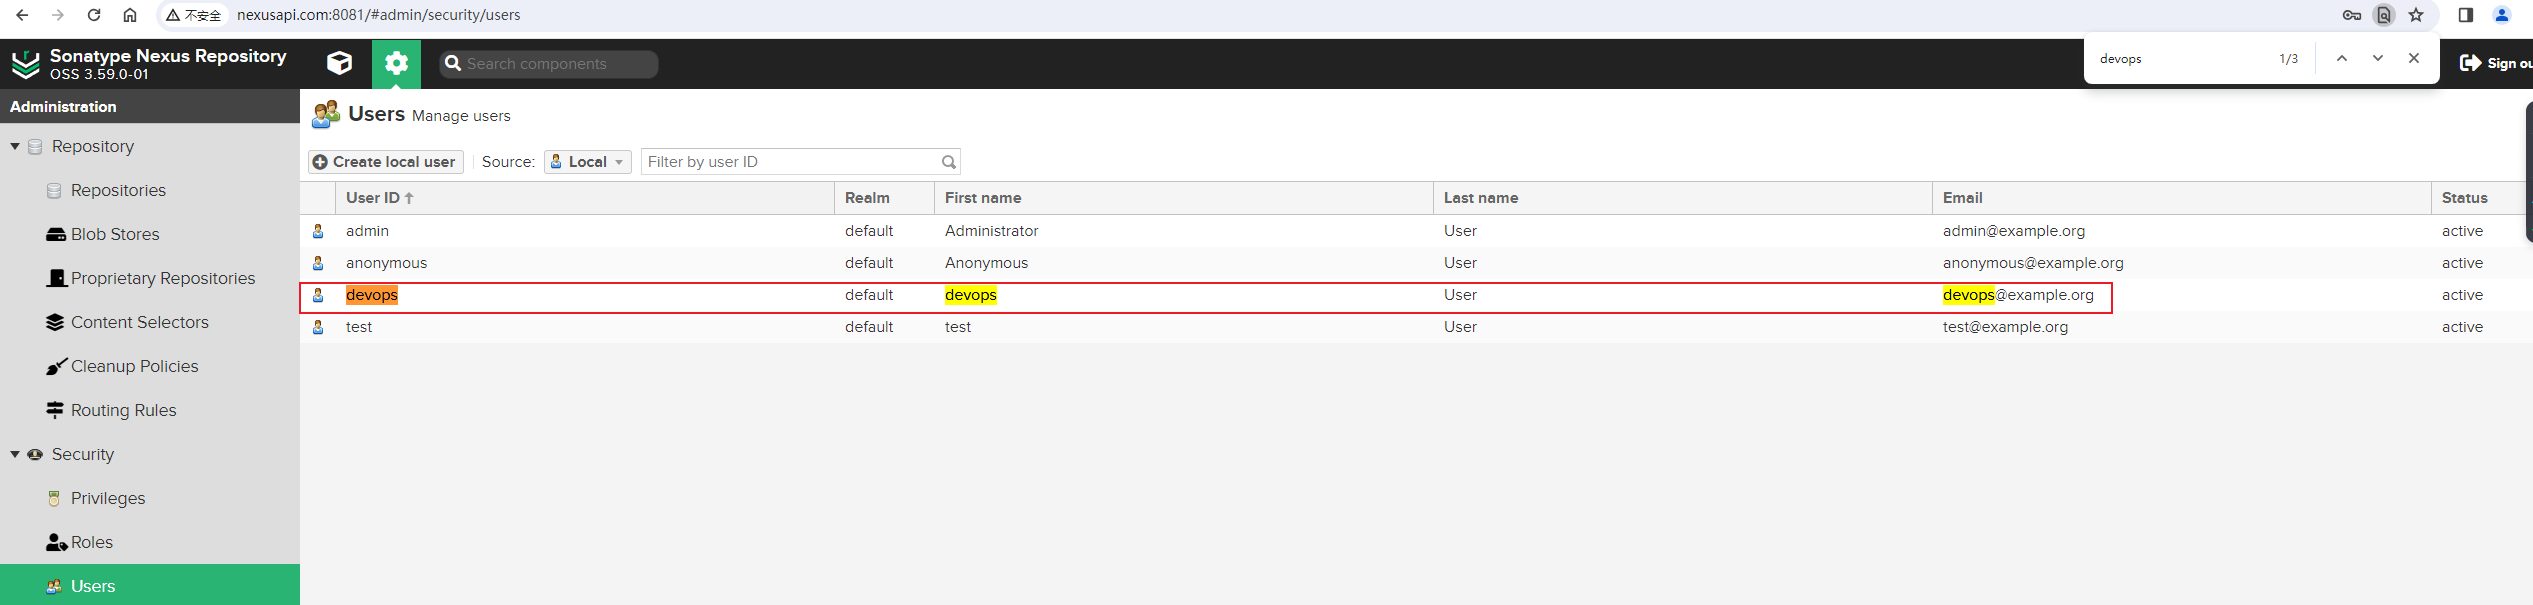
刚创建的devops角色:
优化后的main.py文件内容如下:
# filename: main.py
# author: Zhaohui Mei <mzh.whut@gmail.com>
# date: 2024-3-5 22:51:31
# python: Python 3.8.5
# description: 使用Nexus API快速创建常用仓库
import sys
import json
import os

# 第三方库
import requests
import yaml
from loguru import logger


# 当前文件所在的目录
BASE_DIR = os.path.split(os.path.realpath(__file__))[0]
print(BASE_DIR)
CONFIG_DIR = f'{BASE_DIR}/config'
LOG_DIR = f'{BASE_DIR}/log'
print(LOG_DIR)
YAML_CONFIG = f'{CONFIG_DIR}/nexus.yaml'

# 设置日志路径和日志轮转
logger.add(f'{LOG_DIR}/nexus.log', rotation="500 MB", retention=10)


class Nexus:
    def __init__(self):
        """构造函数"""
        with open(YAML_CONFIG, encoding='utf-8') as yaml_file:
            self._nexus = yaml.safe_load(yaml_file)
        self._nexus_info = self._nexus.get('nexus_info')
        # api接口基本路径
        self._path = self._nexus_info.get('API_base_path')
        # nexus api token
        self._token = self._nexus_info.get('base64_info')
        # 待创建仓库相关信息
        self._repositories = self._nexus_info.get('Repositories')
        logger.info(f'api接口基本路径:{self._path}')
        logger.info(f'api接口token信息:{self._token}')
        logger.info(f'待创建仓库相关信息:{self._repositories}')

    def curl(self, api='', method='POST', payload=None):
        """自定义请求方法
        api: api接口信息,如`/v1/blobstores/file`
        method: 请求方法,由于大部分接口都是创建仓库,因此默认使用POST方法,也可以GET方法等
        payload: 使用POST请求时,需要传输的json数据信息
        """
        api_url = f'{self._path}{api}'
        logger.info(f'请求的API接口URL: {api_url}')
        headers = {
            "Accept": "application/json",
            "Content-Type": "application/json",
            "content-type": "application/json",
            "Authorization": f"Basic {self._token}"
        }
        logger.info(f'请求头部信息: {headers}')
        try:
            response = requests.request(
                method=method, url=api_url, json=payload, headers=headers)
            logger.info(f'请求响应response: {response}')
            status_code = response.status_code
            logger.info(f'退出码:{status_code}')
            if status_code not in [200, 201, 204]:
                logger.warning(f'请求 {api_url} 接口异常 ,请检查')
                logger.info(response.json)
        except:
            logger.error('发生异常')
            sys.exit(1)

    def create_docker_blob(self):
        """创建docker blob块对象"""
        logger.info('创建docker blob块对象')
        payload = {
            "path": "docker",
            "name": "docker"
        }
        api = '/v1/blobstores/file'
        self.curl(api=api, method='POST', payload=payload)

    def set_active_realm(self):
        """设置激活的Realm"""
        logger.info('设置激活的Realm')
        payload = [
            "NexusAuthenticatingRealm",
            "NexusAuthorizingRealm",
            "DockerToken"
        ]
        api = '/v1/security/realms/active'
        self.curl(api=api, method='PUT', payload=payload)

    @staticmethod
    def load_json_config_file(json_file=None):
        """加载json配置文件"""
        logger.info('加载json配置文件')
        with open(json_file) as file:
            payload = json.load(file)
        return payload

    def create_repository(self, repo_format=None, repo_type=None, json_file=None):
        """创建单个仓库"""
        logger.info('创建仓库')
        payload = self.load_json_config_file(json_file=json_file)
        api = f'/v1/repositories/{repo_format}/{repo_type}'
        self.curl(api=api, method='POST', payload=payload)
        logger.success(f'成功创建仓库格式:{repo_format},类型:{repo_type}')

    def create_repositories(self):
        """创建多个仓库"""
        logger.info('根据配置文件定义创建多个仓库')
        for repo in self._repositories:
            logger.info(f'当前处理的仓库repo: {repo}')
            filename = repo.get('name')
            logger.info(f'仓库配置文件名: {filename}')
            json_file = f'{CONFIG_DIR}/{filename}'
            logger.info(f'仓库配置文件绝对路径: {json_file}')
            repo_type = repo.get('type')
            repo_format = repo.get('format')
            logger.info(
                f'待创建的仓库的配置文件:{json_file}, 仓库类型: {repo_type}, 仓库格式:{repo_format}')
            self.create_repository(
                repo_format=repo_format, repo_type=repo_type, json_file=json_file)

    def create_role(self):
        """创建普通用户角色"""
        logger.info('创建普通用户角色')
        role_file = f'{CONFIG_DIR}/role.json'
        payload = self.load_json_config_file(json_file=role_file)
        api = f'/v1/security/roles'
        self.curl(api=api, method='POST', payload=payload)
        logger.success(f'成功创建用户角色')

    def create_user(self):
        """创建用户"""
        logger.info('创建用户')
        user_file = f'{CONFIG_DIR}/user.json'
        payload = self.load_json_config_file(json_file=user_file)
        api = f'/v1/security/users'
        self.curl(api=api, method='POST', payload=payload)
        logger.success(f'成功创建用户')


if __name__ == '__main__':
    n = Nexus()
    n.create_docker_blob()
    n.set_active_realm()
    n.create_repositories()
    n.create_role()
n.create_user()说明:创建仓库、角色或者用户时,以上代码并没有去判断系统中是否已经存在,原因是Nexus中刚创建的,并没有手动去添加相关的信息。如果你创建的时候,提示400异常的话,有可能是系统中已经存在重复数据。
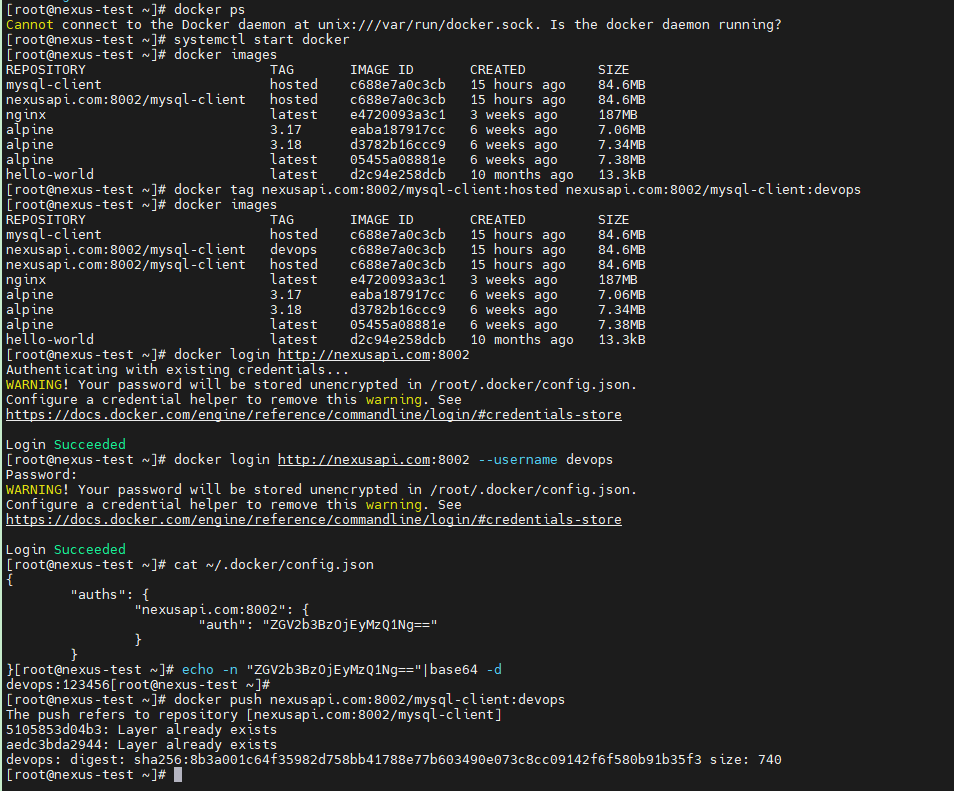
3.4 测试推送
# 测试虚拟机启动docker服务
[root@nexus-test ~]# systemctl start docker

# 查看当前镜像
[root@nexus-test ~]# docker images
REPOSITORY                       TAG       IMAGE ID       CREATED         SIZE
mysql-client                     hosted    c688e7a0c3cb   15 hours ago    84.6MB
nexusapi.com:8002/mysql-client   hosted    c688e7a0c3cb   15 hours ago    84.6MB
nginx                            latest    e4720093a3c1   3 weeks ago     187MB
alpine                           3.17      eaba187917cc   6 weeks ago     7.06MB
alpine                           3.18      d3782b16ccc9   6 weeks ago     7.34MB
alpine                           latest    05455a08881e   6 weeks ago     7.38MB
hello-world                      latest    d2c94e258dcb   10 months ago   13.3kB

# 对镜像打标签
[root@nexus-test ~]# docker tag nexusapi.com:8002/mysql-client:hosted nexusapi.com:8002/mysql-client:devops

# 再次查看镜像信息
[root@nexus-test ~]# docker images
REPOSITORY                       TAG       IMAGE ID       CREATED         SIZE
mysql-client                     hosted    c688e7a0c3cb   15 hours ago    84.6MB
nexusapi.com:8002/mysql-client   devops    c688e7a0c3cb   15 hours ago    84.6MB
nexusapi.com:8002/mysql-client   hosted    c688e7a0c3cb   15 hours ago    84.6MB
nginx                            latest    e4720093a3c1   3 weeks ago     187MB
alpine                           3.17      eaba187917cc   6 weeks ago     7.06MB
alpine                           3.18      d3782b16ccc9   6 weeks ago     7.34MB
alpine                           latest    05455a08881e   6 weeks ago     7.38MB
hello-world                      latest    d2c94e258dcb   10 months ago   13.3kB

# 登陆到远程docker-hosted仓库,如果不指定用户名,则会用之前保存的test账号登陆
[root@nexus-test ~]# docker login http://nexusapi.com:8002
Authenticating with existing credentials...
WARNING! Your password will be stored unencrypted in /root/.docker/config.json.
Configure a credential helper to remove this warning. See
https://docs.docker.com/engine/reference/commandline/login/#credentials-store

Login Succeeded

# 指定用户名为devops,再次登陆到远程docker-hosted仓库
# 可以看到登陆成功了
[root@nexus-test ~]# docker login http://nexusapi.com:8002 --username devops
Password:
WARNING! Your password will be stored unencrypted in /root/.docker/config.json.
Configure a credential helper to remove this warning. See
https://docs.docker.com/engine/reference/commandline/login/#credentials-store

Login Succeeded

# 查看保存下来的认证信息
[root@nexus-test ~]# cat ~/.docker/config.json
{
        "auths": {
                "nexusapi.com:8002": {
                        "auth": "ZGV2b3BzOjEyMzQ1Ng=="
                }
        }
}[root@nexus-test ~]#

# 解密加密后的用户名和密码信息,可以看到是devops账号
[root@nexus-test ~]# echo -n "ZGV2b3BzOjEyMzQ1Ng=="|base64 -d
devops:123456[root@nexus-test ~]#

# 推送镜像到远程仓库中,可以看到,推送成功!
[root@nexus-test ~]# docker push nexusapi.com:8002/mysql-client:devops
The push refers to repository [nexusapi.com:8002/mysql-client]
5105853d04b3: Layer already exists
aedc3bda2944: Layer already exists
devops: digest: sha256:8b3a001c64f35982d758bb41788e77b603490e073c8cc09142f6f580b91b35f3 size: 740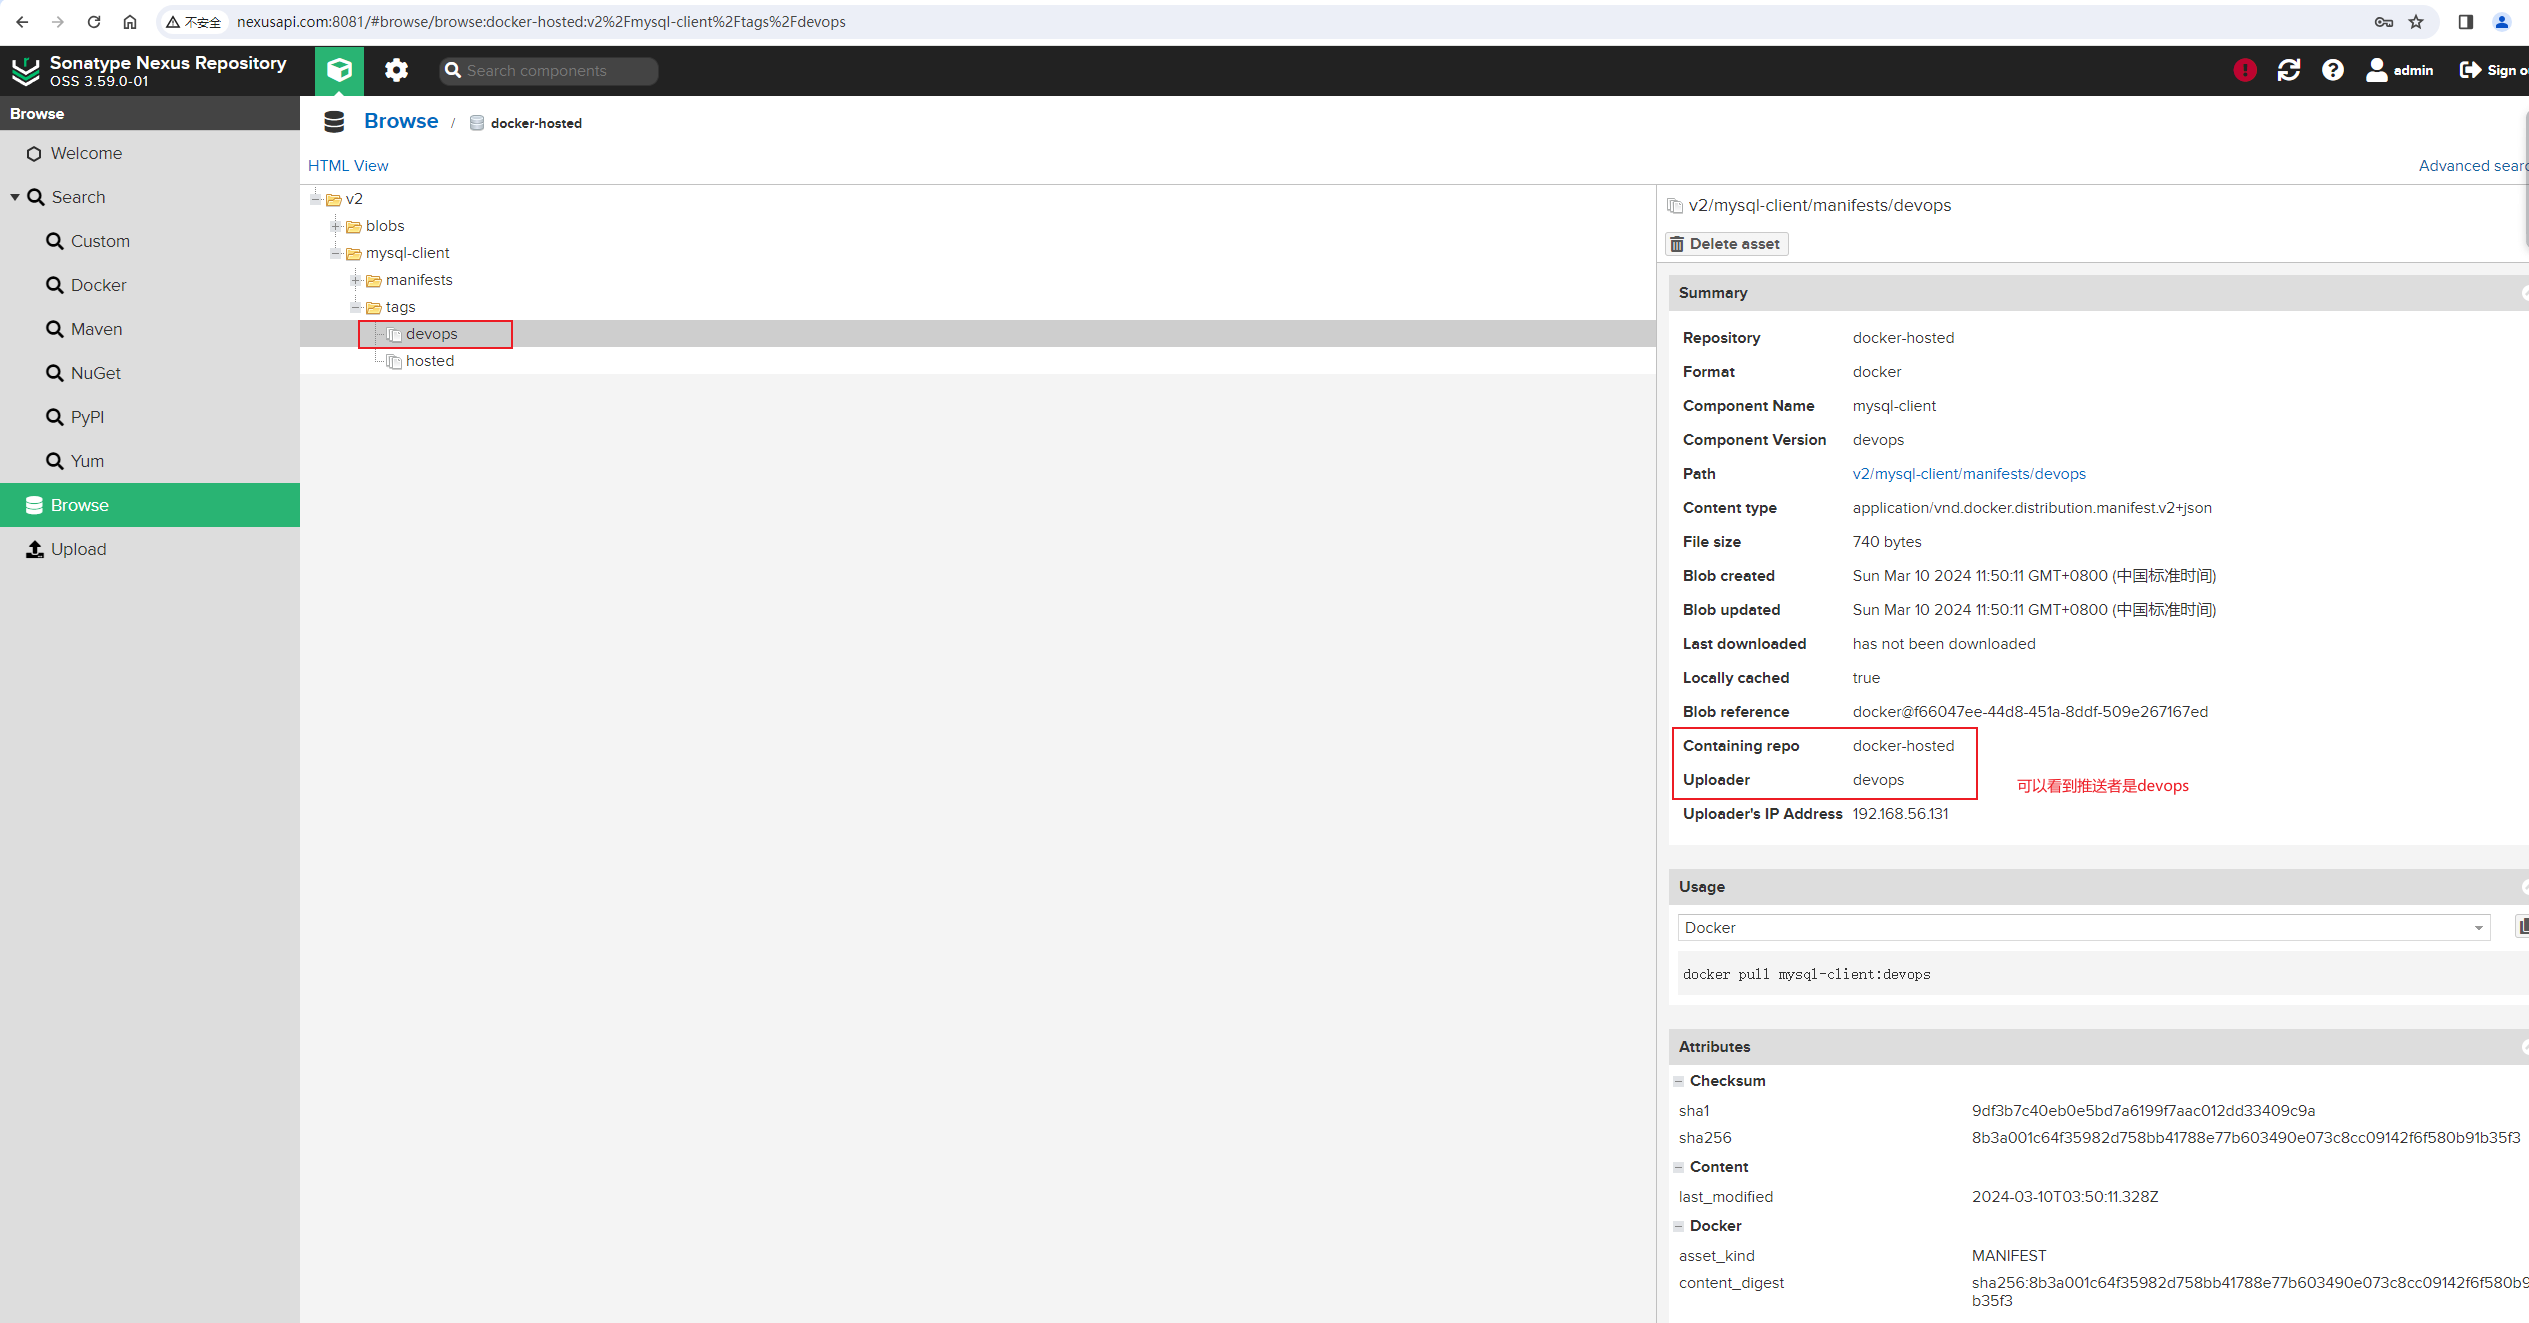
[root@nexus-test ~]#推送效果:
在Nexus Browse浏览器中,可以看到刚才推送的镜像,也可以看到推送人是devops,说明我们通过API接口创建的用户能够正常使用:
到此,通过Nexus API接口快速创建常用仓库并配置用户角色和权限工作已经完成了。后续如果需要快速初始化一个Nexus私有镜像系统,则可以使用以上Python脚本来完成该项工作了。