搭建自己的nexus私有仓库6--使用nginx反向代理
本文档是nexus系列课程第6篇。
- nexus系列课程第1篇,请参考 搭建自己的nexus私有仓库1--nexus初体验
- nexus系列课程第2篇,请参考 搭建自己的nexus私有仓库2--创建python pypi代理
- nexus系列课程第3篇,请参考 搭建自己的nexus私有仓库3--创建yum ius代理
- nexus系列课程第4篇,请参考 搭建自己的nexus私有仓库4--创建docker私有仓库
- nexus系列课程第5篇,请参考 搭建自己的nexus私有仓库5--测试docker仓库pull和push
第4篇中,已经使用nexus创建docker代理仓库(proxy)、本地仓库(hosted)和聚合仓库(group),并尝试通过HTTP方式从代理仓库下载镜像,并且可以正常下载镜像。在第5篇中,测试了使用以上三种仓库作为docker加速源时的pull拉取和push推送镜像情况。
本文计划做以下事情:
- 使用HTTPS形式,配置nginx反向代理,从代理仓库下载镜像,构建镜像并上传到私有仓库。
以下是实验环境:
| 主机 | IP | 主机名 | 操作系统 | docker版本 | 自定义域名 |
|---|---|---|---|---|---|
| 1 | 192.168.56.11 | nexus | CentOS 7.6.1810 | 20.10.5 | nexushub.com |
| 2 | 192.168.56.12 | master | CentOS 7.6.1810 | 20.10.5 |
0. 准备工作
请在主机2以及你的电脑上面配置域名解析:
[root@master ~]# tail -n 1 /etc/hosts
192.168.56.11 nexushub.com注意,实际操作时,请将192.168.56.11替换成你服务器的内网IP或者公网IP,nexushub.com替换成你想使用的域名。
说明,为了更好的测试HTTPS访问,其实本节我已经使用了腾讯的云服务器去测试Nginx反向代理了。
1. 前情回顾
我们在搭建自己的nexus私有仓库4--创建docker私有仓库 中是使用的以下命令启动nexus容器:
[root@nexus ~]# docker run -d --restart always -p 8081:8081 -p 8001-8003:8001-8003  -v /some/dir/nexus-data:/nexus-data --name nexus sonatype/nexus3:3.59.0
8b931229efd4a2749a16342b149901a74674ec5b771591a808baebc744ebcdc4
[root@nexus ~]# docker ps
CONTAINER ID   IMAGE                    COMMAND                  CREATED         STATUS         PORTS                                                      NAMES
8b931229efd4   sonatype/nexus3:3.59.0   "/opt/sonatype/nexus…"   4 seconds ago   Up 3 seconds   0.0.0.0:8001-8003->8001-8003/tcp, 0.0.0.0:8081->8081/tcp   nexus
[root@nexus ~]# netstat -tunlp|grep docker
tcp        0      0 0.0.0.0:8081            0.0.0.0:*               LISTEN      24765/docker-proxy
tcp        0      0 0.0.0.0:8001            0.0.0.0:*               LISTEN      24801/docker-proxy
tcp        0      0 0.0.0.0:8002            0.0.0.0:*               LISTEN      24789/docker-proxy
tcp        0      0 0.0.0.0:8003            0.0.0.0:*               LISTEN      24777/docker-proxy
[root@nexus ~]#可以看到,除了管理端口8081监听了,8001、8002和8003端口也监听了。
在第5篇中已经测试了三类仓库支持的docker pull和push操作情况:
| 仓库类型 | 仓库名称 | HTTP端口号 | HTTPS端口号 | 支持docker操作 |
|---|---|---|---|---|
| proxy代理仓库 | docker-proxy | 8001 | 不设置 | pull |
| hosted本地仓库 | docker-hosted | 8002 | 不设置 | pull、push |
| group聚合仓库 | docker-group | 8003 | 不设置 | pull |
2. SSL证书申请
可以参考Nexus3最佳实践系列:搭建Docker私有仓库 利用工具自签泛域名证书https://github.com/Fishdrowned/ssl 来生成自签名 SSL 证书。
也可以申请免费的SSL证书。
2.1 域名申请
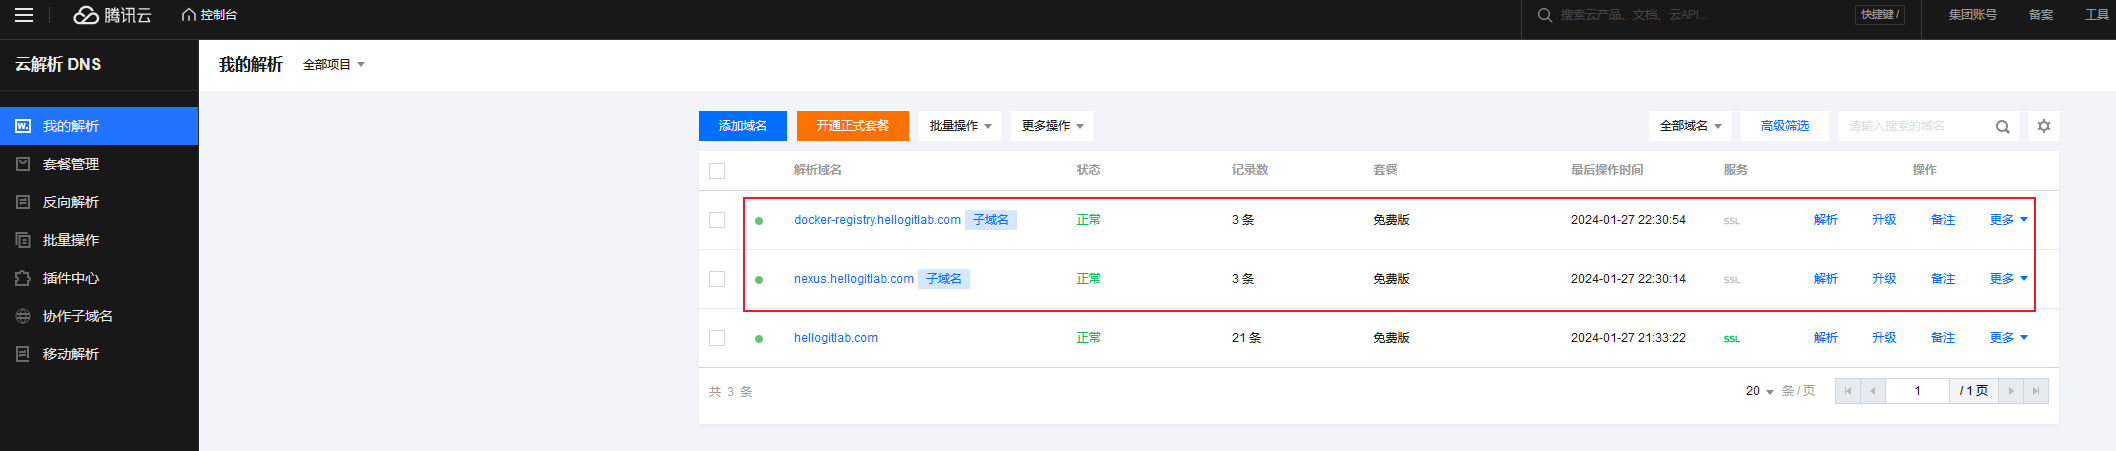
由于我的域名 hellogitlab.com 主要用于显示你现在看到的这个博客,所以为了能够正常访问nexus管理页面以及docker仓库,我们单独申请两个子域名。
域名规划:
| 域名 | 端口 | 代理地址 |
|---|---|---|
| nexus.hellogitlab.com | 80、443 | nexushub.com:8080 |
| docker-registry.hellogitlab.com | 80、443 | nexushub.com:8002、nexushub.com:8003 |
为了子域名能够正常使用,需要在hellogitlab.com域名中添加以下解析,如果你不使用子域名,则可以忽略此步:
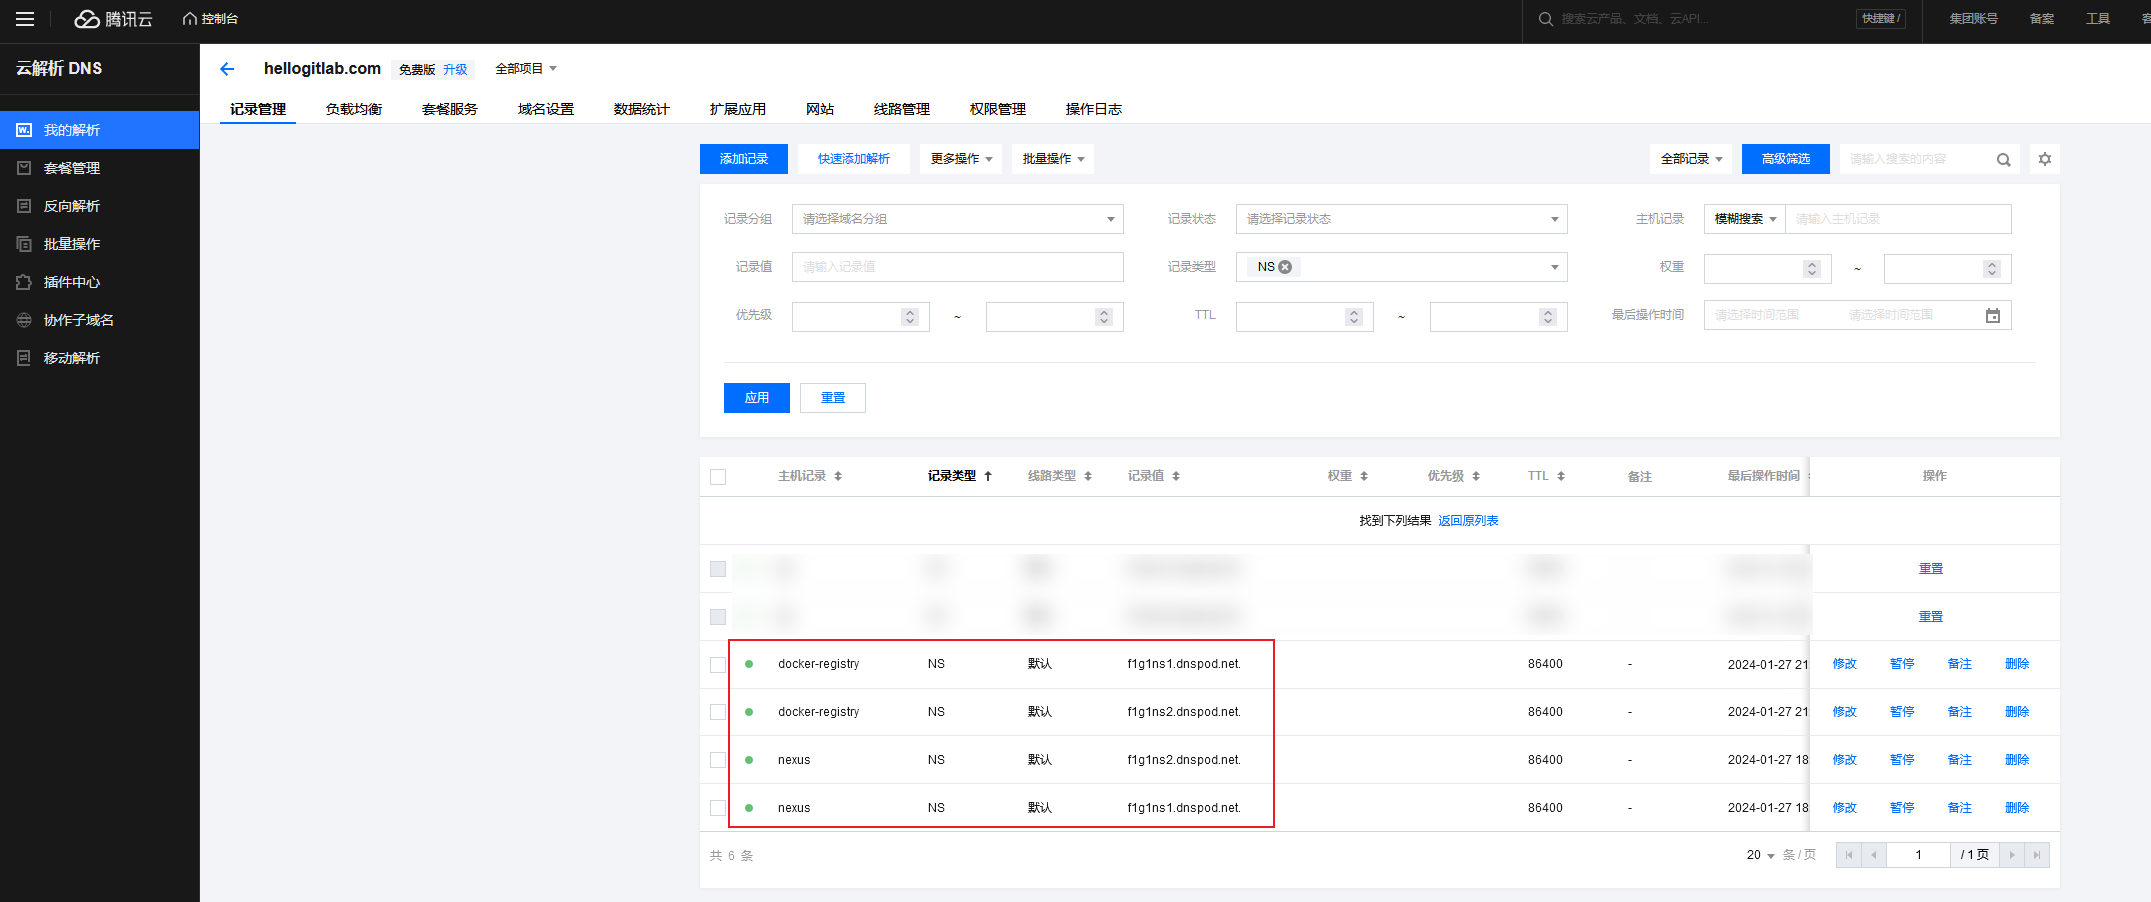
注意,填写子域名前缀记录值时,实际填写时没有带最后的.点,即输入时只用输出以下两个记录值就行:
- f1g1ns1.dnspod.net
- f1g1ns2.dnspod.net
.net后面的点是腾讯自己加的。
2.2 域名解析
你应该在你对应的域名服务商那里配置域名解析,我直接在腾讯云上面配置域名解析:
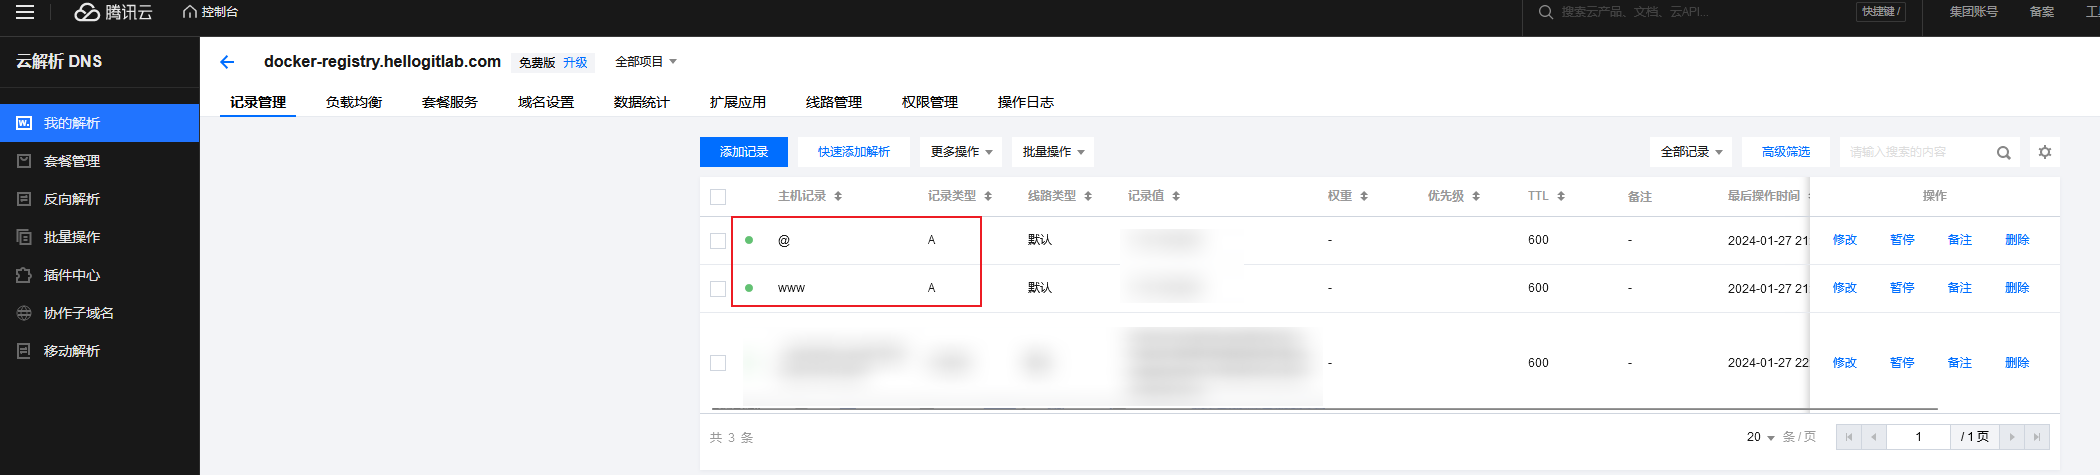
域名解析时,需要添加@和www解析:

2.3 SSL证书申请
我在腾讯云上面申请免费的SSL证书。

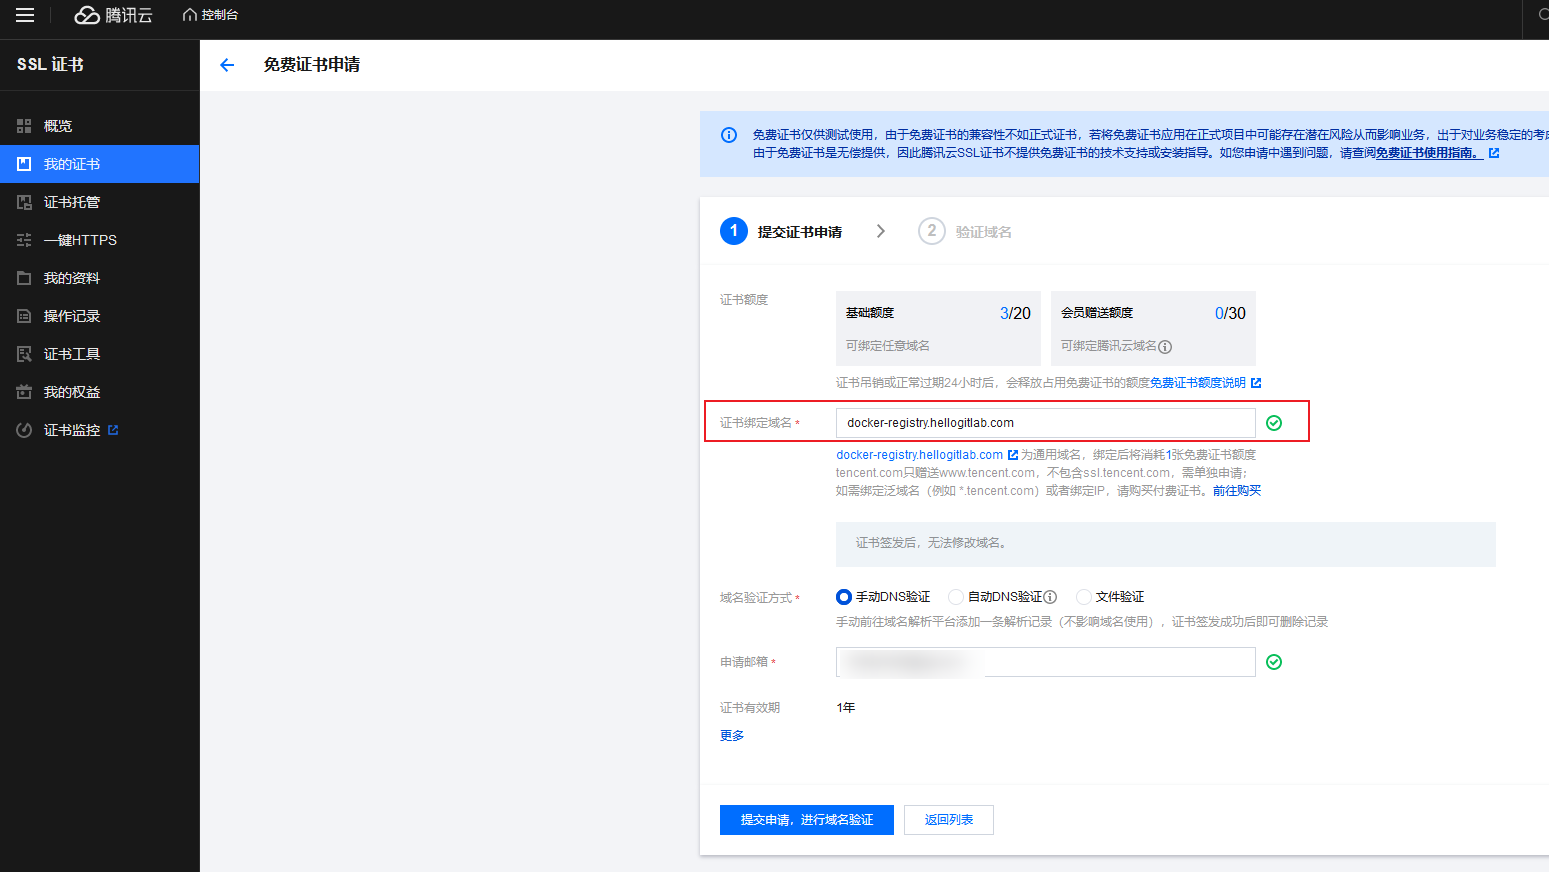
警告
我这里域名验证方式选择的是【手动DNS验证】,手动配置容易出错。
建议使用【自动DNS验证】,那样腾讯会自动将域名解析记录添加到域名解析列表中,这样腾讯会快速颁发SSL证书给我们。
建议使用【自动DNS验证】,那样腾讯会自动将域名解析记录添加到域名解析列表中,这样腾讯会快速颁发SSL证书给我们。
建议使用【自动DNS验证】,那样腾讯会自动将域名解析记录添加到域名解析列表中,这样腾讯会快速颁发SSL证书给我们。
证书申请成功后,就可以下载域名使用的SSL证书文件。

在【我的证书】页面,点击证书信息的右侧【下载】:
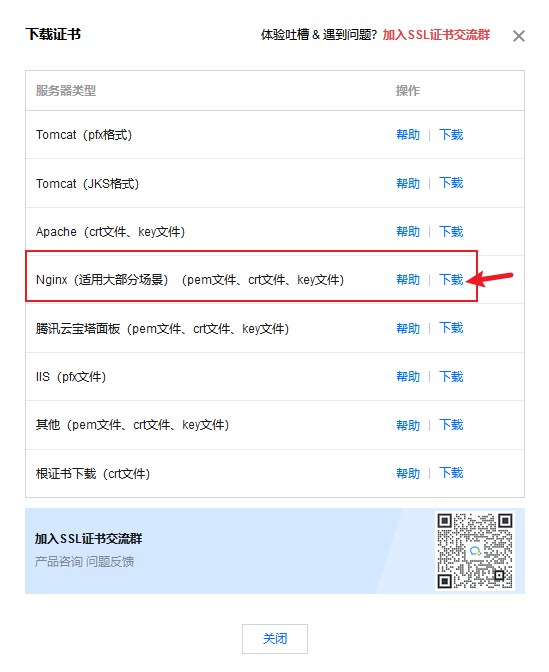
根据你使用服务器类型,选择相应的证书即可。我因为使用的Nginx服务器,直接点击Nginx右侧的下载即可。
下载的证书是一个压缩包,使用压缩软件解压即可。
解压后,查看文件夹中的文件列表信息:
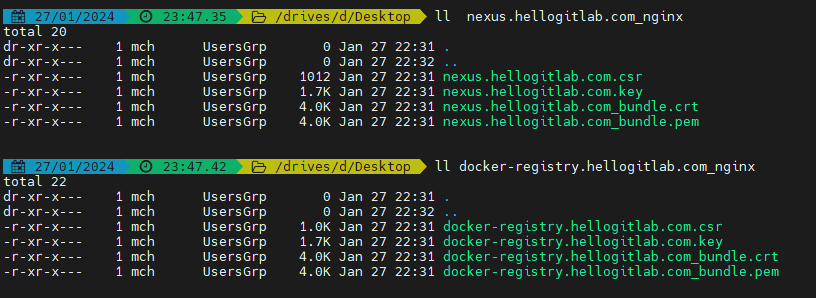
以下这四个文件是我们配置Nginx证书需要使用的文件:
nexus.hellogitlab.com.key
nexus.hellogitlab.com_bundle.crt
docker-registry.hellogitlab.com.key
docker-registry.hellogitlab.com_bundle.crt
3. Nginx配置
3.1 创建Nginx配置文件
修改Nginx默认配置/etc/nginx/nginx.conf,将原来的80、443端口相关信息注释掉:
# The first line
# For more information on configuration, see:
#   * Official Chinese Documentation: http://nginx.org/cn/docs/
#  * Download Nginx: http://nginx.org/en/download.html
#   * Official Russian Documentation: http://nginx.org/ru/docs/
#   * Download Nginx: http://nginx.org/en/download.html

user nginx;
worker_processes auto;
error_log /var/log/nginx/error.log;
pid /run/nginx.pid;

# Load dynamic modules. See /usr/share/doc/nginx/README.dynamic.
include /usr/share/nginx/modules/*.conf;

events {
    worker_connections 1024;
}

http {
    log_format  main  '$remote_addr - $remote_user [$time_local] "$request" '
                      '$status $body_bytes_sent "$http_referer" '
                      '"$http_user_agent" "$http_x_forwarded_for"';

    access_log  /var/log/nginx/access.log  main;

    sendfile            on;
    tcp_nopush          on;
    tcp_nodelay         on;
    keepalive_timeout   65;
    types_hash_max_size 4096;

    include             /etc/nginx/mime.types;
    default_type        application/octet-stream;

    # Load modular configuration files from the /etc/nginx/conf.d directory.
    # See http://nginx.org/en/docs/ngx_core_module.html#include
    # for more information.
    include /etc/nginx/conf.d/*.conf;

#     server {
#         listen       80;
#         listen       [::]:80;
#         server_name  _;
#         root         /usr/share/nginx/html;
#
#         # Load configuration files for the default server block.
#         include /etc/nginx/default.d/*.conf;
#
#         error_page 404 /404.html;
#         location = /404.html {
#         }
#
#         error_page 500 502 503 504 /50x.html;
#         location = /50x.html {
#         }
#     }
#
# Settings for a TLS enabled server.
#
#    server {
#        listen       443 ssl http2;
#        listen       [::]:443 ssl http2;
#        server_name  _;
#        root         /usr/share/nginx/html;
#
#        ssl_certificate "/etc/pki/nginx/server.crt";
#        ssl_certificate_key "/etc/pki/nginx/private/server.key";
#        ssl_session_cache shared:SSL:1m;
#        ssl_session_timeout  10m;
#        ssl_ciphers HIGH:!aNULL:!MD5;
#        ssl_prefer_server_ciphers on;
#
#        # Load configuration files for the default server block.
#        include /etc/nginx/default.d/*.conf;
#
#        error_page 404 /404.html;
#            location = /40x.html {
#        }
#
#        error_page 500 502 503 504 /50x.html;
#            location = /50x.html {
#        }
#    }

}你可以直接点download nexus.conf 下载我配置好的nginx配置文件。配置文件中关键信息直接使用注释添加说明了。
或者复制以下配置文件内容:
# web管理控制台
upstream nexus_web {
    server localhost:8081;
}

# docker-group聚合仓库
upstream nexus_docker_get {
    server localhost:8003;
}

# docker-hosted本地仓库
upstream nexus_docker_put {
    server localhost:8002;

}

# HTTP 自动跳转 HTTPS
server {
    listen 80;
    # 设置docker代理使用的域名,你可以将 docker-registry.hellogitlab.com 替换成你的域名
    server_name docker-registry.hellogitlab.com;
    rewrite ^ https://$http_host$request_uri? permanent;
}

server {
    # 由于上面设置了HTTP 自动跳转 HTTPS,此处注释掉80端口
    # listen 80;
    listen 443 ssl;
    # 设置docker代理使用的域名,你可以将 docker-registry.hellogitlab.com 替换成你的域名
    server_name docker-registry.hellogitlab.com;
    # 设置日志文件,对应的日志格式使用main
    # main日志格式,在nginx.conf中log_format  main行定义过
    access_log /var/log/nginx/docker-registry.hellogitlab.com.log main;
    # 证书
    ssl_certificate     /etc/pki/nginx/docker-registry.hellogitlab.com_bundle.crt;
    ssl_certificate_key /etc/pki/nginx/docker-registry.hellogitlab.com.key;
    ssl_protocols TLSv1.1 TLSv1.2;
    ssl_ciphers '!aNULL:kECDH+AESGCM:ECDH+AESGCM:RSA+AESGCM:kECDH+AES:ECDH+AES:RSA+AES:';
    ssl_prefer_server_ciphers on;
    ssl_session_cache shared:SSL:10m;

    # disable any limits to avoid HTTP 413 for large image uploads
    client_max_body_size 0;
    # required to avoid HTTP 411: see Issue #1486 (https://github.com/docker/docker/issues/1486)
    chunked_transfer_encoding on;

    # 请求逻辑调整
    # 设置默认使用docker-group聚合仓库,即拉取镜像的情况多些
    set $upstream "nexus_docker_get";
    # 当请求是 PUT,也就是推送镜像的时候,如此便解决了拉取和推送的端口统一
    if ( $request_method ~* 'PUT') {
        set $upstream "nexus_docker_put";
    }
    # 我测试的时候,docker-hosted本地仓库和docker-proxy代理仓库都支持搜索,所以将下面这段逻辑调整注释掉
    # 只有本地仓库才支持搜索,所以将搜索请求转发到本地仓库,否则出现 500 报错
    # if ($request_uri ~ '/search') {
    #    set $upstream "nexus_docker_put";
    # }

    index index.html index.htm index.php;
    location / {
        proxy_pass http://$upstream;
        proxy_set_header Host $host;
        proxy_connect_timeout 3600;
        proxy_send_timeout 3600;
        proxy_read_timeout 3600;
        proxy_set_header X-Real-IP $remote_addr;
        proxy_buffering off;
        proxy_request_buffering off;
        proxy_set_header X-Forwarded-For $proxy_add_x_forwarded_for;
        # 直接使用以下配置【proxy_set_header X-Forwarded-Proto http; 】时,
        # 在尝试向仓库中push推送镜像时,就是docker login登陆成功了也会报以下认证异常
        # unauthorized: access to the requested resource is not authorized
        # proxy_set_header X-Forwarded-Proto http;
        # 修复docker push认证异常问题,将http替换成https即可
        proxy_set_header X-Forwarded-Proto https;
    }
}

# HTTP 自动跳转 HTTPS
server {
    listen 80;
    # 设置Nexus web管理控制台使用的域名,你可以将 nexus.hellogitlab.com 替换成你的域名
    server_name nexus.hellogitlab.com;
    rewrite ^ https://$http_host$request_uri? permanent;
}

server {
    # 由于上面设置了HTTP 自动跳转 HTTPS,此处注释掉80端口
    # listen 80;
    listen 443 ssl;
    # 设置Nexus web管理控制台使用的域名,你可以将 nexus.hellogitlab.com 替换成你的域名
    server_name nexus.hellogitlab.com;
    index index.html index.htm index.php;
    # 证书
    ssl_certificate     /etc/pki/nginx/nexus.hellogitlab.com_bundle.crt;
    ssl_certificate_key /etc/pki/nginx/nexus.hellogitlab.com.key;
    ssl_protocols TLSv1.1 TLSv1.2;
    ssl_ciphers '!aNULL:kECDH+AESGCM:ECDH+AESGCM:RSA+AESGCM:kECDH+AES:ECDH+AES:RSA+AES:';
    ssl_prefer_server_ciphers on;
    ssl_session_cache shared:SSL:10m;
    # 设置日志文件,对应的日志格式使用main
    # main日志格式,在nginx.conf中log_format  main行定义过
    access_log /var/log/nginx/nexus.hellogitlab.com.log main;
    location / {
        proxy_pass http://nexus_web;
        proxy_set_header Host $host;
        client_max_body_size 512m;
        proxy_connect_timeout 3600;
        proxy_send_timeout 3600;
        proxy_read_timeout 3600;
        proxy_buffering off;
        proxy_request_buffering off;
    }
}3.2 上传SSL证书
创建/etc/pki/nginx/目录,并将第2节中申请的免费证书上传到该目录下:
[root@nexus ~]# ll /etc/pki/nginx/
total 24
-rw-rw-r-- 1 root root 4133 Jan 27 22:35 docker-registry.hellogitlab.com_bundle.crt
-rw-rw-r-- 1 root root 1702 Jan 27 22:35 docker-registry.hellogitlab.com.key
-rw-rw-r-- 1 root root 4105 Jan 27 22:35 nexus.hellogitlab.com_bundle.crt
-rw-rw-r-- 1 root root 1706 Jan 27 22:35 nexus.hellogitlab.com.key
[root@nexus ~]#3.3 创建日志文件
# 创建日志文件
[root@nexus ~]# touch /var/log/nginx/nexus.hellogitlab.com.log /var/log/nginx/docker-registry.hellogitlab.com.log

# 修改文件权限
[root@nexus ~]# chown nginx:root /var/log/nginx/nexus.hellogitlab.com.log /var/log/nginx/docker-registry.hellogitlab.com.log重启Nginx后就可以发现会正常生成日志:
[root@nexus ~]# ll /var/log/nginx/nexus.hellogitlab.com.log /var/log/nginx/docker-registry.hellogitlab.com.log
-rw-r--r-- 1 nginx root  10067 Jan 28 00:12 /var/log/nginx/docker-registry.hellogitlab.com.log
-rw-r--r-- 1 nginx root 375323 Jan 28 00:12 /var/log/nginx/nexus.hellogitlab.com.log
[root@nexus ~]#3.4 检查配置有效性
使用nginx -t检查配置文件是否有效,如果有异常,则需要进行检查,调整,直到检查正常为止:
[root@nexus ~]# nginx -t
nginx: the configuration file /etc/nginx/nginx.conf syntax is ok
nginx: configuration file /etc/nginx/nginx.conf test is successful
[root@nexus ~]#检查无异常后,重新加载配置文件生效:
[root@nexus ~]# nginx -s reload
[root@nexus ~]#检查服务端口:
[root@nexus ~]# netstat -tunlp|grep nginx
tcp        0      0 0.0.0.0:80              0.0.0.0:*               LISTEN      1338/nginx: worker
tcp        0      0 0.0.0.0:443             0.0.0.0:*               LISTEN      1338/nginx: worker
[root@nexus ~]#可以看到,主机正常监听80和443端口。
3.5 访问域名
访问web管理控制台 https://nexus.hellogitlab.com/,可以正常显示,随意点下看:
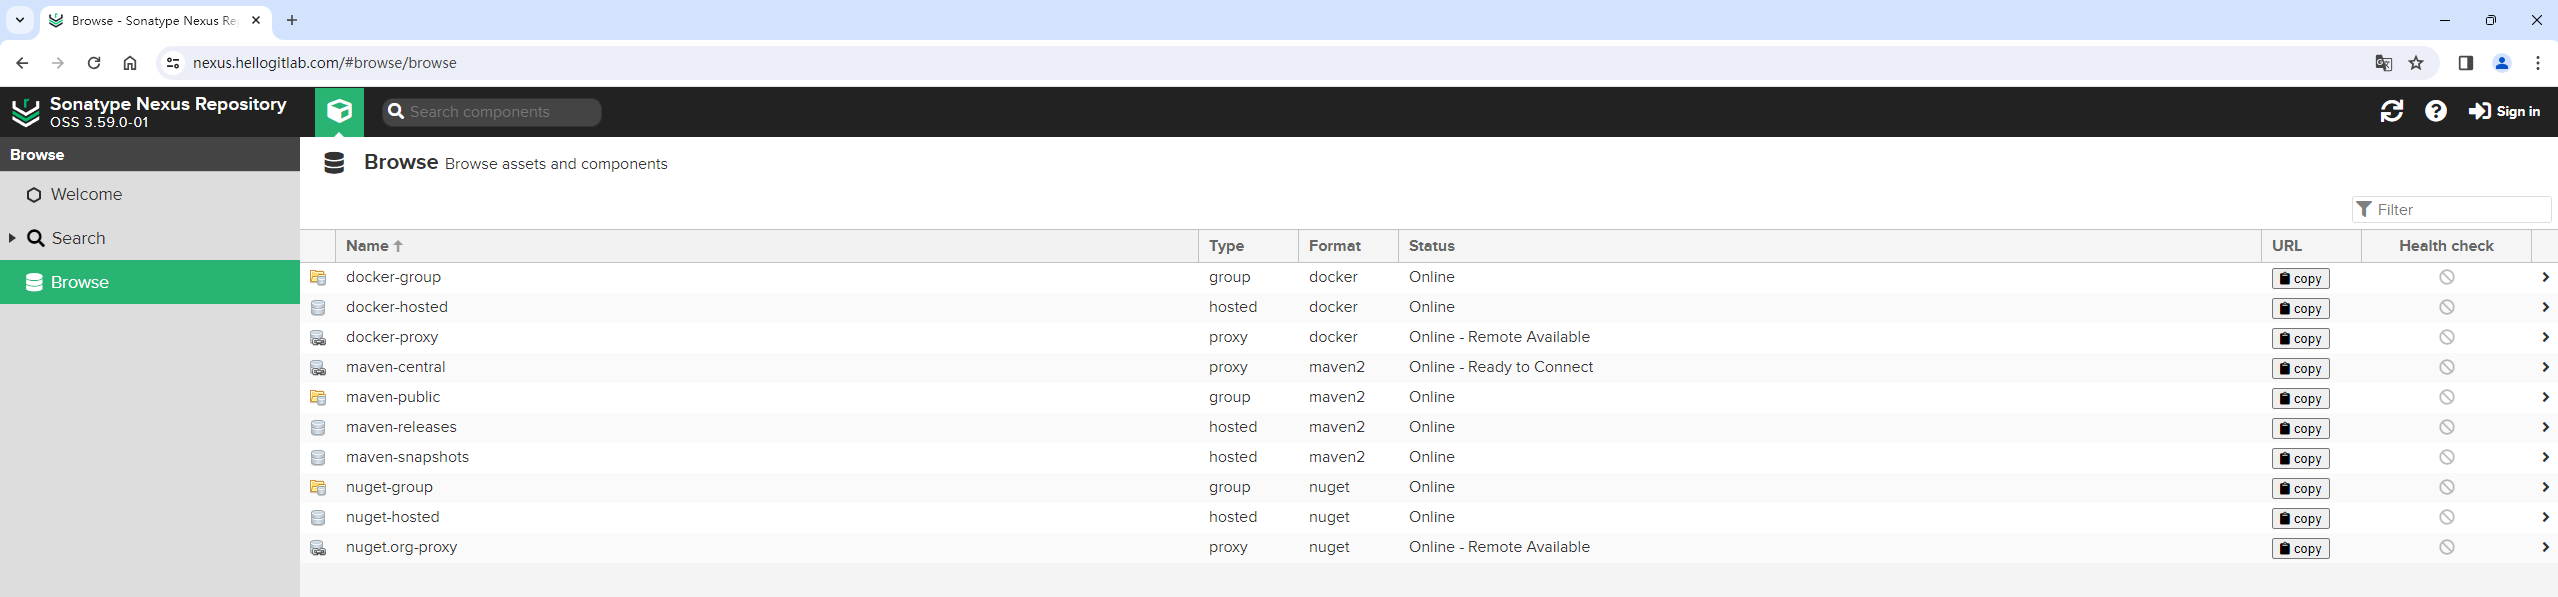
可以看到,我们之前下载的一些镜像:
说明web管理控制台是可以正常访问的。
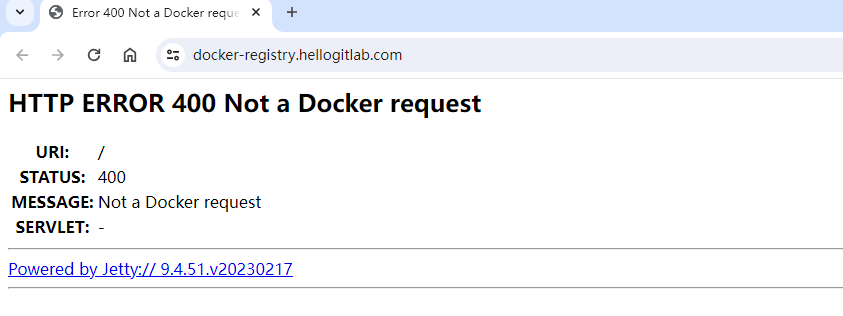
在浏览器中访问https://docker-registry.hellogitlab.com/,提示不是一个正常的docker请求,说明Nginx代理正常,有后端响应:
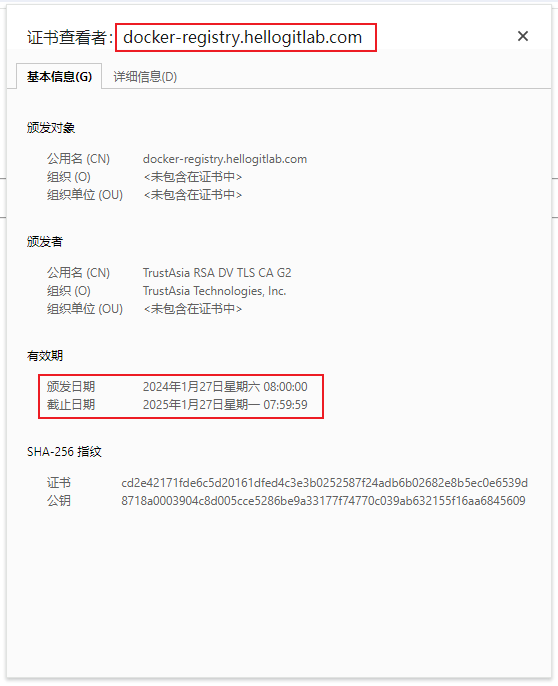
在浏览器上面也可以看到证书是有效证书:

4. 测试代理仓库的pull和push
4.1 修改docker代理配置
[root@master ~]# cd /etc/docker/
[root@master docker]# cp -p daemon.json daemon.json.with_nexushub.com
[root@master docker]# vi daemon.json
[root@master docker]# cat daemon.json
{
    "registry-mirrors":[
        "https://docker-registry.hellogitlab.com"
    ],
    "data-root": "/data/docker"
}
[root@master docker]#重启docker服务,并查看加速源信息:
[root@master ~]# systemctl restart docker
[root@master ~]# docker info|tail -n 6
 Insecure Registries:
  127.0.0.0/8
 Registry Mirrors:
  https://docker-registry.hellogitlab.com/
 Live Restore Enabled: false
[root@master ~]#4.2 测试pull拉取镜像
4.2.1 拉取docker官方仓库中的镜像
拉取我们没有下载过的镜像:
[root@master ~]# docker pull alpine:3.15
3.15: Pulling from library/alpine
d078792c4f91: Pull complete
Digest: sha256:19b4bcc4f60e99dd5ebdca0cbce22c503bbcff197549d7e19dab4f22254dc864
Status: Downloaded newer image for alpine:3.15
docker.io/library/alpine:3.15
[root@master ~]# docker images
REPOSITORY                       TAG       IMAGE ID       CREATED        SIZE
alpine                           3.17      eaba187917cc   16 hours ago   7.06MB
nexushub.com:8001/mysql-client   proxy     f326dd608a3f   3 days ago     41.1MB
nexushub.com:8002/mysql-client   hosted    f326dd608a3f   3 days ago     41.1MB
nexushub.com:8003/mysql-client   group     f326dd608a3f   3 days ago     41.1MB
nexushub.com:8003/mysql-client   hosted    f326dd608a3f   3 days ago     41.1MB
mysql-client                     proxy     f326dd608a3f   3 days ago     41.1MB
alpine                           3.19      f8c20f8bbcb6   7 weeks ago    7.38MB
alpine                           3.15      32b91e3161c8   8 weeks ago    5.59MB
alpine                           3.16      e525c930fe75   8 weeks ago    5.54MB
alpine                           3.9       78a2ce922f86   3 years ago    5.55MB
[root@master ~]#可以看到,很快就下载下来了。
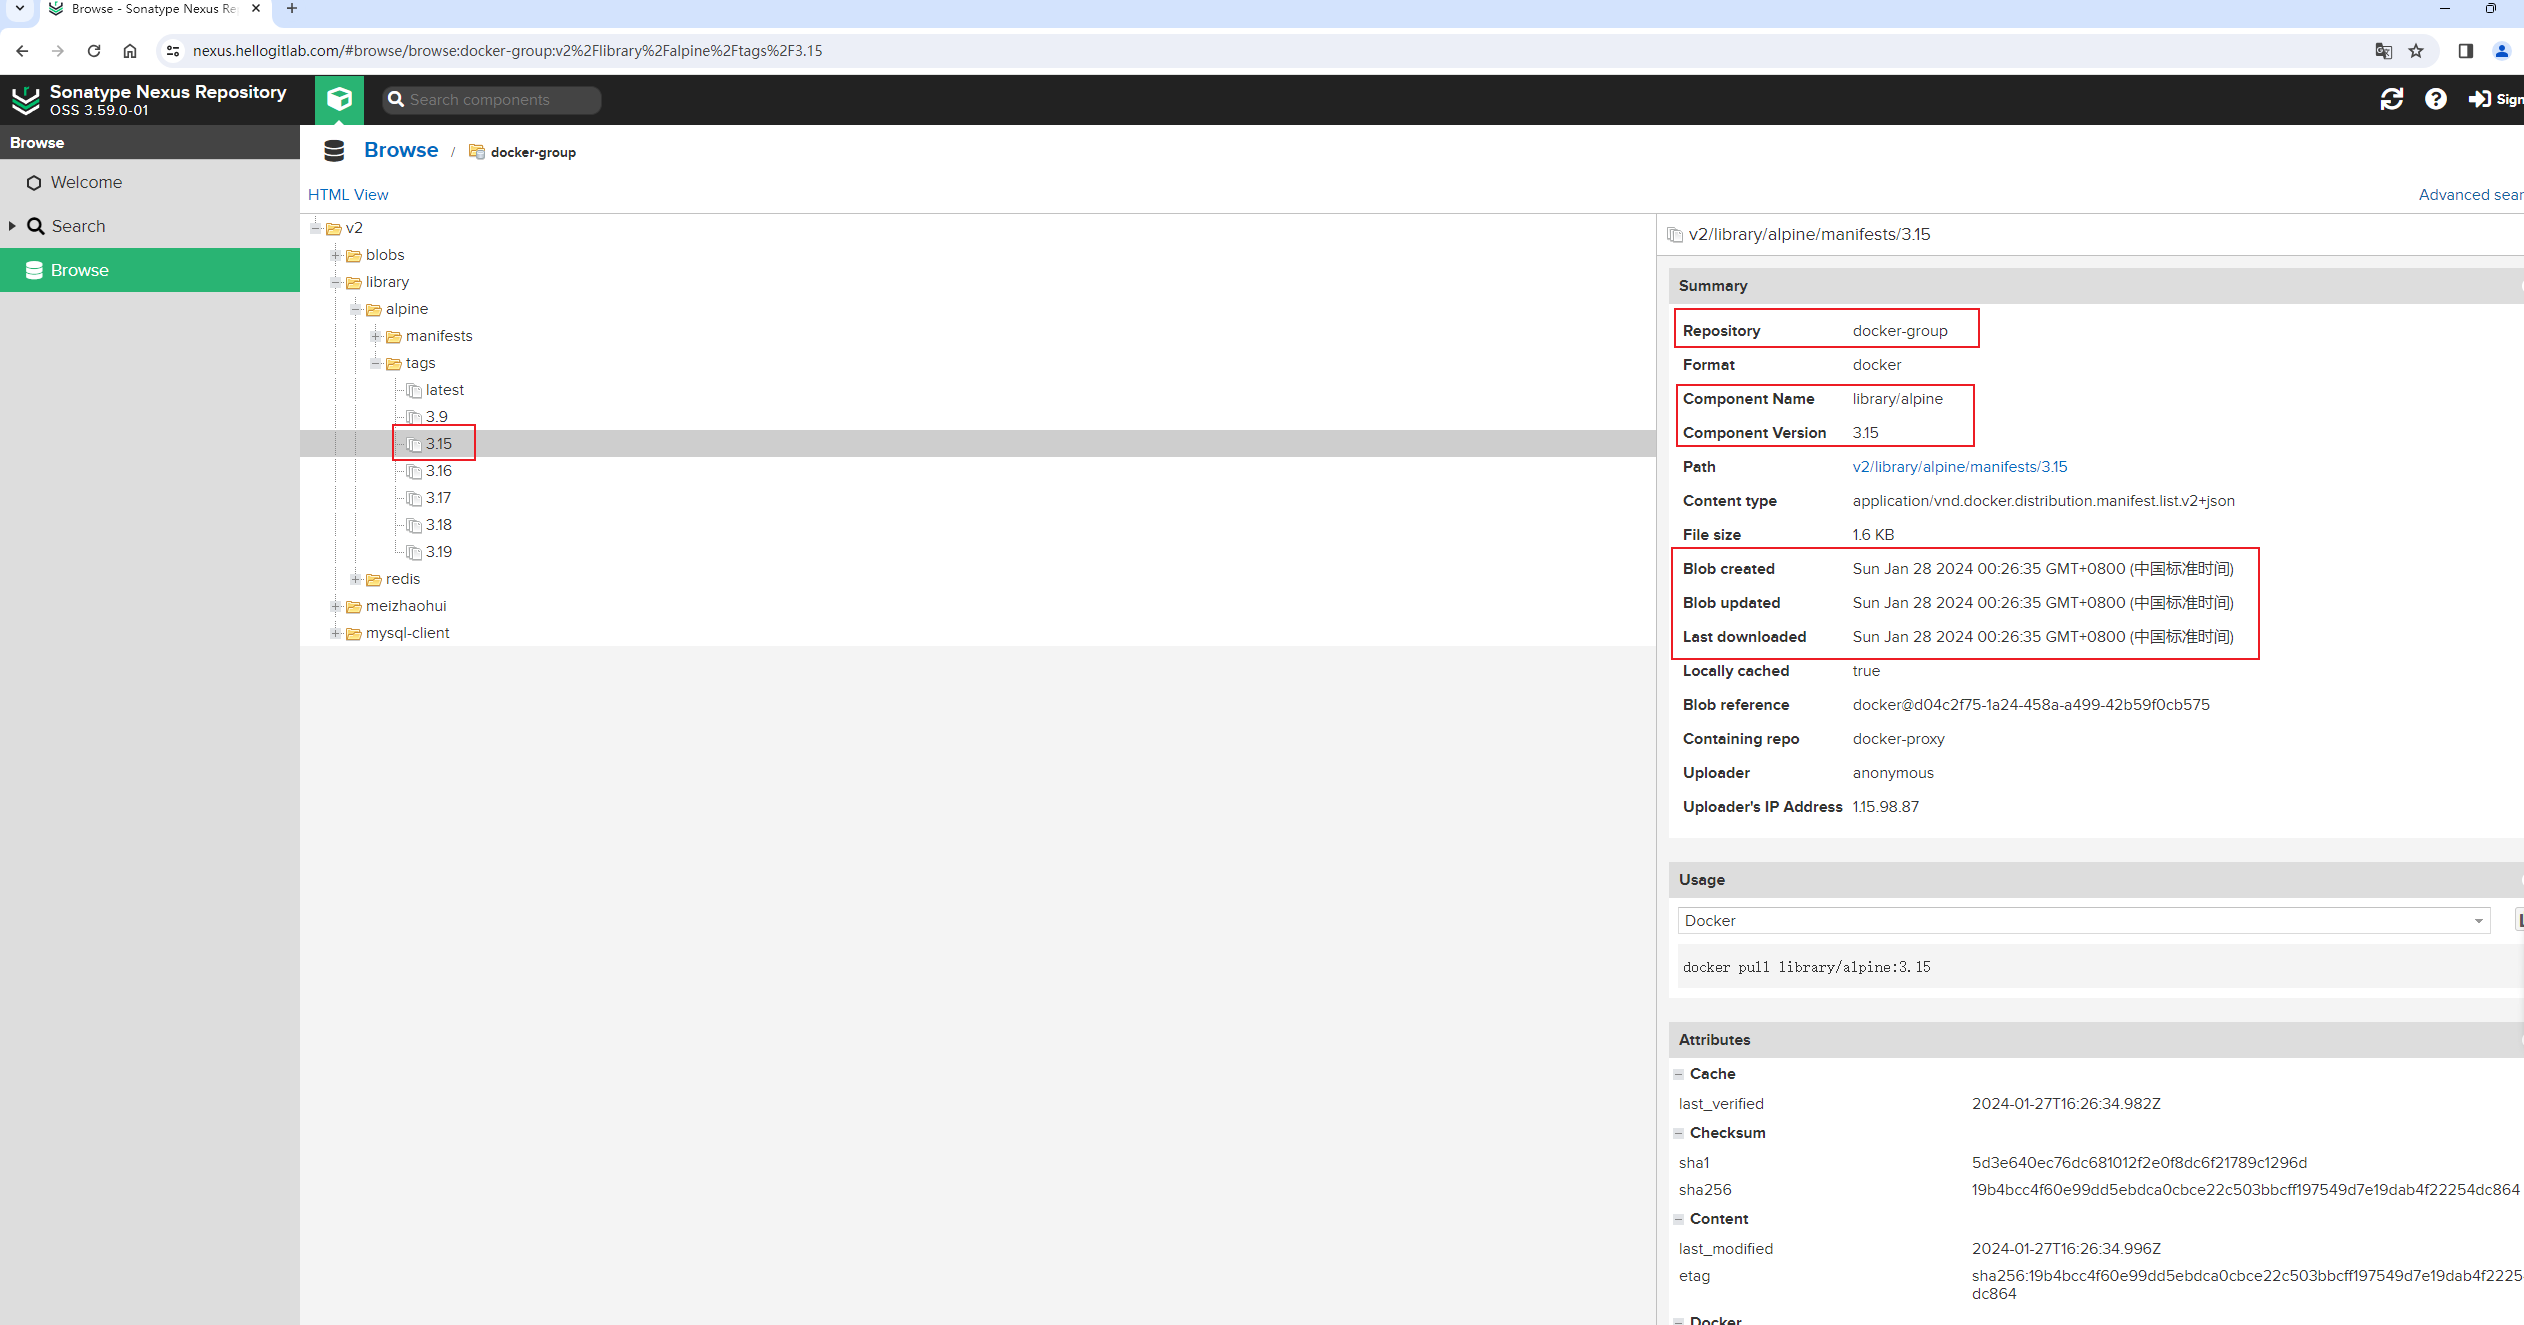
在Nexus browse浏览器上面,马上就看到刚才下载过的镜像信息,说明alpine:3.15镜像已经被缓存到Neuxs服务器上面了。
4.2.2 拉取docker-hosted本地仓库中的镜像
# 直接使用nexus上面的下载命令下载
# 可以看到,下载不了镜像,这个镜像不存在,需要登陆
[root@master ~]# docker pull mysql-client:hosted
Error response from daemon: pull access denied for mysql-client, repository does not exist or may require 'docker login': denied: requested access to the resource is denied

# 直接使用docker login则会登陆docker官方仓库,我们取消
[root@master ~]# docker login
Login with your Docker ID to push and pull images from Docker Hub. If you don't have a Docker ID, head over to https://hub.docker.com to create one.
Username: ^C

# 登陆我们自己的仓库
[root@master ~]# docker login https://docker-registry.hellogitlab.com
Username: admin  # <--- 输入用户名
Password:        # <--- 输入密码
WARNING! Your password will be stored unencrypted in /root/.docker/config.json.
Configure a credential helper to remove this warning. See
https://docs.docker.com/engine/reference/commandline/login/#credentials-store

Login Succeeded

# 登陆成功后,不使用域名下载,还是会从官方仓库下载
[root@master ~]# docker pull mysql-client:hosted
Error response from daemon: pull access denied for mysql-client, repository does not exist or may require 'docker login': denied: requested access to the resource is denied


# 登陆成功后,指定域名,则从我们自己的仓库下载镜像
[root@master ~]# docker pull docker-registry.hellogitlab.com/mysql-client:hosted
hosted: Pulling from mysql-client
Digest: sha256:55ff0eed604c1ed42c18455a1ac3ba6fbd10a44cc7e6b489bb48d2e6a4d5ad01
Status: Downloaded newer image for docker-registry.hellogitlab.com/mysql-client:hosted
docker-registry.hellogitlab.com/mysql-client:hosted

# 可以看到,镜像下载成功了
[root@master ~]# docker images
REPOSITORY                                     TAG       IMAGE ID       CREATED        SIZE
alpine                                         3.17      eaba187917cc   16 hours ago   7.06MB
docker-registry.hellogitlab.com/mysql-client   hosted    f326dd608a3f   3 days ago     41.1MB
mysql-client                                   proxy     f326dd608a3f   3 days ago     41.1MB
nexushub.com:8001/mysql-client                 proxy     f326dd608a3f   3 days ago     41.1MB
nexushub.com:8002/mysql-client                 hosted    f326dd608a3f   3 days ago     41.1MB
nexushub.com:8003/mysql-client                 group     f326dd608a3f   3 days ago     41.1MB
nexushub.com:8003/mysql-client                 hosted    f326dd608a3f   3 days ago     41.1MB
alpine                                         3.19      f8c20f8bbcb6   7 weeks ago    7.38MB
alpine                                         3.15      32b91e3161c8   8 weeks ago    5.59MB
alpine                                         3.16      e525c930fe75   8 weeks ago    5.54MB
alpine                                         3.9       78a2ce922f86   3 years ago    5.55MB
[root@master ~]#其实,我们的本地也开启了允许匿名下载镜像,因此不登陆也可以下载镜像的:
# 删除刚下载的镜像
[root@master ~]# docker rmi docker-registry.hellogitlab.com/mysql-client:hosted
Untagged: docker-registry.hellogitlab.com/mysql-client:hosted
Untagged: docker-registry.hellogitlab.com/mysql-client@sha256:55ff0eed604c1ed42c18455a1ac3ba6fbd10a44cc7e6b489bb48d2e6a4d5ad01

# 退出登陆
[root@master ~]# docker logout
Removing login credentials for https://index.docker.io/v1/

# 再次下载镜像,可以看到也可以下载
[root@master ~]# docker pull docker-registry.hellogitlab.com/mysql-client:hosted
hosted: Pulling from mysql-client
Digest: sha256:55ff0eed604c1ed42c18455a1ac3ba6fbd10a44cc7e6b489bb48d2e6a4d5ad01
Status: Downloaded newer image for docker-registry.hellogitlab.com/mysql-client:hosted
docker-registry.hellogitlab.com/mysql-client:hosted

# 再次查看镜像
[root@master ~]# docker images
REPOSITORY                                     TAG       IMAGE ID       CREATED        SIZE
alpine                                         3.17      eaba187917cc   16 hours ago   7.06MB
docker-registry.hellogitlab.com/mysql-client   hosted    f326dd608a3f   3 days ago     41.1MB
mysql-client                                   proxy     f326dd608a3f   3 days ago     41.1MB
nexushub.com:8001/mysql-client                 proxy     f326dd608a3f   3 days ago     41.1MB
nexushub.com:8002/mysql-client                 hosted    f326dd608a3f   3 days ago     41.1MB
nexushub.com:8003/mysql-client                 group     f326dd608a3f   3 days ago     41.1MB
nexushub.com:8003/mysql-client                 hosted    f326dd608a3f   3 days ago     41.1MB
alpine                                         3.19      f8c20f8bbcb6   7 weeks ago    7.38MB
alpine                                         3.15      32b91e3161c8   8 weeks ago    5.59MB
alpine                                         3.16      e525c930fe75   8 weeks ago    5.54MB
alpine                                         3.9       78a2ce922f86   3 years ago    5.55MB
[root@master ~]#可以看到docker-registry.hellogitlab.com/mysql-client:hosted镜像下载成功了。
即,拉取本地镜像时,必须docker-registry.hellogitlab.com/mysql-client:hosted这样指定域名。不指定域名,则会去docker官方镜像仓库拉取镜像。
4.3 测试push推送镜像
为了和以前镜像不一样,我们重新打个标签:
# 打标签
[root@master ~]# docker tag mysql-client:proxy docker-registry.hellogitlab.com/mysql-client:push-by-ssl

# 查看镜像
[root@master ~]# docker images
REPOSITORY                                     TAG           IMAGE ID       CREATED        SIZE
alpine                                         3.17          eaba187917cc   16 hours ago   7.06MB
docker-registry.hellogitlab.com/mysql-client   hosted        f326dd608a3f   3 days ago     41.1MB
docker-registry.hellogitlab.com/mysql-client   push-by-ssl   f326dd608a3f   3 days ago     41.1MB
mysql-client                                   proxy         f326dd608a3f   3 days ago     41.1MB
nexushub.com:8001/mysql-client                 proxy         f326dd608a3f   3 days ago     41.1MB
nexushub.com:8002/mysql-client                 hosted        f326dd608a3f   3 days ago     41.1MB
nexushub.com:8003/mysql-client                 group         f326dd608a3f   3 days ago     41.1MB
nexushub.com:8003/mysql-client                 hosted        f326dd608a3f   3 days ago     41.1MB
alpine                                         3.19          f8c20f8bbcb6   7 weeks ago    7.38MB
alpine                                         3.15          32b91e3161c8   8 weeks ago    5.59MB
alpine                                         3.16          e525c930fe75   8 weeks ago    5.54MB
alpine 3.9 78a2ce922f86 3 years ago 5.55MB4.3.1 未登陆仓库直接推送镜像
# 未登陆直接推送镜像
[root@master ~]# docker push docker-registry.hellogitlab.com/mysql-client:push-by-ssl
The push refers to repository [docker-registry.hellogitlab.com/mysql-client]
55af1c19d0db: Layer already exists
89ae5c4ee501: Layer already exists
unauthorized: access to the requested resource is not authorized
[root@master ~]#提示unauthorized: access to the requested resource is not authorized认证异常。
也就是说,要推送镜像,还是需要登陆的。
4.3.2 登陆仓库后再推送镜像
登陆一下:
[root@master ~]# docker login https://docker-registry.hellogitlab.com
Username: admin
Password:
WARNING! Your password will be stored unencrypted in /root/.docker/config.json.
Configure a credential helper to remove this warning. See
https://docs.docker.com/engine/reference/commandline/login/#credentials-store

Login Succeeded
[root@master ~]#可以看到,登陆成功!
提示
配置文件中~/.docker/config.json存储了每个仓库的用户名和密码信息,auth键的值就是username:password加密后的值。
# 加密
echo -n "username:password" | base64
# 测试解密,xxx为上面加密后的值
echo -n "xxx" | base64 -d再次推送镜像:
[root@master ~]# docker push docker-registry.hellogitlab.com/mysql-client:push-by-ssl
The push refers to repository [docker-registry.hellogitlab.com/mysql-client]
55af1c19d0db: Layer already exists
89ae5c4ee501: Layer already exists
unauthorized: access to the requested resource is not authorized
[root@master ~]#还是提示异常!!原因待查。
我已经将3.1节中Nginx的配置修改成https形式的了,如果你是参考我的配置的话,此处应该可以直接push推送成功!
google搜索下,在这里Nginx Reverse Proxy for Nexus Docker Registries找到的解决办法:
Overview
This is a solution of a common problem with Nexus Docker repositories. The administrator has to expose port for "pull", another port for "push", other ports for each hosted repository. This solution is about leveraging Nginx reverse proxy to avoid using these ports.
How it works ?
Given :
- Nexus hostname is "nexus.example.com"
- Nexus web port is 8081
- A hosted repository is named "docker-hosted"
- A group repository is named "docker-group"
- Your nginx (with the nginx.conf of this gist) will run for example under cregistry.example.com
The following Nginx configuration file is for a reverse proxy without the need to expose connector ports from nexus :
docker pull cregistry.example.com/myimagelets Nginx forward the request to "docker-group"docker push cregistry.example.com/myimagelets Nginx forward the request to "docker-hosted"Notes
- If you have more than one hosted repository, create another Nginx reverse proxy for it, then aggregate them using a parent Nginx reverse proxy that forwards the request according to certain criteria (.i.e: Host header).
- All Nexus repositories must have consistent configuration of authentication: Either all require authentication, or all don't.
- If TLS is enabled with Nexus, change
proxy_set_header X-Forwarded-Proto "http";byproxy_set_header X-Forwarded-Proto "https";
注意,最后一句话【If TLS is enabled with Nexus, change proxy_set_header X-Forwarded-Proto "http"; by proxy_set_header X-Forwarded-Proto "https";】,即如果Neuxs启用了TLS,那么应该将配置文件中的proxy_set_header X-Forwarded-Proto http;替换成proxy_set_header X-Forwarded-Proto https;,也就是将该参数的值http修改成https。
修改Nginx配置文件后,检查Nginx配置文件后,再重启加载配置:
[root@nexus ~]# nginx -t
nginx: the configuration file /etc/nginx/nginx.conf syntax is ok
nginx: configuration file /etc/nginx/nginx.conf test is successful
[root@nexus ~]# nginx -s reload然后再尝试推送镜像:
[root@master ~]# docker push docker-registry.hellogitlab.com/mysql-client:push-by-ssl
The push refers to repository [docker-registry.hellogitlab.com/mysql-client]
55af1c19d0db: Layer already exists
89ae5c4ee501: Layer already exists
push-by-ssl: digest: sha256:55ff0eed604c1ed42c18455a1ac3ba6fbd10a44cc7e6b489bb48d2e6a4d5ad01 size: 739
[root@master ~]#可以看到,这次正常推送镜像到远程仓库了!
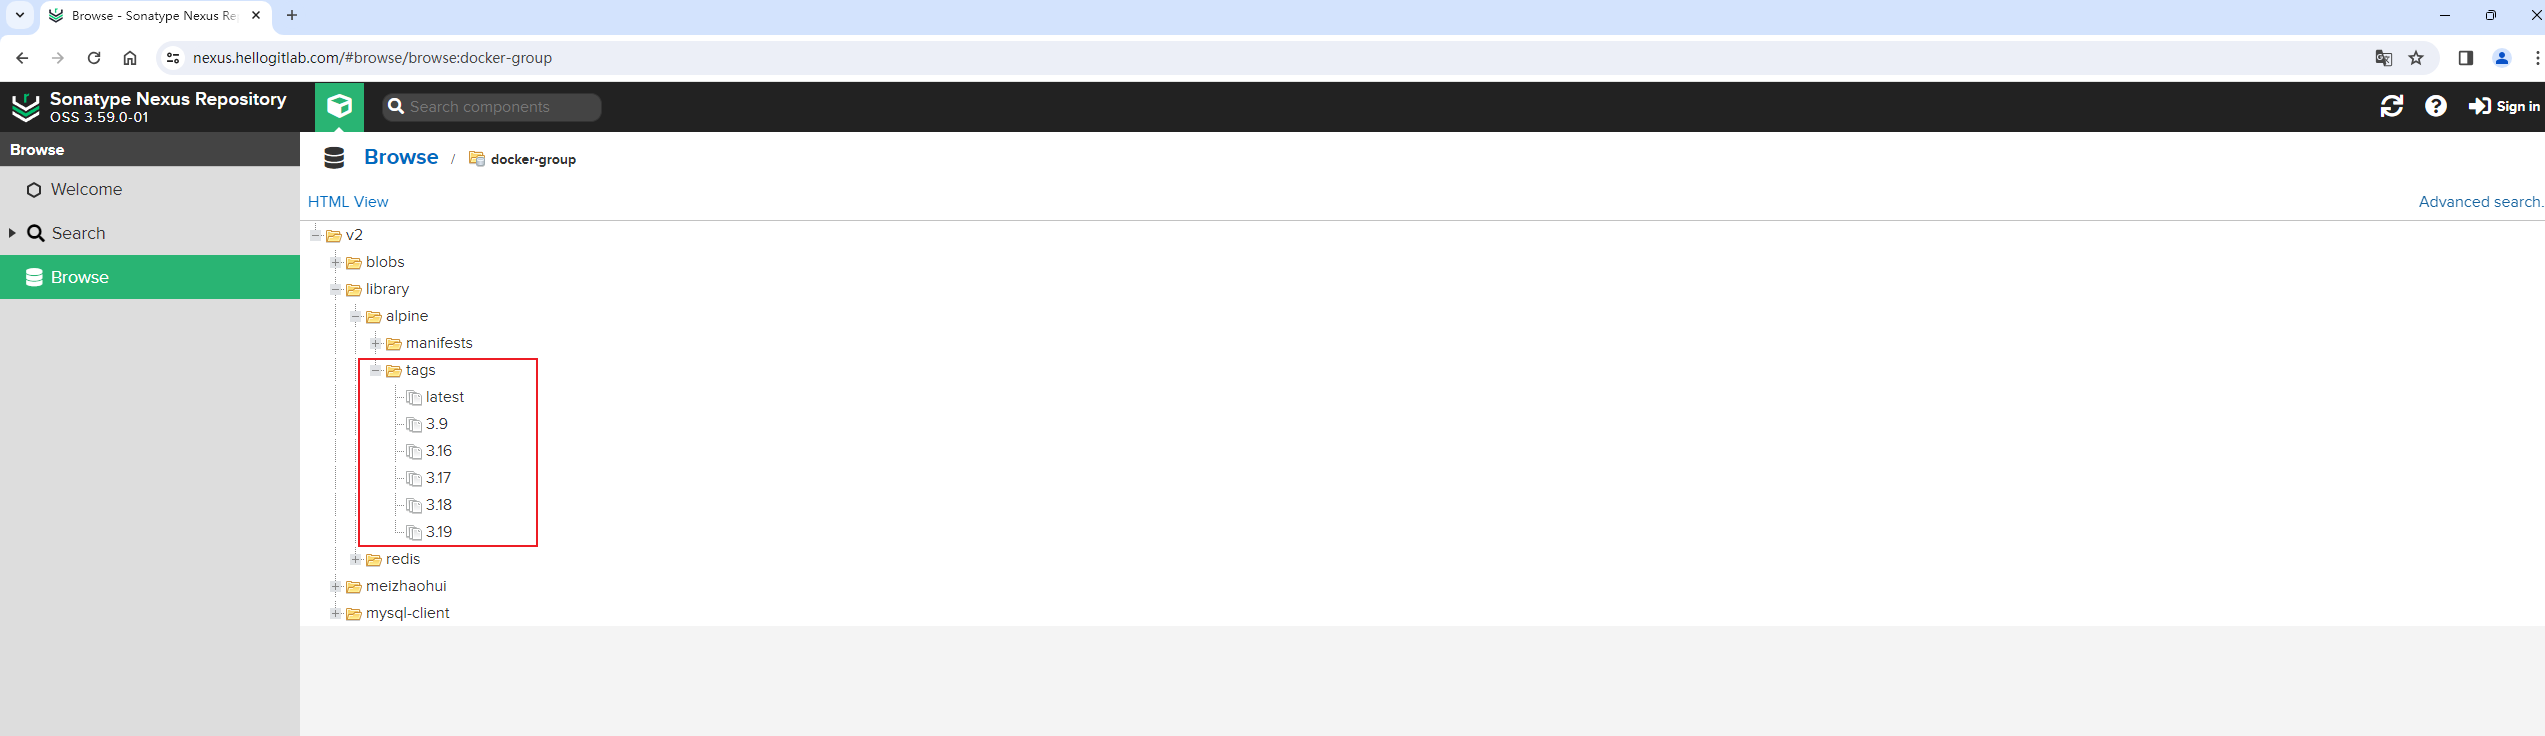
在Nexus Browse浏览器中检查一下:
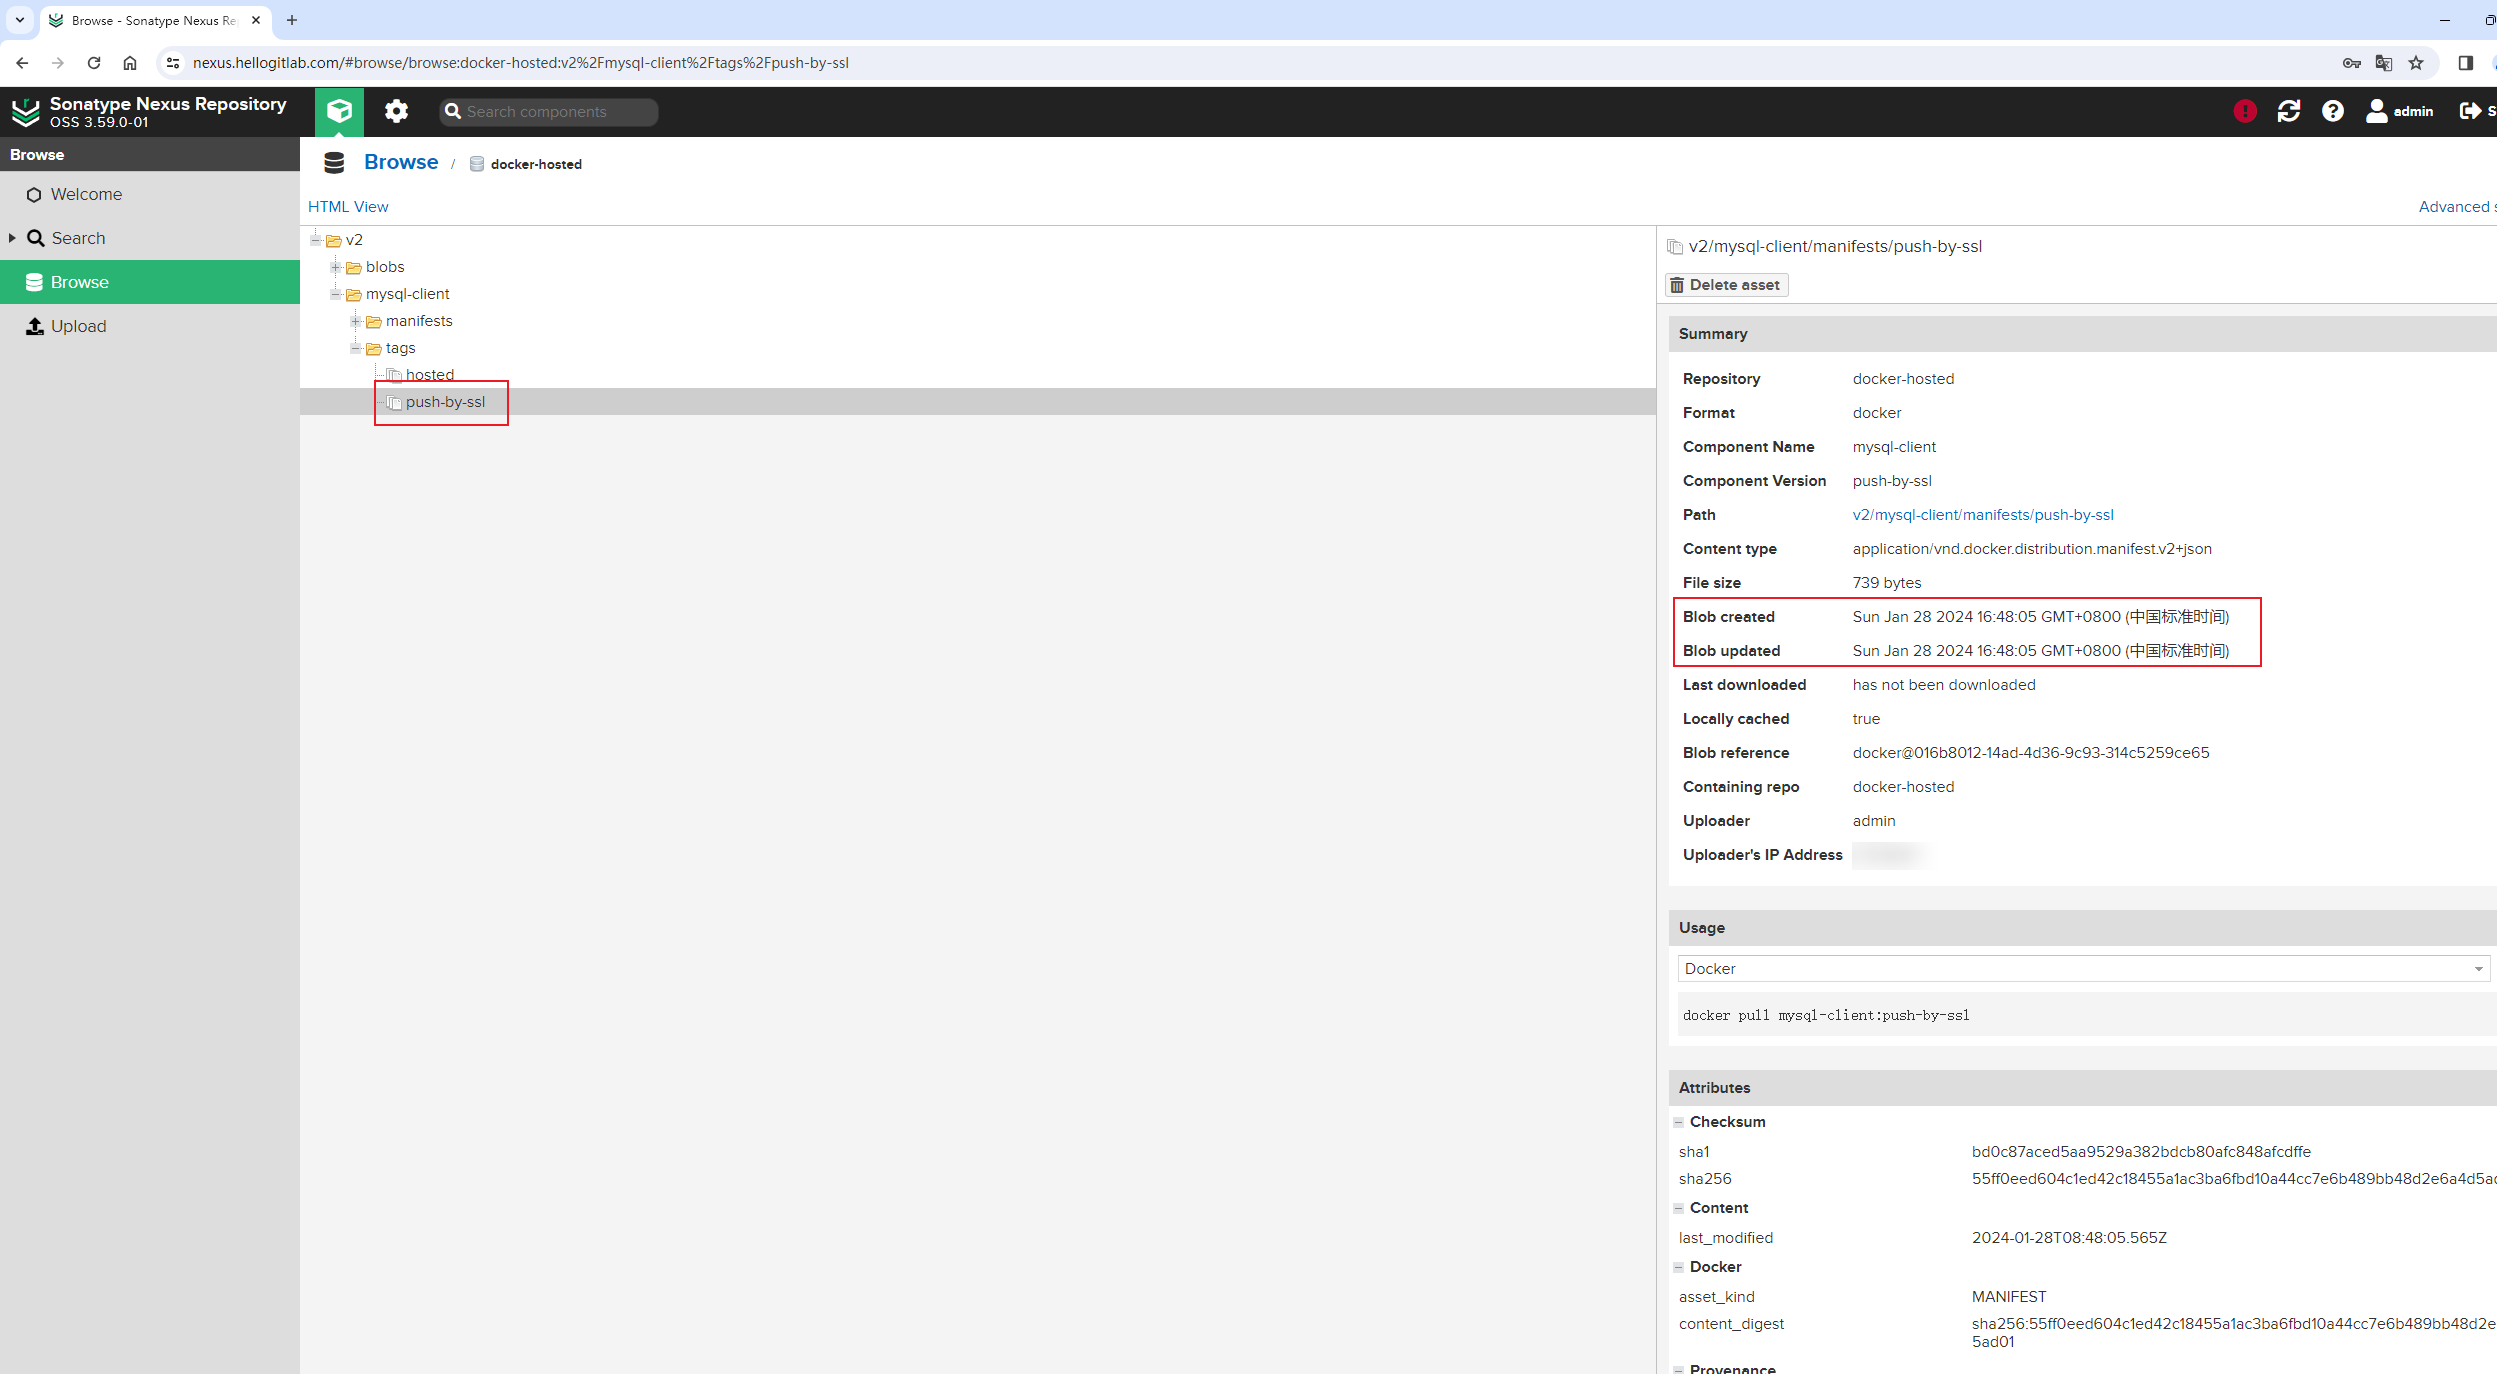
可以发现,已经有我们上传的镜像了!说明推送成功了!!!
查看Nginx后台日志搜索PUT也可以看到,最后一条日志状态码是201:
[root@nexus ~]# grep PUT /var/log/nginx/docker-registry.hellogitlab.com.log
*.*.*.* - - [28/Jan/2024:00:46:49 +0800] "PUT /v2/mysql-client/manifests/push-by-ssl HTTP/1.1" 401 113 "-" "docker/20.10.5 go/go1.13.15 git-commit/363e9a8 kernel/3.10.0-1160.11.1.el7.x86_64 os/linux arch/amd64 UpstreamClient(Docker-Client/20.10.5 \x5C(linux\x5C))" "-"
*.*.*.* - - [28/Jan/2024:00:51:30 +0800] "PUT /v2/mysql-client/manifests/push-by-ssl HTTP/1.1" 401 113 "-" "docker/20.10.5 go/go1.13.15 git-commit/363e9a8 kernel/3.10.0-1160.11.1.el7.x86_64 os/linux arch/amd64 UpstreamClient(Docker-Client/20.10.5 \x5C(linux\x5C))" "-"
*.*.*.* - - [28/Jan/2024:01:07:09 +0800] "PUT /v2/mysql-client/manifests/push-by-ssl HTTP/1.1" 401 113 "-" "docker/20.10.5 go/go1.13.15 git-commit/363e9a8 kernel/3.10.0-1160.11.1.el7.x86_64 os/linux arch/amd64 UpstreamClient(Docker-Client/20.10.5 \x5C(linux\x5C))" "-"
*.*.*.* - - [28/Jan/2024:01:07:20 +0800] "PUT /v2/mysql-client/manifests/push-by-ssl HTTP/1.1" 401 113 "-" "docker/20.10.5 go/go1.13.15 git-commit/363e9a8 kernel/3.10.0-1160.11.1.el7.x86_64 os/linux arch/amd64 UpstreamClient(Docker-Client/20.10.5 \x5C(linux\x5C))" "-"
*.*.*.* - - [28/Jan/2024:01:08:08 +0800] "PUT /v2/mysql-client/manifests/push-by-ssl HTTP/1.1" 401 113 "-" "docker/20.10.5 go/go1.13.15 git-commit/363e9a8 kernel/3.10.0-1160.11.1.el7.x86_64 os/linux arch/amd64 UpstreamClient(Docker-Client/20.10.5 \x5C(linux\x5C))" "-"
*.*.*.* - - [28/Jan/2024:01:08:25 +0800] "PUT /v2/mysql-client/manifests/push-by-ssl HTTP/1.1" 401 113 "-" "docker/20.10.5 go/go1.13.15 git-commit/363e9a8 kernel/3.10.0-1160.11.1.el7.x86_64 os/linux arch/amd64 UpstreamClient(Docker-Client/20.10.5 \x5C(linux\x5C))" "-"
*.*.*.* - - [28/Jan/2024:16:32:24 +0800] "PUT /v2/mysql-client/manifests/push-by-ssl HTTP/1.1" 401 113 "-" "docker/20.10.5 go/go1.13.15 git-commit/363e9a8 kernel/3.10.0-1160.11.1.el7.x86_64 os/linux arch/amd64 UpstreamClient(Docker-Client/20.10.5 \x5C(linux\x5C))" "-"
*.*.*.* - - [28/Jan/2024:16:34:52 +0800] "PUT /v2/mysql-client/manifests/push-by-ssl HTTP/1.1" 401 113 "-" "docker/20.10.5 go/go1.13.15 git-commit/363e9a8 kernel/3.10.0-1160.11.1.el7.x86_64 os/linux arch/amd64 UpstreamClient(Docker-Client/20.10.5 \x5C(linux\x5C))" "-"
*.*.*.* - - [28/Jan/2024:16:48:05 +0800] "PUT /v2/mysql-client/manifests/push-by-ssl HTTP/1.1" 201 739 "-" "docker/20.10.5 go/go1.13.15 git-commit/363e9a8 kernel/3.10.0-1160.11.1.el7.x86_64 os/linux arch/amd64 UpstreamClient(Docker-Client/20.10.5 \x5C(linux\x5C))" "-"
[root@nexus ~]#- 201状态码表示请求已成功处理,并且在响应中创建了新资源。
- 401状态码表示客户端未通过验证,需要提供有效凭证。
再复测一下拉取镜像:
# 查看当前本地镜像
[root@master ~]# docker images
REPOSITORY                                     TAG           IMAGE ID       CREATED        SIZE
alpine                                         3.17          eaba187917cc   33 hours ago   7.06MB
mysql-client                                   proxy         f326dd608a3f   3 days ago     41.1MB
nexushub.com:8001/mysql-client                 proxy         f326dd608a3f   3 days ago     41.1MB
nexushub.com:8002/mysql-client                 hosted        f326dd608a3f   3 days ago     41.1MB
nexushub.com:8003/mysql-client                 group         f326dd608a3f   3 days ago     41.1MB
nexushub.com:8003/mysql-client                 hosted        f326dd608a3f   3 days ago     41.1MB
docker-registry.hellogitlab.com/mysql-client   hosted        f326dd608a3f   3 days ago     41.1MB
docker-registry.hellogitlab.com/mysql-client   push-by-ssl   f326dd608a3f   3 days ago     41.1MB
alpine                                         3.19          f8c20f8bbcb6   7 weeks ago    7.38MB
alpine                                         3.15          32b91e3161c8   8 weeks ago    5.59MB
alpine                                         3.16          e525c930fe75   8 weeks ago    5.54MB
alpine                                         3.9           78a2ce922f86   3 years ago    5.55MB


# 将刚刚推送到Nexus中的mysql-client:push-by-ssl本地镜像删除掉
[root@master ~]# docker rmi docker-registry.hellogitlab.com/mysql-client:push-by-ssl
Untagged: docker-registry.hellogitlab.com/mysql-client:push-by-ssl
[root@master ~]# docker images
REPOSITORY                                     TAG       IMAGE ID       CREATED        SIZE
alpine                                         3.17      eaba187917cc   33 hours ago   7.06MB
docker-registry.hellogitlab.com/mysql-client   hosted    f326dd608a3f   3 days ago     41.1MB
mysql-client                                   proxy     f326dd608a3f   3 days ago     41.1MB
nexushub.com:8001/mysql-client                 proxy     f326dd608a3f   3 days ago     41.1MB
nexushub.com:8002/mysql-client                 hosted    f326dd608a3f   3 days ago     41.1MB
nexushub.com:8003/mysql-client                 group     f326dd608a3f   3 days ago     41.1MB
nexushub.com:8003/mysql-client                 hosted    f326dd608a3f   3 days ago     41.1MB
alpine                                         3.19      f8c20f8bbcb6   7 weeks ago    7.38MB
alpine                                         3.15      32b91e3161c8   8 weeks ago    5.59MB
alpine                                         3.16      e525c930fe75   8 weeks ago    5.54MB
alpine                                         3.9       78a2ce922f86   3 years ago    5.55MB


# 从远程Nexus中下载docker-hosted仓库中的镜像,可以看到能够正常下载
[root@master ~]# docker pull docker-registry.hellogitlab.com/mysql-client:push-by-ssl
push-by-ssl: Pulling from mysql-client
Digest: sha256:55ff0eed604c1ed42c18455a1ac3ba6fbd10a44cc7e6b489bb48d2e6a4d5ad01
Status: Downloaded newer image for docker-registry.hellogitlab.com/mysql-client:push-by-ssl
docker-registry.hellogitlab.com/mysql-client:push-by-ssl


# 下载一个docker官方仓库中的镜像,也可以正常下载
[root@master ~]# docker pull alpine:3.14
3.14: Pulling from library/alpine
f7dab3ab2d6e: Pull complete
Digest: sha256:0f2d5c38dd7a4f4f733e688e3a6733cb5ab1ac6e3cb4603a5dd564e5bfb80eed
Status: Downloaded newer image for alpine:3.14
docker.io/library/alpine:3.14


# 再次查看本地镜像
[root@master ~]# docker images
REPOSITORY                                     TAG           IMAGE ID       CREATED         SIZE
alpine                                         3.17          eaba187917cc   33 hours ago    7.06MB
docker-registry.hellogitlab.com/mysql-client   hosted        f326dd608a3f   3 days ago      41.1MB
docker-registry.hellogitlab.com/mysql-client   push-by-ssl   f326dd608a3f   3 days ago      41.1MB
mysql-client                                   proxy         f326dd608a3f   3 days ago      41.1MB
nexushub.com:8001/mysql-client                 proxy         f326dd608a3f   3 days ago      41.1MB
nexushub.com:8002/mysql-client                 hosted        f326dd608a3f   3 days ago      41.1MB
nexushub.com:8003/mysql-client                 group         f326dd608a3f   3 days ago      41.1MB
nexushub.com:8003/mysql-client                 hosted        f326dd608a3f   3 days ago      41.1MB
alpine                                         3.19          f8c20f8bbcb6   7 weeks ago     7.38MB
alpine                                         3.15          32b91e3161c8   8 weeks ago     5.59MB
alpine                                         3.16          e525c930fe75   8 weeks ago     5.54MB
alpine                                         3.14          9e179bacf43c   10 months ago   5.61MB
alpine                                         3.9           78a2ce922f86   3 years ago     5.55MB
[root@master ~]#可以看到,修改Nginx配置proxy_set_header X-Forwarded-Proto https;后,从Neuxs中拉取镜像不受影响。
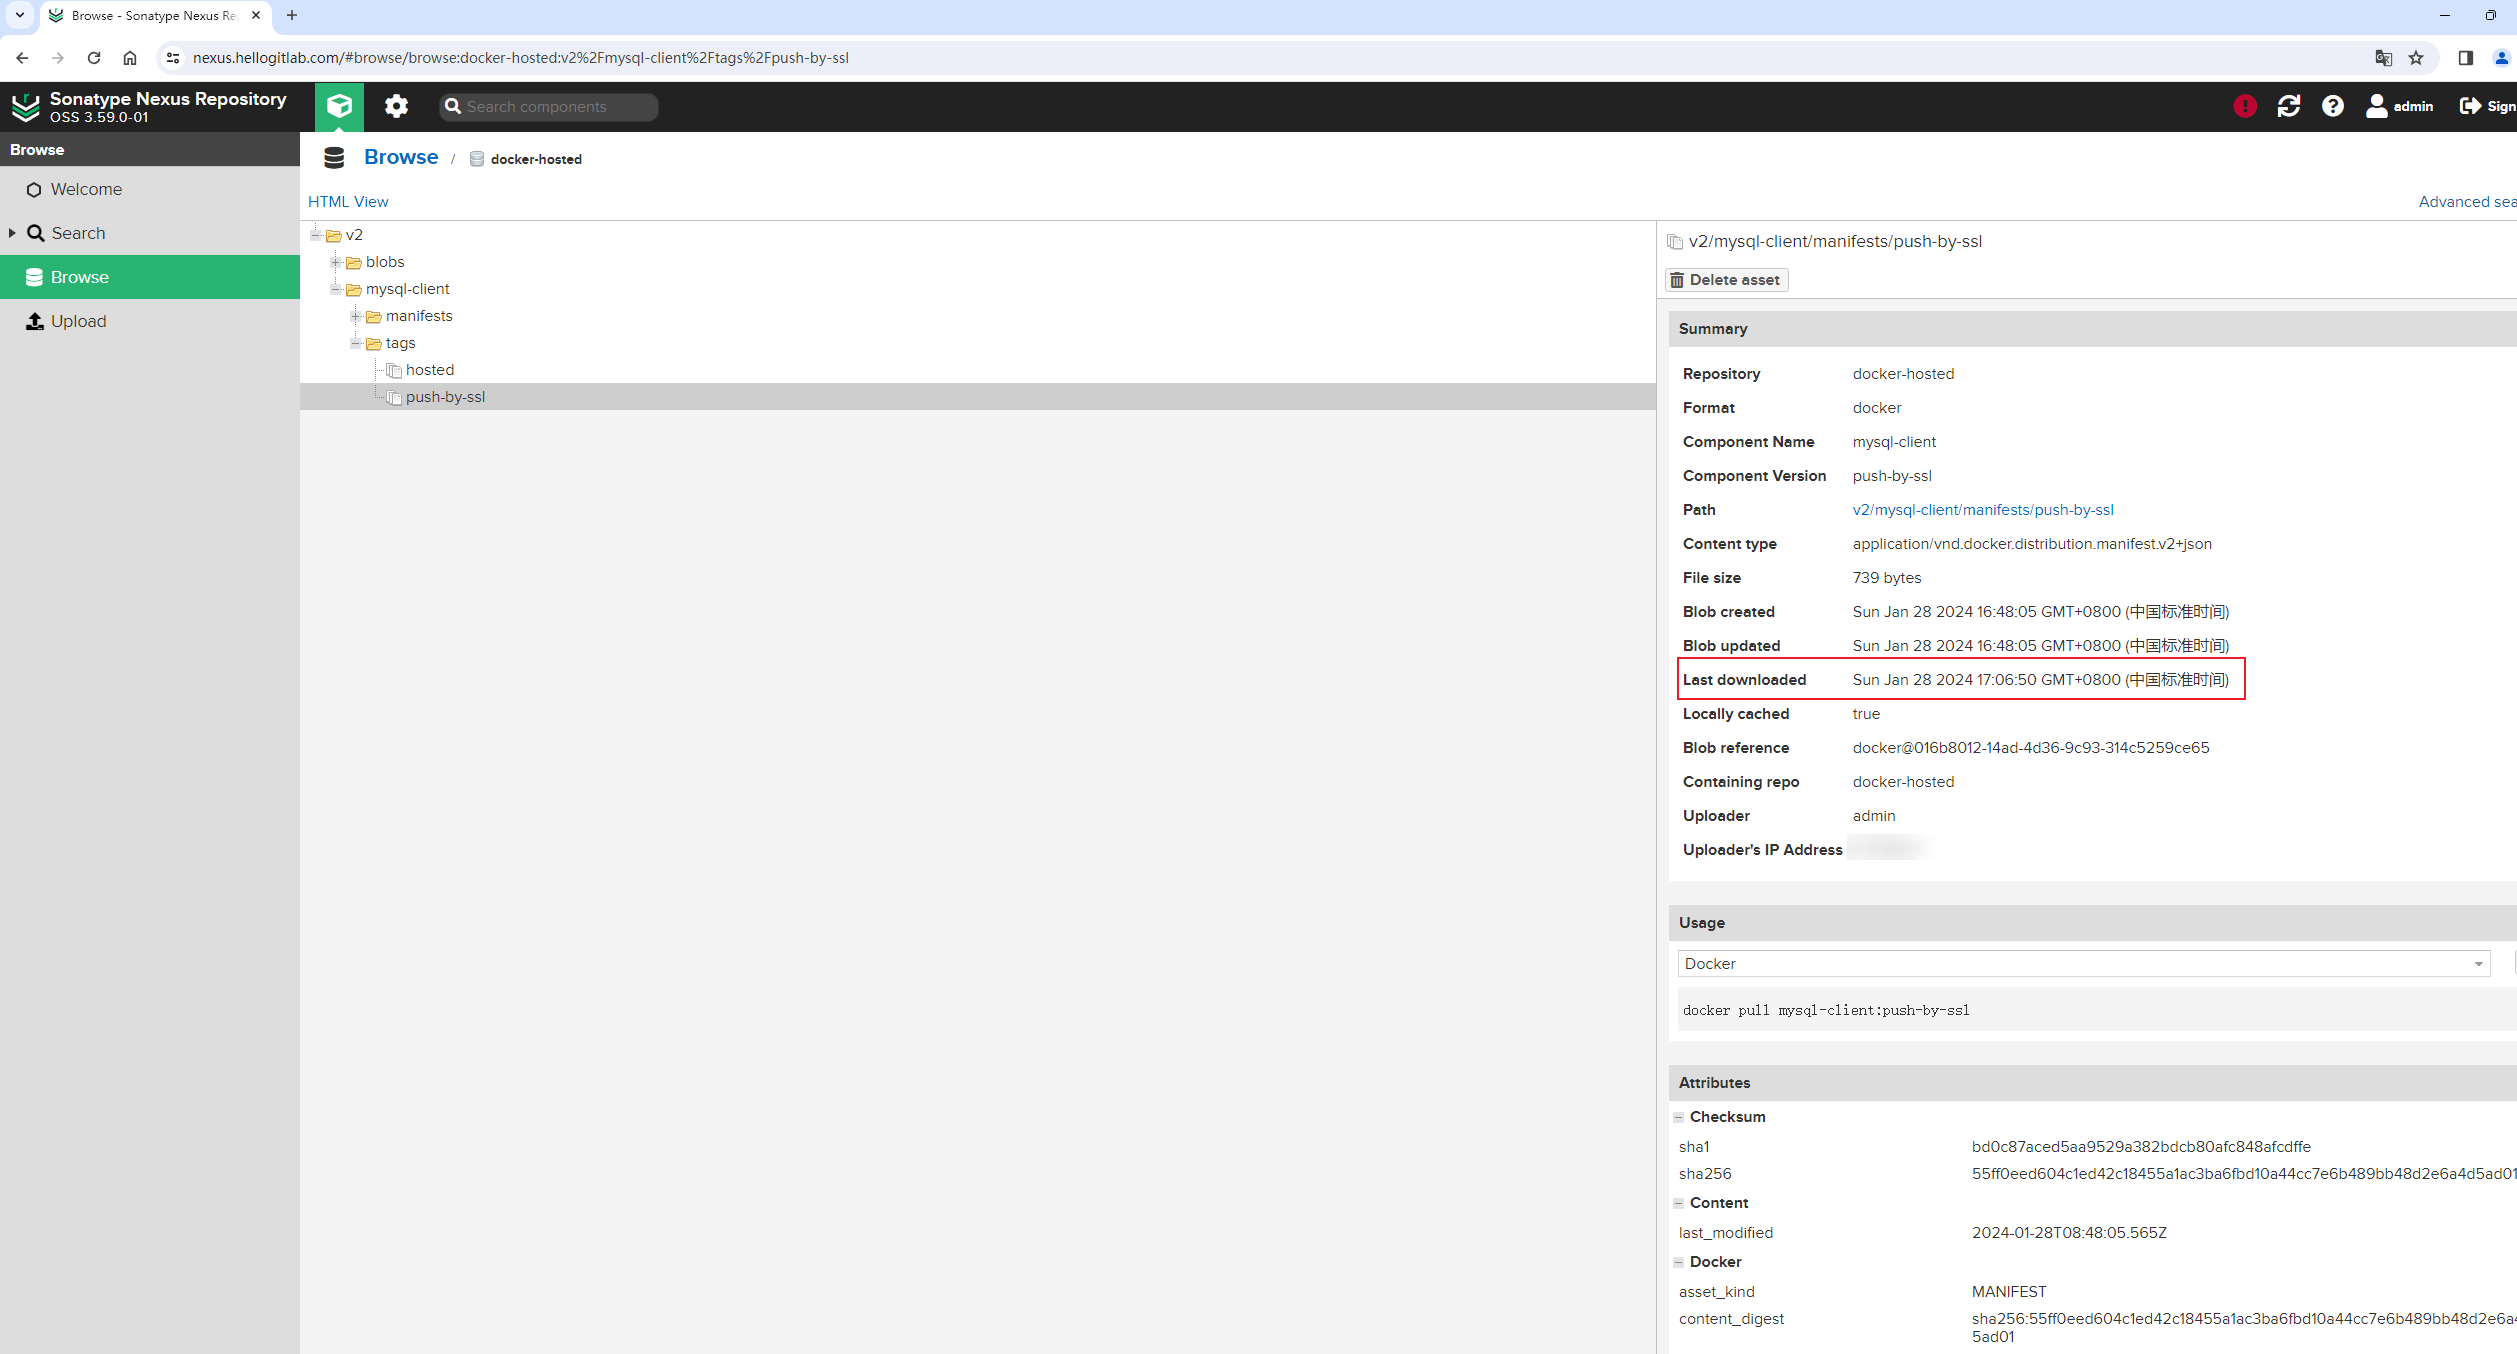
此时在Nexus Browse浏览器上,再次查看mysql-client:push-by-ssl镜像信息,可以看到Last downloaded信息发生了变化,从【Last downloaded has not been downloaded】变成了【Last downloaded Sun Jan 28 2024 17:06:50 GMT+0800 (中国标准时间)】,发生变化是正常的,因为我们刚才从Nexus中下载了该镜像:
到此就完成了从Neuxs私有仓库中pull拉取镜像和push推送镜像的测试工作。
参考: