搭建自己的nexus私有仓库9--Nexus API接口的使用1
本文档是nexus系列课程第9篇。
- nexus系列课程第1篇,请参考 搭建自己的nexus私有仓库1--nexus初体验
- nexus系列课程第2篇,请参考 搭建自己的nexus私有仓库2--创建python pypi代理
- nexus系列课程第3篇,请参考 搭建自己的nexus私有仓库3--创建yum ius代理
- nexus系列课程第4篇,请参考 搭建自己的nexus私有仓库4--创建docker私有仓库
- nexus系列课程第5篇,请参考 搭建自己的nexus私有仓库5--测试docker仓库pull和push
- nexus系列课程第6篇,请参考 搭建自己的nexus私有仓库6--使用nginx反向代理
- nexus系列课程第7篇,请参考 搭建自己的nexus私有仓库7--修改nexus容器时区
- nexus系列课程第8篇,请参考 搭建自己的nexus私有仓库8-Nexus3的数据库结构
0. 情况说明
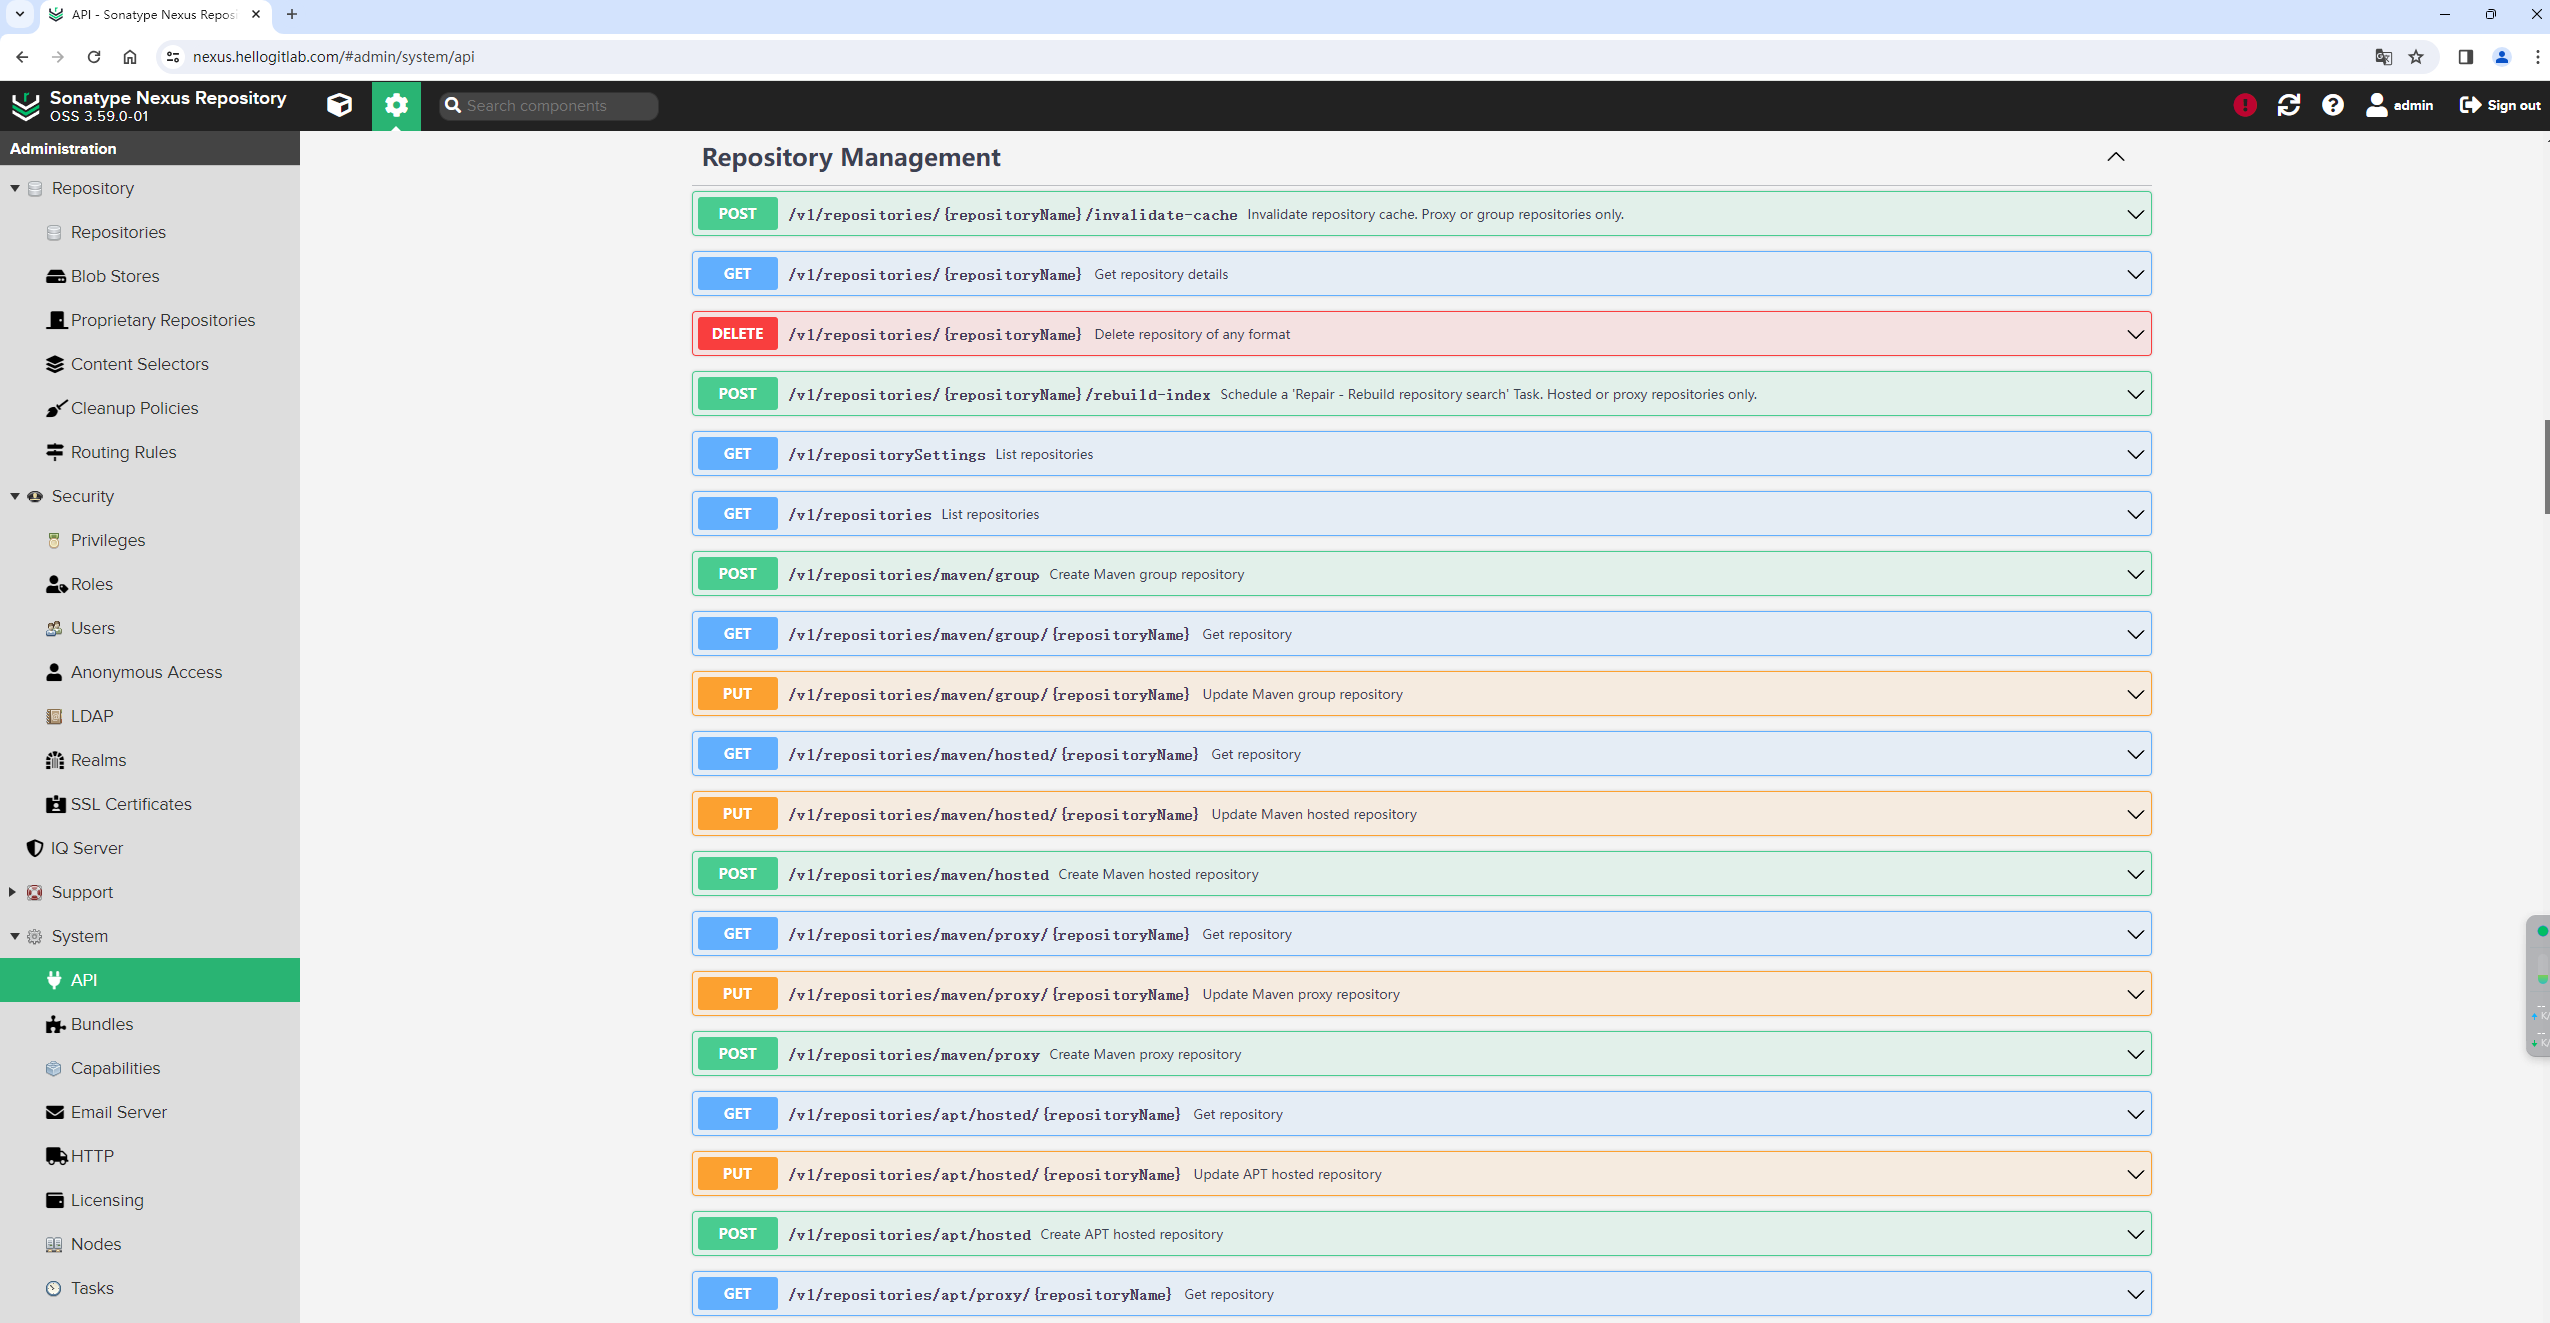
之前有一个需求,是在docker启动nexus容器后,自动创建代理仓库,不用手动在Web上面操作,最开始的思路是想通过修改数据库来实现,上一篇搭建自己的nexus私有仓库8-Nexus3的数据库结构 中看到数据库结构很复杂,不适合直接修改数据库,本篇主要来学习Neuxs API接口的使用。
1. 需求分析
在正式使用API接口前,我们先捋一捋需求,看看需要做哪些事情:
- [√] Neuxs API接口调用时,是否有动态Token,如何正确获取API接口Token值。
- [√] 创建docker blob对象存储,将docker单独存放在该blob对象存储中。
- [√] 激活【Docker Bearer Token Realm】,让能够匿名下载Docker镜像。
- 创建yum、pypi、maven、docker之类的仓库,docker仓库由于涉及到三种类型的仓库创建,并且有端口配置,使用API时优先创建yum和pypi代理代理仓库来测试API接口。
- 快速创建一个用户账号,如账号名为
devops,并将给其授权能够朝docker-hosted仓库推送镜像。
假如我的Nexus https://nexus.hellogitlab.com/是生产环境,为了不影响我的生产环境,应该另外单独创建一个测试环境用于测试Nexus API接口。
事情需要一件一件的做,先从简单的开始,再处理复杂的。
2. 准备测试环境
2.1 创建测试虚拟机
在VirtualBox中分配两个虚拟机,设置其对应IP,并安装好docker环境。
以下是测试环境:
| 主机 | IP | 主机名 | 操作系统 | docker版本 | 用途 | 自定义域名 |
|---|---|---|---|---|---|---|
| 1 | 192.168.56.130 | nexus-server | CentOS 7.9.2009 | 20.10.5 | 部署Nexus,并通过API接口创建仓库 | nexusapi.com |
| 2 | 192.168.56.131 | nexus-test | CentOS 7.9.2009 | 20.10.5 | 测试仓库的有效性 |
查看nexus-server主机相关信息:
[root@nexus-server ~]# hostname -I
192.168.56.130 10.0.3.15
[root@nexus-server ~]# cat /etc/centos-release
CentOS Linux release 7.9.2009 (Core)
[root@nexus-server ~]# docker --version
Docker version 20.10.5, build 55c4c88
[root@nexus-server ~]#查看nexus-test主机相关信息:
[root@nexus-test ~]# hostname -I
192.168.56.131 10.0.3.15
[root@nexus-test ~]# cat /etc/centos-release
CentOS Linux release 7.9.2009 (Core)
[root@nexus-test ~]# docker --version
Docker version 20.10.5, build 55c4c88
[root@nexus-test ~]#2.2 启动nexus容器
在nexus-server主机上面执行以下命令:
# 关闭防火墙
[root@nexus-server ~]# systemctl stop firewalld

# 关闭防火墙开机自启
[root@nexus-server ~]# systemctl disable firewalld
Removed symlink /etc/systemd/system/multi-user.target.wants/firewalld.service.
Removed symlink /etc/systemd/system/dbus-org.fedoraproject.FirewallD1.service.

# 关闭SELINUX
[root@nexus-server ~]# getenforce
Enforcing
[root@nexus-server ~]# setenforce 0
[root@nexus-server ~]# sed -i 's/^SELINUX=enforcing/SELINUX=disabled/g' /etc/selinux/config
[root@nexus-server ~]# grep '^SELINUX=' /etc/selinux/config
SELINUX=disabled
[root@nexus-server ~]#

# 启动docker
[root@nexus-server ~]# systemctl start docker

# 设置docker开机启动
[root@nexus-server ~]# systemctl enable docker
Created symlink from /etc/systemd/system/multi-user.target.wants/docker.service to /usr/lib/systemd/system/docker.service.

# 查看当前在运行的容器
[root@nexus-server ~]# docker ps
CONTAINER ID   IMAGE     COMMAND   CREATED   STATUS    PORTS     NAMES

# 下载nexus镜像
[root@nexus-server ~]# docker pull sonatype/nexus3:3.59.0

# 创建挂载卷目录
[root@nexus-server ~]# mkdir -p /some/dir/nexus-data

# 给挂载卷目录授权
[root@nexus-server ~]# chmod 777 /some/dir/nexus-data

# 运行nexus容器
[root@nexus-server ~]# docker run -d --restart always -p 8081:8081 -p 8001-8003:8001-8003 -v /usr/share/zoneinfo/Asia/Shanghai:/etc/localtime:ro -v /some/dir/nexus-data:/nexus-data --name nexus sonatype/nexus3:3.59.0这种直接加了个时区文件挂载,容器内部的时间与宿主机保持一致。ro参数表示挂载为只读模式。
查看容器运行和端口情况:
# 查看容器运行情况
[root@nexus-server ~]# docker ps
CONTAINER ID   IMAGE                    COMMAND                  CREATED         STATUS         PORTS                                                      NAMES
5f9a17e2870e   sonatype/nexus3:3.59.0   "/opt/sonatype/nexus…"   4 minutes ago   Up 3 minutes   0.0.0.0:8001-8003->8001-8003/tcp, 0.0.0.0:8081->8081/tcp   nexus
[root@nexus-server ~]#

# 查看docker端口监听情况
[root@nexus-server ~]# netstat -tunlp|grep docker
tcp        0      0 0.0.0.0:8001            0.0.0.0:*               LISTEN      2584/docker-proxy
tcp        0      0 0.0.0.0:8002            0.0.0.0:*               LISTEN      2572/docker-proxy
tcp        0      0 0.0.0.0:8003            0.0.0.0:*               LISTEN      2561/docker-proxy
tcp        0      0 0.0.0.0:8081            0.0.0.0:*               LISTEN      2550/docker-proxy
[root@nexus-server ~]#可以看到在正常监听8001、8002、8003和8081端口。
在本地hosts中绑定域名解析:
# windows: C:\Windows\System32\drivers\etc\hosts
# linux: /etc/hosts
# Nexus API
192.168.56.130 nexusapi.com注意,如果你的个人电脑开启了科学上网代理,请将nexusapi.com域名加到不使用代理服务器列表中!
注意,如果你的个人电脑开启了科学上网代理,请将nexusapi.com域名加到不使用代理服务器列表中!
查看Nexus初始密码:
[root@nexus-server ~]# cat /some/dir/nexus-data/admin.password
ffbbad55-ef5b-443f-ba95-1895374a7007[root@nexus-server ~]#即初始密码是ffbbad55-ef5b-443f-ba95-1895374a7007。
打开浏览器访问 http://nexusapi.com:8081/:
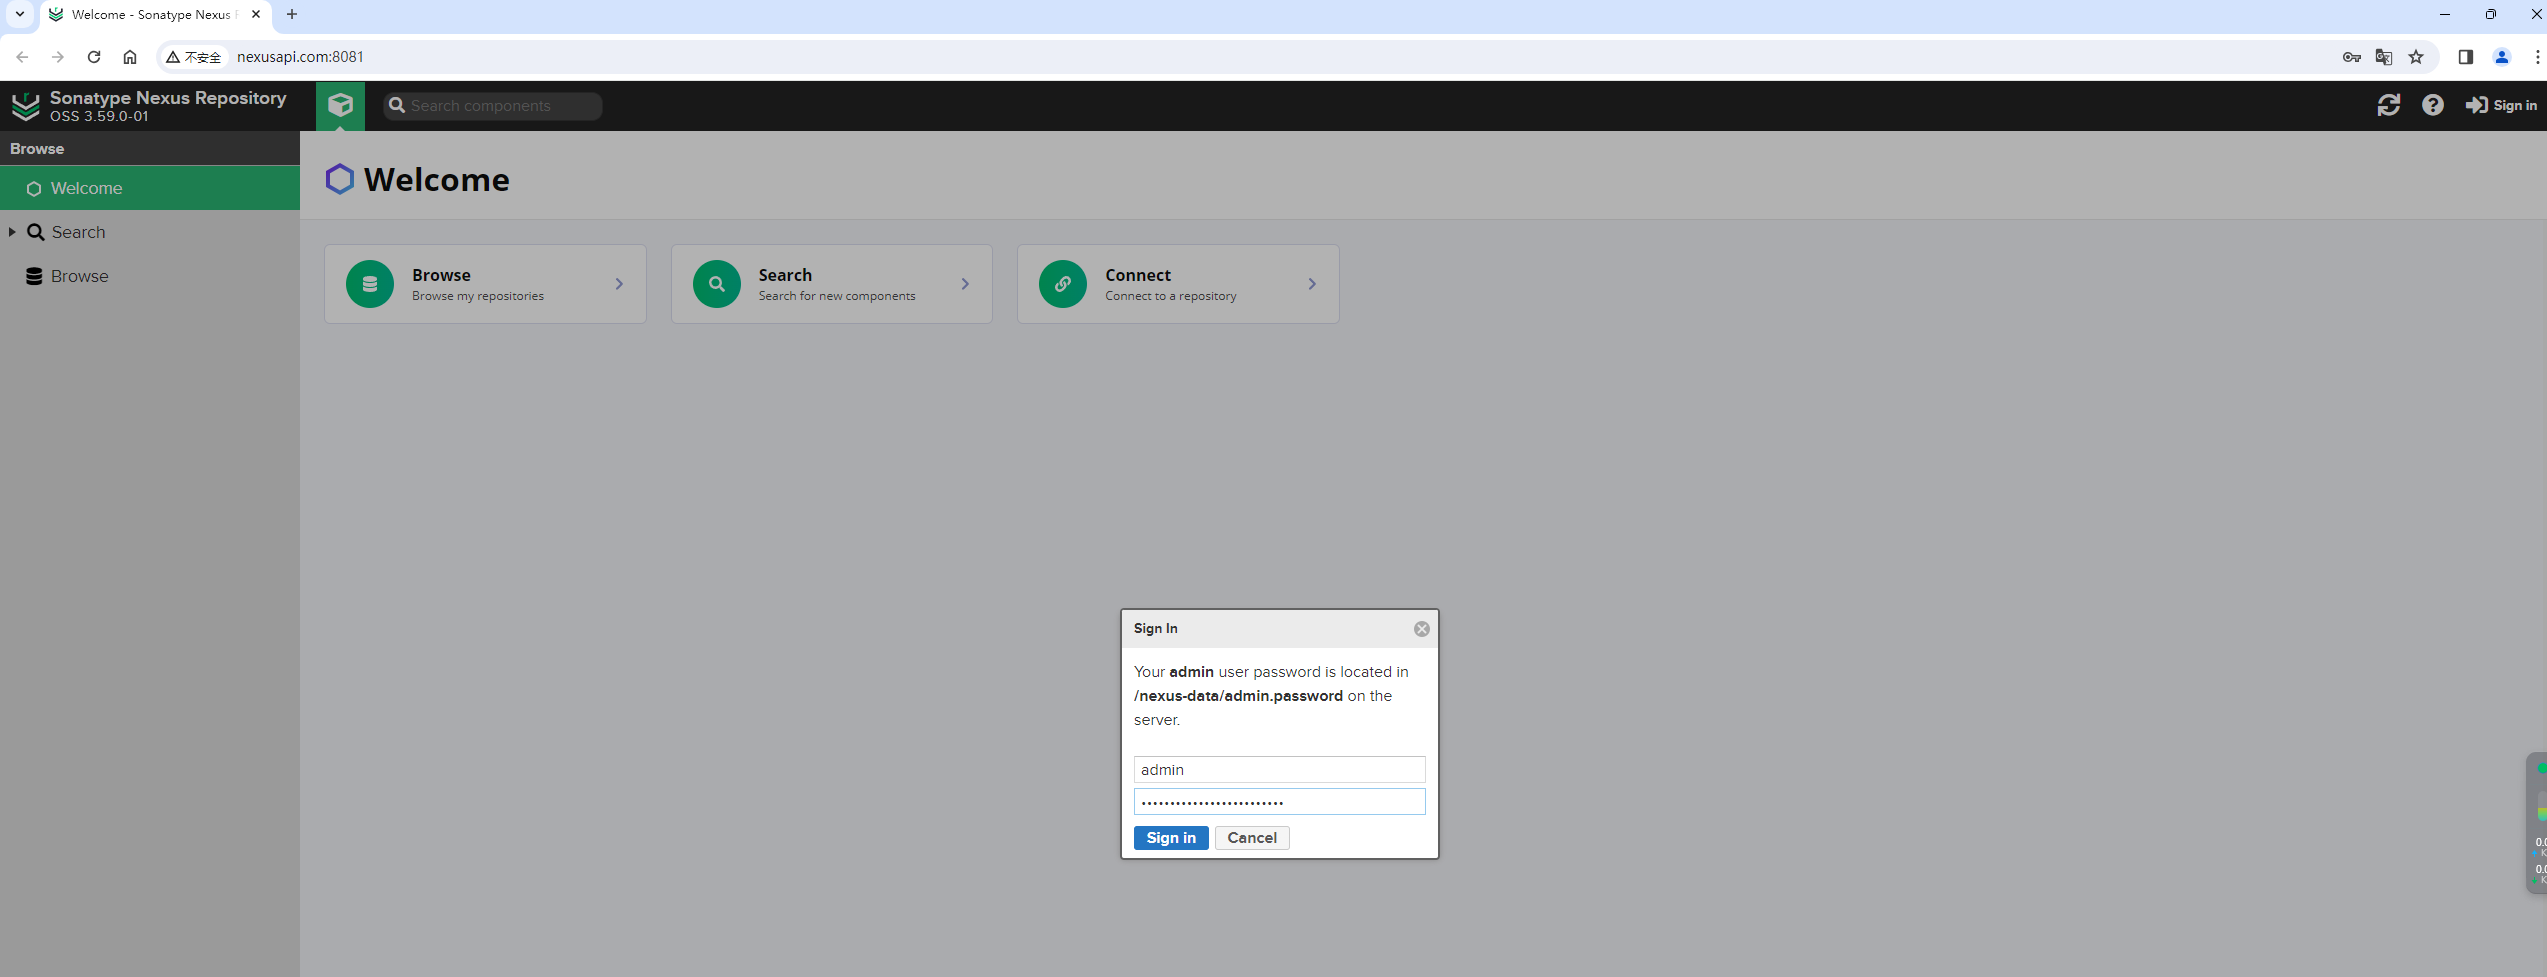
为了方便测试,我们直接将admin的密码改成与官方文档中相同的密码admin123,然后允许匿名访问,这样一个没有进行任何设置的Nexus环境就准备好了!
3. Nexus API接口的使用
官方文档中是这样介绍的:
The REST API can be used to integrate the repository manager with external systems. Nexus Repository leverages Open API to document the REST API. To make it easier to consume, we ship Nexus Repository with Swagger UI - a simple, interactive user interface, where parameters can be filled out and REST calls made directly through the UI to see the results in the browser. This interface is available under the API item via the System sub menu of the Administrationmenu and requires nx-settings-read privilege to access it. NOTE: The nx-settings privileges give access to multiple views. There is no setting to view only the API at this time. Also, when viewing the API all APIs and their examples and models are shown, however, only the APIs that the user has permission to utilize will function.
For those who wish to work with the API outside of Nexus Repository, we serve an Open API Document at
/service/rest/swagger.jsonwhich always represents the API available on running instance and does not require any privilege to access it. This document can be imported into Postman to work with it interactively, Swagger Codegen to generate a programmatic client, or other tools compatible with Open API Specification.For older versions of Nexus Repository (3.3.0 through 3.6.0), you can access Swagger UI at
/swagger-ui/.A comprehensive listing of REST API endpoints and functionality is documented through the UI as stated above and to a lesser extent in subpages shown below.
3.1 测试获取Blob列表信息List the blob stores
测试List the blob stores接口:
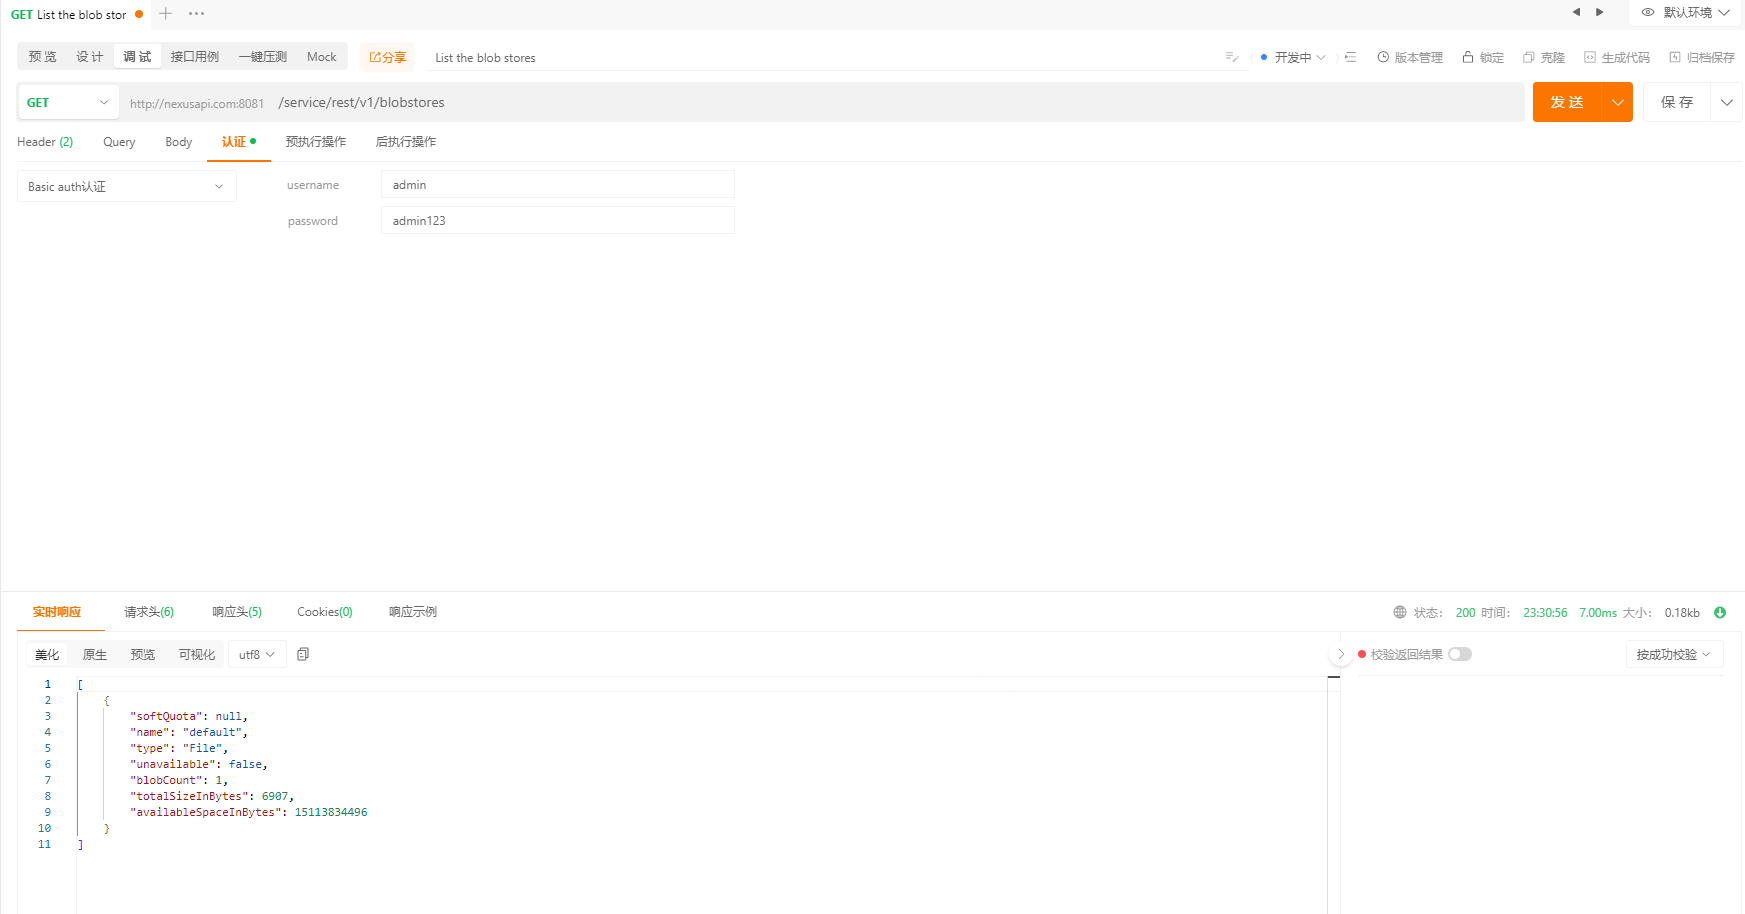
可以看到,请示成功,并且正常返回了值:
[
	{
		"softQuota": null,
		"name": "default",
		"type": "File",
		"unavailable": false,
		"blobCount": 1,
		"totalSizeInBytes": 6907,
		"availableSpaceInBytes": 15113834496
	}
]点击右上角的【生成代码】功能,生成对应的Python3代码:
import requests

url = "http://nexusapi.com:8081/service/rest/v1/blobstores"

headers = {
    "Accept": "application/json",
    "Authorization": "Basic YWRtaW46YWRtaW4xMjM="
}

response = requests.request("GET", url, headers=headers)

print(response.text)注意,请求头中的"Authorization": "Basic YWRtaW46YWRtaW4xMjM=" 中字符串YWRtaW46YWRtaW4xMjM=的生成方法是这样的:
[root@nexus-server ~]# echo -n 'admin:admin123'|base64
YWRtaW46YWRtaW4xMjM=将代码放到nexus_api.py文件中,并运行代码:
$ python nexus_api.py
[ {
  "softQuota" : null,
  "name" : "default",
  "type" : "File",
  "unavailable" : false,
  "blobCount" : 1,
  "totalSizeInBytes" : 6907,
  "availableSpaceInBytes" : 15114141696
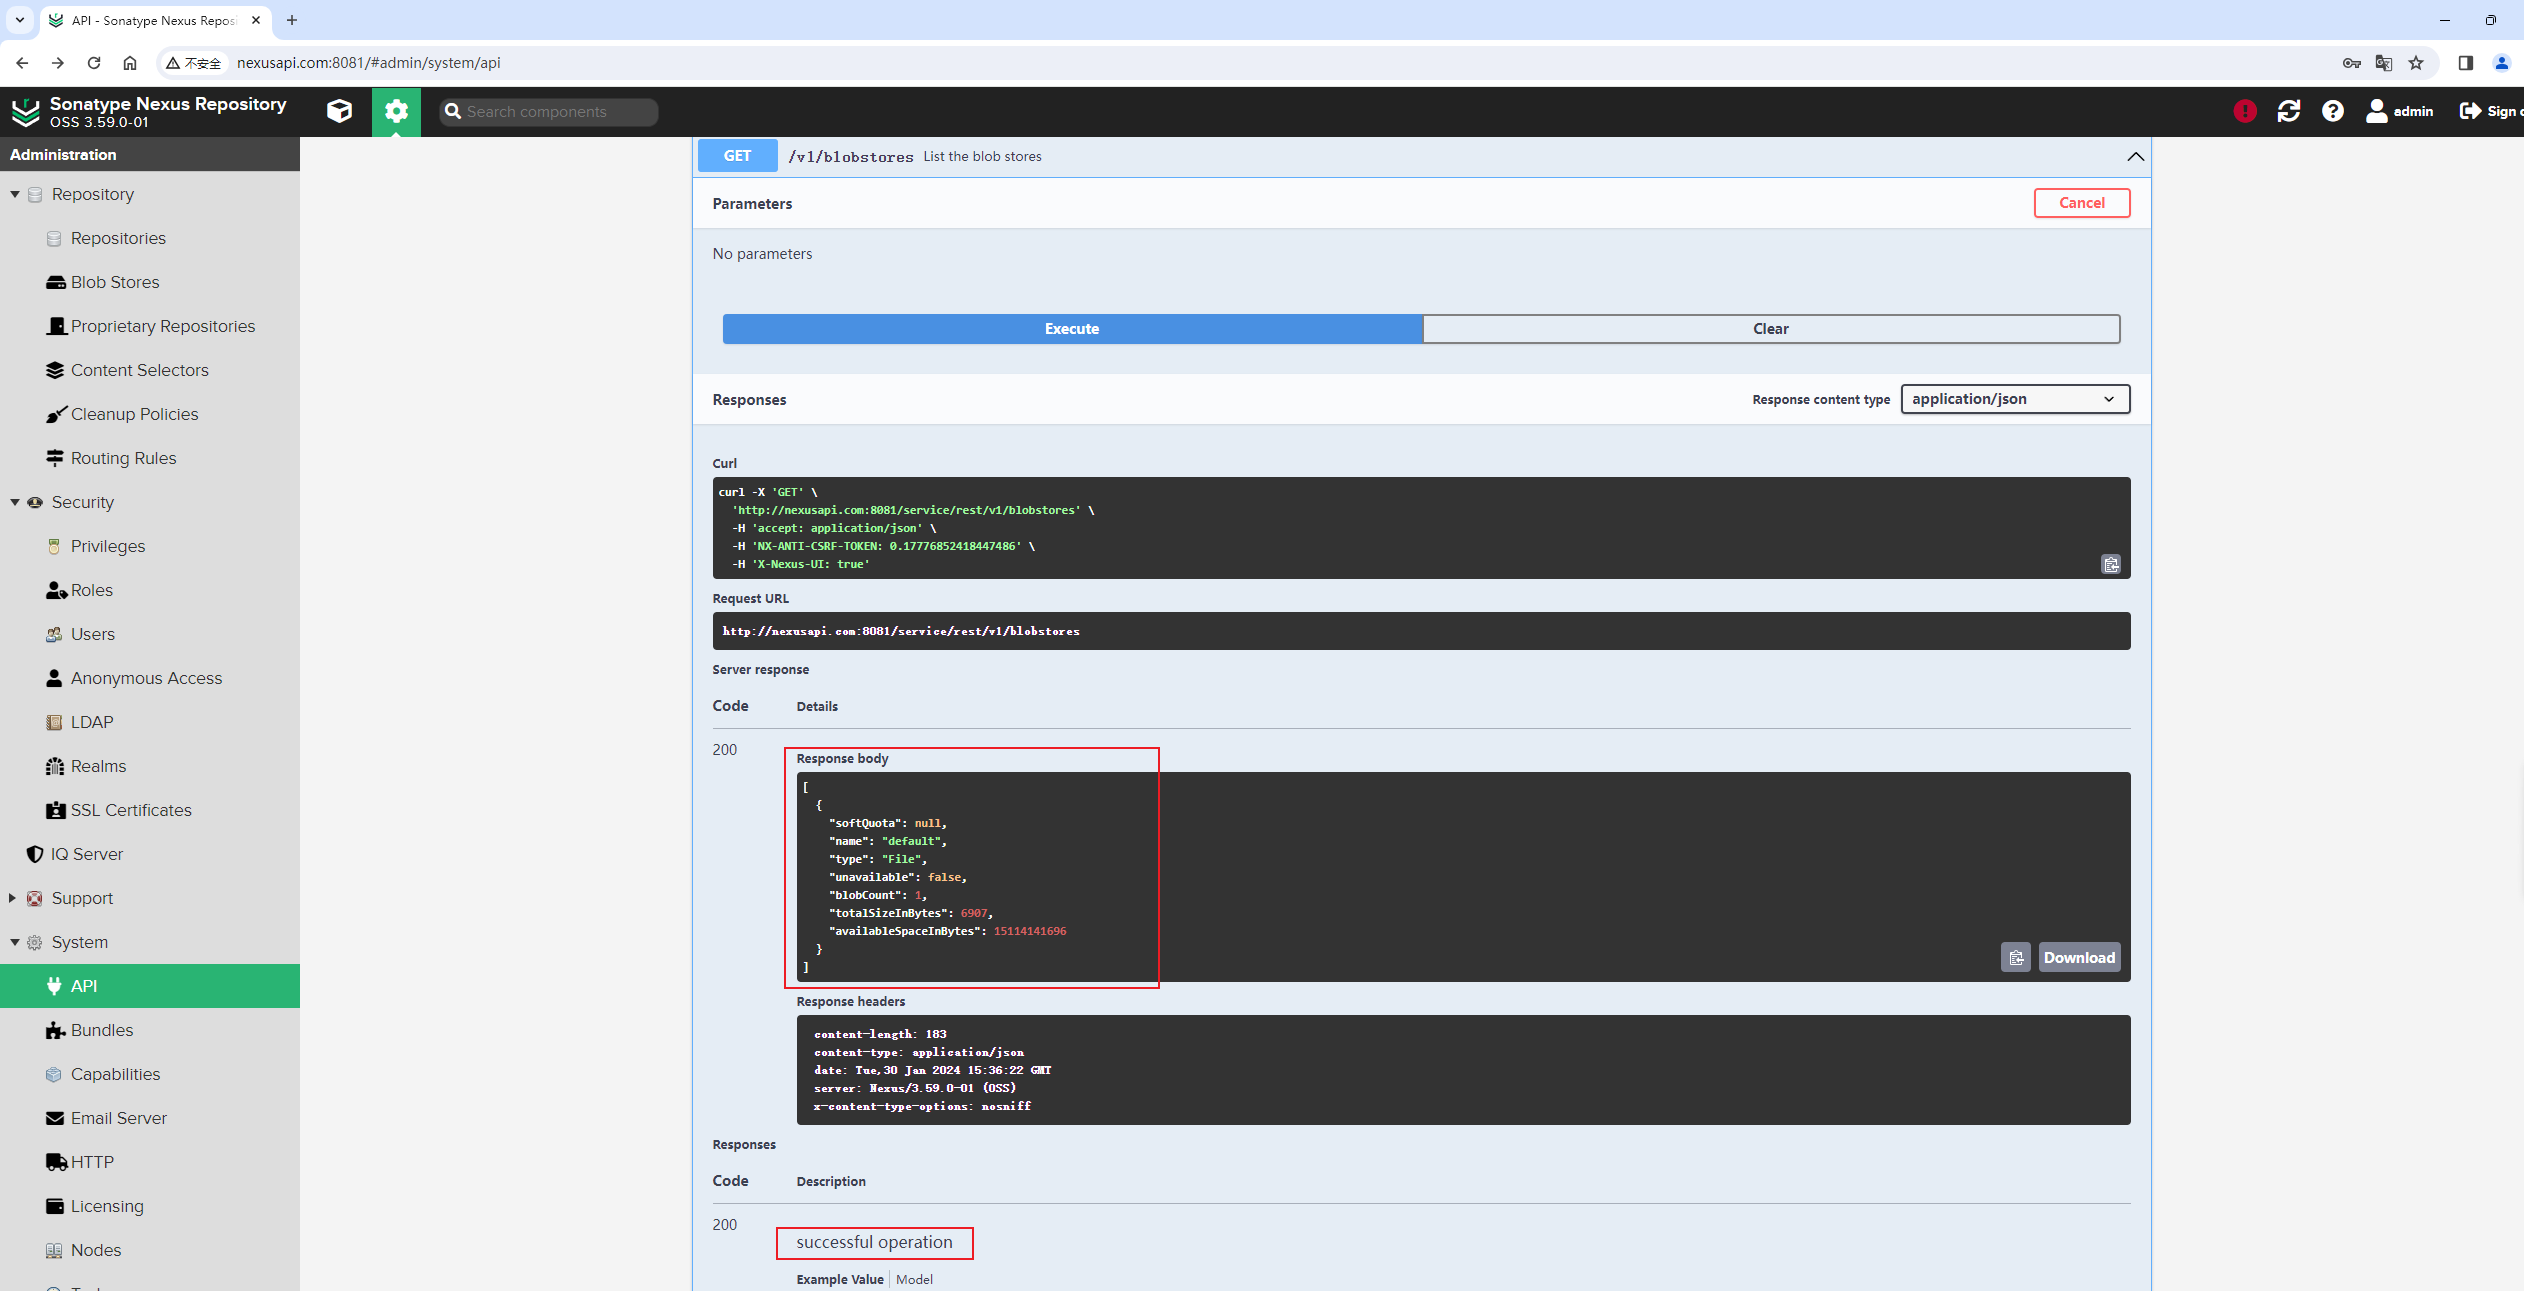
} ]可以看到,通过Python代码正常获取到了API接口的输出。
与在Nexus UI上面获取到结果是一致的,说明Python代码是正常可用的。
这样就可以知道以下事情已经明确:
- [√] Neuxs API接口调用时,是否有动态Token,如何正确获取API接口Token值。直接在代码里面增加
"Authorization": "Basic YWRtaW46YWRtaW4xMjM="请求头信息即可。
3.2 测试创建Blob对象存储接口Create a file blob store
测试Create a file blob store接口:
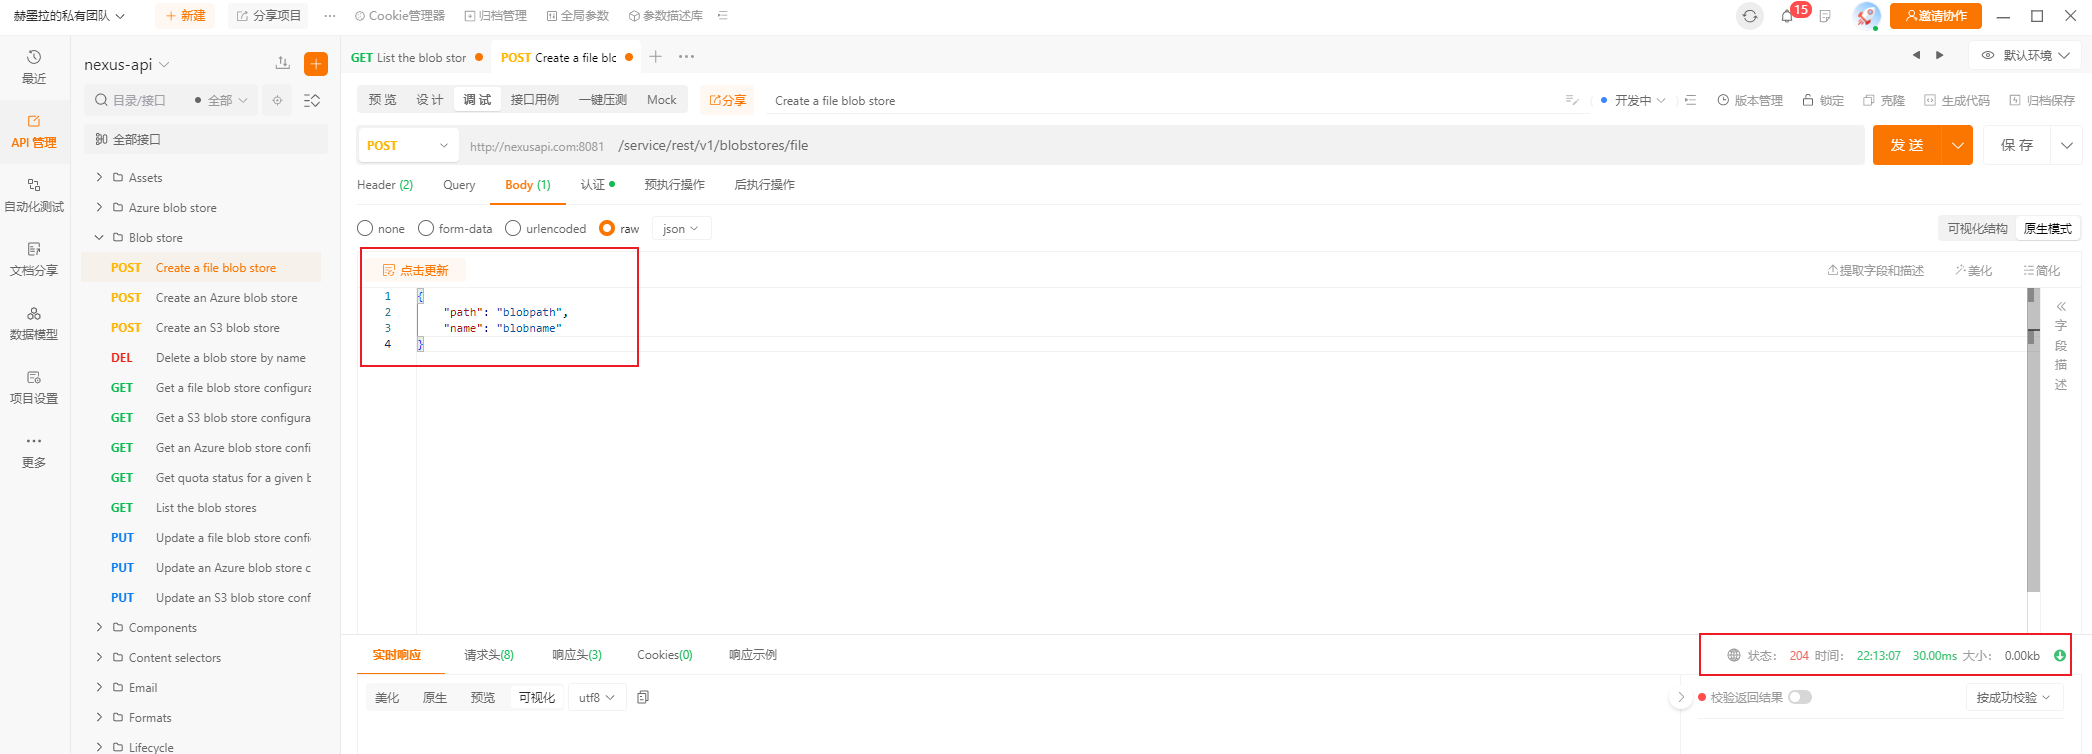
创建一个没有限制的Blob对象存储,其json字符串是:
{
	"path": "blobpath",
	"name": "blobname"
}POST请求的URL是http://nexusapi.com:8081/service/rest/v1/blobstores/file,创建成功时返回码是204。
此时的Nexus界面上面查看,可以看到刚通过接口创建的Blob对象存储已经创建成功:


Blob对象存储的名称和路径与json传递的名称和路径是一致的。
手动将blobname删除掉。然后测试通过python代码创建:
点击右上角的【生成代码】功能,生成对应的Python3代码 :
import requests

url = "http://nexusapi.com:8081/service/rest/v1/blobstores/file"

payload = {
    "path": "blobpath",
    "name": "blobname"
}
headers = {
    "Accept": "application/json",
    "Content-Type": "application/json",
    "content-type": "application/json",
    "Authorization": "Basic YWRtaW46YWRtaW4xMjM="
}

response = requests.request("POST", url, json=payload, headers=headers)

print(response.text)此时,执行代码,会同样创建出blobname Blob对象存储。
再次用List the blob stores接口查看当前的Blob对象存储信息:
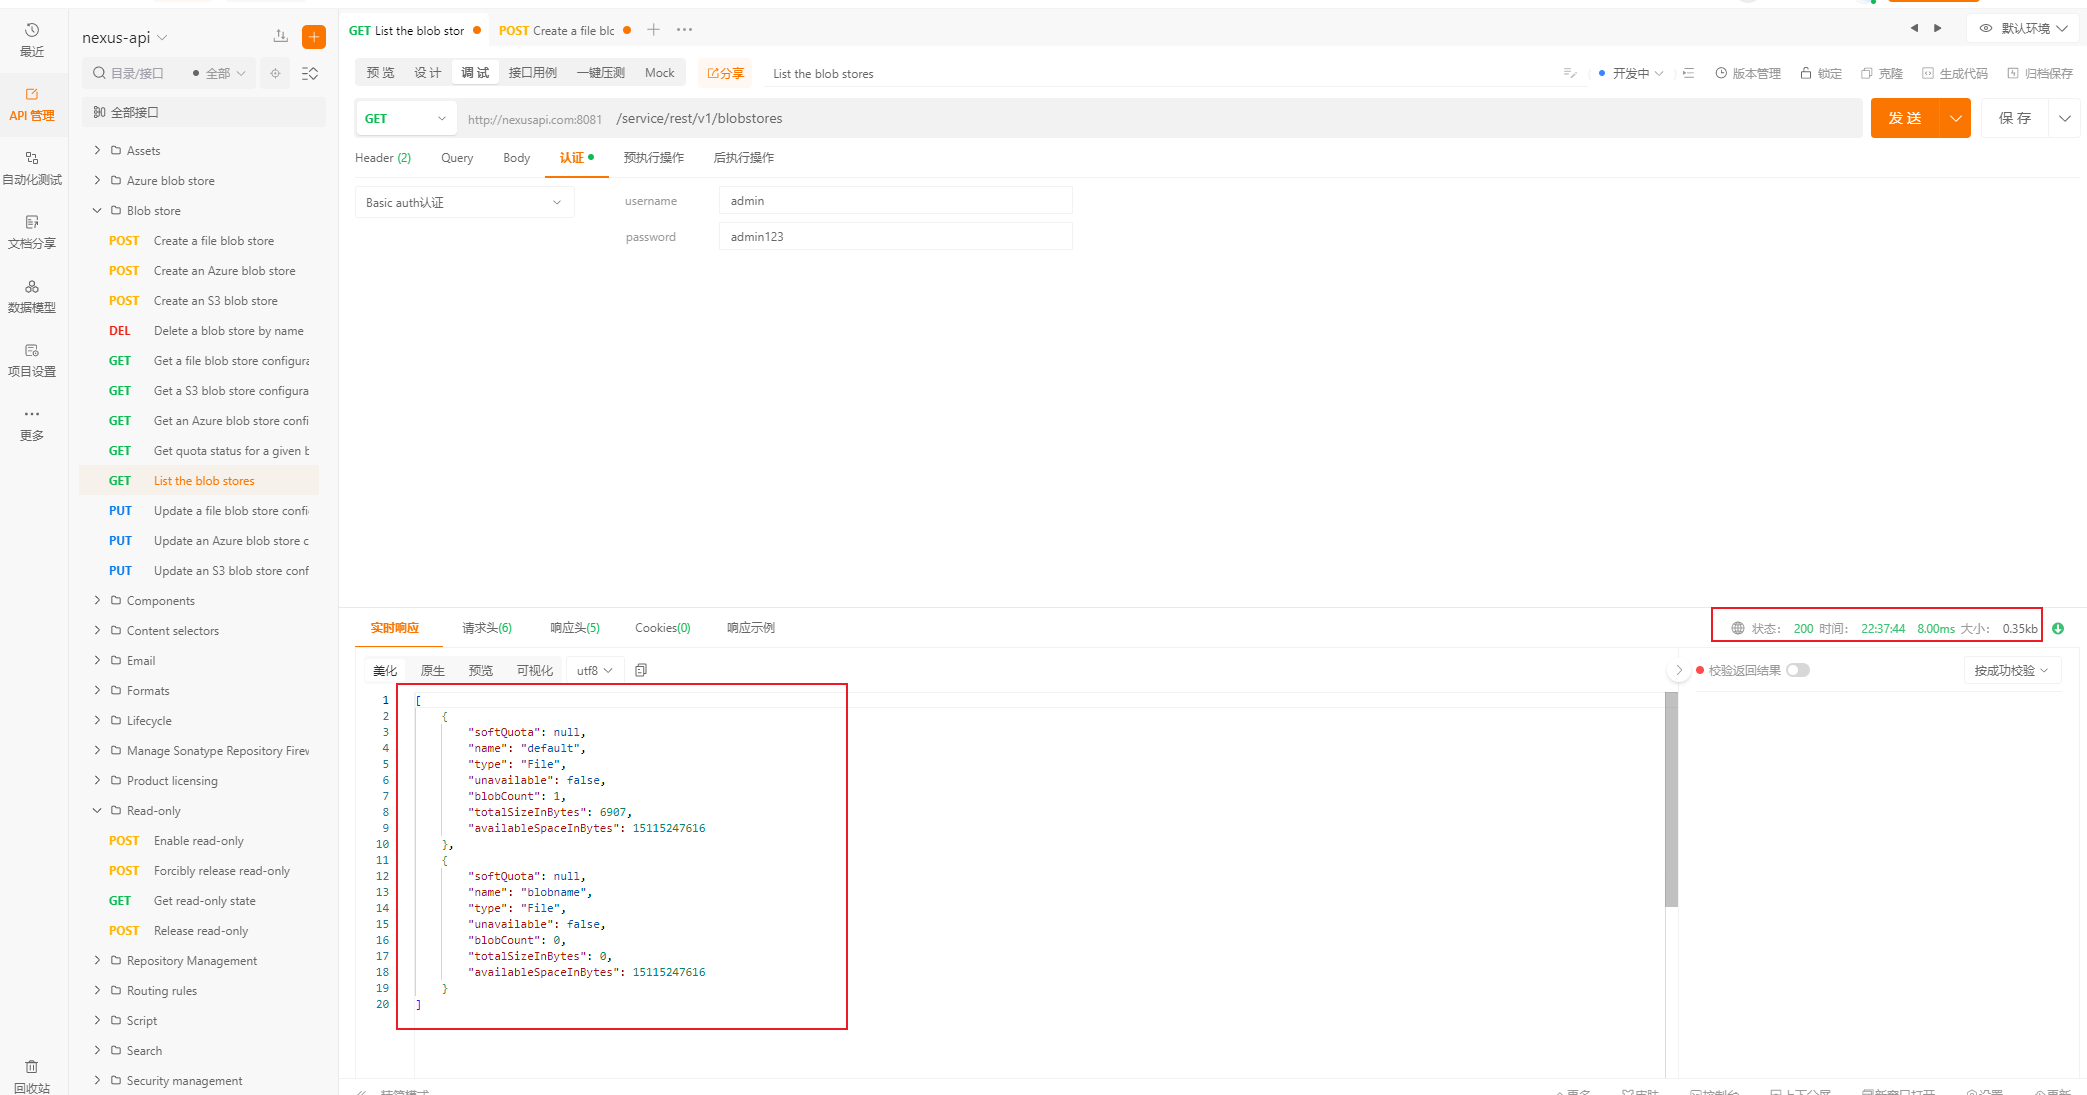
这样就可以知道以下事情可以完成:
- [√] 创建docker blob对象存储,将docker单独存放在该blob对象存储中。直接调用
/service/rest/v1/blobstores/file接口即可。
如果创建docker对象存储,只用设置path和name参数的值都是docker即可。
3.3 Realm权限设置
在Nexus页面上面可以看到有9个有效的Realm配置:
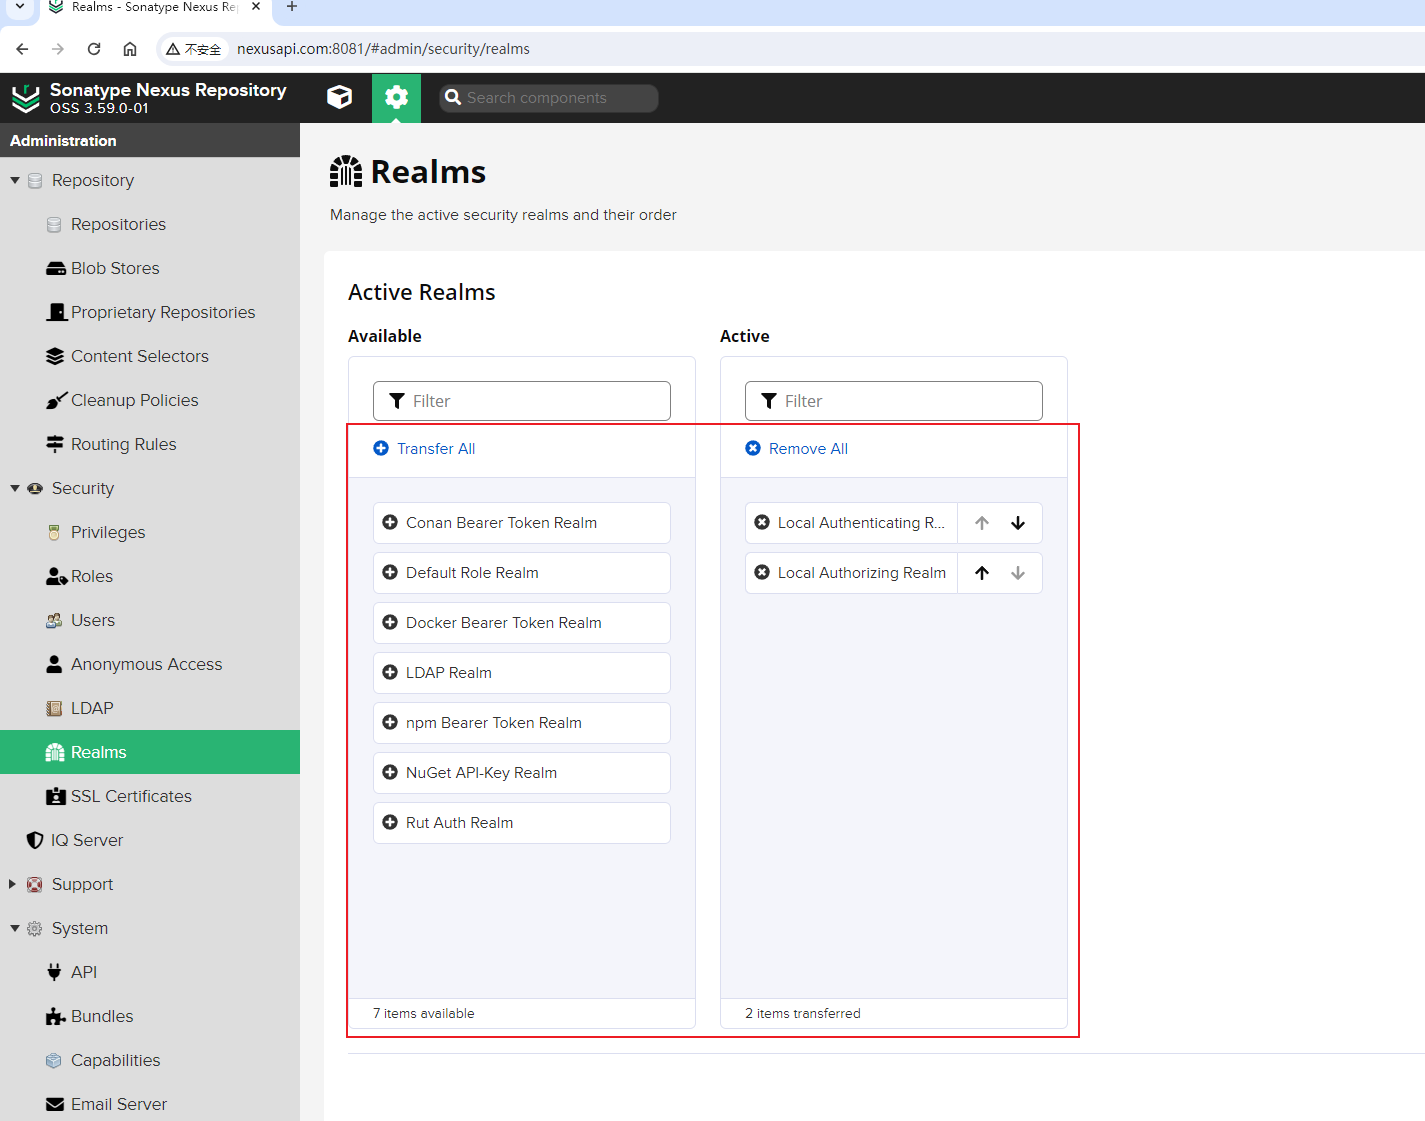
为了能够匿名下载Docker镜像,需要将【Docker Bearer Token Realm】加入到右侧的激活列表中。
涉及这三个接口:

3.3.1 获取所有有效Realm
List the available realms。
GET方法调用/service/rest/v1/security/realms/available接口,可以返回所有有效的Realm信息:
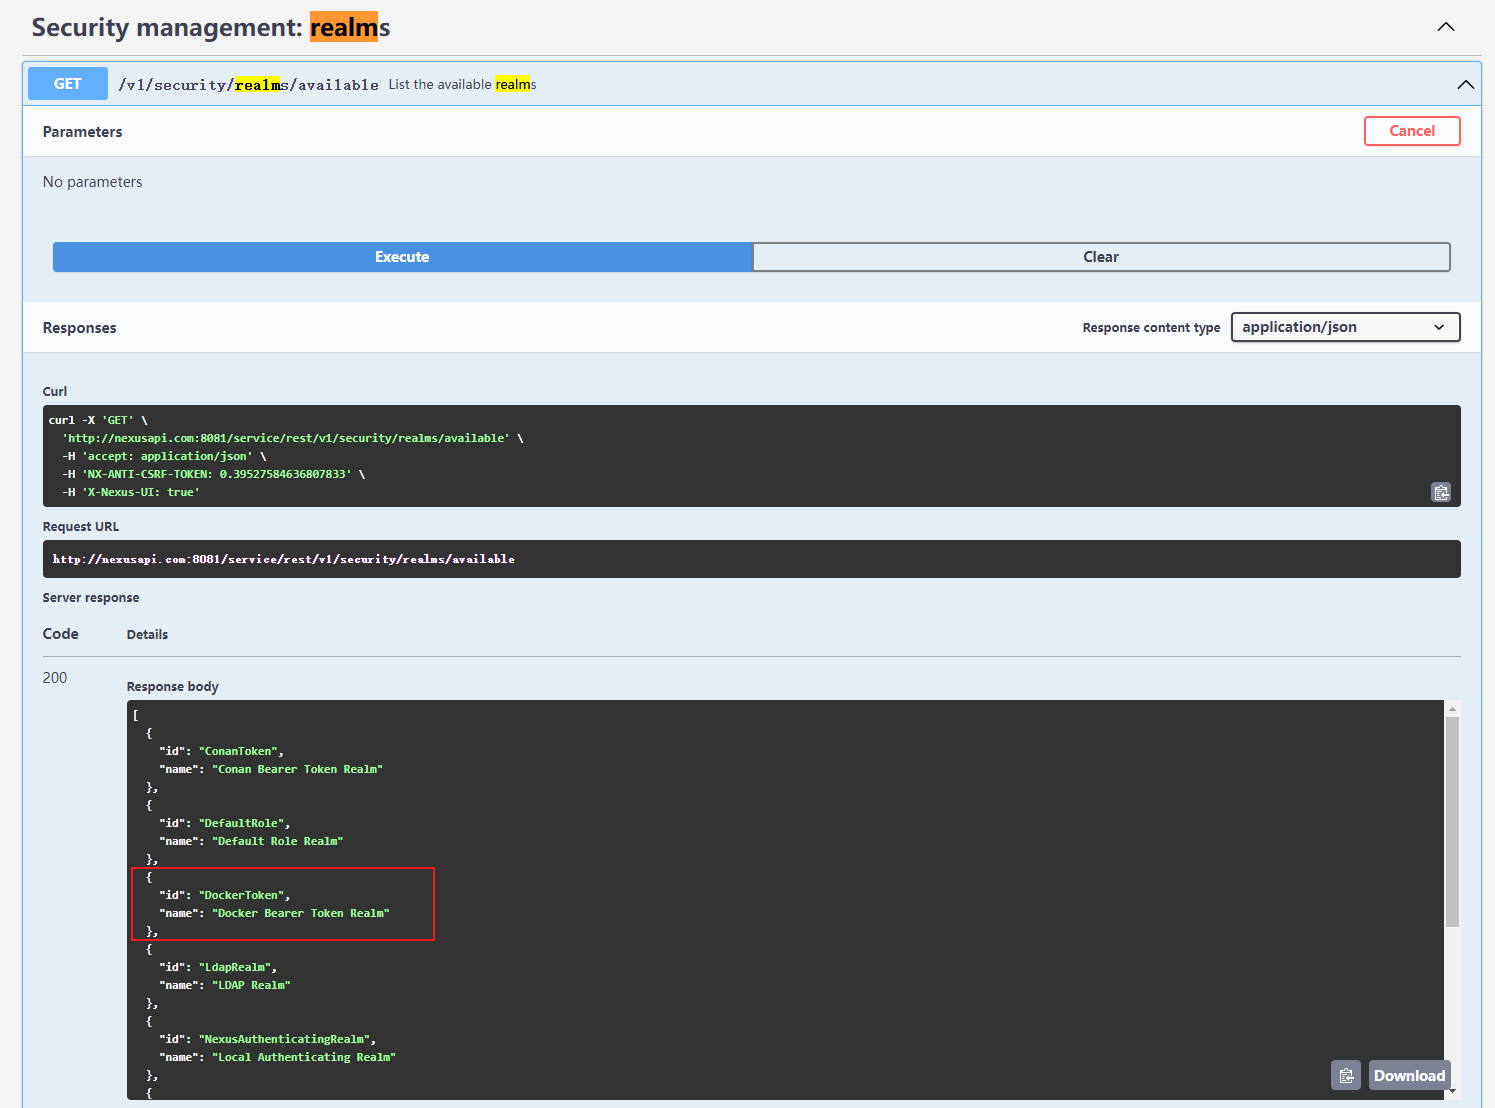
返回值如下:
[
  {
    "id": "ConanToken",
    "name": "Conan Bearer Token Realm"
  },
  {
    "id": "DefaultRole",
    "name": "Default Role Realm"
  },
  {
    "id": "DockerToken",
    "name": "Docker Bearer Token Realm"
  },
  {
    "id": "LdapRealm",
    "name": "LDAP Realm"
  },
  {
    "id": "NexusAuthenticatingRealm",
    "name": "Local Authenticating Realm"
  },
  {
    "id": "NexusAuthorizingRealm",
    "name": "Local Authorizing Realm"
  },
  {
    "id": "NpmToken",
    "name": "npm Bearer Token Realm"
  },
  {
    "id": "NuGetApiKey",
    "name": "NuGet API-Key Realm"
  },
  {
    "id": "rutauth-realm",
    "name": "Rut Auth Realm"
  }
]"Docker Bearer Token Realm"对应的id信息是【DockerToken】。
3.3.2 获取激活的Realm
List the active realm IDs in order。
GET方法调用/service/rest/v1/security/realms/active接口,可以返回所有激活的Realm信息:
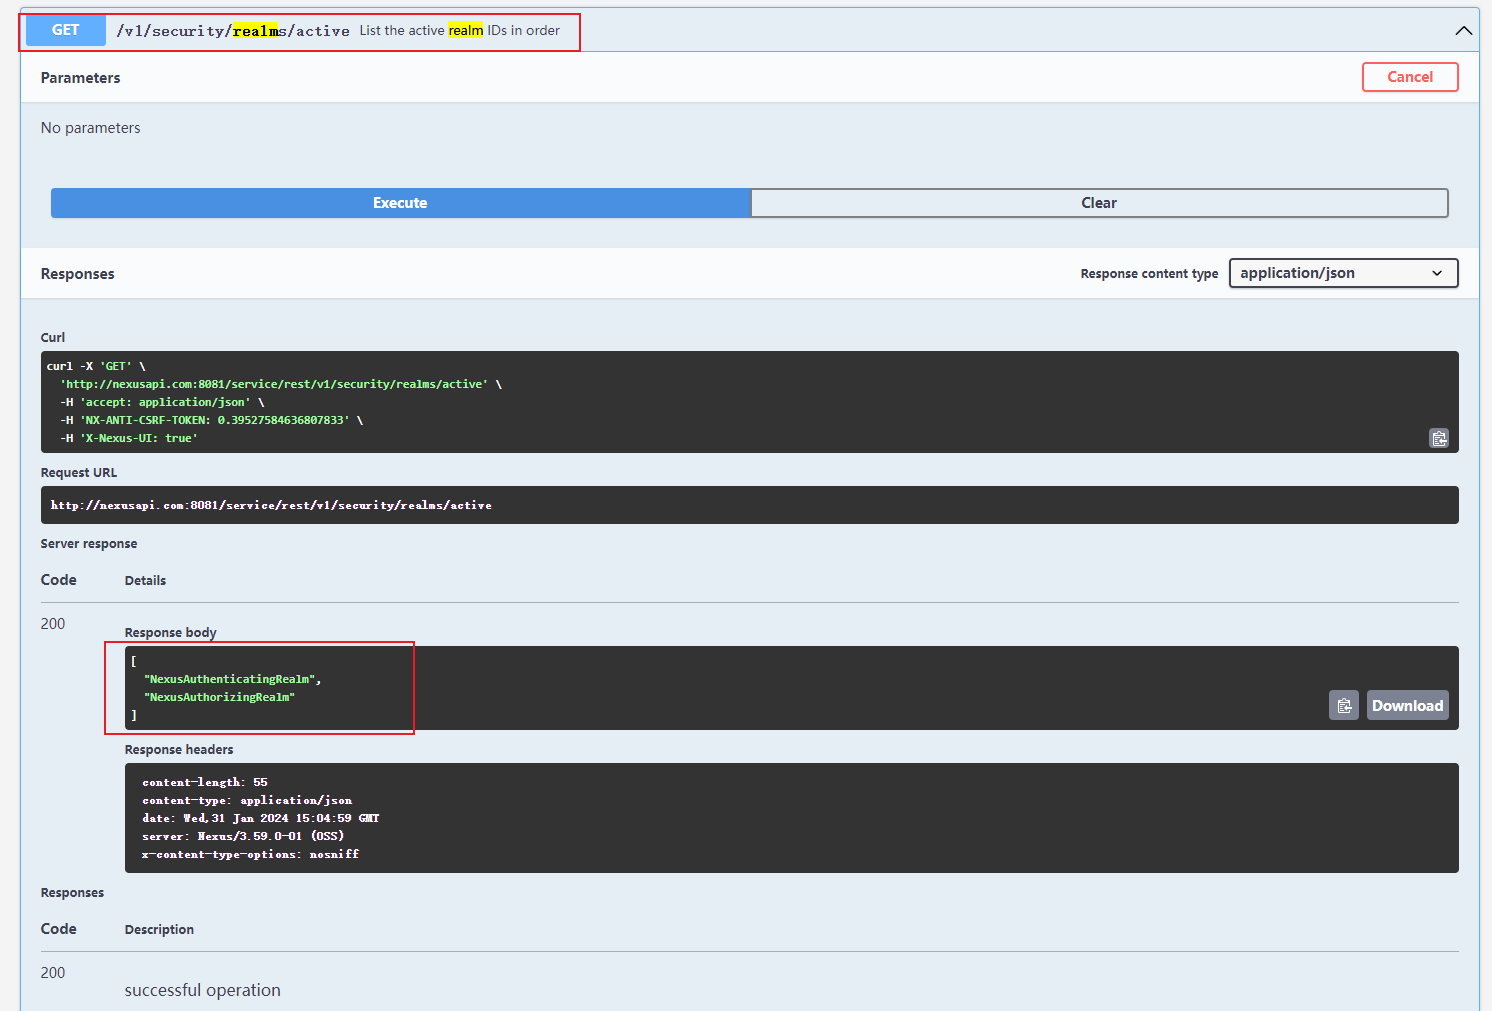
返回值如下:
[
  "NexusAuthenticatingRealm",
  "NexusAuthorizingRealm"
]为了让"Docker Bearer Token Realm"变成激活的Realm,则需要将DockerToken值加入到上面这个列表中。
需要看下一节的的接口【Set the active security realms in the order they should be used】。
3.3.3 设置激活的Realm
Set the active security realms in the order they should be used。
PUT方法调用/service/rest/v1/security/realms/active接口,可以设置激活的Realm信息:
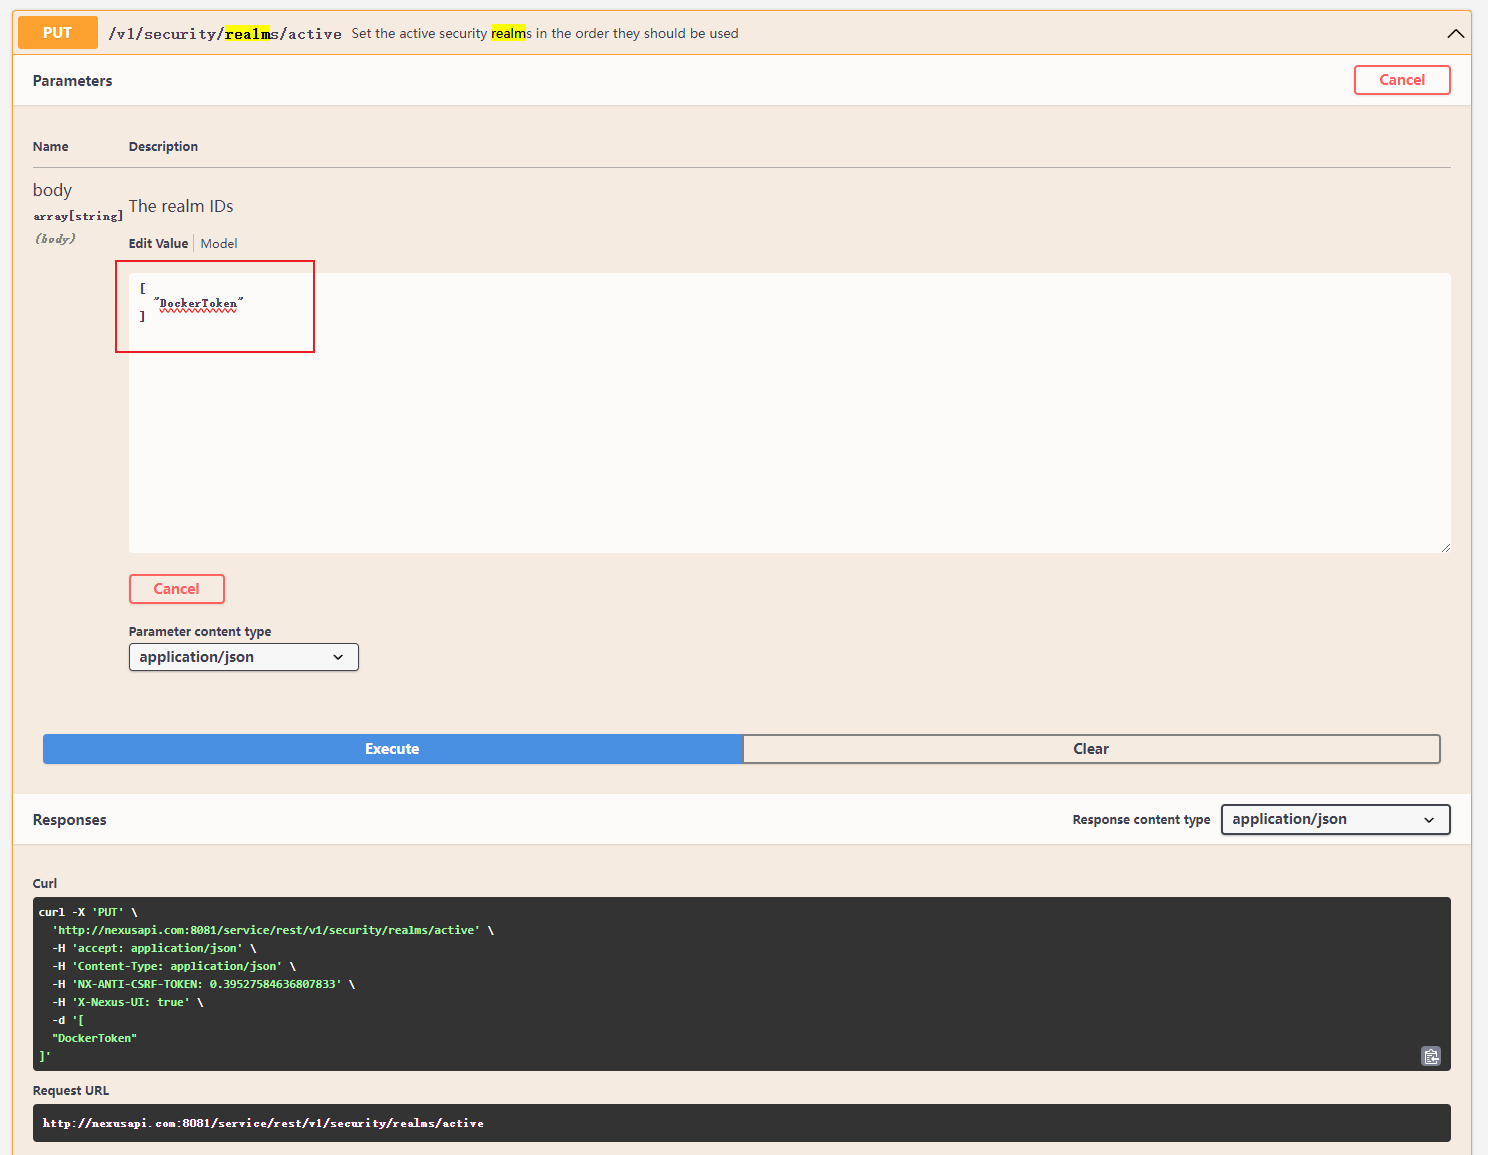
传输的json数据是 The realm IDs 组成的列表:
[
  ## !!! 危险
  "DockerToken"
]危险
这个地方要注意啦,不能直接设置成上面这样的,如果在该列表里面只有"DockerToken"的话,会导致
Nexus无法正常访问,还需要将原来有的"NexusAuthenticatingRealm"和 "NexusAuthorizingRealm"保留着。
由于我直接按上面这样操作了,Nexus挂了,admin账号进去不了,显示要认证:

但输入密码登陆不进去。
我们把测试用的nexus容器删除掉。重新来处理。
# 查看运行的容器
[root@nexus-server ~]# docker ps
CONTAINER ID   IMAGE                    COMMAND                  CREATED        STATUS       PORTS                                                      NAMES
5f9a17e2870e   sonatype/nexus3:3.59.0   "/opt/sonatype/nexus…"   26 hours ago   Up 2 hours   0.0.0.0:8001-8003->8001-8003/tcp, 0.0.0.0:8081->8081/tcp   nexus

# 停掉nexus容器
[root@nexus-server ~]# docker stop nexus
nexus

# 删除nexus容器
[root@nexus-server ~]# docker rm nexus
nexus

# 删除nexus的本地挂载文件
[root@nexus-server ~]# rm -rf /some/dir/nexus-data/*
[root@nexus-server ~]# ll /some/dir/nexus-data/
total 0
[root@nexus-server ~]#重新运行容器:
# 运行nexus容器
[root@nexus-server ~]# docker run -d --restart always -p 8081:8081 -p 8001-8003:8001-8003 -v /usr/share/zoneinfo/Asia/Shanghai:/etc/localtime:ro -v /some/dir/nexus-data:/nexus-data --name nexus sonatype/nexus3:3.59.0重新获取初始密码,然后修改密码成admin123。
因此正确的json realm IDs列表是下面这样的:
[
  "NexusAuthenticatingRealm",
  "NexusAuthorizingRealm",
  "DockerToken"
]再次发送请求:
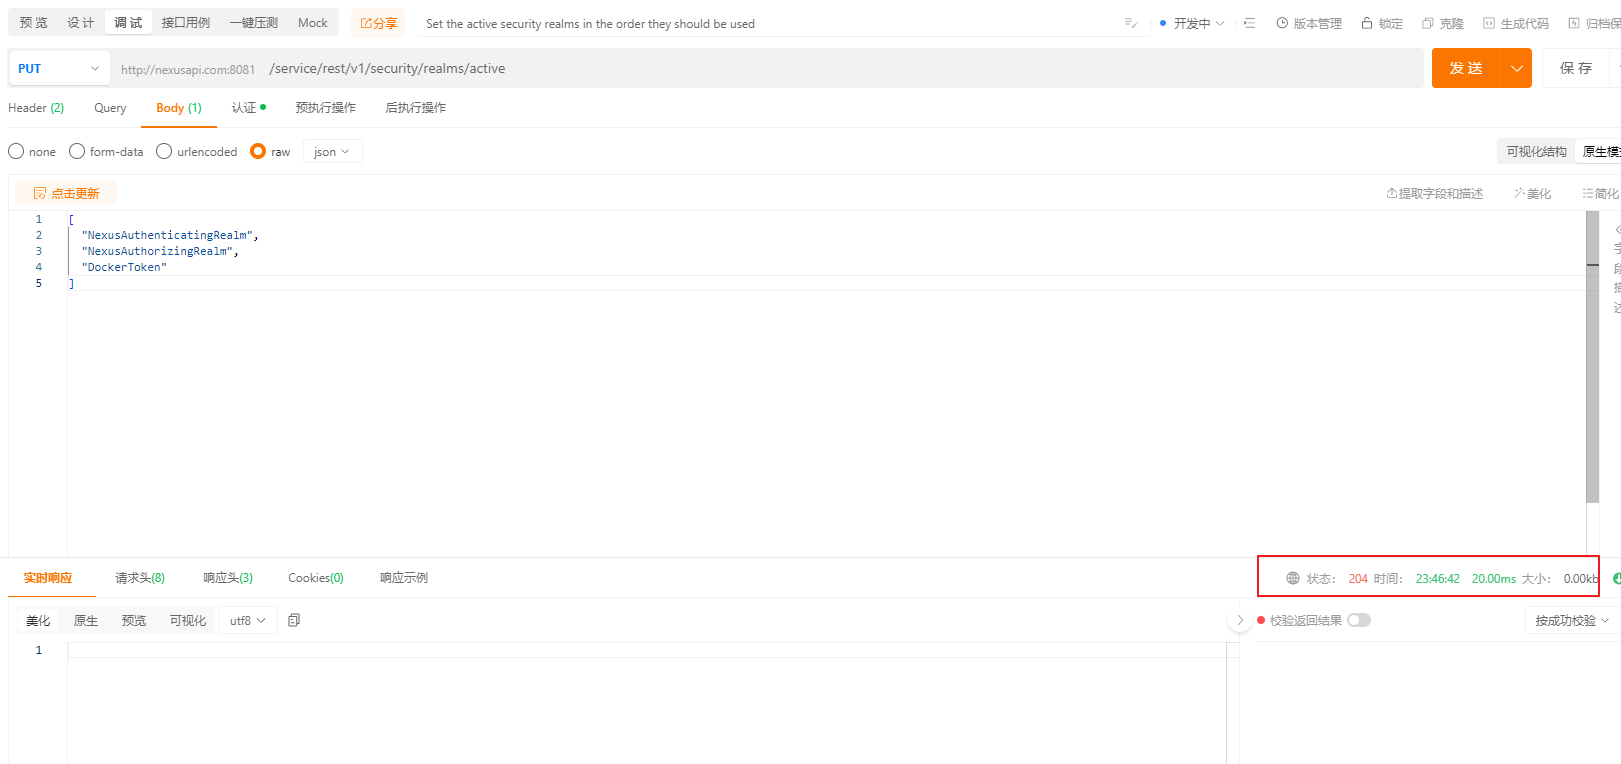
状态码204, 表示请求已经执行成功, 但没有内容。
我们在Nexus页面上面看一下:
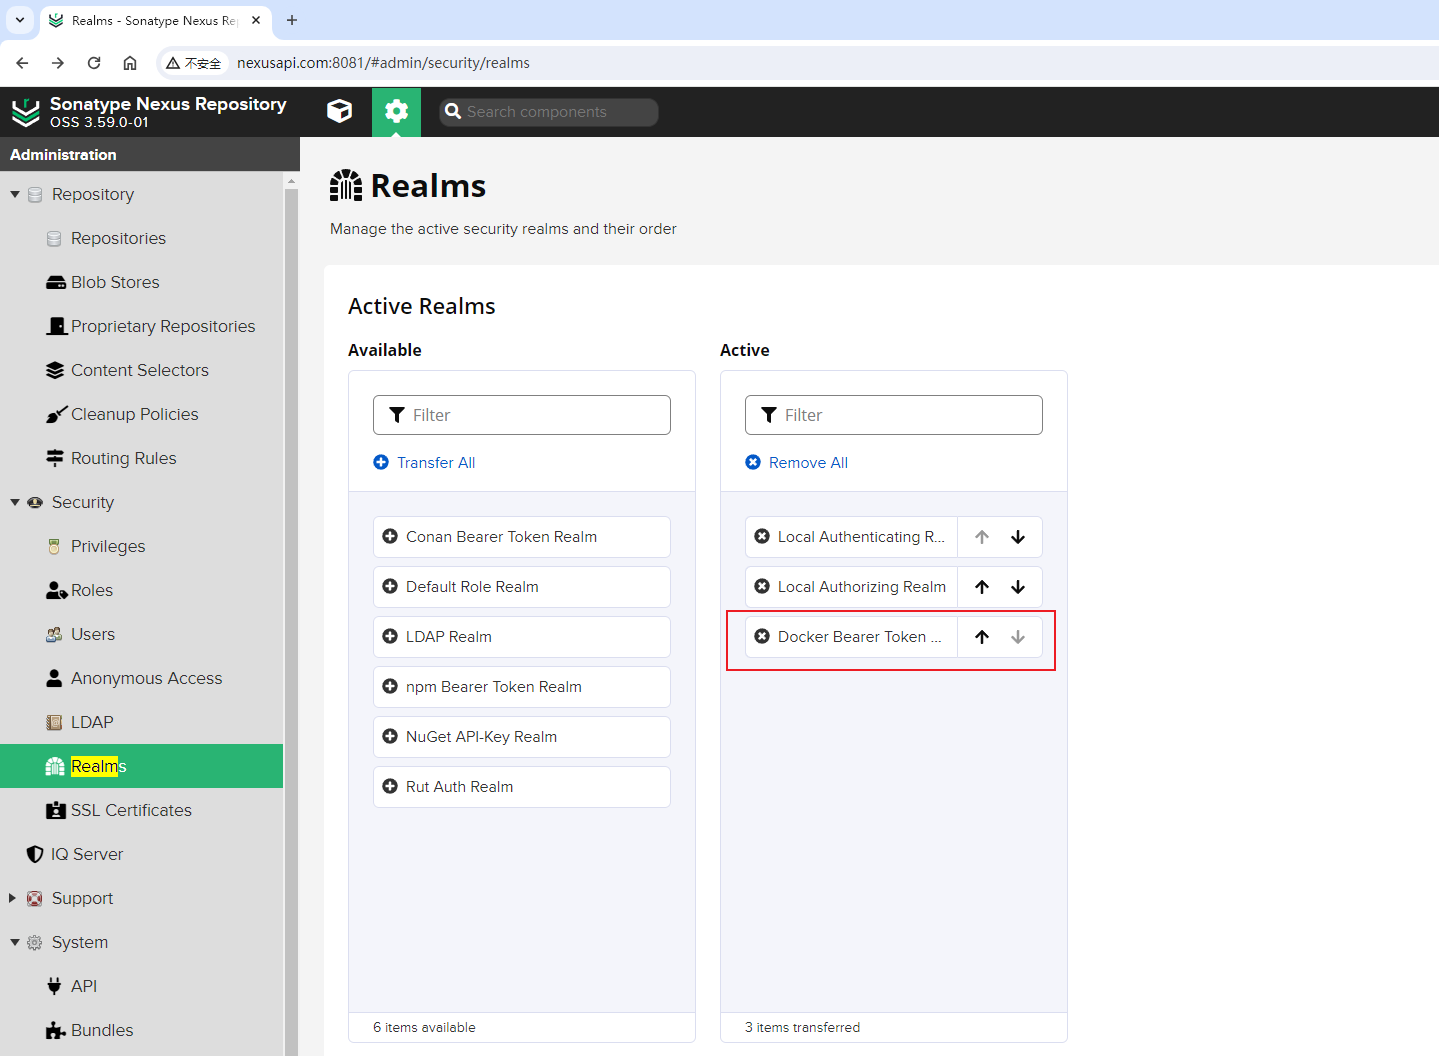
可以看到"Docker Bearer Token Realm"已经激活成功了。
生成对应的Python3代码:
import requests

url = "http://nexusapi.com:8081/service/rest/v1/security/realms/active"

payload = ["NexusAuthenticatingRealm", "NexusAuthorizingRealm", "DockerToken"]
headers = {
    "Accept": "application/json",
    "Content-Type": "application/json",
    "content-type": "application/json",
    "Authorization": "Basic YWRtaW46YWRtaW4xMjM="
}

response = requests.request("PUT", url, json=payload, headers=headers)

print(response.text)这样[√] 激活【Docker Bearer Token Realm】,让能够匿名下载Docker镜像,这件事情也可以通过API接口完成了!!
3.4 Nexus仓库管理
Nexus仓库管理(Repository Management)相关的接口就非常多了,仓库类型不一样,其接口也不同。
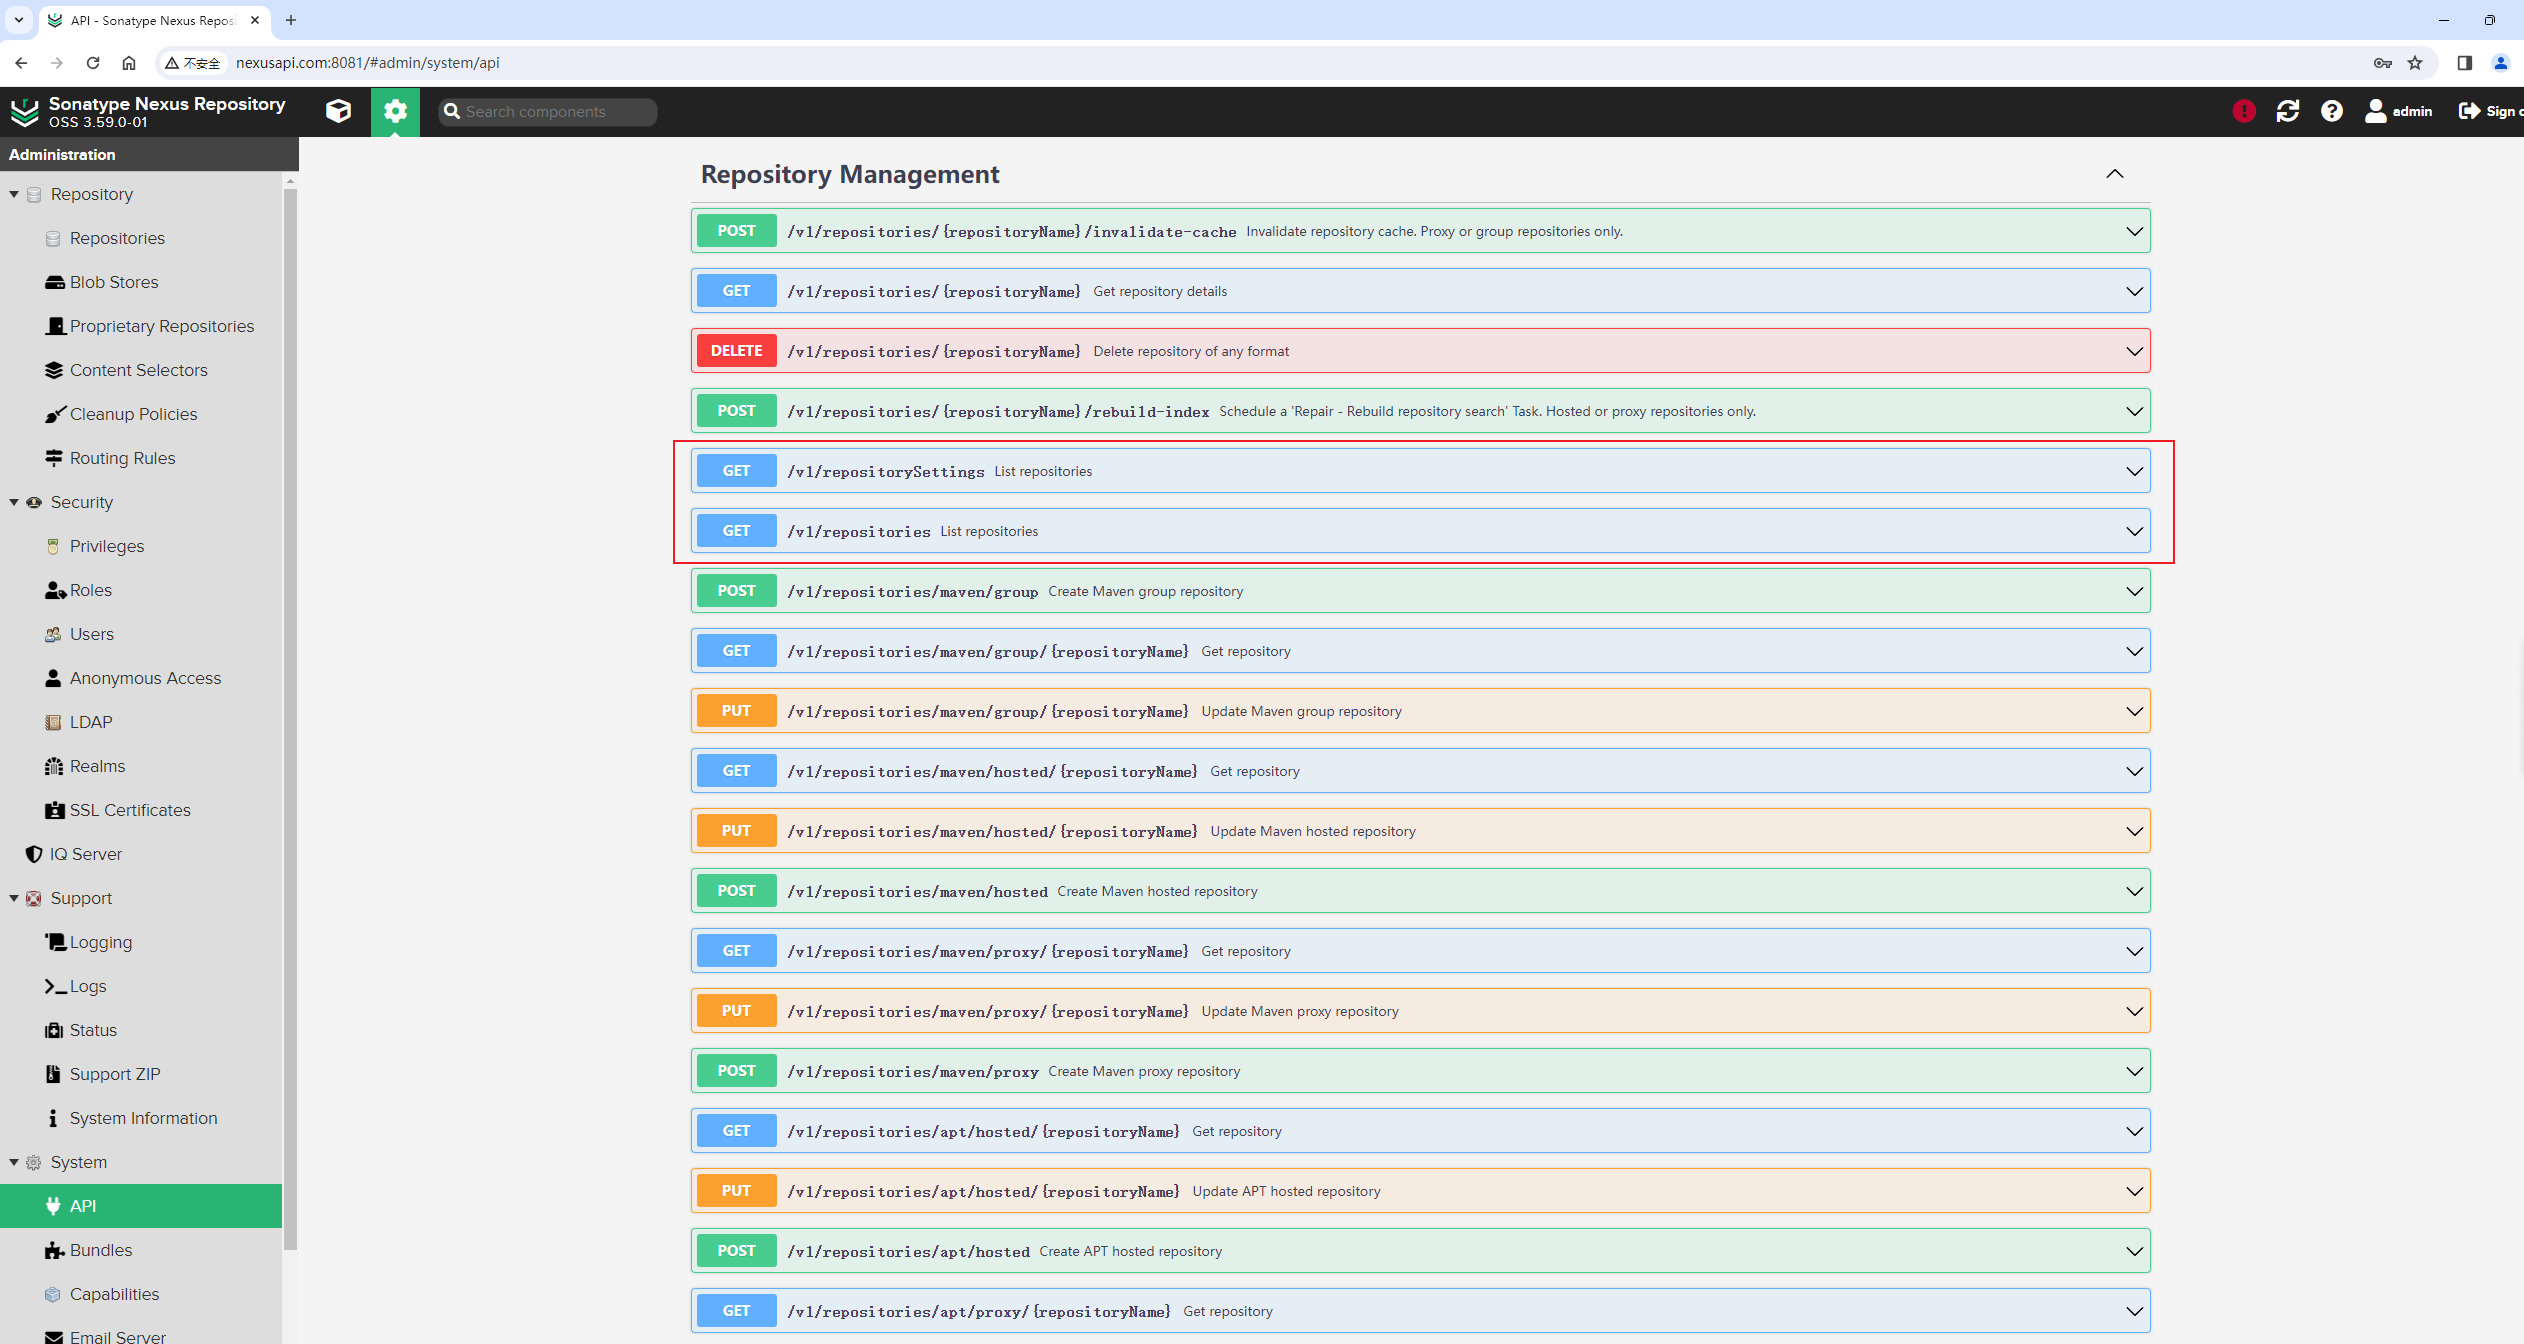


接口太多,我们先只关注yum代理仓库的创建。
3.4.1 列出所有仓库
List repositories。
GET方法调用/service/rest/v1/repositories接口,可以列出当前Nexus上有的所有仓库:
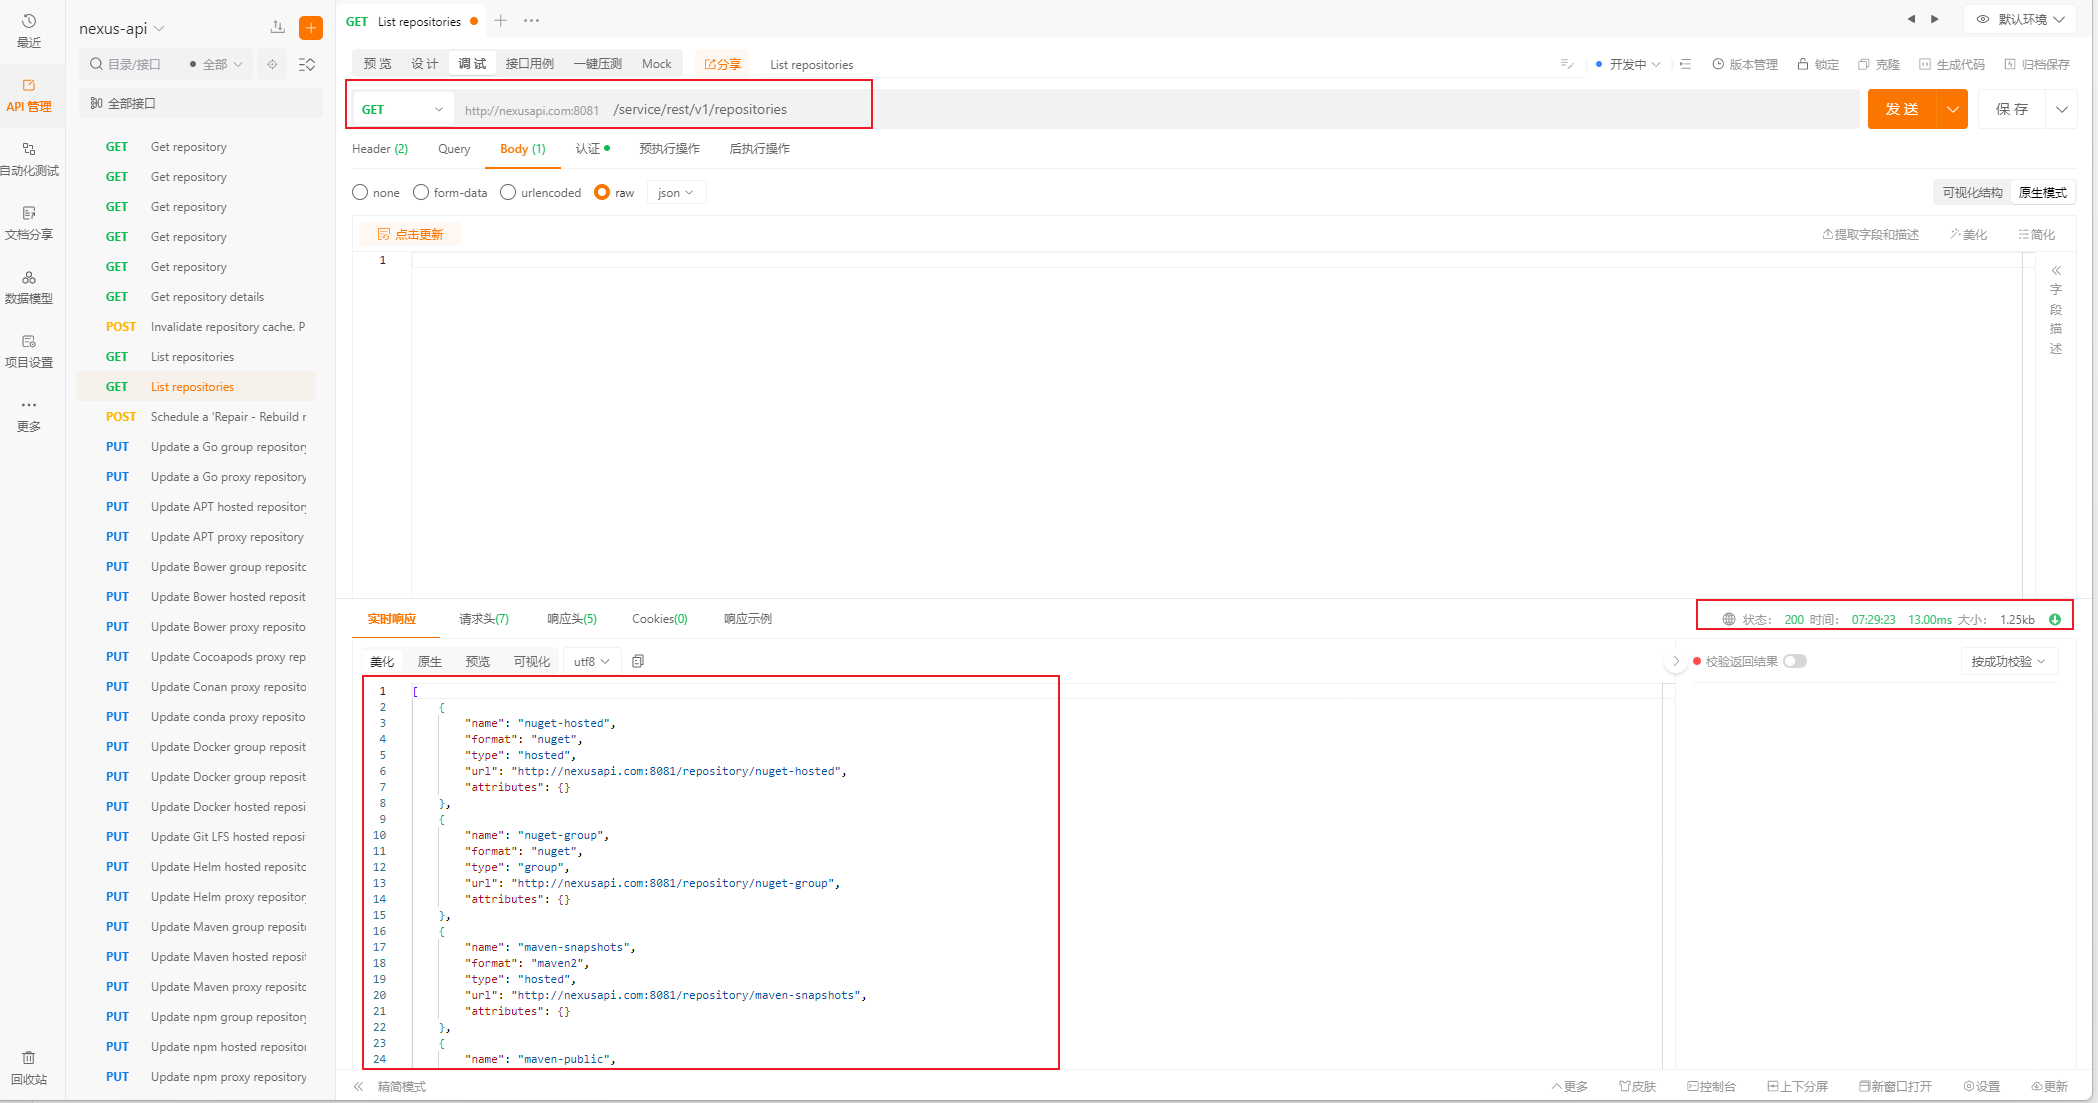
因为我在测试时,刚开始没有创建任何的仓库,此时输入的仓库信息是系统自带的。
输出结果如下:
[
	{
		"name": "nuget-hosted",
		"format": "nuget",
		"type": "hosted",
		"url": "http://nexusapi.com:8081/repository/nuget-hosted",
		"attributes": {}
	},
	{
		"name": "nuget-group",
		"format": "nuget",
		"type": "group",
		"url": "http://nexusapi.com:8081/repository/nuget-group",
		"attributes": {}
	},
	{
		"name": "maven-snapshots",
		"format": "maven2",
		"type": "hosted",
		"url": "http://nexusapi.com:8081/repository/maven-snapshots",
		"attributes": {}
	},
	{
		"name": "maven-public",
		"format": "maven2",
		"type": "group",
		"url": "http://nexusapi.com:8081/repository/maven-public",
		"attributes": {}
	},
	{
		"name": "nuget.org-proxy",
		"format": "nuget",
		"type": "proxy",
		"url": "http://nexusapi.com:8081/repository/nuget.org-proxy",
		"attributes": {
			"proxy": {
				"remoteUrl": "https://api.nuget.org/v3/index.json"
			}
		}
	},
	{
		"name": "maven-releases",
		"format": "maven2",
		"type": "hosted",
		"url": "http://nexusapi.com:8081/repository/maven-releases",
		"attributes": {}
	},
	{
		"name": "maven-central",
		"format": "maven2",
		"type": "proxy",
		"url": "http://nexusapi.com:8081/repository/maven-central",
		"attributes": {
			"proxy": {
				"remoteUrl": "https://repo1.maven.org/maven2/"
			}
		}
	}
]这些信息,就是罗列了当前存在的仓库,跟下面这个页面看到的差不多:

3.4.2 列出所有仓库的设置
List repositorySettings。
GET方法调用/service/rest/v1/repositorySettings接口,可以列出当前Nexus上有的所有仓库的设置信息:
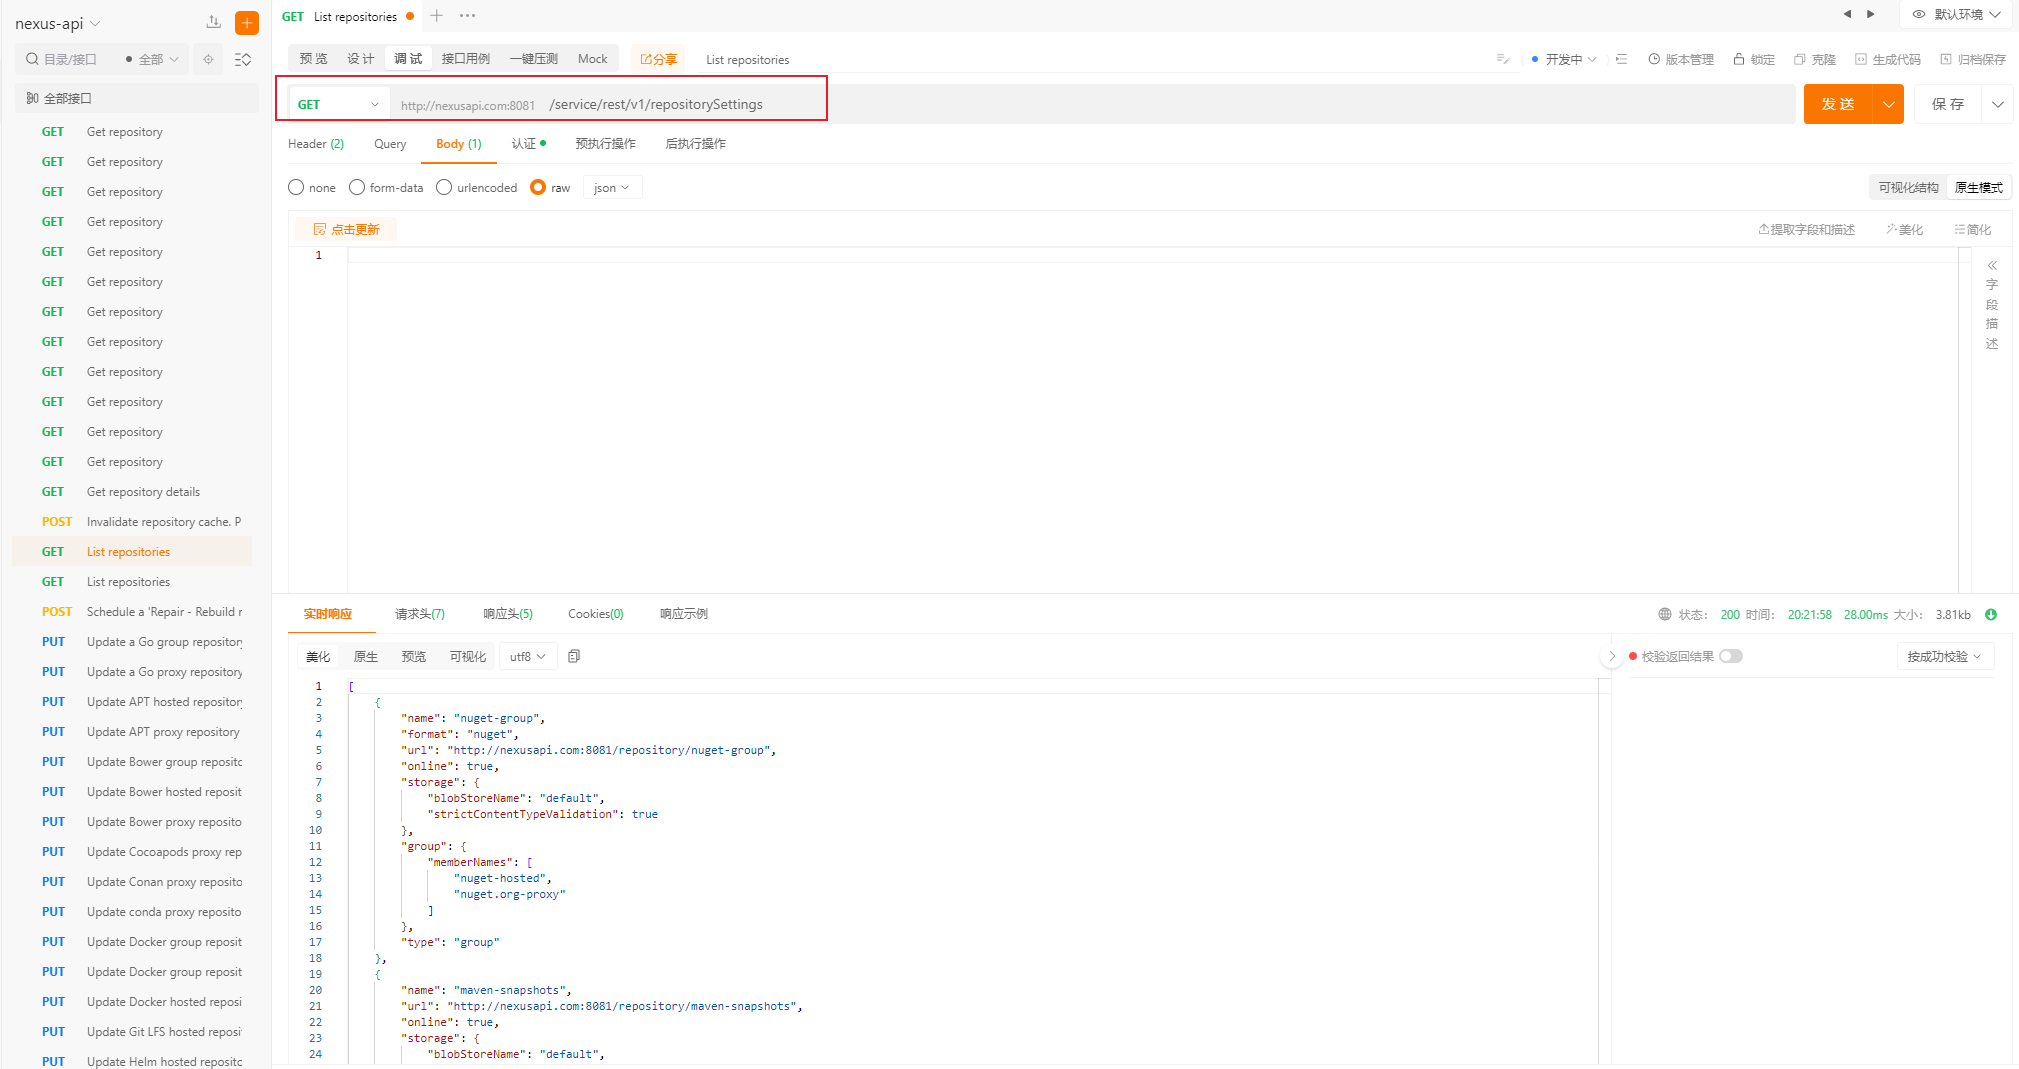
输出结果如下:
[
	{
		"name": "nuget-group",
		"format": "nuget",
		"url": "http://nexusapi.com:8081/repository/nuget-group",
		"online": true,
		"storage": {
			"blobStoreName": "default",
			"strictContentTypeValidation": true
		},
		"group": {
			"memberNames": [
				"nuget-hosted",
				"nuget.org-proxy"
			]
		},
		"type": "group"
	},
	{
		"name": "maven-snapshots",
		"url": "http://nexusapi.com:8081/repository/maven-snapshots",
		"online": true,
		"storage": {
			"blobStoreName": "default",
			"strictContentTypeValidation": false,
			"writePolicy": "ALLOW"
		},
		"cleanup": null,
		"maven": {
			"versionPolicy": "SNAPSHOT",
			"layoutPolicy": "STRICT",
			"contentDisposition": "INLINE"
		},
		"component": {
			"proprietaryComponents": false
		},
		"format": "maven2",
		"type": "hosted"
	},
	{
		"name": "maven-central",
		"url": "http://nexusapi.com:8081/repository/maven-central",
		"online": true,
		"storage": {
			"blobStoreName": "default",
			"strictContentTypeValidation": false,
			"writePolicy": "ALLOW"
		},
		"cleanup": null,
		"proxy": {
			"remoteUrl": "https://repo1.maven.org/maven2/",
			"contentMaxAge": -1,
			"metadataMaxAge": 1440
		},
		"negativeCache": {
			"enabled": true,
			"timeToLive": 1440
		},
		"httpClient": {
			"blocked": false,
			"autoBlock": false,
			"connection": {
				"retries": null,
				"userAgentSuffix": null,
				"timeout": null,
				"enableCircularRedirects": false,
				"enableCookies": false,
				"useTrustStore": false
			},
			"authentication": null
		},
		"routingRuleName": null,
		"maven": {
			"versionPolicy": "RELEASE",
			"layoutPolicy": "PERMISSIVE",
			"contentDisposition": "INLINE"
		},
		"format": "maven2",
		"type": "proxy"
	},
	{
		"name": "nuget.org-proxy",
		"url": "http://nexusapi.com:8081/repository/nuget.org-proxy",
		"online": true,
		"storage": {
			"blobStoreName": "default",
			"strictContentTypeValidation": true,
			"writePolicy": "ALLOW"
		},
		"cleanup": null,
		"proxy": {
			"remoteUrl": "https://api.nuget.org/v3/index.json",
			"contentMaxAge": 1440,
			"metadataMaxAge": 1440
		},
		"negativeCache": {
			"enabled": true,
			"timeToLive": 1440
		},
		"httpClient": {
			"blocked": false,
			"autoBlock": false,
			"connection": {
				"retries": null,
				"userAgentSuffix": null,
				"timeout": null,
				"enableCircularRedirects": false,
				"enableCookies": false,
				"useTrustStore": false
			},
			"authentication": null
		},
		"routingRuleName": null,
		"nugetProxy": {
			"queryCacheItemMaxAge": 3600,
			"nugetVersion": "V3"
		},
		"format": "nuget",
		"type": "proxy"
	},
	{
		"name": "maven-releases",
		"url": "http://nexusapi.com:8081/repository/maven-releases",
		"online": true,
		"storage": {
			"blobStoreName": "default",
			"strictContentTypeValidation": false,
			"writePolicy": "ALLOW_ONCE"
		},
		"cleanup": null,
		"maven": {
			"versionPolicy": "RELEASE",
			"layoutPolicy": "STRICT",
			"contentDisposition": "INLINE"
		},
		"component": {
			"proprietaryComponents": false
		},
		"format": "maven2",
		"type": "hosted"
	},
	{
		"name": "nuget-hosted",
		"format": "nuget",
		"url": "http://nexusapi.com:8081/repository/nuget-hosted",
		"online": true,
		"storage": {
			"blobStoreName": "default",
			"strictContentTypeValidation": true,
			"writePolicy": "ALLOW"
		},
		"cleanup": null,
		"component": {
			"proprietaryComponents": false
		},
		"type": "hosted"
	},
	{
		"name": "maven-public",
		"format": "maven2",
		"url": "http://nexusapi.com:8081/repository/maven-public",
		"online": true,
		"storage": {
			"blobStoreName": "default",
			"strictContentTypeValidation": true
		},
		"group": {
			"memberNames": [
				"maven-releases",
				"maven-snapshots",
				"maven-central"
			]
		},
		"type": "group"
	}
]可以看到,每个仓库里面的设置都比较多。
为了避免本篇总结太长,通过API创建各种类型的仓库另外开一篇总结。