
在Python项目中使用loguru记录日志
loguru 是一个 Python 日志记录 第三方开源库,相比与 Python 原生的 logging 模块,loguru 提供了更简单、更强大、更优雅的日志记录方式。它是对 Python 标准库logging的替代方案,具有开箱即用、功能丰富、配置灵活等特点。
1. loguru的基本使用
- 官方手册: https://loguru.readthedocs.io/en/stable/overview.html
- Pypi说明 https://pypi.org/project/loguru/
- 推荐在虚拟环境中安装依赖库文件,避免对全局环境产生污染。 安装方法:
pip install loguru
1.1 安装loguru
参考 Python虚拟环境管理器miniforge 创建好虚拟环境,然后安装loguru包。
| |
我们在python3.10.16虚拟环境下安装loguru:
| |
可以看第三方包loguru已经安装成功了!其版本是0.7.3 。
1.2 最简单的使用
| |
此时,会在标准输出里面输出一行debug日志。
看一下截图:

可以看到漂亮的日志输出!
1.3 输出不同级别的日志
loguru提供了七层日志层级,或者说七种日志类型。
生产环境中,常常在不同场景下使用不用的日志类型,用于处理各种问题。
每种类型的日志有一个整数值,表示日志层级,称为log level no。
TRACE (5): 用于记录程序执行路径的细节信息,以进行诊断。
DEBUG (10): 开发人员使用该工具记录调试信息。
INFO (20): 用于记录描述程序正常操作的信息消息。
SUCCESS (25): 类似于INFO,用于指示操作成功的情况。
WARNING (30): 警告类型,用于指示可能需要进一步调查的不寻常事件。
ERROR (40): 错误类型,用于记录影响特定操作的错误条件。
CRITICAL (50): 严重类型,用于记录阻止核心功能正常工作的错误条件。
| Level name | Severity value | Logger method |
|---|---|---|
TRACE | 5 | logger.trace() |
DEBUG | 10 | logger.debug() |
INFO | 20 | logger.info() |
SUCCESS | 25 | logger.success() |
WARNING | 30 | logger.warning() |
ERROR | 40 | logger.error() |
CRITICAL | 50 | logger.critical() |
尝试输出不同级别的日志,在Python控制台运行以下代码:
| |
输出如下:
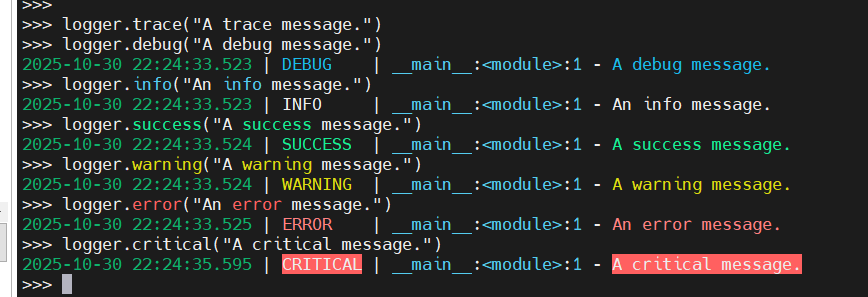
如果你在linux的终端上,可以看到不同类型的日志,已经有不同的颜色加以区分,默认的配置已经很方便的让我们识别和使用了。
请注意,上述输出不包括TRACE级别的日志信息 logger.trace("A trace message.")的信息没有输出。这是因为Loguru默认使用DEBUG作为其最低日志级别,导致任何严重性低于DEBUG的日志信息都会被忽略。
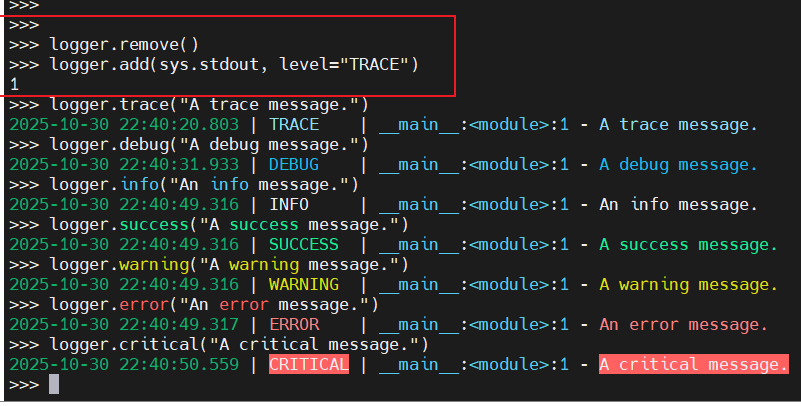
如果您想更改默认级别,可以使用下面所示的add()方法的级别参数:
| |
此时再执行之前的日志输出就可以看到TRACE级别的信息输出了:
再尝试修改日志级别为INFO,然后输出相关日志:
| |
此时再输出日志:

可以看到logger.trace("A trace message.")和logger.debug("A debug message.")的日志都未输出。
通过以上实验,可以根据实际需求调整不同的日志级别输出。
1.4 将日志输出到标准输出
- 默认情况下,日志是输出到标准异常(
stderr)的。
现在我们将日志输出到标准输出(stdout)。
我们来做一下测试,在不改变logger配置前,尝试将输出日志保存到文件中。
编写app.py文件,其内容如下:
| |
然后在命令行执行代码:
| |
通过查看out.txt内容,可以看到文件内容为空。而查看err.txt时,可以看到记录的日志信息。说明默认情况下loguru会将日志记录到标准异常(stderr)中。
尝试将日志记录到标准输出:
| |
再尝试在命令行执行代码:
| |
可以看到,记录标准输出的文件out.txt中有内容!说明此时日志记录到标准输出(stdout)中了。
1.5 将日志记录到文件中
默认情况下,日志不会记录到日志文件上,现在将日志记录到文件中。修改app.py代码。
| |
尝试在不同目录运行~/app.py这个python程序:
| |
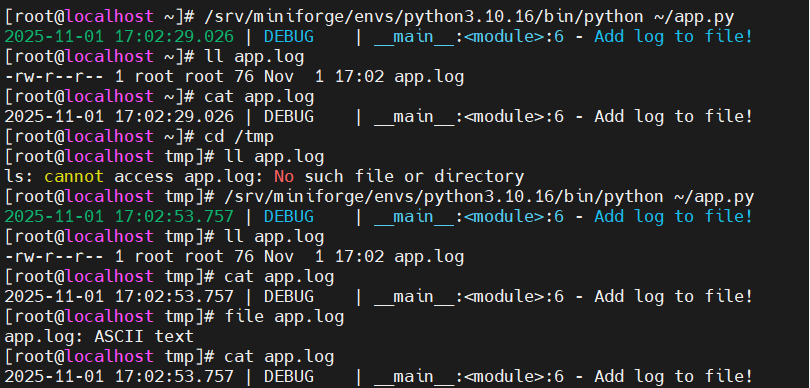
可以看到,当切换目录执行app.py代码程序时,会在当前目录下面创建日志文件app.log,并将日志记录到该文件中!
1.6 将日志存放到指定日志文件夹中
在当前脚本对应的目录下,专门创建一个logs文件夹用于存放日志文件。
| |
运行代码:
| |
可以看到程序自动创建了日志文件夹logs,并将日志输出到logs目录下的app.log文件中了。
1.7 设置日志输出格式
- loguru中的每条日志记录都是一个Python字典,包含时间戳、日志级别、日志内容等数据。
- 可以自定义日志的输出格式。也可以自定义时间输出格式。
- 在定义日志输出格式时,可以使用
{time}时间戳、{level}日志级别、{message}日志内容等指令。 - 如果没有指定时间戳的具体格式时,如果使用
format="{time} {message}"定时日志格式时,默认使用 ISO 8601格式。
1.7.1 使用关键字指令
loguru支持以下指令:
| Key | Description | Attributes |
|---|---|---|
| elapsed | The time elapsed since the start of the program | See datetime.timedelta |
| exception | The formatted exception if any, None otherwise | type, value, traceback |
| extra | The dict of attributes bound by the user (see bind()) | None |
| file | The file where the logging call was made | name (default), path |
| function | The function from which the logging call was made | None |
| level | The severity used to log the message | name (default), no, icon |
| line | The line number in the source code | None |
| message | The logged message (not yet formatted) | None |
| module | The module where the logging call was made | None |
| name | The __name__ where the logging call was made | None |
| process | The process in which the logging call was made | name, id (default) |
| thread | The thread in which the logging call was made | name, id (default) |
| time | The aware local time when the logging call was made | See datetime.datetime |
格式化时间戳可以使用以下关键字:
| Token | Output | |
|---|---|---|
| Year | YYYY | 2000, 2001, 2002 … 2012, 2013 |
| YY | 00, 01, 02 … 12, 13 | |
| Quarter | Q | 1 2 3 4 |
| Month | MMMM | January, February, March … |
| MMM | Jan, Feb, Mar … | |
| MM | 01, 02, 03 … 11, 12 | |
| M | 1, 2, 3 … 11, 12 | |
| Day of Year | DDDD | 001, 002, 003 … 364, 365 |
| DDD | 1, 2, 3 … 364, 365 | |
| Day of Month | DD | 01, 02, 03 … 30, 31 |
| D | 1, 2, 3 … 30, 31 | |
| Day of Week | dddd | Monday, Tuesday, Wednesday … |
| ddd | Mon, Tue, Wed … | |
| d | 0, 1, 2 … 6 | |
| Days of ISO Week | E | 1, 2, 3 … 7 |
| Hour | HH | 00, 01, 02 … 23, 24 |
| H | 0, 1, 2 … 23, 24 | |
| hh | 01, 02, 03 … 11, 12 | |
| h | 1, 2, 3 … 11, 12 | |
| Minute | mm | 00, 01, 02 … 58, 59 |
| m | 0, 1, 2 … 58, 59 | |
| Second | ss | 00, 01, 02 … 58, 59 |
| s | 0, 1, 2 … 58, 59 | |
| Fractional Second | S | 0 1 … 8 9 |
| SS | 00, 01, 02 … 98, 99 | |
| SSS | 000 001 … 998 999 | |
| SSSS… | 000[0..] 001[0..] … 998[0..] 999[0..] | |
| SSSSSS | 000000 000001 … 999998 999999 | |
| AM / PM | A | AM, PM |
| Timezone | Z | -07:00, -06:00 … +06:00, +07:00 |
| ZZ | -0700, -0600 … +0600, +0700 | |
| zz | EST CST … MST PST | |
| Seconds timestamp | X | 1381685817, 1234567890.123 |
| Microseconds timestamp | x | 1234567890123 |
如果你觉得默认的日志格式内容太少,可以自定义日志格式。
如修改app.py为如下内容:
| |
然后运行程序:
| |
可以看到,控制台有日志输出,日志文件中也记录了日志信息。
但因为我并没有在日志格式中设置颜色标记,输出的日志并没有像默认日志那样带有颜色。这个时候就需要使用颜色标记。
1.7.2 颜色标记
To add colors to your logs, you just have to enclose your format string with the appropriate tags (e.g.
<red>some message</red>). These tags are automatically removed if the sink doesn’t support ansi codes. For convenience, you can use</>to close the last opening tag without repeating its name (e.g.<red>another message</>).The special tag
<level>(abbreviated with<lvl>) is transformed according to the configured color of the logged message level.
- 要为日志添加颜色,只需将格式字符串用适当的标签括起来(例如
<red>some message</red>)。如果目标输出不支持 ANSI 代码,这些标签会自动被移除。为了方便,你可以使用</>来关闭最后一个打开的标签,而无需重复其名称(例如<red>another message</>)。 - 特殊标签
<level>(缩写为<lvl>)会根据记录消息级别配置的颜色进行转换。
以下是可用的标签(请注意,兼容性可能因终端而异):
| 颜色(缩写) | Color (abbr) | 样式(缩写) | Styles (abbr) |
|---|---|---|---|
| 黑色 | Black (k) | 加粗 | Bold (b) |
| 蓝色 | Blue (e) | 暗淡 | Dim (d) |
| 青色 | Cyan (c) | 正常 | Normal (n) |
| 绿色 | Green (g) | 斜体 | Italic (i) |
| 品红 | Magenta (m) | 下划线 | Underline (u) |
| 红色 | Red (r) | 删除线 | Strike (s) |
| 白色 | White (w) | 反转 | Reverse (v) |
| 黄色 | Yellow (y) | 闪烁 | Blink (l) |
| 隐藏 | Hide (h) |
使用示例:
| Examples 示例 | Examples 示例 | |
|---|---|---|
| Description | Foreground 前景色 小写 | Background 背景色 大写 |
| Basic colors | <red>, <r> | <GREEN>, <G> |
| Light colors | <light-blue>, <lb> | <LIGHT-CYAN>, <LC> |
| 8-bit colors | <fg 86>, <fg 255> | <bg 42>, <bg 9> |
| Hex colors | <fg #00005f>, <fg #EE1> | <bg #AF5FD7>, <bg #fff> |
| RGB colors | <fg 0,95,0> | <bg 72,119,65> |
| Stylizing | <bold>, <b>, <underline>, <u> |
官方文档中给的示例:
| |
我现在使用官方给的说明,来模拟默认的配置。
此处为了方便颜色展示,我在pycharm中配置了一个项目。
main.py文件内容如下:
| |
tool.py文件内容如下:
| |
然后运行main.py,效果如下图:
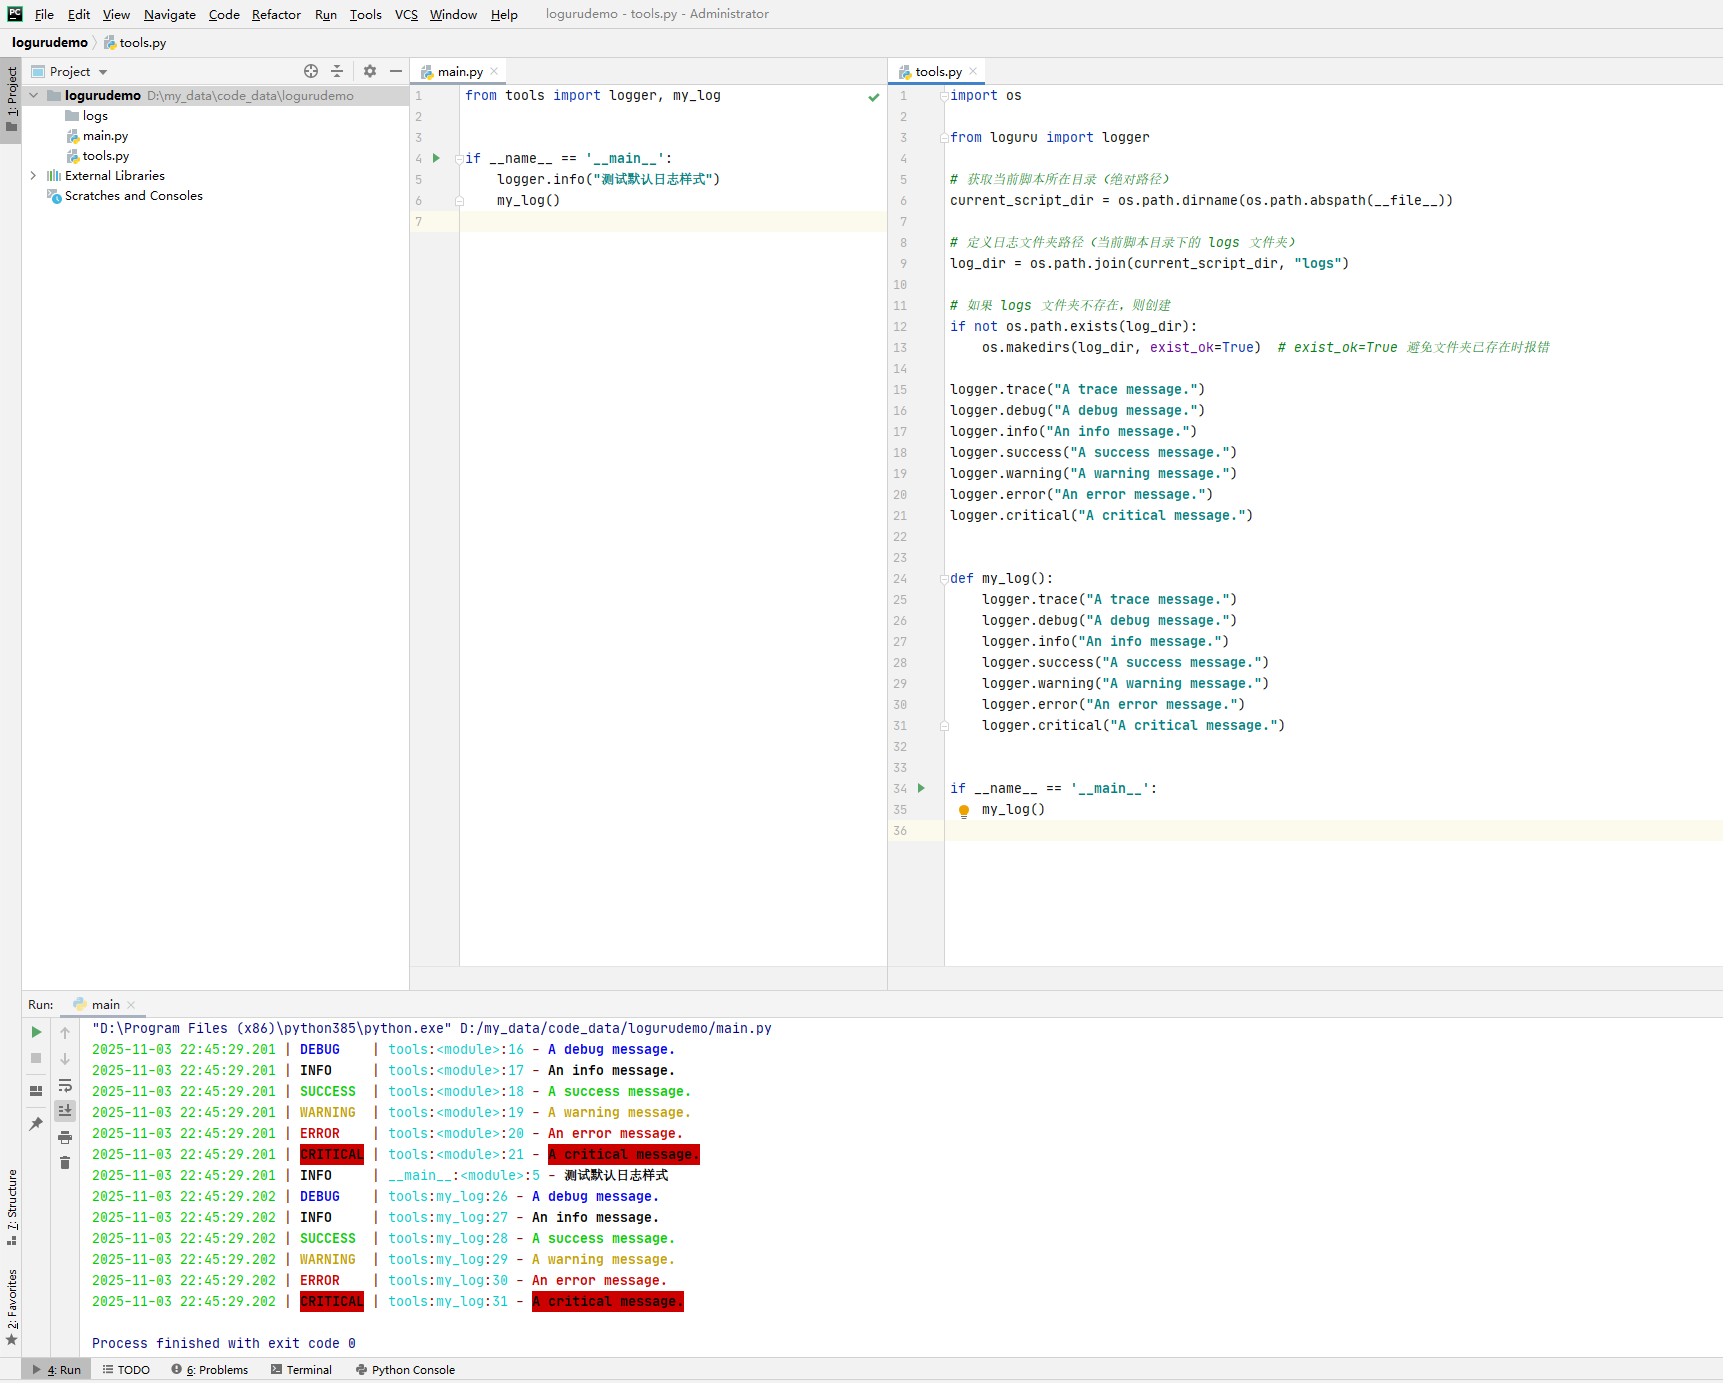
对main.py和tools.py进行修改。
main.py修改后内容如下:
| |
tool.py文件内容如下:
| |
然后运行main.py,效果如下图:
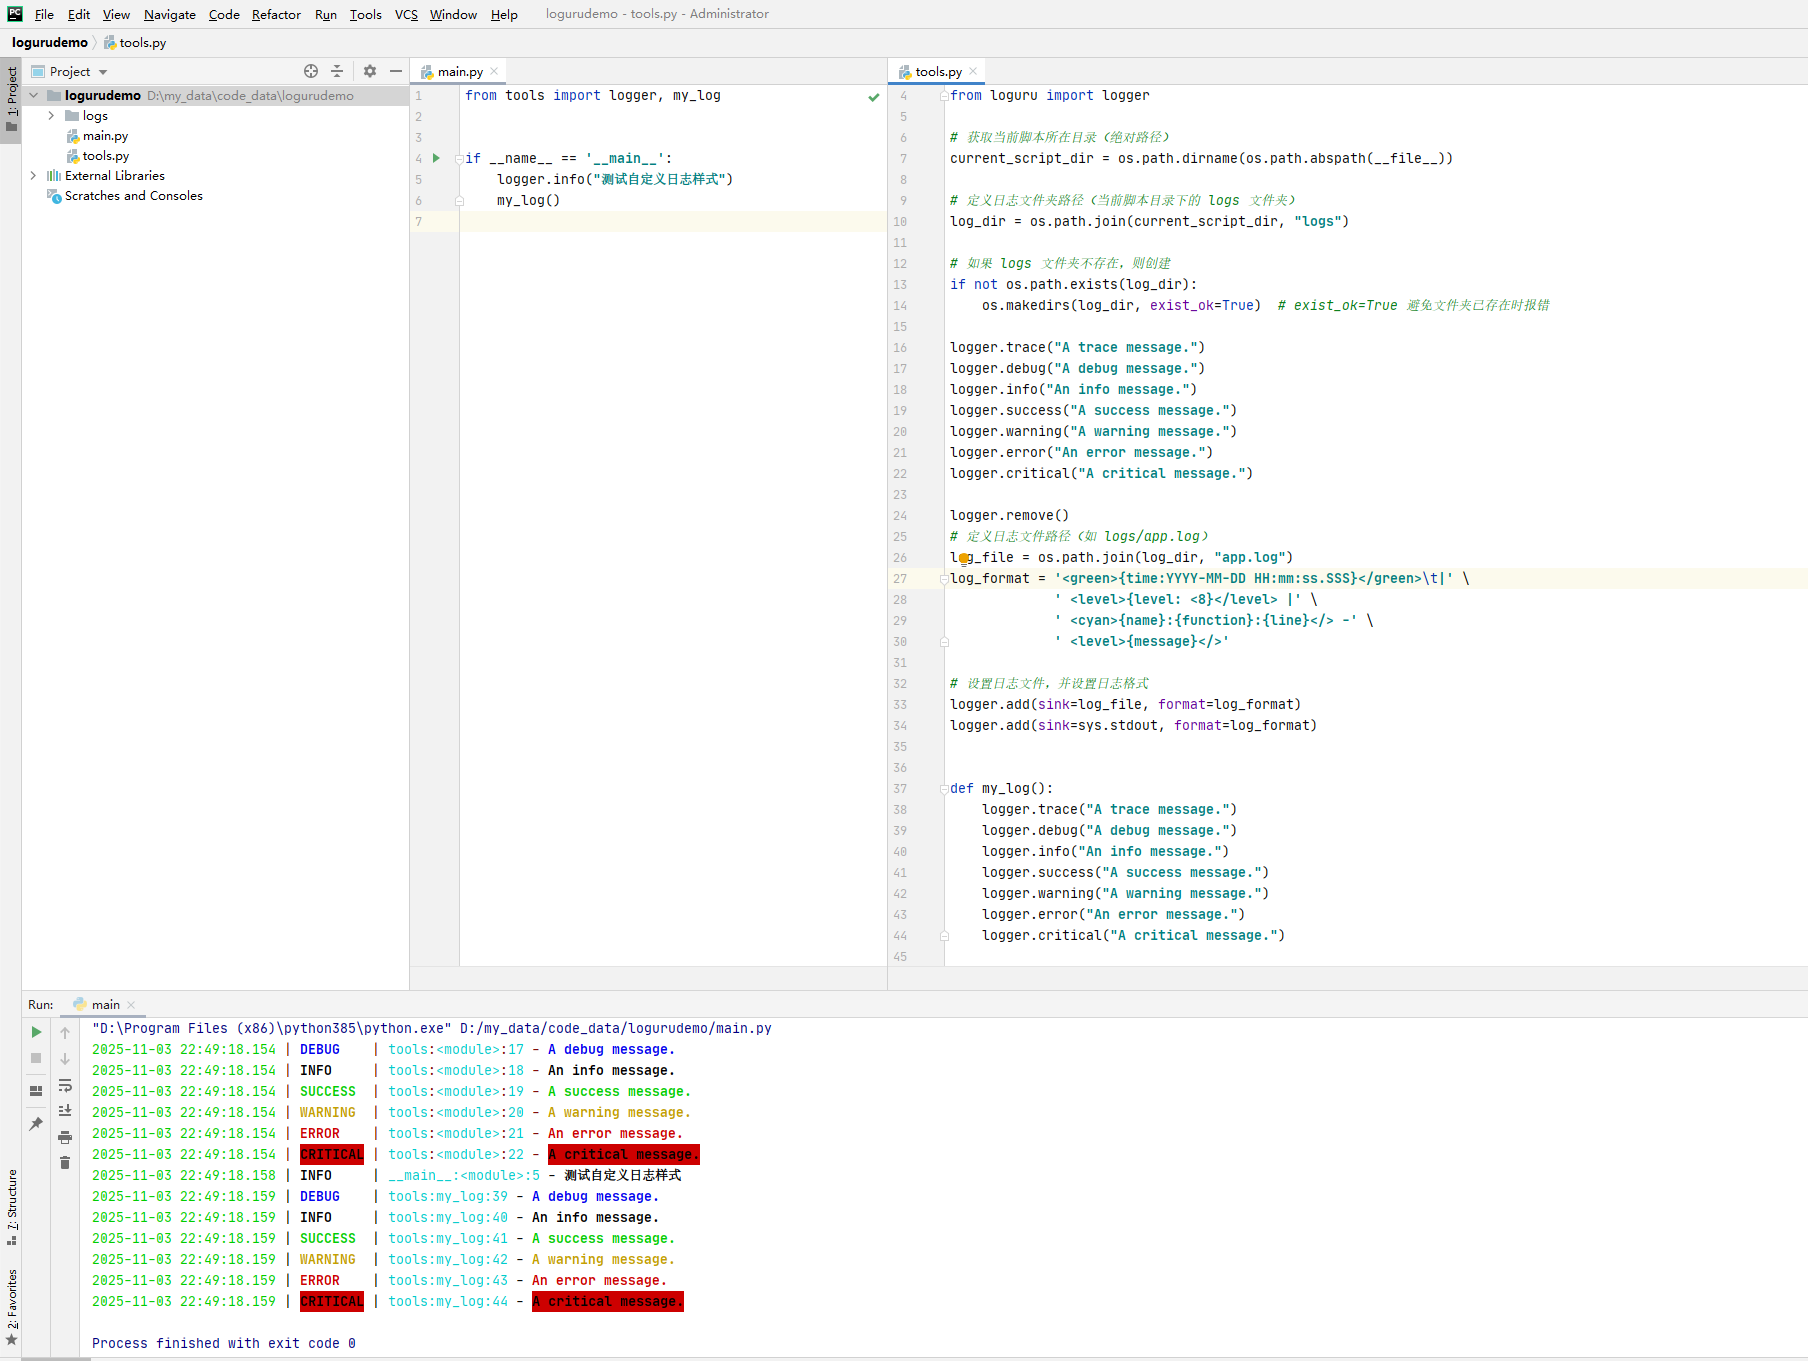
可以看到,通过自定义的日志输出效果与默认的效果一致!此时你还可以根据个人爱好改变不同的样式。
1.8 日志轮转
1.8.1 按字节大小轮转
main.py代码如下:
| |
tools.py代码如下:
| |
运行一次main.py程序:
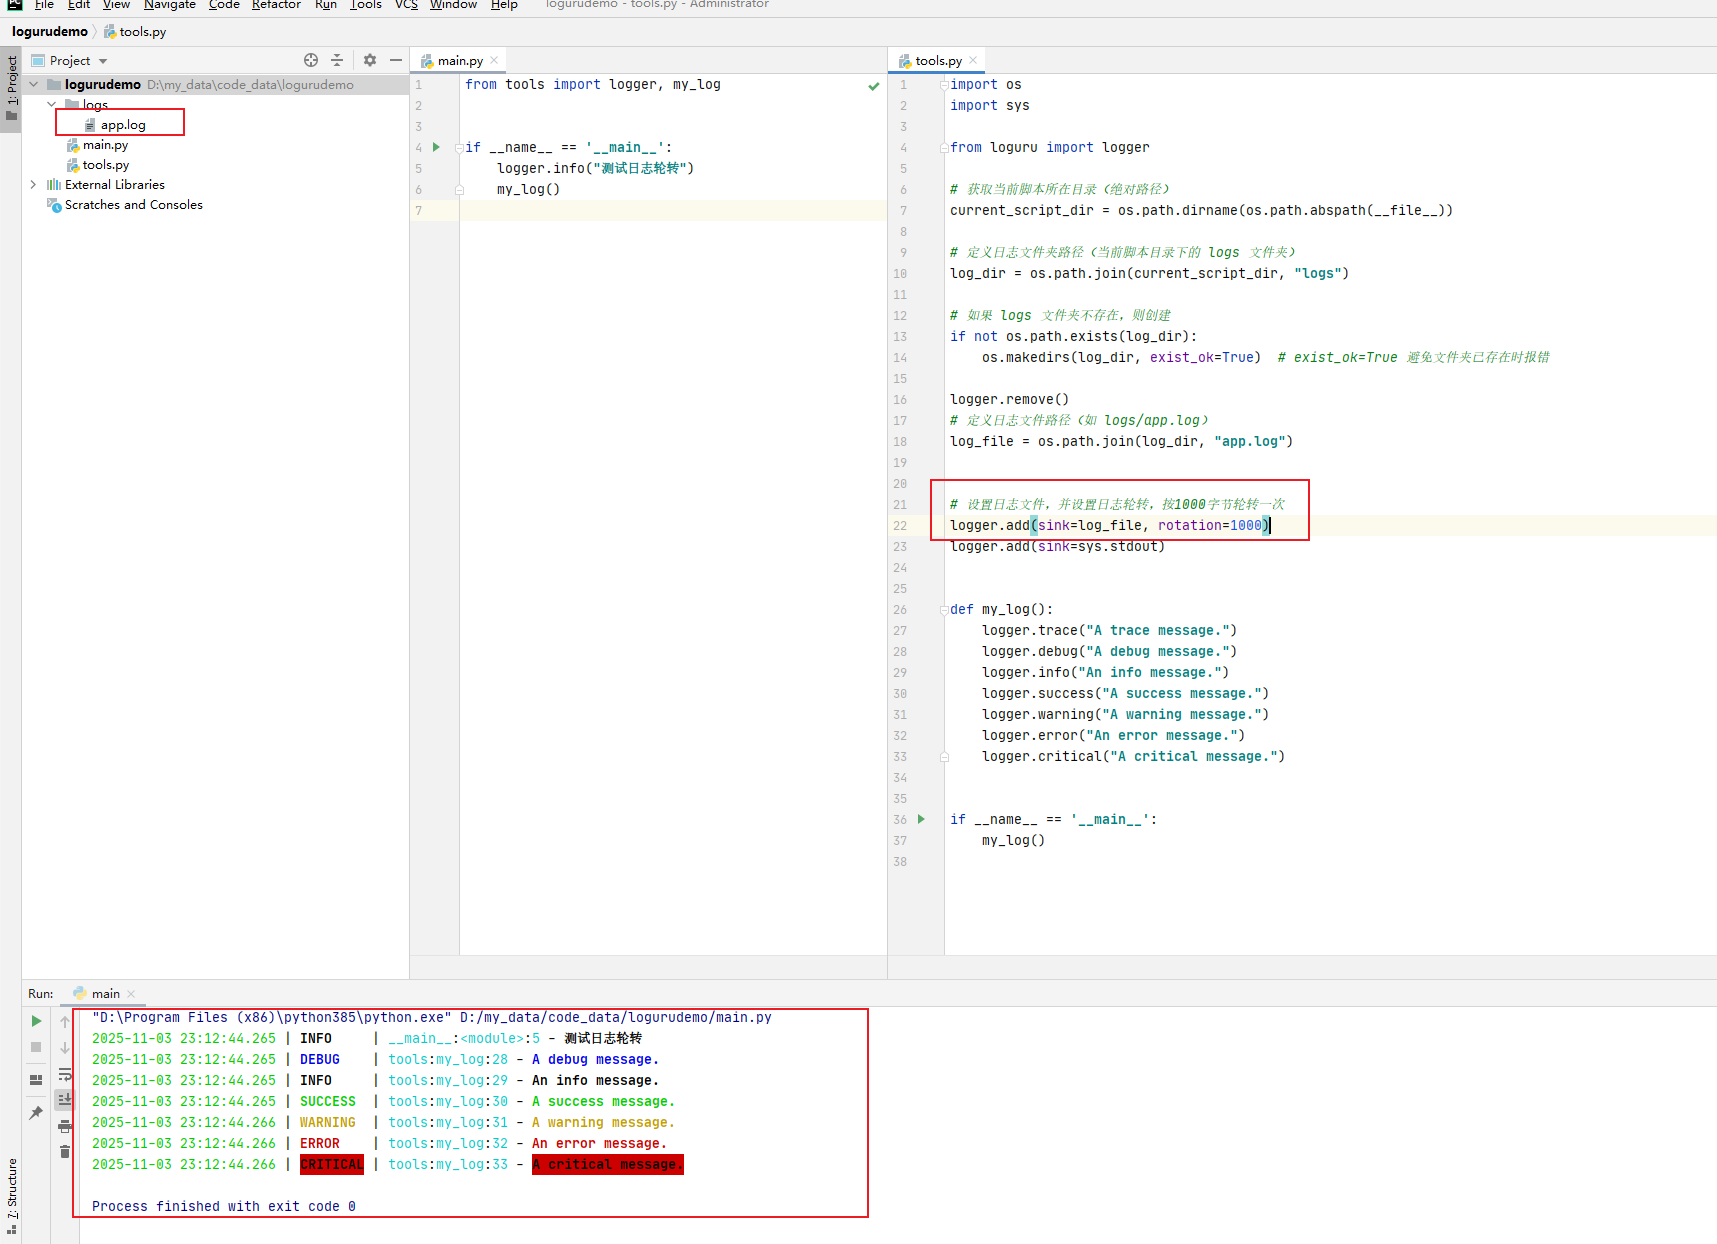
此时在日志文件夹中会生成app.log日志文件:
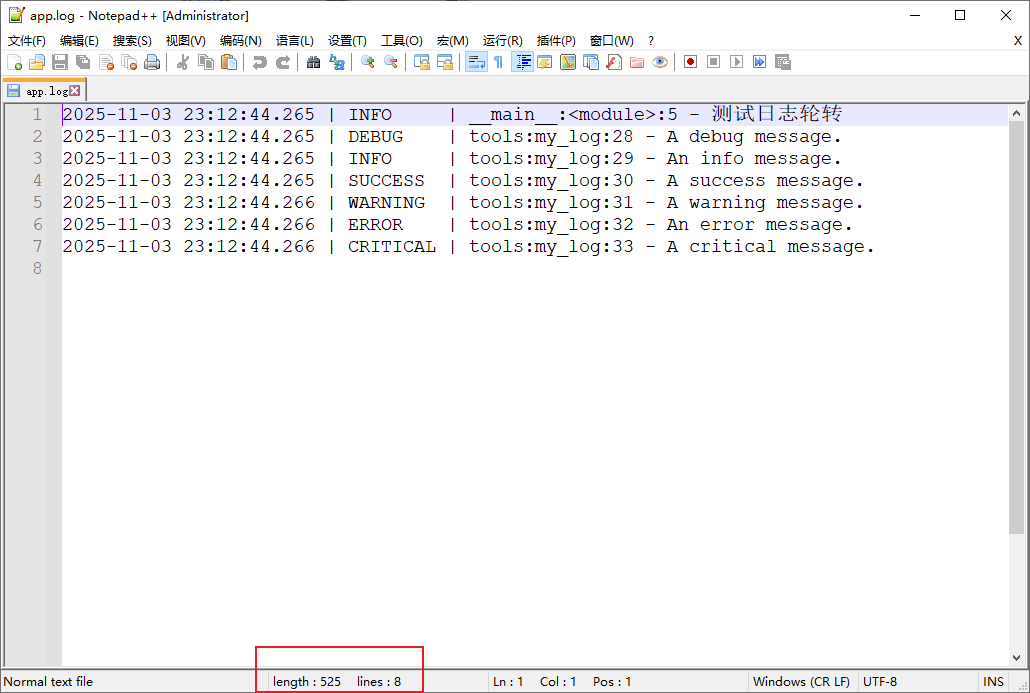
使用notepad++打开app.log日志文件,可以看到其长度为525字节:
再运行一次程序,发现日志做了轮转,生成了一个归档日志文件app.2025-11-03_23-12-44_261418.log:
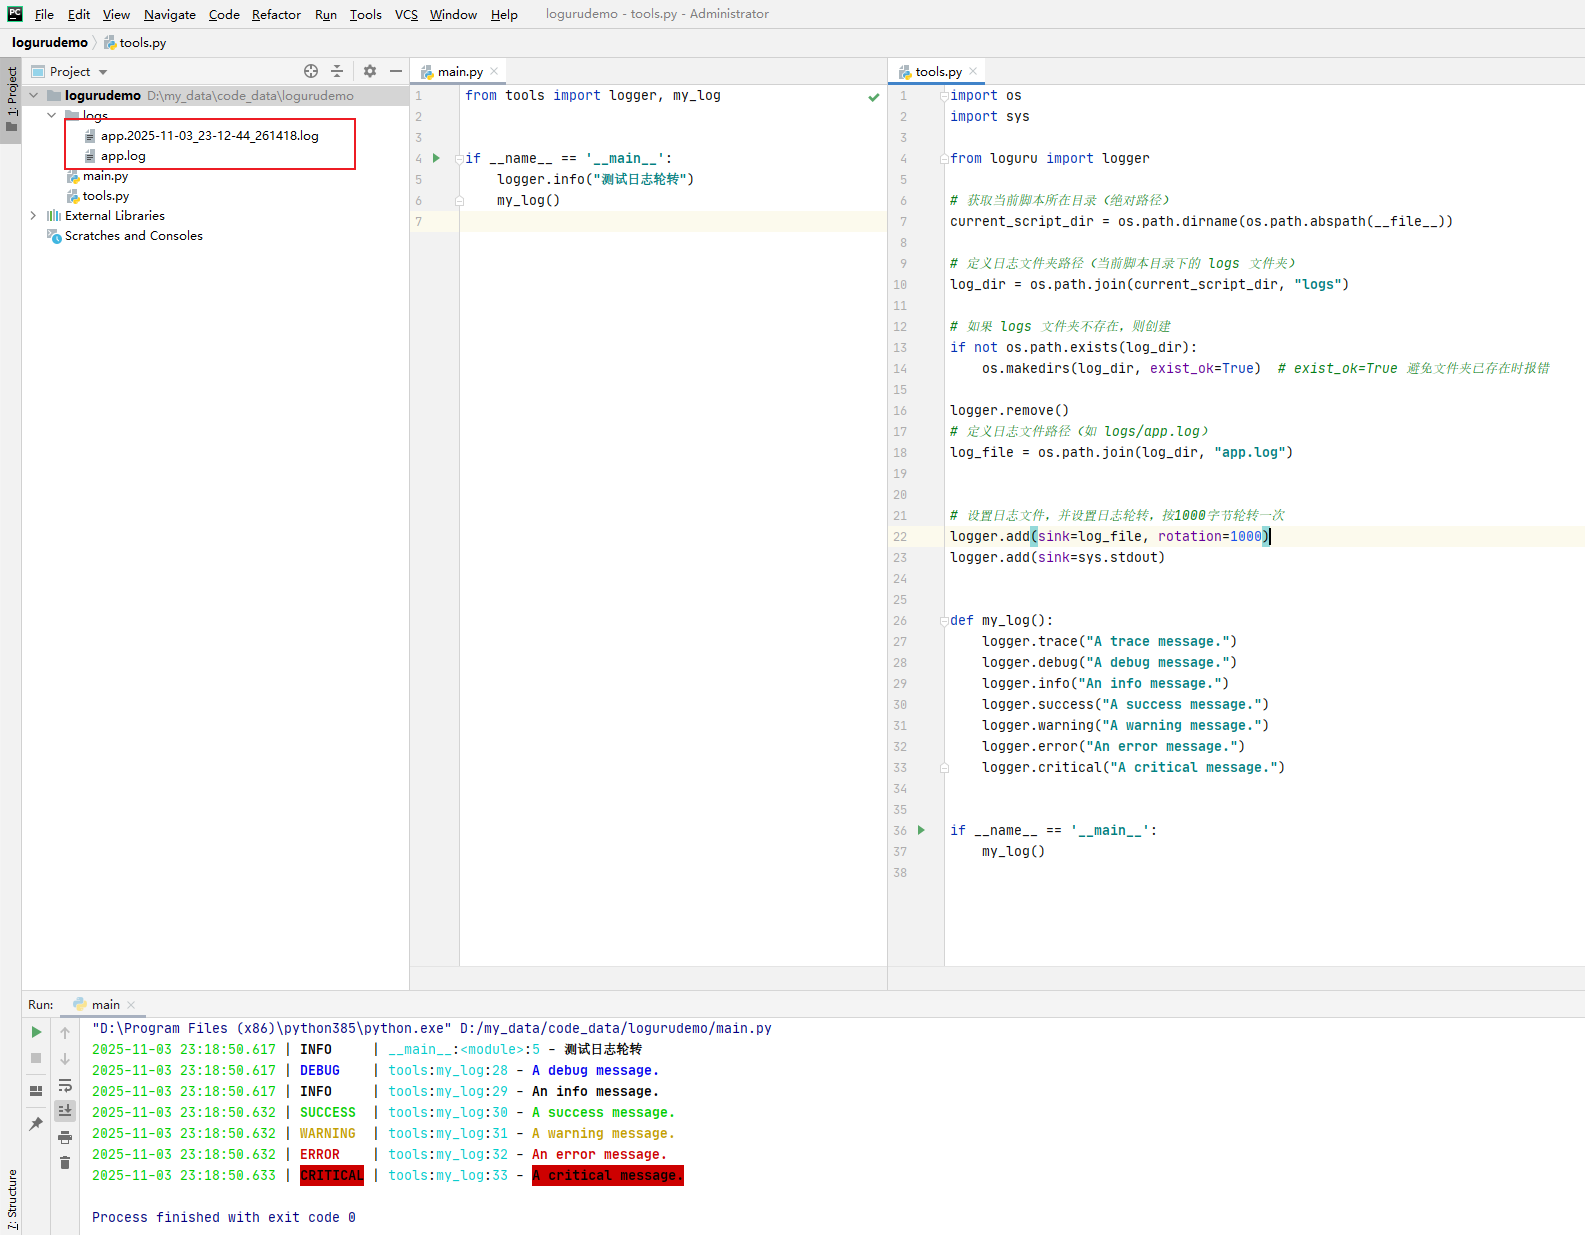
查看app.2025-11-03_23-12-44_261418.log日志内容:
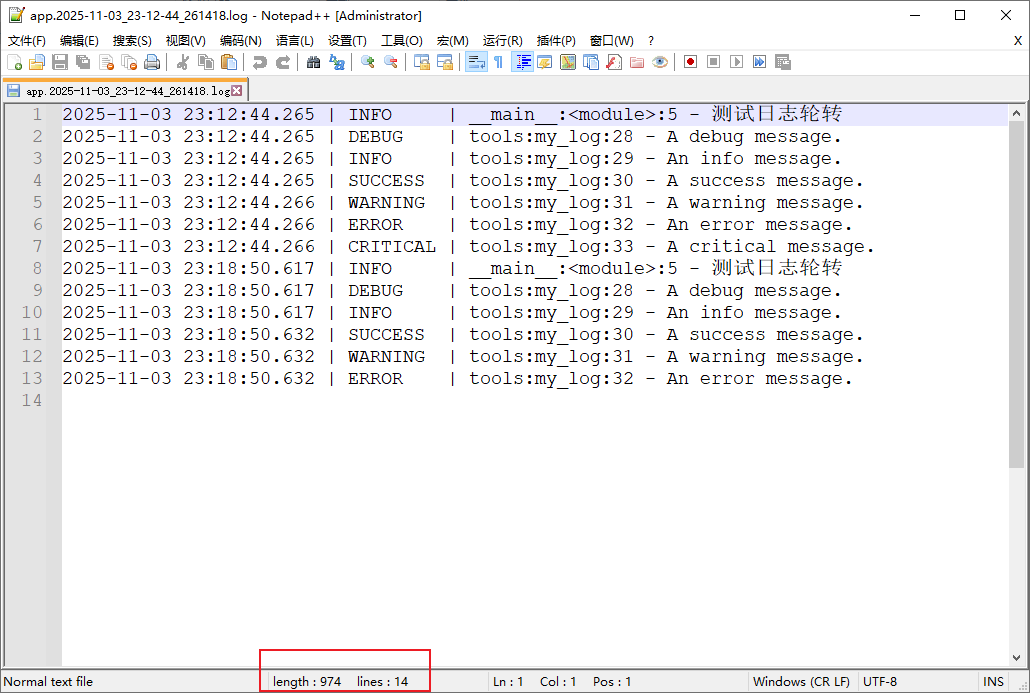
可以看到,其长度为974字节。
而此时的app.log的内容如下:
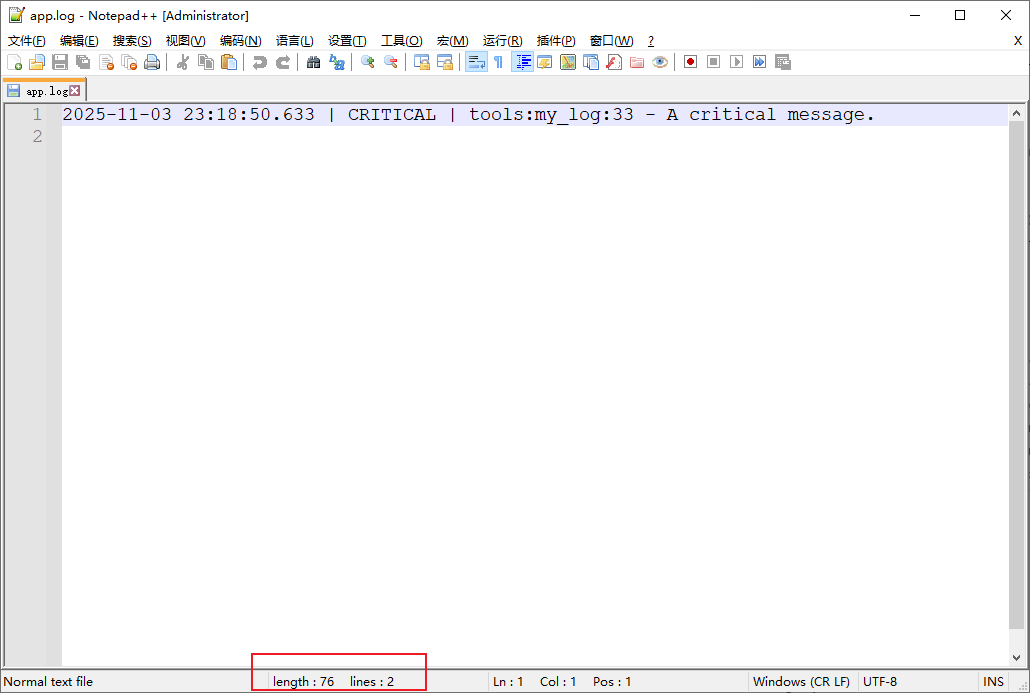
长度为76字节。可以看到,如果将这条日志的76字节写入到之前的日志中,那日志长达将会达到 974+76=1050字节,超过了要求的1000字节,因此就会将之前的日志归档,然后将这最后的一条日志写入到新的app.log中。
1.8.2 使用 datetime.timedelta 设置轮转时间频率
将tools.py代码稍微修改一下,代码如下:
| |
然后运行文件,可以发现生成了多个归档文件app.2025-11-03_23-32-52_450490.log、app.2025-11-03_23-32-55_461361.log,可以看到这两个文件名秒数相差3。查看内容:
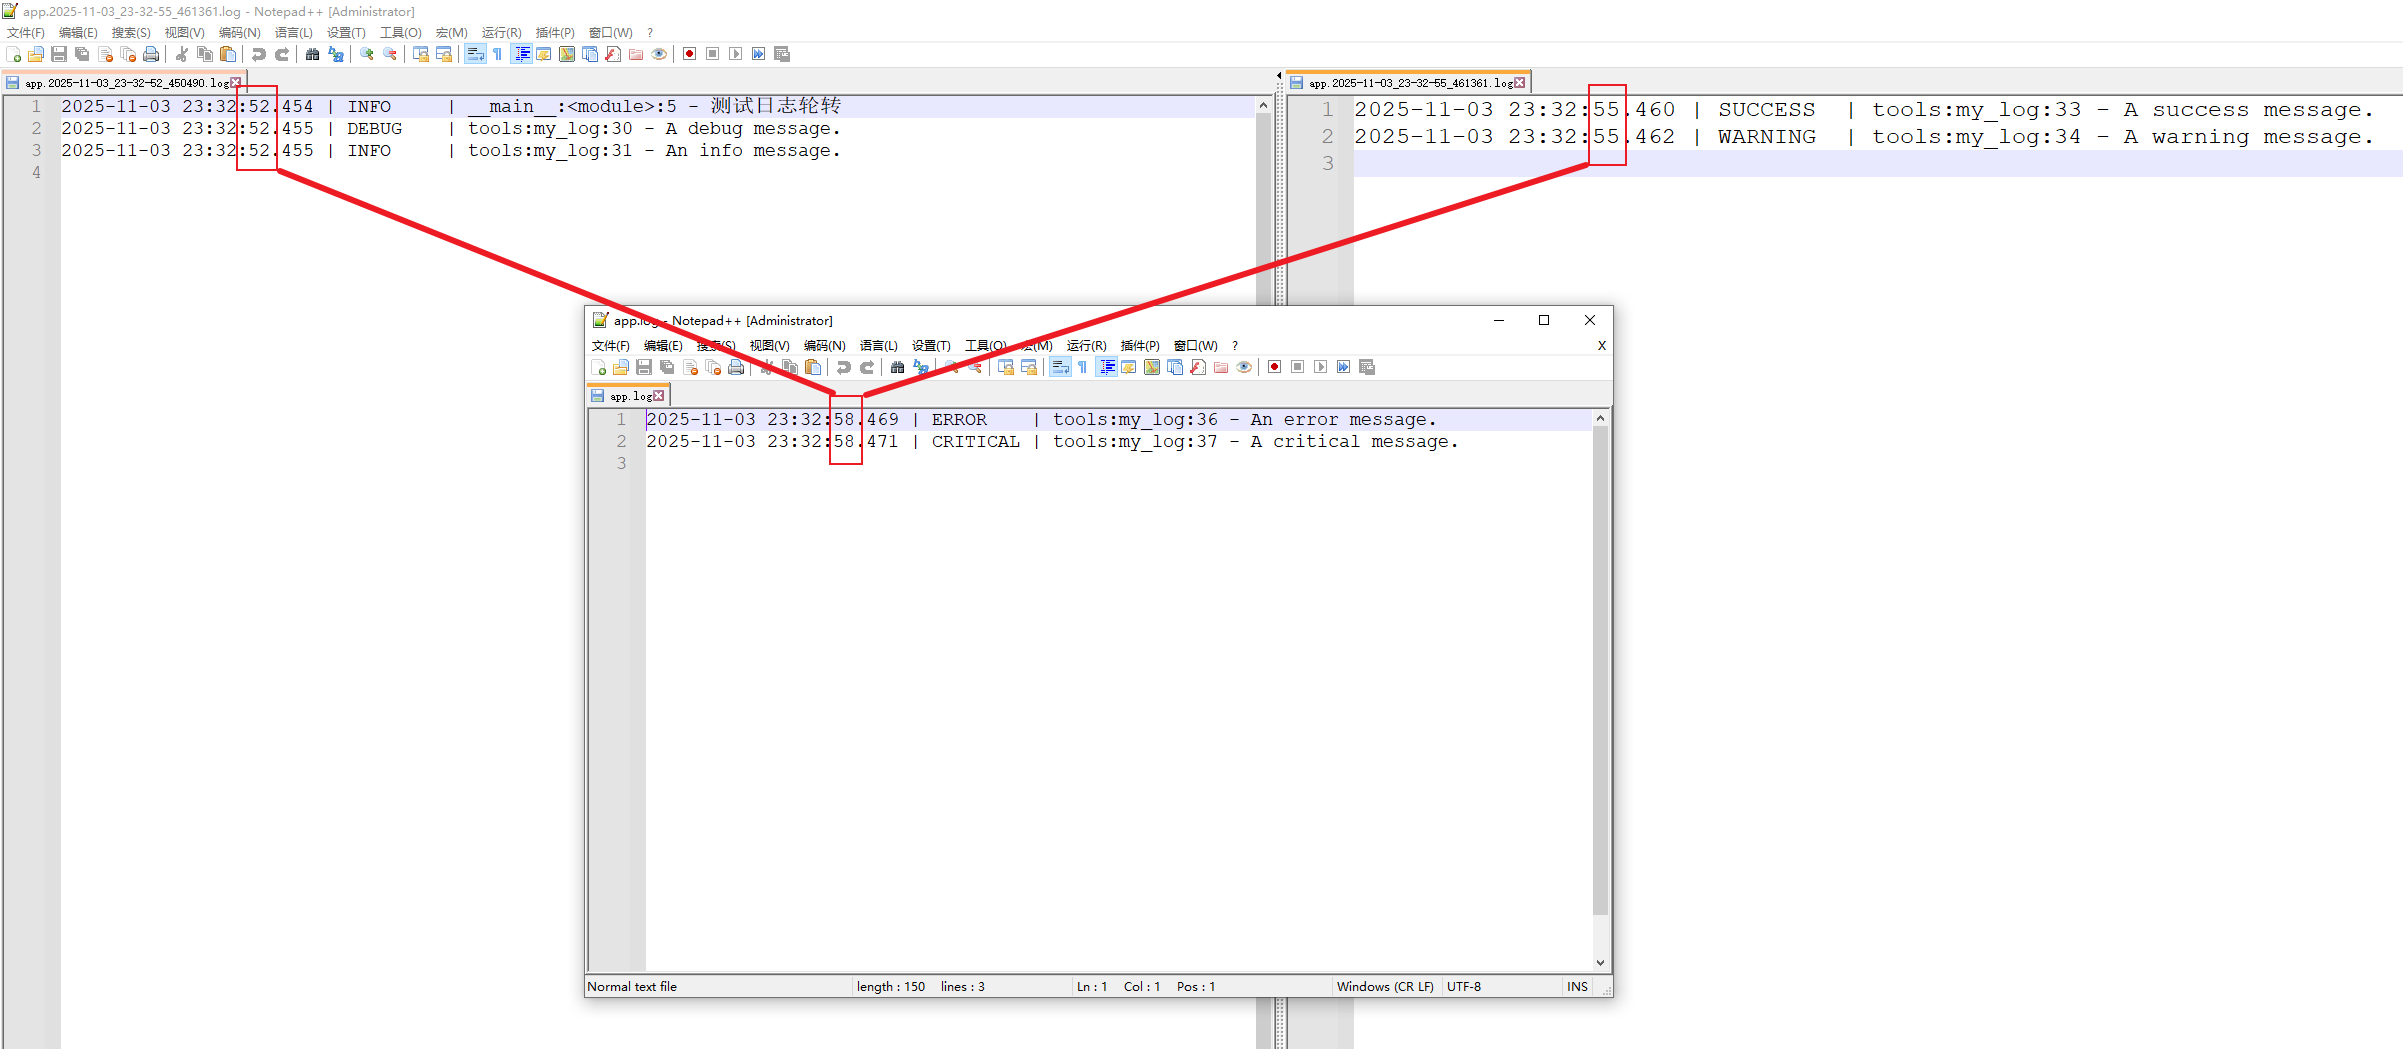
可以看到,日志内容中时间戳相差3秒!
1.8.3 使用字符串表示轮转
如可以使用以下字符串:
Examples: “100 MB”, “0.5 GB”, “1 month 2 weeks”, “4 days”, “10h”, “monthly”, “18:00”, “sunday”, “w0”, “monday at 12:00”, …
示例:
| |
当日志量很大时,建议设置按日志大小进行轮转。
为了方便查询每天的日志,可以每天凌晨的时间进行轮转。时间字符应符合
HH:MM(24 小时制)小时必须是
00-23,分钟是00-59,如'00:00’。0点轮转logger.add("app.log", rotation="00:00")
如以下示例,是在每天17:51轮转:
| |

此时可以看到17:51之前的日志在归档日志app.2025-11-08_17-50-29_576570.log中,17:51之后的新的app.log中。
1.8.4 retention 轮转保留多少日志文件
The
retentionoccurs at rotation or at sink stop if rotation isNone. Files resulting from previous sessions or rotations are automatically collected from disk. A file is selected if it matches the pattern"basename(.*).ext(.*)"(possible time fields are beforehand replaced with.*) based on the configured sink. Afterwards, the list is processed to determine files to be retained. This parameter accepts:
- an
intwhich indicates the number of log files to keep, while older files are deleted.- a
datetime.timedeltawhich specifies the maximum age of files to keep.- a
strfor human-friendly parametrization of the maximum age of files to keep. Examples:"1 week, 3 days","2 months", …- a
callablewhich will be invoked before the retention process. It should accept the list of log files as argument and process to whatever it wants (moving files, removing them, etc.).
如保留100个日志,保留最近2个月日志等。
1.8.5 对归档文件进行压缩
The
compressionhappens at rotation or at sink stop if rotation isNone. This parameter accepts:
- a
strwhich corresponds to the compressed or archived file extension. This can be one of:"gz","bz2","xz","lzma","tar","tar.gz","tar.bz2","tar.xz","zip".- a
callablewhich will be invoked before file termination. It should accept the path of the log file as argument and process to whatever it wants (custom compression, network sending, removing it, etc.).
- 支持多种格式的压缩,如
tar.gz、zip等等。
如:
| |
1.9 异常日志捕获
可以使用@logger.catch装饰器来捕获异常日志,如下所示:
| |
当x + y + z的值为0时,将抛出ZeroDivisionError: division by zero,如果不加@logger.catch异常捕获,日志中将不会记录该异常。
示例:
| |
运行程序后,日志中正常捕获了异常日志:
| |
- 在 Python 中,
logger.catch是loguru库提供的一个装饰器,用于自动捕获函数或代码块中的异常并记录日志。它与你自己手写的try...except异常捕获在目的、用法和场景上有所不同,但可以互补使用。
使用建议
- 什么时候用
logger.catch?
- 对「无需手动处理,仅需记录异常详情」的场景(如工具函数、异步任务、回调函数);
- 作为「异常兜底日志」,确保即使代码未手动捕获异常,也能记录完整的错误信息(避免无声失败);
- 适合快速迭代、不想写大量
try...except的场景。- 什么时候用自定义
try...except?
- 需要「手动处理异常」的场景(如重试、回滚事务、返回默认值、给用户友好提示);
- 需精确控制「捕获哪些异常、忽略哪些异常」的场景;
- 异常处理逻辑复杂(如多层嵌套、条件判断)的场景。
- 两者结合使用
- 外层用
try...except处理「可恢复的异常」(如用户输入错误);- 内层或关键函数用
logger.catch记录「不可预期的异常」(如系统错误、第三方接口异常),确保日志完整。
注意事项:
logger.catch仅用于「记录异常」,不能替代「异常处理」—— 如果需要程序从异常中恢复,必须用try...except手动处理;- 避免过度使用
logger.catch(如给每个函数都加装饰器),否则可能掩盖需要手动处理的异常; - 敏感场景(如密码、隐私数据)需关闭
diagnose=True,避免局部变量中的敏感信息被记录到日志; logger.catch捕获的异常默认会重新抛出(reraise=True),如果不需要向上传播,需手动设置reraise=False。
2. loguru的高级用法
2.1 日志序列化
当你想将日志便于解析或传递给其他应用时,可以使用serialize参数,每条日志消息将在发送到配置的接收端之前被转换为 JSON 字符串。
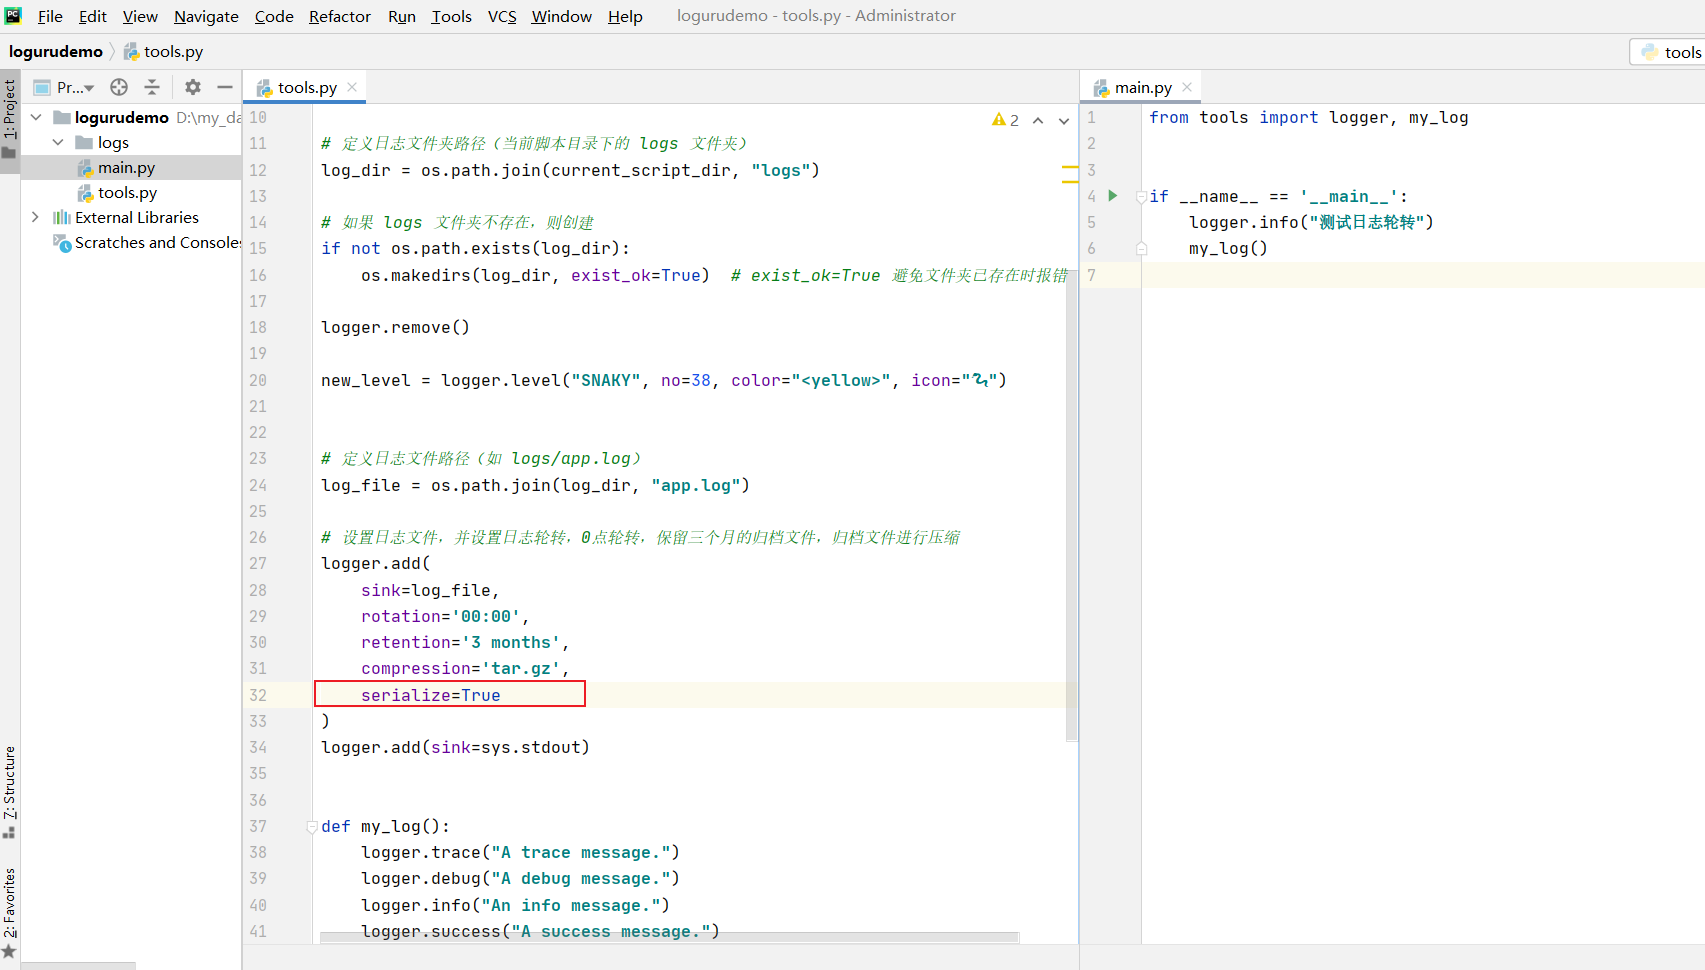
此时修改tools.py代码如下:
| |
在命令行运行main.py程序,并使用jq命令获取日志文件输出。
注意,jq是一个json解析工具,可参考JSON解析工具-jq
可以看到jq命令能够正常解析出已经序列化的日志文件 app.log。
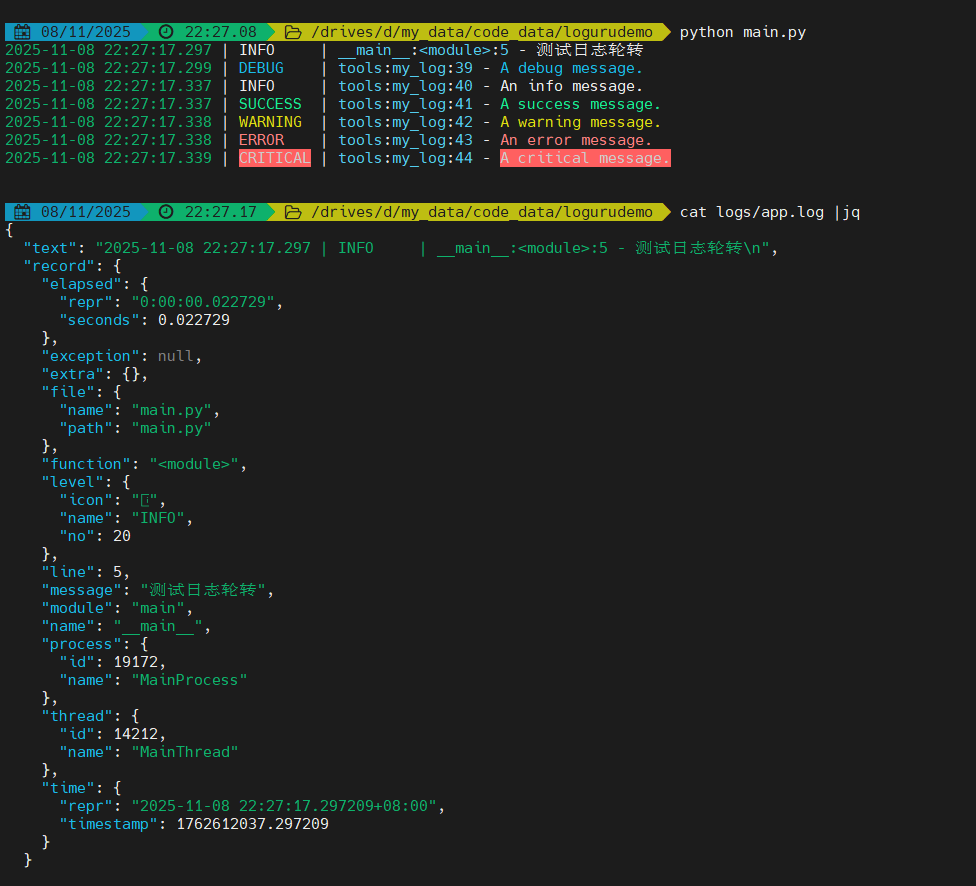
序列化的日志文件长这样:
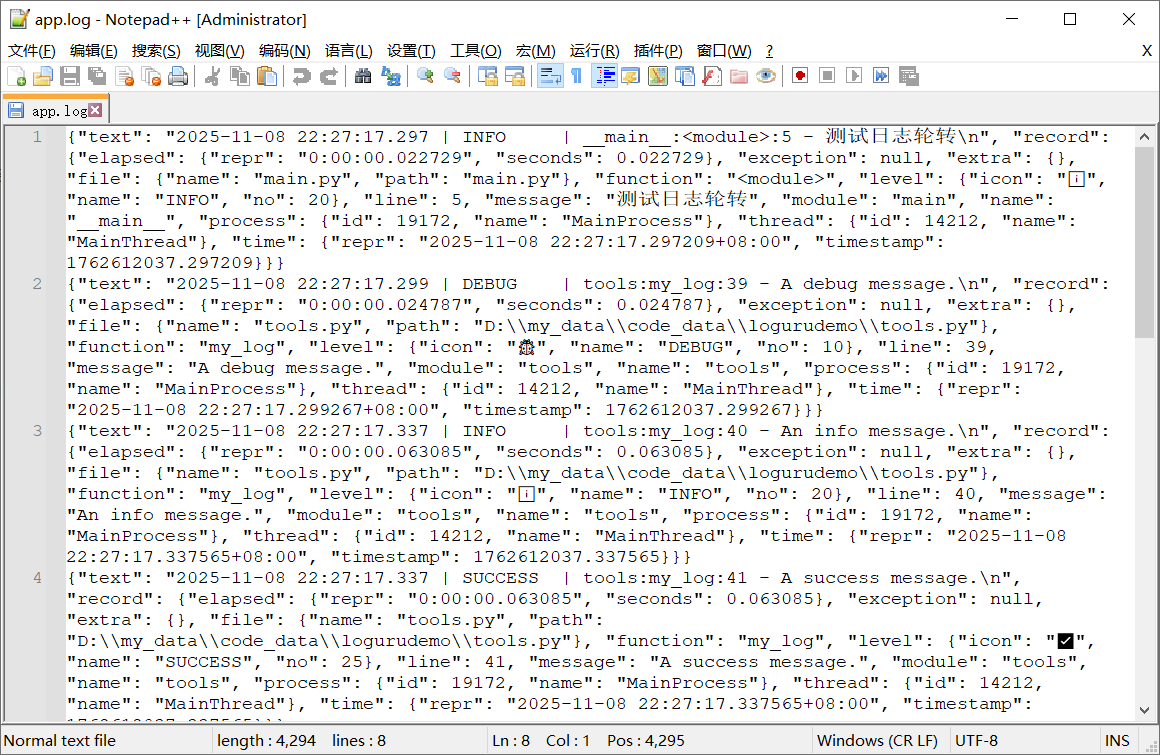
| |
2.2 使用bind()函数给日志增加额外属性
- 使用 bind(),您可以通过修改额外的记录属性来为日志消息提供上下文。
Bind attributes to the
extradict of each logged message record.This is used to add custom context to each logging call.
Parameters:
**kwargs – Mapping between keys and values that will be added to the
extradict.Returns:
Logger– A logger wrapping the core logger, but which sends record with the customizedextradict.
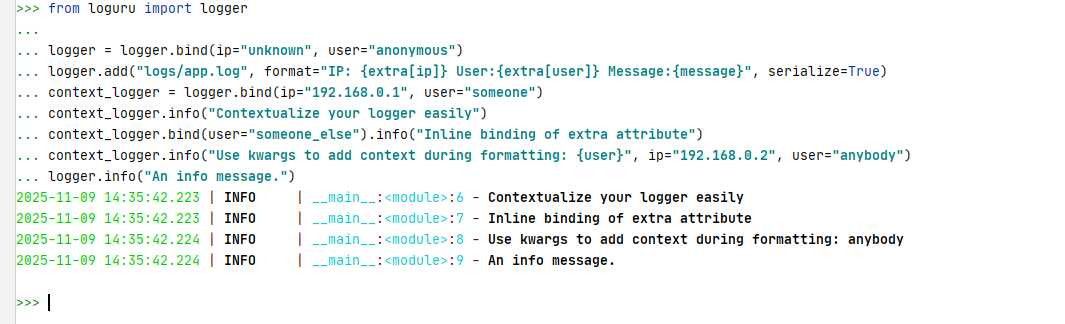
官方示例:
| |
为了更清晰的看到额外属性,我们开启日志序列化,修改代码如下:
| |
在Python命令行运行以上代码:
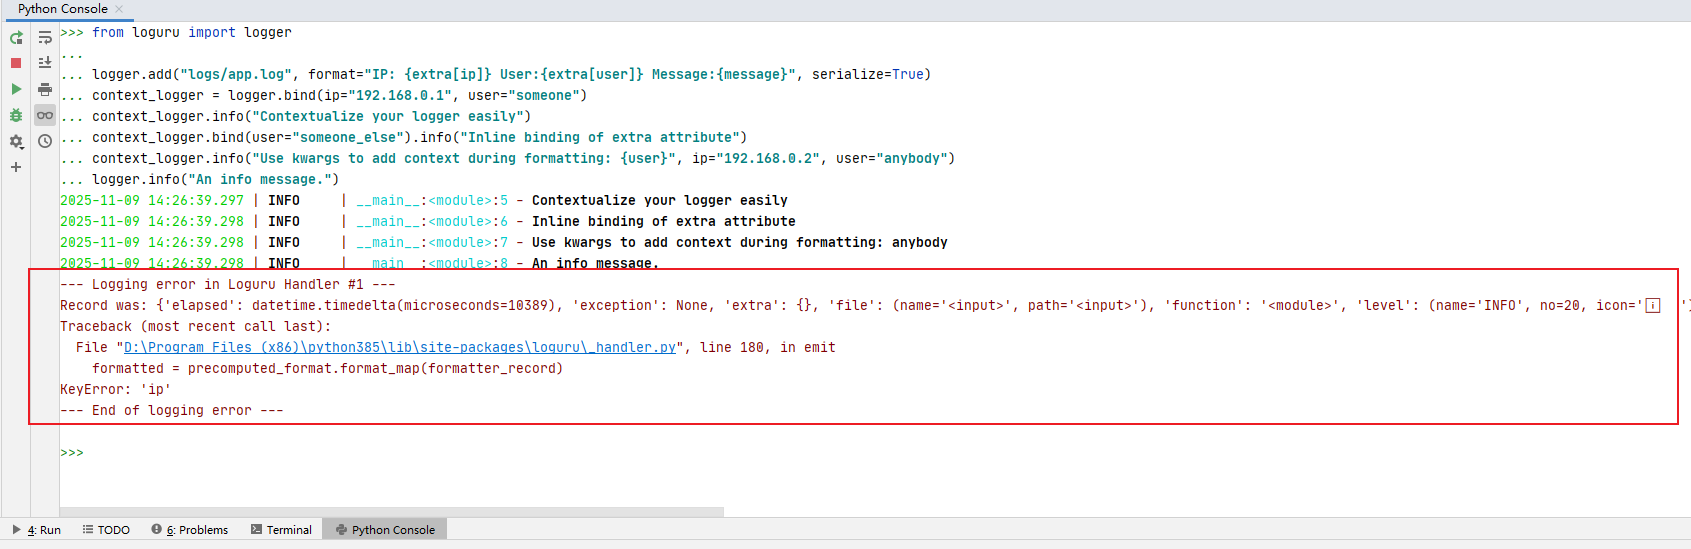
可以看到,新生成的context_logger的日志能正常输出,但logger.info("An info message.")这一行代码使用的默认的logger就抛出了异常,提示KeyError: 'ip',这是因为默认logger并没有ip这个额外属性。
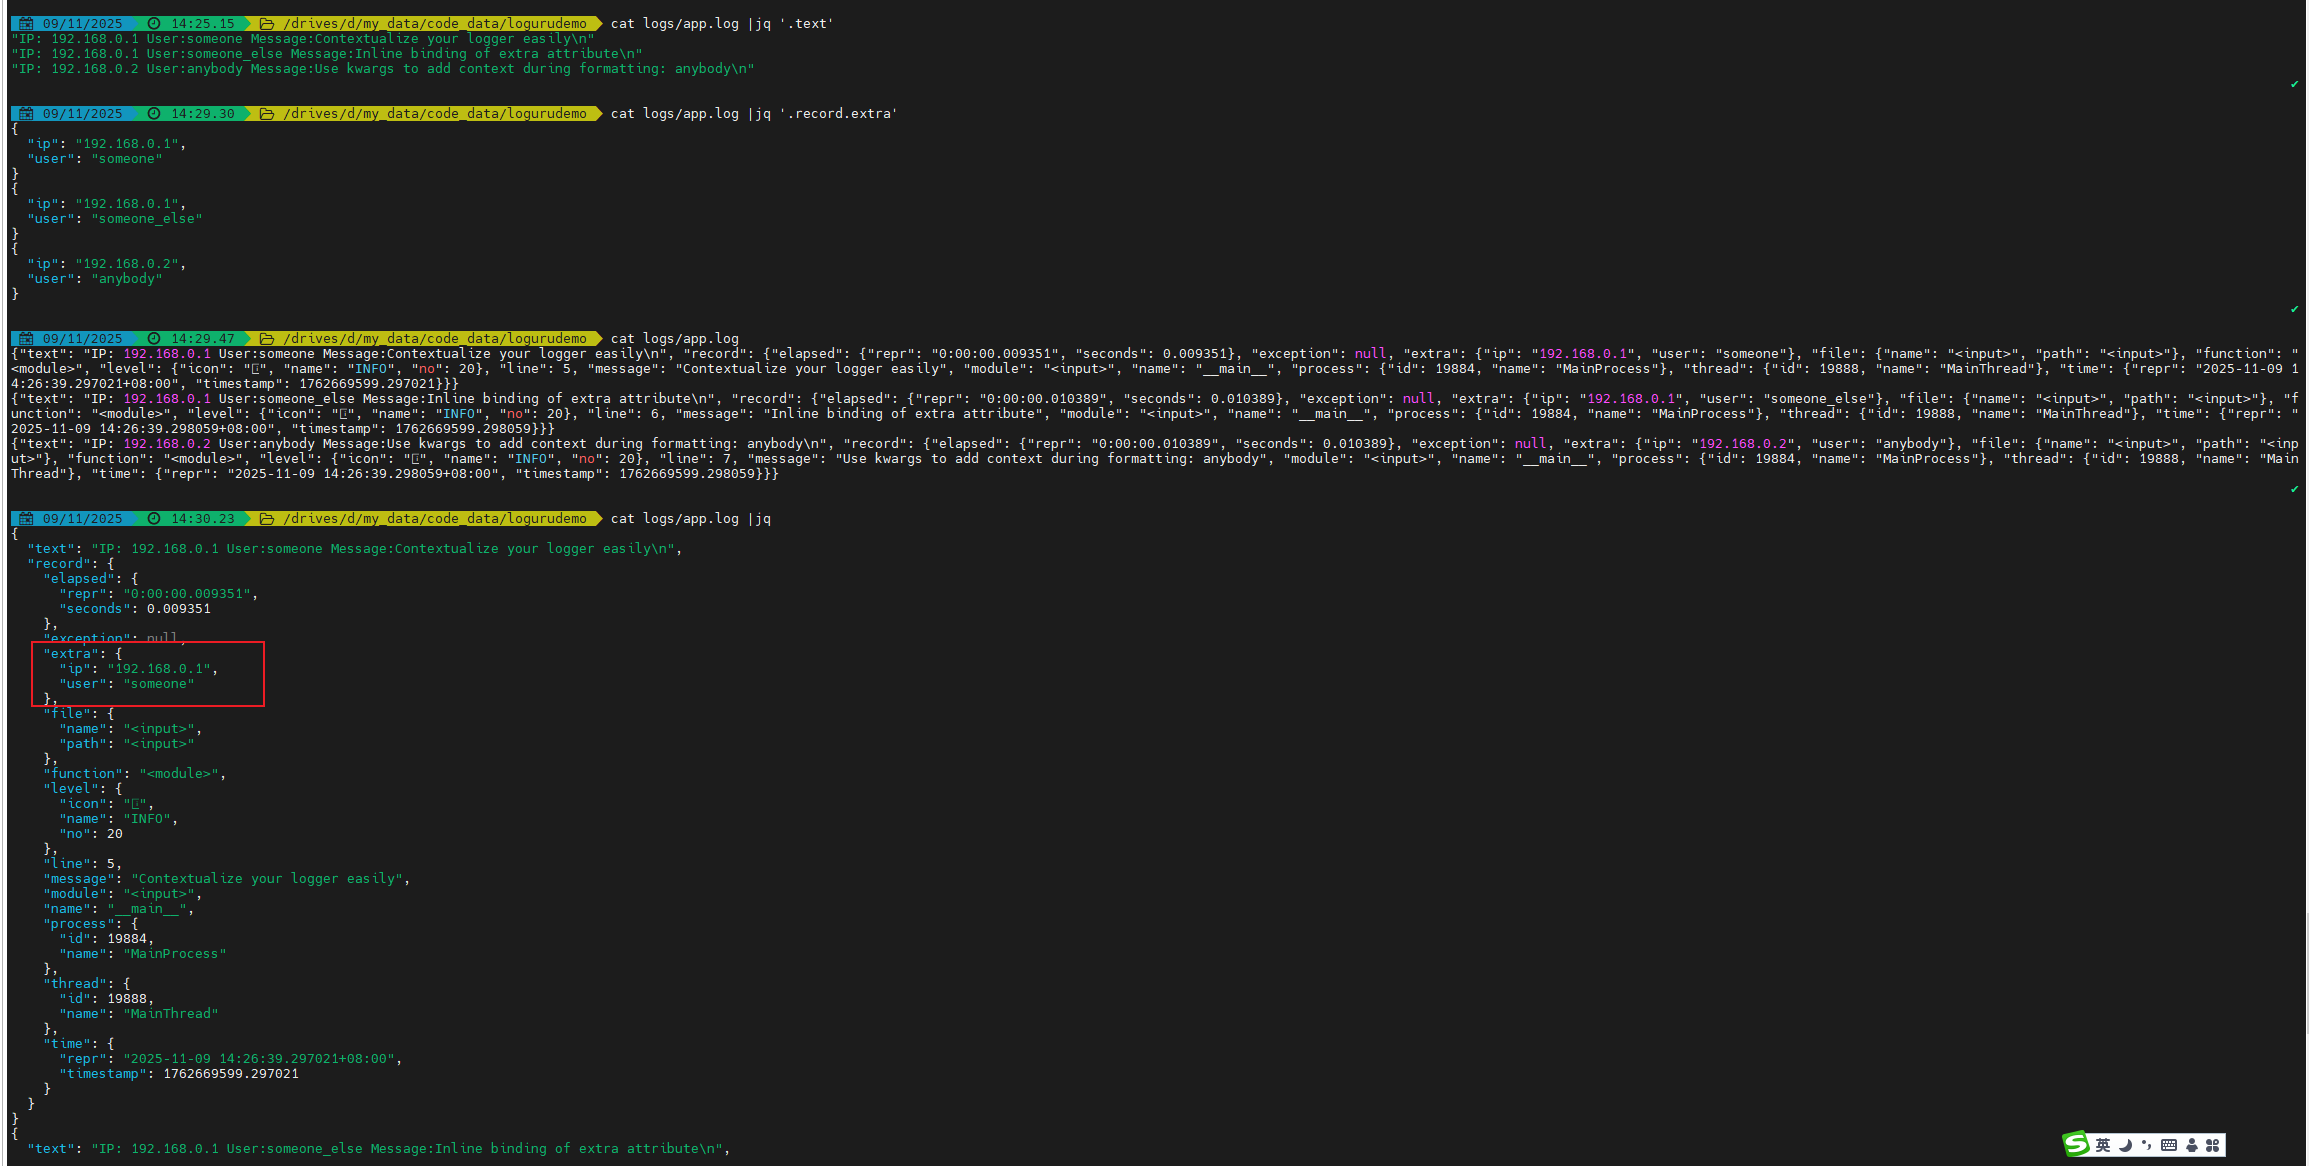
此时app.log中日志内容如下:
| |
此时,可以看到日志记录中都额外记录了ip和user这两个属性:
为了让默认的logger输出日志时不报KeyError异常,可通过以下方式进行修复。
2.2.1 为根日志绑定默认属性
增加一个默认属性绑定:
| |
注意第三行logger = logger.bind(ip="unknown", user="anonymous")
此时程序正常运行,没有报错:
看输出日志文件:
| |
使用jq获取相关的信息:
| |
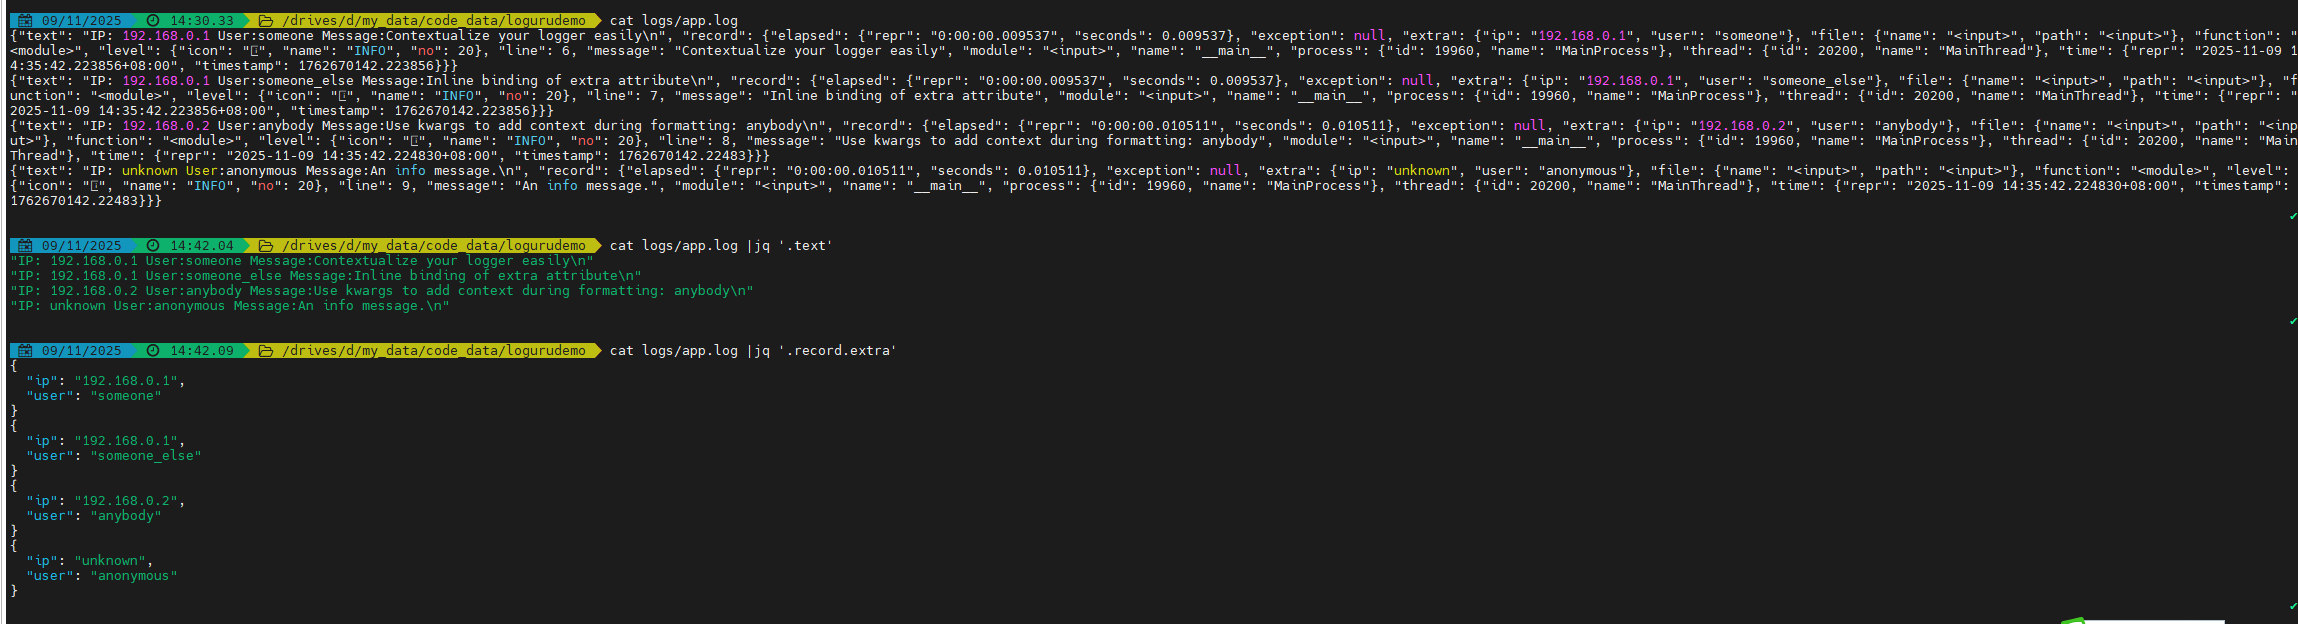
可以看到,此时默认的logger和新生成的context_logger都能正常工作了。
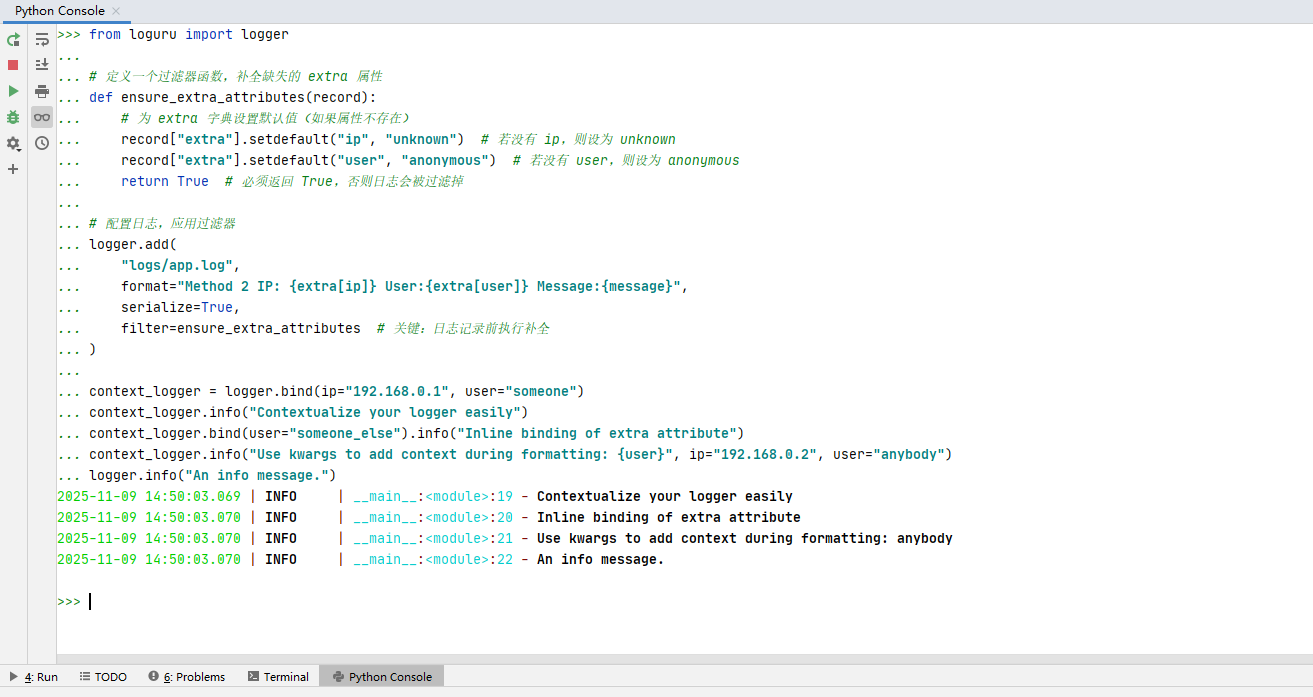
2.2.2 通过 filter 补全默认属性(推荐)
最可靠的方式是使用 Loguru 的 filter 机制,在日志记录被处理前,自动为 extra 字典补全缺失的属性(如 ip、user),确保格式字符串中引用的属性一定存在。
代码如下:
| |
此时,运行代码正常。
此时生成的日志文件:
| |
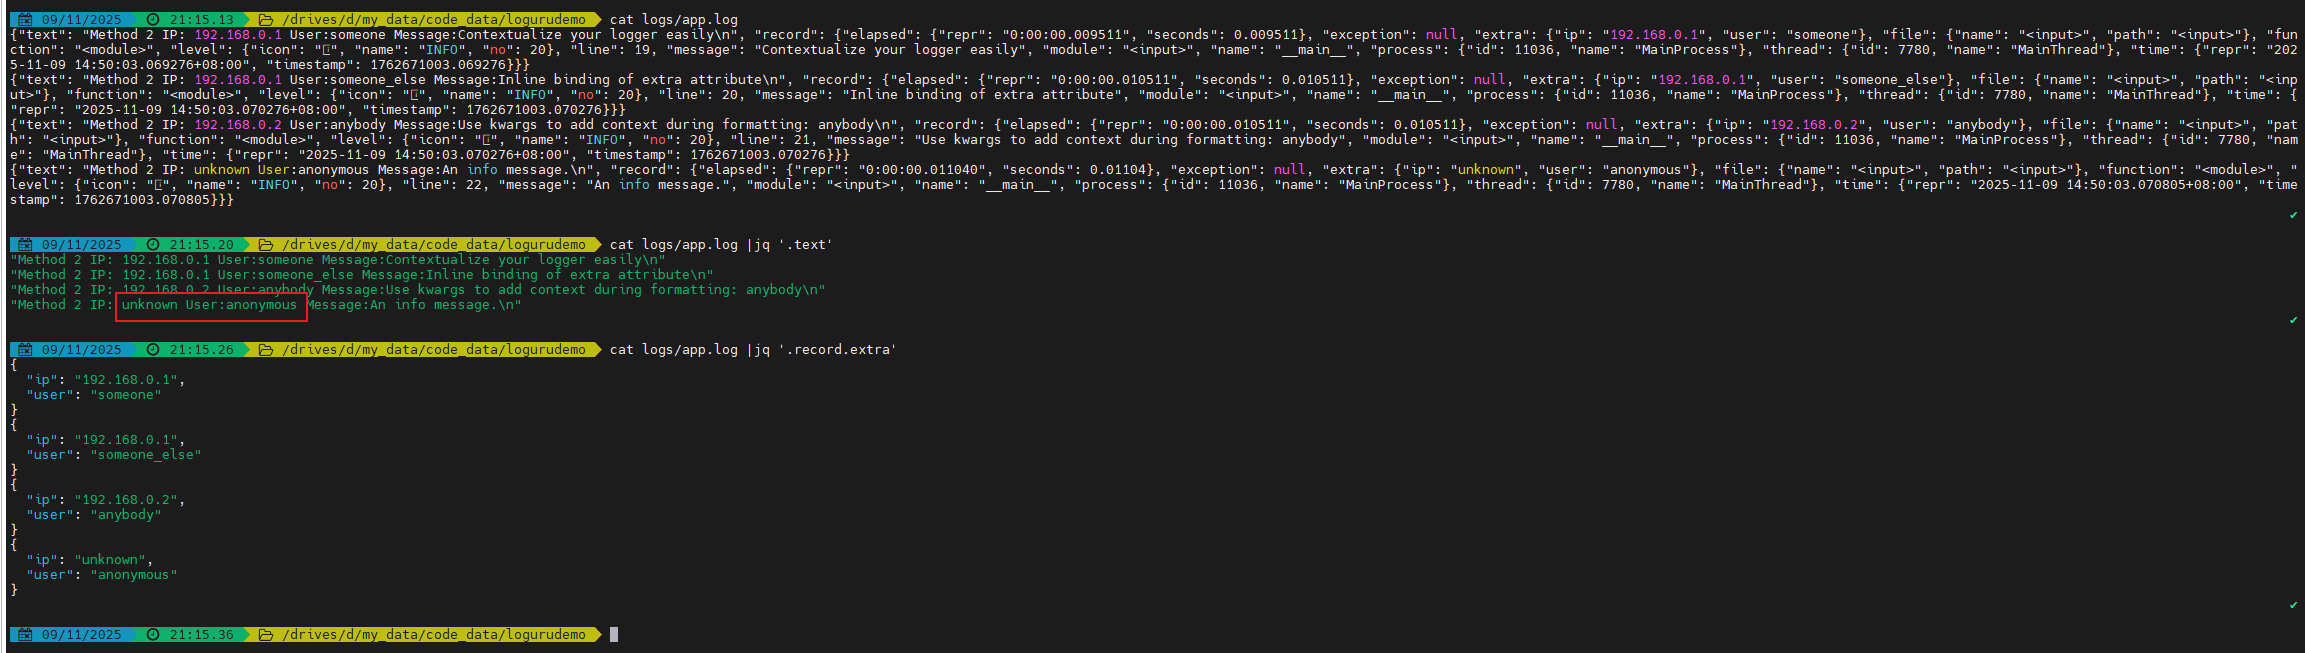
可以看到,此时默认的logger和新生成的context_logger也都能正常工作了。
2.3 使用filter过滤器
在 loguru 中,filter 过滤器的主要作用是决定日志是否被输出(返回 True 保留,False 丢弃) 。
以下编写一个程序,ERROR及更高级别日志写入到error.log文件中,其他日志写入到app.log中。
main.py代码如下:
| |
tools.py代码如下:
| |
然后运行main.py程序:
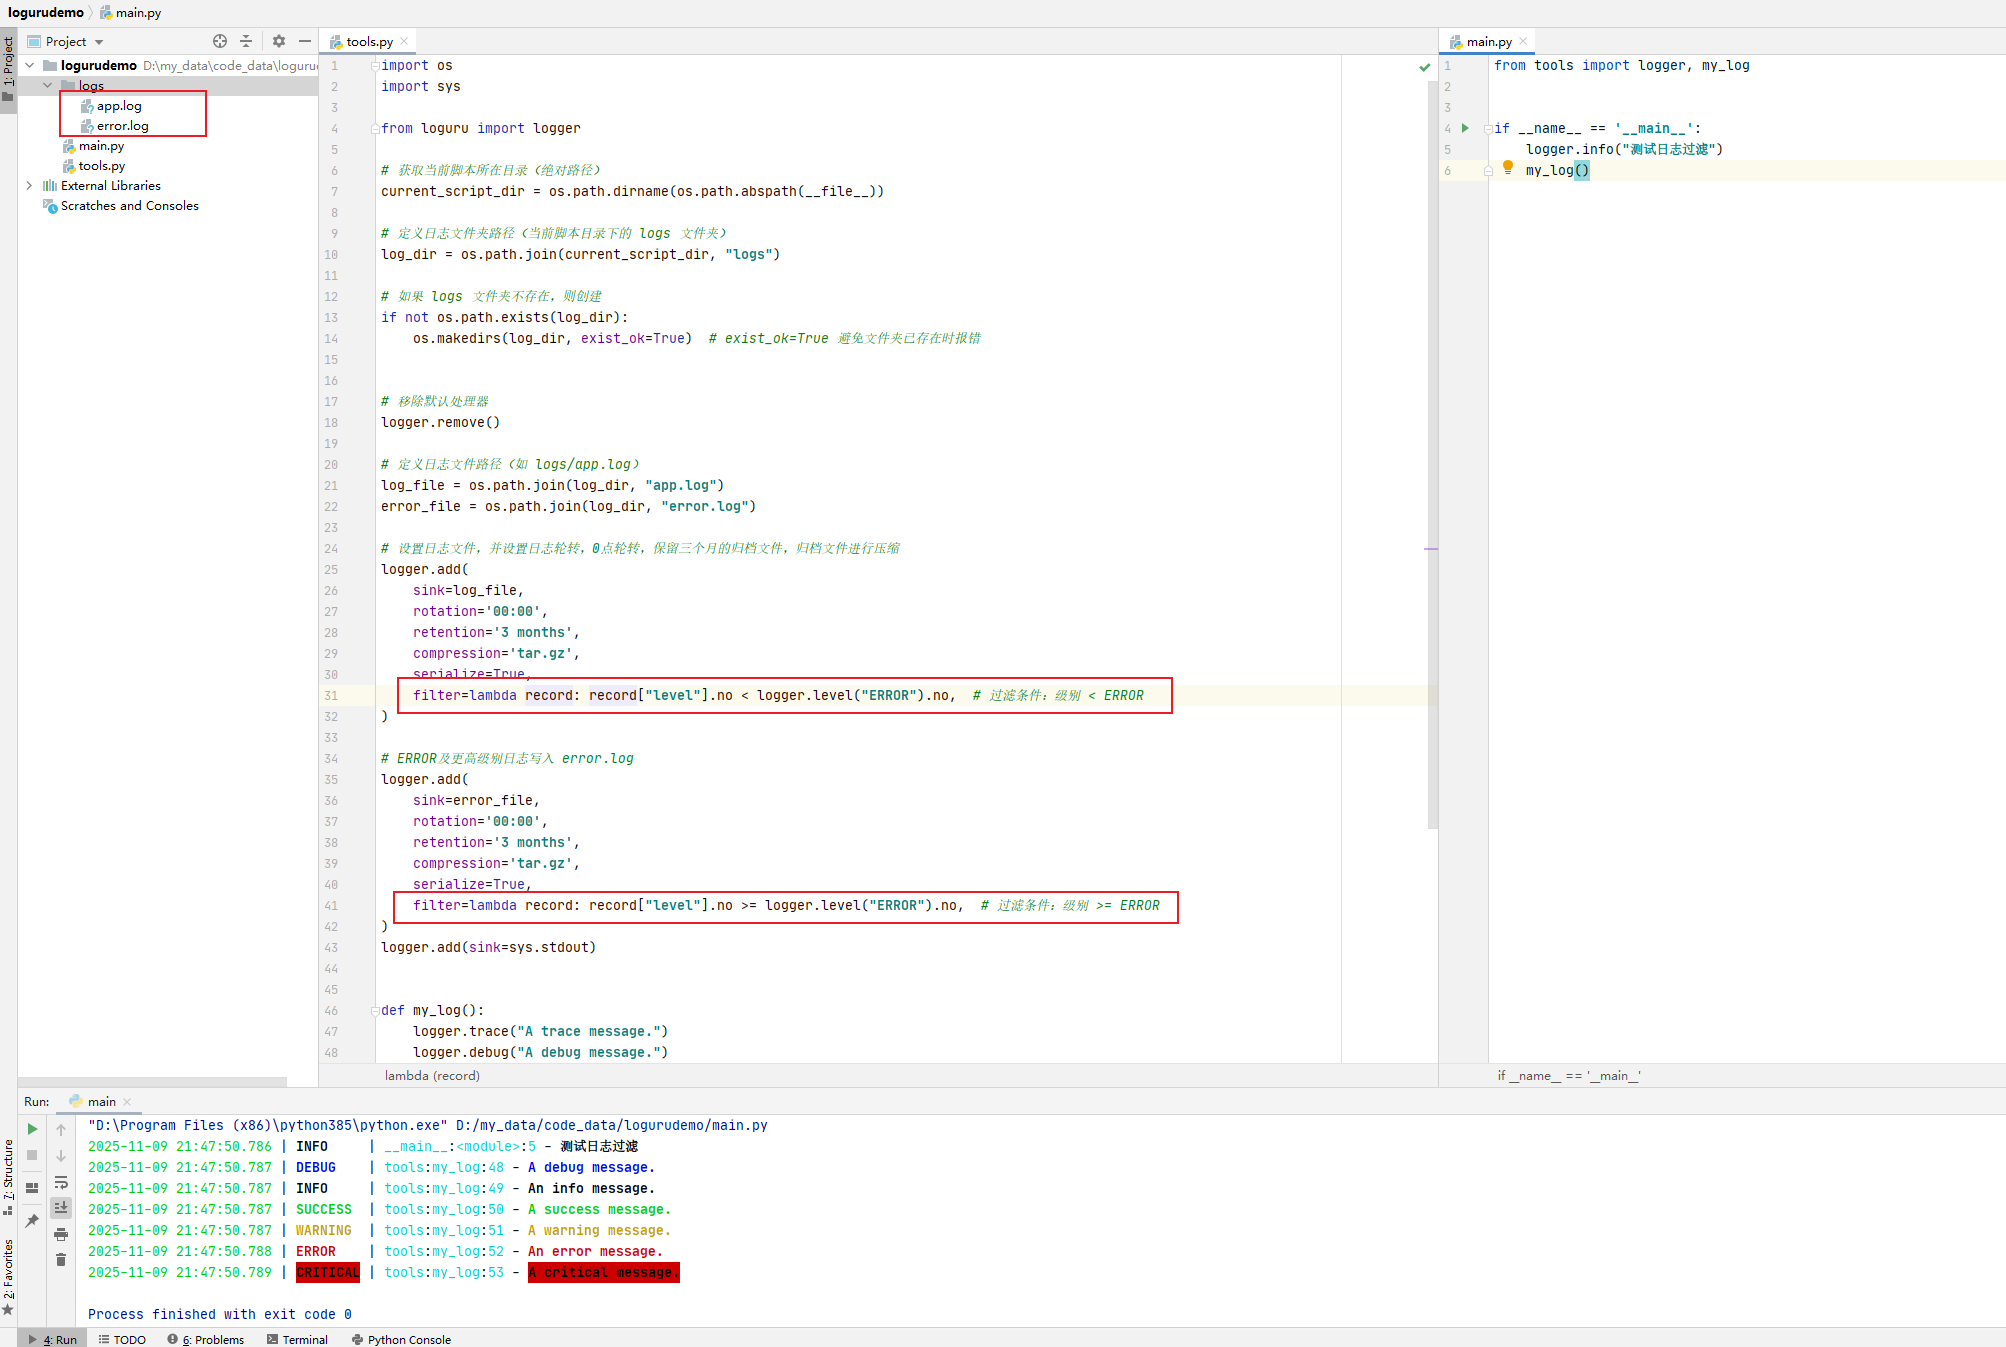
此时,在日志文件夹logs目录中生成了app.log和error.log,查看其内容:
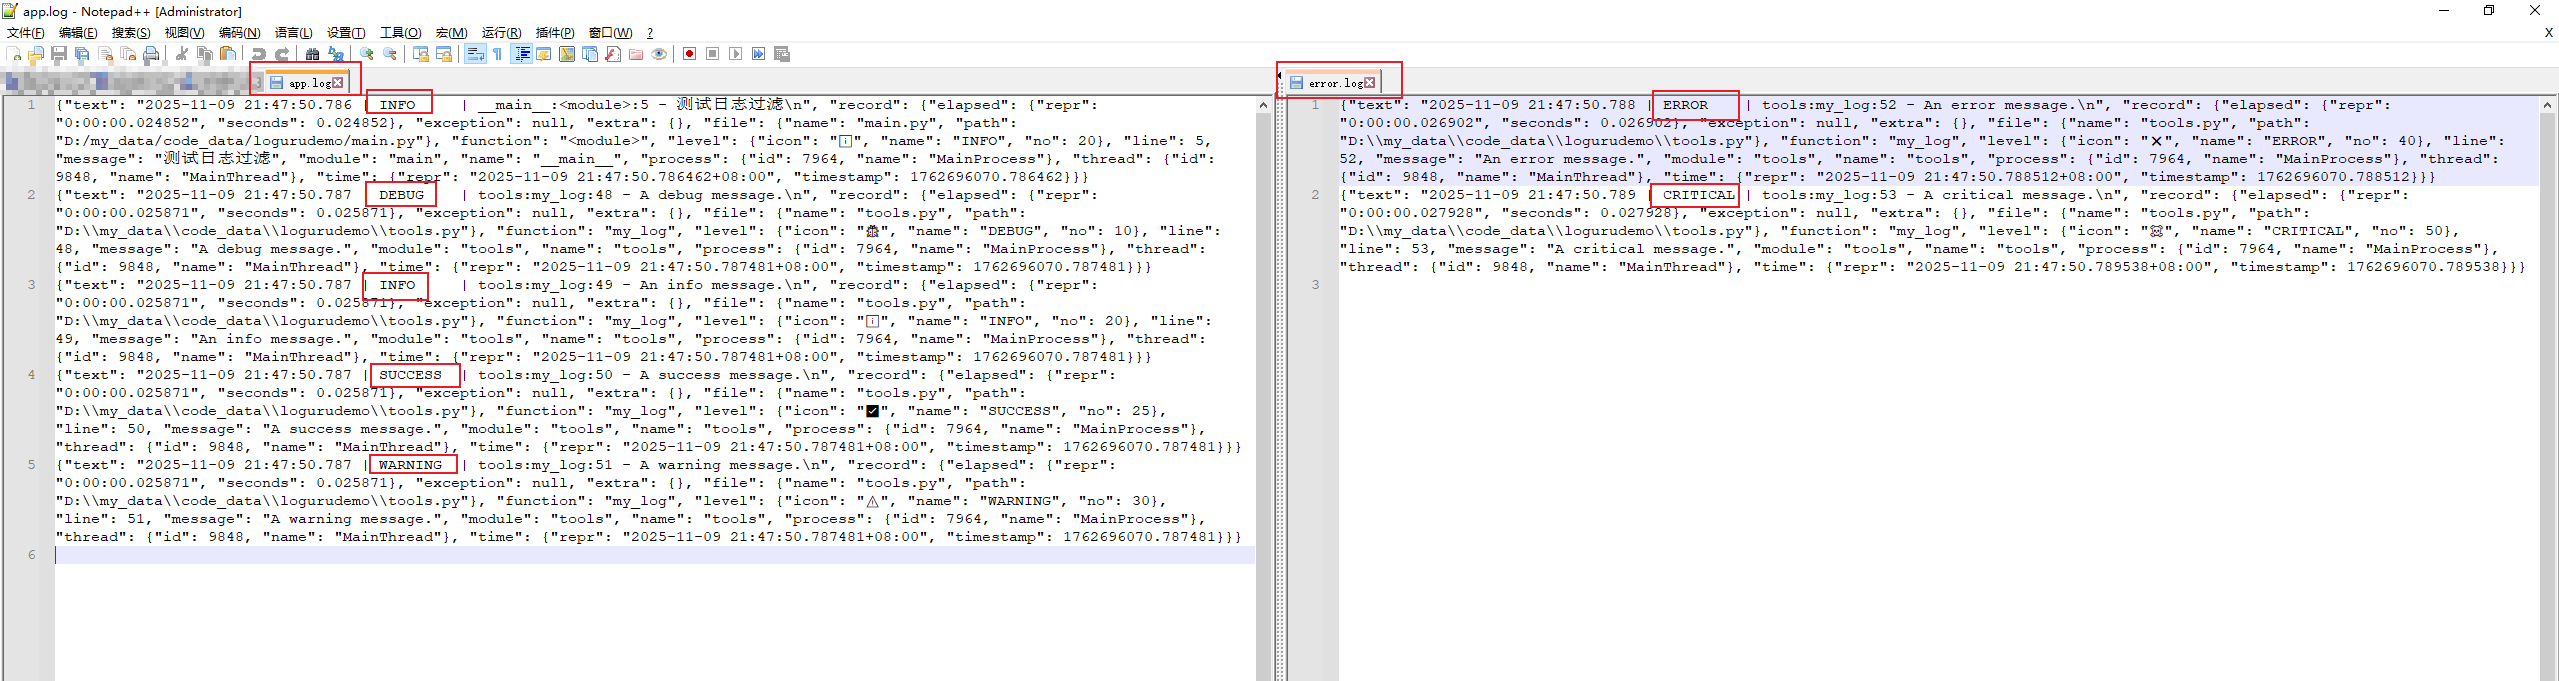
可以看到ERROR和CRITICAL日志写入到error.log文件中了,而INFO、DEBUG、SUCCESS和WARNING日志写入到app.log文件中,与预期相同!
2.4 定义新的日志级别
Customizable levels
Loguru comes with all standard logging levels to which
trace()andsuccess()are added. Do you need more? Then, just create it by using thelevel()function.
1 2 3new_level = logger.level("SNAKY", no=38, color="<yellow>", icon="🐍") logger.log("SNAKY", "Here we go!")
当你认为默认的日志级别不够用的时候,就可以使用level()函数来创建一个,如官方示例:
| |
执行代码:
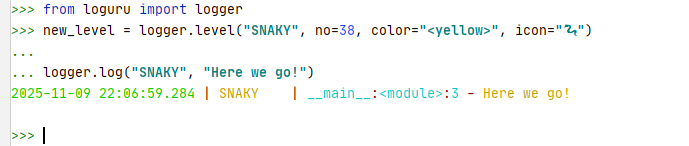
可以看到,正常显示日志级别SNAKY。
我们来将日志序列化一下。
main.py代码如下:
| |
tools.py代码如下:
| |
然后运行main.py程序:
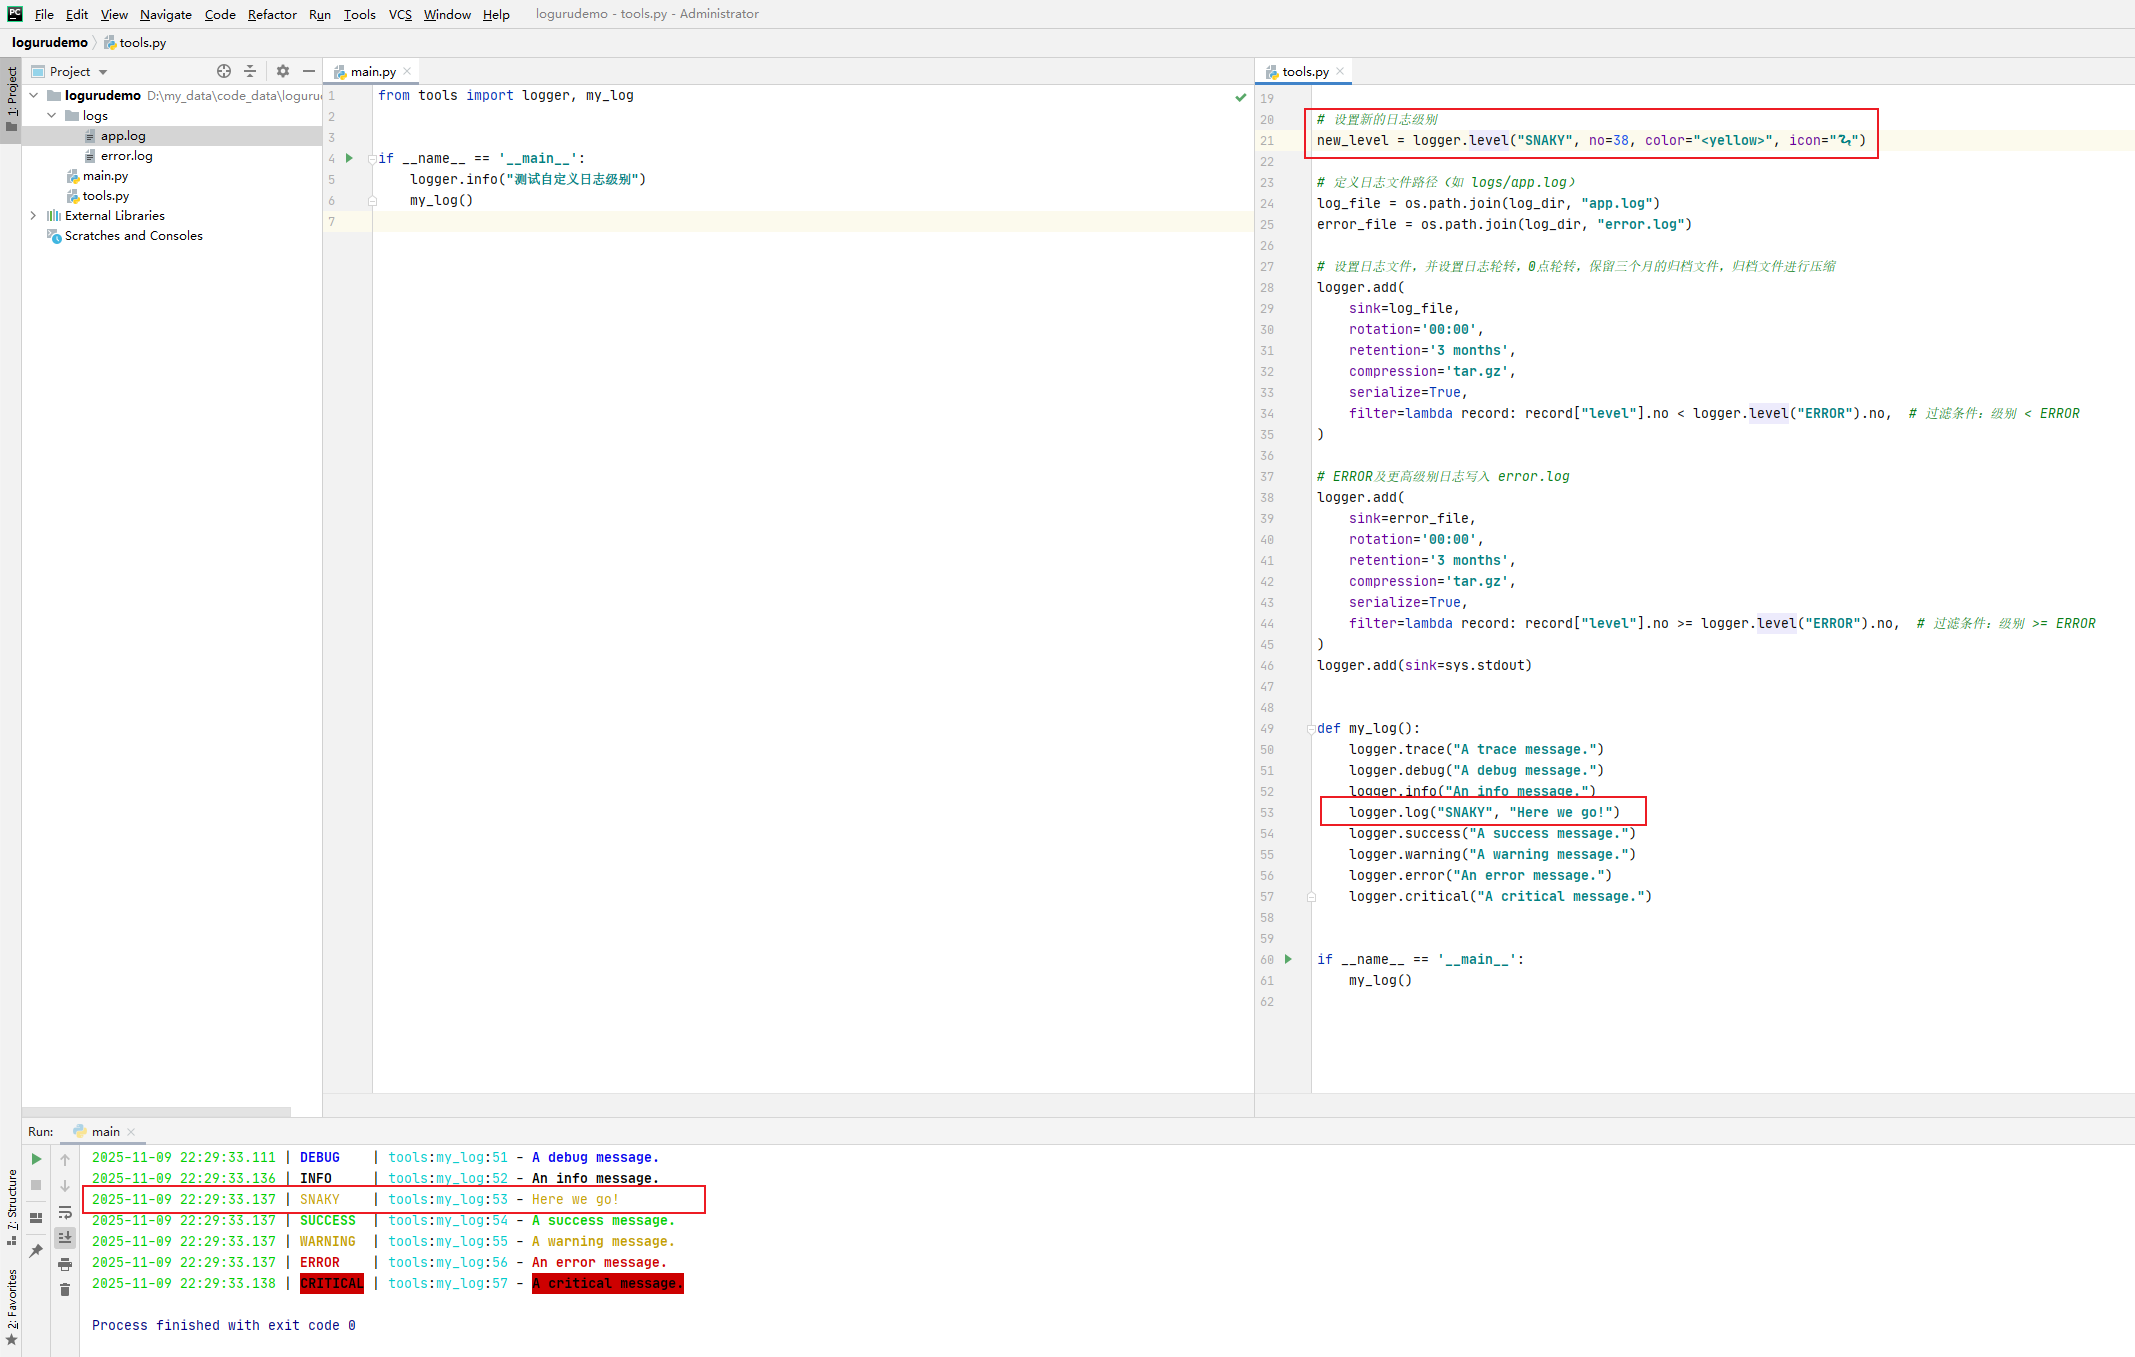
查看日志文件:
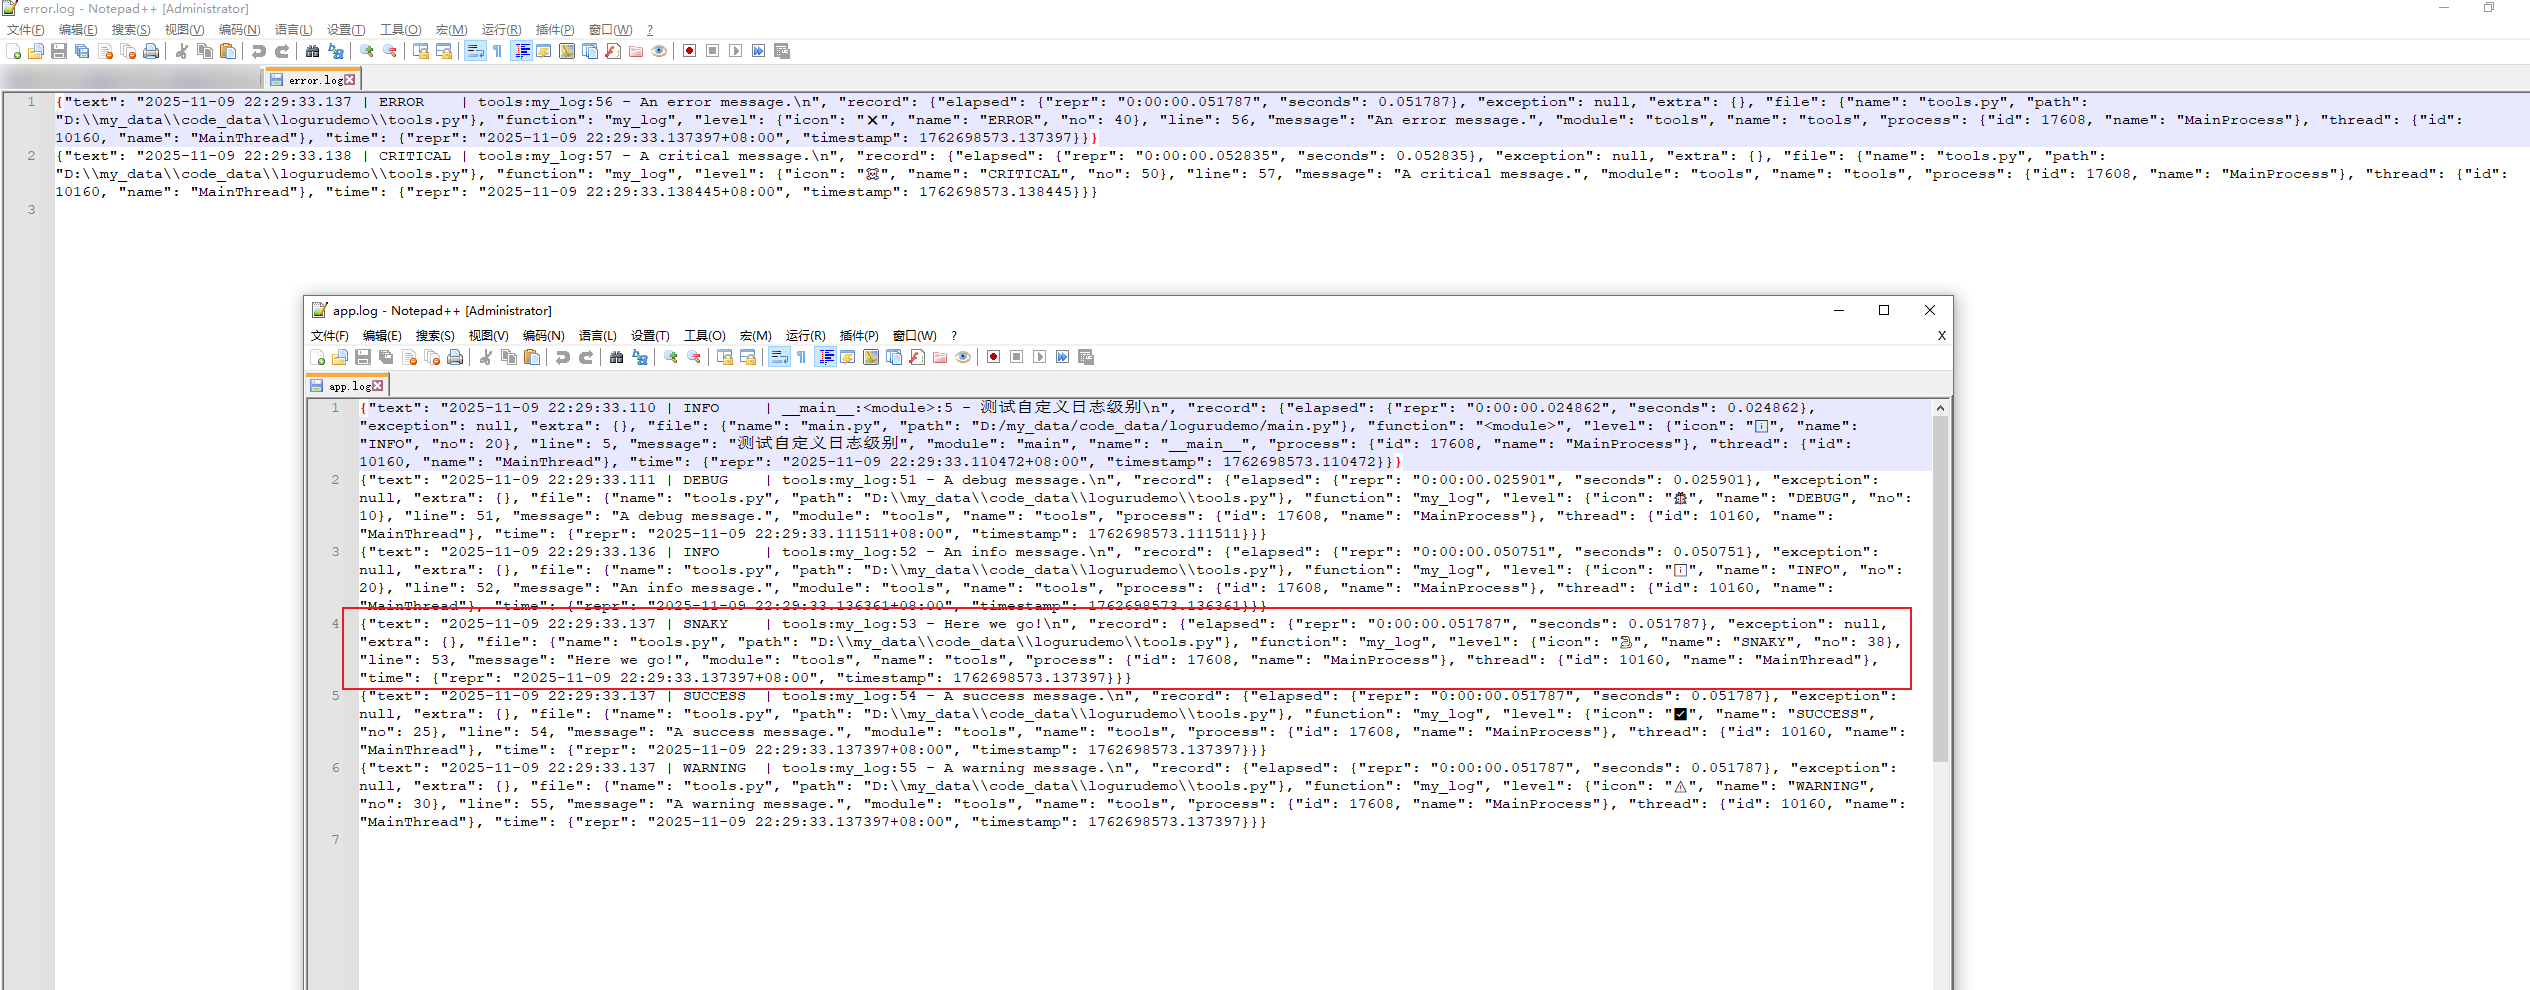
可以看到SNAKY日志写入到app.log文件中了。
2.4.1 不使用logger.log而使用logger.snaky
Python 偏函数是通过 functools 模块被用户调用。
偏函数 partial 应用
函数在执行时,要带上所有必要的参数进行调用。但是,有时参数可以在函数被调用之前提前获知。这种情况下,一个函数有一个或多个参数预先就能用上,以便函数能用更少的参数进行调用。
偏函数是将所要承载的函数作为partial()函数的第一个参数,原函数的各个参数依次作为partial()函数后续的参数,除非使用关键字参数。
简单总结
functools.partial的作用就是,把一个函数的某些参数给固定住(也就是设置默认值),返回一个新的函数,调用这个新函数会更简单。
其他日志级别都有一个自己的函数,如logger.info、logger.success,为什么我们自己定义的日志级别要使用logger.log("SNAKY", "Here we go!")这样,与其他的日志级别感觉不一样!
为了达到相同的效果,我们可以使用偏函数partial。
修改tools.py代码:
| |
运行main.py程序:
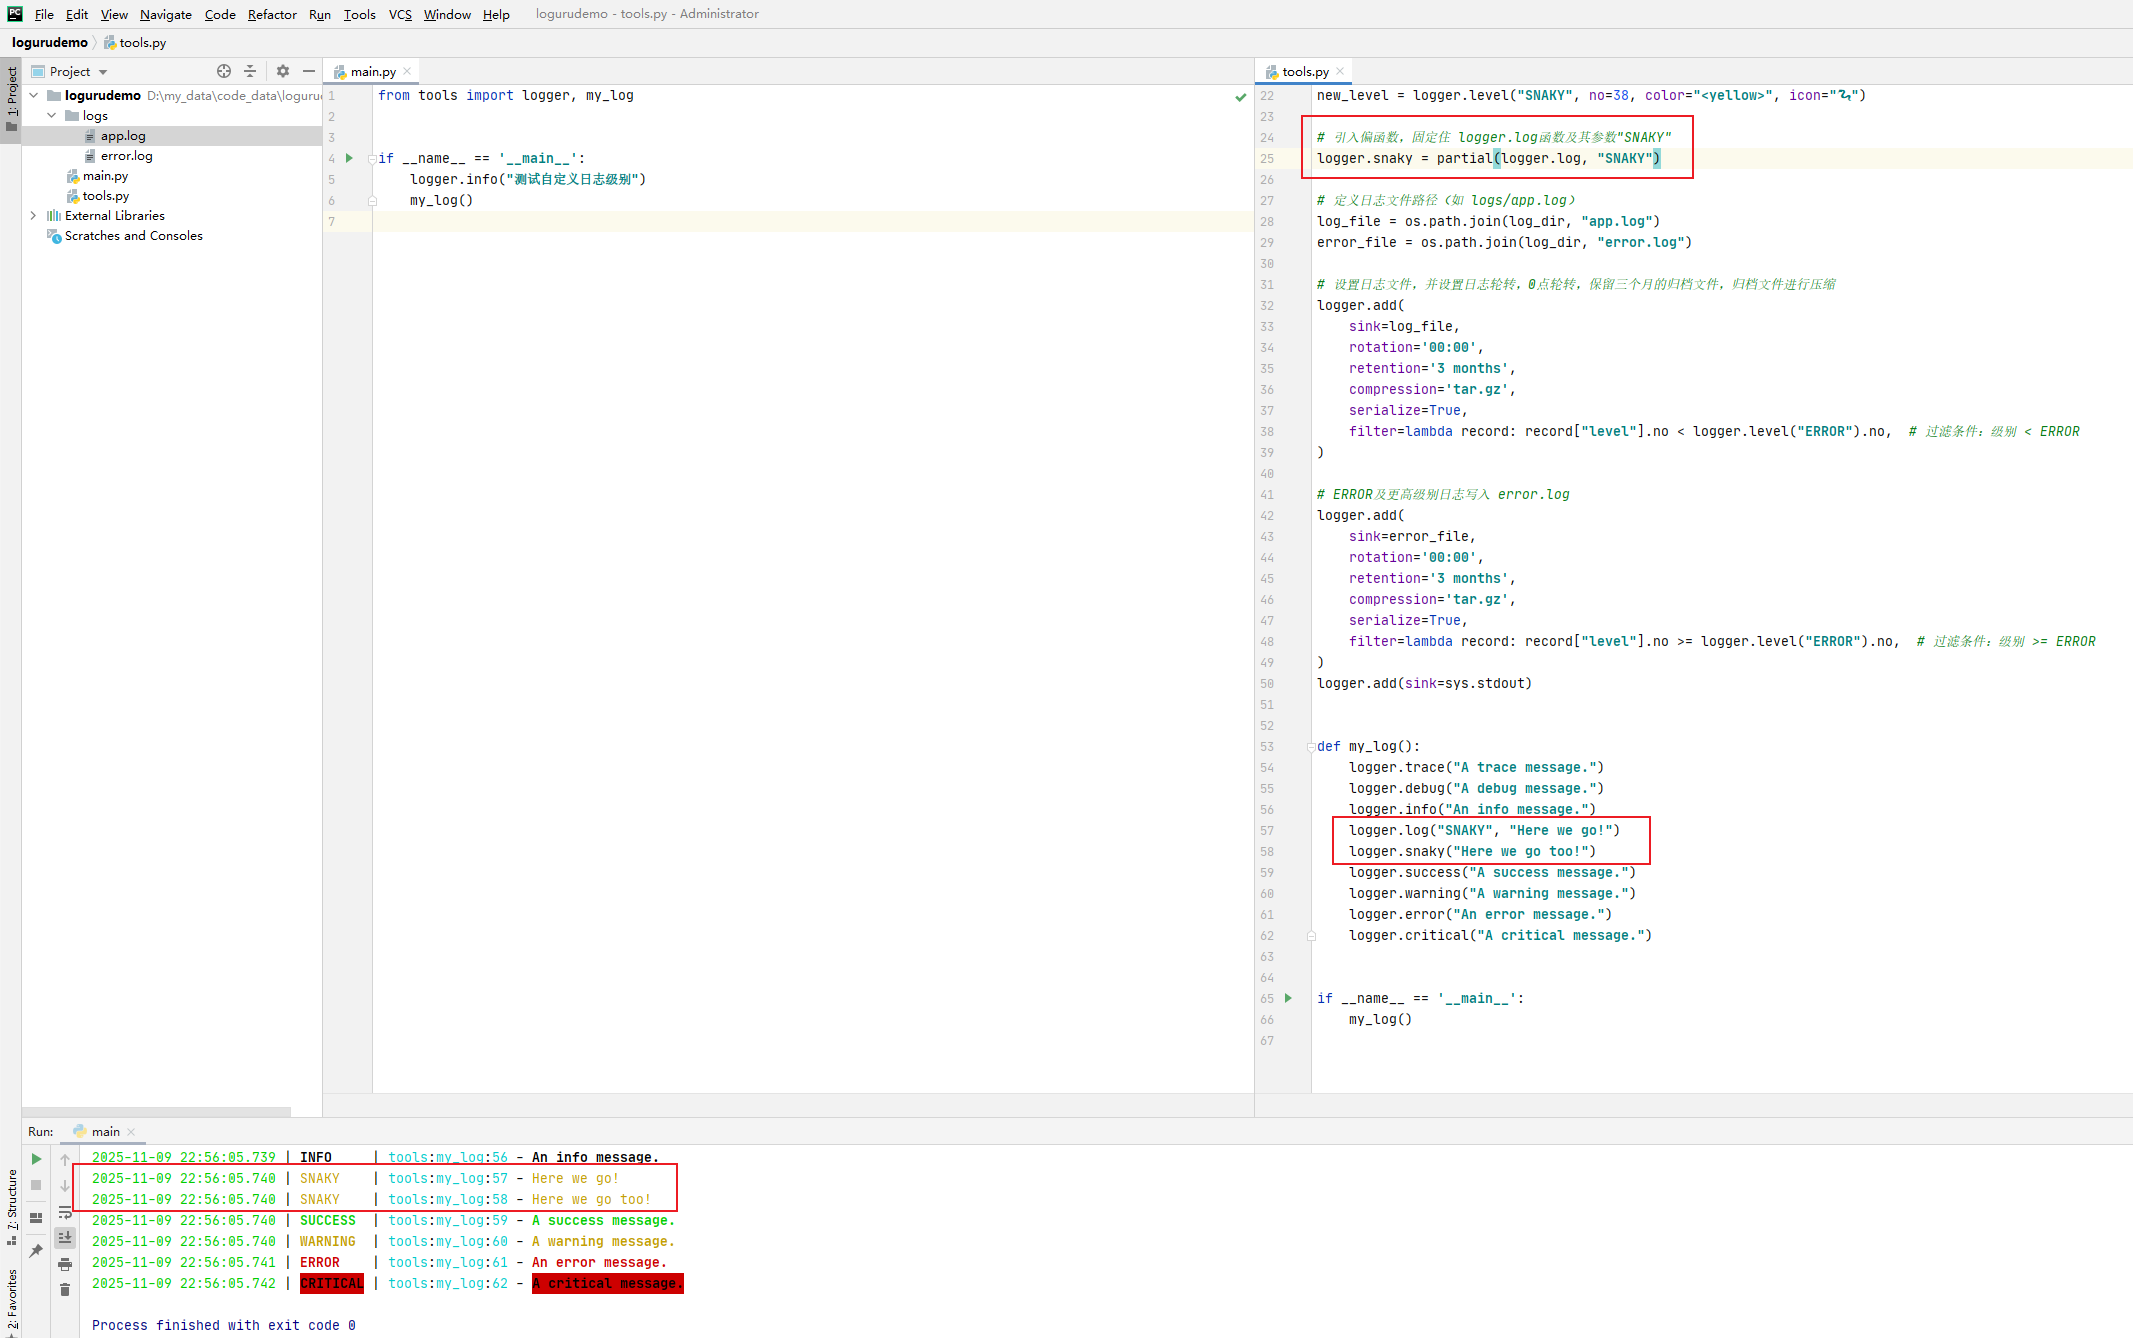
此时,可以看到,使用logger.snaky("Here we go too!")与logger.log("SNAKY", "Here we go!")的效果相同!!!
参考: