VuePress从零开始搭建自己的博客 高级配置
本文接着上一篇文章VuePress从零开始搭建自己的博客 对博客系统进行更多的设置。
增加文档目录(table of contents)
在Markdown文件中第一行的一级标题"# VuePress从零开始搭建自己的博客"的下面增加[[toc]]:
# VuePress从零开始搭建自己的博客
[[toc]]使用yarn docs:dev重新构建,则会生成目录结构。如 VuePress从零开始搭建自己的博客 增加目录结构显示如下:
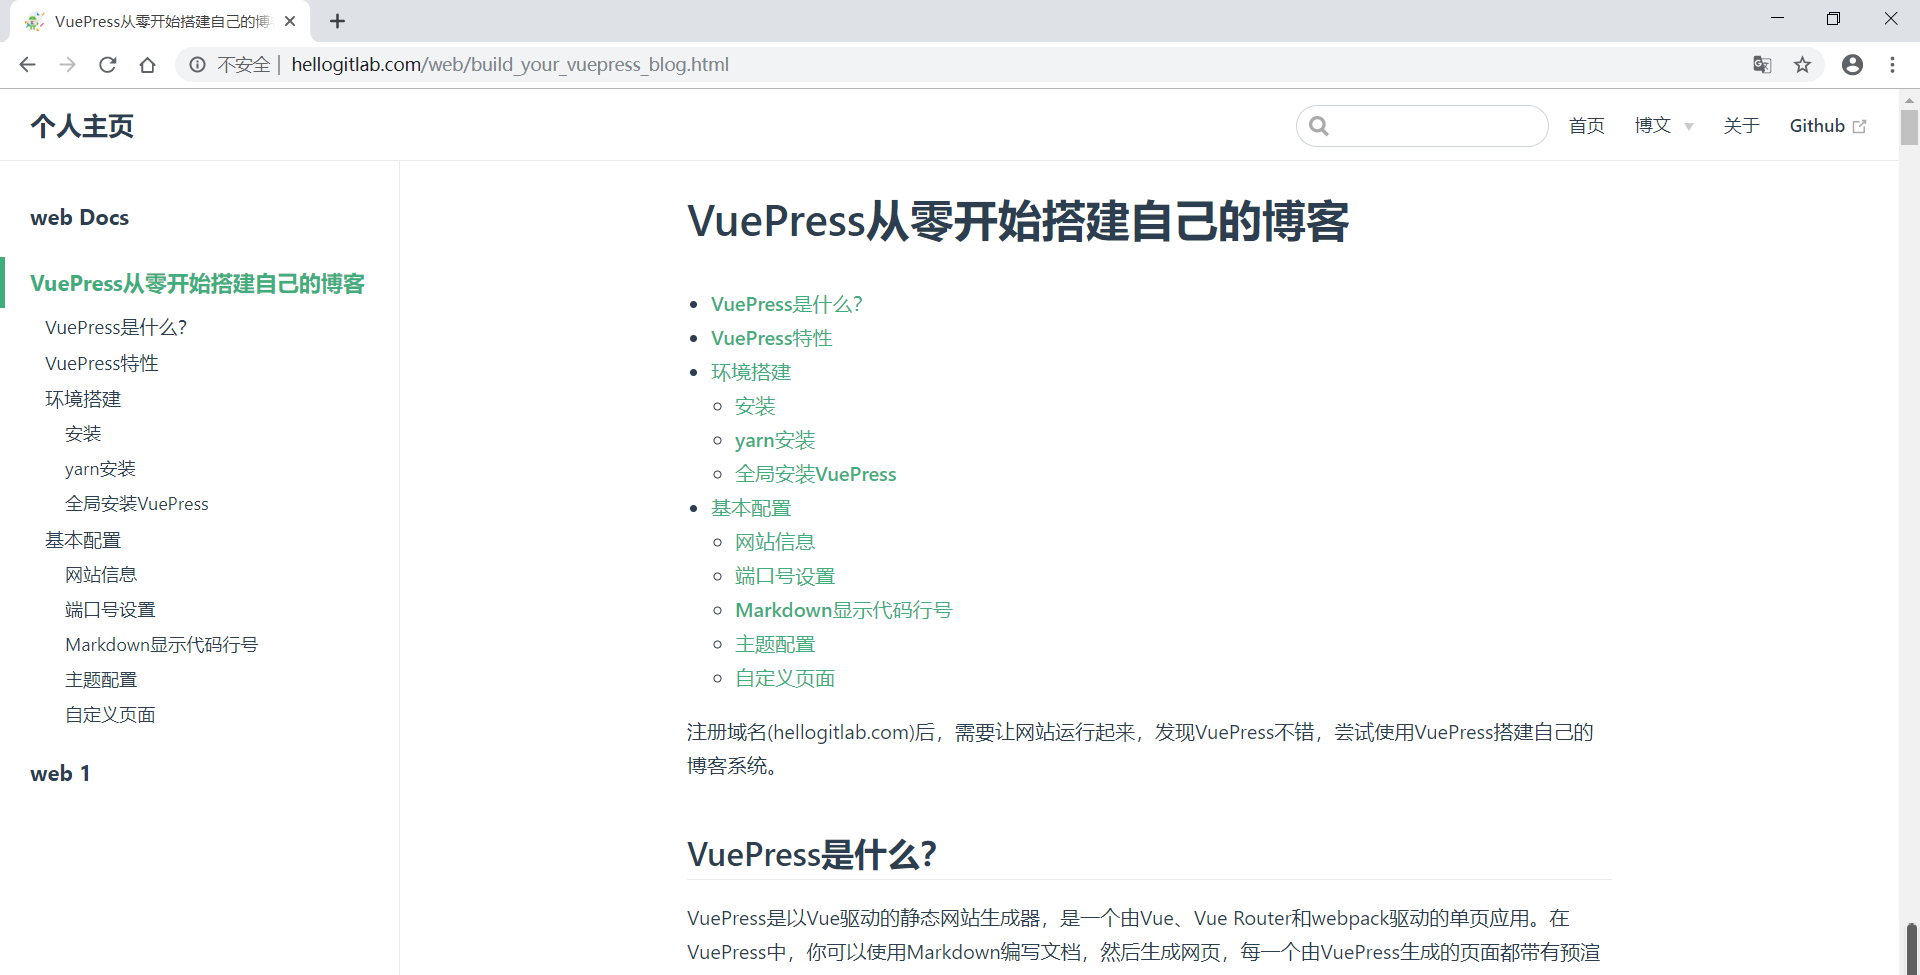
参考: VuePress目录设置
Emoji支持
- Emoji表情非常有趣,我们在写文章的时候,可以在Markdown文件加入一些Emoji表情,让我们的文档更生动。
- 如
:tada:代表🎉,:100:代表💯,更多的Emoji表情可参考markdown-it-emoji。
下面列出部分表情与英文的对应关系:
{
  "100": "💯",
  "1234": "🔢",
  "grinning": "😀",
  "smiley": "😃",
  "smile": "😄",
  "grin": "😁",
  "laughing": "😆",
  "satisfied": "😆",
  "sweat_smile": "😅",
  "joy": "😂",
  "rofl": "🤣",
  "relaxed": "☺️",
  "blush": "😊",
  "innocent": "😇",
  "slightly_smiling_face": "🙂",
  "upside_down_face": "🙃",
  "wink": "😉",
  "relieved": "😌",
  "heart_eyes": "😍",
  "kissing_heart": "😘",
  "kissing": "😗"
}自定义容器(custom containers)
下面在MarkDown文件中使用一些容器,对用户进行一些提示或者警告。
- 可以使用
tip、warning、danger关键字来指定提示的类型和颜色。 - 在
tip、warning、danger关键字后面增加其他字符则指定了提示的标题。
TIP
这是一个提示,未设置提示标题
提示
这是一个提示,设置了提示标题
WARNING
这是一个警告,未设置警告标题
注意
这是一个警告,设置了警告标题
DANGER
这是一个危险警告,未设置危险警告标题
危险
这是一个危险警告,设置了危险警告标题
在Markdown文件中第一行的一级标题"# VuePress从零开始搭建自己的博客"的下面增加以下内容,展示Emoji表情和提示的效果:
# VuePress从零开始搭建自己的博客
:heavy_check_mark: :heart: :basketball: :snowman:

::: tip 提示
这是一个提示,设置了提示标题
:::

::: warning 注意
这是一个警告,设置了警告标题
:::

::: danger 危险
这是一个危险警告,设置了危险警告标题
:::使用yarn docs:dev重新构建,则会生成目录结构。如 VuePress从零开始搭建自己的博客 Emoji表情和提示警告显示如下:
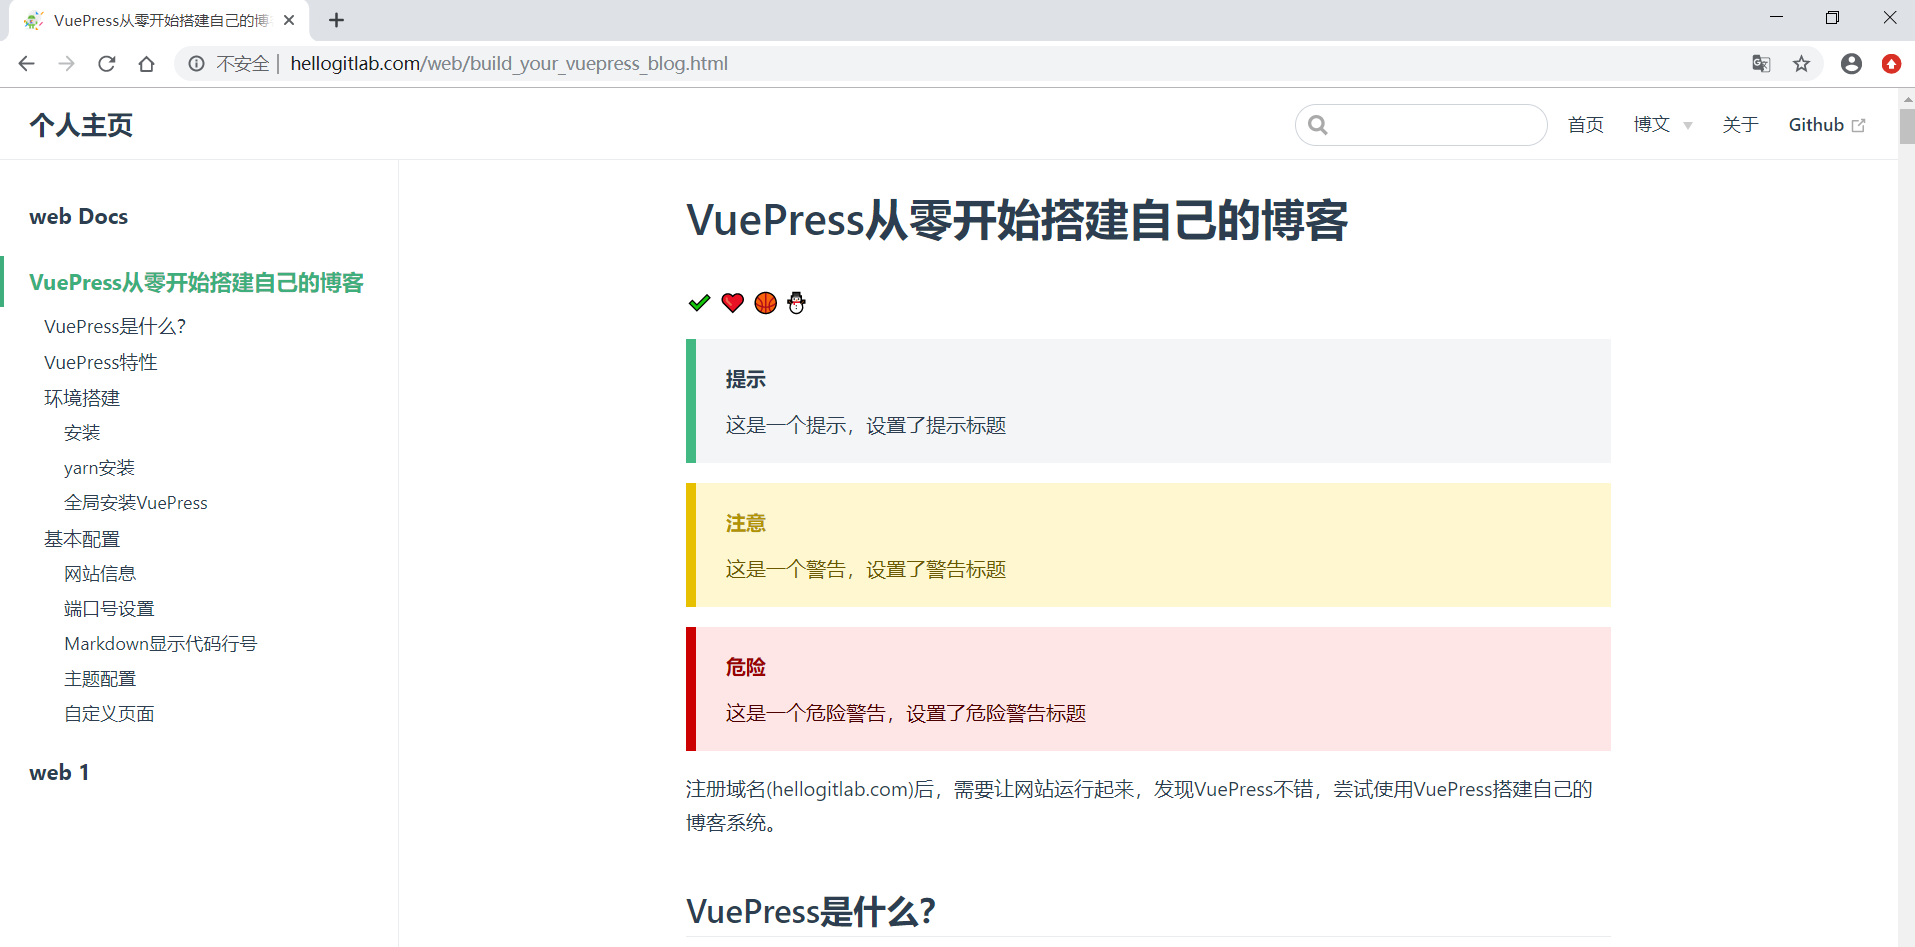
参考: 自定义容器
显示上次更新时间
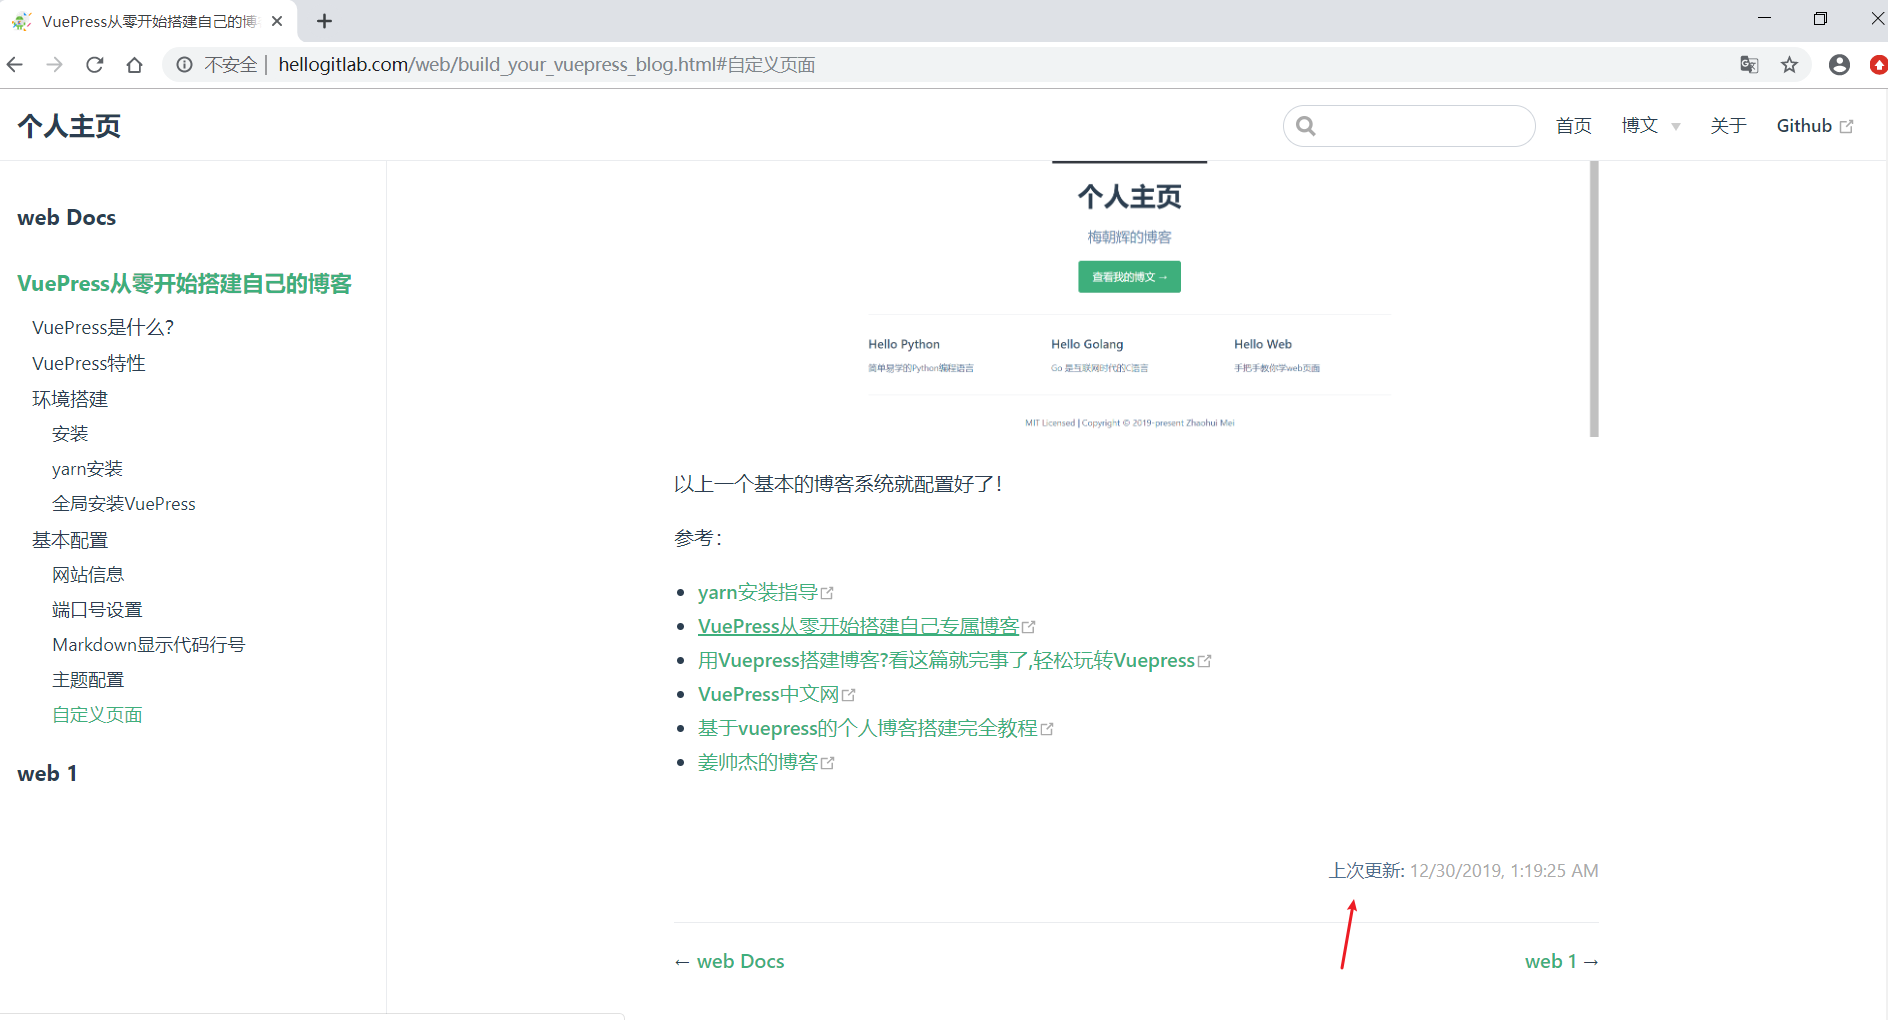
在config.js中themeConfig中配置lastUpdated参数即可,则会在每篇文章最后显示上次更新的时间。
module.exports = {
    ...省略
    themeConfig: {
            lastUpdated: '上次更新',
            ...省略
)使用yarn docs:dev重新构建,则会生成目录结构。如 VuePress从零开始搭建自己的博客 上次更新时间显示如下:
参考: 多语言支持
此时显示的时间不符合国人的使用习惯,设置一下语言本地化。
重要提示
lastUpdated是基于git版本管理的文件最后更新提交的时间,如本博客的源码地址vueblog ,只有将构建过程中的代码存放在基于git版本管理的GitHub或GitLab网站上面才能正常显示出页面的上次更新时间。
语言本地化设置
在config.js中增加locales参数关键字,并配置lang: 'zh-CN',即指定使用中文。
module.exports = {
    title: '个人主页',
    description: '梅朝辉的博客',
    locales: {
         '/': {
             lang: 'zh-CN',
         }
    },
    ...省略
}再次运行程序,显示如下: 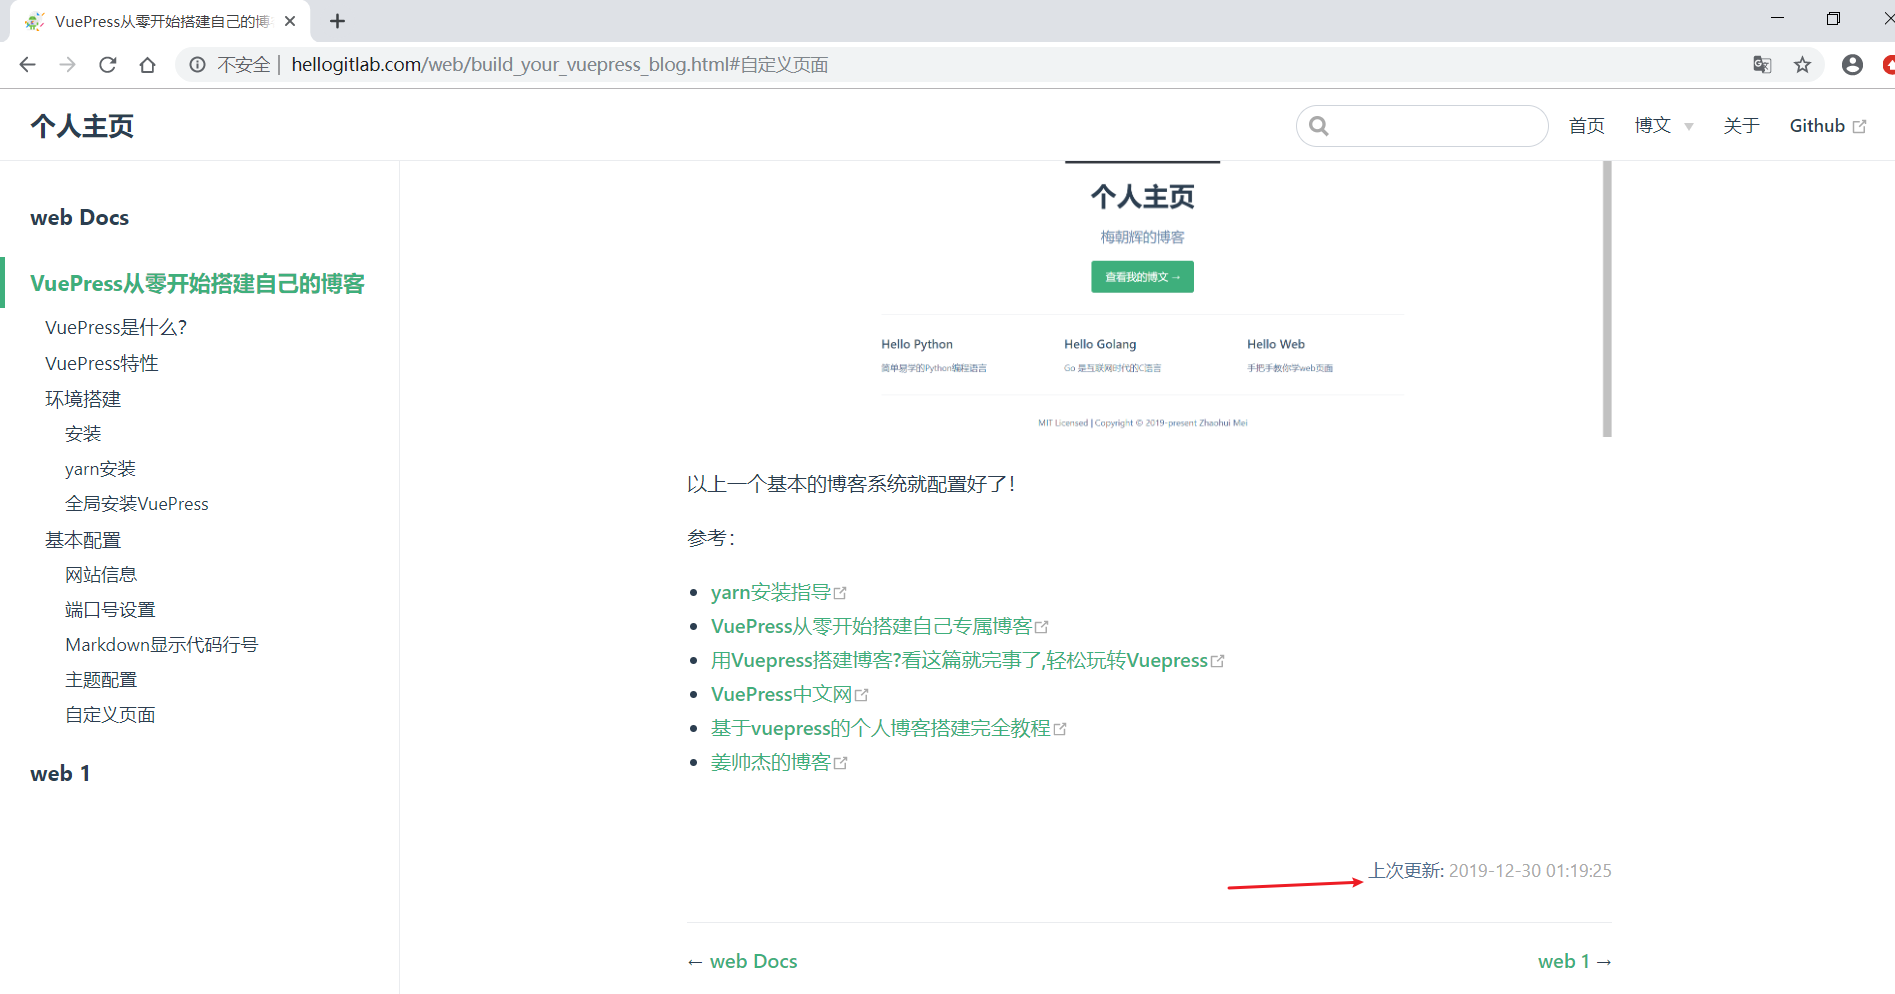
参考: 多语言支持
logo和博客标题设置
我们可以给自己的博客设置一个自己喜欢的logo,如可以在 LogoFree 上面制作一款自己喜欢的logo。可以付费导出自己的logo的ico图片,也可以通过截图获取自己喜欢的logo,然后在 在线生成透明ICO图标 生成32*32的favicon.ico文件,将favicon.ico文件保存到 docs/.vuepress/public/img目录下,并修改config.js文件的head属性值。
同时,我们也可以修改一下博客的标题为"梅朝辉的博客",修改config.js文件的title属性值为"梅朝辉的博客"即可。
module.exports = {
    title: '梅朝辉的博客',
    description: '种一棵树最好的时间是十年前,其次就是现在。',
    head: [
        ['link', { rel: 'icon', href: '/img/favicon.ico' }],
    ],
...省略另外,我们更新一下根目录docs下的README.md文件,将其中的heroImage: img/gitlab.jfif中的图片替换成我们自己的logo图片heroImage: img/hellogitlab_logo.png:
[root@hellogitlab docs]# cat README.md
---
home: true
heroImage: img/hellogitlab_logo.png
actionText: 查看我的博文 →
actionLink: /python/
features:
- title: Hello Python
  details: 简单易学的Python编程语言
- title: Hello Golang
  details: Go 是互联网时代的C语言
- title: Hello Web
  details: 手把手教你学web页面
footer: MIT Licensed | Copyright © 2019-present Zhaohui Mei
---再次运行程序,显示如下: 
可以看到标签页上面的小图片已经变成了我们的logo图标了,并且页面中间的图片和说明内容也更新了。
参考: 导航栏 Logo
背景音乐设置
之前想着给博客增加背景音乐的,但当自己带着耳机,突然打开一个自动播放背景音乐的网站的时候,把我震惊了(吓一跳),决定放弃这个功能。
使用Valine配置评论功能
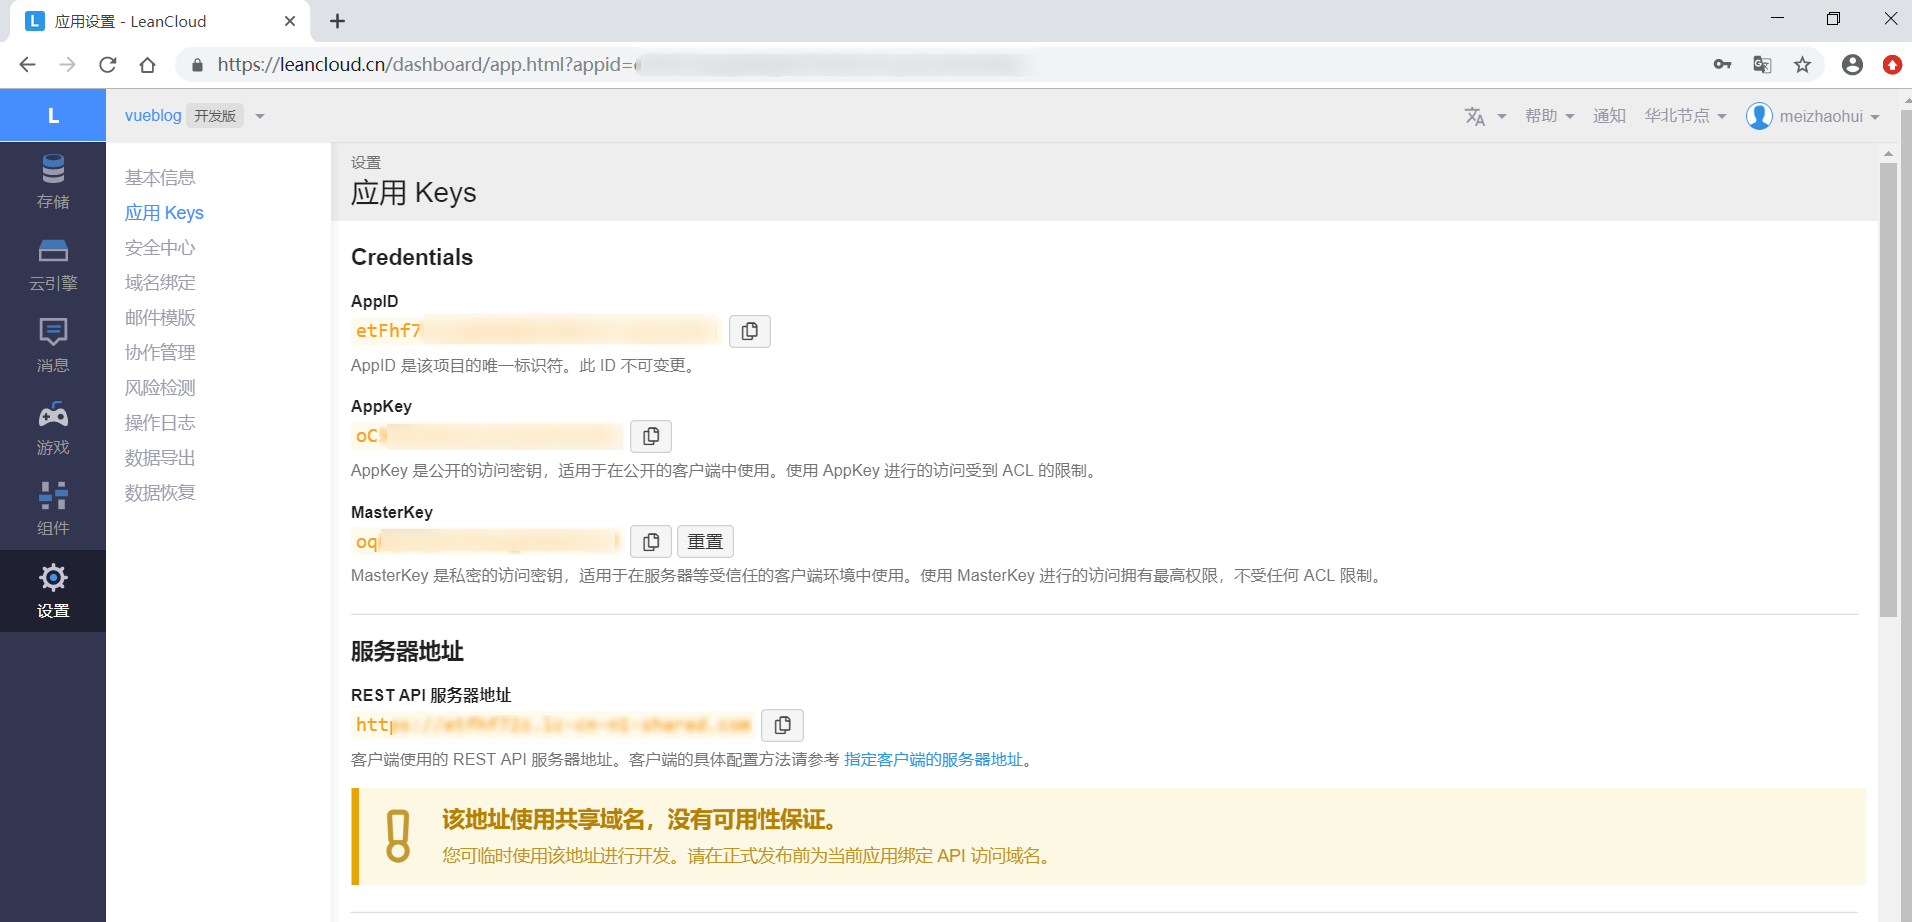
首先在 https://leancloud.cn 网站上面注册一个账号,并使用支付宝进行实名认证,并创建一个应用,创建应用后,可以在应用设置中查看到应用的Keys信息。
leancloud中显示如下:
然后按照 在VuePress中使用Valine 的配置方法下载安装vuepress-plugin-comment插件,并配置config.js文件。
安装vuepress-plugin-comment插件
yarn add vuepress-plugin-comment -D重要提示
如果你从我的 vueblog 上面直接克隆下来的代码的话,切换到myblog目录后,使用yarn直接就可以安装相关的插件依赖了。
将vuepress-plugin-comment添加到vuepress项目的插件配置中
module.exports = {
  plugins: [
    [
      'vuepress-plugin-comment',
      {
        choosen: 'valine',
        // options选项中的所有参数,会传给Valine的配置
        options: {
          el: '#valine-vuepress-comment',
          appId: 'Your own appId',
          appKey: 'Your own appKey'
        }
      }
    ]
  ]
}我这边参照上面的方法,并增加了placeholder和lang属性,配置如下:
module.exports = {
    title: '梅朝辉的博客',
    ...省略
    plugins: [
        [
            'vuepress-plugin-comment',
            {
                choosen: 'valine',
                // options选项中的所有参数,会传给Valine的配置
                options: {
                    el: '#valine-vuepress-comment',
                    appId: 'your leancloud appid',
                    appKey: 'your leancloud appkey',
                    placeholder: '同道中人,文明留言...',  // 评论框占位提示符
                    lang: 'zh-cn', // 支持中文
                }
            }
        ]
],重新运行后,打开任意一篇文章,都可以在最下方添加评论信息了。
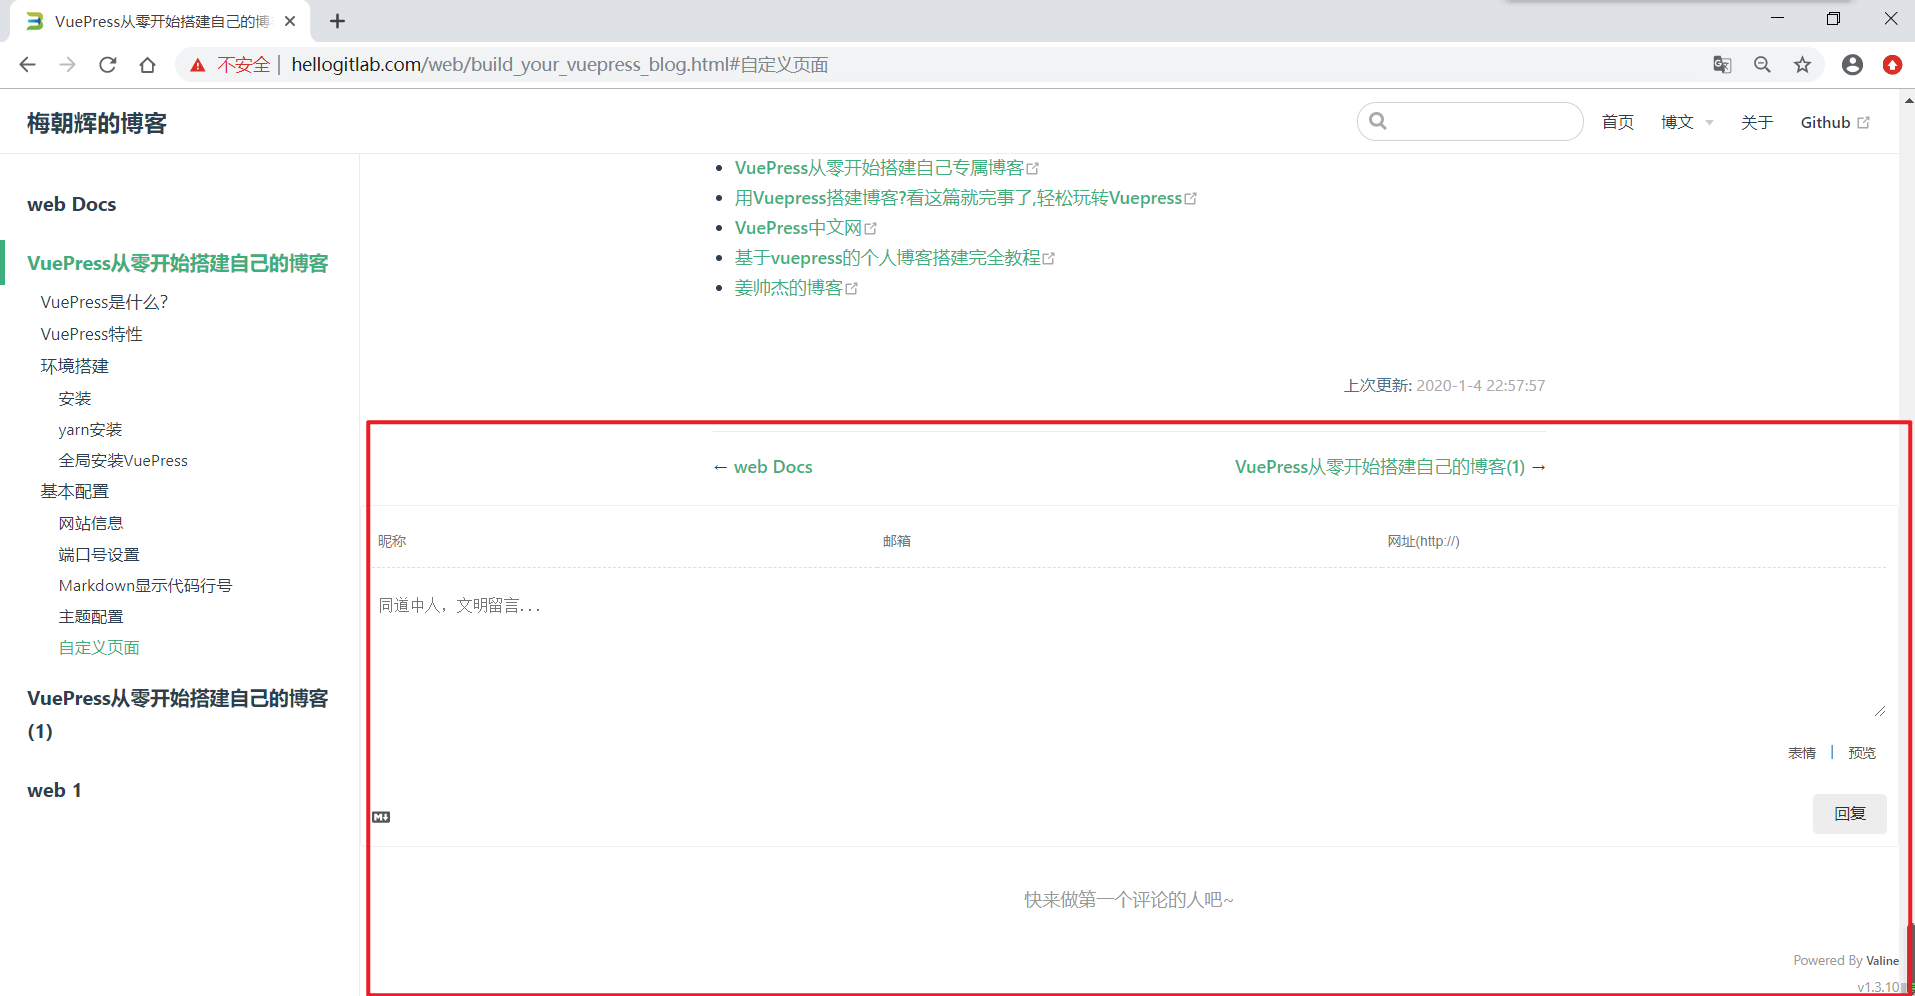
此时,可以在输入框中添加评论信息了。
如我添加两条评论信息。第一条"写得不错,棒棒哒!",第二条"与君共勉,加油!👍"。评论后的页面信息如下:
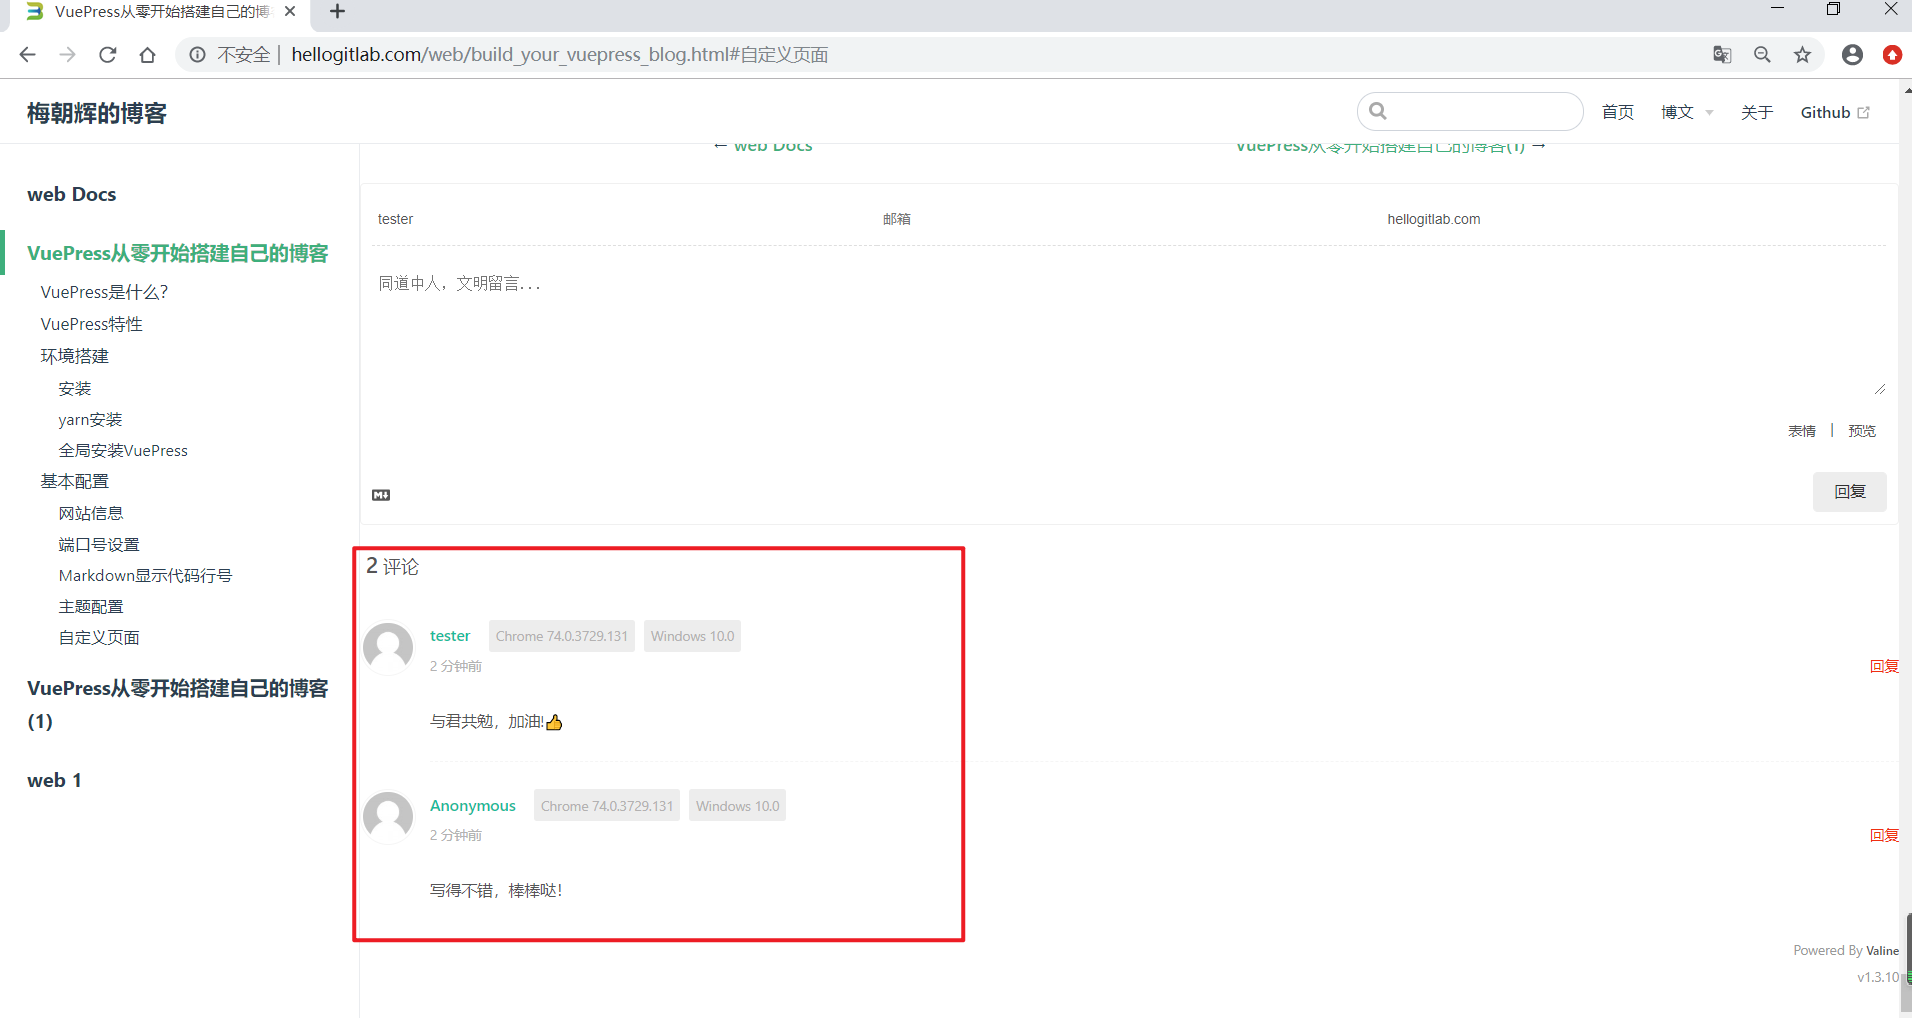
但此时存在一个问题,每个页面都会显示相同的评论信息,后续咨询Valina团队再改进。但过一会再刷新页面,评论又显示是正常的,感觉是API调用延迟的问题。
另外,我们提交了两个评论信息,在leancloud.cn的应用--存储页面也看到提交的Comment评论记录:
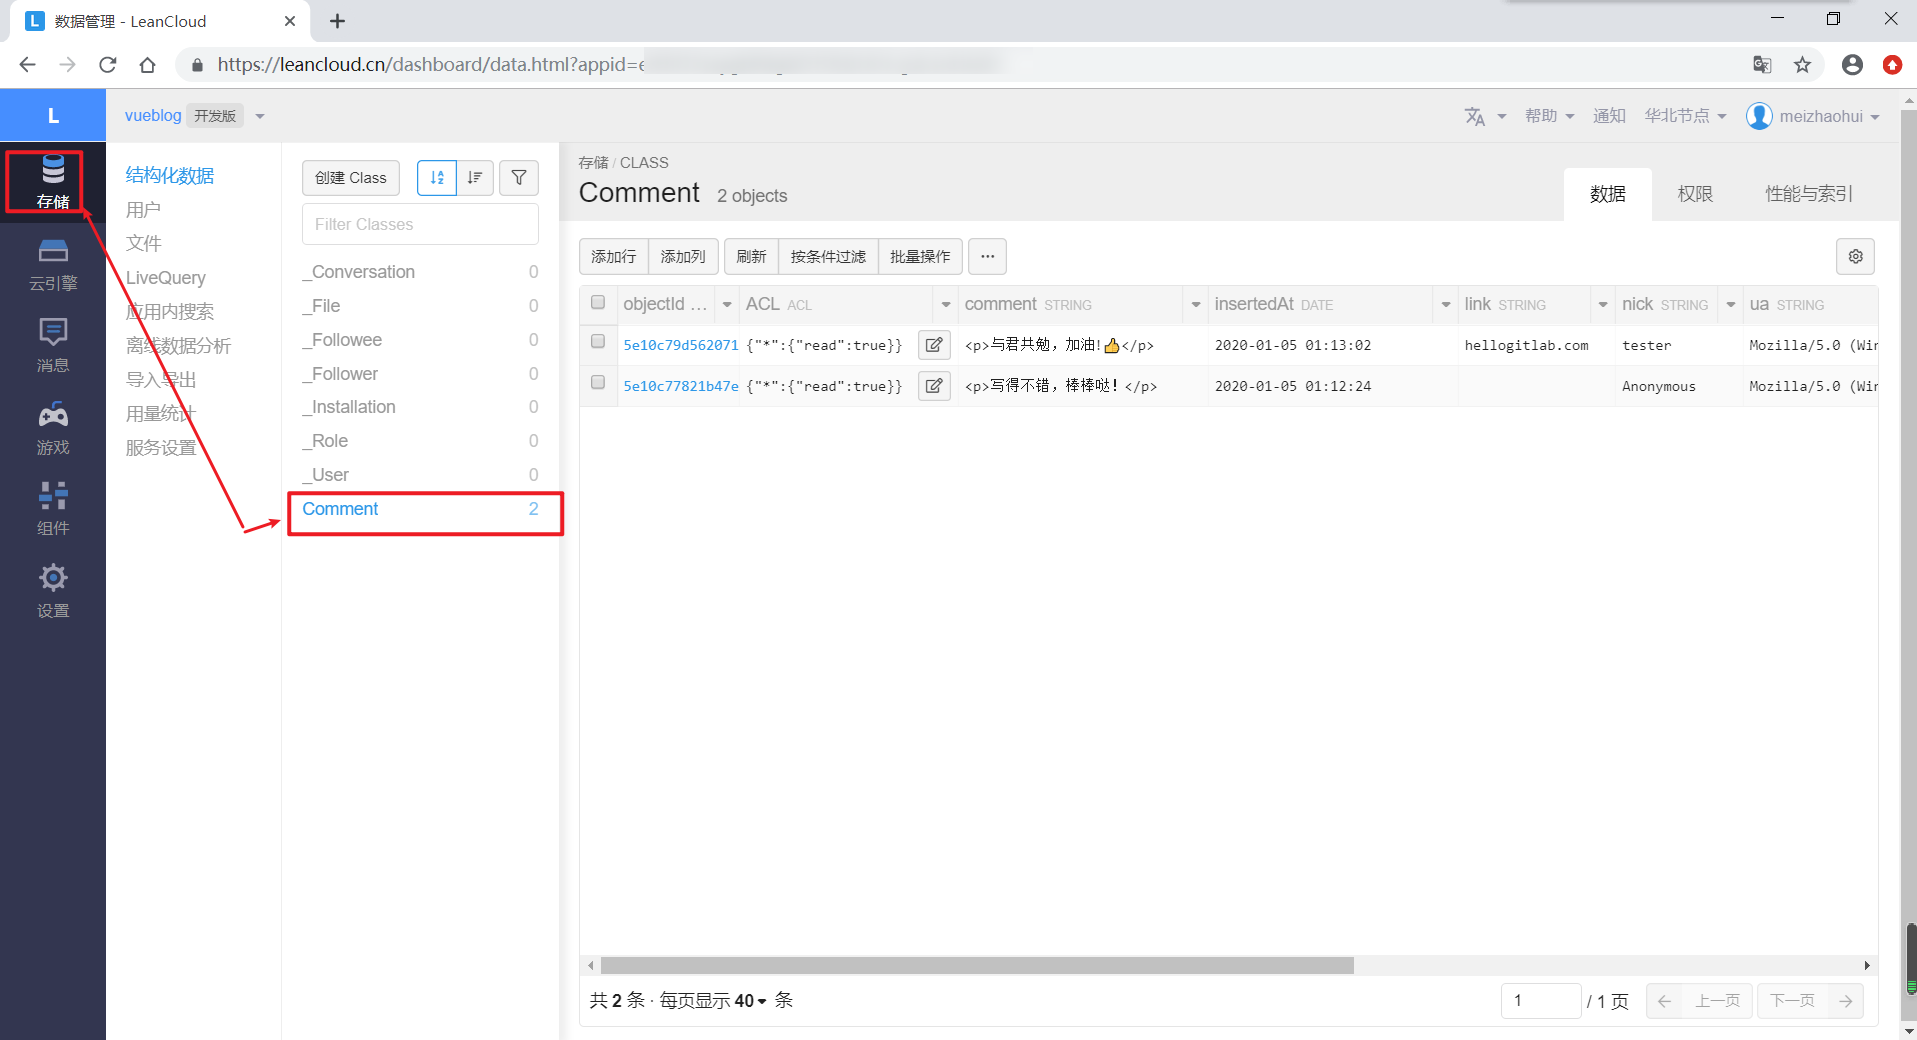
以上说明评论功能配置正常!
优化导航栏
在优化导航栏时,我们可以做以下事情:
- 导航栏左侧添加logo图标
- 导航栏右侧通过repo指定GitHub链接,而不是自己手动指定GitHub的链接地址。
我们更新一下config.js文件,配置如下:
module.exports = {
    title: '梅朝辉的博客',
    ...省略
    themeConfig: {
        logo: '/img/favicon.ico', // 导航栏左侧的logo,不写就不显示
        lastUpdated: '上次更新',
        repo: 'https://www.github.com/meizhaohui/vueblog',  // 链接的地址
        repoLabel: 'GitHub',  // 链接的名称
        nav: [
            { text:'首页', link: '/'},
            {
                text: '博文',
                items: [
                    { text: 'Python', link: '/python/' },
                    { text: 'Golang', link: '/golang/' },
                    { text: 'Web', link: '/web/' }
                ]
            },
            { text:'关于', link: '/about/'},
            // { text: 'Github', link: 'https://www.github.com/meizhaohui' } 此行被移除
        ],
...省略重新运行后,可以看到在导航栏的左侧多出了logo图标,并且通过repo属性也生成了GitHub的超链接。效果如下图所示:

添加编辑此页面超链接
我们在优化导航栏的基础上,给themeConfig增加editLinks、editLinkText、docsDir参数,参数的说明详见以下代码,具体如下:
module.exports = {
    title: '梅朝辉的博客',
    ...省略
    themeConfig: {
        logo: '/img/favicon.ico', // 导航栏左侧的logo,不写就不显示
        lastUpdated: '上次更新',
        repo: 'https://www.github.com/meizhaohui/vueblog',  // 链接的地址
        repoLabel: 'GitHub',  // 链接的名称
        editLinks: true,  // 开启编辑链接功能
        editLinkText: '帮助我们改善此页面',  // 自定义超链接的文本内容
        docsDir: 'myblog/docs',  // docs文件的路径,从根目录开始
        nav: [
            { text:'首页', link: '/'},
            {
                text: '博文',
                items: [
                    { text: 'Python', link: '/python/' },
                    { text: 'Golang', link: '/golang/' },
                    { text: 'Web', link: '/web/' }
                ]
            },
            { text:'关于', link: '/about/'},
        ],
...省略参考:Git repository and Edit Links
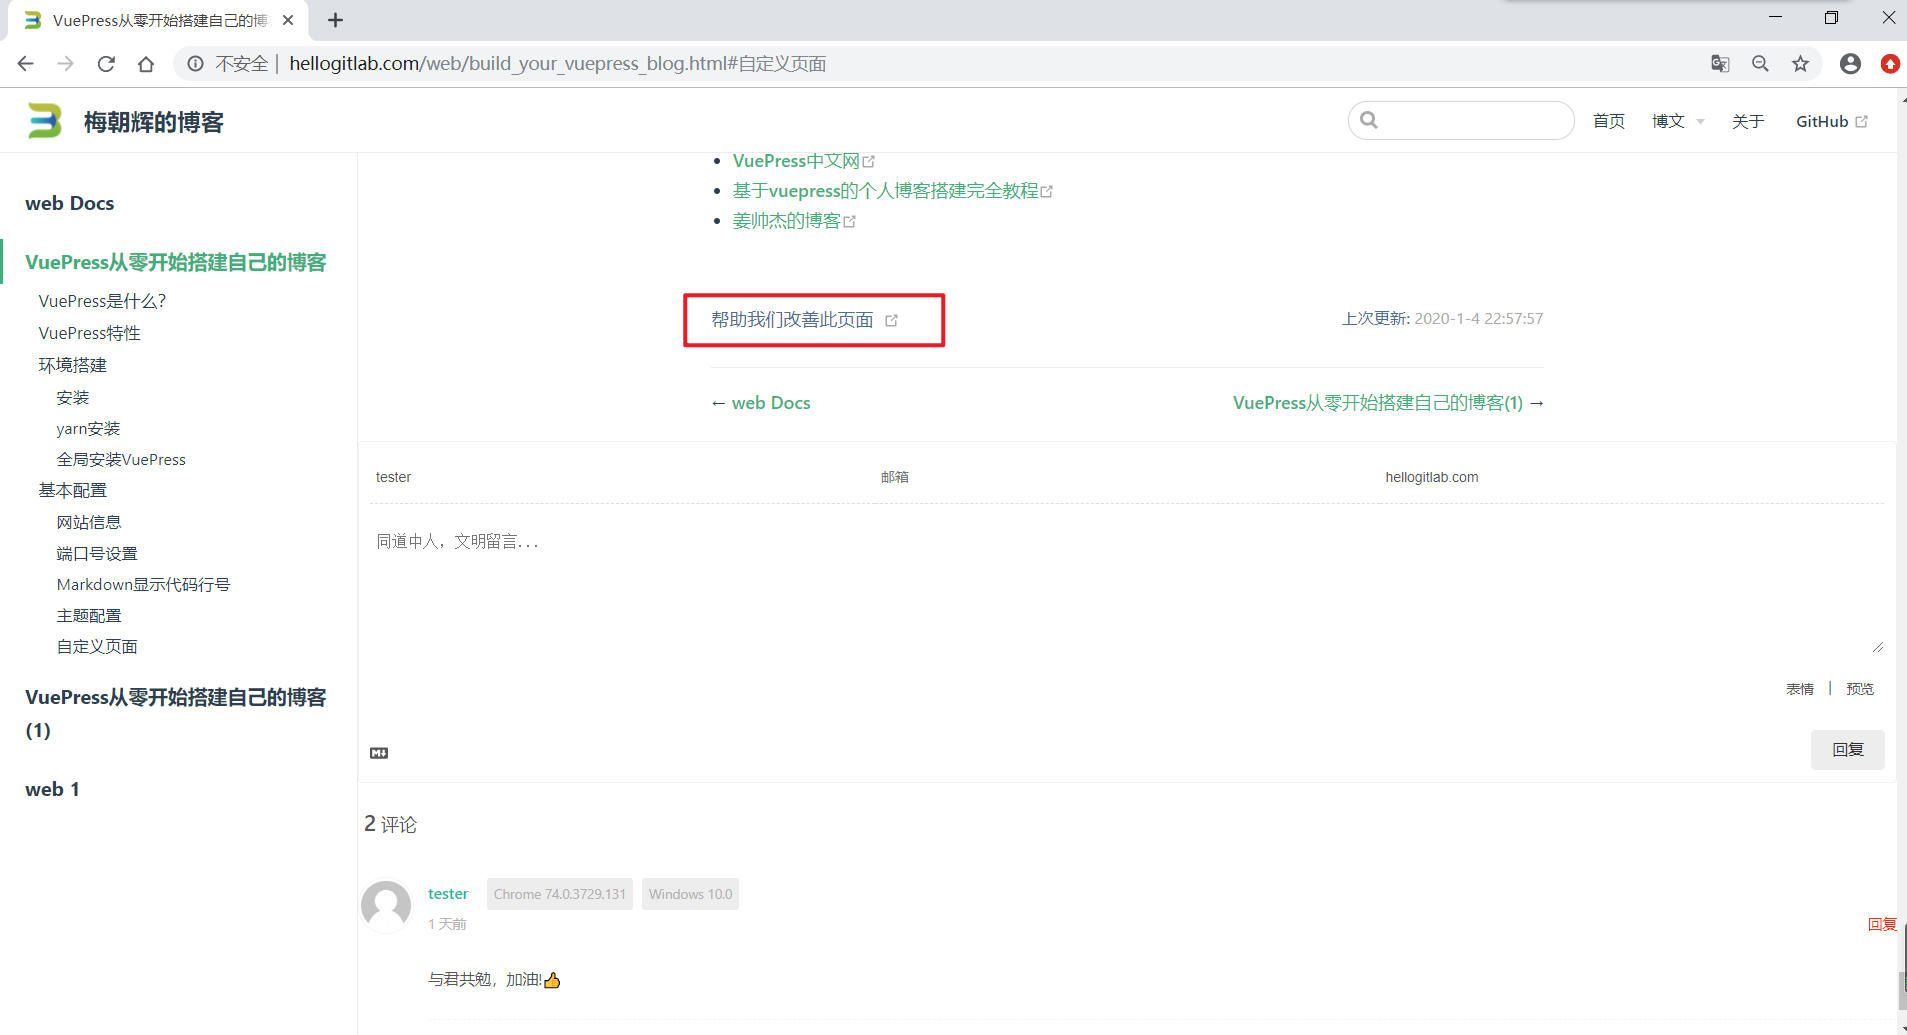
重新构建后,在页面的底部可以看到多出了"帮助我们改善此页面"超链接,点击超链接可以打开GitHub仓库中文件的编辑页面。效果如下图所示:
隐藏私密信息
在使用Valine配置评论功能 中,我们在配置文件中使用了appId: 'your leancloud appid'和appKey: 'your leancloud appkey',并上传到了GitHub上面,然后在服务上面再进行手动修改成真实的appid或appkey值,每次部署到服务器上面时都需要重新修改一次,显得非常麻烦。
如果我们将自己的leancloud人appid或appkey上传到GitHub中,别人就可以看到你的私密信息,也不够安全。因此我们需要隐藏这些私密信息。
我们在项目根目录docs目录同级创建一个config目录,并在其中创建secureinfo.js文件。目录结构如下图:
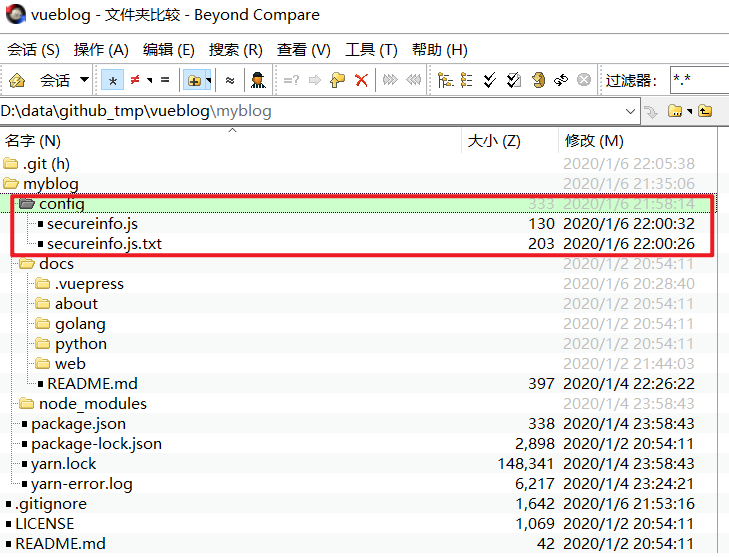
我们同时创建了secureinfo.js.txt文件,用于与secureinfo.js文件进行对比,secureinfo.js.txt文件中增加一些说明。
secureinfo.js文件内容如下:
module.exports = {
    leancloud_appId: 'your leancloud appid',
    leancloud_appKey: 'your leancloud appkey'
}注:'your leancloud appid'和'your leancloud appkey'改成你自己的leancloud的appid和appkey值。
secureinfo.js.txt文件内容如下:
// please rename this file to secureinfo.js, and then input your secure leancloud info.
module.exports = {
    leancloud_appId: 'your leancloud appid',
    leancloud_appKey: 'your leancloud appkey'
}最重要的一步,将secureinfo.js文件加入到.gitignore文件列表中。在.gitignore文件最后加以下内容:
# secure info
secureinfo.js检查git查看忽略文件:
$ git check-ignore -v config\secureinfo.js
.gitignore:107:secureinfo.js    "config\\secureinfo.js"

$ git check-ignore -v config\secureinfo.js.txt可以看到config\secureinfo.js文件已经被忽略掉,而secureinfo.js.txt文件不会忽略。所以我们提交时config\secureinfo.js不会被提交。
同时,也可以使用git status命令来查看这两个文件是否被提交:
$ git status config\secureinfo.js
On branch master
Your branch is up-to-date with 'origin/master'.
nothing to commit, working directory clean


$ git status config\secureinfo.js.txt
On branch master
Your branch is up-to-date with 'origin/master'.
Untracked files:
  (use "git add <file>..." to include in what will be committed)

        config/secureinfo.js.txt

nothing added to commit but untracked files present (use "git add" to track)可以看到config\secureinfo.js文件未被跟踪,不会被上传到GitHub中。
另外需要更改一下.vuepress/config.js文件:
- 在第1行使用
const secureConf = require('../../config/secureinfo.js');引入安全文件,注意此处使用的相对引用,..表示向上一级目录。 - 原来
appId: 'your leancloud appid',内容替换成appId: secureConf.leancloud_appId, // 读取secure_info.js中的配置信息。 - 原来
appKey: 'your leancloud appkey',内容替换成appKey: secureConf.leancloud_appKey, // 读取secure_info.js中的配置信息。
修改后,我们使用正确的leancloud_appId和leancloud_appKey值时,在本地可以调试时,可以获取到评论信息,显示如下图所示:
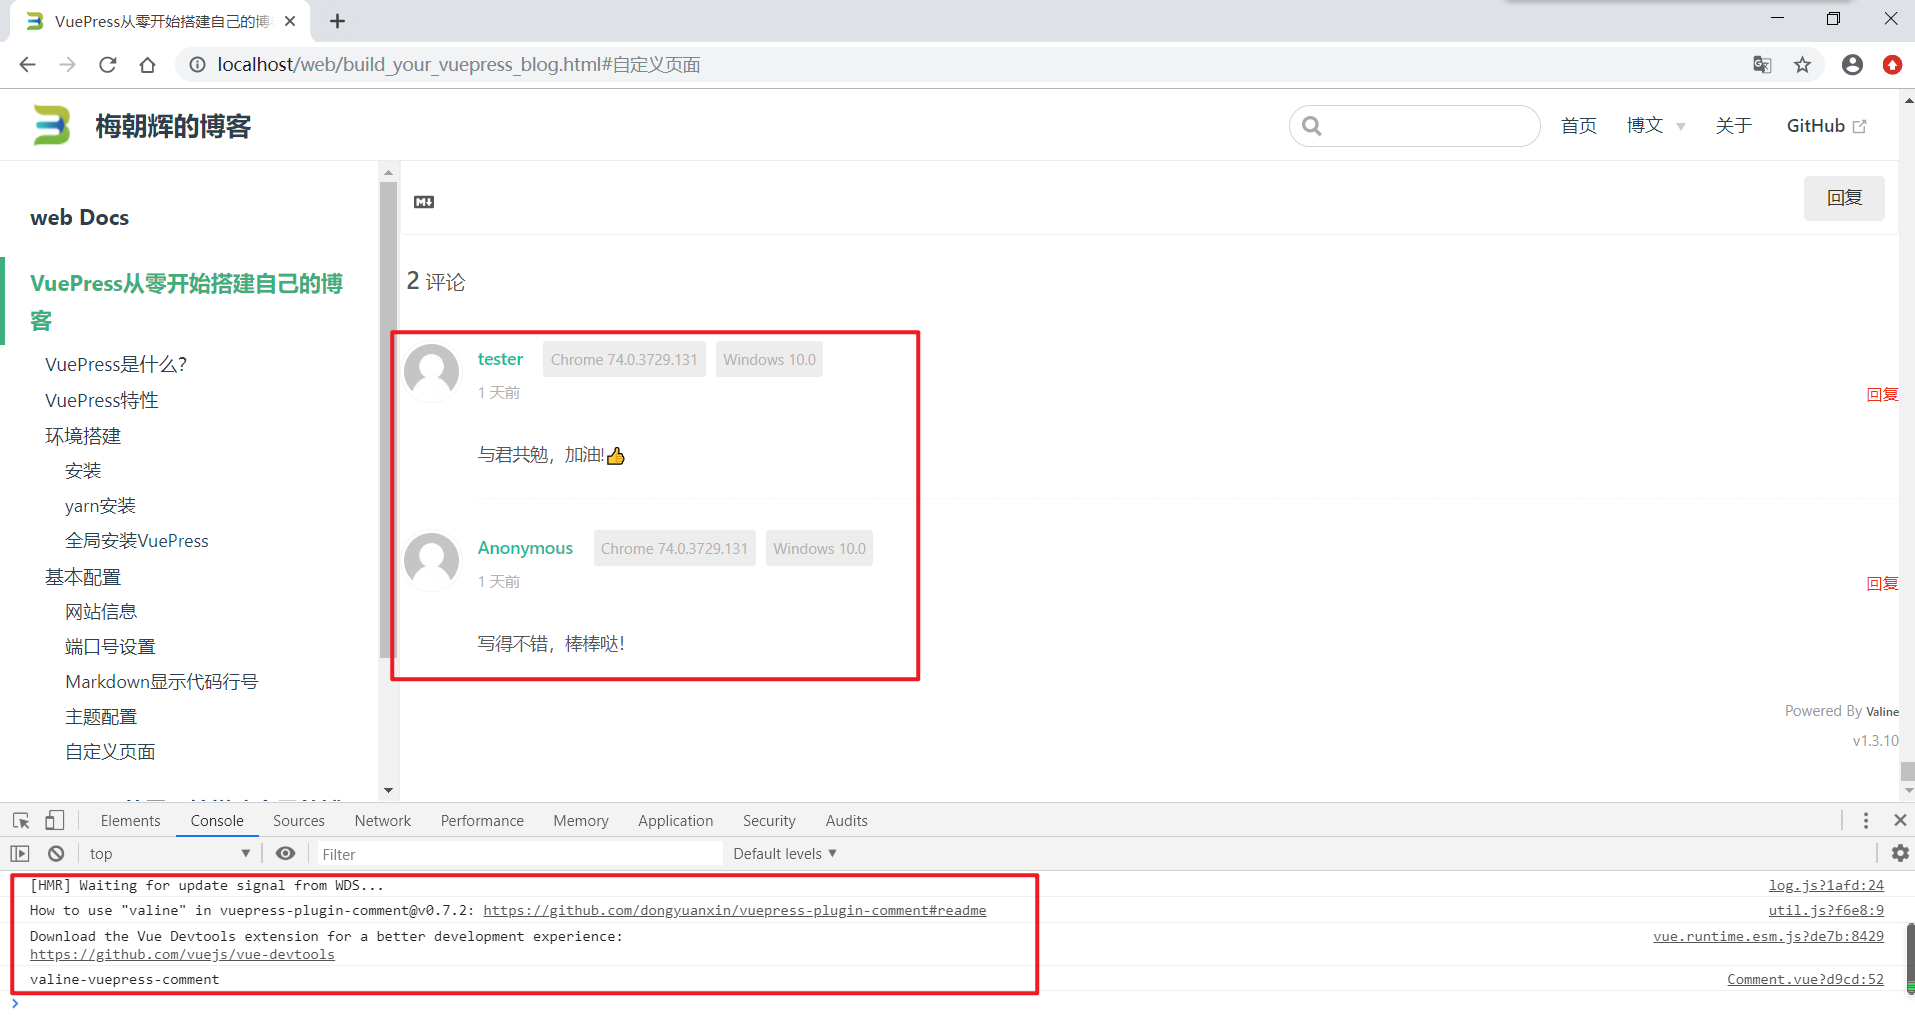
评论显示正常!
我们修改一下leancloud_appId,随机改成其他的值,再运行试一下,显示如下图所示:
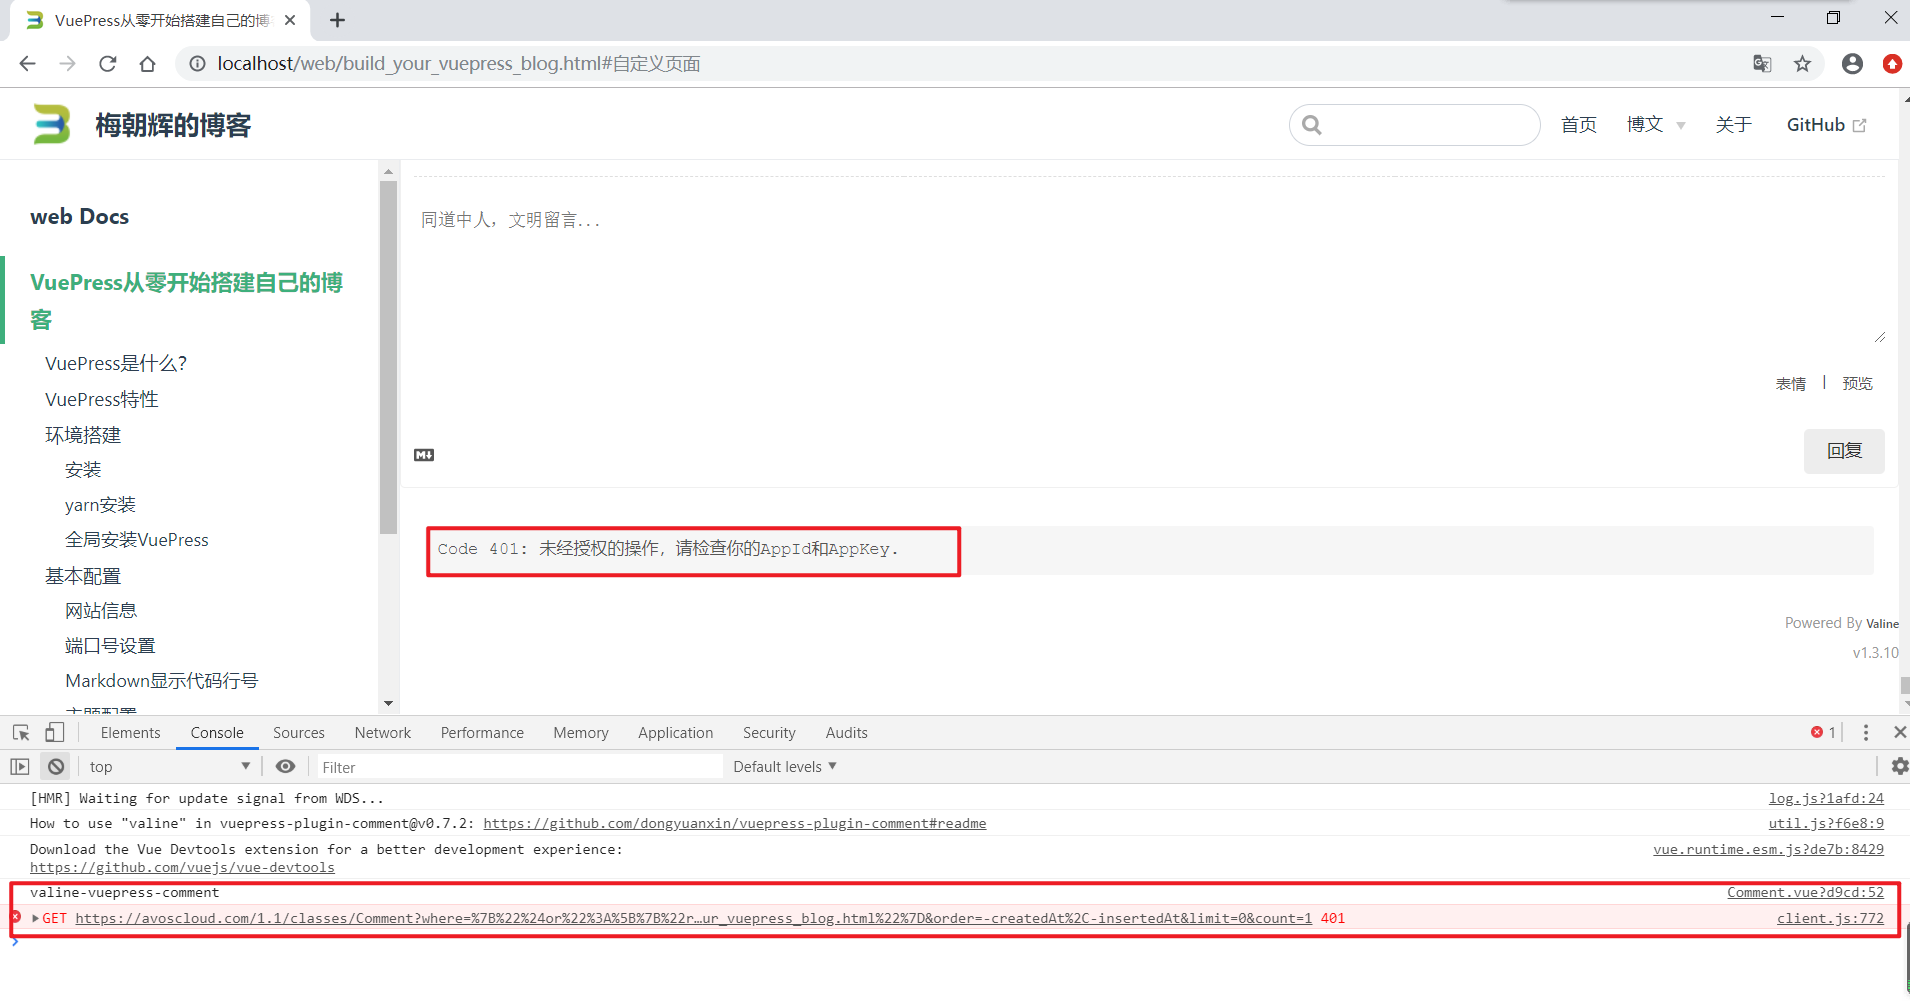
此时,可以看到页面显示"Code 401: 未经授权的操作,请检查你的AppId和AppKey.",且在Console界面显示异常。
再将leancloud_appId改成正常的值重新运行,又可以正常显示评论信息,说明配置生效。
后续,只用在服务器的项目目录中配置config/secureinfo.js文件即可,既可以隐藏私密信息,也方便后续提交部署。
具体可参考 飞跃高山与大洋的鱼 视频教程 一步步搭建 VuePress 及优化 视频中第26-31分钟。
优化config.js将导航栏、插件、侧边栏数据拆分
我们现在只增加了几篇文件,config.js文件已经达到了88行,内容如下:
const secureConf = require('../../config/secureinfo.js');

module.exports = {
    title: '梅朝辉的博客',
    description: '种一棵树最好的时间是十年前,其次就是现在。',
    locales: {
         '/': {
             lang: 'zh-CN',
         }
    },
    head: [
        ['link', { rel: 'icon', href: '/img/favicon.ico' }],
    ],
    port: 80,
    markdown: {
        lineNumbers: true, // 代码显示行号
    },
    plugins: {
        'vuepress-plugin-comment':
        {
            choosen: 'valine',
            // options选项中的所有参数,会传给Valine的配置
            options: {
                el: '#valine-vuepress-comment',
                appId: secureConf.leancloud_appId,  // 读取secure_info.js中的配置信息
                appKey: secureConf.leancloud_appKey,  // 读取secure_info.js中的配置信息
                placeholder: '同道中人,文明留言...',  // 评论框占位提示符
                lang: 'zh-cn', // 支持中文
            }
        },
    },
    themeConfig: {
        logo: '/img/favicon.ico', // 导航栏左侧的logo,不写就不显示
        lastUpdated: '上次更新',
        repo: 'https://www.github.com/meizhaohui/vueblog',  // 链接的地址
        repoLabel: 'GitHub',  // 链接的名称
        editLinks: true,  // 开启编辑链接功能
        editLinkText: '帮助我们改善此页面',  // 自定义超链接的文本内容
        docsDir: 'myblog/docs',  // docs文件的路径,从根目录开始
        nav: [
            { text:'首页', link: '/'},
            {
                text: '博文',
                items: [
                    { text: 'Python', link: '/python/' },
                    { text: 'Golang', link: '/golang/' },
                    { text: 'Web', link: '/web/' }
                ]
            },
            { text:'关于', link: '/about/'},
        ],
        sidebar: {
            '/python/': [
                {
                    title: 'Python基础知识',
                    collapsable: true,  // 是否可折叠,默认可折叠true
                    children: [
                        "python1",
                        "python2",
                        "python3"
                    ]
                },
                {
                    title: 'Python Web',
                    collapsable: false,
                    children: [
                        "python4",
                        "python5",
                        "python6"
                    ]
                },
            ],
            '/golang/': [
                "",
                "golang1",
                "golang2",
                "golang3"
            ],
            '/web/': [
                "",
                "build_your_vuepress_blog",
                "build_your_vuepress_blog_1",
                "web1"
            ],
        },
        sidebarDepth: 2 // 侧边栏显示深度,默认为1,即显示一级标题
    }
}配置文件已经显得比较臃肿了,但我们的文章越来越多时,config.js文件将会越来越大,所以我们应对配置文件进行拆分。
现在主要将导航栏、插件、侧边栏数据拆分出来,放到三个不同的文件里面去。
我们在config目录下新建三个js文件,分别存放导航栏(navConfig.js)、插件(pluginConfig.js)、侧边栏(sidebarConfig.js)数据。
在config.js中插件plugins暴露的是{}对象,因此我们在pluginConfig.js也暴露一个对象,并导入私密配置文件。
pluginConfig.js文件内容如下:
const secureConf = require('./secureinfo.js');
module.exports = {
    'vuepress-plugin-comment': {
        choosen: 'valine',
        // options选项中的所有参数,会传给Valine的配置
        options: {
            el: '#valine-vuepress-comment',
            appId: secureConf.leancloud_appId, // 读取secure_info.js中的配置信息
            appKey: secureConf.leancloud_appKey, // 读取secure_info.js中的配置信息
            placeholder: '同道中人,文明留言...', // 评论框占位提示符
            lang: 'zh-cn', // 支持中文
        }
    },
}在config.js中导航栏nav暴露的是[]列表,因此我们在navConfig.js也暴露一个[]列表。
navConfig.js文件内容如下:
module.exports = [{
        text: '首页',
        link: '/'
    },
    {
        text: '博文',
        items: [{
                text: 'Python',
                link: '/python/'
            },
            {
                text: 'Golang',
                link: '/golang/'
            },
            {
                text: 'Web',
                link: '/web/'
            }
        ]
    },
    {
        text: '关于',
        link: '/about/'
    },
]在config.js中侧边栏sidebar暴露的是{}对象,因此我们在sidebarConfig.js也暴露一个对象。
sidebarConfig.js文件内容如下:
module.exports = {
    '/python/': [{
            title: 'Python基础知识',
            collapsable: true, // 是否可折叠,默认可折叠true
            children: [
                "python1",
                "python2",
                "python3"
            ]
        },
        {
            title: 'Python Web',
            collapsable: false,
            children: [
                "python4",
                "python5",
                "python6"
            ]
        },
    ],
    '/golang/': [
        "",
        "golang1",
        "golang2",
        "golang3"
    ],
    '/web/': [
        "",
        "build_your_vuepress_blog",
        "build_your_vuepress_blog_1",
        "web1"
    ],
}然后再在config.js中引入导航栏(navConfig.js)、插件(pluginConfig.js)、侧边栏(sidebarConfig.js)三个配置文件。
并将plugin,nar,sidebar处进行替换,替换后的config.js文件内容如下:
const pluginConf = require('../../config/pluginConfig.js');
const navConf = require('../../config/navConfig.js');
const sidebarConf = require('../../config/sidebarConfig.js');

module.exports = {
    title: '梅朝辉的博客',
    description: '种一棵树最好的时间是十年前,其次就是现在。',
    locales: {
         '/': {
             lang: 'zh-CN',
         }
    },
    head: [
        ['link', { rel: 'icon', href: '/img/favicon.ico' }],
    ],
    port: 80,
    markdown: {
        lineNumbers: true, // 代码显示行号
    },
    plugins: pluginConf,
    themeConfig: {
        logo: '/img/favicon.ico', // 导航栏左侧的logo,不写就不显示
        lastUpdated: '上次更新',
        repo: 'https://www.github.com/meizhaohui/vueblog',  // 链接的地址
        repoLabel: 'GitHub',  // 链接的名称
        editLinks: true,  // 开启编辑链接功能
        editLinkText: '帮助我们改善此页面',  // 自定义超链接的文本内容
        docsDir: 'myblog/docs',  // docs文件的路径,从根目录开始
        nav: navConf,
        sidebar: sidebarConf,
        sidebarDepth: 2 // 侧边栏显示深度,默认为1,即显示一级标题
    }
}可以看到config.js文件已经变成了33行,后续增加新的文件不需要修改config.js,只需要改navConfig.js和sidebarConfig.js文件即可。
我们随意修改一下导航栏(navConfig.js)、插件(pluginConfig.js)、侧边栏(sidebarConfig.js)三个配置文件的数据,分别增加testnav, testplugin, testsidebar字符,然后重新运行,看看效果:
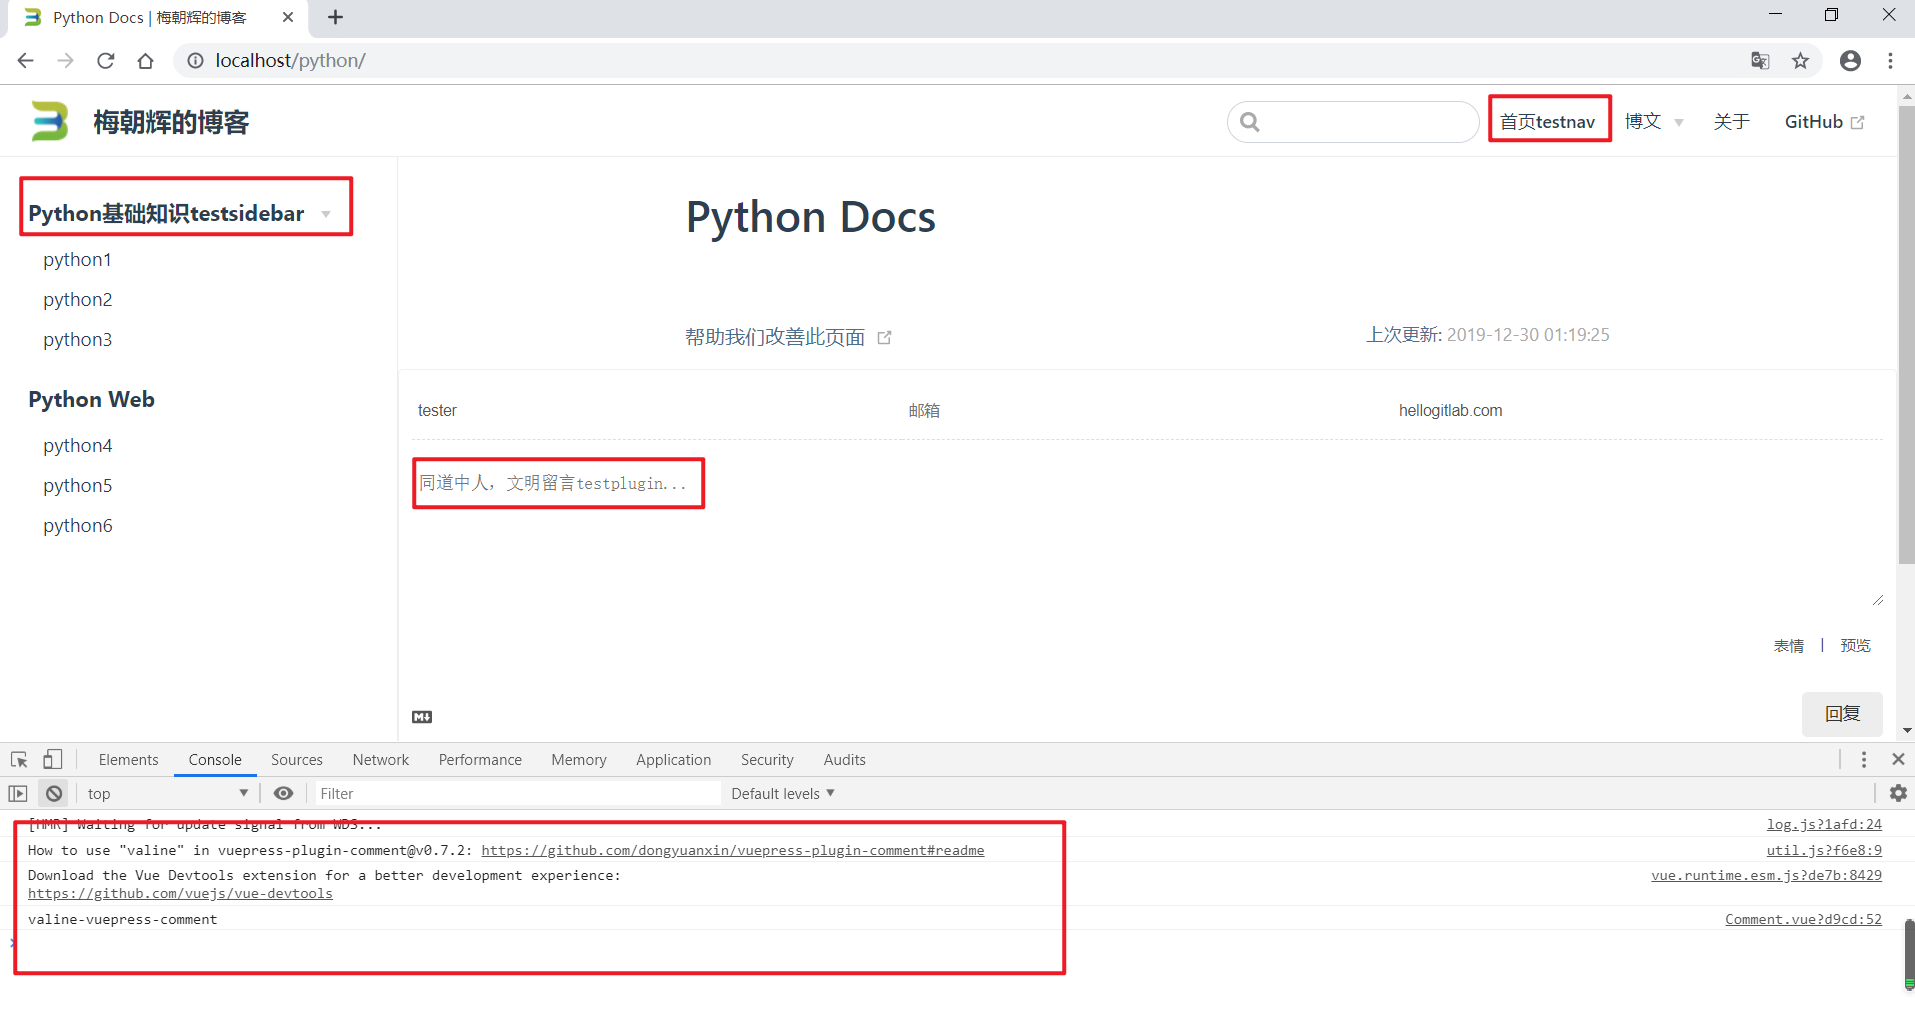
可以发现导航栏、侧边栏、评论插件都发生了变化,并且console中没有提示异常,说明我们的拆分配置正常。
详细可参考 飞跃高山与大洋的鱼 视频教程 一步步搭建 VuePress 及优化 视频中第1-18分钟。
此时侧边栏(sidebarConfig.js)的文件内容相对来说稍微大一些,后续可以再进行优化。
将刚才的测试字符testnav, testplugin, testsidebar删除掉,再重新运行,看看是否能正常运行。能正常运行就说明此次配置正确。
自动生成侧边栏
参考https://github.com/shanyuhai123/vuepress-plugin-auto-sidebar安装Vuepress Plugin Auto Sidebar插件。
- 安装
$ yarn add vuepress-plugin-auto-sidebar -D
$ # npm i vuepress-plugin-auto-sidebar -D

> core-js@2.6.11 postinstall ~/Documents/GitHub/vueblog/myblog/node_modules/core-js
> node -e "try{require('./postinstall')}catch(e){}"

Thank you for using core-js ( https://github.com/zloirock/core-js ) for polyfilling JavaScript standard library!

The project needs your help! Please consider supporting of core-js on Open Collective or Patreon:
> https://opencollective.com/core-js
> https://www.patreon.com/zloirock

Also, the author of core-js ( https://github.com/zloirock ) is looking for a good job -)

npm WARN myblog@1.0.0 No description
npm WARN myblog@1.0.0 No repository field.

+ vuepress-plugin-auto-sidebar@1.3.1
added 11 packages from 10 contributors and audited 11 packages in 19.168s
found 0 vulnerabilities

$ echo $?
0- 配置
在config目录下的pluginConfig.js中引入插件,引入后内容如下:
$ cat pluginConfig.js
const secureConf = require('./secureinfo.js');
module.exports = {
    'vuepress-plugin-comment': {
        choosen: 'valine',
        // options选项中的所有参数,会传给Valine的配置
        options: {
            el: '#valine-vuepress-comment',
            appId: secureConf.leancloud_appId, // 读取secure_info.js中的配置信息
            appKey: secureConf.leancloud_appKey, // 读取secure_info.js中的配置信息
            placeholder: '同道中人,文明留言...', // 评论框占位提示符
            lang: 'zh-cn', // 支持中文
        }
    },
     "vuepress-plugin-auto-sidebar" : {}, // 自动侧边栏
}- 移除
docs/.vuepress/config.js配置的sidebar设置
注释或删除第3行和第30行的sidebarConf和sidebar设置。
 cat .vuepress/config.js
const pluginConf = require('../../config/pluginConfig.js');
const navConf = require('../../config/navConfig.js');
//const sidebarConf = require('../../config/sidebarConfig.js');

module.exports = {
    title: '梅朝辉的博客',
    description: '种一棵树最好的时间是十年前,其次就是现在。',
    locales: {
         '/': {
             lang: 'zh-CN',
         }
    },
    head: [
        ['link', { rel: 'icon', href: '/img/favicon.ico' }],
    ],
    port: 80,
    markdown: {
        lineNumbers: true, // 代码显示行号
    },
    plugins: pluginConf,
    themeConfig: {
        logo: '/img/favicon.ico', // 导航栏左侧的logo,不写就不显示
        lastUpdated: '上次更新',
        repo: 'https://www.github.com/meizhaohui/vueblog',  // 链接的地址
        repoLabel: 'GitHub',  // 链接的名称
        editLinks: true,  // 开启编辑链接功能
        editLinkText: '帮助我们改善此页面',  // 自定义超链接的文本内容
        docsDir: 'myblog/docs',  // docs文件的路径,从根目录开始
        nav: navConf,
//        sidebar: sidebarConf,
        sidebarDepth: 2 // 侧边栏显示深度,默认为1,即显示一级标题
    }
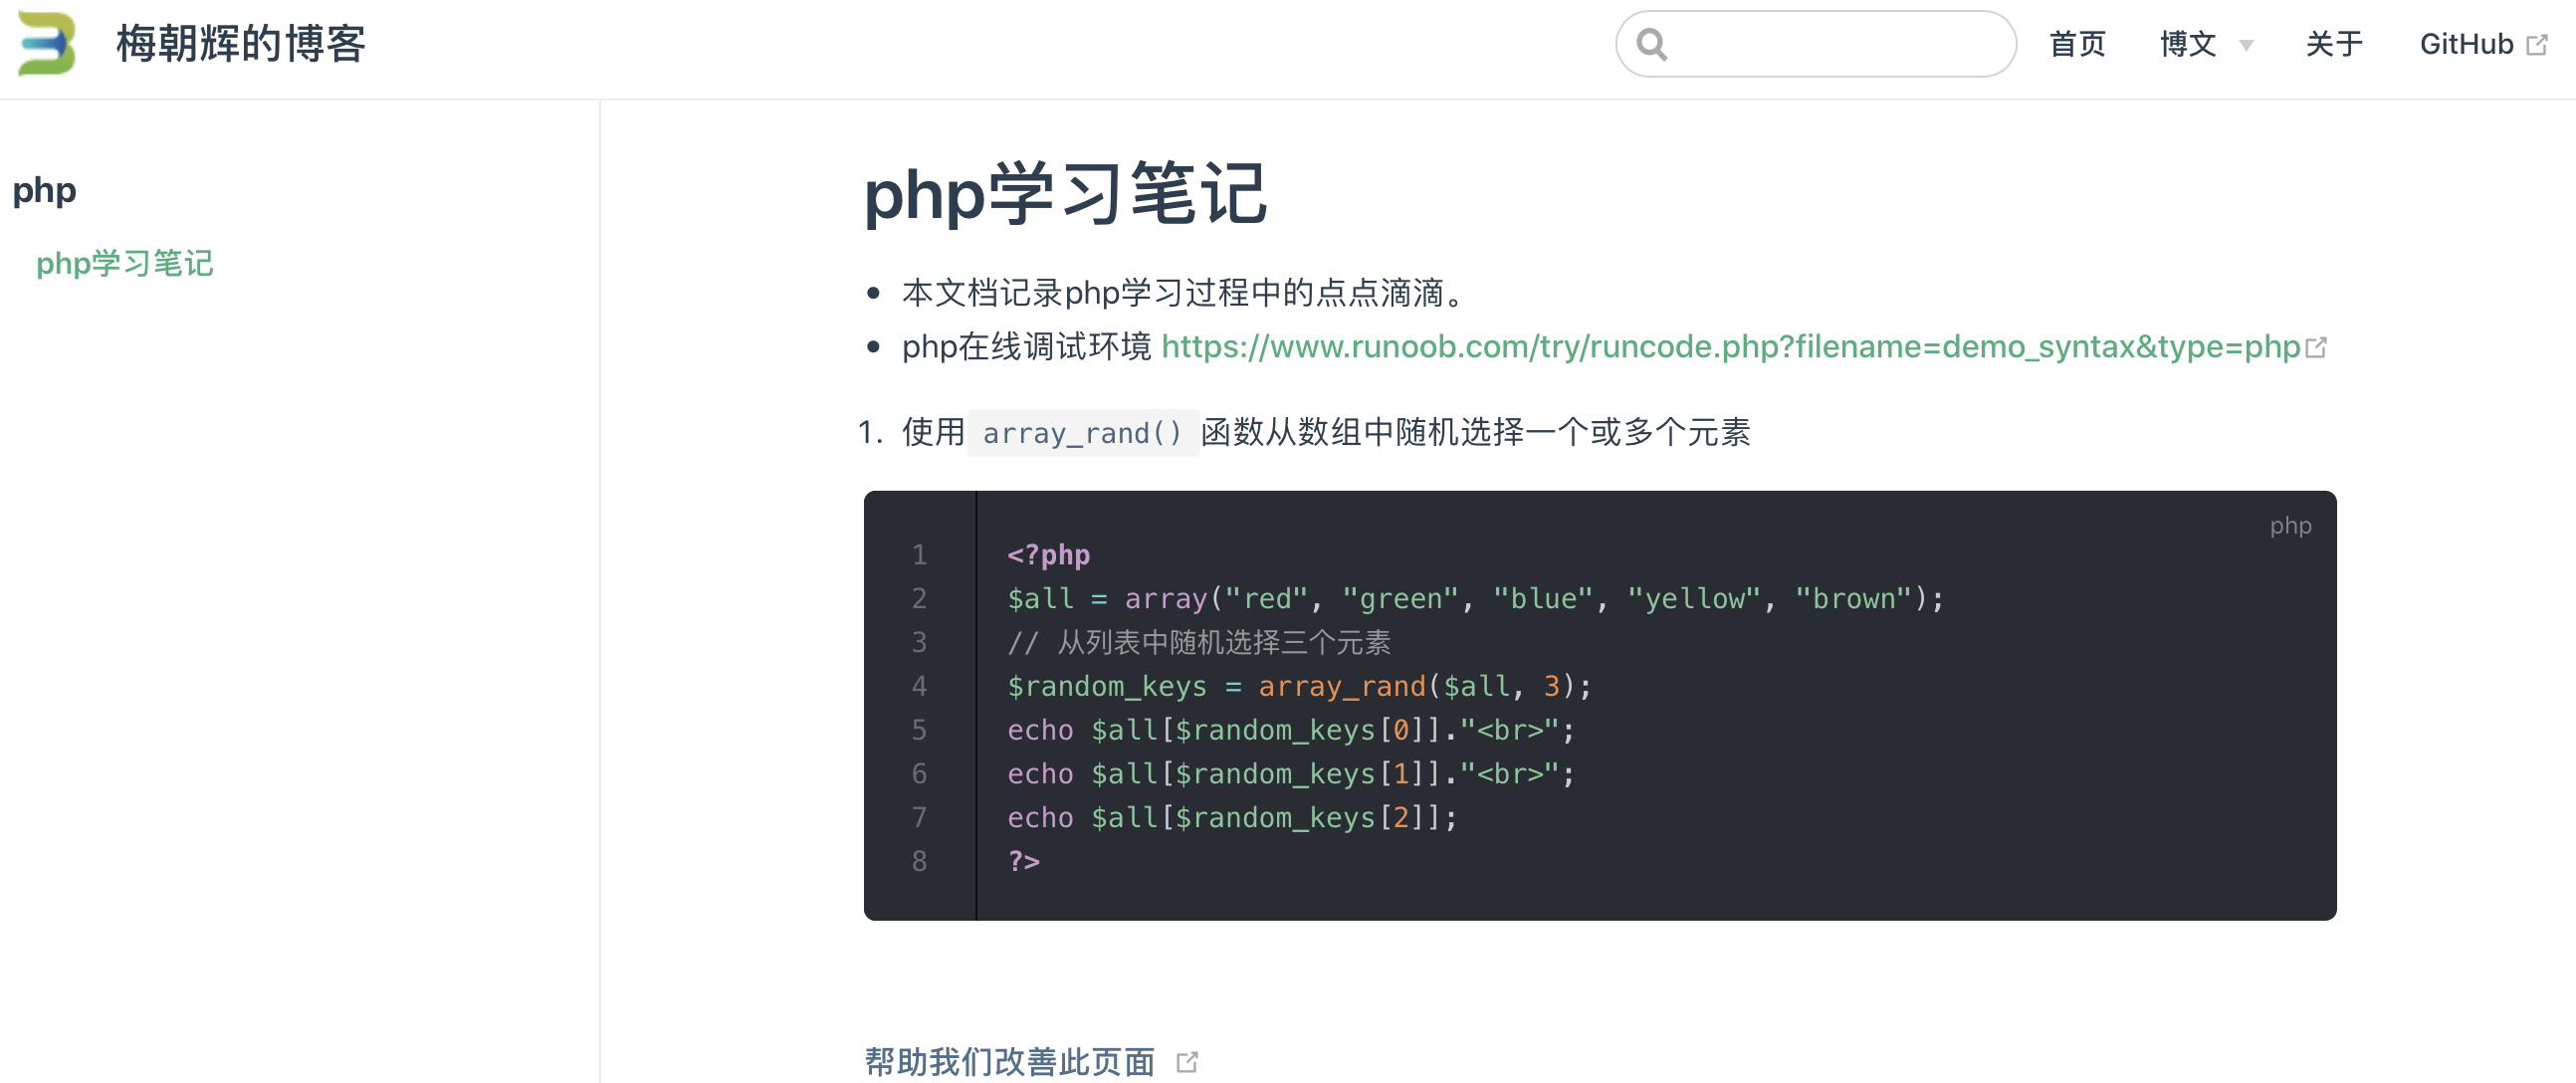
}如在docs中增加php目录,并增加php学习笔记.md文件,最后使用yarn docs:dev运行项目,可以看到php相关页面会显示出来。
全文搜索
内置搜索只能对文章标题进行搜索。我们如果想进行全文搜索,可以使用algolia搜索。
algolia提供了简化的方式Algolia DocSearch ,只需要提交自己的网站和邮箱地址,然后加入少量的脚本,就能使用了。
申请

回复确认邮件
Algolia DocSearch会发送确认邮件,收到后需要回复一下这个网站是你自己的,并且可以修改网站代码。
- 查收使用邮件
Algolia DocSearch会发送一封使用邮件,里面有apiKey和indexName。
- 修改配置文件
在配置文件中添加如下内容, apiKey和indexName就是上面邮件中的内容。
提示
遗憾的是,我这边收到DocSearch的邮件通知,说不能爬取我的网站,返回403异常,有可能IP或者user_agent被过滤了,这个功能没有弄成功。😢
https配置
现在有很多免费的SSL证书提供商,如阿里云的云盾证书,腾讯的免费版DVSSL证书,这两种免费证书有效期为一年。
申请证书
我因为购买的是腾讯的云服务器,就申请一个免费的腾讯SSL证书。
在证书申请页面https://console.cloud.tencent.com/ssl/apply填写证书的一些信息:
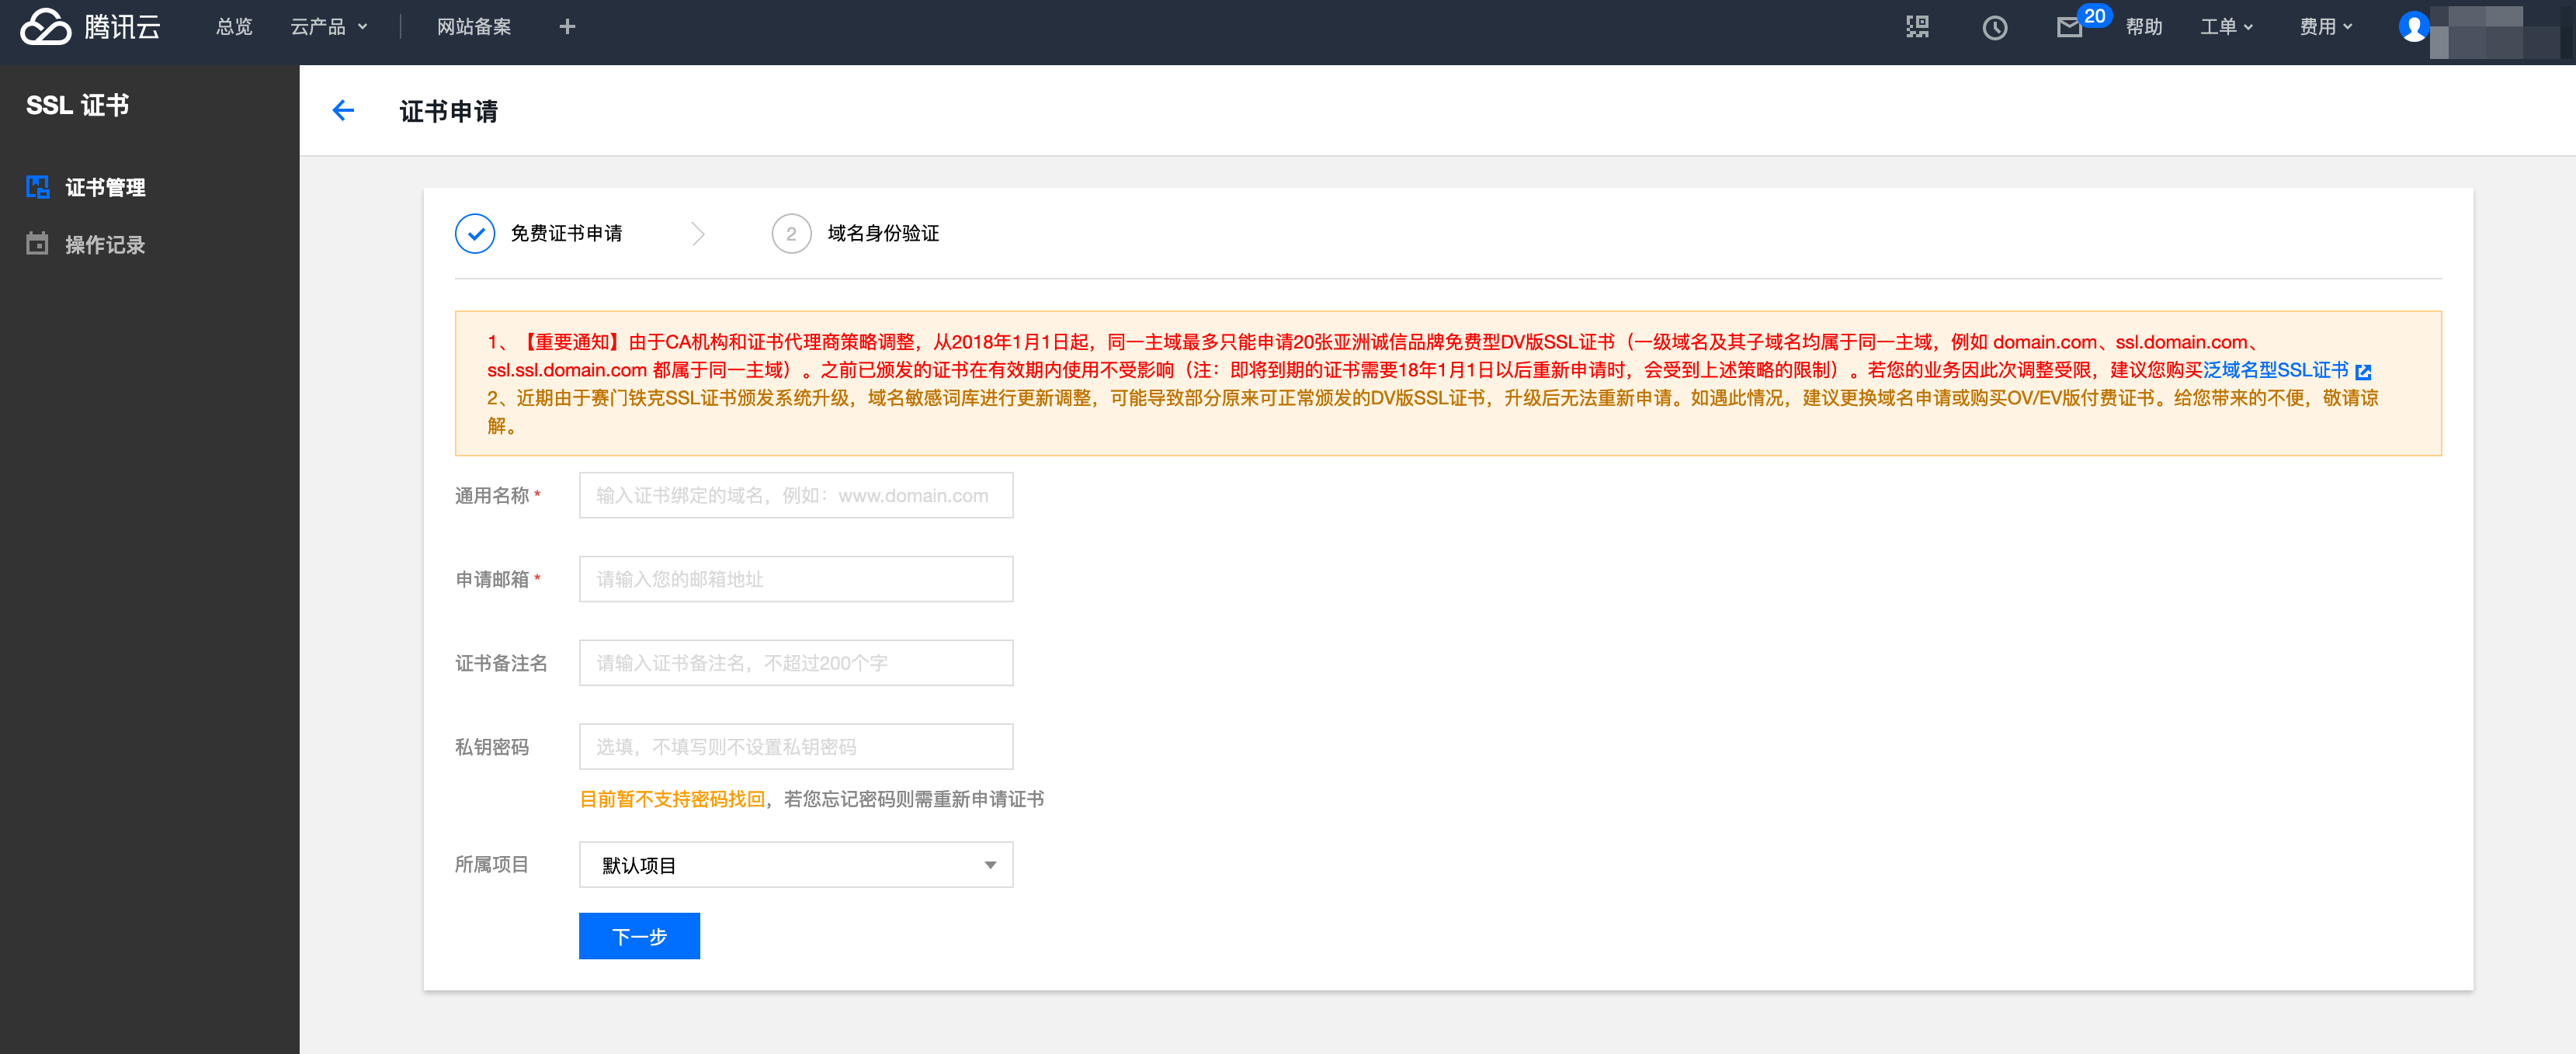
按照提示申请完成后,可以在证书管理页面看到申请到的免费SSL证书记录:
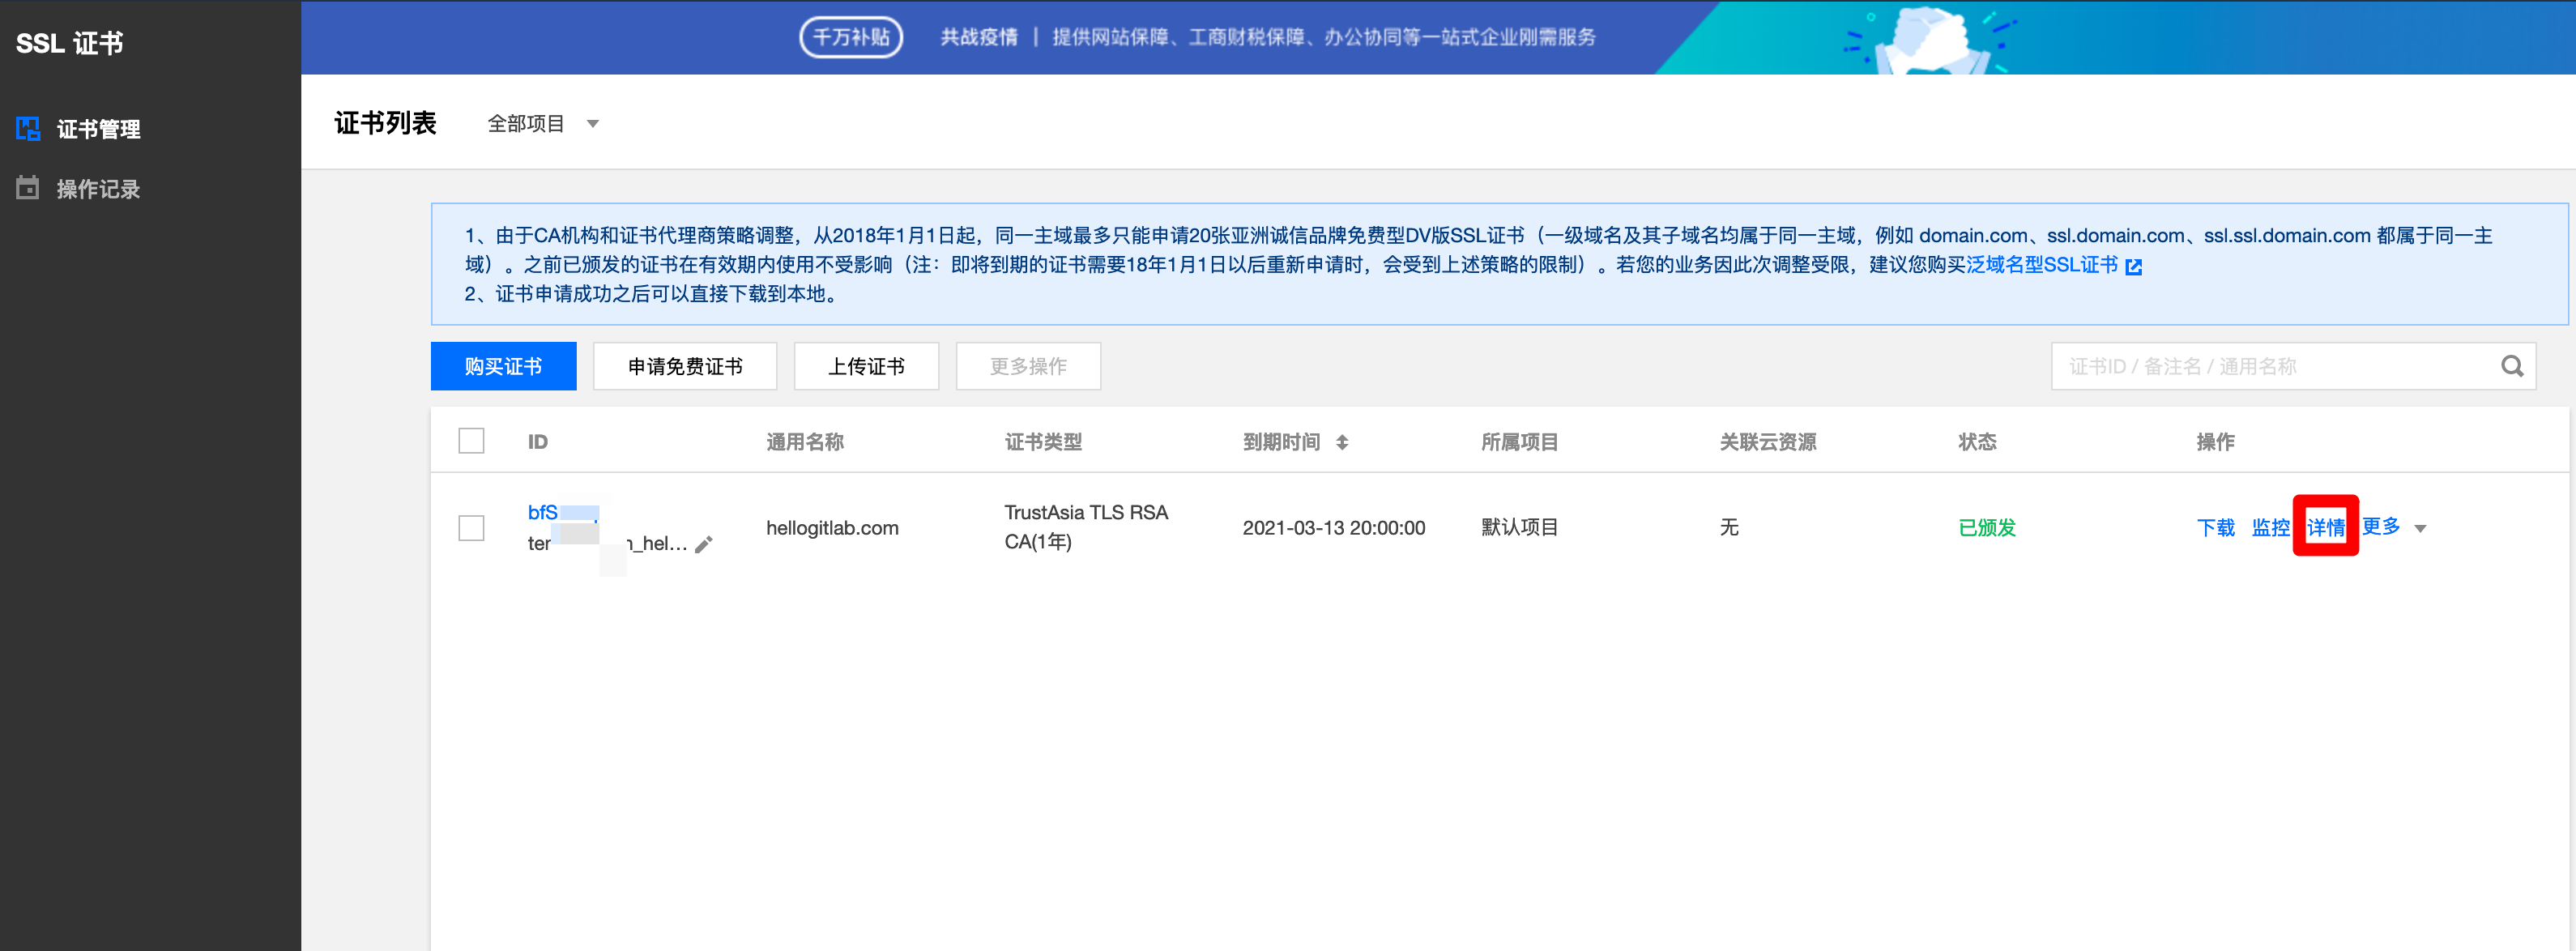
点击详情可以查看证书的详细信息:
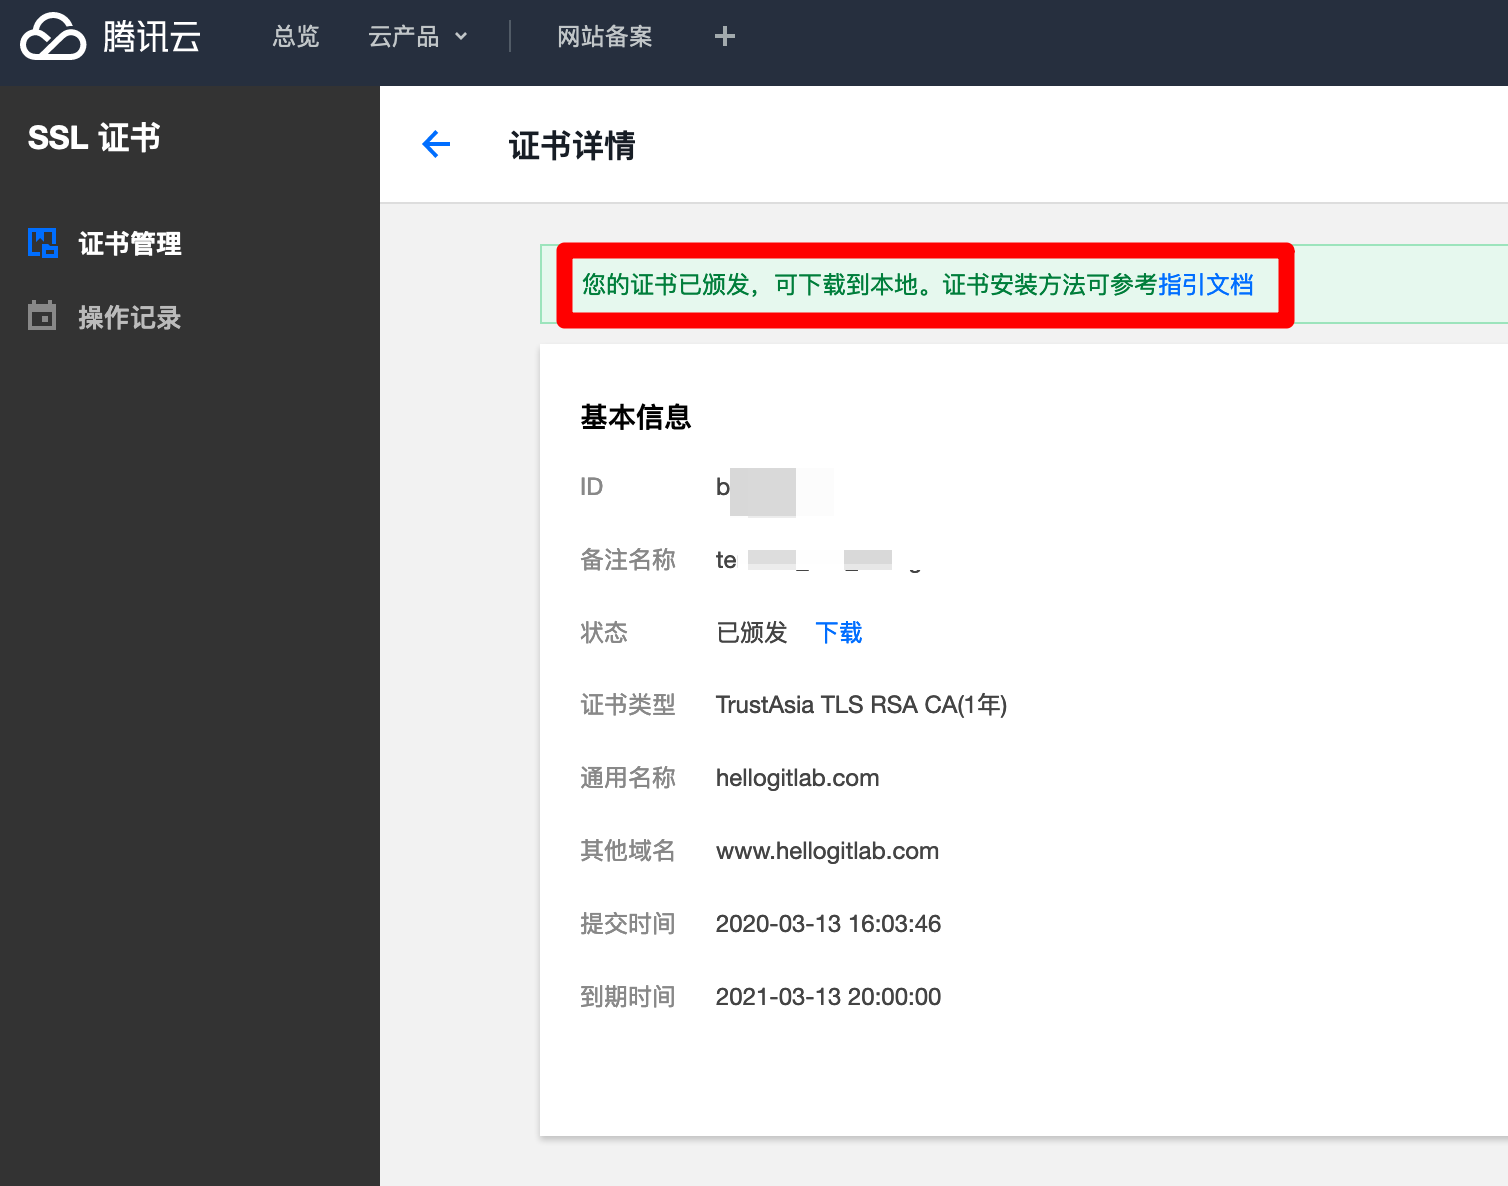
点击下载下载证书文件,下载下来的文件名为hellogitlab.com.zip,解压后文件夹的内容如下:
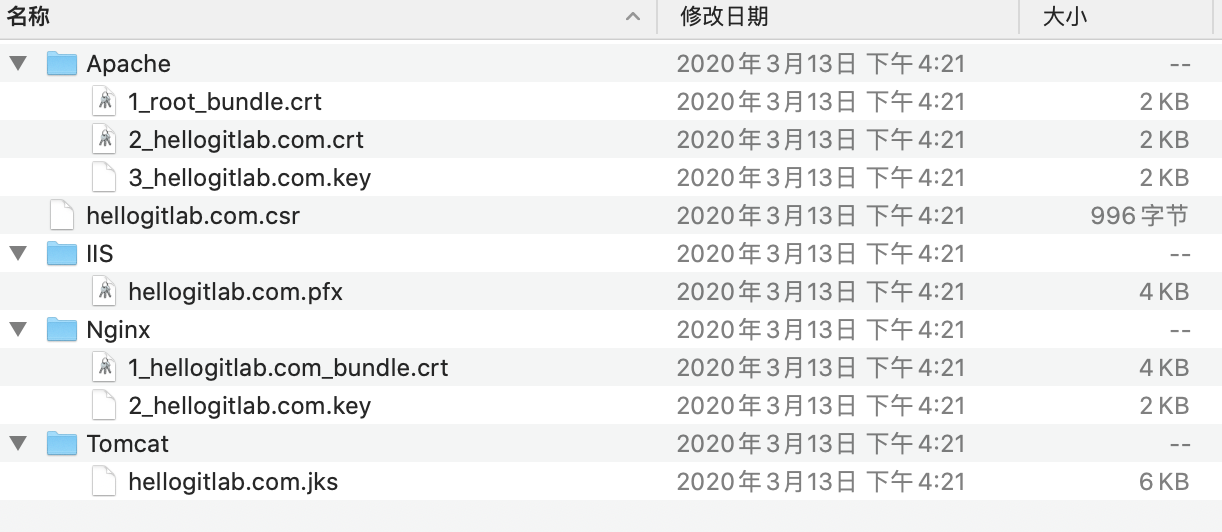
根据自己使用的web服务器选择不同文件夹里面的SSL文件即可。 证书安装指引 -> 如何选择证书安装类型?有手动安装指引。
证书配置
如果使用的是Apache httpd服务,可以参考 https://cloud.tencent.com/document/product/400/35243。
我的配置文件内容如下:
[root@hellogitlab conf.d]# cat vueblog.conf
<VirtualHost 0.0.0.0:443>
    DocumentRoot "/var/www/html/vueblog"
    #填写证书名称
    ServerName hellogitlab.com
    #启用 SSL 功能
    SSLEngine on
    #证书文件的路径
    SSLCertificateFile "/etc/httpd/conf.d/2_hellogitlab.com.crt"
    #私钥文件的路径
    SSLCertificateKeyFile "/etc/httpd/conf.d/3_hellogitlab.com.key"
    #证书链文件的路径
    SSLCertificateChainFile "/etc/httpd/conf.d/1_root_bundle.crt"
</VirtualHost>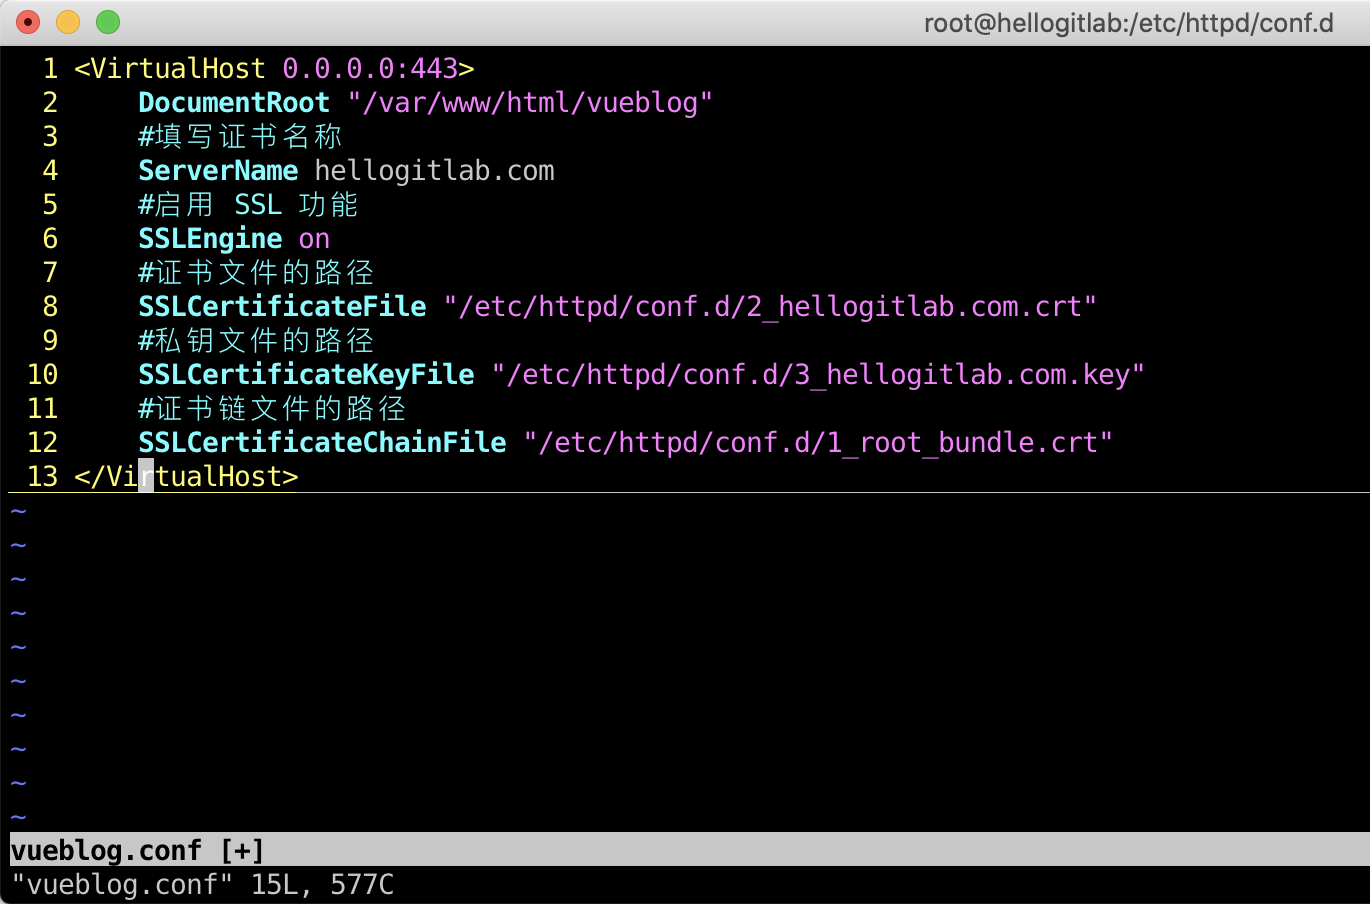
HTTP 自动跳转 HTTPS 的安全配置
可以参考腾讯的指导手册上面,自动跳转所有非443端口的链接:
[root@hellogitlab conf.d]# cat http2https.conf
<Directory "/var/www/html">
# 新增
RewriteEngine on
RewriteCond %{SERVER_PORT} !^443$
RewriteRule ^(.*)?$ https://%{SERVER_NAME}%{REQUEST_URI} [L,R]
</Directory>这种所有非443端口的URL请求都会跳转到https方式请求。
如果仅跳转80端口的请求到443端口,可以按如下方式配置:
[root@hellogitlab conf.d]# cat http2https.conf
<Directory "/var/www/html">
# 新增
RewriteEngine on
RewriteCond %{SERVER_PORT} ^80$
RewriteRule ^(.*)?$ https://%{SERVER_NAME}%{REQUEST_URI} [L,R]
</Directory>检查配置是否正确
使用httpd -t检查配置是否正确:
[root@hellogitlab conf.d]# httpd -t
Syntax OK如果开启了防火墙,防火墙需要放行80和443端口。
重启htttpd服务器
[root@hellogitlab conf.d]# systemctl restart httpd检查http和https是否配置成功
访问http://hellogitlab.ocm/看能否自动跳转到https://hellogitlab.ocm/,发现可以正常跳转,说明配置正确。
说明:我的证书DNS解析是在腾讯云DNS解析 DNSPod中设置的。链接地址:https://console.cloud.tencent.com/cns
在URL点可以查看网站SSL的具体信息:
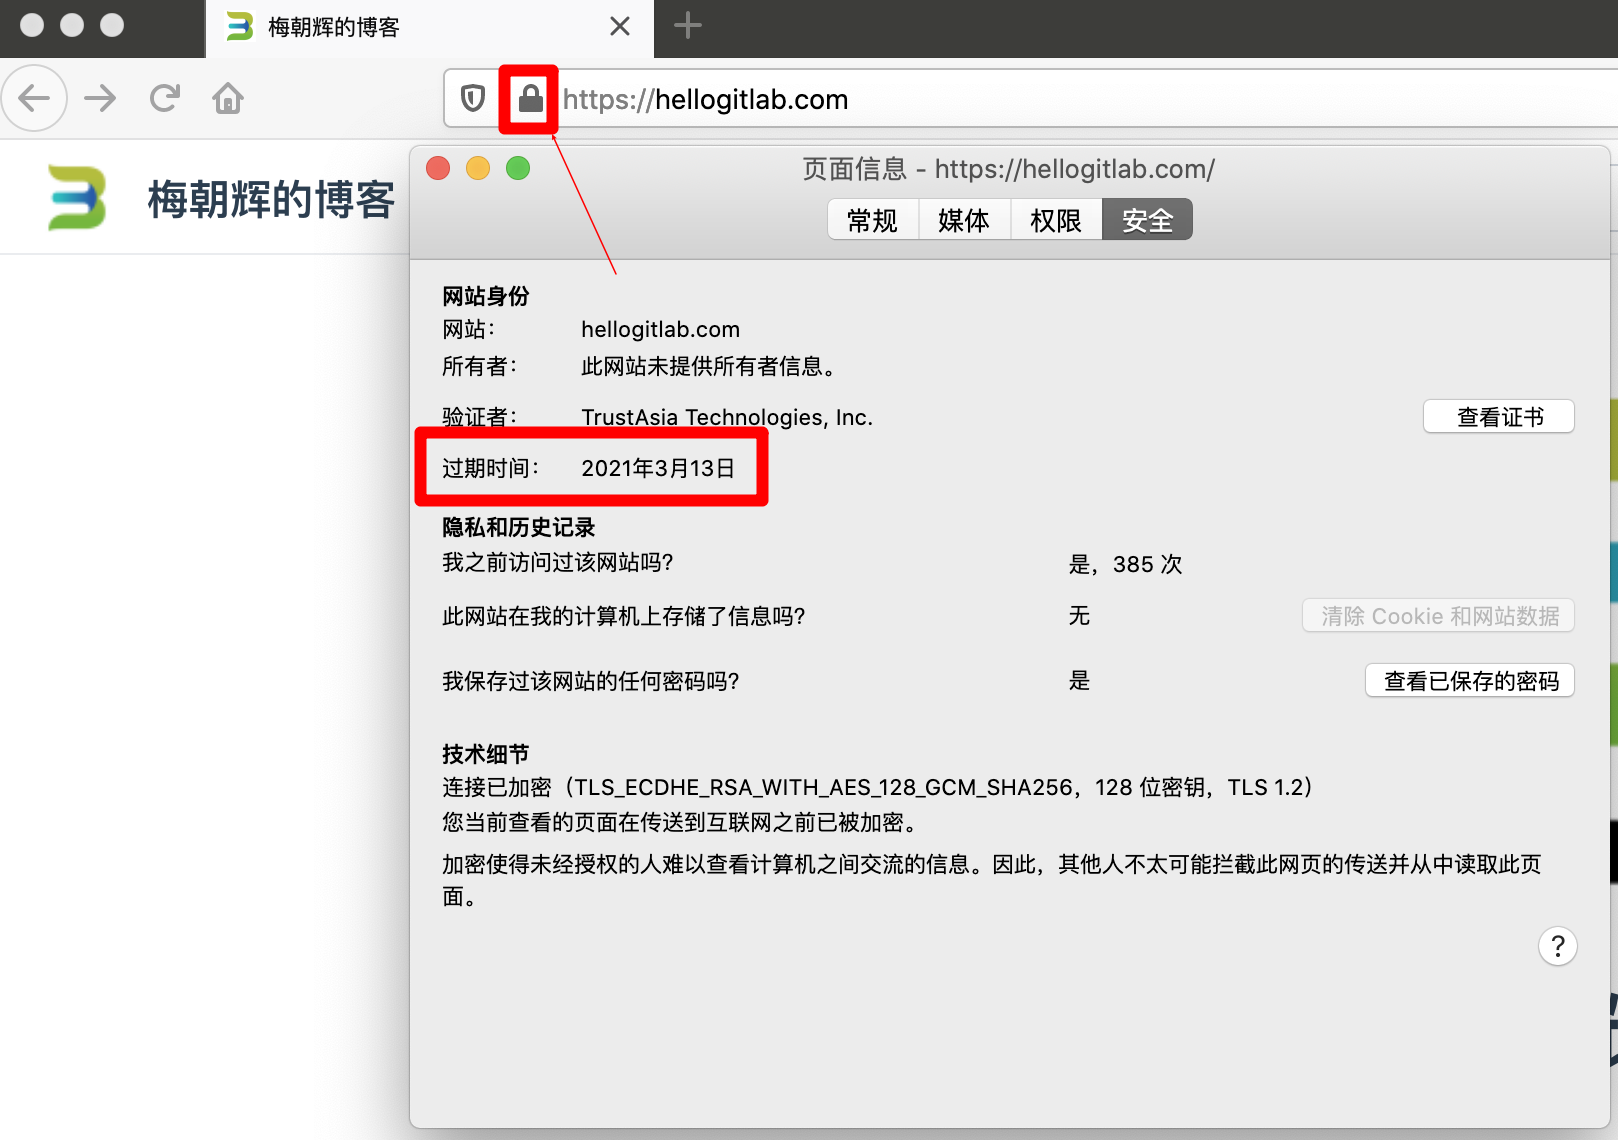
至此,网站的SSL证书配置完成。
证书过期设置
证书过期时,使用Chrome浏览器访问网站时,会提示以下异常。
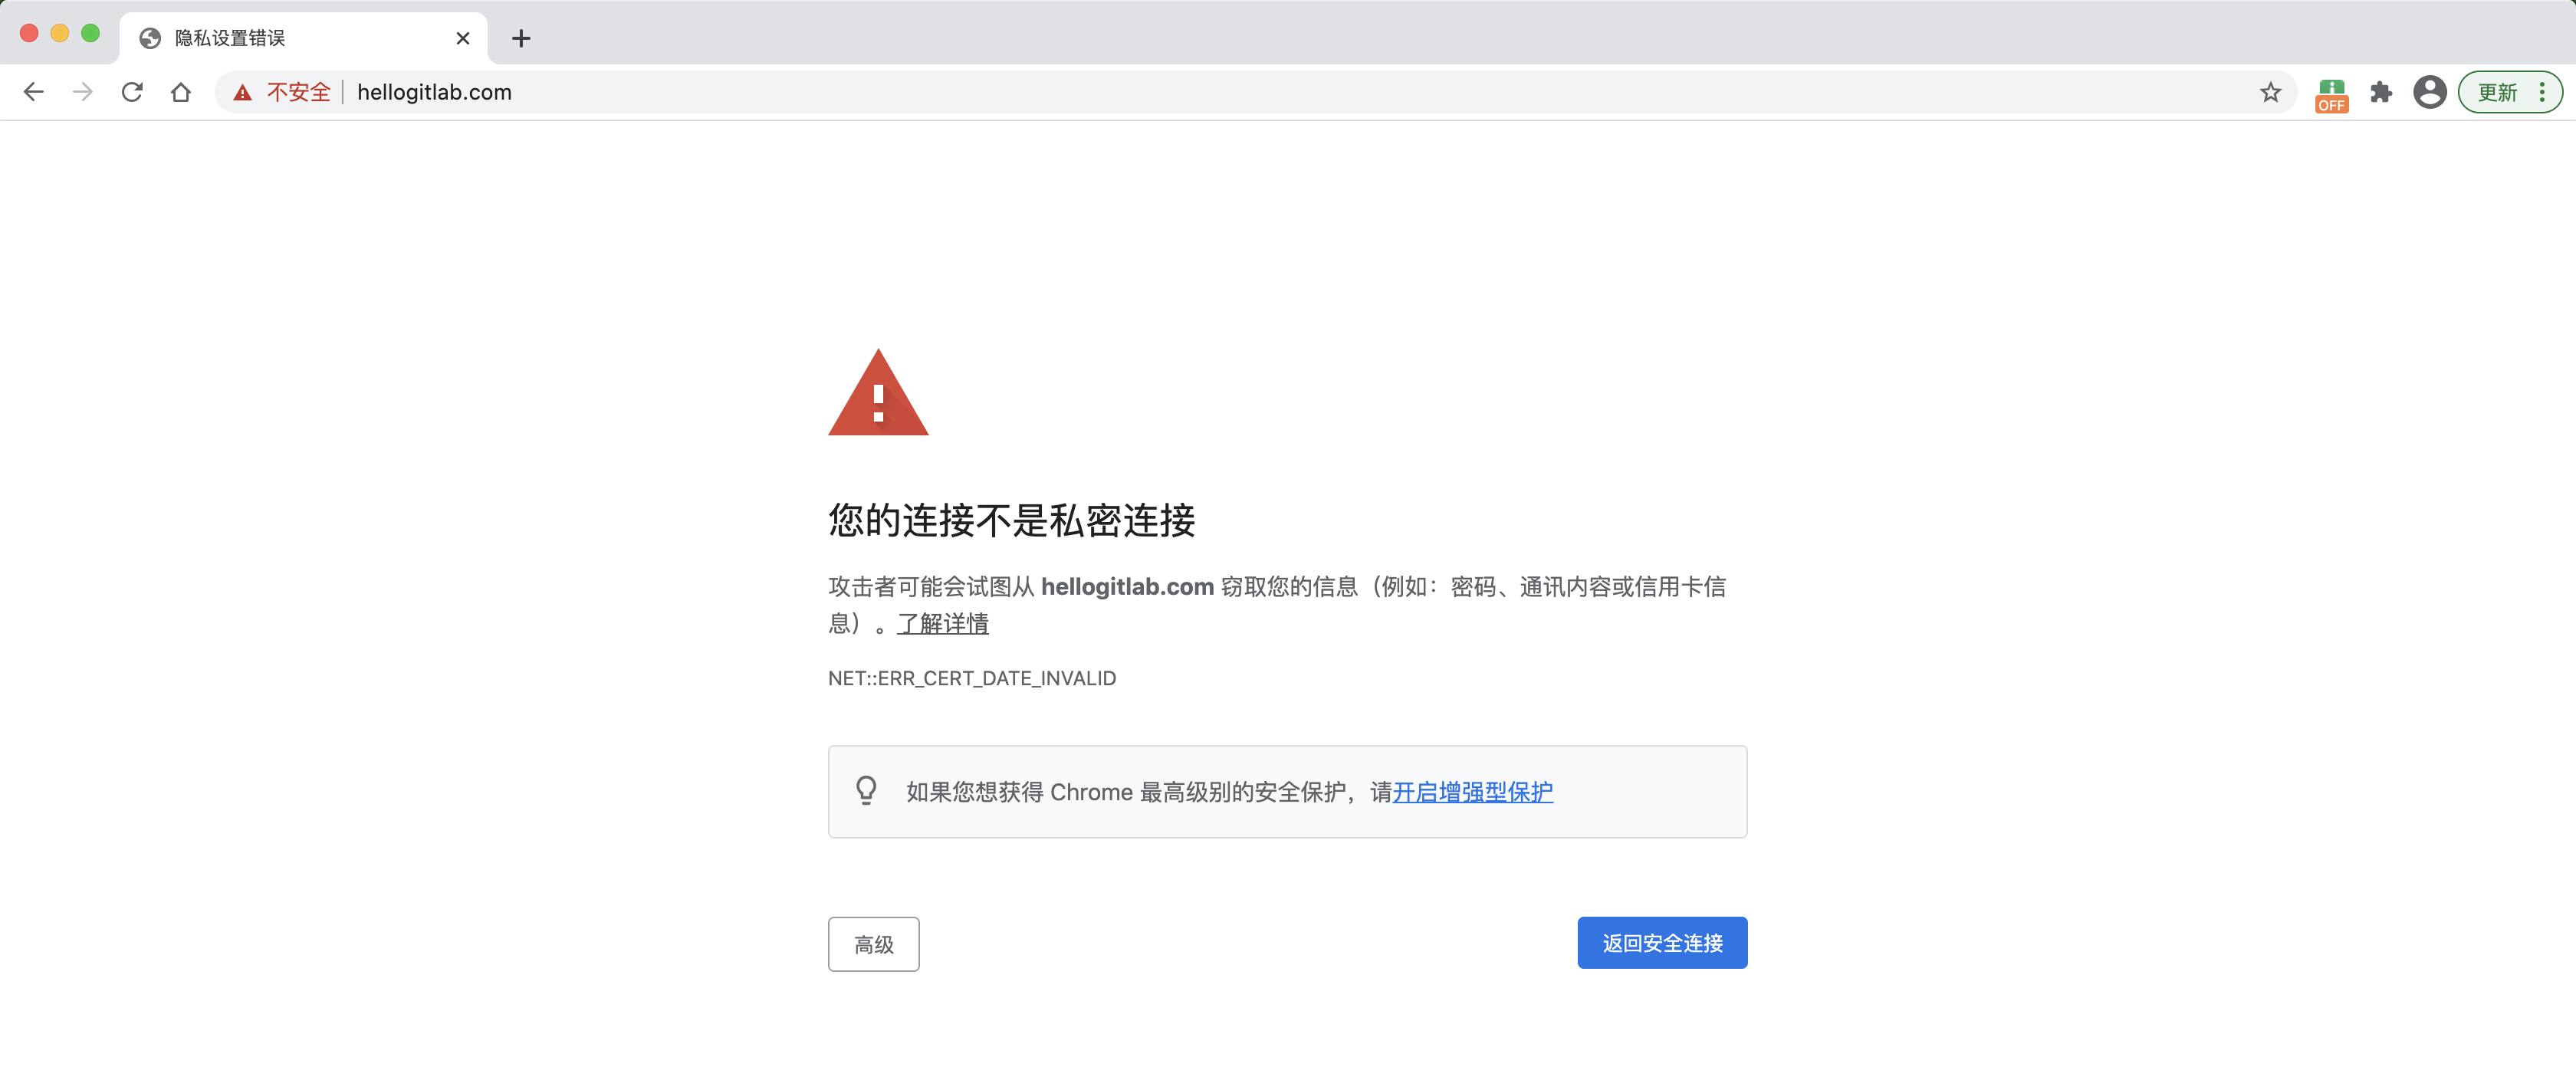
应在腾讯的SSL证书界面进行重新签发。地址 https://console.cloud.tencent.com/ssl
点击证书的重颁发,让腾讯公司进行重新签发。
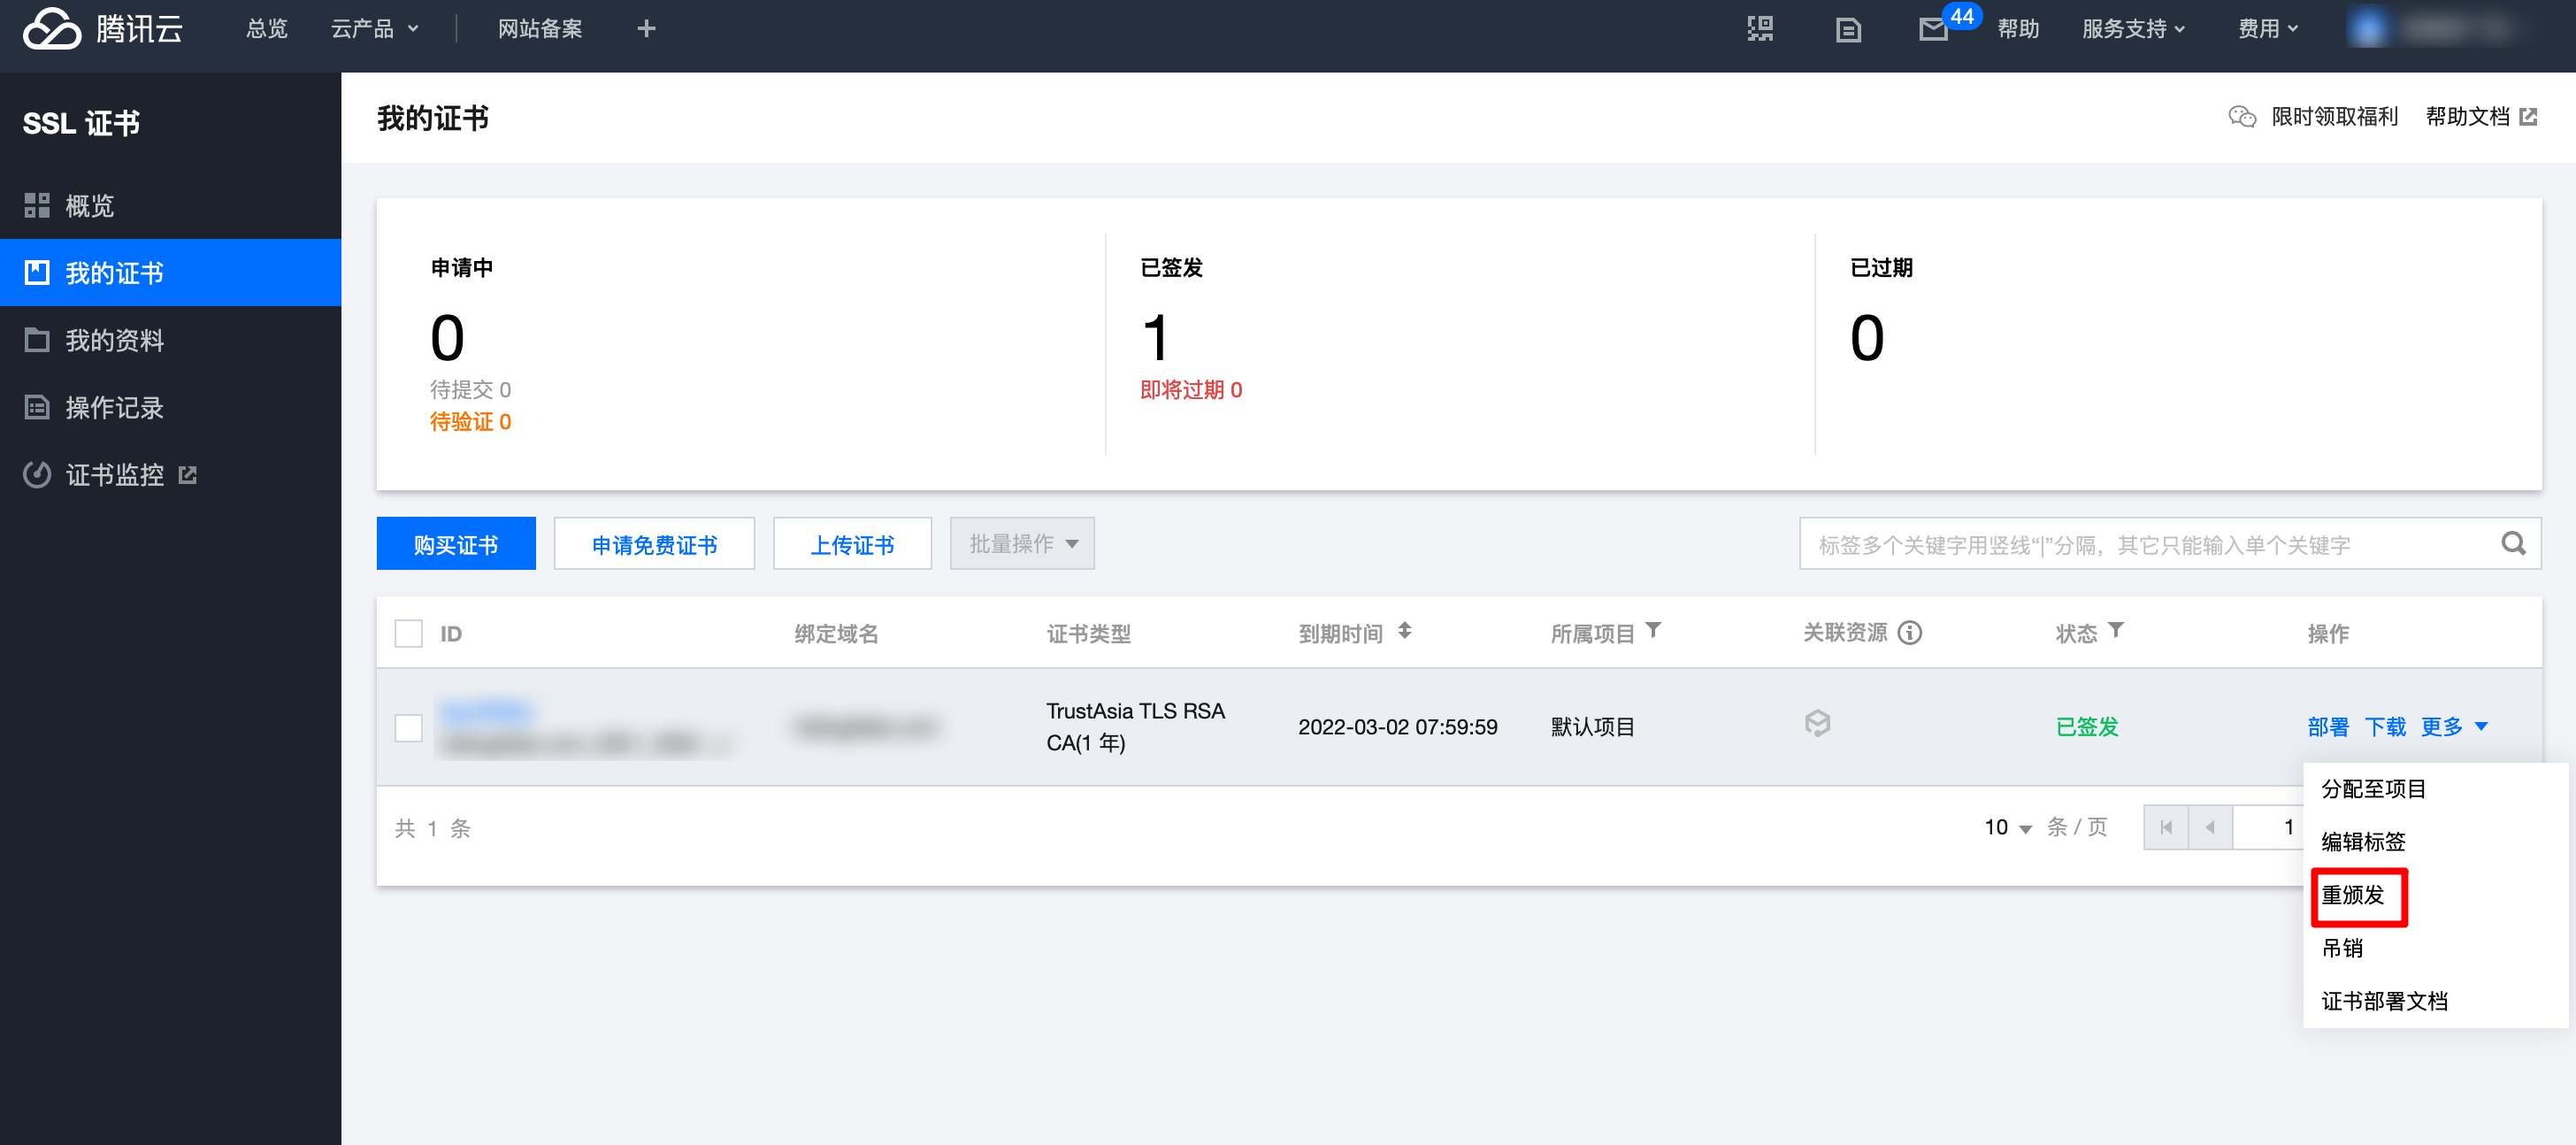
重新签发成功后,可以点击下载超链接下载新颁发的证书。并将证书上传到服务器上。
可参考 Apache 服务器 SSL 证书安装部署重新设置conf文件。
注意,有可能你重启后证书并没有生效。此时,可以更新一下原来证书所在路径。
如原来的配置文件如下:
[root@hellogitlab conf.d]# cat vueblog.conf
<VirtualHost 0.0.0.0:443>
    DocumentRoot "/var/www/html/vueblog"
    #填写证书名称
    ServerName hellogitlab.com
    #启用 SSL 功能
    SSLEngine on
    #证书文件的路径
    SSLCertificateFile "/etc/httpd/conf.d/2_hellogitlab.com.crt"
    #私钥文件的路径
    SSLCertificateKeyFile "/etc/httpd/conf.d/3_hellogitlab.com.key"
    #证书链文件的路径
    SSLCertificateChainFile "/etc/httpd/conf.d/1_root_bundle.crt"
</VirtualHost>这时更新时,可以将证书路径换一下,如/etc/httpd/ssl。
新的配置文件内容如下:
[root@hellogitlab ~]$ ls /etc/httpd/ssl
1_root_bundle.crt  2_hellogitlab.com.crt  3_hellogitlab.com.key
[root@hellogitlab ~]# cat /etc/httpd/conf.d/vueblog.conf
<VirtualHost 0.0.0.0:443>
    DocumentRoot "/var/www/html/vueblog"
    #填写证书名称
    ServerName hellogitlab.com
    #启用 SSL 功能
    SSLEngine on
    #证书文件的路径
    SSLCertificateFile "/etc/httpd/ssl/2_hellogitlab.com.crt"
    #私钥文件的路径
    SSLCertificateKeyFile "/etc/httpd/ssl/3_hellogitlab.com.key"
    #证书链文件的路径
    SSLCertificateChainFile "/etc/httpd/ssl/1_root_bundle.crt"
</VirtualHost>检查配置是否正确,然后重启服务:
[root@hellogitlab ~]$ httpd -t
Syntax OK
[root@hellogitlab ~]$ systemctl restart httpd
[root@hellogitlab ~]$ systemctl status httpd
● httpd.service - The Apache HTTP Server
   Loaded: loaded (/usr/lib/systemd/system/httpd.service; enabled; vendor preset: disabled)
   Active: active (running) since 一 2021-03-15 21:44:52 CST; 9s ago
     Docs: man:httpd(8)
           man:apachectl(8)
  Process: 10254 ExecStop=/bin/kill -WINCH ${MAINPID} (code=exited, status=0/SUCCESS)
  Process: 29432 ExecReload=/usr/sbin/httpd $OPTIONS -k graceful (code=exited, status=0/SUCCESS)
 Main PID: 10260 (httpd)
   Status: "Total requests: 0; Current requests/sec: 0; Current traffic:   0 B/sec"
   CGroup: /system.slice/httpd.service
           ├─10260 /usr/sbin/httpd -DFOREGROUND
           ├─10261 /usr/sbin/httpd -DFOREGROUND
           ├─10262 /usr/sbin/httpd -DFOREGROUND
           ├─10263 /usr/sbin/httpd -DFOREGROUND
           ├─10264 /usr/sbin/httpd -DFOREGROUND
           └─10265 /usr/sbin/httpd -DFOREGROUND
[root@hellogitlab ~]$此时再重启浏览器并登陆网站,可以看到连接是安全的,并且网站过期时间已经更新了。
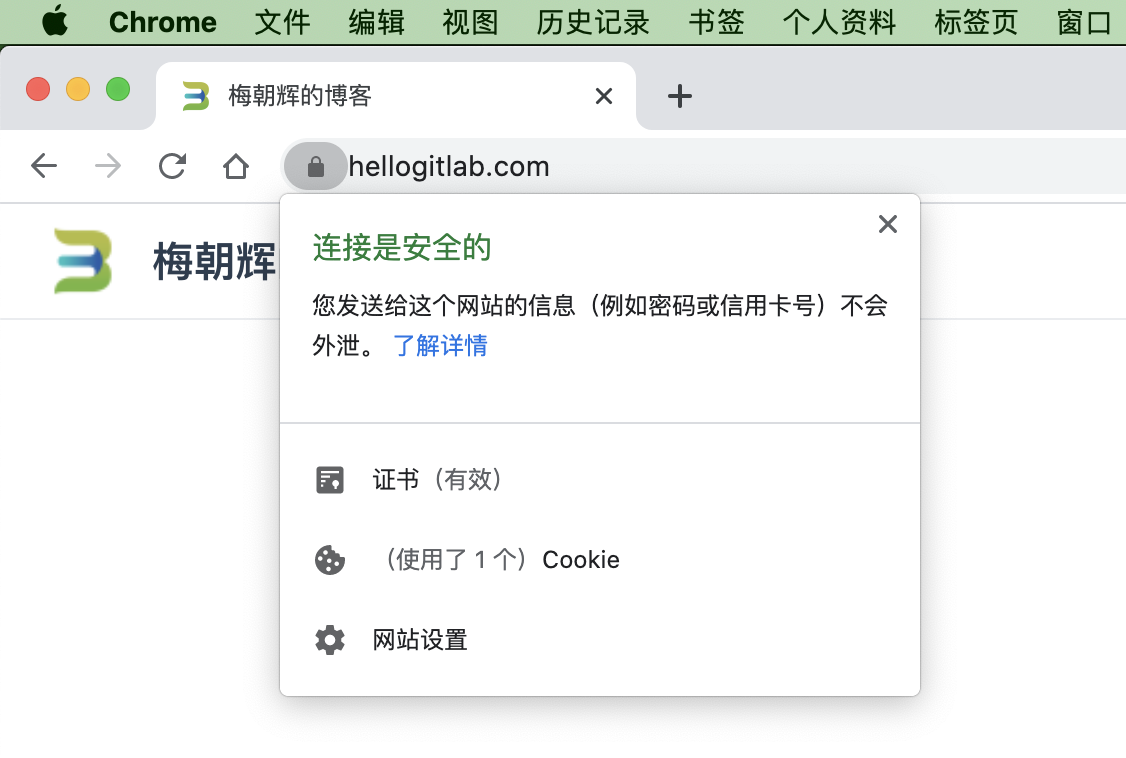
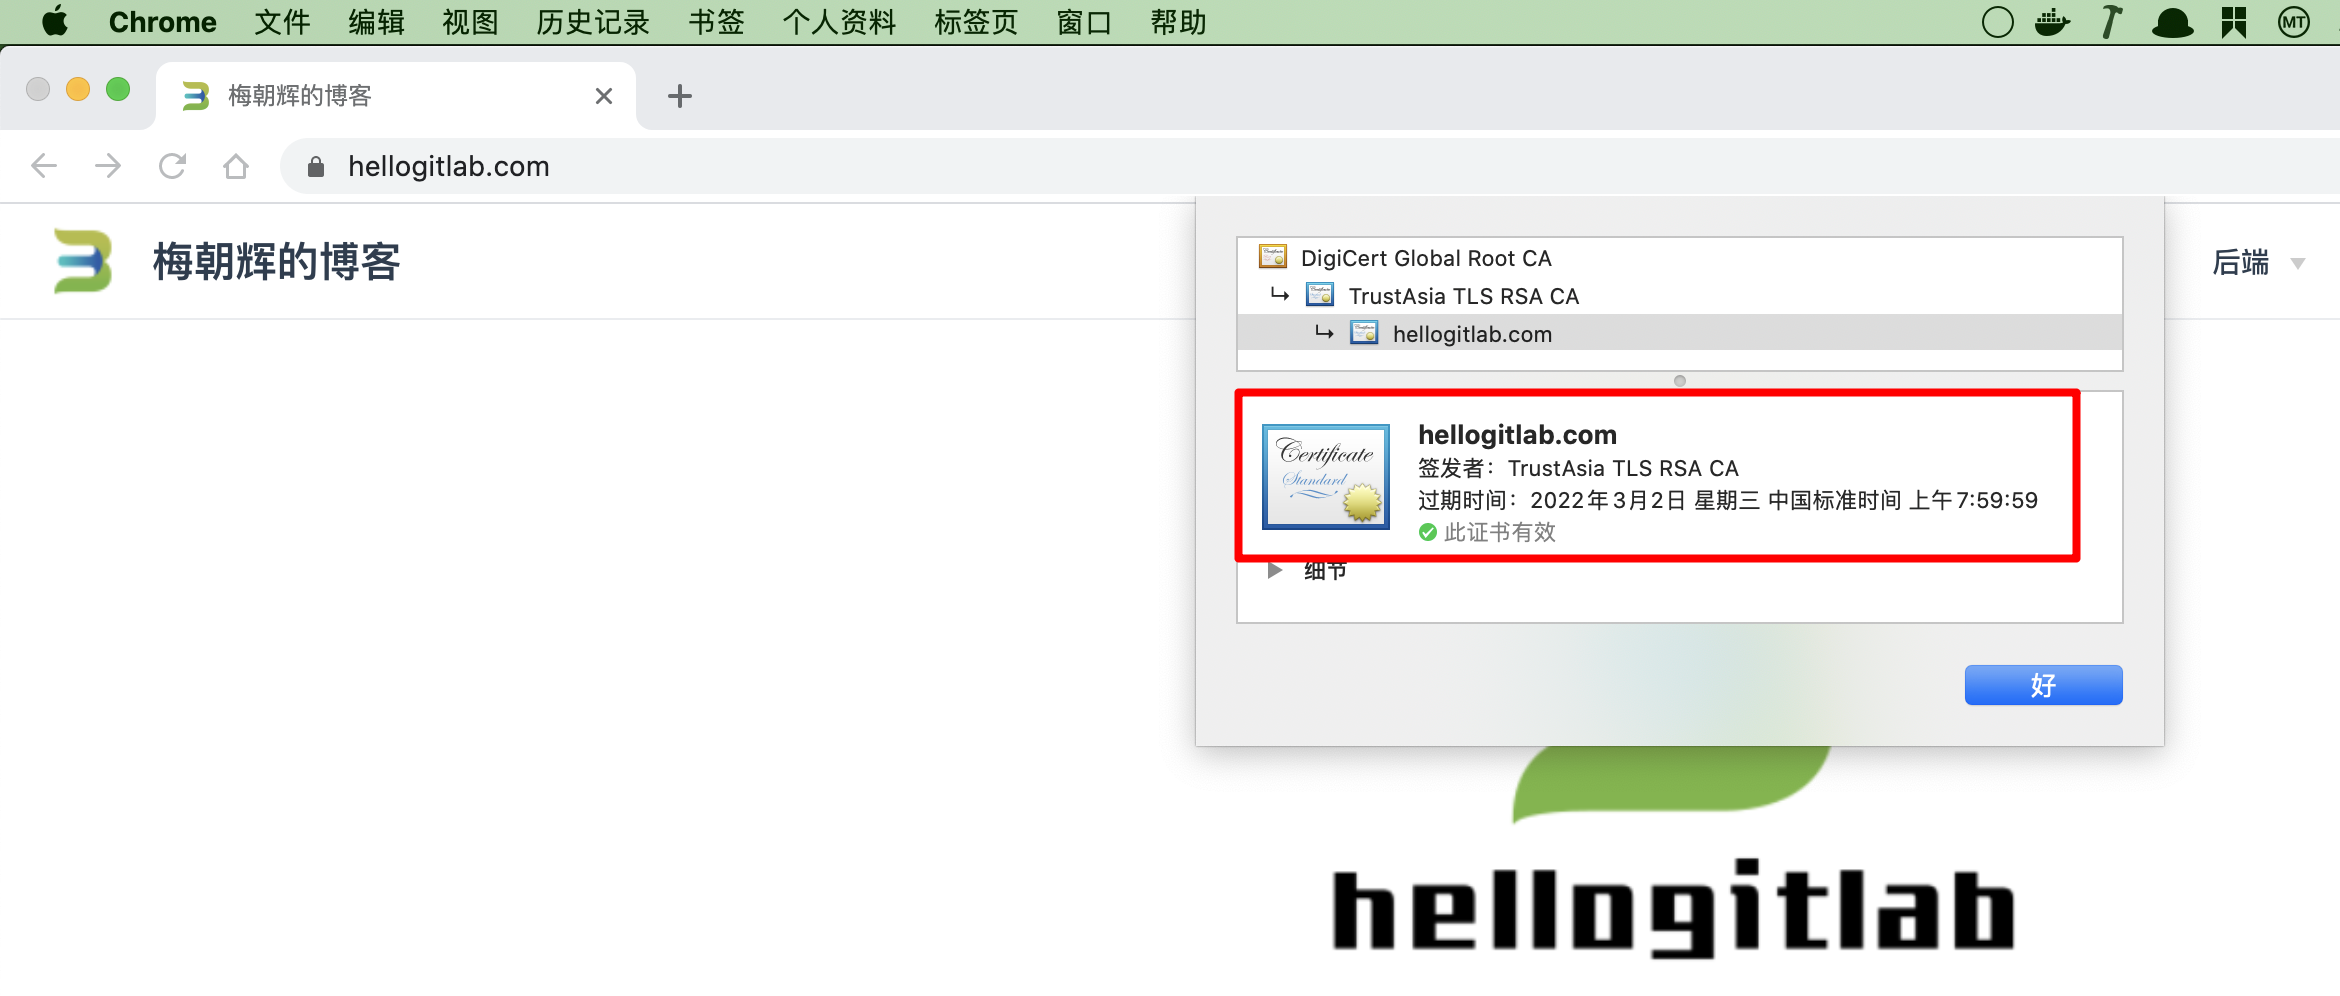
说明更新成功!
手动部署项目
使用root账号手动部署项目。
由于国内下载GitHub代码太慢,借助码云进行一次中转,在码云上面创建一个相同的仓库https://gitee.com/meizhaohui/vueblog。
克隆代码
[root@hellogitlab ~]# git clone https://gitee.com/meizhaohui/vueblog.git
正克隆到 'mayun'...
remote: Enumerating objects: 411, done.
remote: Counting objects: 100% (411/411), done.
remote: Compressing objects: 100% (188/188), done.
remote: Total 411 (delta 163), reused 411 (delta 163)
接收对象中: 100% (411/411), 4.13 MiB | 17.35 MiB/s, 完成.
处理 delta 中: 100% (163/163), 完成.可以看到国内下载码云上面的代码非常的快。
更新代码
[root@hellogitlab ~]# pushd vueblog && git pull安装插件
[root@hellogitlab vueblog]# cd myblog
[root@hellogitlab myblog]# yarn add vuepress-plugin-comment -D
[root@hellogitlab myblog]# yarn add vuepress-plugin-auto-sidebar -D修改配置文件config/secureinfo.js
把'your_id'和'your_key'改成自己的。
[root@hellogitlab myblog]# cat config/secureinfo.js
module.exports = {
    leancloud_appId: 'your_id',
    leancloud_appKey: 'your_key'
}尝试本地运行
[root@hellogitlab myblog]# yarn docs:dev
yarn run v1.21.1
$ vuepress dev docs
wait Extracting site metadata...
tip Apply theme @vuepress/theme-default ...
tip Apply plugin container (i.e. "vuepress-plugin-container") ...
tip Apply plugin @vuepress/last-updated (i.e. "@vuepress/plugin-last-updated") ...
tip Apply plugin @vuepress/register-components (i.e. "@vuepress/plugin-register-components") ...
tip Apply plugin @vuepress/active-header-links (i.e. "@vuepress/plugin-active-header-links") ...
tip Apply plugin @vuepress/search (i.e. "@vuepress/plugin-search") ...
tip Apply plugin @vuepress/nprogress (i.e. "@vuepress/plugin-nprogress") ...
tip Apply plugin comment (i.e. "vuepress-plugin-comment") ...
tip Apply plugin auto-sidebar (i.e. "vuepress-plugin-auto-sidebar") ...

✔ Client
  Compiled successfully in 4.78s

ℹ 「wds」: Project is running at http://0.0.0.0:82/
ℹ 「wds」: webpack output is served from /
ℹ 「wds」: Content not from webpack is served from /root/vueblog/myblog/docs/.vuepress/public
ℹ 「wds」: 404s will fallback to /index.html
success [00:22:41] Build afd0fe finished in 4778 ms!
> VuePress dev server listening at http://localhost:82/

✔ Client
  Compiled successfully in 188.87ms
success [00:22:42] Build c7597a finished in 190 ms! ( http://localhost:82/ )发现可以正常运行,则停止本地运行的项目。
构建目标文件
开始构建目标文件。
[root@hellogitlab myblog]# yarn docs:build
yarn run v1.21.1
$ vuepress build docs
wait Extracting site metadata...
tip Apply theme @vuepress/theme-default ...
tip Apply plugin container (i.e. "vuepress-plugin-container") ...
tip Apply plugin @vuepress/last-updated (i.e. "@vuepress/plugin-last-updated") ...
tip Apply plugin @vuepress/register-components (i.e. "@vuepress/plugin-register-components") ...
tip Apply plugin @vuepress/active-header-links (i.e. "@vuepress/plugin-active-header-links") ...
tip Apply plugin @vuepress/search (i.e. "@vuepress/plugin-search") ...
tip Apply plugin @vuepress/nprogress (i.e. "@vuepress/plugin-nprogress") ...
tip Apply plugin comment (i.e. "vuepress-plugin-comment") ...
tip Apply plugin auto-sidebar (i.e. "vuepress-plugin-auto-sidebar") ...

✔ Client
  Compiled successfully in 27.68s

✔ Server
  Compiled successfully in 27.53s

wait Rendering static HTML...
Rendering page: /CI/docker/How to use ""valine"" in vuepress-plugin-comment@v0.7.3: https://github.com/dongyuanxin/vuepress-plugin-comment#readme
success Generated static files in docs/.vuepress/dist.

Done in 33.20s复制目标文件到/var/www/html/vueblog/目录下
[root@hellogitlab myblog]# unalias cp
[root@hellogitlab myblog]# cp -rf docs/.vueblog/dist/* /var/www/html/vueblog/重启httpd服务
[root@hellogitlab myblog]# systemctl restart httpd && systemctl status httpd
● httpd.service - The Apache HTTP Server
   Loaded: loaded (/usr/lib/systemd/system/httpd.service; enabled; vendor preset: disabled)
   Active: active (running) since 一 2020-03-23 00:28:16 CST; 1min 4s ago
     Docs: man:httpd(8)
           man:apachectl(8)
  Process: 23435 ExecStop=/bin/kill -WINCH ${MAINPID} (code=exited, status=0/SUCCESS)
  Process: 29543 ExecReload=/usr/sbin/httpd $OPTIONS -k graceful (code=exited, status=0/SUCCESS)
 Main PID: 23444 (httpd)
   Status: "Total requests: 17; Current requests/sec: 0; Current traffic:   0 B/sec"
   CGroup: /system.slice/httpd.service
           ├─23444 /usr/sbin/httpd -DFOREGROUND
           ├─23450 /usr/sbin/httpd -DFOREGROUND
           ├─23452 /usr/sbin/httpd -DFOREGROUND
           ├─23453 /usr/sbin/httpd -DFOREGROUND
           ├─23454 /usr/sbin/httpd -DFOREGROUND
           ├─23479 /usr/sbin/httpd -DFOREGROUND
           ├─23480 /usr/sbin/httpd -DFOREGROUND
           ├─23485 /usr/sbin/httpd -DFOREGROUND
           ├─23486 /usr/sbin/httpd -DFOREGROUND
           ├─23487 /usr/sbin/httpd -DFOREGROUND
           └─23488 /usr/sbin/httpd -DFOREGROUND

3月 23 00:28:15 hellogitlab.com systemd[1]: Starting The Apache HTTP Server...
3月 23 00:28:16 hellogitlab.com systemd[1]: Started The Apache HTTP Server.
[root@hellogitlab myblog]#同步github与码云
- 查看远程库列表
$ git remote -v
origin	https://github.com/meizhaohui/vueblog.git (fetch)
origin https://github.com/meizhaohui/vueblog.git (push)- 将码云远程库添加到远程库列表中
$ git remote add gitee git@gitee.com:meizhaohui/vueblog.git
$ git remote -v
gitee	git@gitee.com:meizhaohui/vueblog.git (fetch)
gitee	git@gitee.com:meizhaohui/vueblog.git (push)
origin	https://github.com/meizhaohui/vueblog.git (fetch)
origin https://github.com/meizhaohui/vueblog.git (push)- 从 GitHub 上拉取最新代码到本地
$ git pull origin master
Already up to date.- 推送本地最新代码到 Gitee 上
$ git pull origin master
The authenticity of host 'gitee.com (212.64.62.174)' can't be established.
ECDSA key fingerprint is SHA256:FQGC9Kn/eye1W8icdBgrQp+KkGYoFgbVr17bmjey0Wc.
Are you sure you want to continue connecting (yes/no)? yes
Warning: Permanently added 'gitee.com,212.64.62.174' (ECDSA) to the list of known hosts.
Everything up-to-date- 提交最新的修改到GitHub和码云上
$ git status
On branch master
Your branch is up to date with 'origin/master'.

Changes not staged for commit:
  (use "git add <file>..." to update what will be committed)
  (use "git checkout -- <file>..." to discard changes in working directory)

	modified:   myblog/docs/about/blog/build_your_vuepress_blog_1.md

no changes added to commit (use "git add" and/or "git commit -a")
$ git add -A
$ git commit -m"sync github to gitee"
[master 694525d] sync github to gitee
 1 file changed, 40 insertions(+)

# 提交到GitHub
$ git push
Enumerating objects: 13, done.
Counting objects: 100% (13/13), done.
Delta compression using up to 8 threads
Compressing objects: 100% (7/7), done.
Writing objects: 100% (7/7), 1.06 KiB | 1.06 MiB/s, done.
Total 7 (delta 5), reused 0 (delta 0)
remote: Resolving deltas: 100% (5/5), completed with 5 local objects.
To https://github.com/meizhaohui/vueblog.git
   3a83131..694525d  master -> master

# 提交到码云gitee
$ git push gitee master
Enumerating objects: 13, done.
Counting objects: 100% (13/13), done.
Delta compression using up to 8 threads
Compressing objects: 100% (7/7), done.
Writing objects: 100% (7/7), 1.06 KiB | 1.06 MiB/s, done.
Total 7 (delta 5), reused 0 (delta 0)
remote: Powered by GITEE.COM [GNK-3.8]
To gitee.com:meizhaohui/vueblog.git
3a83131..694525d master -> master使用Travis-CI自动部署项目
参考:
获取GitHub Access Token
Travis CI在自动部署的时候,需要push内容到仓库的某个分支,而访问GitHub仓库需要用户授权,授权方式就是用户提供 Access Token 给Travis CI。
获取token的位置:GitHub->Settings->Developer Settings->Personal access tokens。
勾选repo下的所有项,以及user下的user:email后,生成一个token,复制token值。
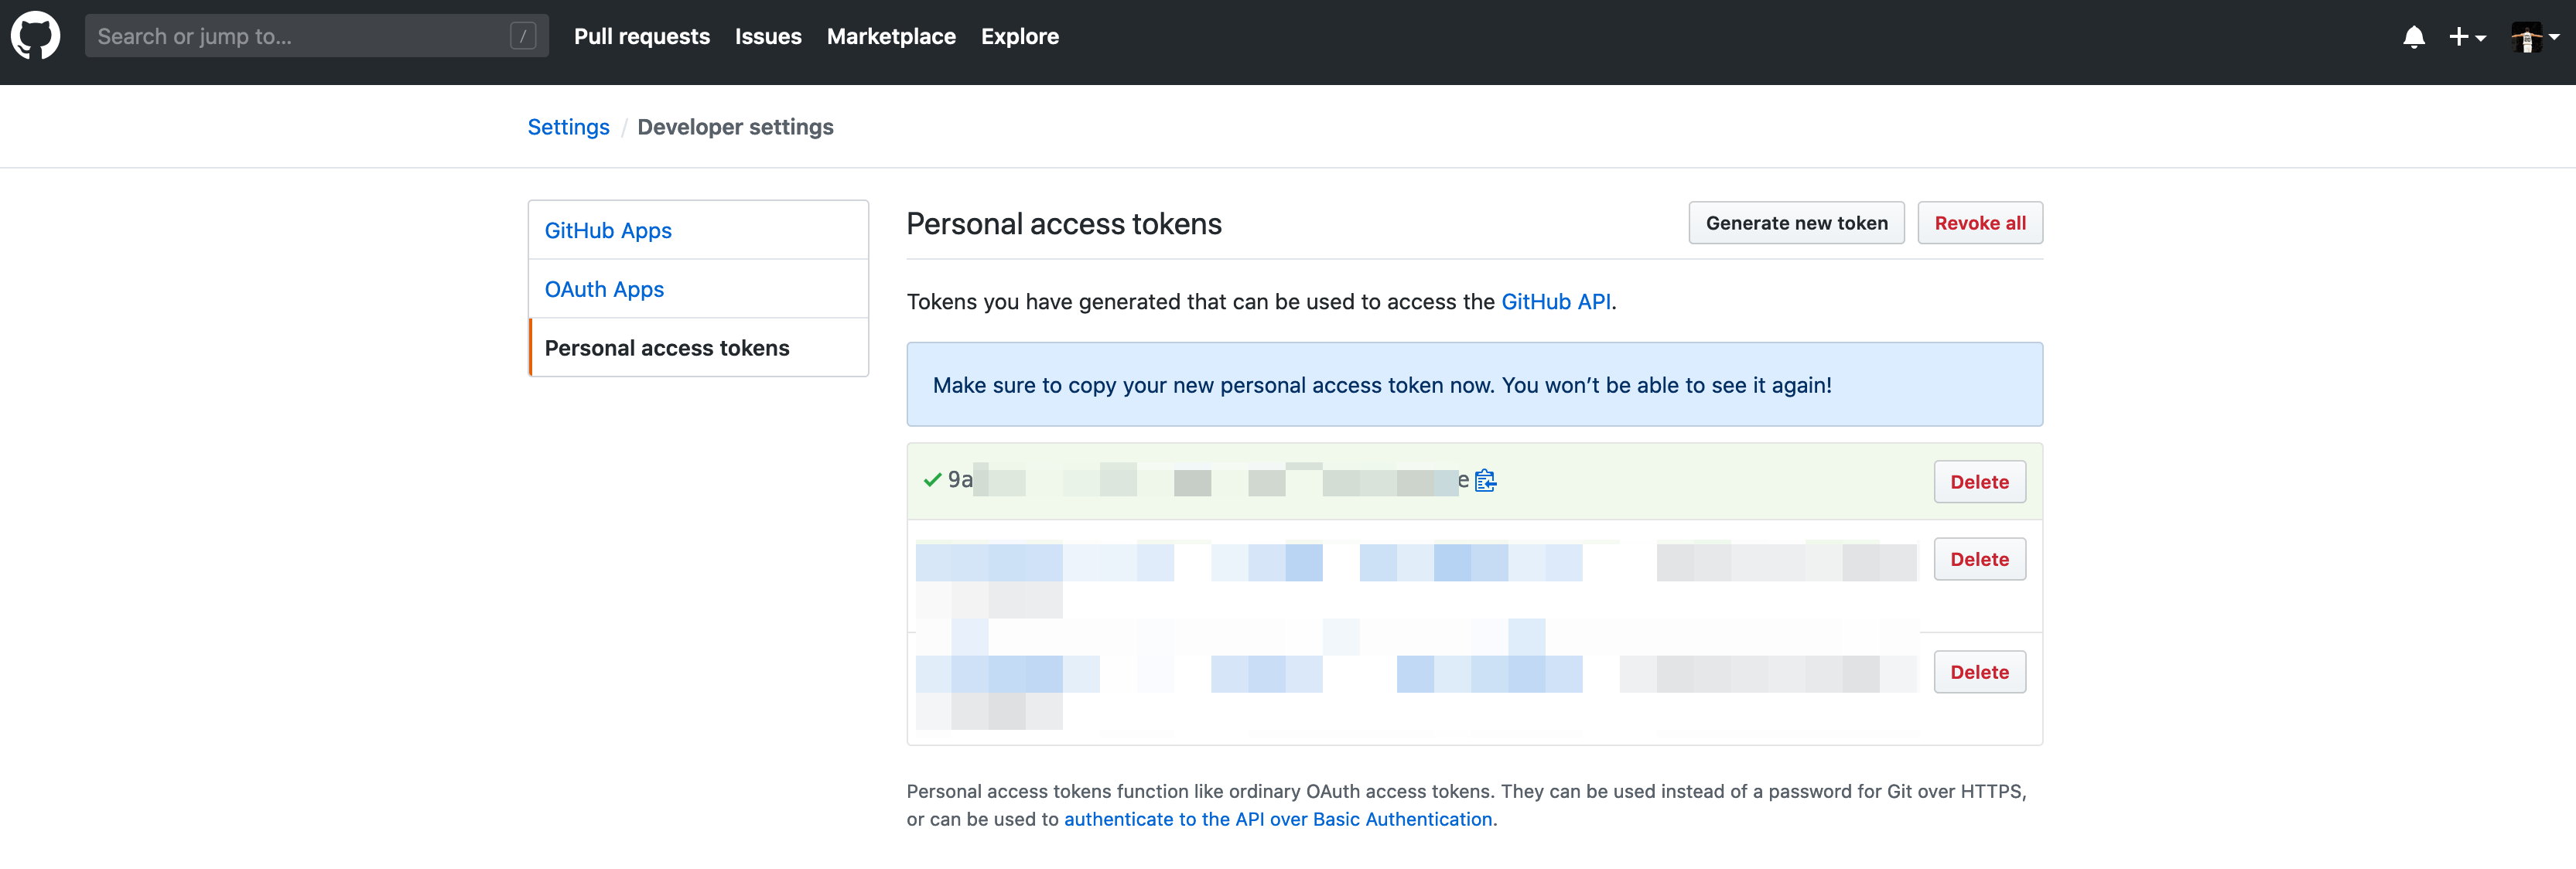
注意
这个token只有现在可以看到,再次进入就看不到了,而且是再也看不到了,忘记了就只能重新生成了,所以要记住保管好。
安装travis
# 检查依赖,需要Ruby 2.0以上版本
$ ruby -v
ruby 2.7.0p0 (2019-12-25 revision 647ee6f091) [x86_64-darwin19]

# 安装
$ gem install travis

# 查看版本信息
$ travis -v
1.8.11

# 查看帮助信息
$ travis --help
Usage: travis COMMAND ...

Available commands:

	accounts       displays accounts and their subscription status
	branches       displays the most recent build for each branch
	cache          lists or deletes repository caches
	cancel         cancels a job or build
	console        interactive shell
	disable        disables a project
	enable         enables a project
	encrypt        encrypts values for the .travis.yml
	encrypt-file   encrypts a file and adds decryption steps to .travis.yml
	endpoint       displays or changes the API endpoint
	env            show or modify build environment variables
	help           helps you out when in dire need of information
	history        displays a projects build history
	init           generates a .travis.yml and enables the project
	lint           display warnings for a .travis.yml
	login          authenticates against the API and stores the token
	logout         deletes the stored API token
	logs           streams test logs
	monitor        live monitor for what's going on
	open           opens a build or job in the browser
	pubkey         prints out a repository's public key
	raw            makes an (authenticated) API call and prints out the result
	report         generates a report useful for filing issues
	repos          lists repositories the user has certain permissions on
	requests       lists recent requests
	restart        restarts a build or job
	settings       access repository settings
	setup          sets up an addon or deploy target
	show           displays a build or job
	sshkey         checks, updates or deletes an SSH key
	status         checks status of the latest build
	sync           triggers a new sync with GitHub
	token          outputs the secret API token
	version        outputs the client version
	whatsup        lists most recent builds
	whoami         outputs the current user

run `/usr/local/bin//travis help COMMAND` for more infos切换到项目目录再登陆
# 可以通过用户名密码登陆
$ travis login
We need your GitHub login to identify you.
This information will not be sent to Travis CI, only to api.github.com.
The password will not be displayed.

Try running with --github-token or --auto if you don't want to enter your password anyway.

Username: meizhaohui
Password for meizhaohui: ***********
server error (500: "Sorry, we experienced an error.\n\nrequest_id:ff721d1a6198c4a7705c1bf261eed365\n")
$ cd Documents/GitHub/vueblog
$ travis login
We need your GitHub login to identify you.
This information will not be sent to Travis CI, only to api.github.com.
The password will not be displayed.

Try running with --github-token or --auto if you don't want to enter your password anyway.

Username: meizhaohui
Password for meizhaohui: ***********
Successfully logged in as meizhaohui!


# 也可以通过token登陆
# 此处的secure_github_token就是前面获取的"GitHub Access Token"值
$ export GITHUB_TOKEN="secure_github_token"
$ travis login --github-token=$GITHUB_TOKEN
Successfully logged in as meizhaohui!

# 使用假名
$ alias tl="travis login --github-token=${GITHUB_TOKEN}"
# 使用tl命令就可以登陆了
$ tl
Successfully logged in as meizhaohui!

# 注销
$ travis logout
Successfully logged out!加密关键信息
travis encrypt DEPLOY_USER =  "meizhaohui" --add
travis encrypt DEPLOY_PASSWORD = "mzh6" --add
travis encrypt DEPLOY_DOMAIN = "hellogitlab.com" --add
travis encrypt DEPLOY_PORT = "port" --add你也可以直接在travis网站上面配置这些键值对信息。
配置.travis.yml文件
经过多次修改配置,我的.travis.yml文件如下:
language: node_js
node_js:
- 13.11.0
env:
  matrix:
  - HOST_URL=https://hellogitlab.com
install:
- echo "Install sshpass"
- sudo apt-get update -y && sudo apt-get install sshpass -y && sshpass -h && sshpass -V
- echo "Install vuepress"
- yarn global add vuepress
- echo "Install vuepress plugin"
notifications:
  email:
    recipients:
    - mzh@hellogitlab.com
    on_success: always
    on_failure: always
script:
- echo "${TRAVIS_OS_NAME}"
- uname -a
- echo "Check Node.js version" && node -v
- echo "Check yarn version" && yarn -v
- cd myblog && pwd
- yarn install
- yarn add vuepress-plugin-comment -D
- yarn add vuepress-plugin-auto-sidebar -D
- echo "change file contents"
- cp config/secureinfo.js.txt config/secureinfo.js
- sed -i "s/your leancloud appid/${LEAN_APPID}/g" config/secureinfo.js
- sed -i "s/your leancloud appkey/${LEAN_APPKEY}/g" config/secureinfo.js
- yarn docs:build
- echo "Hello Travis"
after_success:
- sshpass -p "${DEPLOY_PASSWORD}" ssh "${DEPLOY_USERNAME}@${DEPLOY_DOMAIN}" -p "${DEPLOY_PORT}" 'echo "travis" > ~/test.travis'travis网站上面也可以看到构建过程:
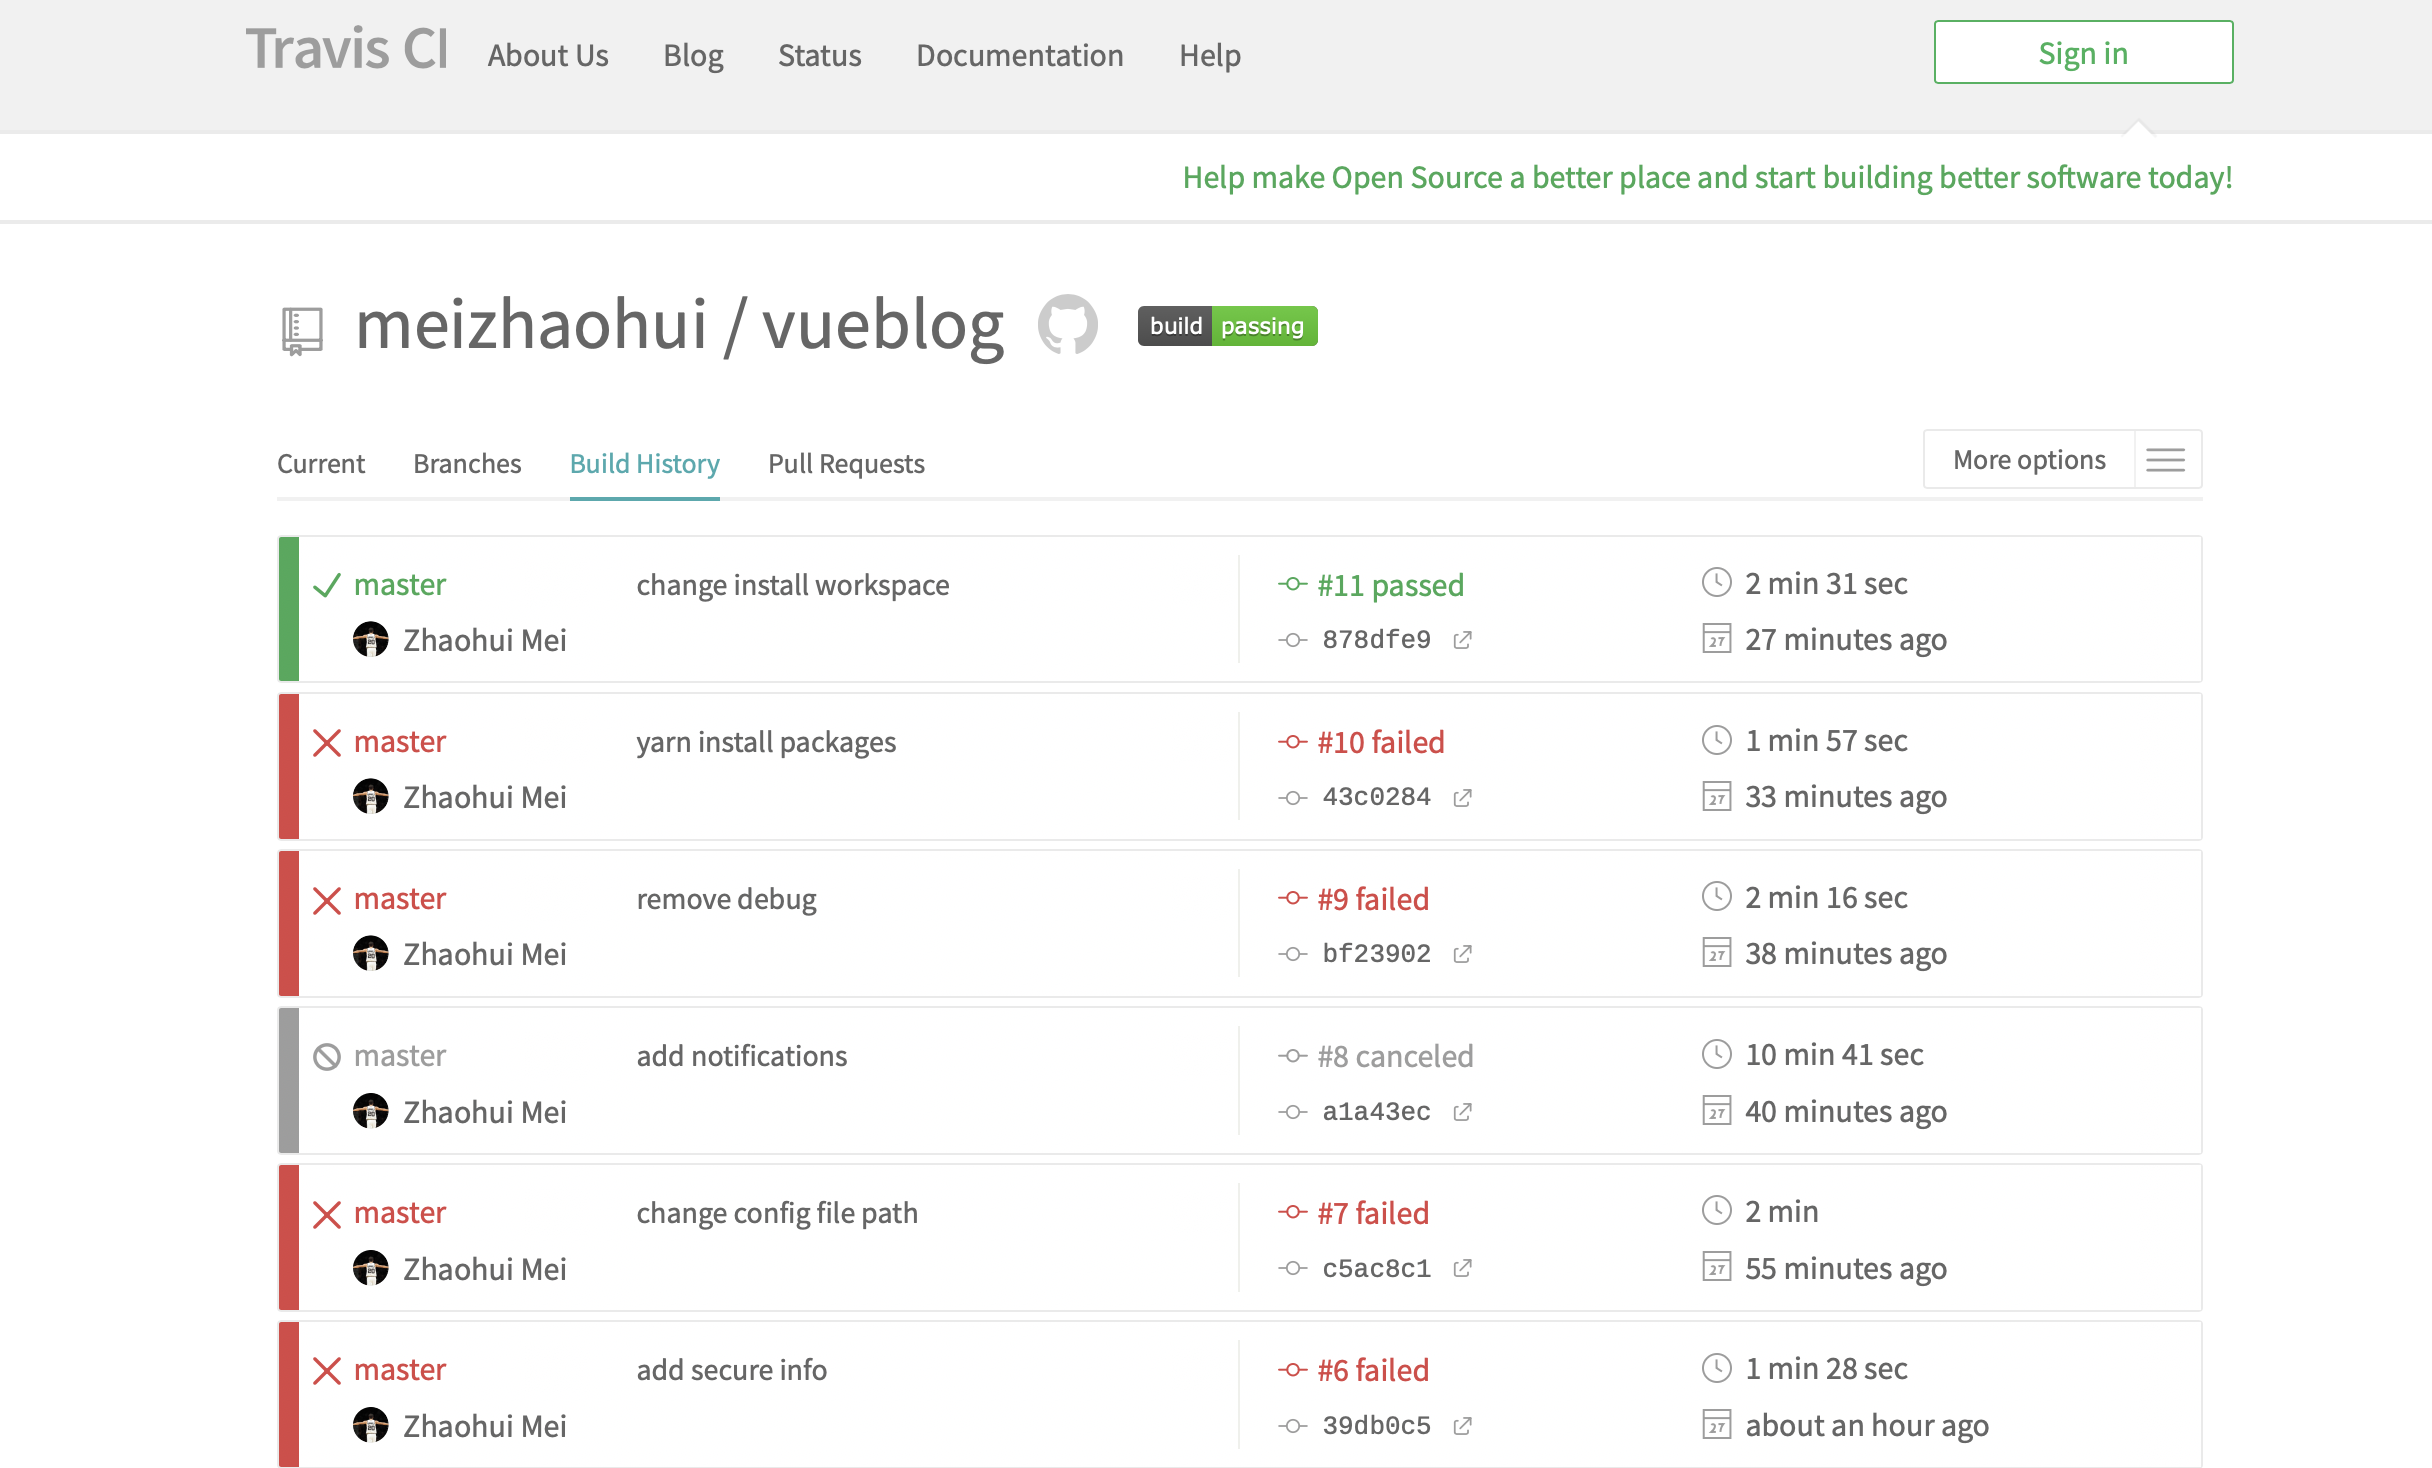
可以将下面的内容加入到markdown文件中,显示出构建状态:
[](https://travis-ci.org/meizhaohui/vueblog)增加文章
增加各种文章。
自动部署项目
编写自动部署脚本:
##################################################
#      Filename: auto_deploy.sh
#        Author: Zhaohui Mei<mzh.whut@gmail.com>
#   Description: 自动检查git远程仓库是否有更新,有更新则自动部署
#   Create Time: 2021-03-17 07:26:10
# Last Modified: 2021-03-17 07:28:13
##################################################
a
function auto_deploy(){
    pushd ~/vueblog && pwd
    current=$( git log --pretty=oneline -n 1|head )
    git pull
    new=$( git log --pretty=oneline -n 1|head )
    if [[ "${current}" != "${new}" ]]; then
        echo "远程仓库有更新,开始自动部署"
        sh deploy.sh && echo "自动部署完成!"
    else
        echo "远程仓库没有更新,不进行自动部署"
    fi
    popd
}

auto_deploy

[root@hellogitlab ~]#再配置一个定时任务:
*/30 * * * * sh ~/auto_deploy.sh >> ~/auto_deploy.log这样自动部署项目的工作就完成了!
CDN加速配置
当网站文章变多时,网站页面打开速度变得越来越慢。这时我们可以通过配置CDN加速,来使我们的网站更快。
我使用腾讯云的内容分发网络CDN,可参考内容分发网络快速入门进行操作 https://cloud.tencent.com/document/product/228/38091
需要在内容分发网络控制台 https://console.cloud.tencent.com/cdn/domains 添加域名。
添加完成后,内容分发网络中的域名如下:

我因为使用了腾讯云的免费证书,因此选择回源协议时使用了HTTPS形式:
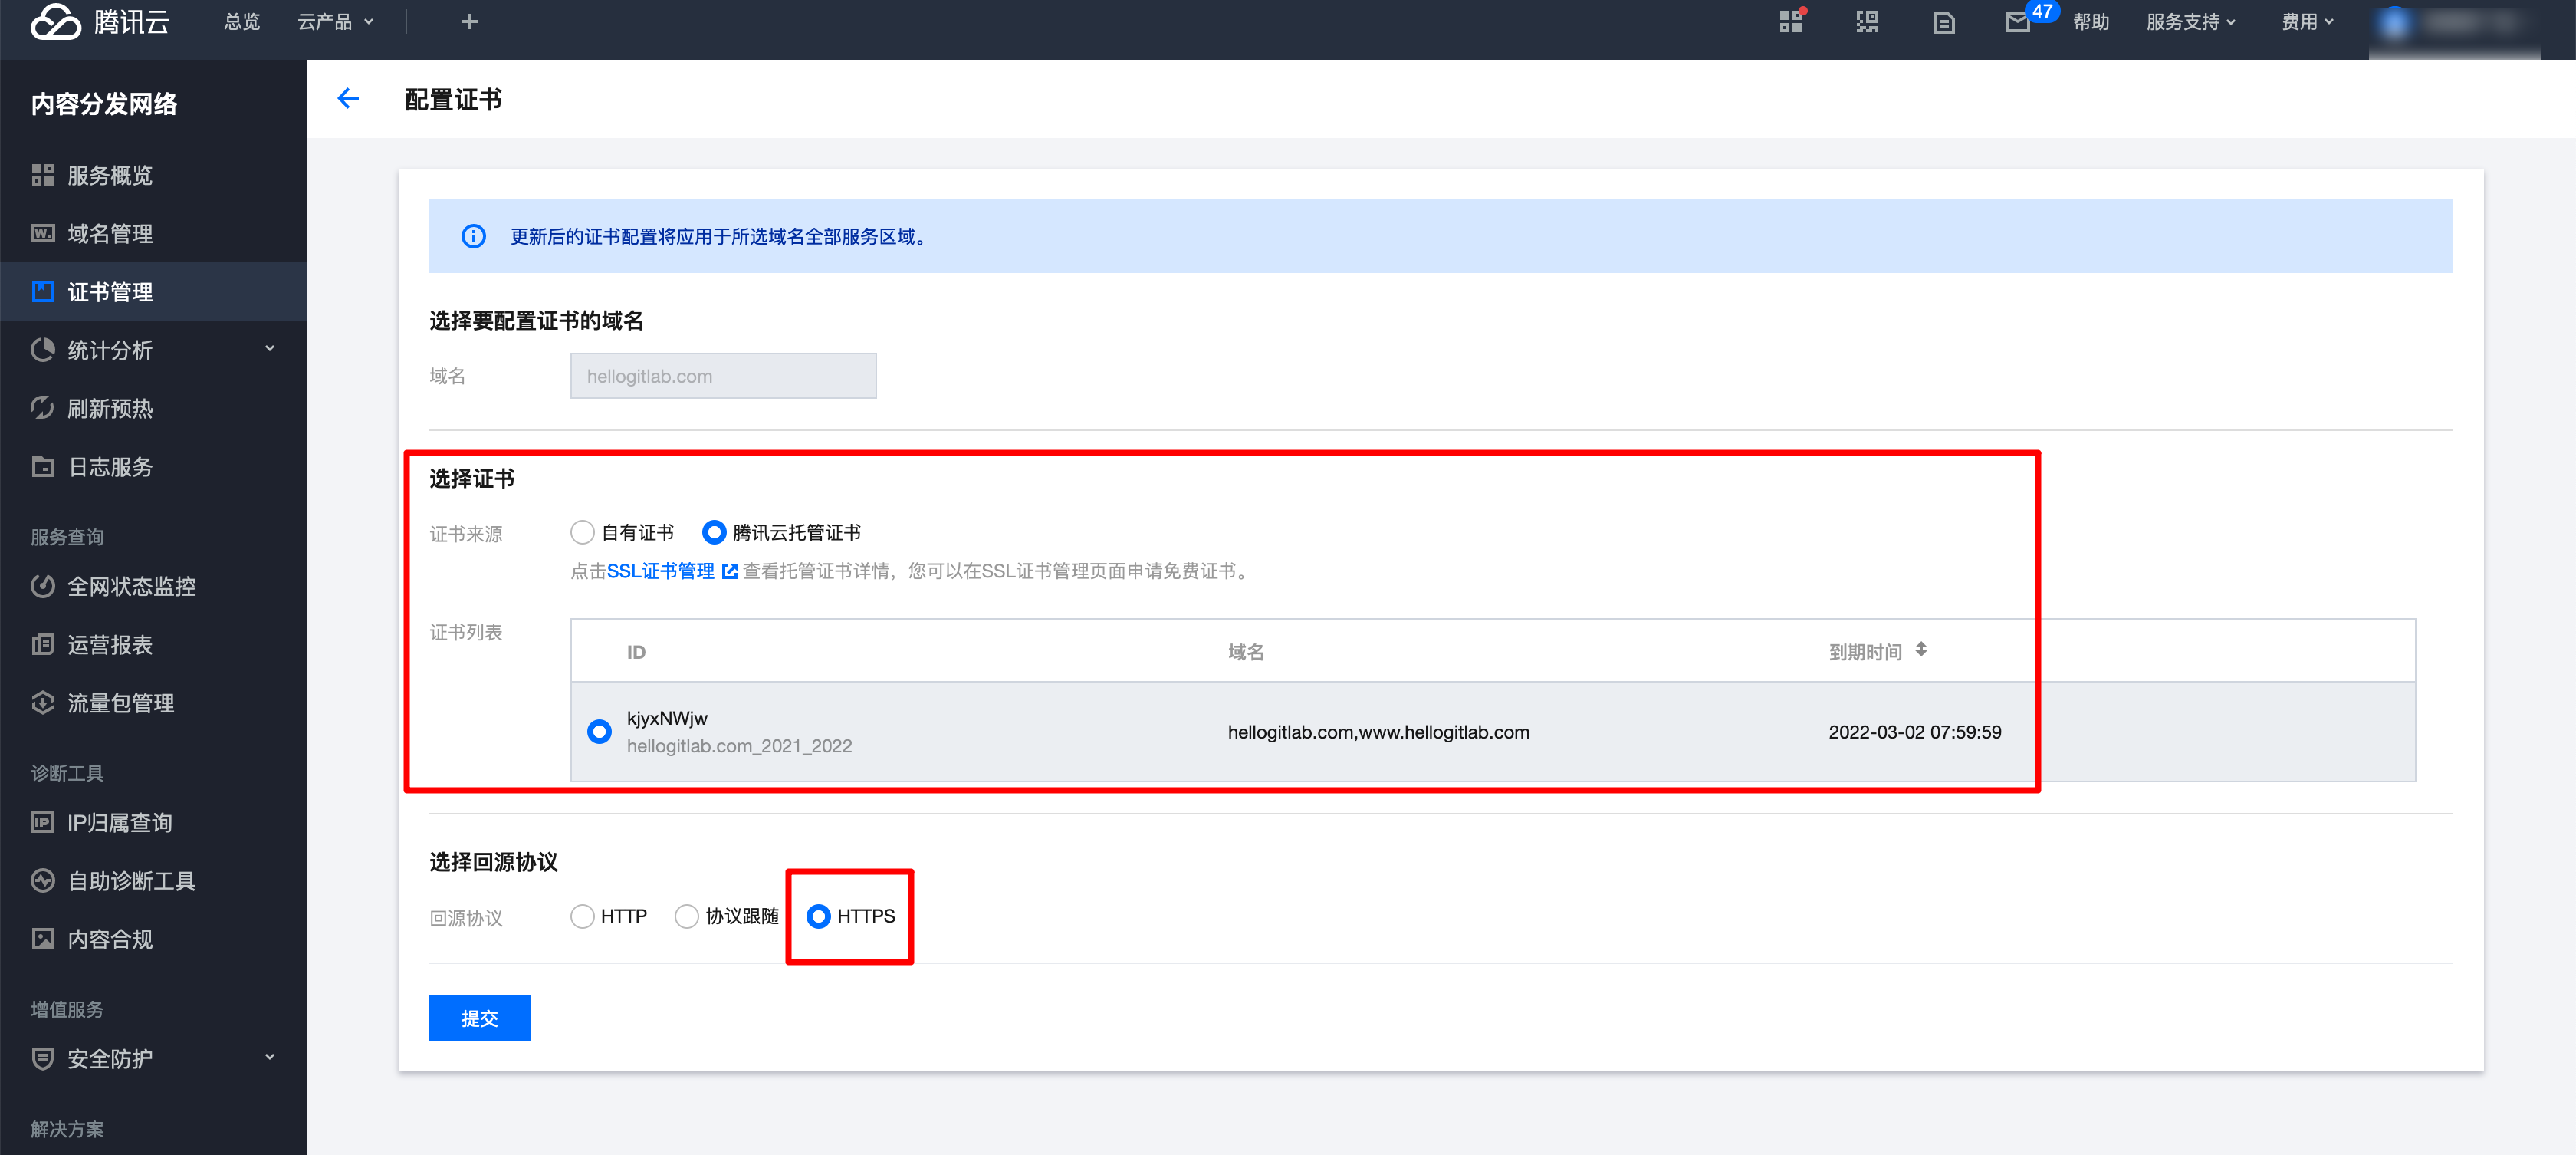
另外,需要配置域名解析,需要在DNS 解析 DNSPod控制台配置。
添加CNAME记录,并将原来的A记录暂停:
暂停原先的A记录:

并添加CNAME记录:
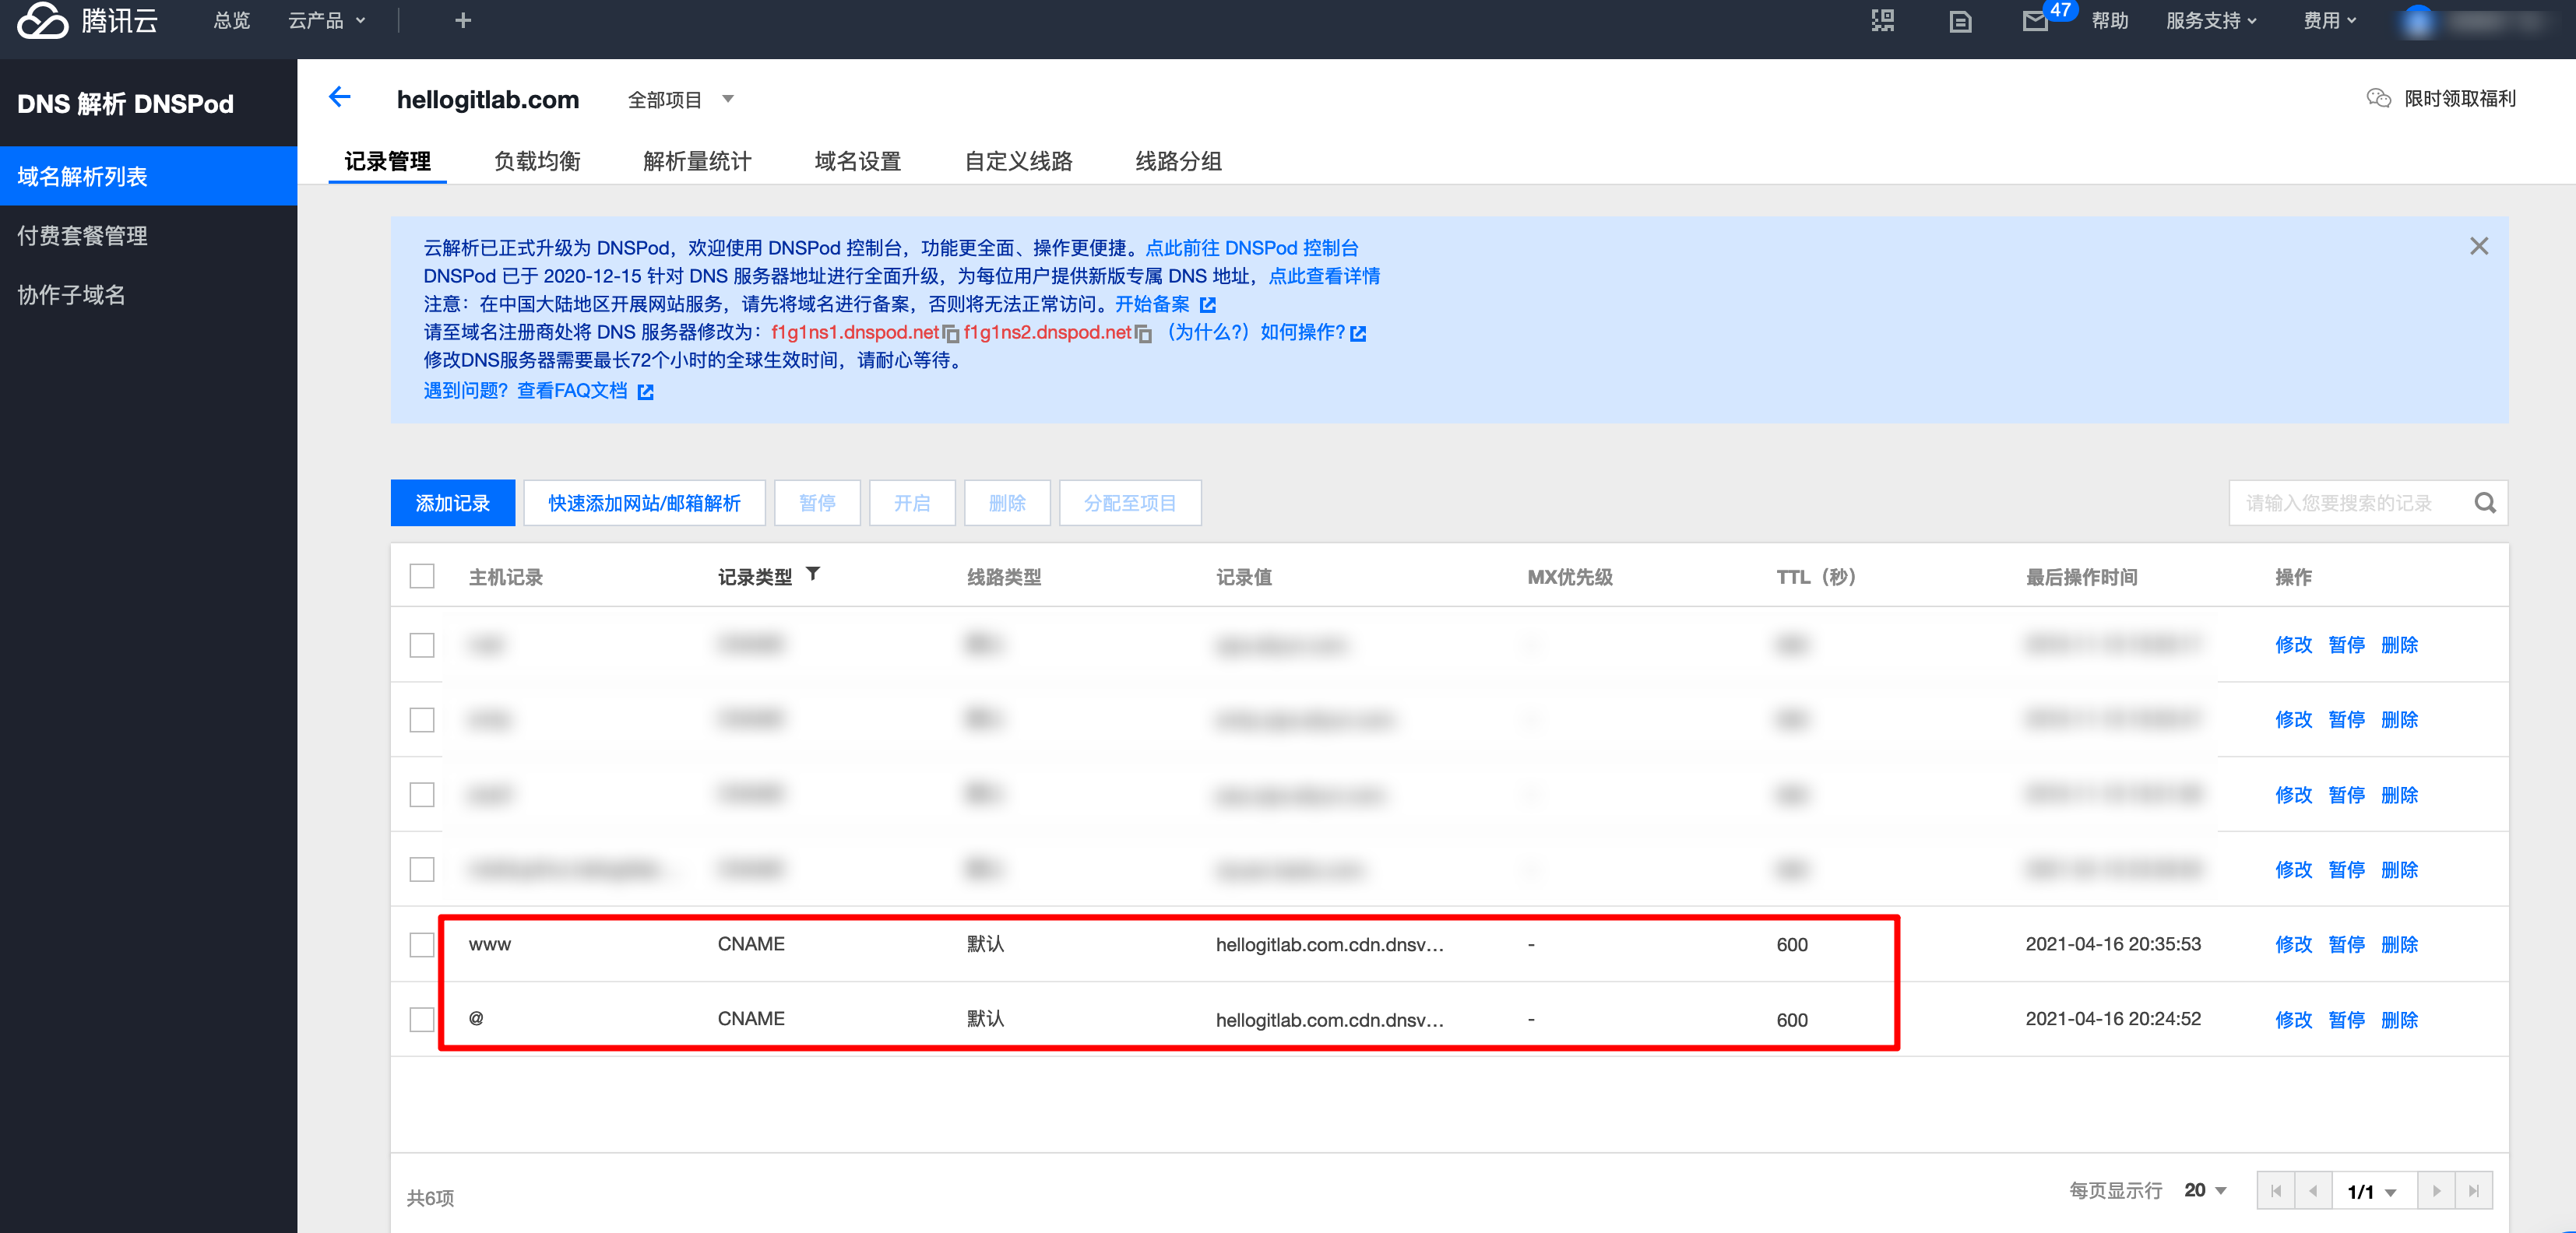
配置好域名解析后,等几分钟解析就会生效。生效后,我们可以通过ping我们的域名来看一下是否是从CDN解析过来的。
$ ping hellogitlab.com -c 3
PING 9jr9cwhb.slt.sched.tdnsv8.com (180.96.32.89): 56 data bytes
64 bytes from 180.96.32.89: icmp_seq=0 ttl=53 time=16.757 ms
64 bytes from 180.96.32.89: icmp_seq=1 ttl=53 time=17.313 ms
64 bytes from 180.96.32.89: icmp_seq=2 ttl=53 time=17.547 ms

--- 9jr9cwhb.slt.sched.tdnsv8.com ping statistics ---
3 packets transmitted, 3 packets received, 0.0% packet loss
round-trip min/avg/max/stddev = 16.757/17.206/17.547/0.331 ms
$ ping www.hellogitlab.com -c 3
PING 9jr9cwhb.slt.sched.tdnsv8.com (180.96.32.88): 56 data bytes
64 bytes from 180.96.32.88: icmp_seq=0 ttl=53 time=17.681 ms
64 bytes from 180.96.32.88: icmp_seq=1 ttl=53 time=17.275 ms
64 bytes from 180.96.32.88: icmp_seq=2 ttl=53 time=17.705 ms

--- 9jr9cwhb.slt.sched.tdnsv8.com ping statistics ---
3 packets transmitted, 3 packets received, 0.0% packet loss
round-trip min/avg/max/stddev = 17.275/17.554/17.705/0.197 ms
$通过ping命令可以看到,已经不是从原始的域名返回信息了,说明加速成功了!
虽然加速成功了,但导致我其他二级域名的网站不能访问,需要修改!
又考虑到腾讯云的CDN只能免费使用6个月,因此我还是将CDN加速关闭了!
因为我们的源码存放在GitHub和gitee码云上面。我们可以利用gitee或github的加速。
首先使用jsdelivr对赚点图片进行加速,你可以访问jsdelivr官网 https://www.jsdelivr.com/。
我们尝试对我们的图片进行加速,以下是一个加速链接:
https://cdn.jsdelivr.net/gh/meizhaohui/vueblog/tree/master/myblog/docs/.vuepress/public/img/1589212177224.png
访问时,提示异常:

即"Package size exceeded the configured limit of 50 MB."原因是我的仓库超过50M,jsdelivr不给提供加速服务。因此我们不用这种方式。我们使用码云对我们的网站进行加速。
我们执行以下命令ping -c 3 gitee.com:
$ ping -c 3 gitee.com
PING fn0wz54v.dayugslb.com (180.97.125.228): 56 data bytes
64 bytes from 180.97.125.228: icmp_seq=0 ttl=53 time=16.763 ms
64 bytes from 180.97.125.228: icmp_seq=1 ttl=53 time=18.131 ms
64 bytes from 180.97.125.228: icmp_seq=2 ttl=53 time=18.443 ms

--- fn0wz54v.dayugslb.com ping statistics ---
3 packets transmitted, 3 packets received, 0.0% packet loss
round-trip min/avg/max/stddev = 16.763/17.779/18.443/0.730 ms可以看出gitee.com网站也是做了CDN加速的。并没有直接从gitee.com原始域名返回数据,我们可以利用这个特性来加快我们的网站访问速度。
为了白嫖gitee.com码云的CDN,我们将仓库中所有图片地址更新为码云的地址。
以图片Snipaste_2021-04-20_22-06-33.png为例,其在gitee.com上图床的地址是是:
https://meizhaohui.gitee.io/imagebed/img/Snipaste_2021-04-20_22-06-33.png 而在我们本地的Markdown文件中配置是
我们只需要把(https://meizhaohui.gitee.io/imagebed/img/字符符进行批量替换成(/img/即可。
使用以下命令替换:
sed -i "" 's@(https://meizhaohui.gitee.io/imagebed/img/@(https://meizhaohui.gitee.io/imagebed/img/@g' `grep "(https://meizhaohui.gitee.io/imagebed/img/" -rl --include="*.md" ./`注意,macbook上面-i直接替换时,需要加一个"",表示不进行备份。
# 替换
[mzh@MacBookPro docs (master ✗)]$ sed -i "" 's@(/img/@(/img/@g' `grep "(/img/" -rl --include="*.md" ./`
# 查看一下
[mzh@MacBookPro docs (master ✗)]$ grep -Rn '](https://meizhaohui' *|head
CI/docker/nextcloud_in_docker.md:191:
CI/docker/nextcloud_in_docker.md:195:
CI/docker/nextcloud_in_docker.md:215:
CI/docker/nextcloud_in_docker.md:241:
CI/docker/nextcloud_in_docker.md:567:
CI/docker/nextcloud_in_docker.md:569:
CI/docker/nextcloud_in_docker.md:579:
CI/docker/nextcloud_in_docker.md:583:
CI/docker/nextcloud_in_docker.md:692:
CI/docker/nextcloud_in_docker.md:703:每次有新的图片上传时,都需要手动点击Gitee pager页面进行更新部署,比较麻烦。在网上搜索了一下,如何自动部署Gitee Pager服务。参考GiteePages自动部署 https://www.freesion.com/article/80541046591/ , 我优化了一下,使用selenium操作浏览器自动部署Gitee Pages服务的脚本auto_deploy_gitee_page.py.
download auto_deploy_gitee_page.py
脚本内容如下:
#!/usr/bin/python
# -*- coding: utf-8 -*-
"""
Filename: auto_deploy_gitee_page.py
Date    : 2021-04-23 21:49:26
Function: 使用selenium操作浏览器自动部署Gitee Pages服务
Author  : 梅朝辉<mzh@hellogitlab.com>
Release : V1.0

1. 定位元素,参考:史上最全!Selenium元素定位的30种方式 https://blog.csdn.net/qq_32897143/article/details/80383502
2. 源码方法,参考:GiteePages自动部署  https://www.freesion.com/article/80541046591/
"""
import os
import time

# 将驱动放在脚本同级目录下
# Chrome驱动下载地址:http://npm.taobao.org/mirrors/chromedriver/


# 第三方包
# 操作浏览器
# 安装: pip3 install selenium
# 参考:https://pypi.org/project/selenium/
from selenium import webdriver
from selenium.webdriver.common.alert import Alert

# 第三方包
# 加载.env配置文件
# 安装: pip3 install selenium
# 参考:https://pypi.org/project/python-dotenv/
from dotenv import load_dotenv

base_dir = os.path.dirname(__file__)
dotenv_path = os.path.join(base_dir, '.env')
load_dotenv(dotenv_path)

# 加载环境变量
gitee_host = os.getenv('GITEE_HOST')
username = os.getenv('GITEE_USERNAME')
password = os.getenv('GITEE_PASSWORD')
image_host = os.getenv('IMAGE_HOST')

# 模拟浏览器打开到gitee登录界面

# 创建chrome浏览器和他的无头模式
options = webdriver.ChromeOptions()
# 当不需要实际打开浏览器时,可以将以下headless行取消注释
options.add_argument('--headless')
options.add_argument("--disable-setuid-sandbox")
# 将驱动放在脚本同级目录下
executable = "%s/chromedriver" % base_dir
driver = webdriver.Chrome(executable_path=executable, options=options)
driver.get('%s/login' % gitee_host)
# 将窗口最大化
driver.maximize_window()
time.sleep(2)

# 输入账号--通过html的id属性定位输入位置--改为你的账号
user_login = driver.find_element_by_id('user_login')
user_login.send_keys(username)
# 输入密码--通过html的id属性定位输入位置--改为你的密码
driver.find_element_by_id('user_password').send_keys(password)
# 点击登录按钮--通过name确定点击位置
driver.find_element_by_name('commit').click()
time.sleep(2)

# 切换到gitee pages界面
driver.get('%s/%s/%s/pages' % (gitee_host, username, image_host))
# 点击更新按钮--通过xpath确定点击位置
driver.find_element_by_xpath('//*[@id="pages-branch"]/div[7]').click()
# 确认更新提示框--这个函数的作用是确认提示框
Alert(driver).accept()
# 等待5秒更新
time.sleep(5)

# 这个print其实没事什么用,如果真的要测试脚本是否运行成功,可以用try来抛出异常
print("gitee pages服务更新成功")

# 脚本运行成功,退出浏览器
driver.quit()在脚本的同目录下新建一个.env文件,其内容如下:
# GITEE主页
GITEE_HOST = https://gitee.com
# GITEE用户名
GITEE_USERNAME = 修改为你的gitee账号
# GITEE密码
GITEE_PASSWORD = 修改为你的gitee密码
# 图床项目名称
IMAGE_HOST = imagebed你只需要修改.env配置文件中用户名和密码,以及你的图床项目名称即可。
注意,需要安装依赖包:
$ pip3 install selenium python-dotenv
$ pip3 list|grep -E "selenium|dotenv"
python-dotenv 0.17.0
selenium 3.141.0后面每次提交代码时,在快捷命令后面加上python3 auto_deploy_gitee_page.py即可。这样就会自动部署Gitee Pages服务了。
警告
Gitee Pages需要实名认证,要上传身份证照片才能用,决定放弃使用图床。还是将图片存在自己的服务器上面比较靠谱。
先将图床仓库中的图片复制到博客仓库的myblog/docs/.vuepress/public/img目录下。
还原所有图床链接,类似这样将所有文件中类似这样的图片链接进行替换,https://meizhaohui.gitee.io/imagebed/img/20211101225952.png替换成/img/20211101225952.png即可。
使用以下命令进行替换:
$ grep -rl 'https://meizhaohui.gitee.io/imagebed/img' |xargs sed -i".bak" 's@https://meizhaohui.gitee.io/imagebed/img@/img@g'确认调整无误后,将.bak文件删除掉:
$ find . -name '*.md.bak' -delete增加百度收录
可以在百度的站点管理页面 https://ziyuan.baidu.com/site/index#/ 将个人博客的url添加到百度资源中。
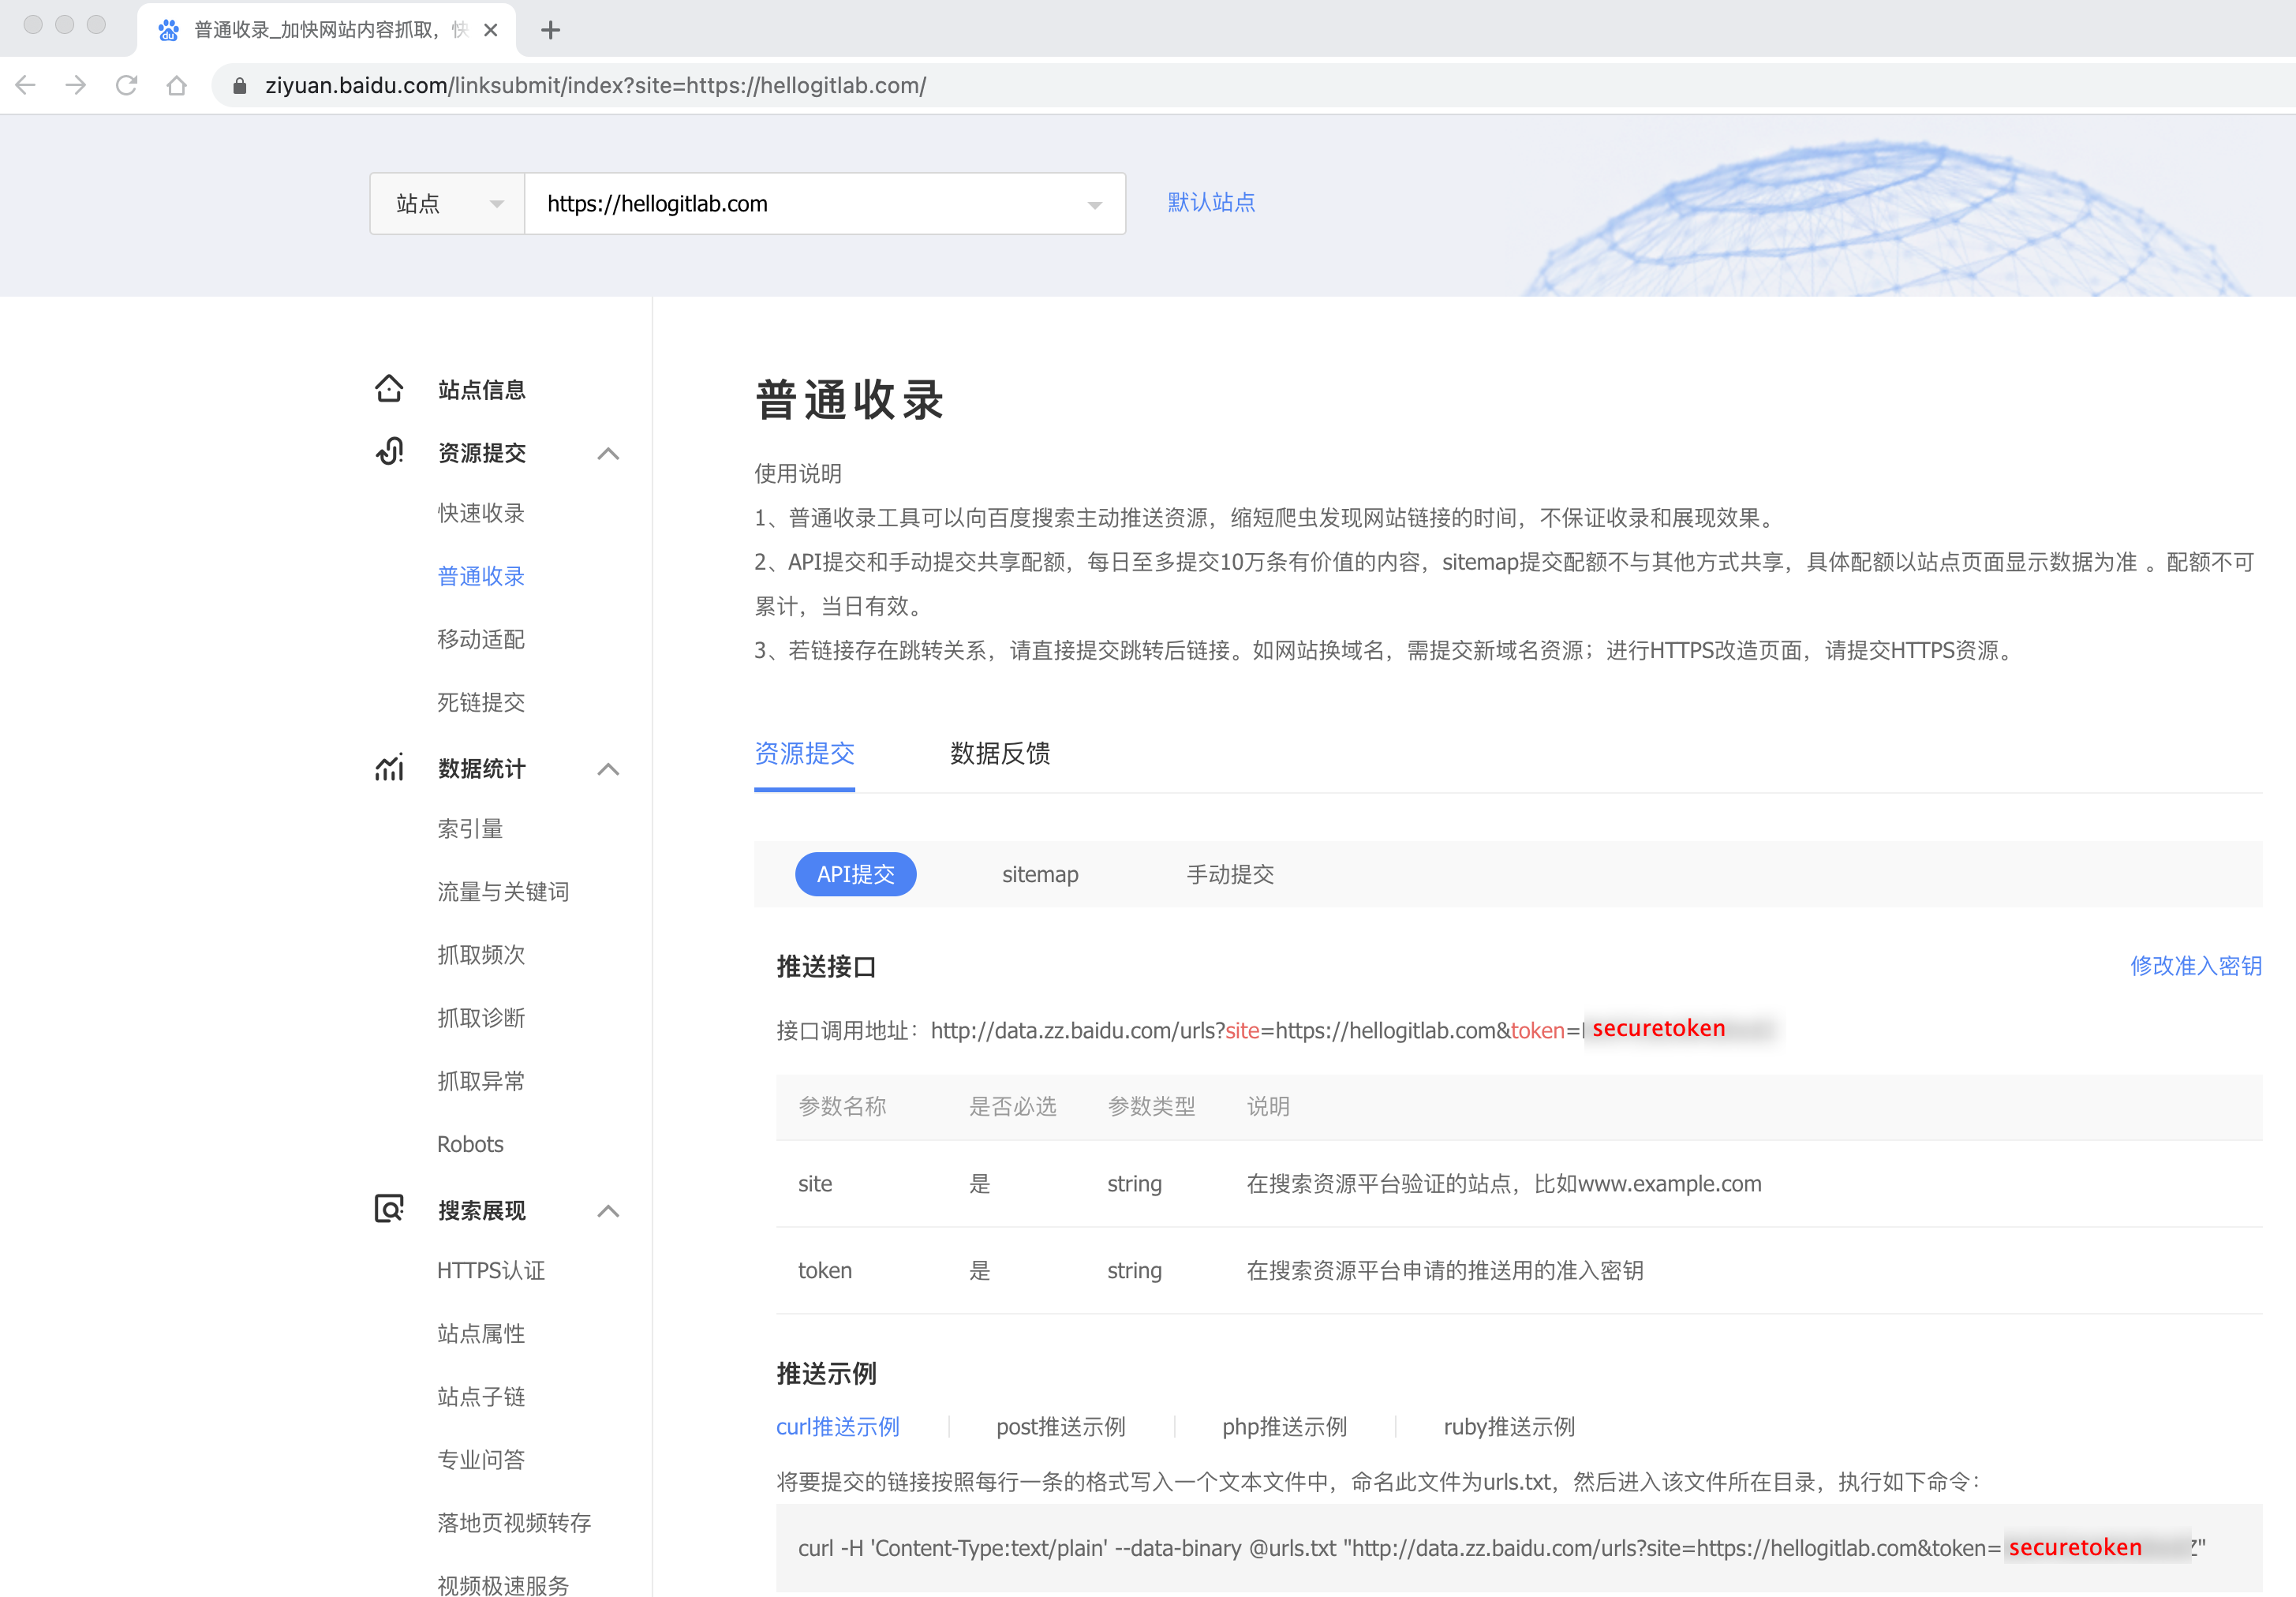
配置完成后,在网站仓库的docs目录下,创建auto_generate_sites.sh。然后使用auto_generate_sites.sh生成站点的所有URL地址,并提交到百度资源中:
[mzh@MacBookPro docs (master ✗)]$ cat auto_generate_sites.sh
#!/bin/bash
##################################################
#      Filename: auto_generate_sites.sh
#        Author: Zhaohui Mei<mzh.whut@gmail.com>
#   Description: 自动生成网站URL超链接并提交至百度资源中
#   Create Time: 2021-04-20 21:28:06
# Last Modified: 2021-04-20 21:53:09
# 百度资源链接 : https://ziyuan.baidu.com/linksubmit/index?site=https://hellogitlab.com/
##################################################

SCRIPT_PATH=$(cd "$(dirname "${0}")" && pwd)
echo "SCRIPT_PATH:${SCRIPT_PATH}"
site_file="${SCRIPT_PATH}/urls.txt"
# 你可以将百度token存放在环境变量中,在~/.bashrc中加入以下内容
# export BAIDU_TOKEN="your_baidu_token"
echo "BAIDU_TOKEN:${BAIDU_TOKEN}"
find . -name '*.md'|sed 's/.md$/.html/g'|sed 's/README.html//g'|sed 's@^.@https://hellogitlab.com@g'|sort > "${site_file}"
upload_result=$(curl -H 'Content-Type:text/plain' --data-binary @${site_file} "http://data.zz.baidu.com/urls?site=https://hellogitlab.com&token=${BAIDU_TOKEN}")
echo "字段	说明
remain	当天剩余的可推送url条数
success	成功推送的url条数"
echo "upload_result:${upload_result}"执行脚本:
[mzh@MacBookPro docs (master ✗)]$ sh auto_generate_sites.sh
SCRIPT_PATH:/Users/mzh/Documents/Github/vueblog/myblog/docs
BAIDU_TOKEN:securetoken
  % Total    % Received % Xferd  Average Speed   Time    Time     Time  Current
                                 Dload  Upload   Total   Spent    Left  Speed
100  5991  100    29  100  5962    144  29661 --:--:-- --:--:-- --:--:-- 29805
字段	说明
remain	当天剩余的可推送url条数
success	成功推送的url条数
upload_result:{"remain":2168,"success":104}你可以配置一个定时任务,隔段时间执行一下脚本将网站URL上传到百度资源中。
优秀案例
统一网站端口号
当我的配置越来越多的二级域名网站,如gogs.hellogitlab.com、nextcloud.hellogitlab.com之后,我发现存在了以下问题:
- 我的博客主页
hellogitlab.com使用httpd服务驱动,httpd将80和443端口占用。博客系统页面直接从80跳转到443端口正常。 - 其他二级域名所对应的服务,我一般是用
docker运行的,这个时候会存在多个端口之间的转发,如私有云盘系统nextcloud.hellogitlab.com,首先docker中使用的是80端口,运行容器时,将容器内部80端口映射到宿主机8080端口,为了使用HTTPS加密协议传输,因为httpd服务已经将80和443端口占用了,所以Nginx服务不能用这两个端口,只用能其他。使用Nginx进行反向代理,将宿主机444端口转发到8080端口,这就涉及到宿主机的两个端口444和8080,这个时候如果用户直接输入http://nextcloud.hellogitlab.com将会提示您的连接不是私密连接异常。同样,Gogs服务也会存在这个问题。需要多考虑一个端口号,还需要配置防火墙放行规则。发现配置新的服务越来越麻烦,HTTP还不能自动跳转至HTTPS页面。
存在以上问题,能不能同一个端口绑定多个域名呢。这时就有了新的需求:同一端口绑定多个域名提供服务。
百度一下,找到了这篇文章 多个域名通过nginx共用一个端口
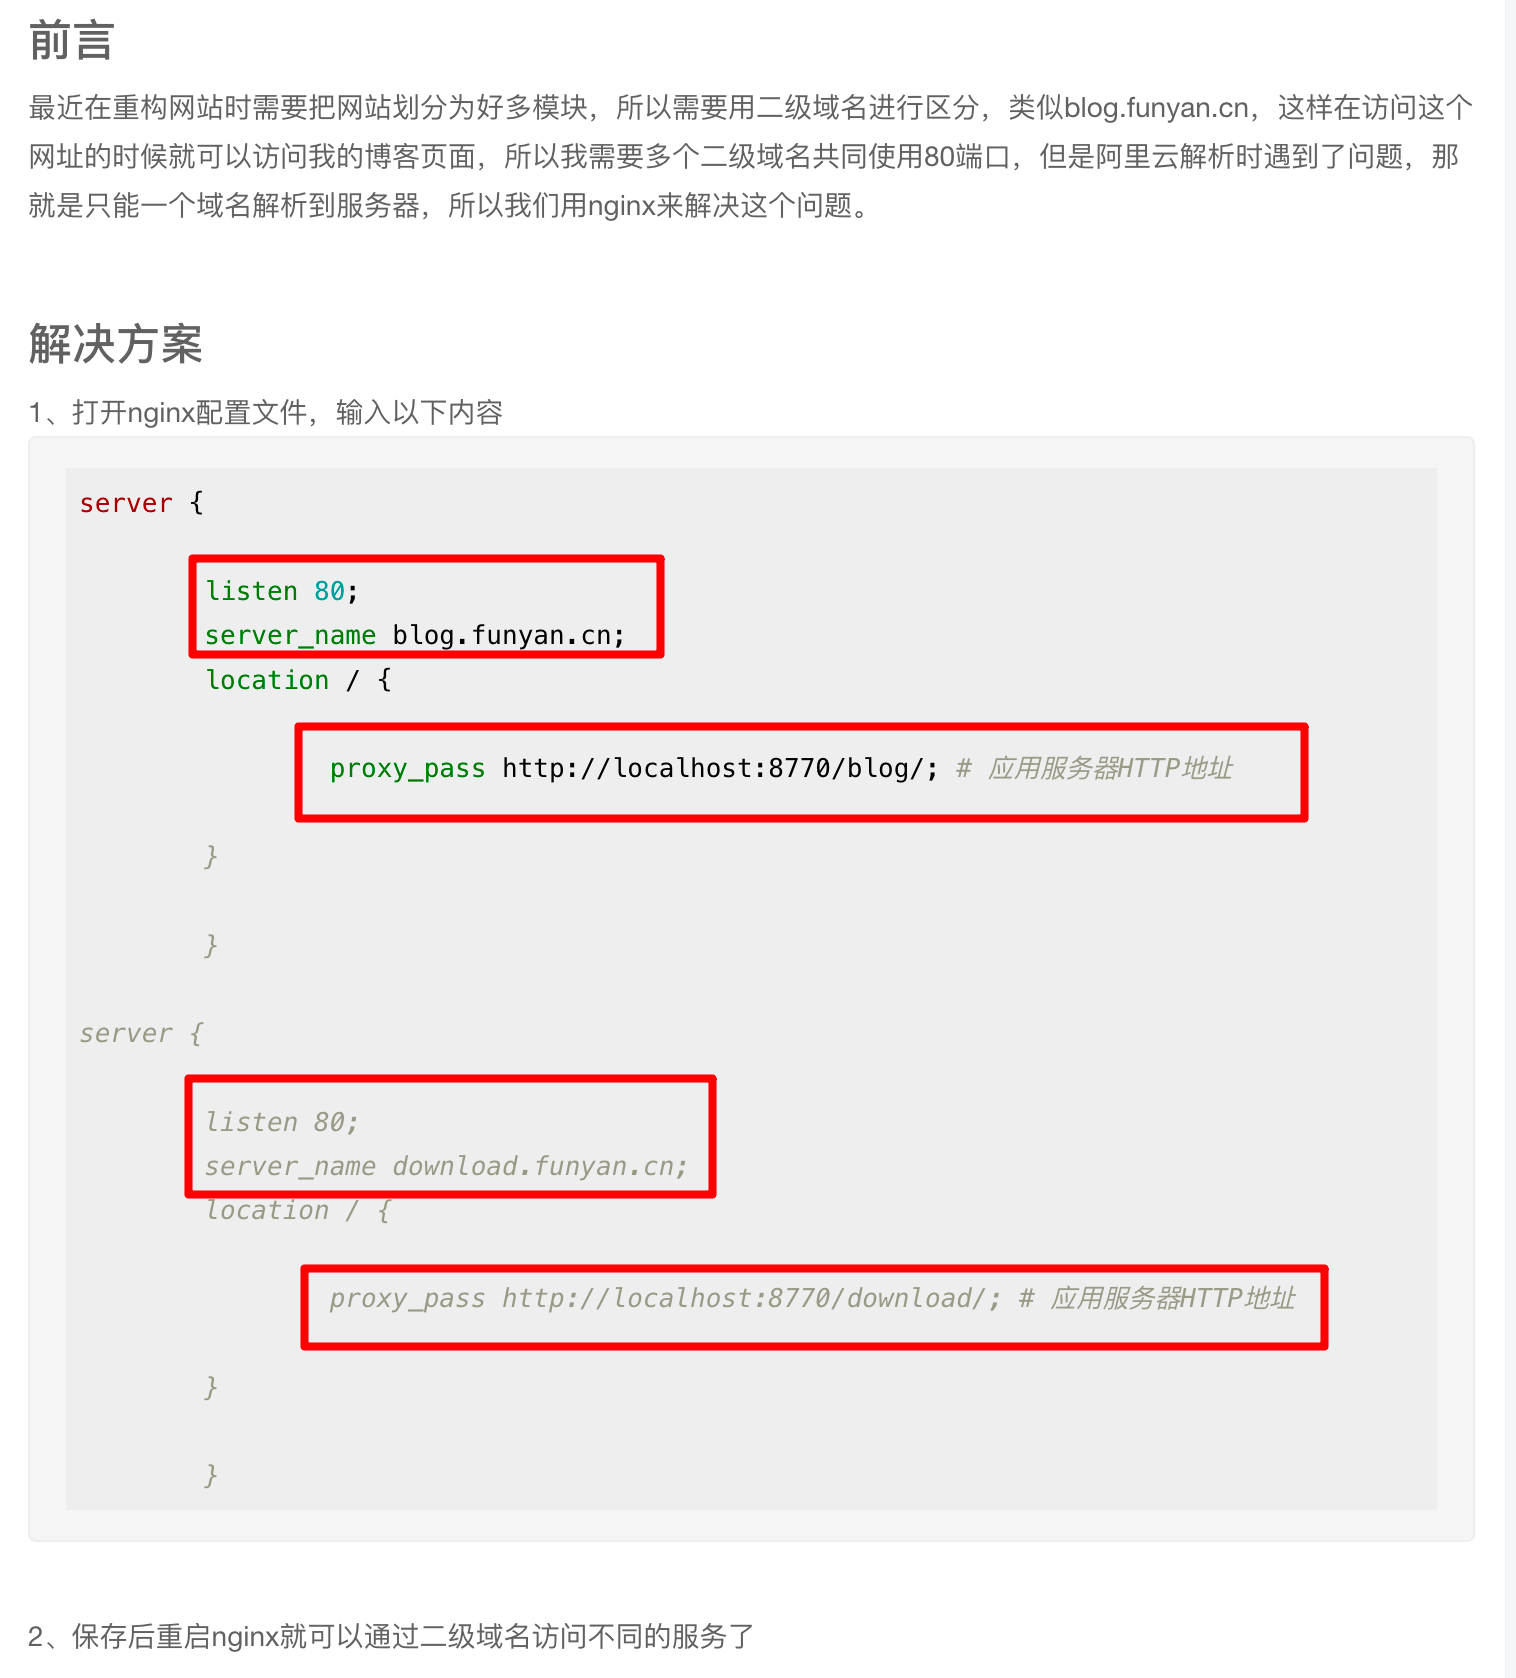
可以看到其使用了Nginx直接将80端口绑定了不同的域名,最后转发到8770端口的blog地址或download地址。
受此启发,我们应该可以使用Nginx监听80或443端口,然后转到到其他的端口,如8080或10080端口。
我就要开始运行起来了。
大体思路如下:
- 将主页
hellogitlab.com使用Nginx驱动,并监听80和443端口。 - 配置二级域名的端口转发。
刚开始的时候,我们httpd和nginx都是正常运行的。
我尝试在/etc/nginx/conf.d目录中加一个博客系统的配置信息:
# 查看修改后的博客配置文件
[root@hellogitlab ~]# cat /etc/nginx/conf.d/blog.conf
server {
        listen       443 ssl;
        server_name  hellogitlab.com;
        ssl_certificate "/etc/pki/nginx/1_hellogitlab.com_bundle.crt";
        ssl_certificate_key "/etc/pki/nginx/2_hellogitlab.com.key";
        ssl_session_timeout 5m;
        ssl_protocols TLSv1 TLSv1.1 TLSv1.2;
        ssl_ciphers ECDHE-RSA-AES128-GCM-SHA256:HIGH:!aNULL:!MD5:!RC4:!DHE;
        ssl_prefer_server_ciphers on;

        root /var/www/html/vueblog;
}
[root@hellogitlab ~]#
# 检查nginx配置是否正确
[root@hellogitlab ~]# nginx -t
nginx: the configuration file /etc/nginx/nginx.conf syntax is ok
nginx: configuration file /etc/nginx/nginx.conf test is successful
[root@hellogitlab ~]#这时候可以看到Nginx配置正确,没有报异常。
那我尝试再重启Nginx服务:
[root@hellogitlab ~]# systemctl restart nginx
Job for nginx.service failed because the control process exited with error code. See "systemctl status nginx.service" and "journalctl -xe" for details.
[root@hellogitlab ~]# systemctl status nginx
● nginx.service - The nginx HTTP and reverse proxy server
   Loaded: loaded (/usr/lib/systemd/system/nginx.service; disabled; vendor preset: disabled)
   Active: failed (Result: exit-code) since 一 2021-04-26 22:53:09 CST; 10s ago
  Process: 20460 ExecStart=/usr/sbin/nginx (code=exited, status=1/FAILURE)
  Process: 20456 ExecStartPre=/usr/sbin/nginx -t (code=exited, status=0/SUCCESS)
  Process: 20454 ExecStartPre=/usr/bin/rm -f /run/nginx.pid (code=exited, status=0/SUCCESS)

4月 26 22:53:06 hellogitlab.com nginx[20460]: nginx: [emerg] bind() to 0.0.0.0:443 failed (98: Address already in use)
4月 26 22:53:07 hellogitlab.com nginx[20460]: nginx: [emerg] bind() to 0.0.0.0:443 failed (98: Address already in use)
4月 26 22:53:07 hellogitlab.com nginx[20460]: nginx: [emerg] bind() to 0.0.0.0:443 failed (98: Address already in use)
4月 26 22:53:08 hellogitlab.com nginx[20460]: nginx: [emerg] bind() to 0.0.0.0:443 failed (98: Address already in use)
4月 26 22:53:08 hellogitlab.com nginx[20460]: nginx: [emerg] bind() to 0.0.0.0:443 failed (98: Address already in use)
4月 26 22:53:09 hellogitlab.com nginx[20460]: nginx: [emerg] still could not bind()
4月 26 22:53:09 hellogitlab.com systemd[1]: nginx.service: control process exited, code=exited status=1
4月 26 22:53:09 hellogitlab.com systemd[1]: Failed to start The nginx HTTP and reverse proxy server.
4月 26 22:53:09 hellogitlab.com systemd[1]: Unit nginx.service entered failed state.
4月 26 22:53:09 hellogitlab.com systemd[1]: nginx.service failed.
Hint: Some lines were ellipsized, use -l to show in full.
[root@hellogitlab ~]#
[root@hellogitlab ~]# netstat -tunlp|grep 443
tcp6       0      0 :::443                  :::*                    LISTEN      19259/httpd
[root@hellogitlab ~]#重启失败了,提示nginx: [emerg] bind() to 0.0.0.0:443 failed (98: Address already in use)异常,即443端口被占用了。
而我们查看443端口占用情况,可以看到443端口被httpd服务占用了。这是当然,因为我的博客系统正在httpd服务上面跑着。为了让我们Nginx服务能够运行起来,我们将httpd服务停止掉。
在我们停掉httpd服务时,我们可以通过curl -I 博客URL地址的方式查看一下我们的网站到底是由httpd还是nginx服务驱动的:
$ curl -I http://hellogitlab.com
HTTP/1.1 302 Found
Date: Mon, 26 Apr 2021 14:59:28 GMT
Server: Apache/2.4.6 (CentOS) SVN/1.11.1 OpenSSL/1.0.2k-fips PHP/7.2.27 mod_wsgi/4.6.2 Python/3.6
Location: https://hellogitlab.com/
Content-Type: text/html; charset=iso-8859-1

$ curl -I https://hellogitlab.com
HTTP/1.1 200 OK
Date: Mon, 26 Apr 2021 14:59:33 GMT
Server: Apache/2.4.6 (CentOS) SVN/1.11.1 OpenSSL/1.0.2k-fips PHP/7.2.27 mod_wsgi/4.6.2 Python/3.6
Last-Modified: Sun, 25 Apr 2021 16:31:43 GMT
ETag: "5c30-5c0ce907ad0e1"
Accept-Ranges: bytes
Content-Length: 23600
Content-Type: text/html; charset=UTF-8

$可以看到,此时博客系统是由Apache/2.4.6驱动的。
在服务器端验证一下httpd的版本信息:
[root@hellogitlab ~]# httpd -v
Server version: Apache/2.4.6 (CentOS)
Server built: Aug 8 2019 11:41:18可以看到与我们使用curl -I命令查看到版本信息是一致,说明我们的博客系统的确是由Apache/2.4.6驱动的。
现在我们停止httpd服务,再尝试启动nginx服务:
[root@hellogitlab ~]# systemctl stop httpd
[root@hellogitlab ~]# systemctl status httpd
● httpd.service - The Apache HTTP Server
   Loaded: loaded (/usr/lib/systemd/system/httpd.service; enabled; vendor preset: disabled)
   Active: inactive (dead) since 一 2021-04-26 23:11:16 CST; 5s ago
     Docs: man:httpd(8)
           man:apachectl(8)
  Process: 24720 ExecStop=/bin/kill -WINCH ${MAINPID} (code=exited, status=0/SUCCESS)
  Process: 11873 ExecReload=/usr/sbin/httpd $OPTIONS -k graceful (code=exited, status=0/SUCCESS)
  Process: 19259 ExecStart=/usr/sbin/httpd $OPTIONS -DFOREGROUND (code=exited, status=0/SUCCESS)
 Main PID: 19259 (code=exited, status=0/SUCCESS)
   Status: "Total requests: 45; Current requests/sec: 0; Current traffic:   0 B/sec"

4月 26 22:48:02 hellogitlab.com systemd[1]: Starting The Apache HTTP Server...
4月 26 22:48:03 hellogitlab.com systemd[1]: Started The Apache HTTP Server.
4月 26 23:11:15 hellogitlab.com systemd[1]: Stopping The Apache HTTP Server...
4月 26 23:11:16 hellogitlab.com systemd[1]: Stopped The Apache HTTP Server.
[root@hellogitlab ~]# systemctl restart nginx
[root@hellogitlab ~]# systemctl status nginx
● nginx.service - The nginx HTTP and reverse proxy server
   Loaded: loaded (/usr/lib/systemd/system/nginx.service; disabled; vendor preset: disabled)
   Active: active (running) since 一 2021-04-26 23:11:43 CST; 5s ago
  Process: 24854 ExecStart=/usr/sbin/nginx (code=exited, status=0/SUCCESS)
  Process: 24851 ExecStartPre=/usr/sbin/nginx -t (code=exited, status=0/SUCCESS)
  Process: 24849 ExecStartPre=/usr/bin/rm -f /run/nginx.pid (code=exited, status=0/SUCCESS)
 Main PID: 24856 (nginx)
    Tasks: 3
   Memory: 4.2M
   CGroup: /system.slice/nginx.service
           ├─24856 nginx: master process /usr/sbin/nginx
           ├─24857 nginx: worker process
           └─24858 nginx: worker process

4月 26 23:11:43 hellogitlab.com systemd[1]: Starting The nginx HTTP and reverse proxy server...
4月 26 23:11:43 hellogitlab.com nginx[24851]: nginx: the configuration file /etc/nginx/nginx.conf syntax is ok
4月 26 23:11:43 hellogitlab.com nginx[24851]: nginx: configuration file /etc/nginx/nginx.conf test is successful
4月 26 23:11:43 hellogitlab.com systemd[1]: Started The nginx HTTP and reverse proxy server.
[root@hellogitlab ~]#此时,可以看到,我们的Nginx服务正常启动了!
我们检查一下自己的博客系统是否能正常访问,访问https://hellogitlab.com,此时可以正常访问。但直接访问http://hellogitlab.com/出现异常,不能访问。
同样,我们使用curl -i命令检查一下我们的URL地址:
$ curl -I https://hellogitlab.com
HTTP/1.1 200 OK
Server: nginx/1.16.1
Date: Mon, 26 Apr 2021 15:19:04 GMT
Content-Type: text/html
Content-Length: 23600
Last-Modified: Sun, 25 Apr 2021 16:31:43 GMT
Connection: keep-alive
ETag: "6085996f-5c30"
Accept-Ranges: bytes

$ curl -I http://hellogitlab.com
curl: (7) Failed to connect to hellogitlab.com port 80: Connection refused
$可以看到我们的博客系统现在是由nginx/1.16.1驱动的,说明我们的博客系统配置生效了,页面也能正常访问。只是现在80端口访问还存在问题。原因是我们在博客配置中并没有监听80端口,也没有配置自动跳转。
我们修改一下配置,增加80端口的监听并自动跳转到https服务页面。
修改后的配置如下:
# 查看修改后的博客配置文件
[root@hellogitlab ~]# cat /etc/nginx/conf.d/blog.conf
server {
        listen       80;
	      server_name hellogitlab.com;
	      rewrite ^ https://$http_host$request_uri? permanent;
}
server {
        listen       443 ssl;
        server_name  hellogitlab.com;
        ssl_certificate "/etc/pki/nginx/1_hellogitlab.com_bundle.crt";
        ssl_certificate_key "/etc/pki/nginx/2_hellogitlab.com.key";
        ssl_session_timeout 5m;
        ssl_protocols TLSv1 TLSv1.1 TLSv1.2;
        ssl_ciphers ECDHE-RSA-AES128-GCM-SHA256:HIGH:!aNULL:!MD5:!RC4:!DHE;
        ssl_prefer_server_ciphers on;

        root /var/www/html/vueblog;
}
[root@hellogitlab ~]#
# 检查nginx配置是否正确
[root@hellogitlab ~]# nginx -t
nginx: the configuration file /etc/nginx/nginx.conf syntax is ok
nginx: configuration file /etc/nginx/nginx.conf test is successful
[root@hellogitlab ~]#然后重启Nginx服务:
[root@hellogitlab ~]# systemctl restart nginx
[root@hellogitlab ~]# systemctl status nginx|grep Active
   Active: active (running) since 一 2021-04-26 23:25:55 CST; 4min 31s ago
[root@hellogitlab ~]# netstat -tunlp|grep nginx
tcp        0      0 0.0.0.0:80              0.0.0.0:*               LISTEN      29938/nginx: master
tcp        0      0 0.0.0.0:443             0.0.0.0:*               LISTEN      29938/nginx: master
tcp        0      0 0.0.0.0:444             0.0.0.0:*               LISTEN      29938/nginx: master
tcp        0      0 0.0.0.0:10081           0.0.0.0:*               LISTEN      29938/nginx: master
tcp6       0      0 :::444                  :::*                    LISTEN      29938/nginx: master
[root@hellogitlab ~]#此时,再在浏览器中检查博客系统,发现可以正常访问了。并且能够实现http链接自动跳转到https链接。
再次用curl -I命令检查一下我们的博客系统的地址:
$ curl -I http://hellogitlab.com
HTTP/1.1 301 Moved Permanently
Server: nginx/1.16.1
Date: Mon, 26 Apr 2021 15:35:33 GMT
Content-Type: text/html
Content-Length: 169
Connection: keep-alive
Location: https://hellogitlab.com/

$ curl -I https://hellogitlab.com
HTTP/1.1 200 OK
Server: nginx/1.16.1
Date: Mon, 26 Apr 2021 15:35:45 GMT
Content-Type: text/html
Content-Length: 23600
Last-Modified: Sun, 25 Apr 2021 16:31:43 GMT
Connection: keep-alive
ETag: "6085996f-5c30"
Accept-Ranges: bytes

$此时,http://hellogitlab.com和https://hellogitlab.com都能正常显示,并且可以看http形式会自动重定向到https形式。
说明我们配置正确!
现在需要优化的是,将各子域名的端口号绑定到443端口,并设置http自动重定向https。
掘金风格代码块复制
当博客系统中的很多代码块时,为方便用户复制代码,可以拉回一个"掘金风格代码块复制 "功能,只需要安装vuepress-plugin-nuggets-style-copy插件即可。
参考:https://gitee.com/yaoaifen/vuepress-plugins/tree/master/vuepress-plugin-copy
安装方法:
yarn add vuepress-plugin-nuggets-style-copy安装完成后,在pluginConfig.js增加以下内容:
     // 代码复制插件
     "vuepress-plugin-nuggets-style-copy": {
        copyText: "复制代码",
        tip: { content: "复制成功" }
}最终插件配置文件pluginConfig.js内容如下:
const secureConf = require('./secureinfo.js');
module.exports = {
    'vuepress-plugin-comment': {
        choosen: 'valine',
        // options选项中的所有参数,会传给Valine的配置
        options: {
            el: '#valine-vuepress-comment',
            appId: secureConf.leancloud_appId, // 读取secure_info.js中的配置信息
            appKey: secureConf.leancloud_appKey, // 读取secure_info.js中的配置信息
            placeholder: '同道中人,文明留言...', // 评论框占位提示符
            lang: 'zh-cn', // 支持中文
        }
    },
     "vuepress-plugin-auto-sidebar" : {
        sidebarDepth: 2
     }, // 自动侧边栏

     // 代码复制插件
     "vuepress-plugin-nuggets-style-copy": {
        copyText: "复制代码",
        tip: { content: "复制成功" }
     }
}这样在每个代码块右上角都有复制代码的文字,点击该处就可以复制代码了。
文章主体宽度设置
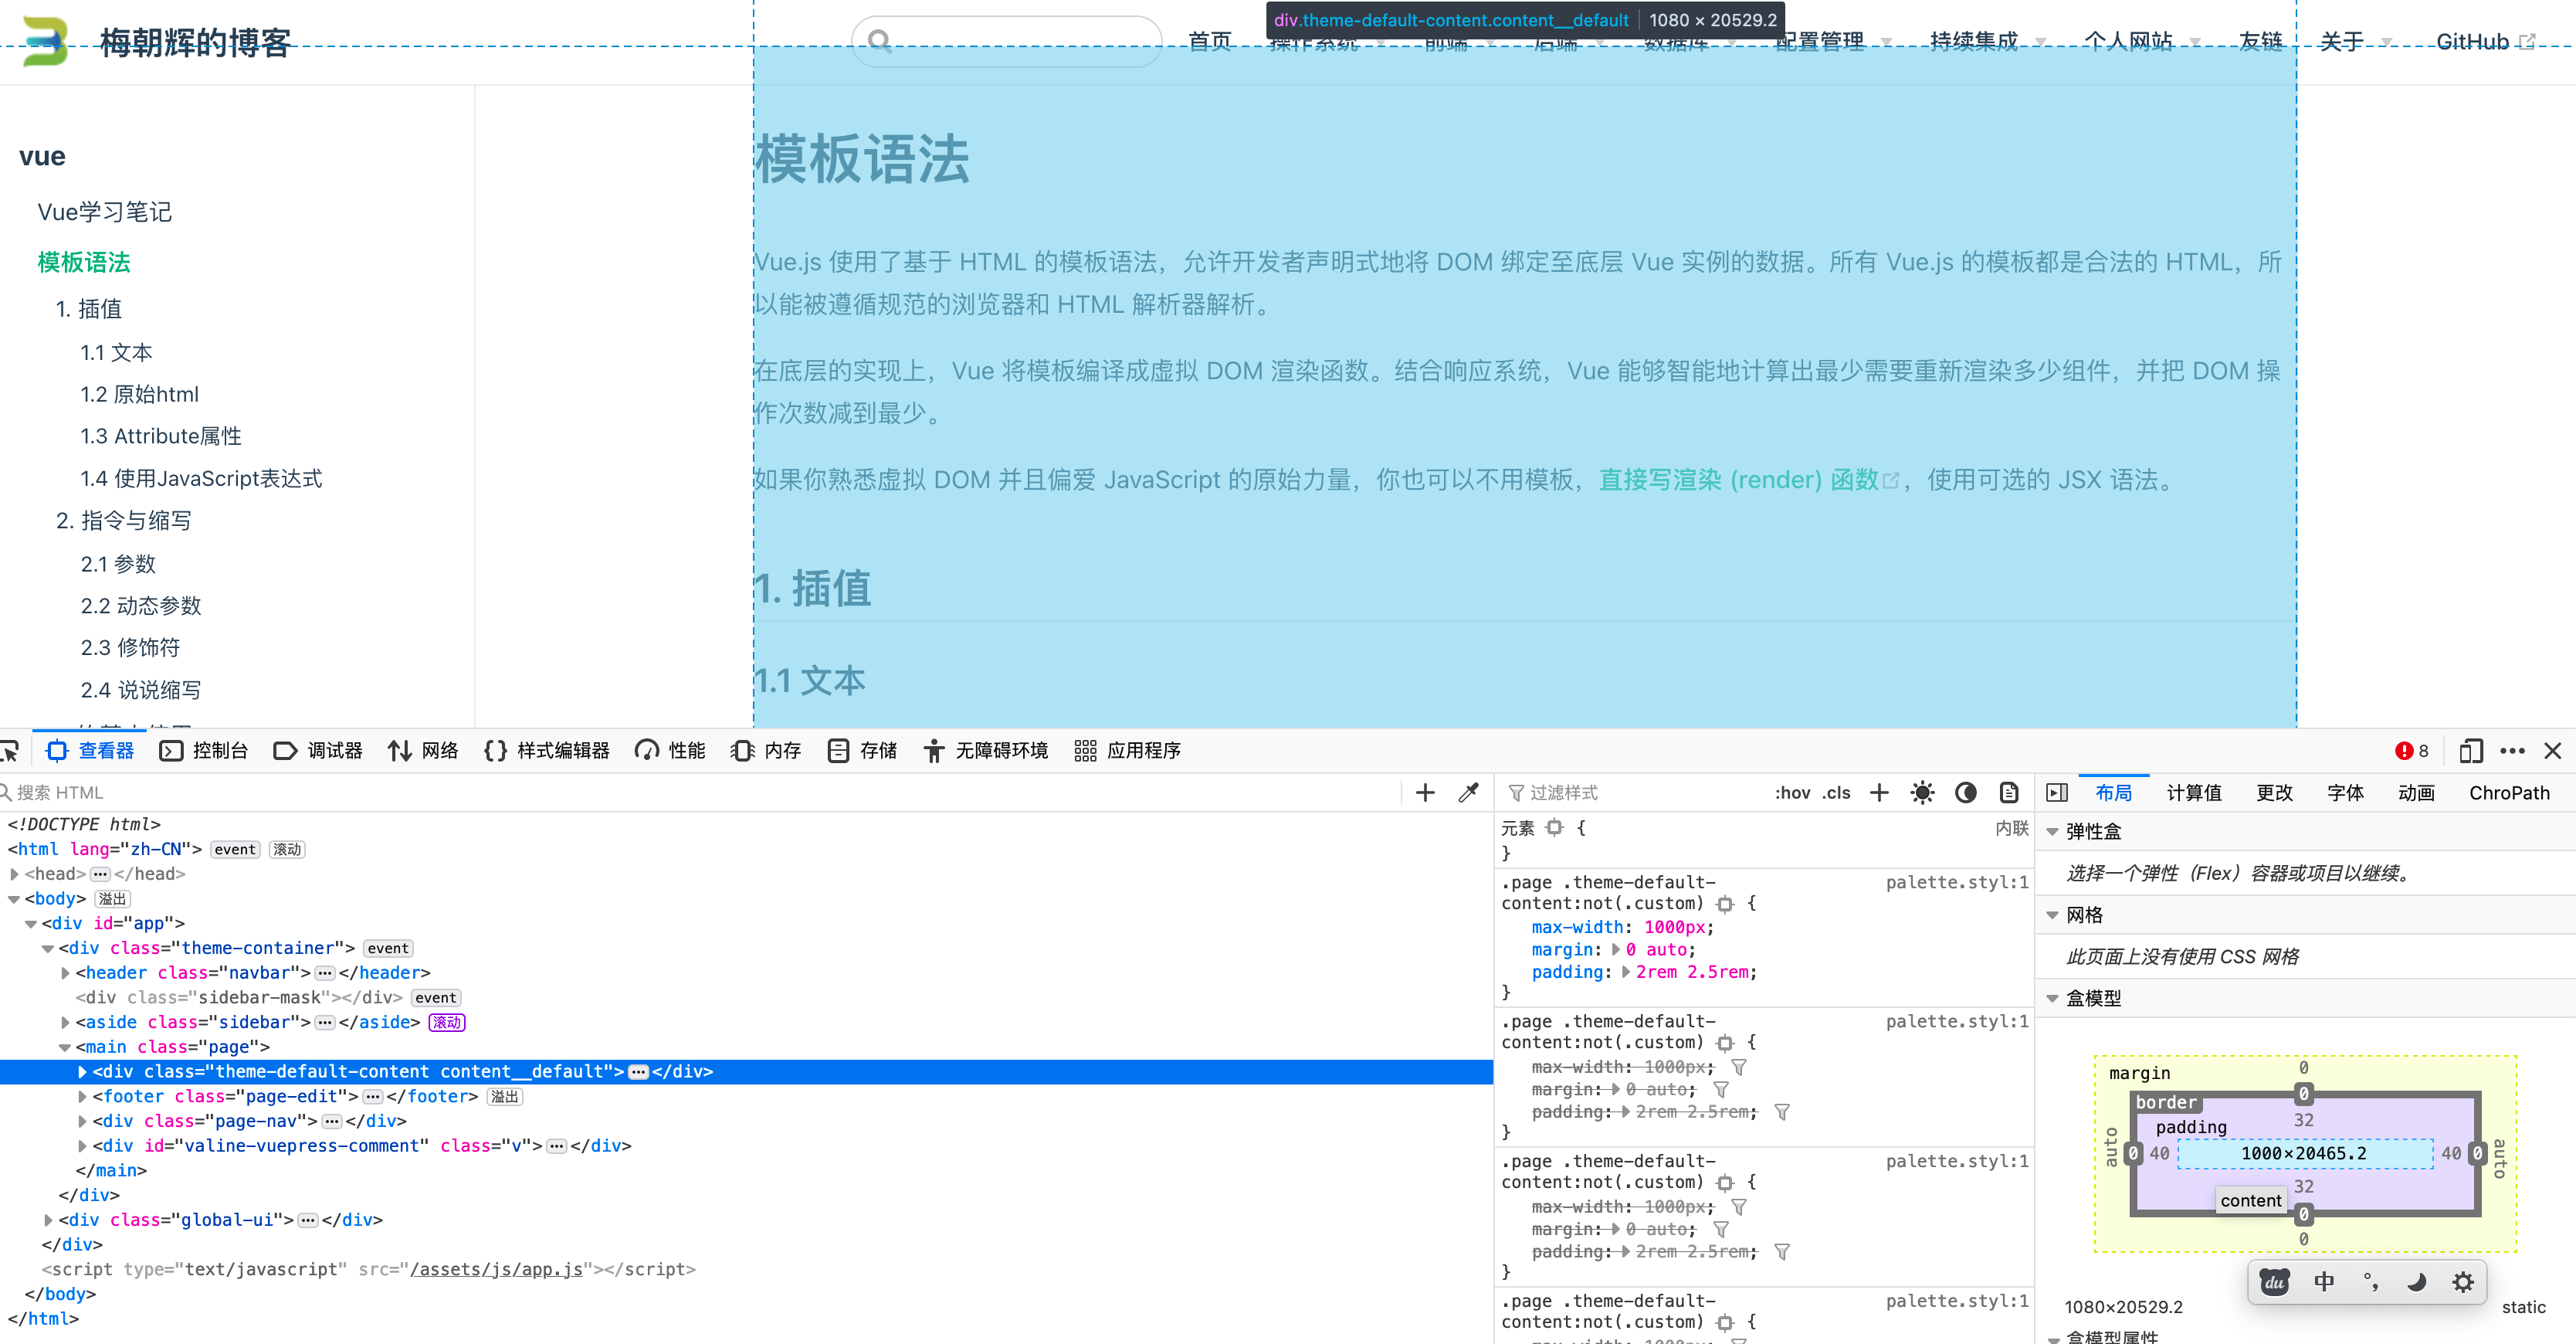
默认样式中,文章主体宽度最大宽度是740px,主体左侧和右侧有两个大空白区域。我们可以调整一下最大宽度值。
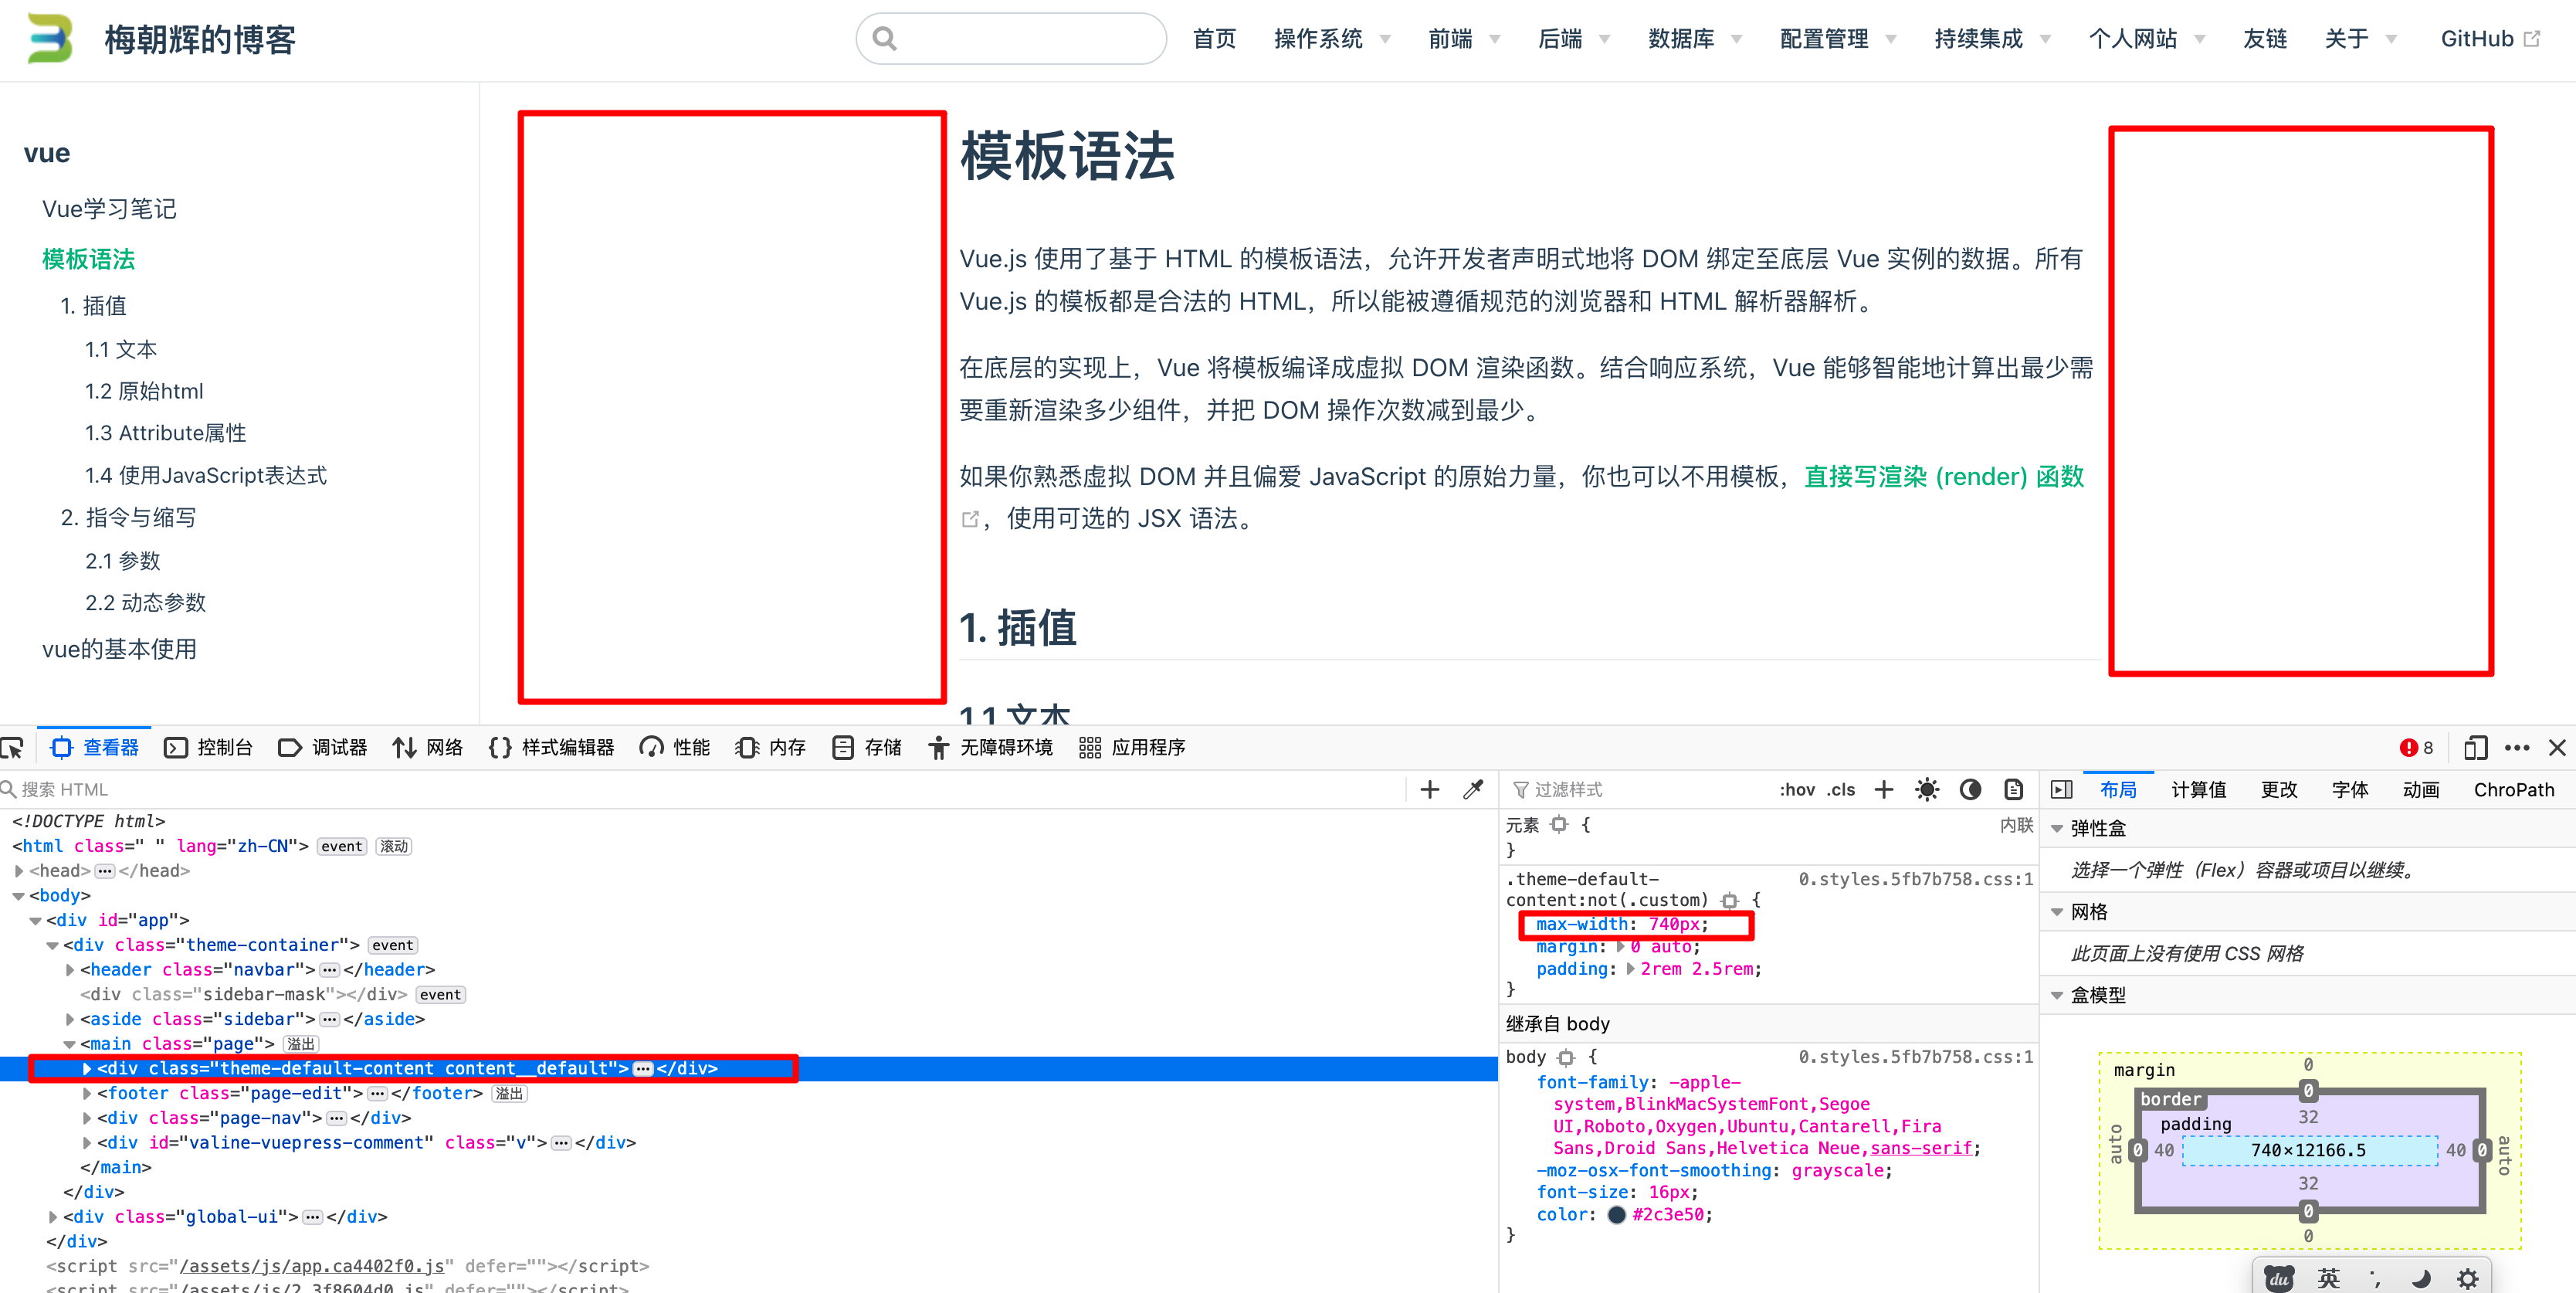
在.vuepress目录下新建styles文件夹,并在styles文件夹下创建palette.styl文件,并在该文件中增加以下内容:
.page .theme-default-content:not(.custom) {
    max-width: 1000px;
    margin: 0 auto;
    padding: 2rem 2.5rem;
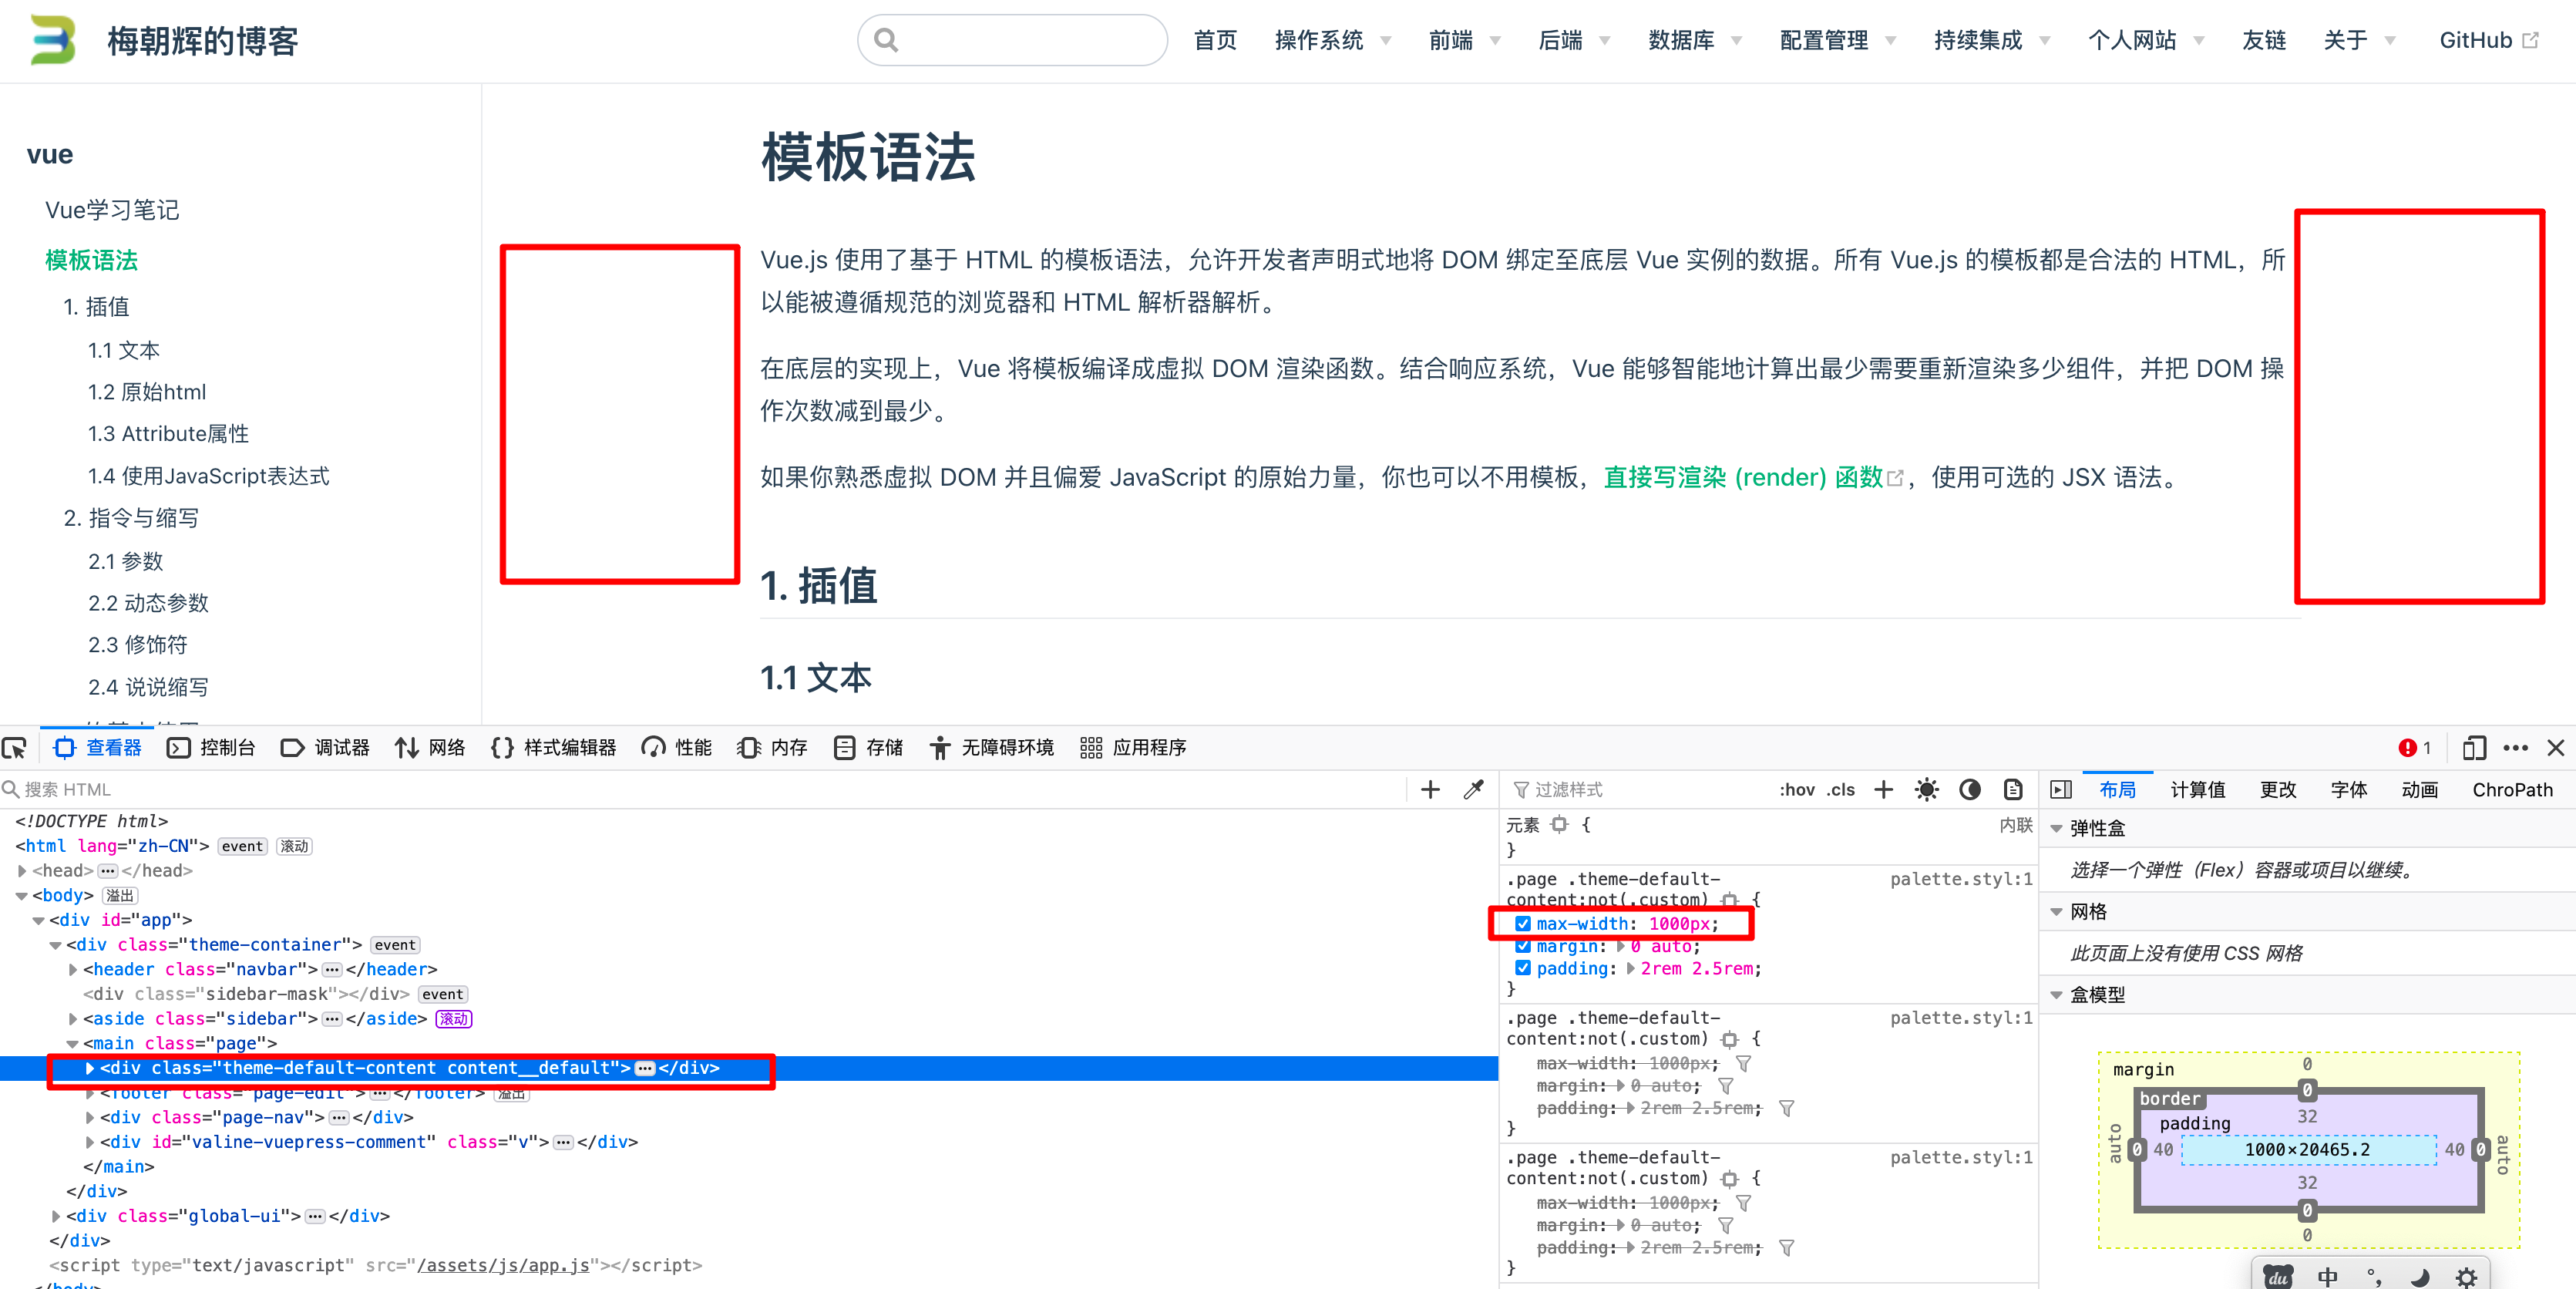
}然后重新运行项目,可以发现文章主体宽度已经发生变化。
修改后:
修改代码块样式
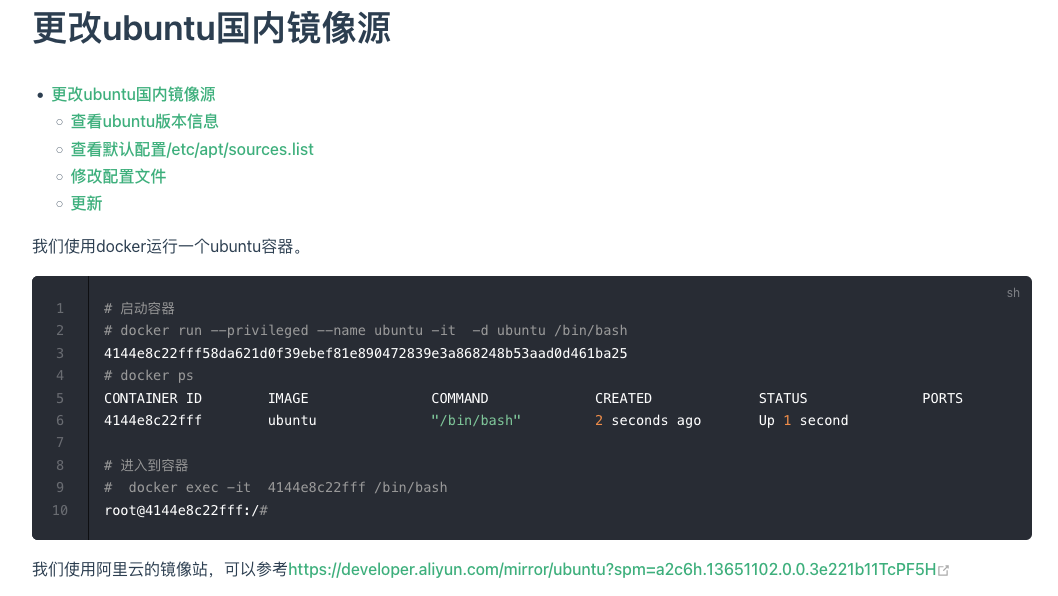
主要修改以下几点:
- 注释绿色高亮显示。
- 行号黄色显示。
以更改ubuntu国内镜像源代码为例,修改前,代码中的备注信息显示如下:
修改后显示如下:
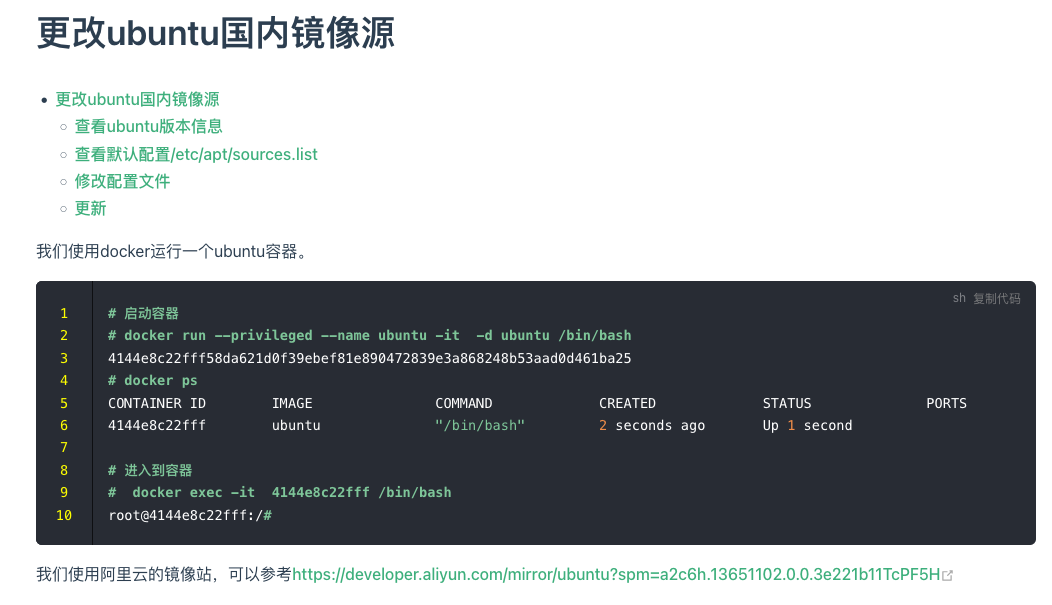
可以看到,备注信息已经从浅白色变成了高亮的绿色,行号也从浅白色变成了黄色啦。
修改方法,针对需要修改的元素,直接在浏览器中定位对应的位置的样式,然后进行修改测试,满足要求后,将对应的样式复制到docs/.vuepress/styles/palette.styl文件中。
本次修改新增内容如下:
.token.comment, .token.block-comment, .token.prolog, .token.doctype, .token.cdata {
    color: #7ec699;
    font-weight: bolder;
}

code, kbd, .line-number {
    font-family: source-code-pro, Menlo, Monaco, Consolas, "Courier New", monospace;
    color: yellow;
}参考:
- 基于vuepress的个人博客搭建完全教程
- VuePress从零开始搭建自己专属博客
- markdown-it-emoji
- Vuepress使用Valine搭建带有评论系统的博客
- Finen's Blog
- VuePress指南
- 試毅-思伟_技术笔记
- 飞跃高山与大洋的鱼 视频教程 一步步搭建 VuePress 及优化
- 一步步搭建 VuePress 及优化
- Vuepress Plugin Auto Sidebar
- 飞跃高山与大洋的鱼的博客
- vuepress自动生成侧边栏
- 前端进阶积累
- Zhu Zhaohua的博客搭建过程
- 管鲍切思世所稀的博客
- 程序员你为什么这么累?
- 在VuePress中使用Valine
- 从今天开始,拿起VuePress打造属于自己的专属博客
- 导航栏 Logo
- Git repository and Edit Links
- 多个域名通过nginx共用一个端口