VitePress从零开始搭建自己的博客 基础配置
0. 为什么要使用VitePress搭建博客
主要有以下两个原因:
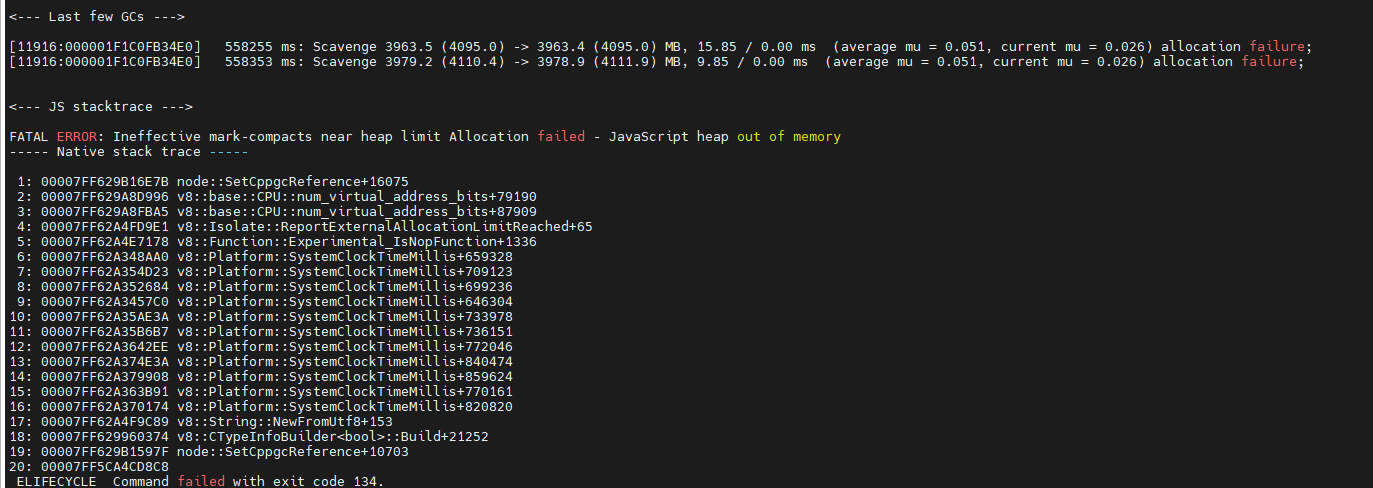
- 随着我博客文章越来越多后,使用vuepress本地编译时非常慢,经常编译的时候会出现
JavaScript heap out of memory异常,导致本地查看博客效果时,非常的折腾。 - 服务端端会定时检查博客是否有更新,有更新就会自动编译,但编译时也会出现
JavaScript heap out of memory异常,博客就不能第一时间显示在网站上,需要我手动去重新执行脚本编译。
内存泄露的问题仍然存在!!
VitePress是什么?
参考: vitePress快速搭建及部署一个博客
什么是 VitePress?
VitePress 是 VuePress 的小弟弟,但是vitepress是在 Vite 上构建的。
动机
主要是因为太慢!但是不怪 VuePress,怪 Webpack!
Vite 则非常好的解决了问题:
1.几乎实时的服务启动
2.根据需要编译页面
3.非常轻量快速的 HMR(热模块重载)
另外,本身 VuePress 一些设计问题一直没有时间去修复,正好这次做个大重构。
改进的地方
1.利用了 Vue 3 的改进的模板静态分析来尽可能字符串化静态内容
2.静态内容以字符串模式而不是渲染函数代码发送,JS 负载更便宜,注水(SSR 时生成 js 交互逻辑代码)也更快
3.这些优化仍然允许在 markdown 中混合使用 Vue 组件,编译器会帮你处理静态/动态分离工作
4.使用了 Vite
5.更快的 dev 服务器启动
6.更快的热更新
7.更快的构建(使用 Rollup)
更轻量的页面
Vue 3 + Rollup 代码分离 不会把所有页面的元数据都在一个请求中发送出去。客户端导航时再一起获得新页面的组件及元数据
其他不同点
1.VitePress 更武断且更少的配置。VitePress目标是缩减掉当前 VuePress 的复杂性并从其极简主义的根源重新开始
2.VitePress 是面向未来的:其目标浏览器是只支持原生 ES 模块导入的浏览器。其鼓励使用原始的 JavaScript 而不用转义以及使用 CSS 变量来主题化
而官方文档 什么是VitePress? 是这么说的:
开发者体验
VitePress 旨在在处理 Markdown 内容时提供出色的开发者体验 (DX)。
- 基于 Vite 引擎: VitePress实现了即时的服务器启动,对编辑的更改始终在瞬间反映出来(<100毫秒),无需重新加载页面。
- 内置Markdown扩展: VitePress提供了许多高级功能,包括Frontmatter(前置元数据)、表格、语法高亮等等,几乎所有你能想到的功能它都有。特别是在处理代码块方面,VitePress提供了许多高级功能,使其非常适合编写高度技术性的文档。
- 增强型Vue Markdown: 由于Vue模板与HTML具有100%的语法兼容性,因此每个Markdown页面也是一个Vue单文件组件(Single-File Component)SFC。您可以使用Vue模板的特性或导入的Vue组件,在静态内容中嵌入交互性。这意味着您可以在Markdown页面中使用Vue模板的语法和功能来实现交互效果。
性能
与许多传统的SSG不同,VitePress生成的网站实际上是一个单页应用程序 (SPA)。
快速初始加载
对于任何页面的初始访问,将提供静态的预渲染HTML,以实现极快的加载速度和最佳的SEO效果。然后,页面会加载一个JavaScript捆绑包,将页面转换为Vue单页面应用程序(SPA)进行"水合"(hydration)过程。水合过程非常快速:在PageSpeed Insights上,即使在低端移动设备上使用缓慢的网络,典型的VitePress站点也能获得接近完美的性能分数。
快速加载后导航
更重要的是,SPA模型在初始加载之后为用户提供了更好的用户体验。在站点内进行后续导航将不再导致完整的页面重新加载。相反,将获取并动态更新进入页面的内容。VitePress还会自动预取视口内链接的页面块。在大多数情况下,加载后的导航将感觉瞬间完成。
无损交互性
为了能够对静态Markdown中嵌入的动态Vue部分进行水合(hydration),每个Markdown页面都会被处理为一个Vue组件并编译为JavaScript。这听起来可能效率低下,但是Vue编译器足够智能,能够将静态部分和动态部分分离,从而将水合成本和负载大小都最小化。对于初始页面加载,静态部分会自动从JavaScript负载中删除,并在水合过程中跳过。
说起来高大上,我们实际体验一把。
1. 安装依赖
先决条件
我直接去 https://nodejs.org/en 这里面下载,可以看到当前20.11.0是长期支持版,下载后安装到D:\ProgramFiles\nodejs目录,并将目录加入到Path环境变量。
1.1 安装nodejs
打开终端,查看版本信息:
 1
 2
 3
 4
 5
 6
 7
 8
 9
10
11
12
13
| ## 查看nodejs版本信息
$ node --version
v20.11.0
## 查看npm版本信息
$ npm --version
10.2.4
## 查看命令所在路径
$ where node npm
D:\ProgramFiles\nodejs\node.exe
D:\ProgramFiles\nodejs\npm
D:\ProgramFiles\nodejs\npm.cmd
|
1.2 安装pnpm包管理工具
可参考https://pnpm.io/zh/installation
安装方法:
安装:
1
2
3
4
5
6
7
8
9
| ## 安装pnpm
$ npm install -g pnpm
added 1 package in 2s
## 查看pnpm版本信息
$ pnpm --version
8.15.1
|
在家目录下创建文件.pnpmrc,其内容如下:
1
2
3
| auto-install-peers=true
registry=https://registry.npmmirror.com
|
1.3 安装vitepress和vue
安装依赖:
 1
 2
 3
 4
 5
 6
 7
 8
 9
10
11
12
13
14
15
16
17
18
19
20
21
| $ pnpm add -D vitepress vue
Progress: resolved 1, reused 0, downloaded 0, added 0
Progress: resolved 31, reused 0, downloaded 19, added 0
Progress: resolved 109, reused 0, downloaded 59, added 0
Packages: +81
++++++++++++++++++++++++++++++++++++++++++++++++++++++++++++++++++++++++++++++++
Progress: resolved 116, reused 0, downloaded 79, added 41
Progress: resolved 116, reused 0, downloaded 80, added 76
Progress: resolved 116, reused 0, downloaded 81, added 81, done
.../node_modules/vue-demi postinstall$ node -e "try{require('./scripts/postinstall.js')}catch(e){}"
.../node_modules/vue-demi postinstall: Done
.../esbuild@0.19.12/node_modules/esbuild postinstall$ node install.js
.../esbuild@0.19.12/node_modules/esbuild postinstall: Done
devDependencies:
+ vitepress 1.0.0-rc.41
+ vue 3.4.15
Done in 6.2s
$
|
可以看到安装成功。
查看安装的包的版本信息:
1
2
3
4
5
6
7
8
| $ pnpm list
Legend: production dependency, optional only, dev only
devDependencies:
vitepress 1.0.0-rc.41
vue 3.4.15
$
|
2. 创建博客项目
参考 vitepress入门
创建项目目录:
 1
 2
 3
 4
 5
 6
 7
 8
 9
10
11
12
13
14
15
16
17
18
| ## 切换到E盘下的data目录下
$ cd E:\data
## 查看当前路径,/drives/e/ 就表示E盘
$ pwd
/drives/e/data
## 创建博客目录viteblog
$ mkdir viteblog
## 切换到博客目录
$ cd viteblog/
## 查看当前路径
$ pwd
/drives/e/data/viteblog
$
|
运行设置向导命令:
1
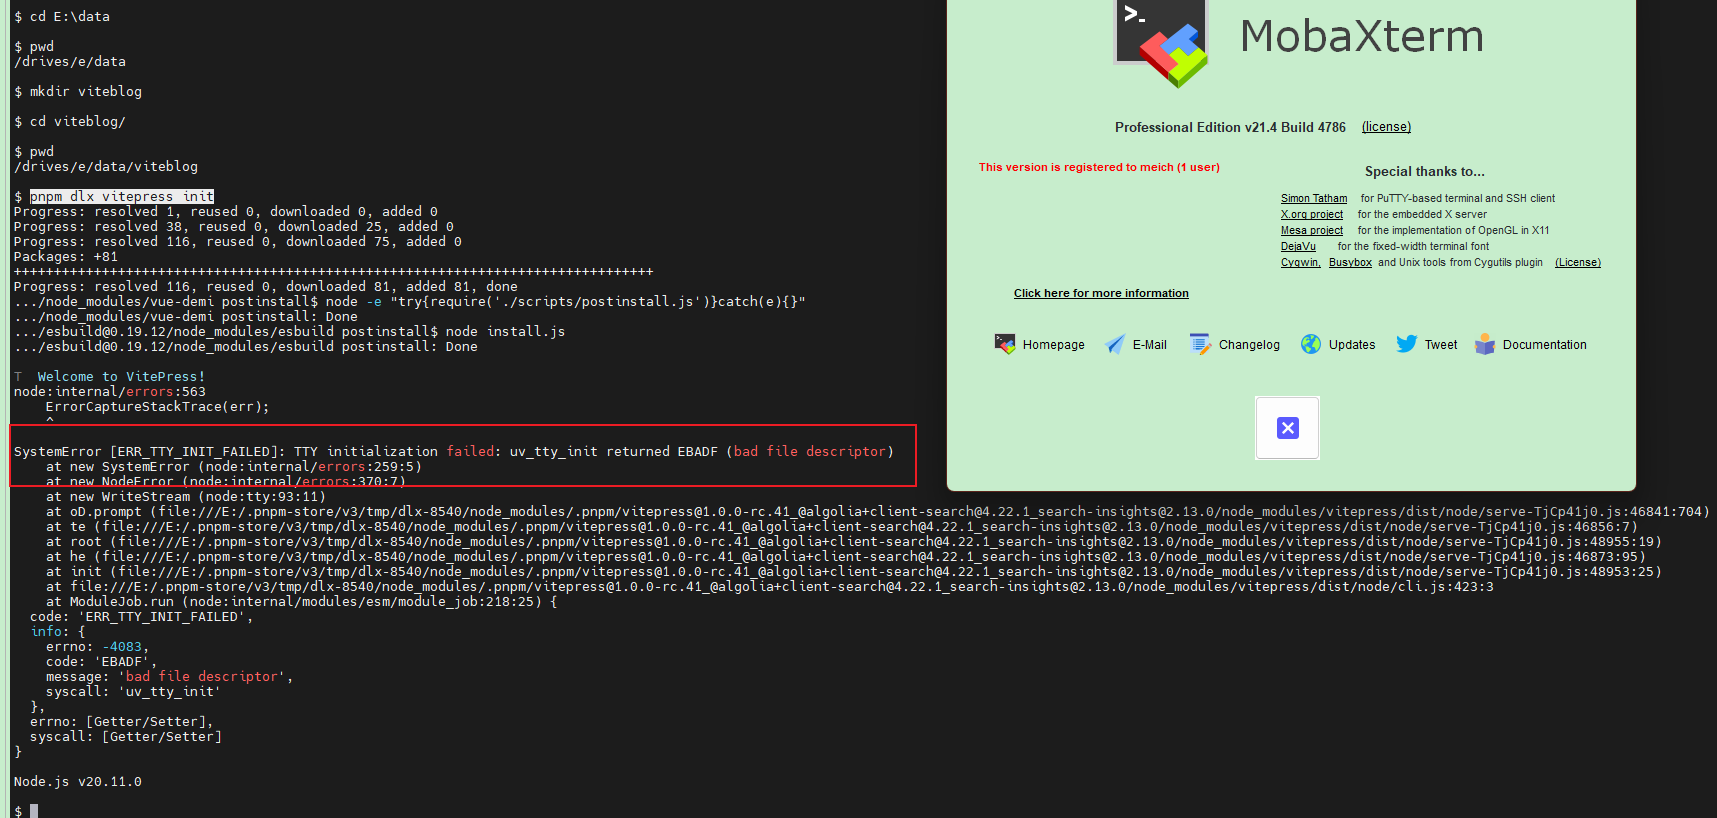
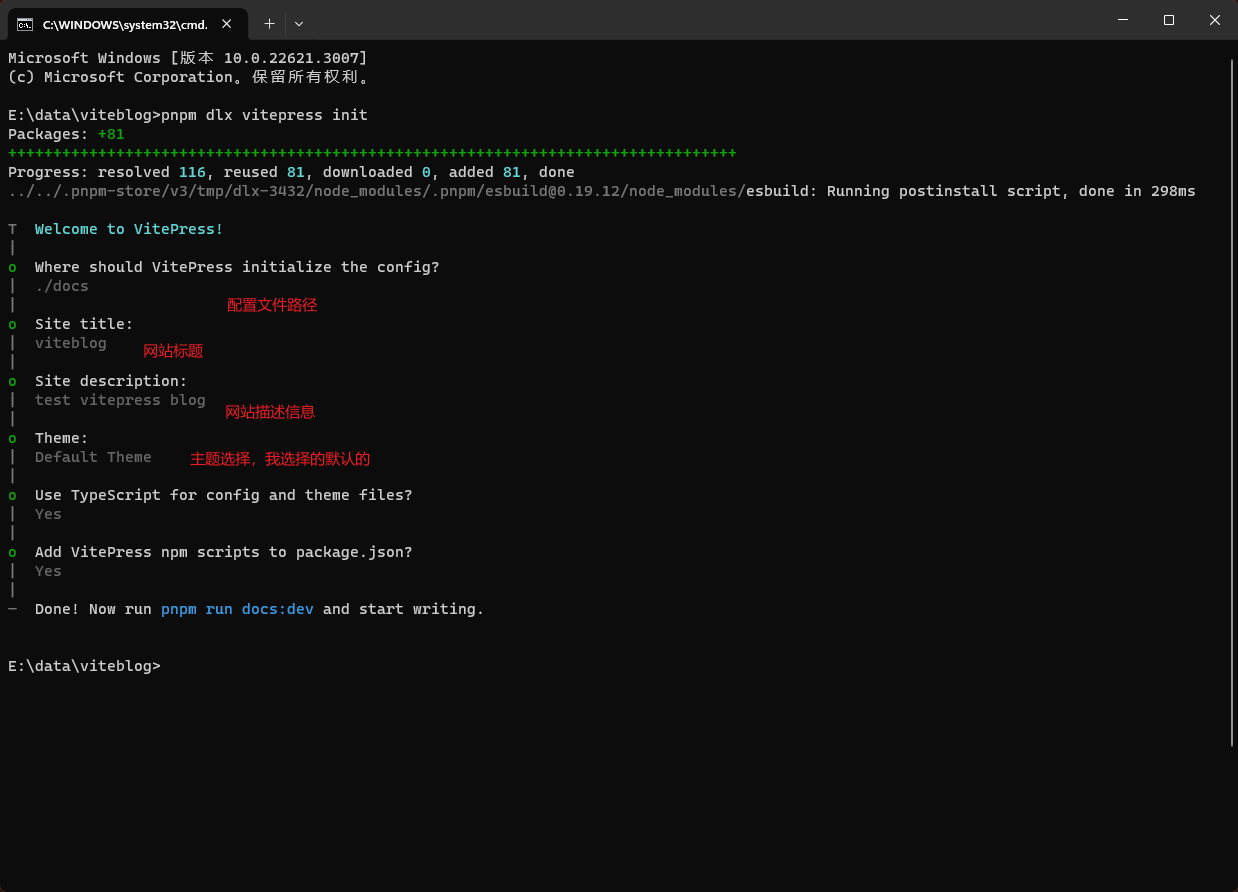
| pnpm dlx vitepress init
|
注意,此处不要直接在MobaXterm命令行执行,执行会报异常,需要在windows cmd窗口执行。
在cmd窗口执行:
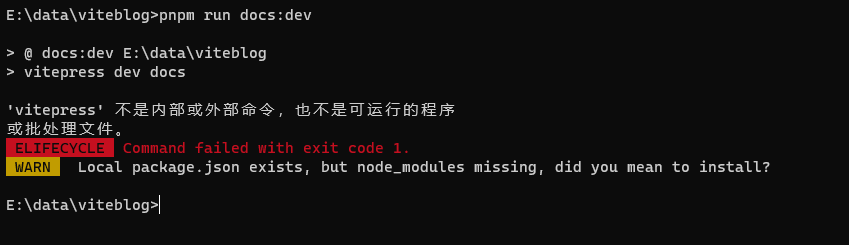
按提示运行命令pnpm run docs:dev,发现报错:
将家目录下的node_modules\.bin目录加到环境变量Path中,如我的是C:\Users\mch\node_modules\.bin。
加入后,再打开命令行窗口,执行命令pnpm run docs:dev,还是报错:
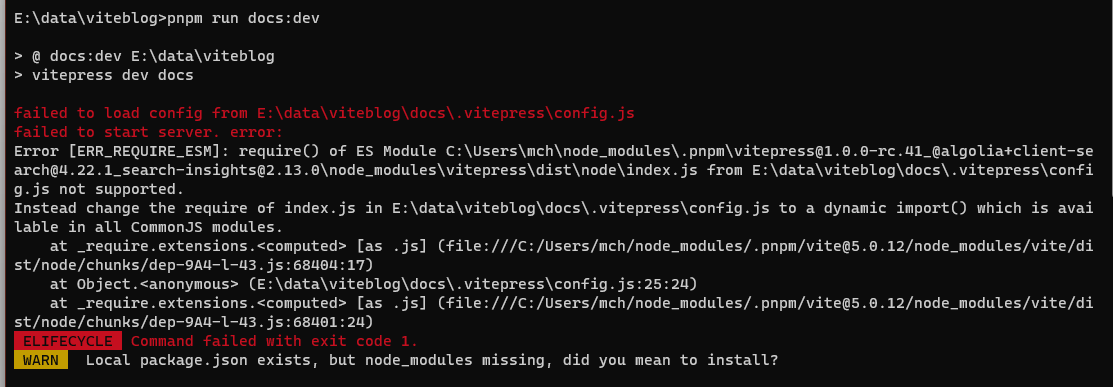
大意是没有配置文件。
docs/.vitepress 目录下默认有一个config.mts文件,我们复制一份为config.js,并修改其内容为如下:
 1
 2
 3
 4
 5
 6
 7
 8
 9
10
11
12
13
14
15
16
17
18
19
20
21
22
23
24
25
26
| // https://vitepress.dev/reference/site-config
export default {
title: "viteblog",
description: "test vitepress blog",
themeConfig: {
// https://vitepress.dev/reference/default-theme-config
nav: [
{ text: 'Home', link: '/' },
{ text: 'Examples', link: '/markdown-examples' }
],
sidebar: [
{
text: 'Examples',
items: [
{ text: 'Markdown Examples', link: '/markdown-examples' },
{ text: 'Runtime API Examples', link: '/api-examples' }
]
}
],
socialLinks: [
{ icon: 'github', link: 'https://github.com/vuejs/vitepress' }
]
}
}
|
再执行命令pnpm run docs:dev,没报错了:
 1
 2
 3
 4
 5
 6
 7
 8
 9
10
11
12
13
| E:\data\viteblog>pnpm run docs:dev
> @ docs:dev E:\data\viteblog
> vitepress dev docs
Failed to resolve dependency: vitepress > @vue/devtools-api, present in 'optimizeDeps.include'
Failed to resolve dependency: vitepress > @vueuse/core, present in 'optimizeDeps.include'
vitepress v1.0.0-rc.41
➜ Local: http://localhost:5173/
➜ Network: use --host to expose
➜ press h to show help
|
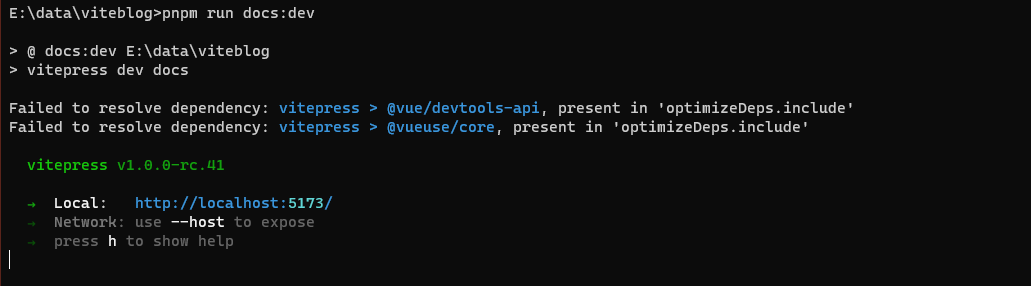
访问页面 http://localhost:5173/
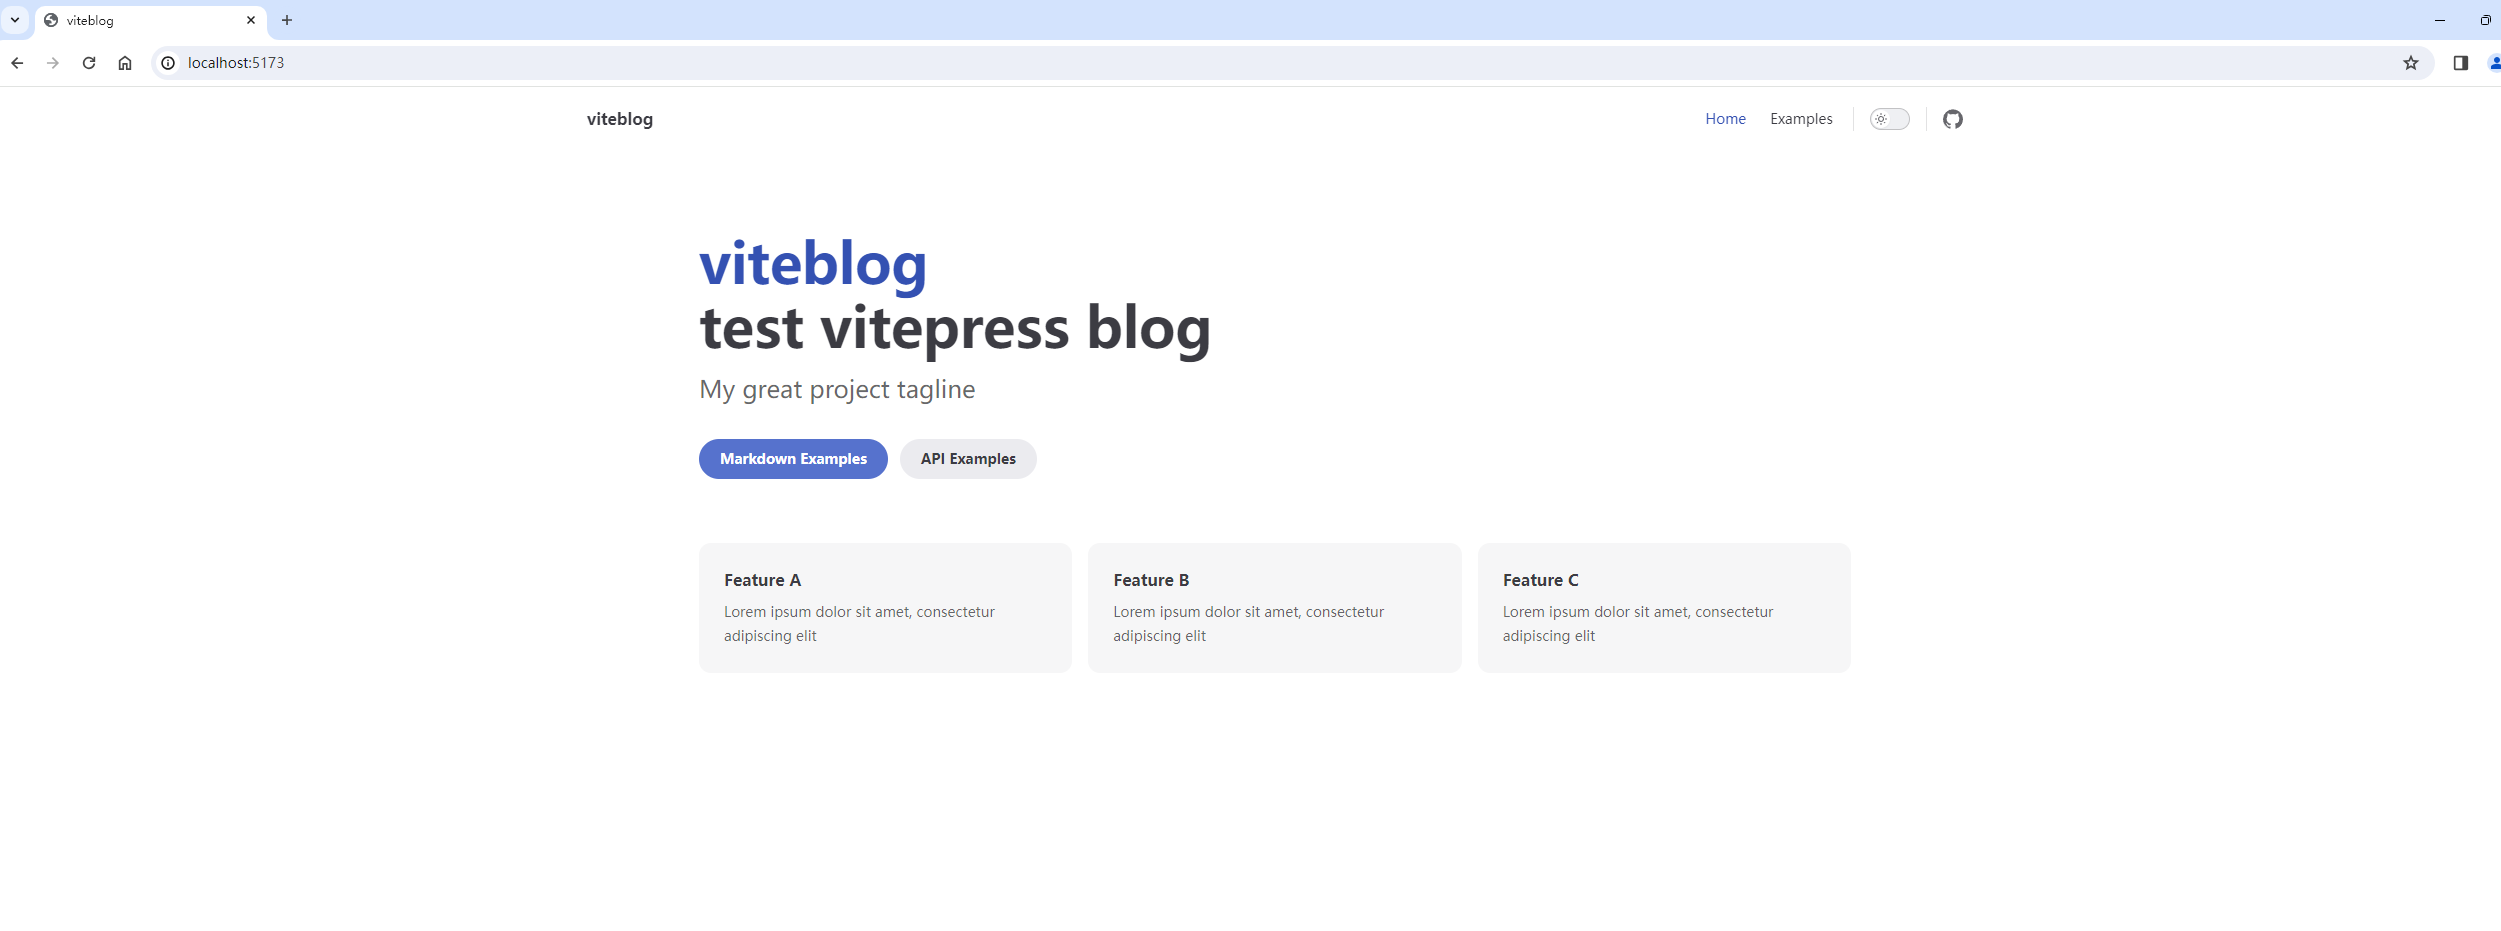
可以看到,可以正常打开!说明初始化网站正常了!
3. 网站优化
3.1 修改博客运行端口号
默认情况下,执行命令pnpm run docs:dev后会监听5173端口来运行博客程序。为了我们在浏览器中直接输入localhost就能打开博客,我修改一下博客的配置文件package.json,在vitepress dev docs后面增加内容 --port=80,然后查看配置文件信息:
1
2
3
4
5
6
7
8
9
| $ cat package.json
{
"scripts": {
"docs:dev": "vitepress dev docs --port=80",
"docs:build": "vitepress build docs",
"docs:preview": "vitepress preview docs"
}
}
$
|
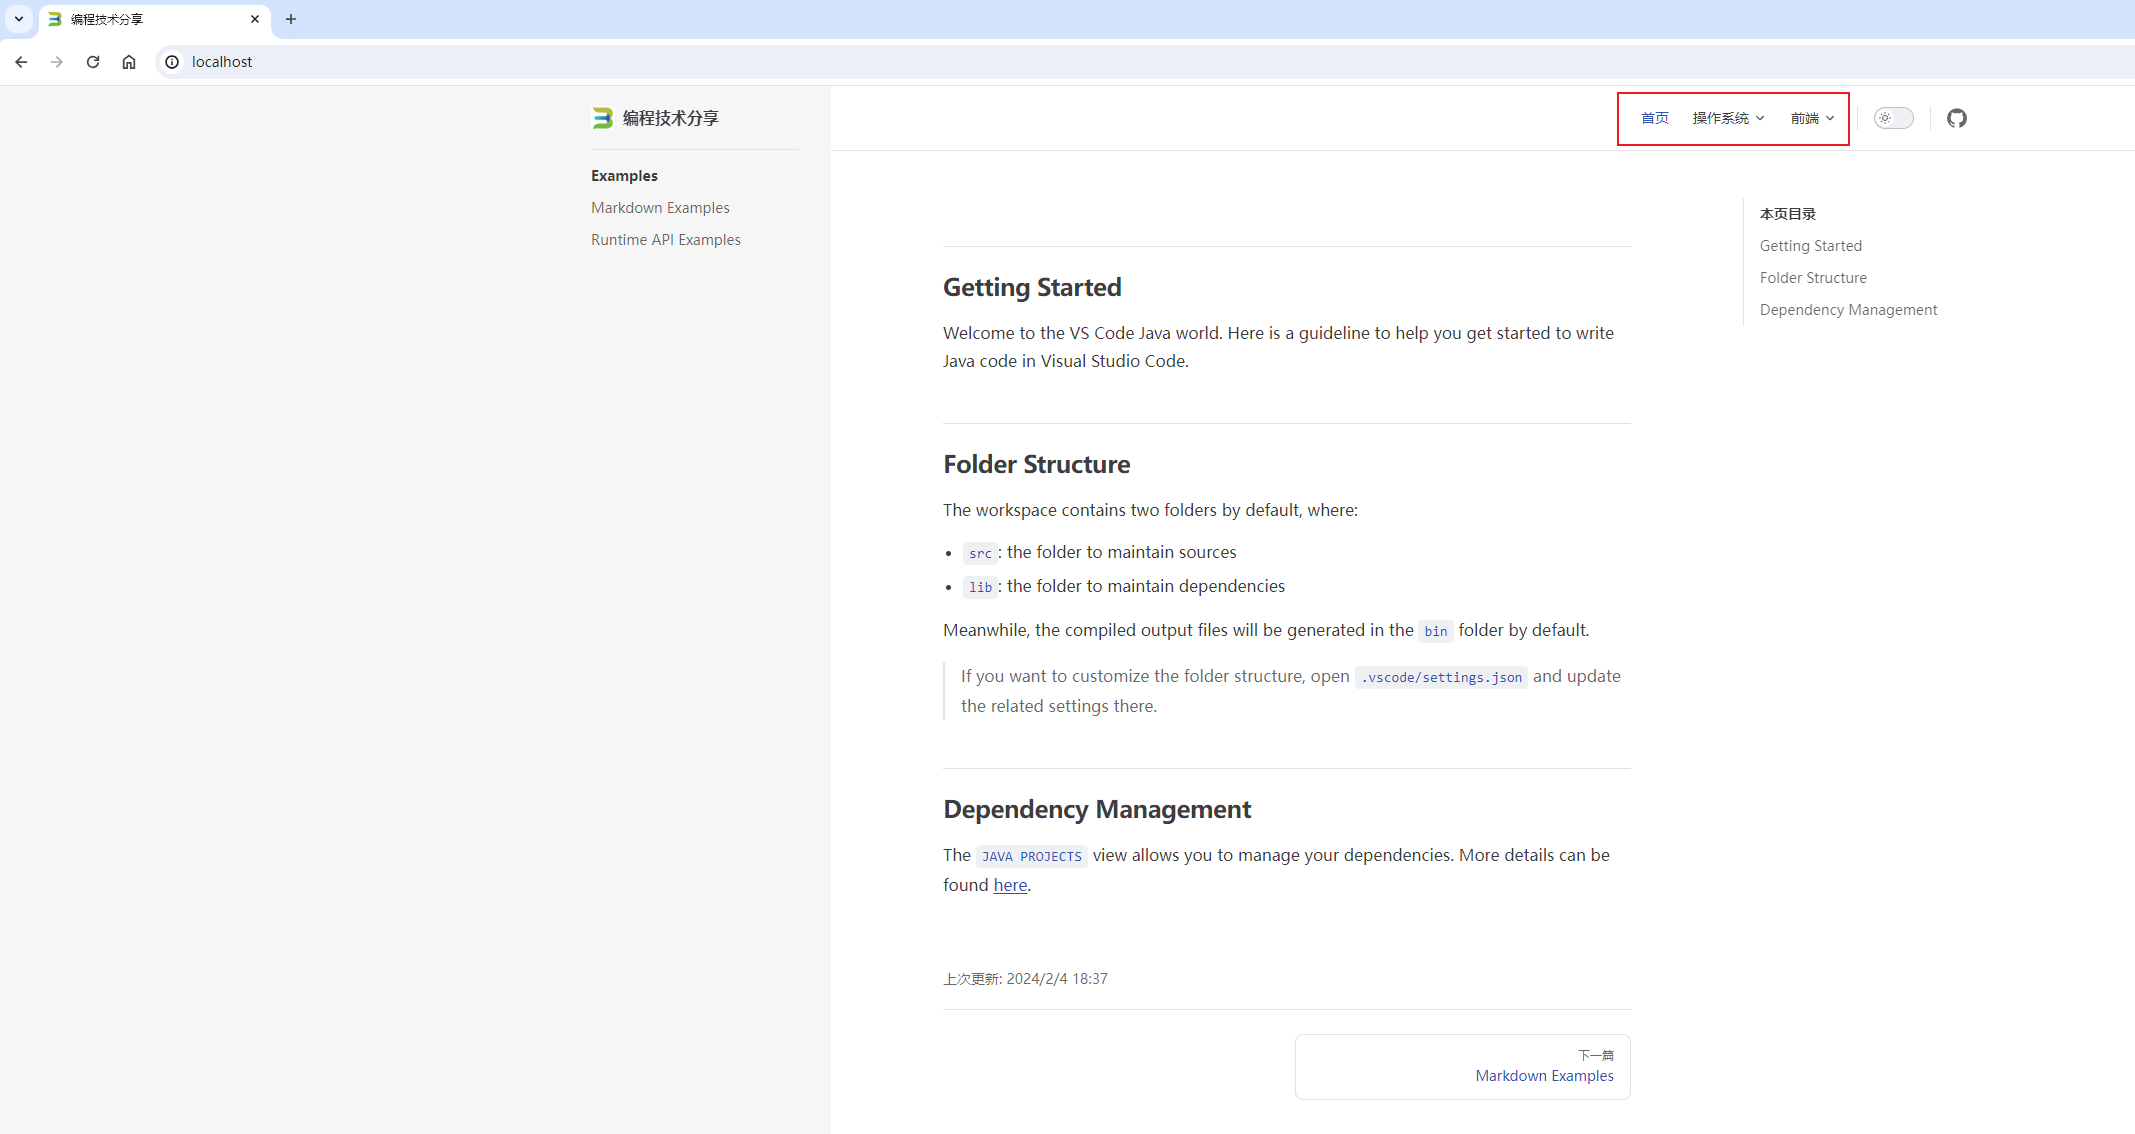
此时,浏览器打开localhost,就可以直接打开博客了:
3.2 优化导航栏
随着博客文章越来越多,导航栏越来越多时,将导航栏配置都放在config.js文件中,会使该文件变得非常大。我们应将其拆分出来单独放一个文件中,也方便后期新增其他的导航信息。
不拆分前,config.js中关于导航栏的配置如下:
 1
 2
 3
 4
 5
 6
 7
 8
 9
10
11
12
13
14
15
16
17
18
19
20
21
22
23
24
25
26
27
28
29
30
31
32
33
34
35
36
37
38
39
40
41
42
43
44
45
46
| /* 主题配置 */
themeConfig: {
i18nRouting: false,
logo: '/favicon.ico',
// https://vitepress.dev/reference/default-theme-config
nav: [{
text: '首页',
link: '/'
},
{
text: '操作系统',
items: [{
text: 'CentOS',
link: '/OS/Centos/'
},
{
text: 'Ubuntu',
link: '/OS/Ubuntu/'
},
{
text: 'MacOS',
link: '/OS/MacOS/'
},
{
text: 'Windows',
link: '/OS/Windows/'
},
{
text: 'Cobbler',
link: '/OS/Cobbler/'
},
{
text: 'Rocky Linux',
link: '/OS/RockyLinux/'
}
]
},
{
text: '前端',
items: [{
text: 'Vue',
link: '/frontend/vue/'
}
]
}
]
|
会非常的长,在.vitepress/目录下创建配置文件夹configs,并在configs目录下创建navConfig.js文件,其内容如下:
 1
 2
 3
 4
 5
 6
 7
 8
 9
10
11
12
13
14
15
16
17
18
19
20
21
22
23
24
25
26
27
28
29
30
31
32
33
34
35
36
37
38
39
40
41
42
43
44
45
| module.exports = [{
text: '首页',
link: '/'
},
{
text: '操作系统',
items: [{
text: 'CentOS',
link: '/OS/Centos/'
},
{
text: 'Ubuntu',
link: '/OS/Ubuntu/'
},
{
text: 'MacOS',
link: '/OS/MacOS/'
},
{
text: 'Windows',
link: '/OS/Windows/'
},
{
text: 'Cobbler',
link: '/OS/Cobbler/'
},
{
text: 'Rocky Linux',
link: '/OS/RockyLinux/'
}
]
},
{
text: '前端',
items: [{
text: 'Vue',
link: '/frontend/vue/'
},
{
text: 'Javascript',
link: '/frontend/js/'
}
]
}
]
|
然后,修改config.js配置文件:
 1
 2
 3
 4
 5
 6
 7
 8
 9
10
11
12
13
14
15
16
17
18
19
20
21
22
23
24
25
26
27
28
29
30
31
32
33
34
35
36
37
38
39
40
41
42
43
44
45
46
47
48
49
50
51
52
53
54
55
56
57
58
59
60
61
62
63
64
65
66
67
68
69
70
71
72
73
| // 将导航栏单独拆分成一个配置文件
const navConf = require('./configs/navConfig.js');
// https://vitepress.dev/reference/site-config
export default {
// 打包输出目录
outDir: '../dist',
// 站点语言标题等
lang: 'zh-CN',
title: '编程技术分享',
description: '阿梅的IT成长之路,记录操作系统、前后端等学习总结文档',
// 显示上次更新时间
lastUpdated: true,
// 为了和vuepress保持一致,不生成干净的URL
cleanUrls: false,
/* markdown 配置 */
markdown: {
// 开启markdown行数显示
lineNumbers: true
},
/* 主题配置 */
themeConfig: {
i18nRouting: false,
logo: '/favicon.ico',
// https://vitepress.dev/reference/default-theme-config
// 导航栏
nav: navConf,
// 侧边栏
sidebar: [{
text: 'Examples',
items: [{
text: 'Markdown Examples',
link: '/markdown-examples'
},
{
text: 'Runtime API Examples',
link: '/api-examples'
}
]
}],
// 社交链接
socialLinks: [{
icon: 'github',
link: 'https://github.com/meizhaohui/'
}],
/* 右侧大纲配置 */
outline: {
level: 'deep',
label: '本页目录'
},
footer: {
message: '如有转载或 CV 的请标注本站原文地址',
copyright: 'Copyright © 2019-2024 阿梅的博客'
},
darkModeSwitchLabel: '外观',
returnToTopLabel: '返回顶部',
lastUpdatedText: '上次更新',
/* Algolia DocSearch 配置 */
// algolia,
docFooter: {
prev: '上一篇',
next: '下一篇'
}
}
}
|
第2行的const navConf = require('./configs/navConfig.js'); 是我新增的,而nav: navConf,则是删除原来写到config.js中的导航栏信息后的配置信息。
这样导航栏就拆分出来了,效果图:
3.3 优化侧边栏
目前侧边栏还是模板里面自带的两个例子,不是我想要的结果。如将每个分类的目录都加到左侧的侧边栏。
在.vitepress/configs配置文件夹下,编写配置文件configs/sidebarConfig.js,我这里是一个示例:
 1
 2
 3
 4
 5
 6
 7
 8
 9
10
11
12
13
14
15
16
17
18
19
20
21
22
23
24
25
26
27
28
29
30
31
32
33
34
35
36
37
38
39
40
41
42
43
44
45
46
47
48
49
50
51
52
53
54
55
56
57
58
59
60
61
62
63
64
65
66
67
| // 侧边栏
module.exports = {
'/OS/': [
{
text: 'CentOS',
collapsed: true, // 是否可折叠,默认可折叠true
items: [
{ text: '学会使用命令帮助', link: '/OS/Centos/X_use_help' },
{ text: 'VIM编辑器的使用', link: '/OS/Centos/X_how_to_use_vim' },
{ text: 'Bash script中的通配符与正则表达式', link: '/OS/Centos/X_wildcard_regular_expression_in_bash_script' }
]
},
{
text: 'Ubuntu',
collapsed: true, // 是否可折叠,默认可折叠true
items: [
{ text: 'Ubuntu桌面初始化安装配置', link: '/OS/Ubuntu/ubuntu_init' },
{ text: '更改ubuntu国内镜像源', link: '/OS/Ubuntu/ubuntu_change_repo' },
{ text: 'Ubuntu防火墙设置', link: '/OS/Ubuntu/ubuntu_firewall' }
]
},
{
text: 'Windows',
collapsed: true, // 是否可折叠,默认可折叠true
items: [
{ text: 'windows批处理的使用', link: '/OS/Windows/cmd' }
]
},
{
text: 'RockyLinux',
collapsed: true, // 是否可折叠,默认可折叠true
items: [
{ text: 'RockyLinux docs', link: '/OS/RockyLinux/' }
]
},
{
text: 'MacOS',
link: '/OS/MacOS/'
},
{
text: 'Cobbler自动化系统',
link: '/OS/Cobbler/'
}
],
'/frontend/': [
{
text: 'Vue',
collapsed: true, // 是否可折叠,默认可折叠true
items: [
{ text: 'vue的基本使用', link: '/frontend/vue/vue_basic_use' },
{ text: '模板语法', link: '/frontend/vue/syntax' },
{ text: '计算属性与侦听器', link: '/frontend/vue/computed_watch' },
{ text: 'Vue-Multiselect下拉框强化插件的使用', link: '/frontend/vue/use_Vue-Multiselect' },
{ text: '动态绑定class或style样式', link: '/frontend/vue/class_style' },
{ text: 'v-if与v-show条件渲染', link: '/frontend/vue/v-if_v_show' },
{ text: 'v-for循环列表', link: '/frontend/vue/v-for' },
{ text: '事件处理', link: '/frontend/vue/events' },
{ text: '表单输入绑定', link: '/frontend/vue/forms' },
{ text: '组件基础', link: '/frontend/vue/components' }
]
},
{
text: 'JavaScript',
link: '/frontend/js/'
},
]
}
|
你可以根据个人需要再加别的。
config.js中再进行修改:
 1
 2
 3
 4
 5
 6
 7
 8
 9
10
11
12
13
14
15
16
17
18
19
20
21
22
23
24
25
26
27
28
29
30
31
32
33
34
35
36
37
38
39
40
41
42
43
44
45
46
47
48
49
50
51
52
53
54
55
56
57
58
59
60
61
62
63
64
65
66
| // 将导航栏单独拆分成一个配置文件
const navConf = require('./configs/navConfig.js');
// 将侧边栏单独拆分成一个配置文件
const sidebarConf = require('./configs/sidebarConfig.js');
// https://vitepress.dev/reference/site-config
export default {
// 打包输出目录
outDir: '../dist',
base: process.env.APP_BASE_PATH || '/',
// 站点语言标题等
lang: 'zh-CN',
title: '编程技术分享',
description: '阿梅的IT成长之路,记录操作系统、前后端等学习总结文档',
// 显示上次更新时间
lastUpdated: true,
// 为了和vuepress保持一致,不生成干净的URL
cleanUrls: false,
/* markdown 配置 */
markdown: {
// 开启markdown行数显示
lineNumbers: true
},
/* 主题配置 */
themeConfig: {
i18nRouting: false,
logo: '/favicon.ico',
// https://vitepress.dev/reference/default-theme-config
// 导航栏
nav: navConf,
// 侧边栏
sidebar: sidebarConf,
// 社交链接
socialLinks: [{
icon: 'github',
link: 'https://github.com/meizhaohui/'
}],
/* 右侧大纲配置 */
outline: {
level: 'deep',
label: '本页目录'
},
footer: {
message: '如有转载或 CV 的请标注本站原文地址',
copyright: 'Copyright © 2019-2024 阿梅的博客'
},
darkModeSwitchLabel: '外观',
returnToTopLabel: '返回顶部',
lastUpdatedText: '上次更新',
/* Algolia DocSearch 配置 */
// algolia,
docFooter: {
prev: '上一篇',
next: '下一篇'
}
}
}
|
这样就可以正常显示侧边栏了。
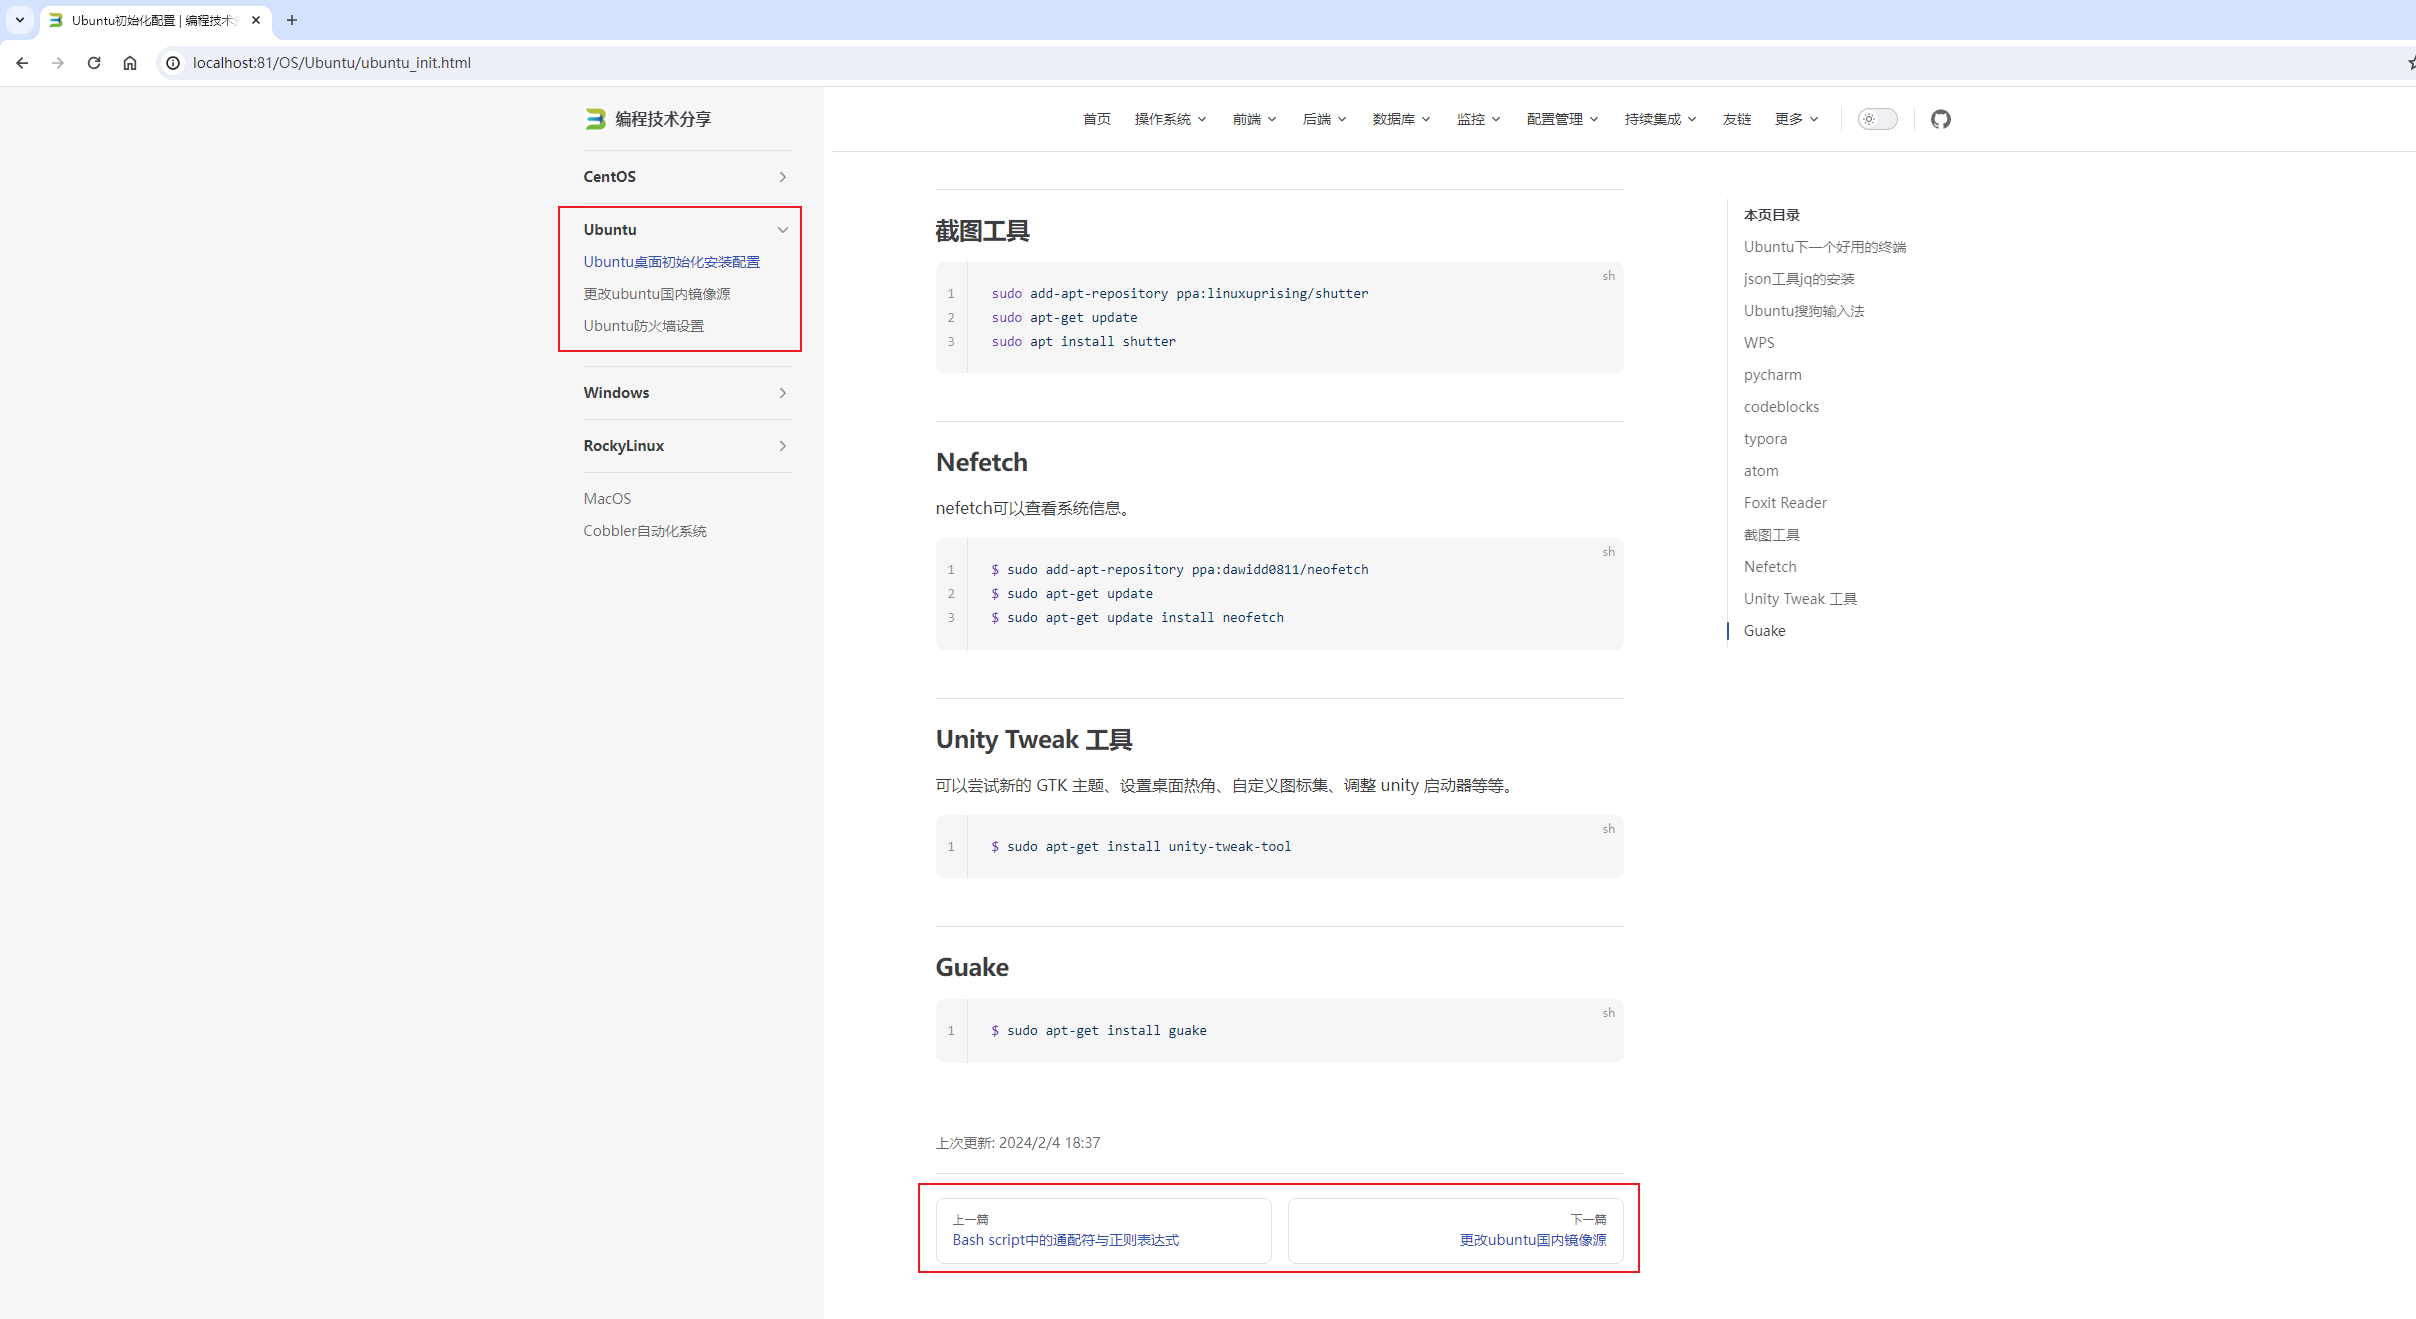
博客有模有样了!
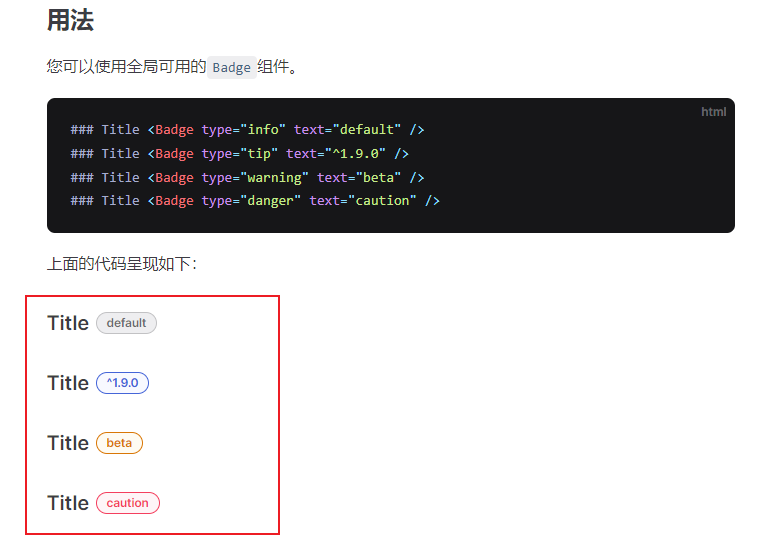
3.4 设置徽标
参考 https://vitepress.qzxdp.cn/reference/default-theme-badge.html 。
您可以使用全局可用的Badge组件。
1
2
3
4
| #### Title <Badge type="info" text="default" />
#### Title <Badge type="tip" text="^1.9.0" />
#### Title <Badge type="warning" text="beta" />
#### Title <Badge type="danger" text="caution" />
|
效果图:
3.5 优化搜索功能
参考:
安装插件:
1
| pnpm add -D vitepress-plugin-pagefind pagefind
|
 1
 2
 3
 4
 5
 6
 7
 8
 9
10
11
12
13
14
15
16
17
18
19
20
21
| ## 查看当前工作路径
$ pwd
/drives/e/data/viteblog
## 安装插件
$ pnpm add -D vitepress-plugin-pagefind pagefind
Progress: resolved 0, reused 1, downloaded 0, added 0
Progress: resolved 67, reused 23, downloaded 25, added 0
Packages: +40
++++++++++++++++++++++++++++++++++++++++
Progress: resolved 161, reused 82, downloaded 39, added 12
Progress: resolved 161, reused 82, downloaded 39, added 39
Progress: resolved 161, reused 82, downloaded 40, added 39
Progress: resolved 161, reused 82, downloaded 40, added 40, done
devDependencies:
+ pagefind 1.0.4
+ vitepress-plugin-pagefind 0.2.11
Done in 7.3s
$
|
然后,在.vitepress/config.js增加插件相关内容:
以上两个位置是新增的。
修改后的配置如下:
  1
  2
  3
  4
  5
  6
  7
  8
  9
 10
 11
 12
 13
 14
 15
 16
 17
 18
 19
 20
 21
 22
 23
 24
 25
 26
 27
 28
 29
 30
 31
 32
 33
 34
 35
 36
 37
 38
 39
 40
 41
 42
 43
 44
 45
 46
 47
 48
 49
 50
 51
 52
 53
 54
 55
 56
 57
 58
 59
 60
 61
 62
 63
 64
 65
 66
 67
 68
 69
 70
 71
 72
 73
 74
 75
 76
 77
 78
 79
 80
 81
 82
 83
 84
 85
 86
 87
 88
 89
 90
 91
 92
 93
 94
 95
 96
 97
 98
 99
100
101
102
103
104
105
106
107
108
109
110
111
112
113
114
115
116
117
118
119
120
121
122
123
124
125
| /* 自动侧边栏 https://github.com/w3ctech-editorial-department/vitepress-auto-configure-nav-sidebar
import AutoConfigureNavSidebarPlugin from '@w3ctech-editorial-department/vitepress-auto-configure-nav-sidebar'
const { sidebar } = AutoConfigureNavSidebarPlugin({
collapsed: true,
isCollapse: true,
showNavIcon: false,
singleLayerNav: false,
showSidebarIcon: true,
ignoreFolders: ['.vuepress'],
customIndexFileName: "目录",
})
*/
// 导入本地搜索插件 https://www.npmjs.com/package/vitepress-plugin-pagefind
import { chineseSearchOptimize, pagefindPlugin } from 'vitepress-plugin-pagefind'
// 将导航栏单独拆分成一个配置文件
const navConf = require('./configs/navConfig.js');
// 将侧边栏单独拆分成一个配置文件
const sidebarConf = require('./configs/sidebarConfig.js');
// https://vitepress.dev/reference/site-config
export default {
// 打包输出目录
outDir: '../dist',
// 站点语言标题等
lang: 'zh-CN',
// 搜索功能优化
// 注意,不要将vite属性放到themeConfig主题配置里面去了,会导致搜索插件不起作用
vite: {
plugins: [pagefindPlugin({
customSearchQuery: chineseSearchOptimize,
btnPlaceholder: '搜索',
placeholder: '搜索文档',
emptyText: '空空如也',
heading: '共: {{searchResult}} 条结果',
// 搜索结果不展示最后修改日期日期
showDate: false,
})],
},
// tab标签页上面显示的标题
title: '编程技术分享',
description: '阿梅的IT成长之路,记录操作系统、前后端等学习总结文档',
// 为了和vuepress保持一致,不生成干净的URL
cleanUrls: false,
/* markdown 配置 */
markdown: {
// 开启markdown行数显示
lineNumbers: true
},
/* 主题配置 */
themeConfig: {
// 是否将语言环境更改zh
i18nRouting: false,
// 显示在导航栏中网站标题之前的logo文件
logo: '/favicon.ico',
// 站点标题
siteTitle: '编程技术分享',
// https://vitepress.dev/reference/default-theme-config
// 导航栏,导航菜单项的配置
nav: navConf,
// 侧边栏,侧边栏菜单项的配置
sidebar: sidebarConf,
// 右侧大纲配置,在大纲中显示的标题级别/
outline: {
level: 'deep',
label: '当前页导航'
},
// 社交帐户链接
socialLinks: [{
icon: 'github',
link: 'https://github.com/meizhaohui/'
}],
// 页脚配置
// 当 SideBar 可见时,页脚将不会显示
footer: {
message: '本首页参考 https://notes.fe-mm.com/ 配置而成',
copyright: 'Copyright © 2019-2024 阿梅的博客'
},
// 显示上次更新时间
lastUpdated: true,
lastUpdatedText: '上次更新',
// 显示编辑链接
editLink: {
// 注意,把"/edit"字符前的地址换成你的github仓库地址
pattern: 'https://github.com/meizhaohui/viteblog/edit/main/docs/:path',
// 编辑链接显示的文本内容
text: "在 GitHub 上编辑此页"
},
// 自定义深色模式开关标签
// 该标签仅显示在移动视图中
darkModeSwitchLabel: '外观',
// 自定义返回顶部按钮的标签
// 该标签仅显示在移动视图中
returnToTopLabel: '返回顶部',
// VitePress支持使用浏览器内置索引进行模糊全文搜索
// 此处使用本地搜索
// 你也可以配置algolia搜索
// 需要去官网 https://docsearch.algolia.com/apply 申请key
// 做相应的修改即可
// search: {
// provider: 'algolia',
// options: {
// appId: '...',
// apiKey: '...',
// indexName: '...'
// },
search: {
provider: 'local',
text: '搜索',
},
// 自定义上一个和下一个链接上方显示的文本
docFooter: {
prev: '上一篇',
next: '下一篇'
}
}
}
|
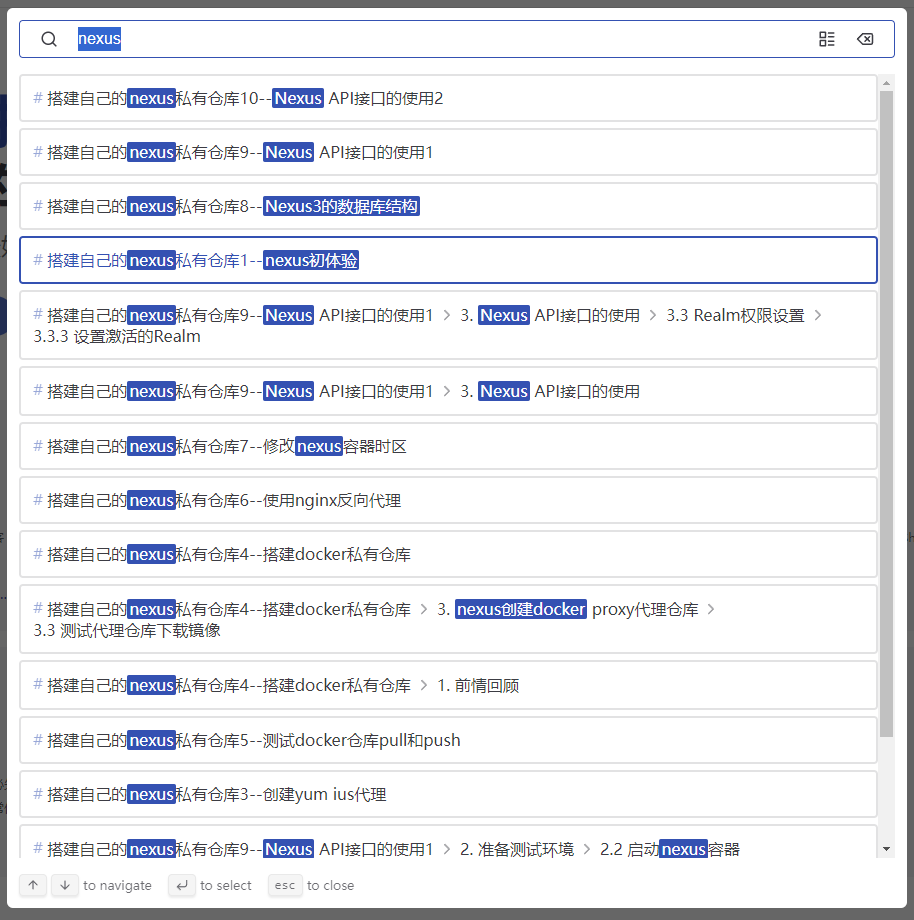
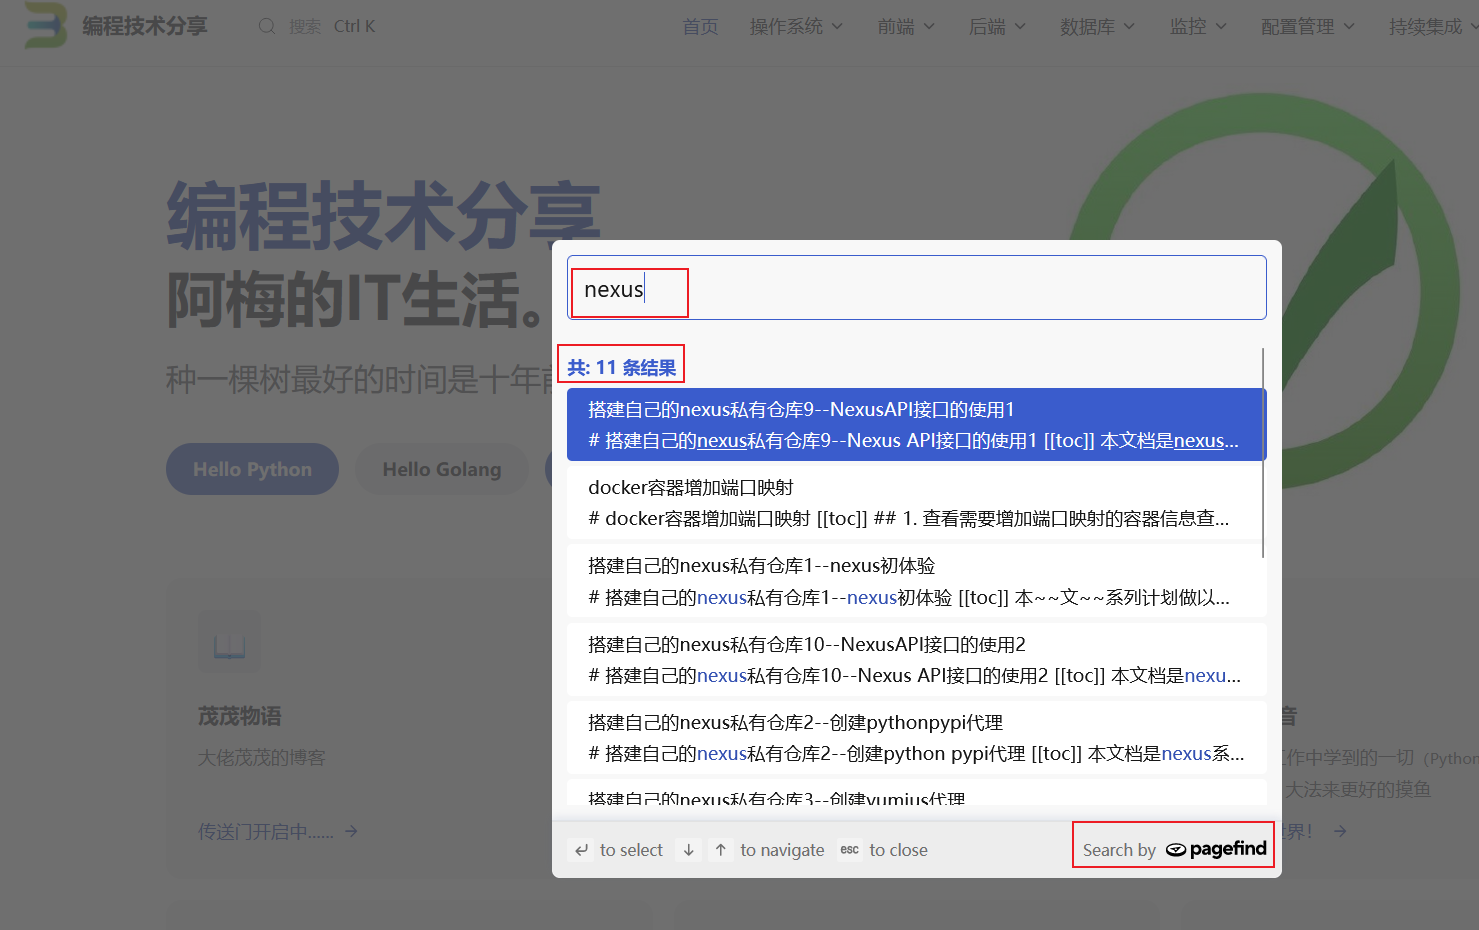
搜索效果:
优化前:
优化后:
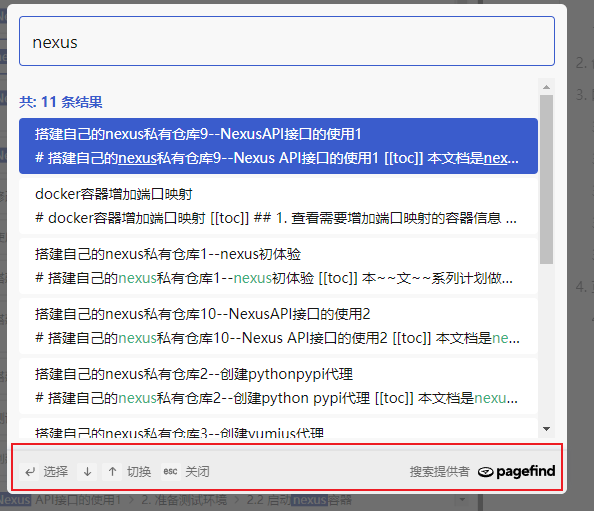
搜索结果中,最下方显示还是英文的,因为vitepress-plugin-pagefind插件里面源码Search.vue中使用的是硬编码,我们直接修改一下本地Search.vue文件:

对应路径是 node_modules/vitepress-plugin-pagefind/src/Search.vue。
修改后,再次进行搜索,搜索结果底部已经正常显示中文了:
3.6 图片单击放大
vitepress 实现,单击图片时图片放大,再次单击图像时图片缩小的功能。
详细可参考:Allow images to be zoomed in on click https://github.com/vuejs/vitepress/issues/854
安装插件:
1
| pnpm add -D medium-zoom
|
安装过程:
 1
 2
 3
 4
 5
 6
 7
 8
 9
10
11
12
13
14
15
16
17
18
19
20
21
22
23
24
25
26
27
28
| ## 查看当前工作路径
$ pwd
/drives/e/data/viteblog
## 安装插件
$ pnpm add -D medium-zoom
Progress: resolved 0, reused 1, downloaded 0, added 0
╭──────────────────────────────────────────────────────────────────╮
│ │
│ Update available! 8.15.1 → 8.15.3. │
│ Changelog: https://github.com/pnpm/pnpm/releases/tag/v8.15.3 │
│ Run "pnpm add -g pnpm" to update. │
│ │
│ Follow @pnpmjs for updates: https://twitter.com/pnpmjs │
│ │
╰──────────────────────────────────────────────────────────────────╯
Progress: resolved 75, reused 69, downloaded 2, added 0
Packages: +1
+
Progress: resolved 162, reused 121, downloaded 2, added 1, done
devDependencies:
+ medium-zoom 1.1.0
Done in 2.3s
$
|
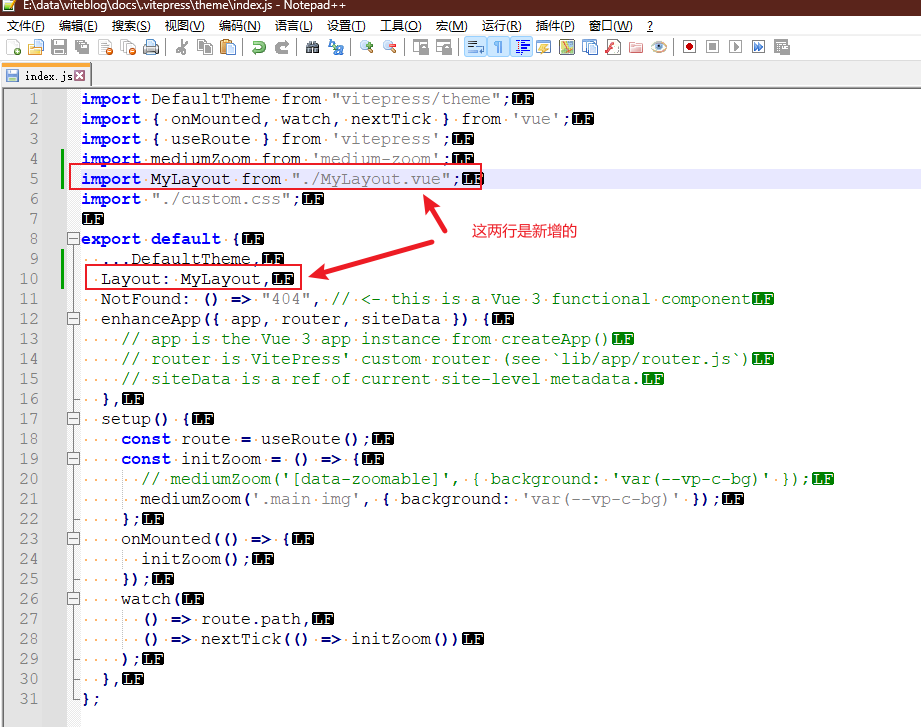
然后,在.vitepress/theme/index.js增加插件相关内容 :
 1
 2
 3
 4
 5
 6
 7
 8
 9
10
11
12
13
14
15
16
17
18
19
20
21
22
23
24
25
26
27
28
29
| import DefaultTheme from "vitepress/theme";
import { onMounted, watch, nextTick } from 'vue';
import { useRoute } from 'vitepress';
import mediumZoom from 'medium-zoom';
import "./custom.css";
export default {
...DefaultTheme,
NotFound: () => "404", // <- this is a Vue 3 functional component
enhanceApp({ app, router, siteData }) {
// app is the Vue 3 app instance from createApp()
// router is VitePress' custom router (see `lib/app/router.js`)
// siteData is a ref of current site-level metadata.
},
setup() {
const route = useRoute();
const initZoom = () => {
// mediumZoom('[data-zoomable]', { background: 'var(--vp-c-bg)' });
mediumZoom('.main img', { background: 'var(--vp-c-bg)' });
};
onMounted(() => {
initZoom();
});
watch(
() => route.path,
() => nextTick(() => initZoom())
);
},
};
|
修改后,内容如下:
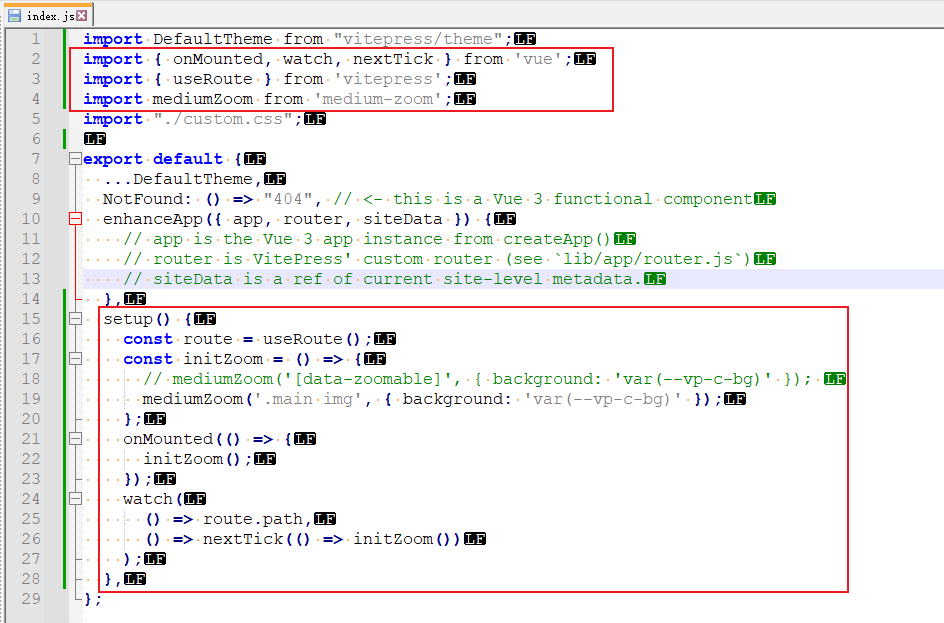
红线框出的是新增的。
然后在自定义样式.vitepress/theme/custom.css中增加以下内容:
 1
 2
 3
 4
 5
 6
 7
 8
 9
10
11
| /**
* Component: image zoom
* -------------------------------------------------------------------------- */
.medium-zoom-overlay {
z-index: 20;
}
.medium-zoom-image {
z-index: 21;
}
|
重新运行项目就可以看到图片放大效果了!!
以上配置还是有点问题,当图片左侧存在侧边栏时,点击图片时会出现图片左半边不能正常显示的问题,
参考:
在自定义样式.vitepress/theme/custom.css中增加以下内容:
 1
 2
 3
 4
 5
 6
 7
 8
 9
10
11
12
13
14
15
16
17
18
| /**
* Component: image zoom
* -------------------------------------------------------------------------- */
:root {
--medium-zoom-z-index: 100;
--medium-zoom-c-bg: var(--vp-c-bg);
}
.medium-zoom-overlay {
/* override element style set by medium-zoom script */
z-index: var(--medium-zoom-z-index);
background-color: var(--medium-zoom-c-bg) !important;
}
.medium-zoom-overlay ~ img {
z-index: calc(var(--medium-zoom-z-index) + 1);
}
|
此时,再重新运行项目,就不会出现图片被遮住的问题。
3.7 优化上次更新显示
参考:https://vitepress.dev/reference/default-theme-config#lastupdated
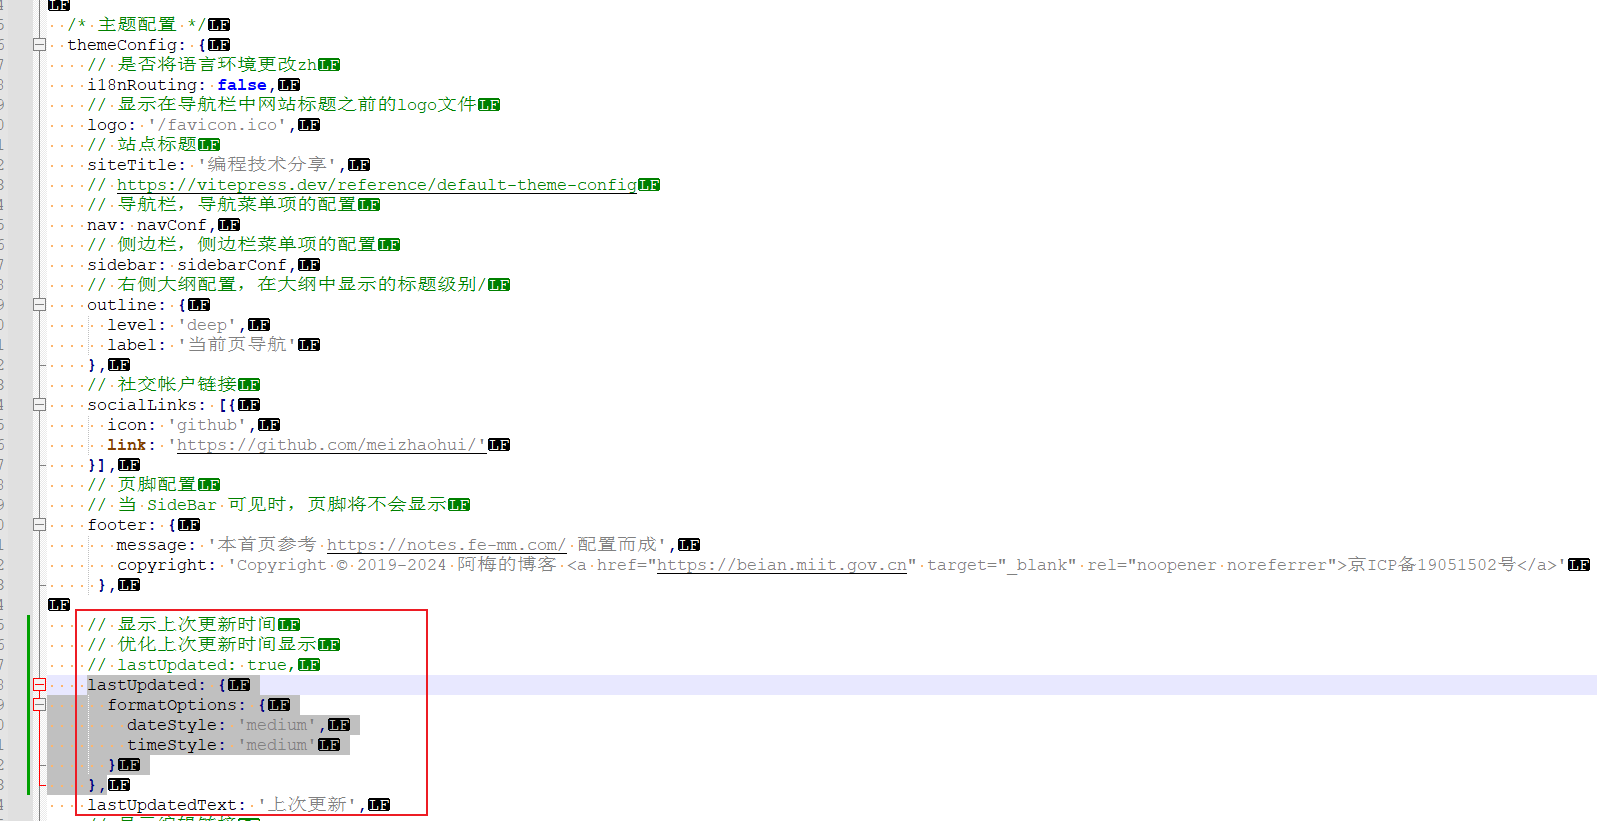
 1
 2
 3
 4
 5
 6
 7
 8
 9
10
11
| export default {
themeConfig: {
lastUpdated: {
text: 'Updated at',
formatOptions: {
dateStyle: 'full',
timeStyle: 'medium'
}
}
}
}
|
像官方示例一样,增加formatOptions参数,根据个人喜好可以调整dataStyle和timeStyle参数的值。
3.8 集成gitalk评论功能
3.8.1 创建一个github存储仓库
创建一个github存储仓库,用于存储评论信息,评论信息会作为issue显示。如我创建viteblog-gitalk仓库用来存储评论信息。
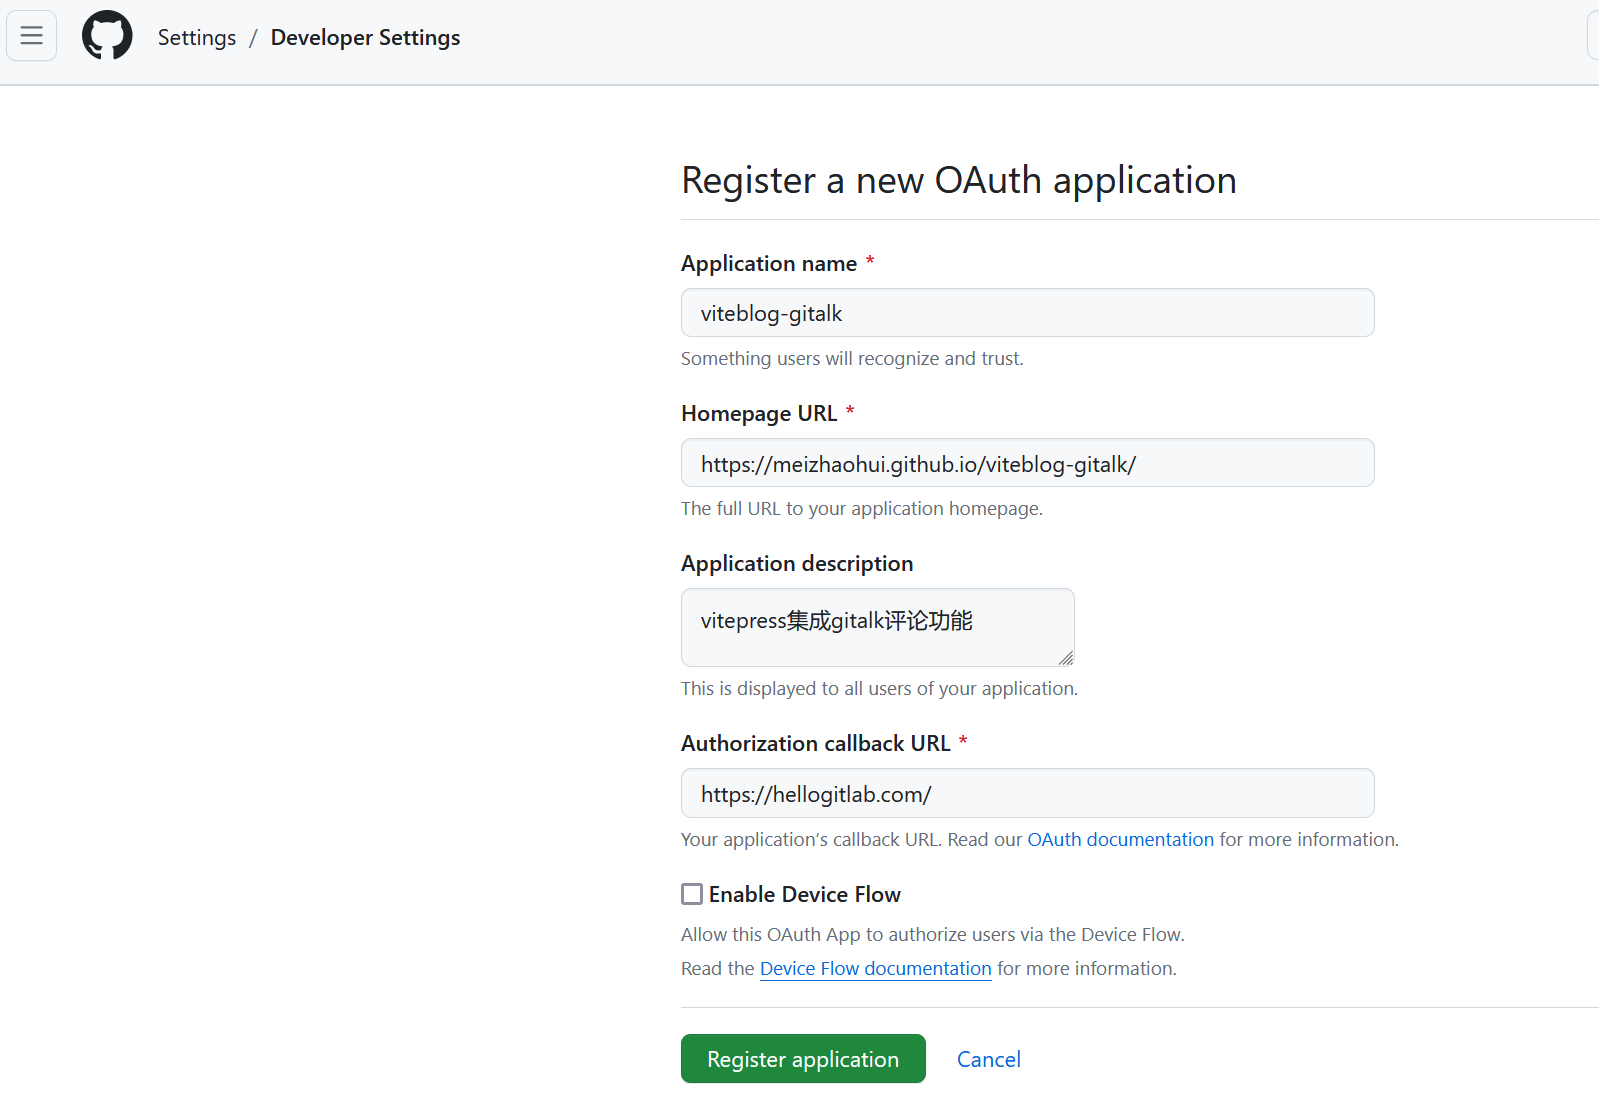
3.8.2 注册OAuth应用
注册地址 https://github.com/settings/applications/new
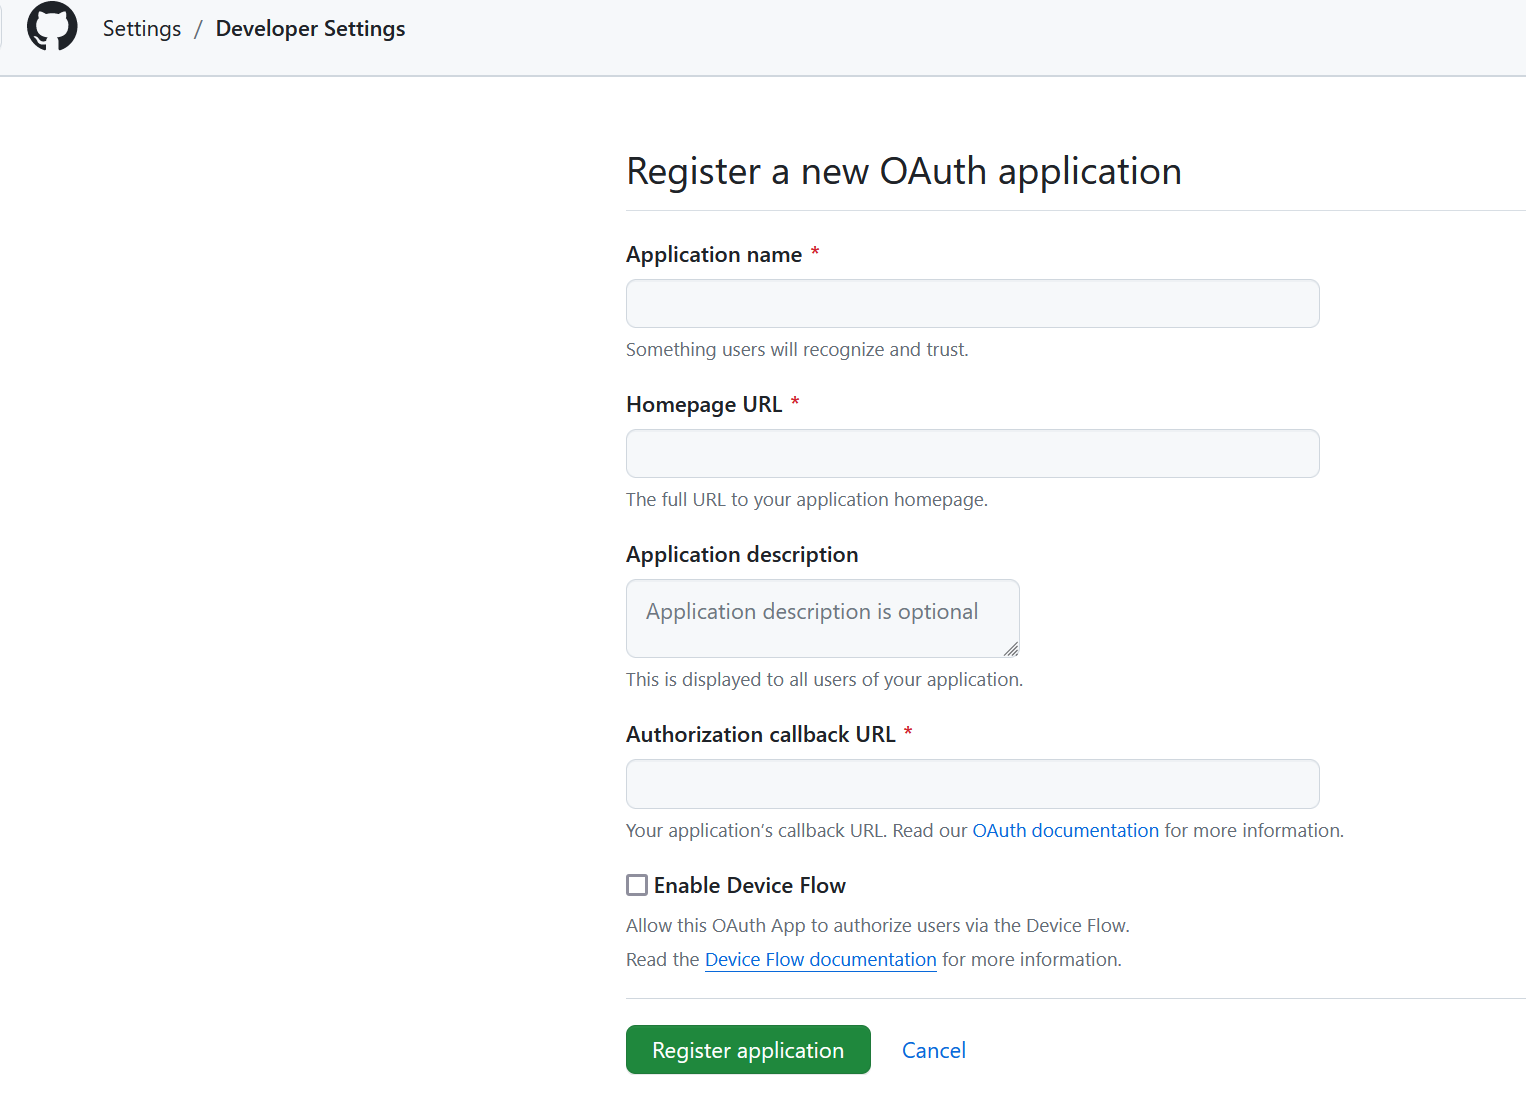
填写相关信息:
3.8.3 生成Client secrets信息
上一节注册OAuth应用成功后,自动跳转到应用页面,此时点击右侧的【Generate a new client secret】生成Client secret信息:
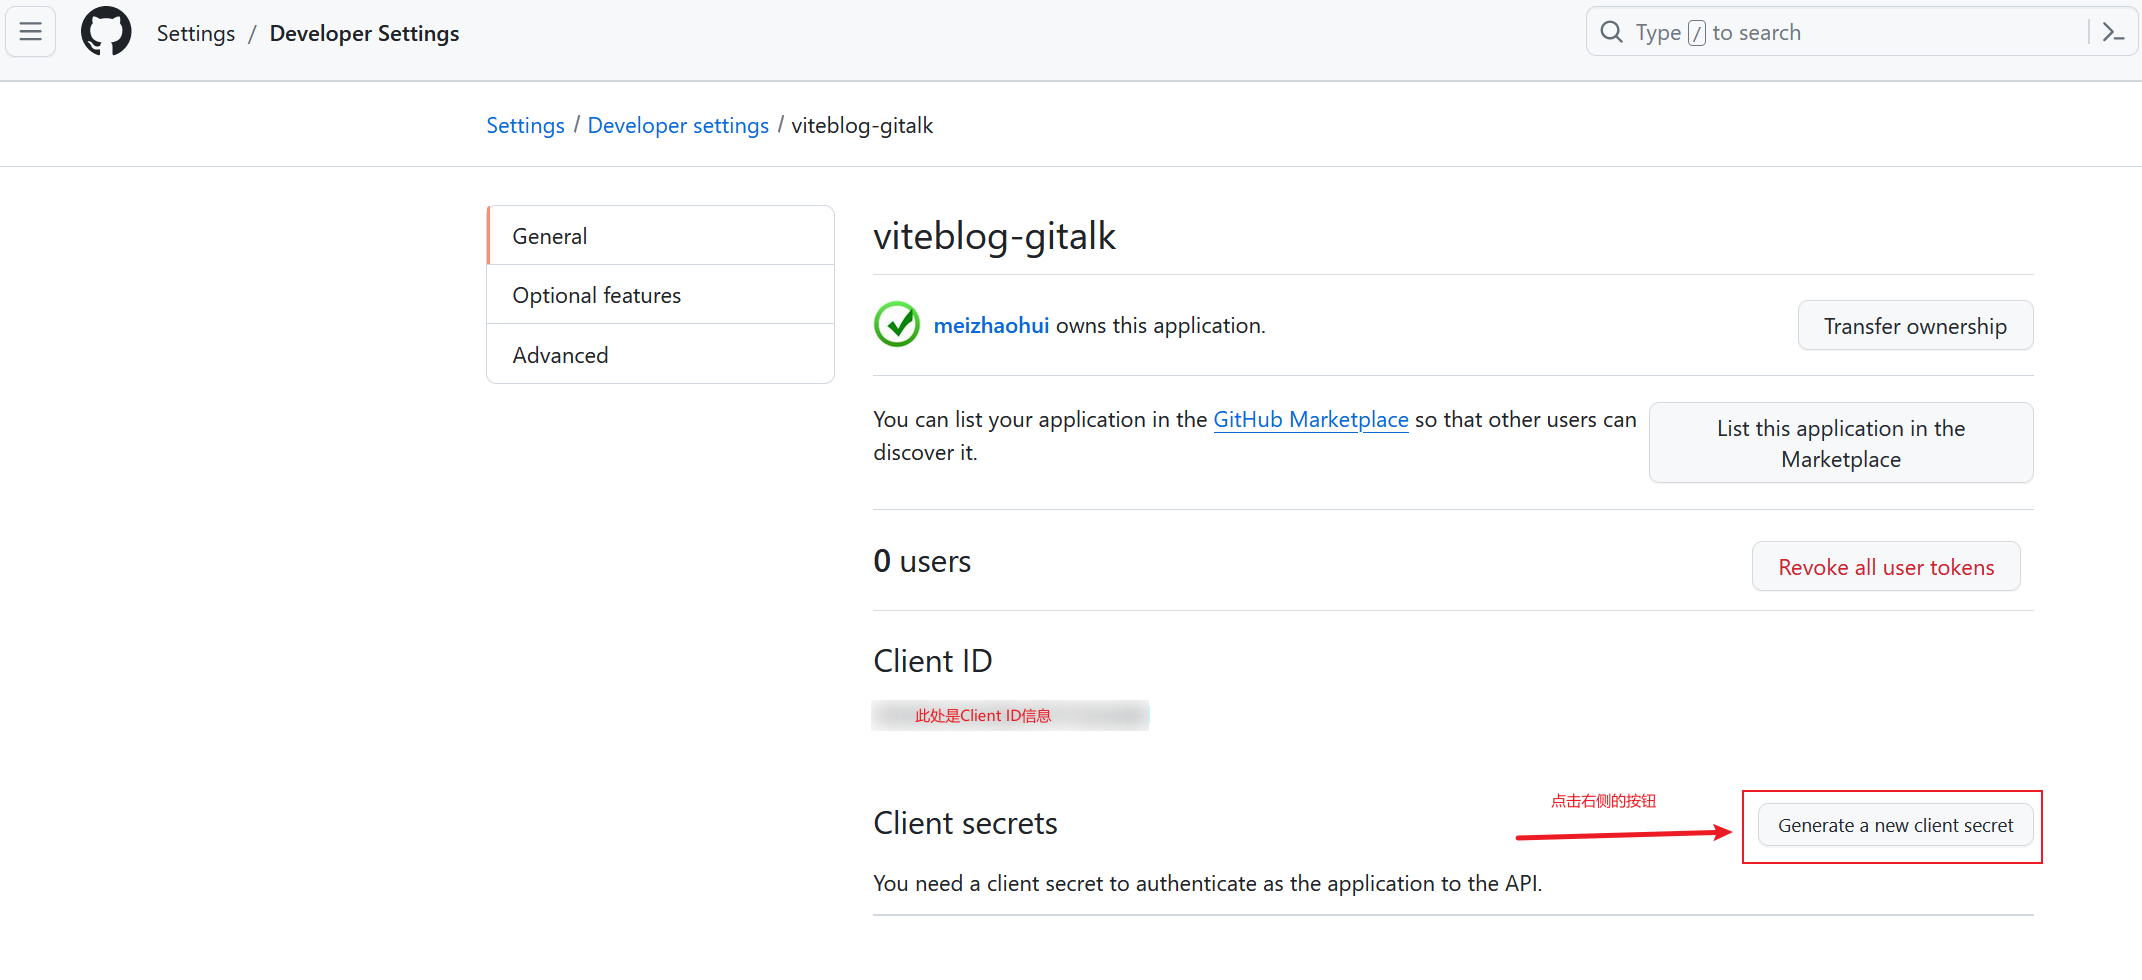
生成后查看对应的secret:
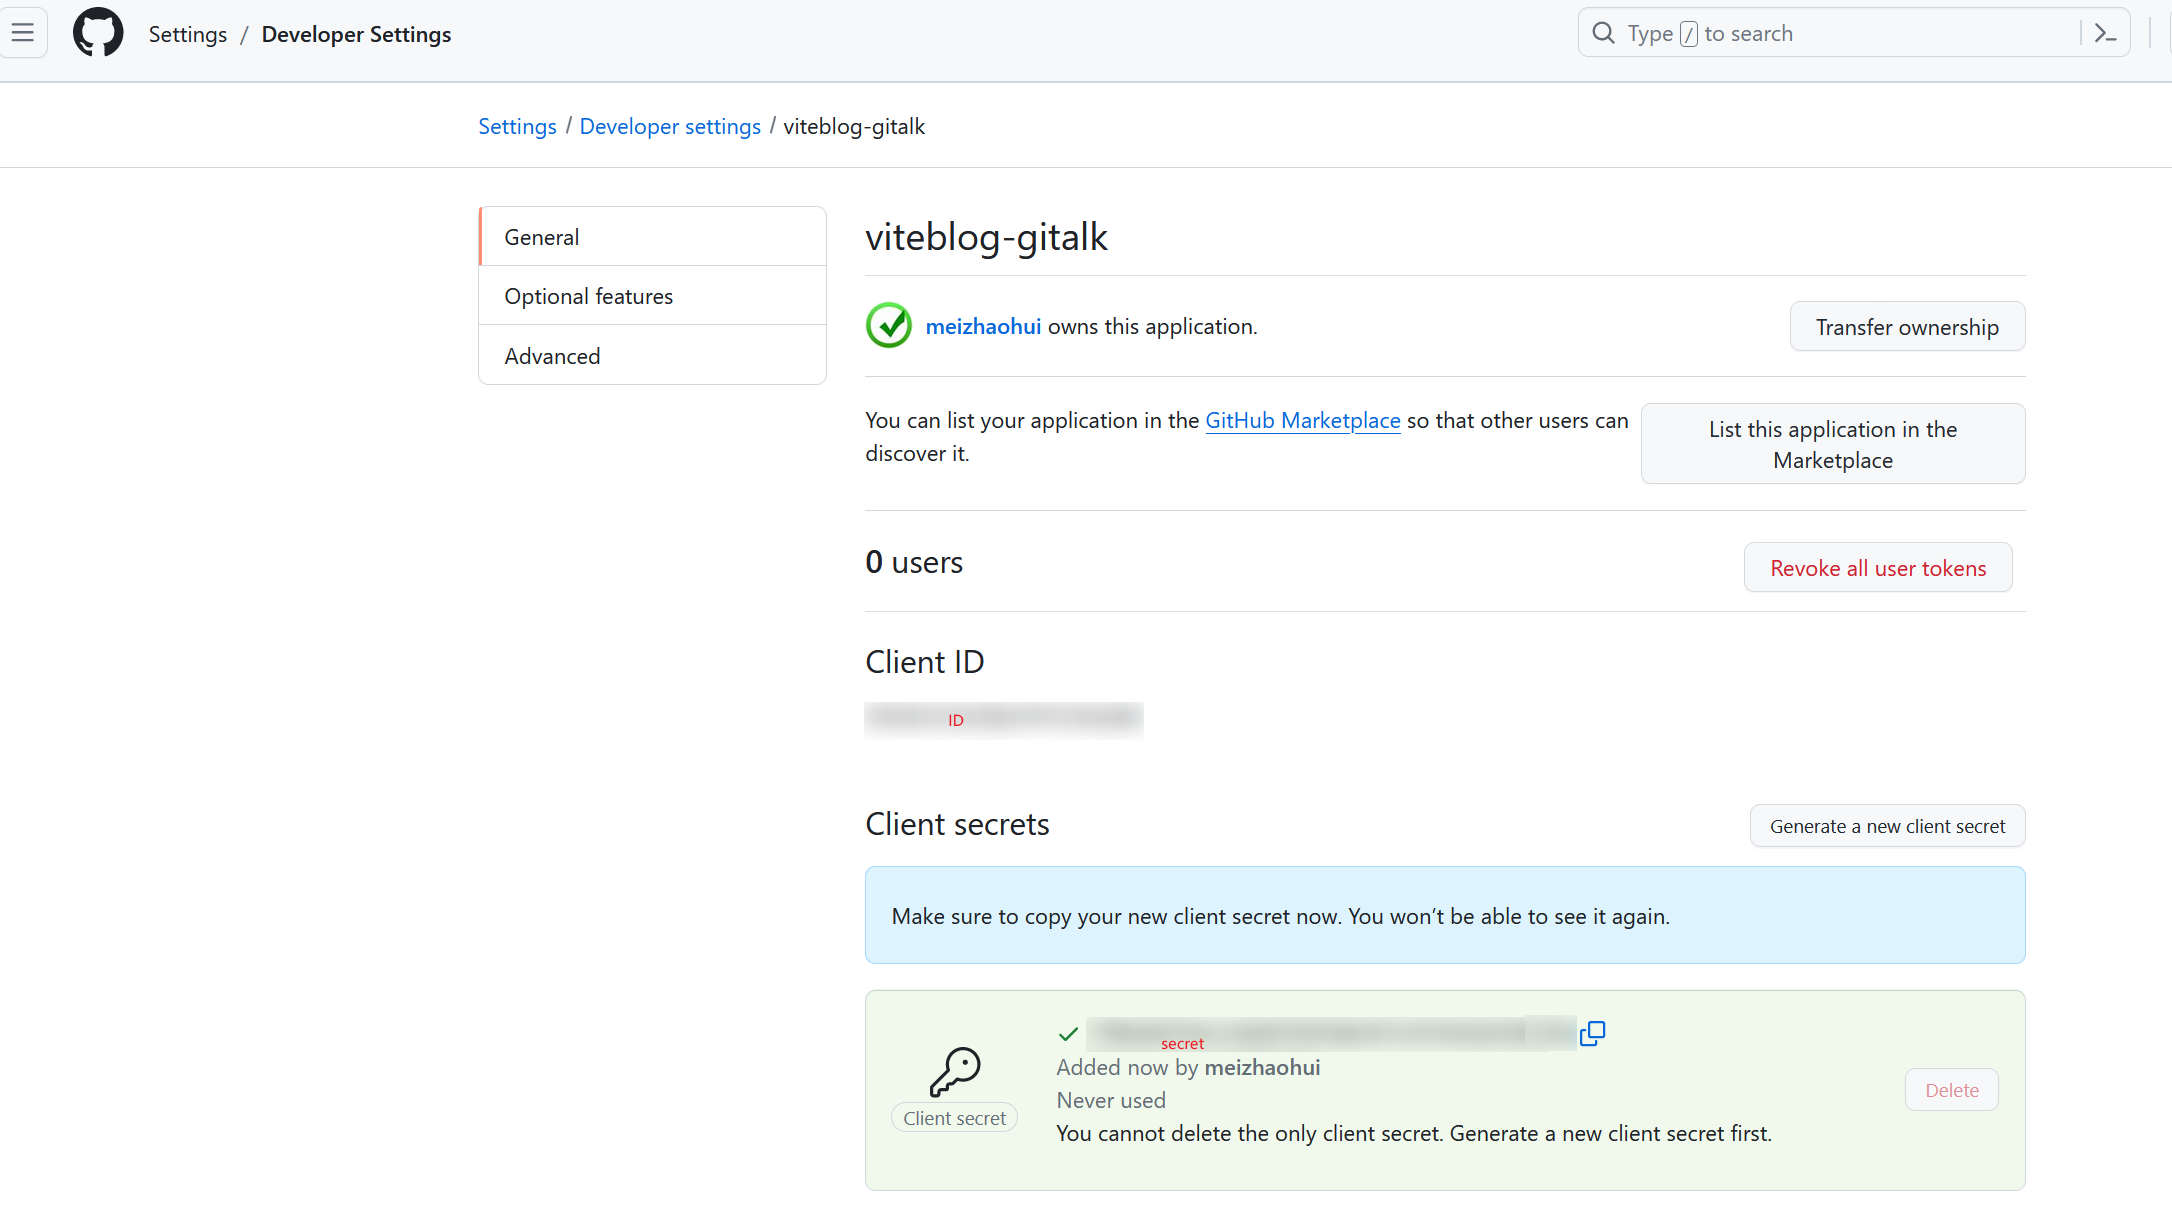
记得将对应的 client secret 信息复制出来,保存到一个文本里面,避免页面关闭后查看不了。
3.8.4 安装依赖包
 1
 2
 3
 4
 5
 6
 7
 8
 9
10
11
12
13
14
15
16
17
18
19
20
21
22
| $ pwd
/drives/e/data/viteblog
## 安装gitalk
$ pnpm add -D gitalk
Progress: resolved 0, reused 1, downloaded 0, added 0
Progress: resolved 215, reused 210, downloaded 0, added 0
WARN 2 deprecated subdependencies found: axios@0.19.2, core-js@1.2.7
Already up to date
Progress: resolved 274, reused 235, downloaded 0, added 0, done
WARN Issues with peer dependencies found
.
└─┬ vitepress 1.0.0-rc.41
└─┬ @docsearch/js 3.5.2
└─┬ @docsearch/react 3.5.2
├── ✕ unmet peer react@">= 16.8.0 < 19.0.0": found 15.7.0
└── ✕ unmet peer react-dom@">= 16.8.0 < 19.0.0": found 15.7.0
Done in 1.7s
$
|
3.8.5 挂载 Gitalk 组件
参考:
 1
 2
 3
 4
 5
 6
 7
 8
 9
10
11
12
13
14
15
16
17
18
19
20
21
22
23
24
25
26
27
28
29
30
31
32
33
34
35
36
37
38
39
40
41
42
43
44
45
46
47
48
49
50
51
| <!--.vitepress/theme/MyLayout.vue-->
<template>
<Layout />
</template>
<script setup>
import DefaultTheme from "vitepress/theme";
const { Layout } = DefaultTheme;
import { watch, nextTick, onMounted } from "vue";
import "gitalk/dist/gitalk.css";
import Gitalk from "gitalk";
import { useRouter } from "vitepress";
let { route } = useRouter(); // 页面路由对象
onMounted(() => {
watch(
() => route.path, // 监听路由变化,重新挂载评论组件
() => {
nextTick(() => {
if (typeof window !== undefined) {
const content_div = document.querySelector(".content-container"); // 查找页面内容DOM节点,此节点只有layout为Page(默认layout属性)的md文档才有
if (content_div) {
const before_s_div = document.getElementById("gitalk-page-container"); // 获取页面评论组件DOM节点
if(before_s_div) {
content_div.removeChild(before_s_div)
}
const s_div = document.createElement("div"); // 创建节点
s_div.setAttribute("id", "gitalk-page-container"); // 设置id
content_div.appendChild(s_div); // querySelector的节点可自己根据自己想加载的地方设置
const gitment = new Gitalk({
proxy: "https://vercel.younglina.top/github_access_token",
id: route.data.title, // 可选,推荐设置为页面标题,因为会作为标签传给Github issues,且issues标签有长度限制。
owner: "meizhaohui", // GitHub repository 所有者
// 此处的仓库名称要和3.8.1节创建的仓库名称保持一致
repo: "viteblog-gitalk", // GitHub repository
clientID: "your client id", // 自己的clientID
clientSecret: "your client secret", // 自己的clientSecret
admin: ["meizhaohui"], // GitHub repository 所有者
labels: ["Gitalk"], // GitHub issue 的标签
createIssueManually: false, //如果当前页面没有相应的 isssue 且登录的用户属于 admin,则会自动创建 issue。如果设置为 true,则显示一个初始化页面,创建 issue 需要点击 init 按钮。
});
gitment.render("gitalk-page-container");
}
}
})
},
{ immediate: true }
);
});
</script>
|
注意,配置文件的proxy: "https://vercel.younglina.top/github_access_token",是配置的代理,避免获取github token异常导致网络问题,评论不了。
然后,在 .vitepress/theme/index.js 文件导入上面的vue文件:
 1
 2
 3
 4
 5
 6
 7
 8
 9
10
11
12
13
14
15
16
17
18
19
20
21
22
23
24
25
26
27
28
29
30
31
| import DefaultTheme from "vitepress/theme";
import { onMounted, watch, nextTick } from 'vue';
import { useRoute } from 'vitepress';
import mediumZoom from 'medium-zoom';
import MyLayout from "./MyLayout.vue";
import "./custom.css";
export default {
...DefaultTheme,
Layout: MyLayout,
NotFound: () => "404", // <- this is a Vue 3 functional component
enhanceApp({ app, router, siteData }) {
// app is the Vue 3 app instance from createApp()
// router is VitePress' custom router (see `lib/app/router.js`)
// siteData is a ref of current site-level metadata.
},
setup() {
const route = useRoute();
const initZoom = () => {
// mediumZoom('[data-zoomable]', { background: 'var(--vp-c-bg)' });
mediumZoom('.main img', { background: 'var(--vp-c-bg)' });
};
onMounted(() => {
initZoom();
});
watch(
() => route.path,
() => nextTick(() => initZoom())
);
},
};
|
3.8.6 测试评论
使用pnpm docs:build构建项目并上传到服务器后,就可以测试评论功能了。
在博客中评论完成后,可以在github上面同步看到对应的评论信息:

为了让我的博客评论信息能够直接显示成我博客仓库的issue,可将 .vitepress/theme/MyLayout.vue 文件中的repo: "viteblog-gitalk", 修改成repo: "viteblog",,这样评论信息就直接会显示到自己的博客仓库的issue中了。
4. 页面异常处理
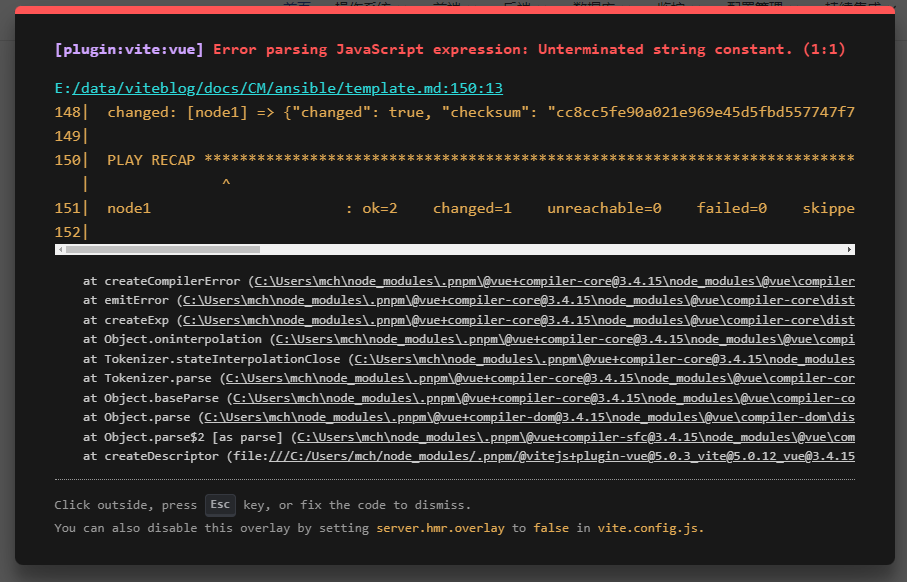
4.1 Error parsing JavaScript expression: Unterminated string constant
有时打开页面,提示一些莫名其妙的异常。
此时我们可以在vscode中安装markdownlint插件,然后使用vscode打开对应的markdown文件,然后查看有哪些异常的位置需要修复:
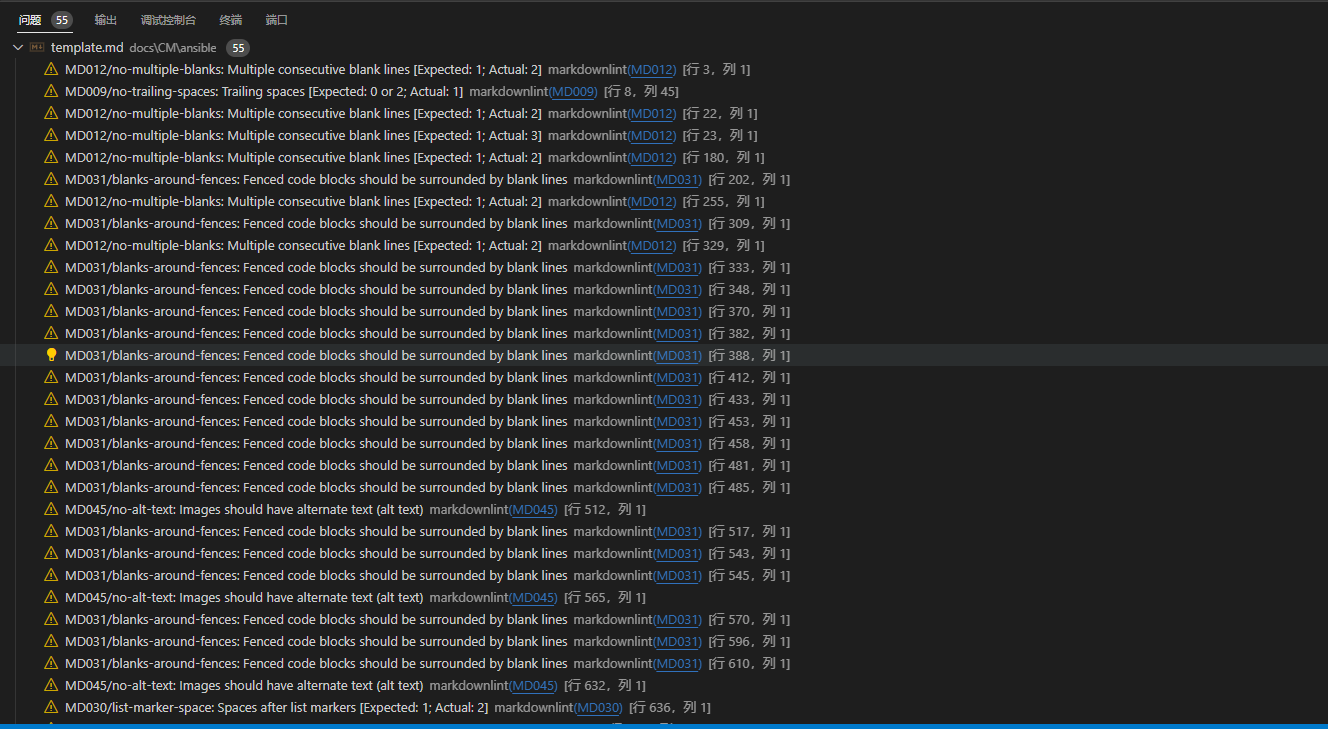
按每行提示进行修改,直到页面正常为止。
最后发现是约44行表格中左双大括号有问题,"{{" 外面需要使用<code v-pre> </code>来转义:

4.2 打包异常Found dead link
使用pnpm docs:build打包项目时,可能会出现Found dead link异常,导致打包失败:
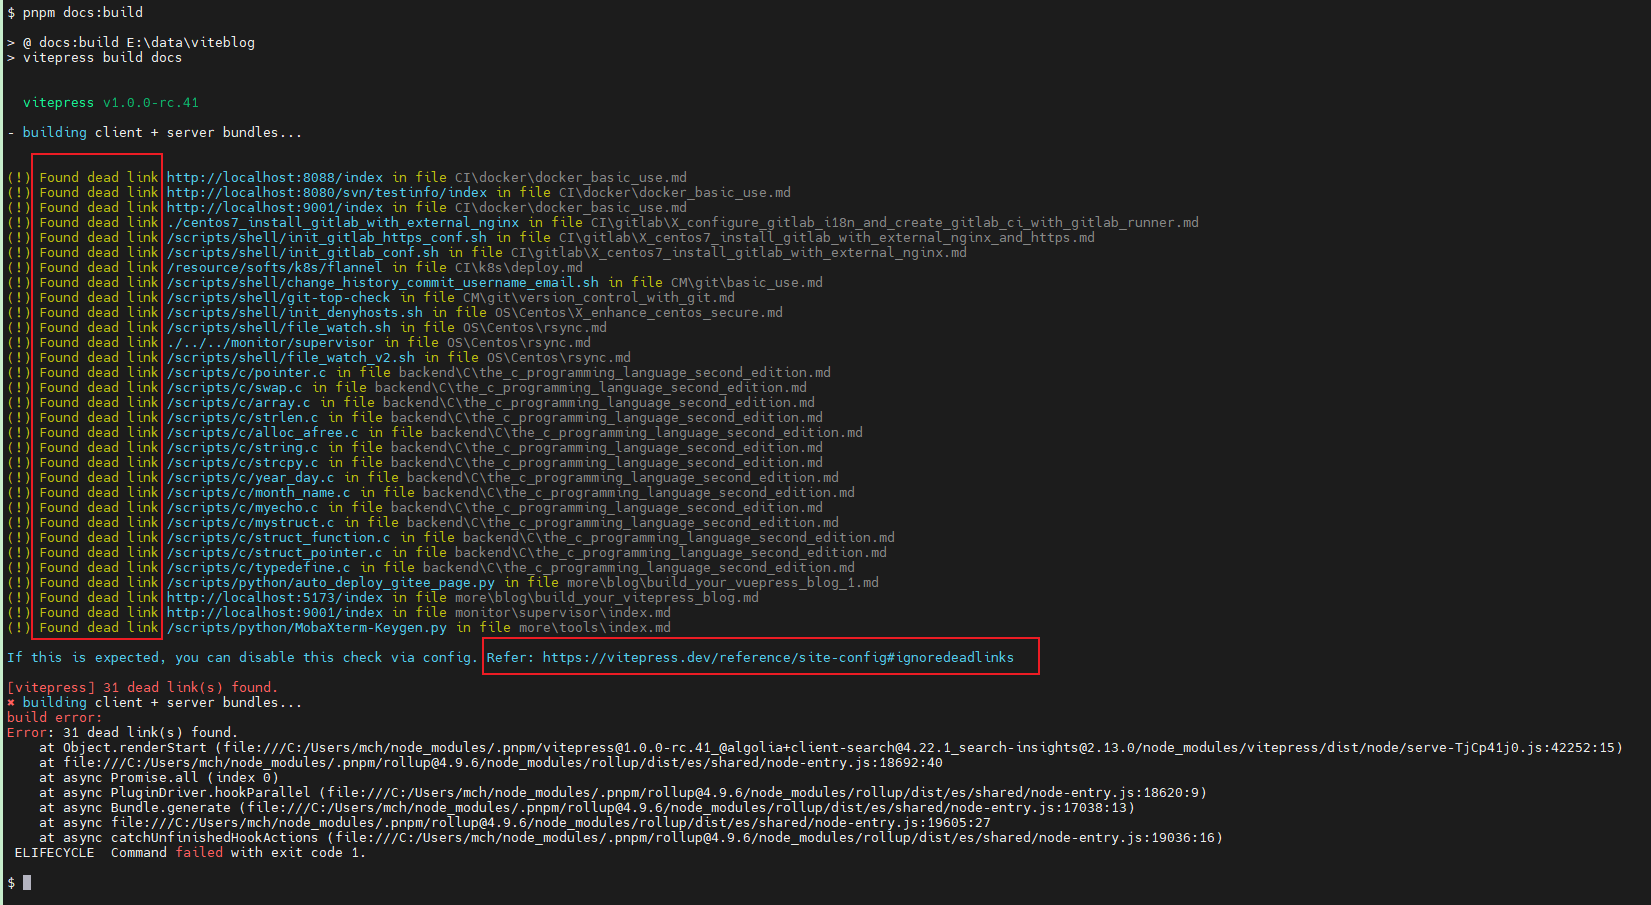
可以参考 https://vitepress.dev/reference/site-config#ignoredeadlinks 设置忽略死链接,但最好我们能够检查一下这些死链接到底是因为什么原因导致的,并修复这些死链接。
4.3 打包异常vitepress data not properly injected in app
使用pnpm docs:build打包项目时,可能会出现vitepress data not properly injected in app异常,导致打包失败:
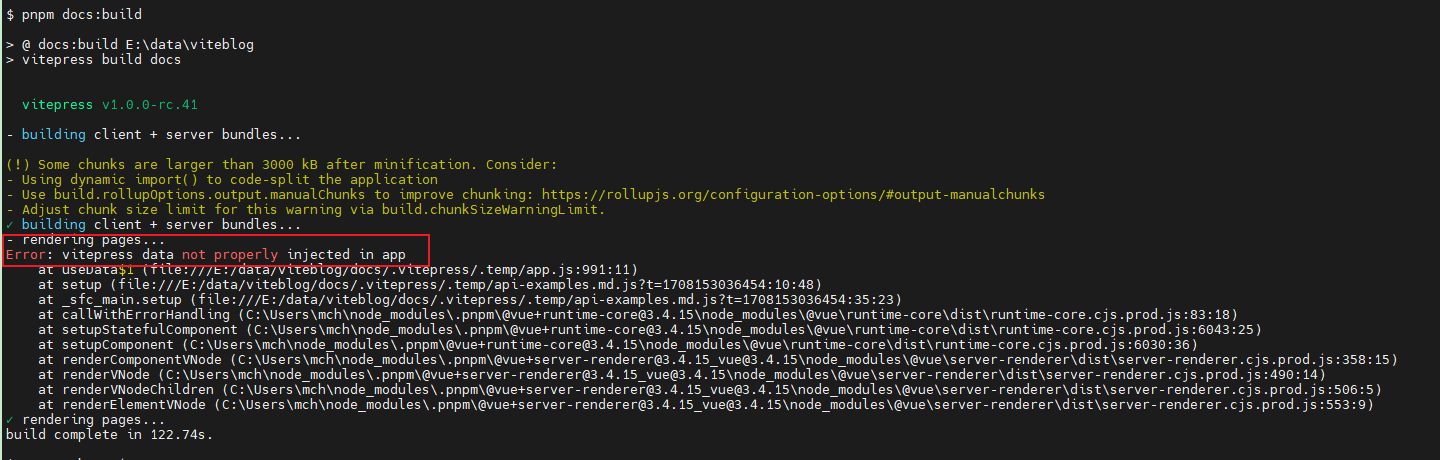
参考:https://github.com/vuejs/vitepress/issues/2287
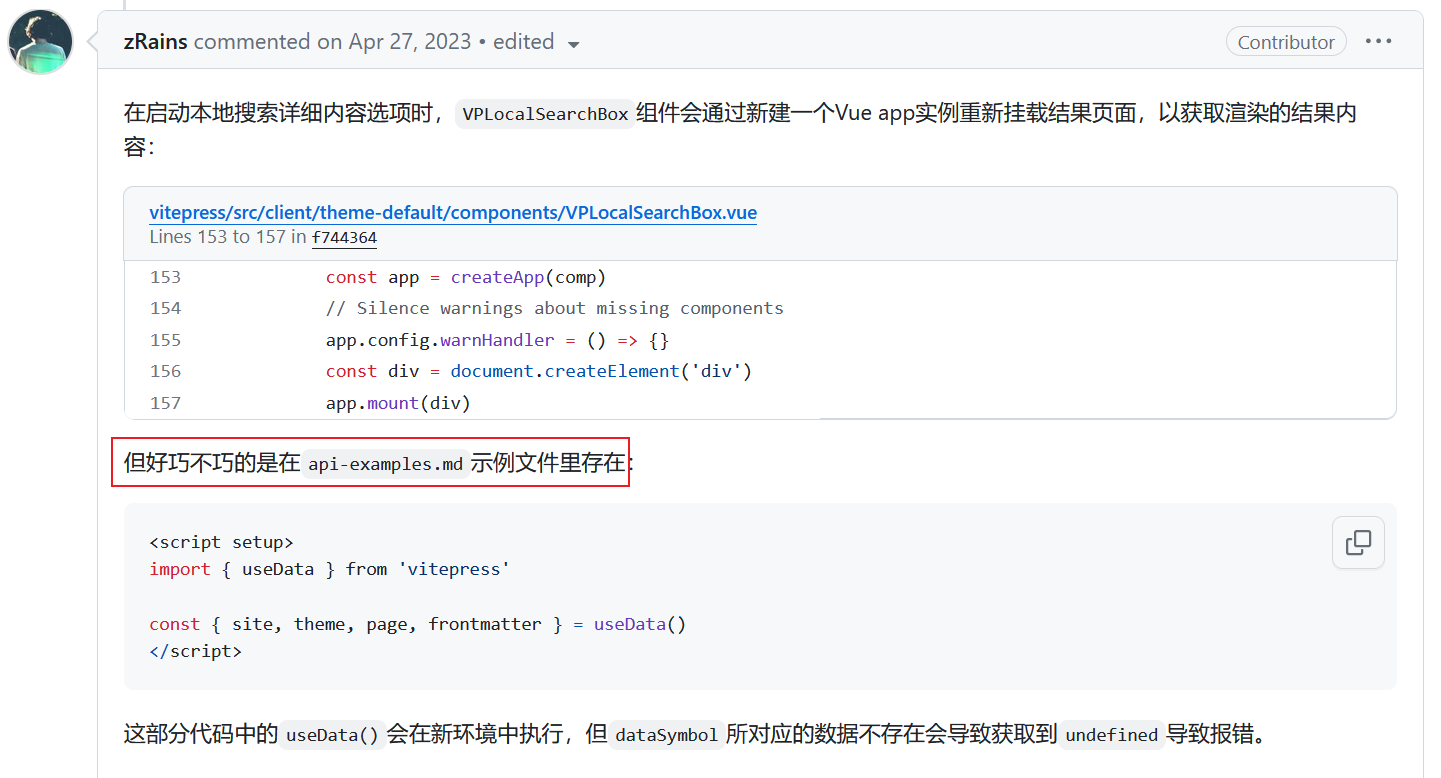
为了避免示例文件导致本地搜索异常,将docs目录下的api-examples.md和markdown-examples.md两个文件删除掉。
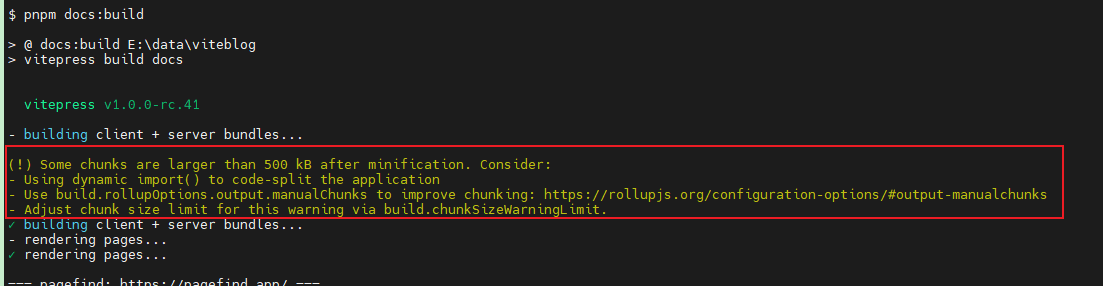
4.4 打包异常Some chunks are larger than 500 kB after minification
使用pnpm docs:build打包项目时,可能会出现Some chunks are larger than 500 kB after minification异常,导致打包失败:
4.5 打包异常terser not found. Since Vite v3, terser has become an optional dependency
上一节修改打包配置时,又提示异常[vite:terser] terser not found. Since Vite v3, terser has become an optional dependency. You need to install it.。
需要手动安装该插件:
 1
 2
 3
 4
 5
 6
 7
 8
 9
10
11
12
13
14
15
16
17
18
| ## 查看当前路径
$ pwd
/drives/e/data/viteblog
## 安装terser
$ pnpm add -D terser
Progress: resolved 0, reused 1, downloaded 0, added 0
Progress: resolved 111, reused 95, downloaded 11, added 0
Packages: +13 -3
+++++++++++++---
Progress: resolved 173, reused 123, downloaded 11, added 13, done
devDependencies:
- busuanzi.pure.js 1.0.3
+ terser 5.27.1
Done in 1.9s
$
|
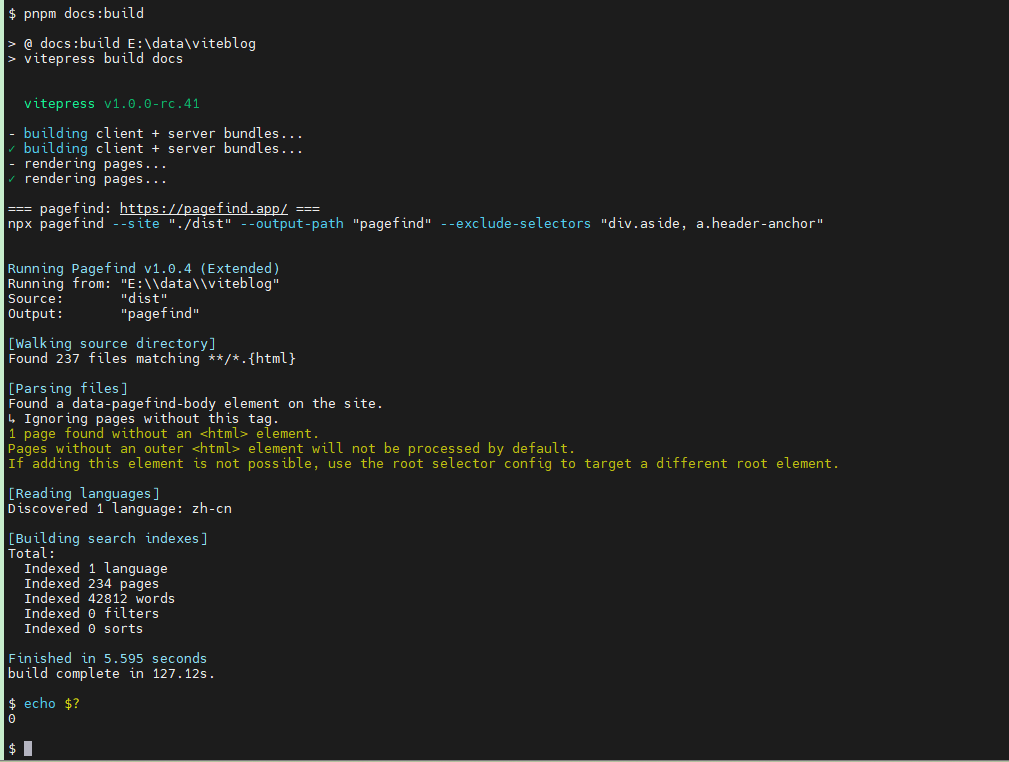
4.6 打包异常Pagefind wasn’t able to build an index
当使用vitepress-plugin-pagefind插件优化本地搜索时,使用pnpm docs:build打包项目时,可能会出现Pagefind wasn't able to build an index异常,导致打包失败:
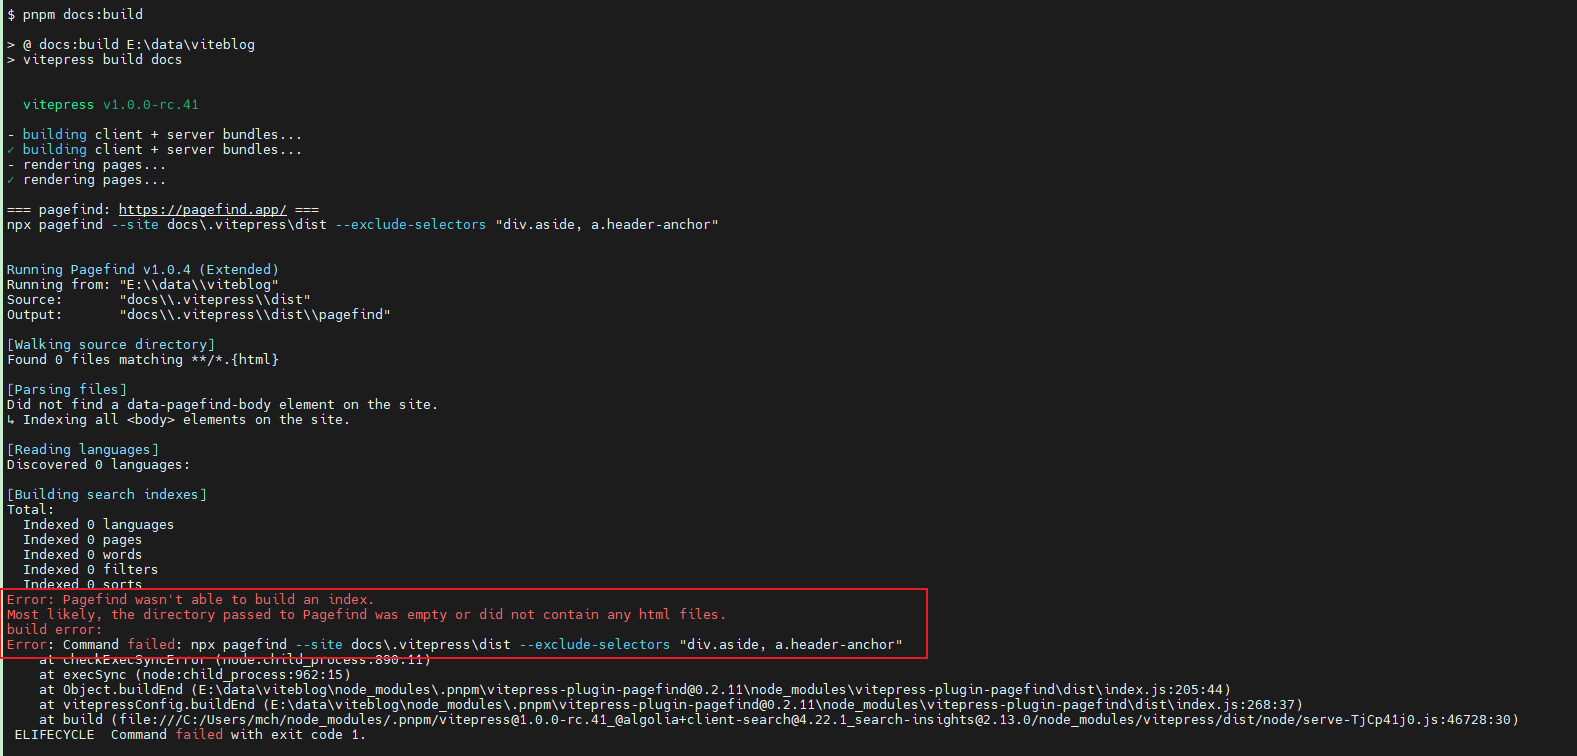
出现异常的原因是插件默认使用npx pagefind --site docs\.vitepress\dist --exclude-selectors "div.aside, a.header-anchor"命令去查找index文件,由于我们打包后生成的文件是在docs目录同级的dist目录,所以上面命令会报错。
而我们手动运行命令npx pagefind --verbose --source dist,则可以正常执行:
 1
 2
 3
 4
 5
 6
 7
 8
 9
10
11
12
13
14
15
16
17
18
19
20
21
22
23
24
25
26
27
28
29
30
31
32
33
34
35
36
37
38
39
40
41
42
43
44
45
46
47
48
49
50
51
52
53
54
55
56
57
| $ pwd
/drives/e/data/viteblog
$ npx pagefind --verbose --source dist
pagefind npm wrapper: Running the executable at E:\data\viteblog\node_modules\.pnpm\@pagefind+windows-x64@1.0.4\node_modules\@pagefind\windows-x64\bin\pagefind_extended.exe
Running Pagefind v1.0.4 (Extended)
Running in verbose mode
Running from: "E:\\data\\viteblog"
Source: "dist"
Output: "dist\\pagefind"
[Walking source directory]
Found 237 files matching **/*.{html}
[Parsing files]
Found a data-pagefind-body element on the site.
↳ Ignoring pages without this tag.
1 page found without an <html> element.
Pages without an outer <html> element will not be processed by default.
If adding this element is not possible, use the root selector config to target a different root element.
* "/scripts/python/use_bottle2_" has no <html> element
[Reading languages]
Discovered 1 language: zh-cn
* zh-cn: 234 pages
[Building search indexes]
Language zh-cn:
Indexed 234 pages
Indexed 42788 words
Indexed 0 filters
Indexed 0 sorts
Total:
Indexed 1 language
Indexed 234 pages
Indexed 42788 words
Indexed 0 filters
Indexed 0 sorts
Note: Pagefind doesn't support stemming for the language zh-cn.
Search will still work, but will not match across root words.
Note: Pagefind doesn't support stemming for the language zh-cn.
Search will still work, but will not match across root words.
Finished in 5.693 seconds
1 configuration warning(s):
The `source` option is deprecated as of Pagefind 1.0. The `source` option has been renamed to `site`:
cli: --site
config: site
env: PAGEFIND_SITE
└─ "The location of your built static website"
pagefind npm wrapper: Process exited with status 0
$
|
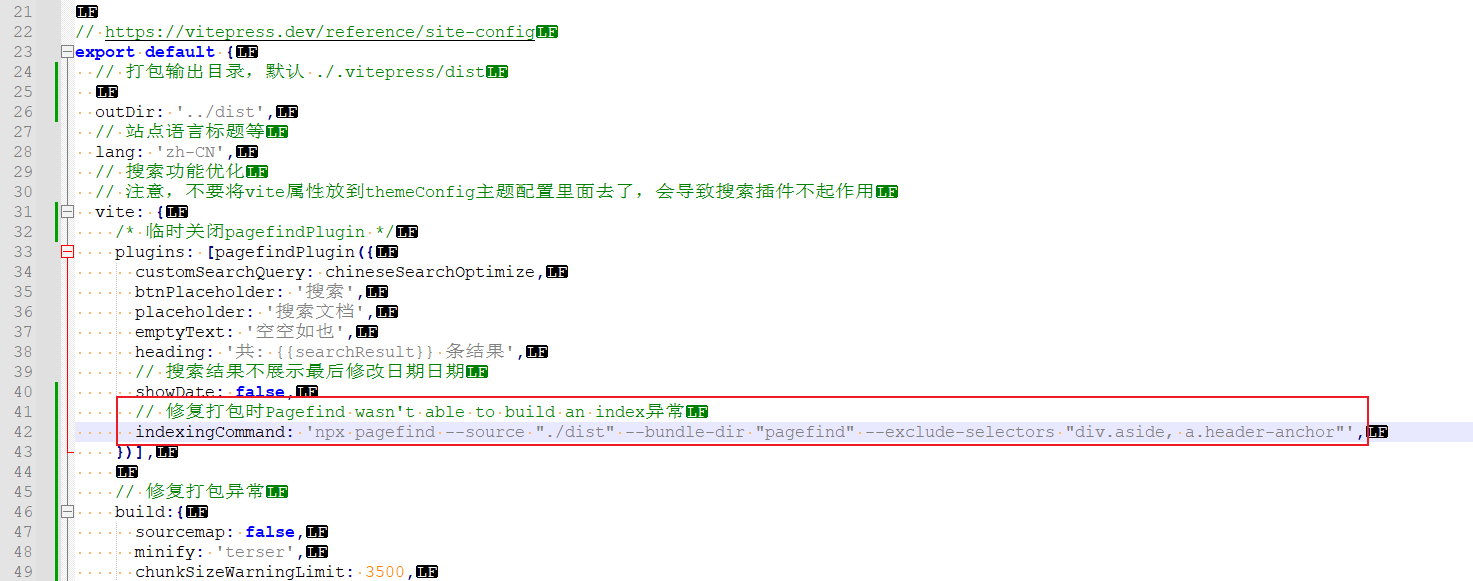
修改.vitepress/config.js配置文件,增加以下两行:
1
2
| // 修复打包时Pagefind wasn't able to build an index异常
indexingCommand: 'npx pagefind --source "./dist" --bundle-dir "pagefind" --exclude-selectors "div.aside, a.header-anchor"',
|
然后再次执行打包命令:
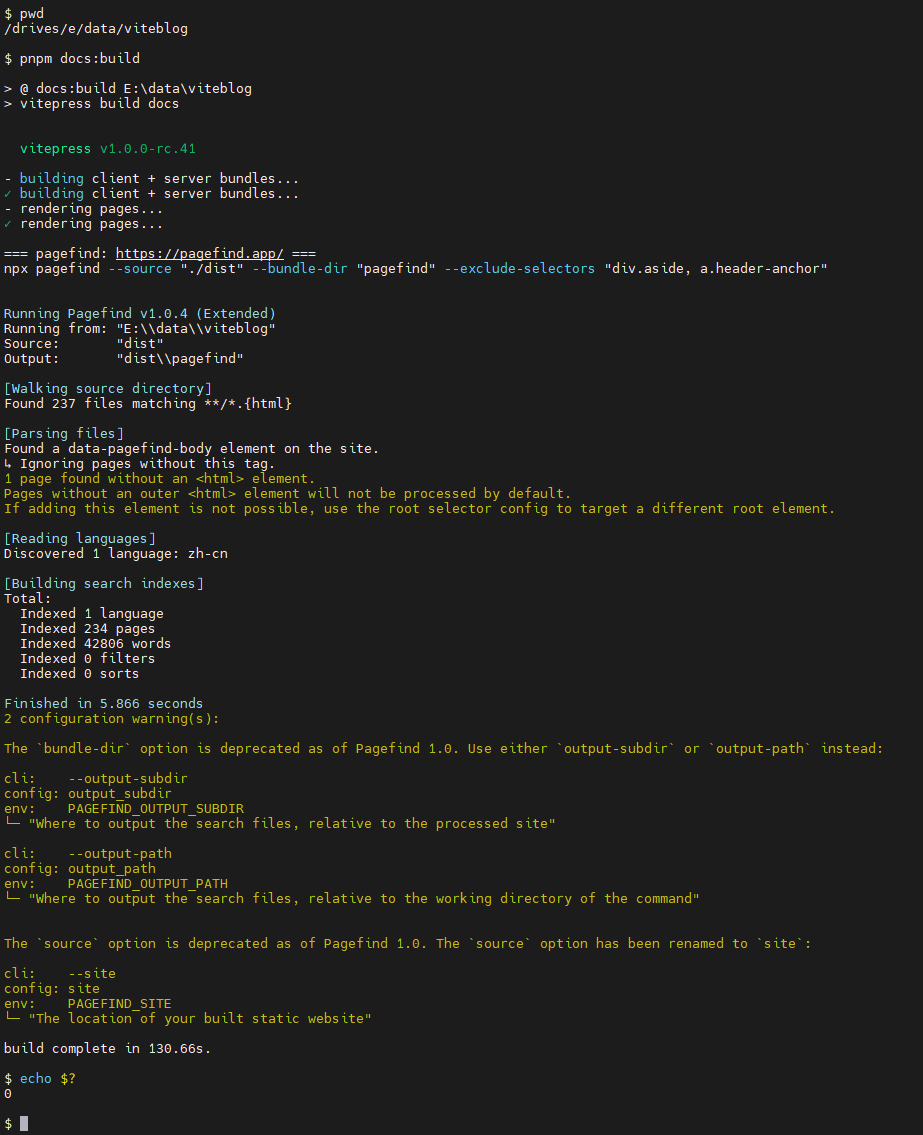
可以看到,提示打包成功,但有警告。
即:
2 configuration warning(s):
The bundle-dir option is deprecated as of Pagefind 1.0. Use either output-subdir or output-path instead:
cli: –output-subdir
config: output_subdir
env: PAGEFIND_OUTPUT_SUBDIR
└─ “Where to output the search files, relative to the processed site”
cli: –output-path
config: output_path
env: PAGEFIND_OUTPUT_PATH
└─ “Where to output the search files, relative to the working directory of the command”
The source option is deprecated as of Pagefind 1.0. The source option has been renamed to site:
cli: –site
config: site
env: PAGEFIND_SITE
└─ “The location of your built static website”
也就是说,我们定义的indexingCommand: 'npx pagefind --source "./dist" --bundle-dir "pagefind" --exclude-selectors "div.aside, a.header-anchor"'中有两个选项在Pagefind 1.0版本中废弃了,建议用 output-subdir 或 output-path 代替bundle-dir选项;使用site代替source选项。或者使用环境变量。
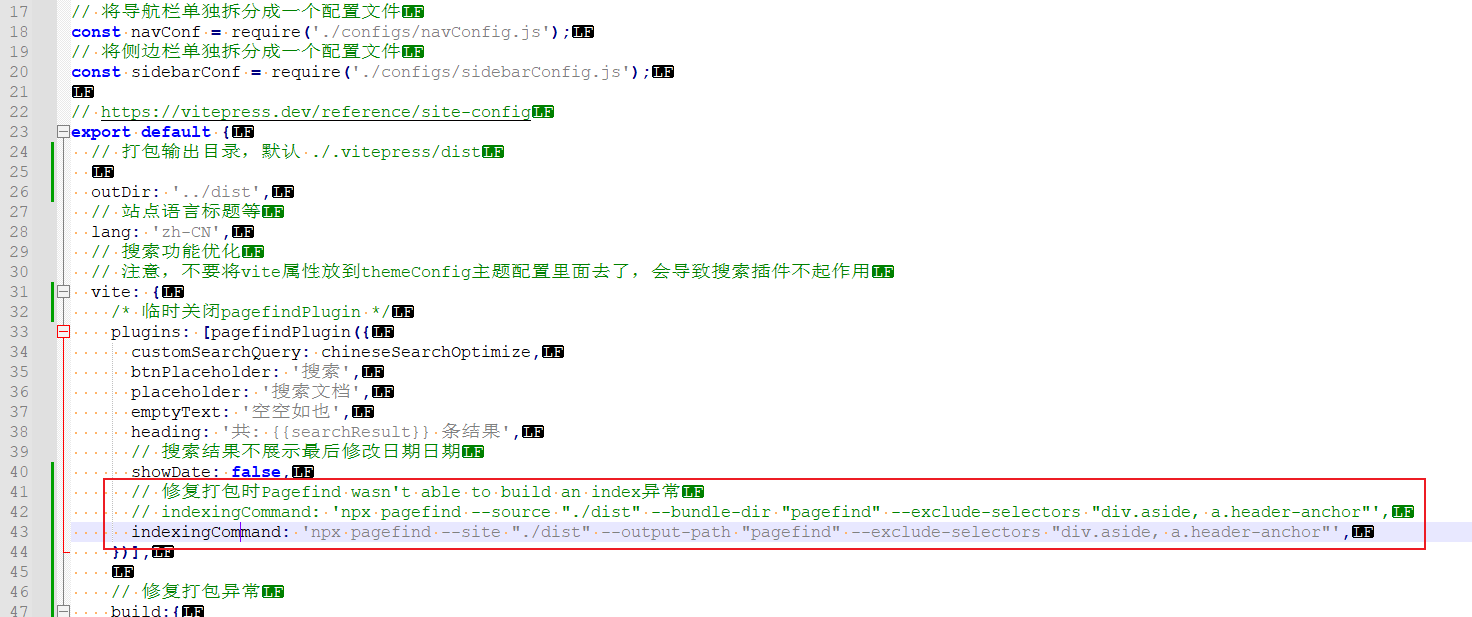
修改配置文件:
1
2
3
| // 修复打包时Pagefind wasn't able to build an index异常
// indexingCommand: 'npx pagefind --source "./dist" --bundle-dir "pagefind" --exclude-selectors "div.aside, a.header-anchor"',
indexingCommand: 'npx pagefind --site "./dist" --output-path "pagefind" --exclude-selectors "div.aside, a.header-anchor"',
|
再次构建项目,可以看到构建成功,没有报异常:
5. 部署
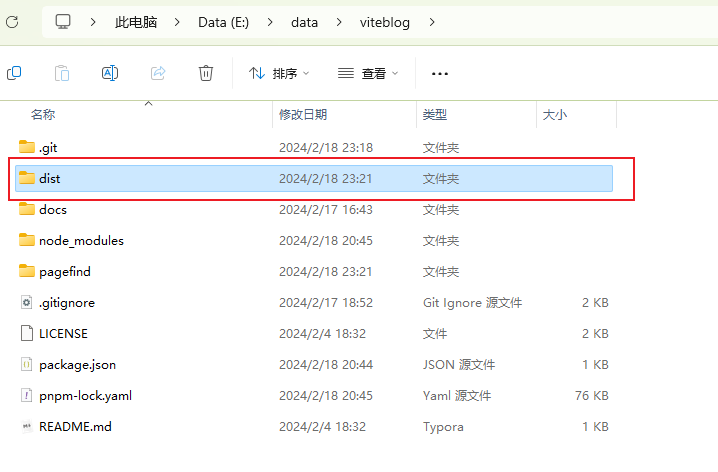
使用pnpm docs:build打包项目后,会在docs同级目录生成dist文件夹:
在服务器上创建/var/www/html/viteblog文件夹,并将dist上传到服务器上的/var/www/html/viteblog目录下:
 1
 2
 3
 4
 5
 6
 7
 8
 9
10
11
12
13
14
15
16
17
18
19
20
21
22
| [root@master ~]# ll /var/www/html/viteblog/
total 484
-rw-r--r-- 1 root root 57282 Feb 18 23:21 404.html
drwxr-xr-x 2 root root 196608 Feb 18 23:21 assets
drwxr-xr-x 8 root root 4096 Feb 17 22:50 backend
drwxr-xr-x 6 root root 4096 Feb 17 22:50 CI
drwxr-xr-x 6 root root 4096 Feb 17 22:50 CM
drwxr-xr-x 6 root root 4096 Feb 17 22:50 database
-rw-r--r-- 1 root root 4286 Feb 18 23:21 favicon.ico
drwxr-xr-x 2 root root 4096 Feb 17 22:50 friendlink
drwxr-xr-x 4 root root 4096 Feb 17 22:50 frontend
-rw-r--r-- 1 root root 10017 Feb 18 23:21 hashmap.json
drwxr-xr-x 2 root root 81920 Feb 18 23:21 img
-rw-r--r-- 1 root root 63744 Feb 18 23:21 index.html
drwxr-xr-x 8 root root 4096 Feb 17 22:50 js
-rw-r--r-- 1 root root 16960 Feb 18 23:21 logo.png
drwxr-xr-x 4 root root 4096 Feb 17 22:50 monitor
drwxr-xr-x 7 root root 4096 Feb 17 22:50 more
drwxr-xr-x 8 root root 4096 Feb 17 22:50 OS
drwxr-xr-x 5 root root 4096 Feb 17 22:50 resource
drwxr-xr-x 12 root root 4096 Feb 17 22:50 scripts
[root@master ~]#
|
我使用nginx作为web服务器,增加配置文件/etc/nginx/conf.d/viteblog.conf:
 1
 2
 3
 4
 5
 6
 7
 8
 9
10
11
12
13
14
15
16
17
| ## /etc/nginx/conf.d/viteblog.conf
server {
listen 80;
server_name hellogitlab.com;
rewrite ^ https://$http_host$request_uri? permanent;
}
server {
listen 443 ssl;
server_name hellogitlab.com;
ssl_certificate "/etc/pki/nginx/1_hellogitlab.com_bundle.crt";
ssl_certificate_key "/etc/pki/nginx/2_hellogitlab.com.key";
ssl_session_timeout 5m;
ssl_protocols TLSv1 TLSv1.1 TLSv1.2;
ssl_ciphers ECDHE-RSA-AES128-GCM-SHA256:HIGH:!aNULL:!MD5:!RC4:!DHE;
ssl_prefer_server_ciphers on;
root /var/www/html/viteblog;
}
|
此时主页可以正常打开,子页面也可以打开,但刷新子页面则会显示404 Not Found异常:

参考:
参考以上博客,优化/etc/nginx/conf.d/viteblog.conf配置文件:
 1
 2
 3
 4
 5
 6
 7
 8
 9
10
11
12
13
14
15
16
17
18
19
20
21
22
23
24
25
26
27
28
29
30
31
32
33
34
35
36
37
38
39
40
| ## /etc/nginx/conf.d/viteblog.conf
server {
listen 80;
server_name hellogitlab.com;
rewrite ^ https://$http_host$request_uri? permanent;
}
server {
listen 443 ssl;
server_name hellogitlab.com;
ssl_certificate "/etc/pki/nginx/1_hellogitlab.com_bundle.crt";
ssl_certificate_key "/etc/pki/nginx/2_hellogitlab.com.key";
ssl_session_timeout 5m;
ssl_protocols TLSv1 TLSv1.1 TLSv1.2;
ssl_ciphers ECDHE-RSA-AES128-GCM-SHA256:HIGH:!aNULL:!MD5:!RC4:!DHE;
ssl_prefer_server_ciphers on;
root /var/www/html/viteblog;
index index.html;
# Remove the trailing slash (permanent 301 redirect).
rewrite ^(.+)/$ $1 permanent;
# Remove the trailing `index.html`.
if ($request_uri ~ ^/(.*)index\.html(\?|$)) {
return 301 /$1;
}
# Remove the trailing `.html`.
if ($request_uri ~ ^/(.*)\.html(\?|$)) {
return 301 /$1;
}
location / {
# When the HTTP status code is 404, answer with the `/404.html` file.
error_page 404 /404.html;
# When `foo/bar` (which is `$uri`) is requested,
# try to serve the first existing file among the list:
# `foo/bar`, `foo/bar.html` or `foo/bar/index.html`.
# Otherwise answer with a 404 code.
try_files $uri $uri.html $uri/ =404;
}
}
|
17-39行高亮部分的配置是新增的。
然后重启nginx服务:
1
2
3
4
5
6
7
8
| ## 检查nginx配置文件
[root@master ~]# nginx -t
nginx: the configuration file /etc/nginx/nginx.conf syntax is ok
nginx: configuration file /etc/nginx/nginx.conf test is successful
## 重启nginx服务
[root@master ~]# systemctl restart nginx
[root@master ~]#
|
此时,再刷新页面,可以正常显示,不会报404 not found异常了。
至此,博客全部迁移完成!从vuepress迁移到vitepress了。
参考: